1
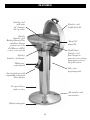
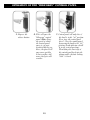
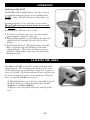
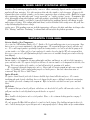
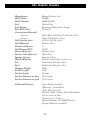
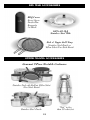
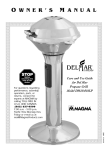
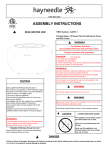
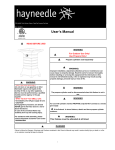
O W N E R ’ S
M A N U A L
Care and Use Guide
for Del Mar
Natural Gas BBQ Grill
Model DM10-016NG
© Magma Products, Inc.
2003
6/03
IMPORTANT SAFETY WARNINGS
PLEASE READ THE FOLLOWING BEFORE OPERATION
OF YOUR DEL MAR™ BBQ GRILL.
FOR YOUR SAFETY
AVERTISSEMENT
S’il y a une odeur de gaz:
If you smell gas:
1.
2.
3.
4.
1. Coupez l’admission de gaz de
l’appariel.
2. Éteindre toute flamme nue.
3. Ouvrir le couvercle.
4. Si l’odeur persiste, appeler
immédiatement votre
compagnie de gaz ou votre
départment des incendies.
Shut off gas to the appliance.
Extinguish any open flame.
Open lid.
If odor continues, immediately
call your gas supplier or your
fire department.
AVERTISSEMENT
FOR YOUR SAFETY
1. Ne pas entreposer ni utiliser de
l’essence ni d’autres vapeurs ou
liquides inflammables dans le
voisinage de l’appareil, ni de
tout autre appareil.
1. Do not store or use gasoline
or other flammable vapors
and liquids in the vicinity of
this or any other appliance.
• Installation of grill must conform to local codes, or in the absence of local codes,
with the National Fuel Gas Code, ANSI #223.1 latest edition, or CAN/CGA - B149.1,
Natural Gas Installation Code or CAN/CGA - B149.2, Propane Installation Code.
• CALIFORNIA PROPOSITION 65 - WARNING - The burning of gas cooking fuel
generates some by-products, which are on the list of substances, which are known by
the State of California to cause cancer or reproductive harm. California law requires
businesses to warn customers of potential exposure to such substances. To minimize
exposure to these substances, always operate this unit according to the use and care
manual, ensuring you provide good ventilation when cooking with gas.
2
➤ Always place your Del Mar® on a solid and
secure base. A patio slab or substantial
deck is recommended.
➤ Connect only to regulated residential
natural gas supply.
➤ Keep outdoor cooking gas appliance area
clear and free from combustible materials,
gasoline and other flammable vapors and
liquids.
➤ Do not obstruct the flow of combustion
and ventilation air.
➤ This outdoor cooking gas appliance is not
intended to be installed in or on
recreational vehicles or boats.
➤ Visually check burner flames upon lighting
the outdoor cooking gas appliance.
➤ Do not install or use the grill within 36" (1
meter) of combustible materials from the
front, back or sides of the grill.
➤ Always check the venturi tube and burner
for insects and insect nests. A clogged
tube or burner can lead to a fire beneath
the grill or could adversely effect the
operation of the appliance. Clean the
venturi tube and/or burner with a small
bottle brush or similar devise.
➤ Grill is for outdoor use only. Grill should be
operated only in a well-ventilated area.
Never operate in an enclosed space, garage
or building.
➤ Check all hoses before each use of the
outdoor cooking gas appliance. If there is
evidence of excessive abrasion or wear, or
the hoses are cut, they must be replaced
prior to the outdoor cooking gas appliance
being put into operation.
➤ Grill shall not be located under unprotected
overhead (enclosed carport, garage, porch,
patio, etc.) made of combustible
construction.
➤ The outdoor cooking gas appliance and its
individual shutoff valve must be
disconnected from the gas supply piping
system during any pressure testing of that
system at test pressures in excess of 1/2
psi (3.5 kPa).
➤ Inspection of the hoses can be achieved
by removing the access panels on the rear
of the barbecue. The top access panel
(inspection panel) allows inspection of the
hoses to and from the valve and to the
venturi tube. The bottom access panel
allows inspection of the hose from the
natural gas supply line.
➤ The outdoor cooking gas appliance must be
isolated from the gas supply piping system
by closing its individual manual shutoff
valve during any pressure testing of the gas
supply piping system at test pressures
equal to or less than 1/2 psi (3.5 kPa).
➤ Always light this outdoor cooking gas
appliance with the lid open.
➤ The top cover (lid) should be closed during
the preheat period.
➤ Never leave any fire unattended. Never
leave children unattended while the
barbecue is in operation or while the
barbecue is cooling after use. Keep all
barbecue utensils out of the reach of
children.
➤ Always use a glove or hot pad when
operating or handling a hot barbecue.
➤ Always turn Barbecue grill off after use.
➤ Keep the ventilation openings free and
clear from debris.
3
Thank you for purchasing a Magma
®
Del Mar Series Barbeque Grill. We have
used the finest materials in its construction
and with only minimal care, the BBQ and its
components will give you many years of
dependable service. Please take time to read
this Care and Use manual to familiarize
yourself with the safety precautions and
operation of your BBQ. If we can answer
any questions, or be of any assistance
please give us a call at
(800) 86 MAGMA,
or e-mail us at [email protected]
4
FEATURES
Stainless steel
grill grate
16” diameter,
201 sq. inches
Stainless steel
double lined lid
(Inside)
Stainless steel
Radiant Burner Plate
and Dome System
permits use of the
Del Mar as a BBQ,
a stove, or as an oven
“Easy Lift”
hinged lid
Double lined
Stainless steel
Bowl-design to
generate even cooking
temperatures across
the grill surface
(Inside)
Stainless steel burner
“Hideaway”
control panel
Valve, hose
inspection panel
One knob design with
dependable integrated
Piezo igniter
No exposed hoses,
tanks or wires
All stainless steel
construction
Nylon leveling pads
5
REMOVING PACKING MATERIALS
1. Remove the grill
grate by depressing
the grate at the tabs
and turning the
grate clockwise until
it is free of the
holding clips.
2. Take out the
4. Place the radiant
cardboard packaging
plate and dome
that includes the
in to the fire pan
radiant plate and
dome.
3. Remove the radiant
plate and dome from
the cardboard
packaging
5. Replace the grill
grate ensuring
that the tabs are
locked into the
holding clips.
6. Remove any tape
that may be
holding the
Hideaway Control
panel in place.
7. Remove any tape
that may be
holding the access
panel in place.
PEELING PROTECTIVE COVER OFF OF HANDLE
1. Use a small
pointed object
(pen knife, nail
file, etc.) to
carefully lift the
edge of the
protective
covering from
the faceplate.
2. Once started,
peel by hand.
6
3. Repeat process
for indented logo.
INSPECTION OF HOSES
1.Visually inspect all 4. Using a flashlight if necessary,
inspect the gas delivery hose,
hoses prior to each
and the upper end of the gas
use of th grill.
supply hose, from this area.
2. Remove the
5. If either hose shows excessive
inspection panel
wear, abrasion, cutting, or
located on the rear
other damage, it must be
of column near the
replaced prior to using grill,
top by rotating the
locking mechanism. (the valve and gas delivery hose
is one assembly). Replace the
3. Lift the panel clear
hoses only with those specified
of the column.
by the manufacturer.
6. Open the access panel at the
bottom rear of the column.
7. Using a flashlight if necessary,
visually inspect the bottom end
of the gas supply hose from this
area.
8. If the hose shows excessive wear,
abrasion, cutting, or other
damage, it must be replaced
prior to using the grill. Replace
the hose only with one specified
by the manufacture.
CONNECTING TO A RESIDENTIAL NATURAL GAS SUPPLY
1. Open the access panel 3. Guide a Natural Gas
Supply Hose (not
at the bottom rear of
included)* through the
the column.
2. Locate the Natural Gas rectangular opening at
the bottom of the access
inlet (3/8” 45º S.A.E.
panel.
Male Flare fitting).
4. Securely attach the female end of
the Natural Gas Supply Hose to
the male end of the fitting using a
wrench. Do not overtighten.
5. Close access panel.
* Note: a Natural Gas Supply Hose is not included with your Del Mar since many residential applications are quite
different. Natural Gas Supply Hoses may be purchased at your local Hardware Store or Home Improvement Center in a
variety of sizes and lengths to accommodate your residential fittings.
7
INSPECTION FOR SPIDERS
Spiders, Earwigs, and other insects find the venturi tube and burner of barbeques to be ideal nest
building areas. Webs, or the insects themselves, can block the flow of gas, which may cause
flashback (a fire in the venturi tube). Always inspect these areas prior to operation of the grill.
Inspection Procedure:
Igniter Electrode
1. Be sure that the
grill is cold.
2. Be sure that
gas is off.
3. Open the lid.
7. Open the
Inspection Panel
on the rear of
the column.
4. Remove the grill
grate by depressing
the grate at the
tabs and turning
the grate clockwise
until it is free of
the holding clips.
8. Depress the thumb
clip holding the gas
delivery hose to the
venturi tube and
pull the hose free.
5. Remove the
Radiant Plate
and Dome.
9. Visually inspect
the venturi tube
for obstructions.
6. Remove the burner by
unscrewing it counterclockwise. Take care not
to damage the igniter
electrode. Inspect the
burner at this time and
clean as required.
10. Clean the tube
by running a
small brush or
similar cleaning
item through the
venturi tube
Igniter Electrode and
electrode protection cap
11. When
the blockage
has been
removed, replace the gas delivery
hose into the venturi tube by
depressing the thumb clip and
inserting the hose until the thumb
clip snaps into place.
12. Replace
the burner
by screwing
it clockwise
until snug on
to its threaded tube, Once again
being careful not to damage the
igniter electrode. Insure that one
of the two electrode protection caps
is directly above the electrode.
13. Replace the radiant
plate and dome and
the grill grate.
8
LEAK TEST
• Do not use an open flame to check for leaks.
• Do not remove valve orifices.
• Do not smoke during testing.
• Do not test indoors. Always test outdoors in a well-ventilated area.
• Test for leaks each time the propane canister is replaced.
• Use a solution of mild soap (liquid dish soap works well) and water for testing
TEST PROCEDURE
1. Visually inspect all hoses before each use. If there is
excessive abrasion, wear, or cutting, replace the
hoses before further use. Replace defective hoses
only with those specified
by the manufacturer.
2. Be sure that the valve
is in the off position.
3. Be sure that the natural
gas delivery hose is correctly
and securely connected.
4. Using a small paint brush, spread
a thin coating of the soap/water
solution onto the following
connections:
Residential Gas Supply
Natural Gas Supply Hose
Gas Supply Hose - Valve Inlet
Valve Outlet - Gas Delivery Hose
5. If the soap/water solution bubbles
there is a leak. Immediately
disconnect the gas supply and check
connections. Reconnect the gas
supply and repeat the test.
6. If the soap/water solution continues
to bubble, remove the gas supply
hose and replace the defective parts
before using grill.
Burner
Venturi Tube
Inspection Panel
Oriface
Gas Delivery Hose
Valve
Gas Supply Hose
Natural Gas Inlet
Access Panel
Natural Gas
Supply Hose
9
OPERATION OF THE ”HIDEAWAY” CONTROL PANEL
1. Depress the
release button.
2. This will open the
“hideaway” control
panel. Note: Since
the speed at which
the control panel
opens is, in part,
regulated by the gas
hoses, the panel will
open more quickly
in hot weather, and
more slowly in cold
weather.
10
3. Control panel will only close if
the knob is in the “off” position.
Never force the control panel
closed. Close the control panel
by moving the knob to the “off”
position (knob indicator should
be in the vertical position).
Then lifting the front edge of
the control panel back into the
column until a definite locking
“click” is heard.
LIGHTING INSTRUCTIONS
Igniter Lighting
Your Del Mar Grill is equipped with a Piezo crystal ignition that is activated through the valve
control knob. For proper operation, the igniter/electrode should be clean and free from debris.
Regular inspection and cleaning is recommended, (see“Maintaining you Grill”).
1. Read Instructions
before lighting.
2. Open lid during
lighting
3. Verify that a propane
canister is installed
and that it contains
sufficient propane.
6. Depress the valve
control knob and turn
it counter-clockwise to
the “HIGH” position.
As the knob indicator
passes the “LIGHT”
position you will hear a
definite “CLICK”
indicating that the piezo
crystal has sparked.
7. Visually verify that ignition has taken place
and that a flame is present.
8. Adjust flame as required to proper cooking
temperature.
9. If the unit does not ignite, return the valve
control knob to the “OFF” position, wait 5
minutes, and repeat the procedure.
4. Open the
“Hideaway”
control panel.
5. Keep face away
from the grill
during lighting.
Match Lighting
If ignition does not take place using the igniter, you may light your grill with the supplied match
lighting rod. Undo chained assembly from rear hatch. Slip a match into the coiled end.
1. Read Instructions
before lighting.
2. Open lid during
lighting
3. Verify that a
propane canister
is installed and
that it contains
sufficient propane .
4. Open the
“Hideaway”
control panel.
5. Keep face away
from the grill
during lighting.
6. Light the match,
gently insert it down
along the grill bowl,
into the burner area
and then turn the
knob on for gas.
11
7. Depress the valve
control knob and turn
it counter-clockwise to
the “HIGH” position.
8. Visually verify that
ignition has taken
place and that a
flame is present.
9. Adjust flame as
required to proper
cooking temperature.
OPERATION
Cooking on the Grill
The Del Mar Grill is highly efficient. For this reason, it
is recommended that you do most of your grilling on the
“LOW” setting. The grill will come to temperature very
quickly.
A common mistake is to use too high of a heat setting.
The grill will continue to become hotter as you cook.
The “LOW” setting will insure proper preparation of your
meal, protect the grill from excessive heat.
1. Use lean cuts of meats, trim excess fat and avoid oilbased marinades, which cause flare-ups.
2. When grilling vegetables or fish, lubricate the grill with
a light coat of oil (vegetable oil or olive oil) to reduce
sticking.
3. Grill with the lid closed. The patented shape of the Del
Mar is designed to take full advantage of convection
cooking principles. This reduces the time necessary to
grill and evenly distributes heat across the grill surface
limiting hot spots.
LEVELING THE GRILL
Your Magma Del Mar gas grill is equipped with adjustable
nylon deck pads. These leveling devices can be used to correct
small inconsistencies in you balcony, terrace, deck, or patio to
insure a level grill. The nylon material will not scratch or mar
the surface of your deck, patio, terrace or balcony. They also
make moving the Del Mar an easy task.
1. Tilt grill and locate one of the three adjustable deck pads.
2. Adjust the pad up or down by turning the pad either
clockwise or counter-clockwise.
3. Repeat as necessary on the other pads until the grill is
level.
12
USING THE DEL MAR AS A STOVE
The unique design of the Del Mar allows it to be used as a conventional stove in your outdoor
setting. This permits you to fry, saute, boil, wok, etc. • Remove the grill grate. • Remove the
radiant dome • Adjust flame to proper cooking temperature.
=
For smaller pots and pans,
place the cookware directly
on the three tongs of the
radiant plate.
=
For larger pots and pans,
including woks, invert the
radiant plate and place the
cookware directly on the
radiant plate.
13
A WORD ABOUT STAINLESS STEEL
Stainless Steel, contrary to popular belief, can rust. Most commonly, deposits on the surface of the
product will trap moisture. It is this moisture that robs the stainless steel of oxygen. Oxygen is the
element that reacts with the stainless steel to form a protective layer of chrome oxide. Robbed of oxygen
this reaction does not take place and “crevice corrosion”, or “surface rusting”, occurs. To minimize this
effect, thoroughly clean your barbeque grill with products specifically designed to clean stainless steel.
Additionally, stainless steel that is exposed to high heat for prolonged periods will change in color
and texture over time. The radiant plate and dome, used to distribute heat evenly across the grill, does
so by deflecting high heat over a large
surface area. This prolong exposure to high temperature will cause the plate and dome to change color.
This “blueing” and later “browning” is normal and will not affect the product operation.
MAINTAINING YOUR GRILL
Exterior Stainless Steel Components:
As we stated in “A Word about Stainless Steel” , Stainless Steel is not totally impervious to rust or corrosion. Some
basic steps are necessary to maintain the shine and appearance. We recommend that you clean the grill after each
use. Use a mild soap or products specifically designed for cleaning stainless steel with a soft cloth or sponge on the
exterior stainless steel. Rinse with fresh water and wipe the stainless dry when finished. We also recommend that
between uses, you cover the grill (Optional acrylic dyed custom covers are available through your retailer or directly
from Magma).
Interior Stainless Steel Components:
Interior stainless steel components (firepan, radiant plate and dome, and burner) are subject to high temperatures,
grease and food residue. The exposure to high heat will cause the interior stainless steel components to first blue, then
brown. This is not a failure of the stainless steel and will not affect the operation of the product.
We recommend a thorough cleaning after each use. Disassemble the interior components and remove any food
residue. A “Scothbrite” pad or similar product may be used in this process. For heavier burned-on stains we
recommend “Easy-Off Oven & Grill Cleaner”.
Igniter Electrode:
The igniter electrode located just beside the burner should be kept clean of all debris and grease. The ceramic
insulation and spark electrode should not, however, be damaged in this process. Although sturdy in its construction,
care should be given to the cleaning of this component. Wipe it clean with a soft cloth to remove grease and food
debris.
Grill Grate:
We recommend that you clean the grill grate with a brass wire brush while the grill is still warm after each use. The
grill grate can then be washed by hand or in your dishwasher as required.
Hoses:
Hoses should be checked prior to each use of the product. Please see the section on checking your hoses on page 7.
Control Valve:
The valve on your Del Mar Grill was adjusted, set and tested at the factory. You should not attempt to adjust the
valve. Call the factory if you suspect that your valve is not properly adjusted. Always follow safety recommendation.
14
TROUBLE SHOOTING GUIDE
Problem
Possible Cause
Possible Solution
Burner will not light
with igniter
Igniter electrode covered with
grease or residue
Clean igniter electrode
Igniter/electrode wire loose or
disconnected
Check connection and reconnect
Wire is shorted causing spark
from wire before electrode
Replace igniter wire
No spark being generated
Replace valve assembly
Electrode protection cap is not
covering the igniter electrode
Position burner so electrode
protection cap is directly above
electrode
No gas flow
Check fuel supply
Obstructed gas flow
Clean venturi tube and burner
Disconnected gas supply hose
Reconnect gas supply hose
High or gusting winds
Place grill out of windy area if
possible. Turn front of grill
away from the wind
Flame on low setting and lid
is closed or opened too quickly
Relight and close or open lid
more slowly
Excessive cooking temperature
Reduce flame level
Grease and/residue build-up
Clean components
Excessive fat in meats
Trim fat from cuts of meat
before grilling
Excessive oils in marinades
Use non-oil based marinades
Excessive cooking temperature
Reduce flame level
Obstruction of gas flow
Check and clean venturi tube
and burner. Check gas supply
line connection
Burner will not light
even with match
Flame goes out
Flare-up
Yellow sooty flame
15
EXPANDED VIEW
11-001
11-002
11-017
11-003
10-453
10-166
10-165
11-004
11-005
11-009
11-006
11-010
11-007
11-008
11-015
11-016
11-012
11-011A
11-013
11-011NG (complete)
Gray parts
11-014
16
11-018
DEL MAR BY MAGMA
Manufacturer
Model Name
Model Number
Fuel
Fuel Supply
Fuel Burn Time
Construction Materials
Exterior
Interior
Grill Surface Area
Grill Material
Number of Burners
Grill Burner BTU
Burner Material
Burner Valve Material
Ignition System
Handle Material
Lid
Bowl
Shipping Weight
Product weight
Product height
Product Diameter at base
Product Daimeter at grill
Additional Features
Magma Products, Inc.
Del Mar
DM10-016NG
Natural Gas
Residential Natural Gas Supply
Unlimited
100% Mirror Polished 18-9 Stainless Steel
100% 18-8 Stainless Steel
16" Dia., 201 Sq. inches
Stainless Steel
1
11,000
Stainless Steel
100% Brass
Integrated, Piezo
Phenolic with stainless steel inserts
Double-lined Stainless Steel
Double-lined Stainless Steel
40 lbs.
32 lbs
41 inches
18 1/4 inches
16 1/4 inches
Comes Fully Assembled
“Hideaway” Contol Panel
“Easy Lift” hinged lid
Patented “Plate & Dome” Heat Distirubtion
Can be used as a Stove
Optional cover (4 colors)
Optional Stainless Steel BBQ Utensils
Propane Model also available
17
DEL MAR ACCESSORIES
BBQ Covers
Forest Green
Pacific Blue
Burgundy
Jet Black
100% All 18-8
Stainless Steel Wok
Fish & Veggie Grill Tray
Stainless Steel Finish or
Teflon Select Non-Stick Finish
OTHER MAGMA ACCESSORIES
Gourmet 9 Piece Nestable Cookware
Stainless Steel with DuPont Teflon Select
Non-Stick Finish
“Nest” in less
than 1/2 cubic foot
Stainless Steel Finish
18
QUICK REFERENCE CHART
* Approximate Cooking Times and Temperatures
Type of
Meat
Beef
Cut of
Meat
Size of
Cut
Recomm.
Fire Temp.
Approximate Cooking Times (Total) and Meat Temperatures
Rare
Medium
Well Done
Comments
Steak
1” - 1-1/2” Med - Hot 10-12 Min/140º 12-14 Min/160º 15 Min +/170º
Roast
2 -3 Lbs.
Low - Med 24-30 Min/140º 36-46 Min/160º 50 Min +/170º
Hamburger
3/4” - 1”
Med
Steak/Fillet
3/4” - 1”
Low - Med
------
------
Low - Med
------
------
10-14 Min/120º When fish is cooked it will
turn from translucent to
14-30 Min/120º opaque and meat will flake.
Chops/Steaks 1” - 1-1/2” Med
------
------
14-20 Min/175º
Ham Steaks 3/4” - 1”
(Pre-Cooked)
Med
------
------
6-12 Min/140º
Low - Med
------
------
15-25 Min
8 Min
12 Min
Fish
Whole
Pork
Spare Ribs
(Whole)
3 Lbs.
Chops/Steaks 1” - 2”
14 Min +
Cut meat near center with
a sharp knife to determine
if it is cooked properly. Use
a meat thermometer for
larger cuts.
Pork should always be well
done but still juicy.
Med - Hot 10-12 Min/140º 12-14 Min/160º 16 Min +180º
Lamb
Leg of Lamb 5 m-6 Lbs. Med - Hot 20 Min/140º
(Butterflied)
30 min/160º
40 Min +/180º
Cook lamb as you would
beef.
Pieces
Low - Med
------
------
3 Lbs. or
less
Low - Med
------
------
Breast
Low - Med
------
------
Turn frequently and don’t
60-90 Min/180º overcook. For larger cuts
(10-12 boneless)
and whole chicken and
hens, try the baking tray
45-60 Min/180º described bellow**.
Cornish Hen Whole
Low - Med
------
------
45-60 Min/170º
Chicken
Chicken
Poultry (Whole)
Turkey
20-30 Min/185º
* Its is important to remember that barbecuing is far from being a science. The times and temperatures in this book are meant to be
used as guidelines only. There are many variables involved in barbecuing which can affect cooking times such as the cut of meat you
are using, weather conditions, the heat of the fire or your taste in food.
** Indirect cooking with an Aluminum Foil Rack - For some types of meat (cornish hens, whole chickens, certain fish and large
cuts of beef), you may want to try a more indirect method of cooking. By utilizing a metal pie plate and rack constructed of
aluminum foil, you can slowly bake meat instead of grilling it. Construct the foil rack by twisting strips of aluminum foil into
cylinder shapes about 1/4” to 1/2” in diameter and as long as needed to fill the pie plate. Weave the foil cylinders together to form a
rack and place in the bottom of the pie plate. A small amount of water may be added to the pie plate to keep direct heat off the meat
your are cooking.
19
LIMITED WARRANTY
Magma Products, Inc. guarantees the Del Mar gas grill to be free from defects in materials or workmanship to the
original consumer.
This guarantee is for the periods herein specified when used under normal and reasonable conditions in the home.
1. Exterior Stainless steel, including the outer lid, outer bowl, column, base, base skirt, and the transition collar from
the column to the outer bowl for a period of five (5) years from the date of purchase against corrosion.
2. All other parts including all exterior plastic components, handles, valve, burner, interior bowl, interior lid, inner
heat distribution system, hinges, interior stainless steel, and other component parts are warranted for a period of one (l)
year for the date of original purchase.
This warranty does not include the cost of property damage or any inconvenience due to the failure of the product.
Nor does it cover damage due to misuse, abuse, accident, or damage resulting from transportation of the product. Nor
does it include damage resulting from the commercial use of this product. If the product fails to operate due to a defect
in materials or workmanship during the warranty period, the defective part will be repaired or replaced at Magma's option.
If you wish to obtain performance under this limited warranty, you should contact Magma's Customer Service Department
via telephone at 562-627-0500 or 800-86-MAGMA, or via e-mail at [email protected], or via U.S. Postal
Service mail at “Magma Products, Inc., attention Customer Service, 3940 Pixie Ave. Lakewood, CA, 90712-4136.“
The defective part, along with proof of purchase, must be returned postage prepaid to Magma Products, Inc. We suggest
that you keep your purchase receipt as we may require reasonable proof of purchase.
In the state of California only, if refinishing or replacement of the product is not commercially practicable, the retailer
selling the product, or Magma Products, Inc., will refund the purchase price paid for the product, less the amount directly
attributable to use by the original consumer prior to the discovery of the nonconformity. In addition, in the state of
California only, you may take the product to the retail establishment from which it was purchased or to any retail
establishment selling this product in order to obtain performance under this warranty.
ALL IMPLIED WARRANTIES, INCLUDING THE IMPLIED WARRANTIES OF MERCHANTABILITY AND FITNESS FOR A
PARTICULAR PURPOSE, ARE LIMITED IN DURATION TO THE EXPRESS WARRANTY PERIODS SPECIFIED HEREIN FOR THE
PARTS DESCRIBED HEREIN.
Some states do not allow limitations on how long an implied warranty lasts, so the above limitation may not apply to
you. Neither Magma dealers, nor the retail establishment selling this product has any authority to make any warranties or
to promise remedies in addition to or inconsistent with those stated above. Magma's maximum liability shall not exceed
the purchase price of the product paid by the original consumer. Some states do not allow the exclusion or limitation of
incidental or consequential damages, so the above limitation or exclusions may not apply to you. The warranty gives you
specific legal rights and you may also have other rights which vary from state to state.
MAGMA and the Magma logo are registered trademarks of Magma Products, Inc.
Del Mar is a registered trademark of Magma Products, Inc. This product is protected for Magma Products, Inc. under one or more
of these U.S. patents: 5,413,090; D438,750; 292,163; other patents pending. This product is further protected for Magma
Products, Inc. under one or more foreign patents.
¤
Magma Products, Inc.
3940 Pixie Avenue, Lakewood, CA 90712 • USA
Phone: (800) 86 MAGMA • Fax: (562) 627-0550 • e-mail: [email protected]
Website: www.MagmaProducts.com
83-001B
6/2003