1
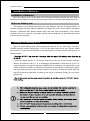
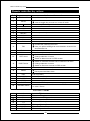
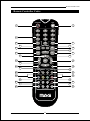
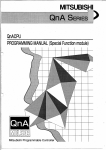
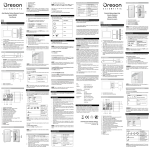
Contents
Contents
Contents
1
Safety Information
2
What'
s in the boxs
6
Main unit
7
Installation of Batteries
8
Setting of Learning Keys
8
Solution of Problems
9
Parameters
9
Remote controller key actions
10
Remote Controller Codes
11
How do I turn the set-top box on and off?
12
How do I tune-in TV stations?
12
Basic Operations
14
Main Menu
17
Channel Edit
18
Setup
20
Closed Captions
22
V-chip)
Parental Control(
23
Specification
24
Help and advice
25
1
Safety Information
Safety Information
Federal Communications
Commission Statement
46FG
This equipment has been tested and found to comply with the limits of a class B digital device,
pursuant to Part 15 of the FCC Rules. These limits are designed to provide reasonable
protection against harmful interference in a residential installation. This equipment generates,
uses and can radiate radio frequency energy and, if not installed and used in accordance with
the instructions, may cause harmful interference to radio communications. However, there is
no guarantee that interference will not occur in a particular installation. If this equipment does
cause harmful interference to radio or television reception, which can be determined by turning
the equipment off and on, the user is encouraged to try to correct the interference by one or
more of the following measures:
1. Reorient/Relocate the receiving antenna.
2. Increase the separation between the equipment and receiver.
3. Connect the equipment into an outlet on a circuit which is different from what the receiver is
connected to.
4. Consult the dealer or an experienced radio/TV technician for help.
Changes or modifications not expressly approved by the manufacturer responsible
for compliance could void the user authority to operate the equipment.
3
Safety Information
Safety Information
Important Safety Instructions
In a separate booklet or sheet, or be located before any operating instructions.
The important safety instructions shall be entitled The following safety instructions shall be included where applicable,and when used,
shall be verbatim as follows.
Additional safety information is not prohibited from being included by adding statements after the end of the following safety instruction list.At the manufacturer'
s option,
a picture or drawing that illustrates the intent of a specific safety instruction is not prohibited from being placed immediately adjacent to that safety instruction.
1.Read these instructions.
2.Keep these instructions.
3.Heed all warnings.
4.Follow all instructions.
5.Do not use this apparatus near water.
6.Clean only with dry cloth.
7.Do not block any ventilation openings.Install in accordance with the manufacturer'
s
instructions.
8.Do not install near any heat sources such as radiators,
heat registers stoves,
or other
apparatus that produce heat.
9.Do not defeat the safety purpose of the polarized or grounding-type plug.
A polarized plug has two blades with one wider than the other.A grounding type plug has two blades and a third grounding prong.The wide blade or the third prong are provided for
your safety.If the provided plug does not fit into your outlet.
consult an electrician for replacement of the obsolete outlet.
10.Protect the power cord from being walked on or pinched particularly at plugs, convenience receptacles and the point where they exit from the apparatus.
11.Only use attachments/accessories specified by the manufacturer.
12.Use only with the cart,stand,
tripod,bracket,or table specified by the manufacturer,
or sold with the apparatus.
When a cart is used,use caution when moving the art/
apparatus combination to avoid injury from tip-over.
13.Unplug this apparatus during lightning storms or when unused for long periods of time.
Safety Information
Safety Information
14.
Refer all servicing to qualified service personnel.
Servicing is required when the apparatus has been damaged in any way,such as power-
supply cord or plug is damaged,liquid has been spilled or objects have fallen into the apparatus,the apparatus has been exposed to rain or moisture,
does not operate normally,
or has been dropped.
15.
The MAINS plug or an appliance coupler is used as the disconnect device,
the disconnect device shall remain readily operable.
16.
The apparatus shall not be exposed to dripping or splashing and that no objects filled with liquids,such as vases,shall be placed on the apparatus. Class II equipment symbol
This symbol indicates that the unit has
a double insulation system
4
Safety Information
Safety Information
Antenna Safety Instructions
Section 810 of National Electrical Code (NEC) provides information with respect to proper grounding of the mast and supporting structure, grounding of the lead-in wire to an antenna discharge unit, size of grounding conductors, location of antenna discharge unit, connection to
grounding electrodes, and requirements for the grounding electrode.
5
What'
s in the box
What'
s in the box
Inside your set top box package you should have:
The Set Top Box
STB
PO
WER
MU
TE
1
2
4
3
5
7
6
8
10+
9
0
VO
L+
INF
O
VOL
-
AUDIO
RE
CA
LL
FAV
CH
+
CH
-
OK
ME
NU
WIDE
BLU
E
SU
BTIT
LE
EXIT
TEXT
GUI
DE
YEL
LOW
GR
EEN
VOL
+
RE
D
CH
+
C1
VO
L-
POW
ER
CH
-
C2
T V FU
STU
DY
CT
ION
Remote Controller
RF Cable
AAA/
7#
Batteries
Quick Start Guide
User Guide
Make sure all of the above contents are included in the package.
If you are missing any items,
please contact the customer support department.
6
Main unit
Main unit
Front view
60Hz,Max.8W
Rear view
7
Installation of Batteries
Installation of Batteries
Installation of batteries:
Open the battery cover on the back of the Remote Controller and put two new AAA/7#
batteries into the battery slot according to the signs. After this, please close the battery cover.
Notice on battery use:
This product is low power-consumed; two new batteries can last for approximately 12
months. Improper use may reduce batteries' life. Please do not use a new and an old battery
together. If batteries leak, please replace them with new ones immediately. If the remote
controller will not be used for a long time, please pick the batteries out and keep them apart
from the remote controller.
Setting of Learning Keys
There are seven learning keys on this remote controller for TV set, VOL+/VOL-, CH+/CH-,
POWER and two custom design keys, C1/C2. All the other keys are for Set Top Box. Make
sure that the TV set's remote controller is working properly, and then set the learning keys as
following steps:
2.Point the signal sender of TV remote controller to the one of this remote controller
directly, and keep the two in 1 to 3 centimeters approximately. Press the key on the TV
remote controller you want to learn(the POWER key, for example), the signal LED on this
remote controller will flash for a while and then keep on shining after receiving this signal,
and then press the key on this remote controller you want to record this signal. After the
red LED flash thrice and keep on shining, this signal is recorded. Please go on to learn
another key.
8
Solution of Problems
Solution of Problems
If you have any problem in setting or using this remote controller, please try the following
approaches:
Parameters of Remote Controller
Effective Distance:
Power:
Battery Type:
Size:
Weight:
within 6 meters
DC 3.0V
AAA/U4/R7
179*50*29mm
75g(without battery)
9
Remote controller key actions
Remote controller key actions
Ref Key on remote. Action on the receiver
1
STB POWER
2
MUTE
3
4
5
6
7
8
9
10
11
0 9
10+
AUDIO
INFO
RECALL
VOL+
VOLCH+
CH-
12
FAV
13
14
UP Arrow
DOWN Arrow
15
LEFT Arrow
16
RIGHT Arrow
17
OK
18
MENU
19
20
21
22
23
EXIT
WIDE
SUBTITLE
TEXT
GUIDE
24
COLOUR KEYS
25
26
27
28
29
30
31
32
VOL+
VOLCH+
CHC1
C2
POWER
STUDY
Enter/Exit standby mode
Set volume to mute
Acts as toggle key to mute-on / mute-off audio
Numeric key to change channel number or numeric value
Not use
Select Audio
Invokes the info banner
Switch to previously viewed channel
Increase volume
Decrease volume
Switch to next channel
Switch to previous channel
Invokes the Channel List menu
User can press Left/Right to move between channel List
and Favorite List
Move focused item in menu or channel list
Move focused item in menu or channel map
Switch to Favorite Channel List in Channel List menu
Change selection in menu
Switch to Next channel in EPG screen
Switch to Favorite Channel List in Channel List menu
Change selection in menu
Switch to Previous channel in EPG screen
Select a channel or menu option
Invokes the Main menu screen
Exit to previous Menu item
Exit from Menu
Select Picture Shape
Select Closed Caption
Not use
Invokes the EPG screen
Used to operate different functions in TEXT screen or other menus
TV FUCTION
Increase TV volume
Decrease TV volume
Switch to next TV channel
Switch to previous TV channel.
Custom define key1
Custom define key2
Enter/Exit TV standby mode
Enter study mode
10
Remote Controller Codes
Remote Controller Codes
STB POWER
MUTE
1
2
1
2
3
4
5
6
7
8
9
10+
0
AUDIO
3
4
6
INFO
8
5
7
RECALL
10
CH+
VOL+
12
9
VOL-
FAV
11
CH-
13
17
15
16
OK
14
MENU
EXIT
18
19
21
WIDE SUBTITLE TEXT
20
23
GREEN
YELLOW
BLUE
24
22
GUIDE
YELLOW GREEN
RED
24
RED
BLUE
30
VOL+
CH+
C1
POWER
32
31
VOL-
CH-
C2
STUDY
33
34
28
35
29
TV FUCTION
11
How do I turn the set-top box on and off?
How do I turn the set-top box on and off?
When you have connected your set-top box to the TV, you are ready to use it.
1. Switch on the TV.
2. Set the source to the input channel you have connected the set-top box (AV1, for example).
3. Switch on the set-top box.
4. The front panel window will flash green.
5. Usually the first channel in the channel list will be displayed. However, if this is the first time you have connected the set-top box, your TV will display the 'No terrestrial channels
found' and 'Enter menu to add channels' screen. See the topic 'How do I tune-in TV
Stations' for details of how to install the set-top box at this stage.
How do I tune-in TV stations?
No terrestrial channels found
Enter menu to add channels
12
How do I tune-in TV stations?
How do I tune-in TV stations?
7. Press the Menu key.
8. Your TV will display the main menu
as shown below.
9. Press the DOWN key and press OK
key to select the channel scan
function.
Channel Edit
All
Favorite
Deleted
Locked
Enter to edit channel properties
10. Press the OK key to select the Terrestrial function and then press the OK key again to start scan all channels.
Channel Scan
Terrestrial
STOP Scan
Update
Cable
49%
0 Channels found
Menu/Enter to stop scan
11. You TV will display the Channel Scan page, and a progress bar will be displayed at the
screen. The set-top box will search through channels 2 to 69 and the TV stations it finds will be listed on the page as it finds them. So the total number of TV stations it finds will be
displayed on the page. The set-top box will store these stations in its memory in the order
of the channel numbers. When the set-top box has finished scanning, the scan page will
close and the set-top box will tune the TV to the first station in the list and display it. In case that want to stop the scanning, an OK key pressing just needed.
Channel Scan
Terrestrial
Cable
STOP Scan
Update
35%
3 Channels found
14-1 ATSC-1
14-2 ATCS-2
14-3 ATSC-3
Menu/Enter to stop scan
12. If the set-top box couldn't find any channels, your TV screen will display the 'No terrestrial
channels found' and 'Enter menu to add channels' screen.
13. If this is not the first time you have switched the set-top box on, it will turn on and tune into the last channel being watched when it was last used.
13
Basic Operations
Basic Operations
Once channel search is completed, you can start to watch digital terrestrial TV channels
and radio broadcasts. Some typical operations are given in this chapter.
Switch On and Off
Whenever you are not using the receiver, press the STAND BY key on the remote
controller to put it into standby mote. And you can press the STAND BY key on the remote
controller again to switch on.
Changing Channels
To switch between different channels, you can:
● Press the CH /CH keys to go to the previous/next channel.
● Use the NUMERIC keys to select a channel number.
14-1
ATSC-1
4:10am
Whenever you change a channel, a banner appears at the top of the screen displaying the
basic information on the current channel.
Adjusting the Volume
Press the VOLUME+ /VOLUME- keys to adjust the volume.
10
Displaying information
To display the detailed information of the current channel while playing, press the INFO key.
14-1 Digital
Moving picture 480i 4:3
4:10am
ATSC-1
4:00 am 5:00 am
No prog ram desc ription avail able
92% 480i
English
Terrestrial
Rating:None
14
Basic Operations
Basic Operations
View All/Favorite Channel list
You can press the FAV key on the remote controller to view All/Favorite Channel list, and then
you switch between the Favorite Channel list and All Channel list with the LEFT/RIGHT keys.
All
Favorite Channels
channels
14-1 ATSC-1
14-1 ATSC-1
14-3 ATSC-3
To view Favorite list
To view All list
Choosing Subtitle
You can press the SUBTITLE key to select or close subtitles on the screen. The available
subtitles depend on the broadcaster.
CC
Digital -1
Displaying EPG
The EPG contains one-day program information of the program in the channel list.
To view the EPG provided by the content provider:
1. Press the GUIDE key and then a EPG picture of one days' program will be shown as
following:
2. Press UP/DOWN/LEFT/RIGHT keys to navigate the lists, The highlighted EPG details will
be shown on the right detailed EPG screen as below:
3. Press the EXIT or GUIDE key to exit the EPG, otherwise, the EPG page will timeout
several seconds later.
14-1ATSC-1
Moving picture 480i 4 :
3
4:
10am
Sat.01.01.2005
4:00am-5:00am
Moving picture 480i 4 :
3
5:00am-6:00am
Moving picture 480i 4 :
3
6:00am-7:00am
Moving picture 480i 4 :
3
7:00am-8:00am
Moving picture 480i 4 :
3
8:00am-9:00am
Moving picture 480i 4 :
3
To navigate channel/programs
No program doscription available
No rating info
15
Basic Operations
Basic Operations
Mute
Press the MUTE key to enable or disable
the audio output.
Wide
Press the WIDE key to switch the Picture
Shape,FULL, ZOOM1, ZOOM2, or
LETTER BOX.
Picture Shape
10
NOT AVAILABLE
Stereo Effect:
Press the RED key to switch the Stereo Effect among SRS TruSurround, SRS
TruSurround XT, SRS TruBass, SRS Focus and None.
Stereo Effect
SPS TruBass
Audio
Press the AUDIO key to select the audio
language.
Switch between TV and Radio
You can press the TV/RADIO keys to
switch between TV and Radio program.
(Not avail
able)
NO
Cable Channels
4:10am
Audio
ZENTEK Application Demo
1.English
EPG is broadcast by individual channels and is subject to the discretion of the
broadcaster.
16
Main Menu
Main Menu
The receiver features an on-screen menu providing access to a variety of setup and
management controls. Use the remote controller to navigate through the menu and activate
required settings.
When you are in the set-up mode of the main menu, press the MENU key if you want to
go back a stage at any time. If you keep pressing MENU key you will eventually close the
main menu. Press the EXIT key if you want to close the main menu straight away.
How to display the Main Menu:
1. Press the MENU key.
2. Your TV will display the main menu.
If you have not pressed another key for 30 seconds after pressing the MENU
key,it will automatically close.
3. The following potions are available:
Channel Edit
㼠 Channel Scan
Channel Scan
Channel Edit
All
Terrestrial
Favorite
Cable
Deleted
Locked
Enter to edit channel properties
Enter to scan channels
Setup
㼠 Closed Captions
Closed Captions
Setup
Service
Clock
Language
Preferences
Audio
Defaults
Version
Enter to edit caption properties
Enter to setup menu
㼠 Parental Control
4. Press the UP and DOWN keys to
select the option you want.
5. Press the OK key to select the
item you have selected. Or you can
close the main menu by pressing the
MENU or EXIT key.
Parental Control
Password
Movie Rating
TV Rating
Additional Rating
Lock
Enter to set parental control
1. There is a prompt for the item highlighted at the bottom of the Main Menu page.
2. And all menu page of the software will timeout several seconds later if no Operation is active.
3. You can back to previous menu in this topic with the MENU key.
17
Channel Edit
Channel Edit
The channel edit function let you choose to:
1. Edit all channel
2. Edit favorite channel
3. Delete channels
4. lock channels
How to select the functions listed above in the edit channels function page:
1. Select 'Channel Edit' in the 'Main Menu'.
2. Press the DOWN key until the item you want is highlighted.
3. Press the OK key.
All
Enter this function you can edit all channel list.
1.
2.
3.
Press the DOWN key until 'All' is highlighted.
Press the OK key.
You can set channel as favorite or delete channel with the LEFT/RIGHT/UP/DOWN keys.
Channel Edit
All
Channel Name
Favorite
14 -1 ATSC -1
14 -2 ATSC -2
14 -3 ATSC -3
Deleted
Locked
Enter to delete channel
Favorite
Deleted
Enter this function you can edit
Enter this function you can edit
favorite channel List.
1. Press the DOWN key until
'Favorite' is highlighted.
2. Press the OK key.
3. You can delete a favorite channel keys.
with the UP/ DOWN deleted channel list.
1. Press the DOWN key until 'Deleted' is highlighted.
2. Press the OK key.
3. You can recover the deletedchannel to the All Channel List
with the UP/DOWN key.
Channel Edit
Channel Edit
All
Channel Name
All
Channel Name
Favorite
14 -1 ATSC -1
Favorite
14 -2 ATSC -2
Deleted
Deleted
Locked
Locked
Enter to delete channel
Enter to set channel as favorite
18
Channel Edit
Channel Edit
Locked
Enter this function you can browse locked channel list.
1. Press the DOWN key until 'Locked' is highlighted.
2. Press the OK key.
3. The locked channel list will be shown if some channels have been locked in the subfunction lock of Parental Control menu.
Channel Edit
All
Channel Name
Favorite
14 -2 ATSC -2
Deleted
Locked
Enter to browse locked channel list
Channel Scan
Enter the Channel Scan page via Main Menu. The channel scan function let you choose
to:
1. Terrestrial channel scan
2. Cable channel scan How to select the functions listed above in the channel scan function page:
1. Select 'Channel Scan' in the 'Main Menu'.
2. Press the DOWN or UP key until the item you want is highlighted.
3. Press the OK key.
Channel Scan
Terrestrial
Cable
STOP Scan
Update
100%
0 Channels found
Menu/Enter to stop scan
Terrestrial channel scan Enter to scan terrestrial channel. In this function you can select 'Scan All' item with pressing OK key if you want to scan all channels, or press DOWN and OK keys to select 'Update' item if
you just want to update with new channels.
See some more information in the 'How do I tune-in TV stations?' topic.
Cable channel scan Enter to scan cable channel. This function is disabled.
19
Setup
Setup
Enter the Setup page via Main Menu. The item let you choose to:
1. Setup clock
2. Setup osd language
3. Setup audio
4. Set factory defaults
5. Check the software version
How to select the functions listed above in the Setup function page:
1. Select 'Setup' in the 'Main Menu'.
2. Press the DOWN or UP key until the item you want is highlighted.
3. Press the OK key.
Clock
Enter to setup clock. You can change the Date & Time and Time zone.
1. Press the DOWN key until 'Clock is highlighted.
2. Press the OK key.
3. You can press the LEFT/RIGHT keys to select an item and press the UP/DOWN keys to change the option of each item.
Setup
Clock
Language
Auto Date
Audio
Date
Time
HH MM AM/PM
04 10
AM
Defaults
Version
&
Time
MM DD YYYY
01 01 2005
Time Zone Info
Time Zone
DST
Pacific
Off
Enter to setup clock
Audio
Language
This function allows you to change
Enter to setup audio. You can switch
the OSD Language. There languages
are available, English, Spanish and
French.
Internal Speakers on or off. And you
can switch Digital Out among PCM,
Dolby Digital or Off.
Setup
Setup
Clock
Language
Espanol
Clock
Language
Audio
Francais
Audio
English
Defaults
Defaults
Version
Version
Internal Speakers
Off
On
Digital Out
Off
PCM
Dolby Digital
Enter to setup audio
Enter to setup osd language
20
Setup
Setup
Defaults
Enter to set factory defaults. This function needs a four-digital password.
Setup
Clock
Language
Audio
Defaults
Enter Password
Version
.
.
.
.
Enter to set factory defaults
Version
Enter to check the software version.
Setup
Clock
Language
System
:katana2
H/W Version :b7707-3
Audio
S/W Version :b7707-45.1cb
Defaults
Built
Version
:20070529
Z_Corelib
:0.4.0.3305
Z_ATSClib
:2.1.1d.3376M
Z_DTVCClib
:6.2.0.3327
Enter to check the version
Closed Captions
Enter the Closed Captions page via Main Menu. This function allows you to edit caption
properties, and let you choose to:
1. Service
2. Preferences
How to select the functions listed above in the Closed Captions function page:
1. Select 'Closed Captions' in the 'Main Menu'.
2. Press the DOWN or UP key until the item you want is highlighted.
3. Press the OK key. Service
Enter to select closed caption service.
1. Press the DOWN key until Service item is highlighted.
2. Press the OK key.
3. You can press the UP/DOWN key to select an item. The services you can select are listed
following: Off, Digital-1, Digital-2, Digital-3, Digital-4, Digital-5, Digital-6, Cc1 .
Closed Captions
Service
Preferences
Off
Digital-1
Digital-2
Digital-3
Digital-4
Digital-5
Digital-6
CC1
CC2
Enter to select closed caption service
21
Closed Captions
Closed Captions
Preferences
Enter to select closed caption preferences.
1. Press the DOWN key until Preferences item is highlighted.
2. Press the OK key.
3. You can press the UP/DOWN key to select an item and press the LEFT/RIGHT keys to
change the function option of each item. When you select the 'Set all to defaults' item all
function items listed following will be set to defaults. The function items are: Size, Style,
FQ Color, BQ Color, FQ Opacity, BQ Opacity and Edge.
4. The closed caption preferences will be shown on the bottom of the sub-menu page after
the function options are selected.
Closed Captions
Service
Preferences
Size
Set all to defaults
Large
Style
Casual
FG Color
Green
BG Color
FG Opacity
Default
Solid
BG Opacity
Solid
Edge
None
Sample Text
Enter to set closed captions preferences
Parental Control(
V-chip)
Enter the Parental Control page via Main Menu. The Parental Control function lets you
choose to:
1. Set Password
2. Movie Rating
3. TV Rating
4. Additional Rating
5. Lock
How to select the functions listed above in the Parental Control function page:
1. Select 'Parental Control' in the 'Main Menu'.
2. Press OK key to select the 'Password' item to input the 4-digit parental controlpassword.
If the password you have entered isn't correct or you haven't entered the password, the
other function items couldn't be highlighted.
3. Press the DOWN or UP key until the item you want is highlighted.
4. Press the OK key.
Now, following are some introduction for each function item of Parental Control.
22
Parental Control
Parental Control
Password
In this section you can Enter Password to set rating limits, Change Password and Reset
Password.
Parental Control
Password
Movie Rating
TV Rating
...
Enter Password
Change Password:
...
Old Password
New Password
Additional Rating
Lock
...
Reset Password
Date:00/00/00 00:00:00
Count:0 times
Enter to key in password
Movie Rating Enter to set movie rating. In this section you can allow or block different grade movies, the
grades you can choose are G, PG, PG13, R, NC-17 and X.
Parental Control
Password
Movie Rating
TV Rating
Additional Rating
Lock
Allow All
G
Allow
PG
Allow
Pg13
Allow
R
Allow
NC-17
Allow
X
Allow
Block All
Enter to set movie rating
TV Rating
Enter to set TV rating. In this section you can allow or block different grade movies, the
grades you can choose are TV Y, TV Y7, TV G, TV PG, TV 14 and TV MA.
Parental Control
Password
Movie Rating
TV Rating
Additional Rating
Lock
Allow All
Allow
TV Y
TV Y7
All
Y7
TV G
FV
Allow
TV PG
All PG
D
L
S
V
TV 14
All
D
L
S
V
TV MA
All MA
L
S
V
14
Block All
Enter to set TV rating
Additional Rating
Enter to set additional rating.
Lock
Enter to set channel as locked.
Parental Control
Password
Movie Rating
TV Rating
Additional Rating
Channel Name
14 -1 ATSC -1
14 -2 ATSC -2
14 -3 ATSC -3
Lock
Enter to set channel as locked
23
24
Help and advice
Help and advice
If you have difficulties using your set-top box and none of the suggestions below work, try
switching your set-top box off, and then on again. If this does not work, contact the shop you
bought your set-top box from or a qualified repair technician. Never try to repair your set-top
box yourself.
Problem Possible cause What to do
Standby light not lit
Mains lead unplugged
Mains fuse blown
Aerial is disconnected
Aerial is damaged/
misaligned
Out of digital signal area
Check mains lead
Check fuse
Check aerial lead
Check aerial Check with dealer
No picture or sound
Tuned to digital teletext channel
Retune to another channel
Scrambled channel message
Channel is scrambled
Select alternative channel
No response to remote controller
Receiver off
Handset not aimed correctly
Front panel obstructed
Handset batteries exhausted
Plug in and turn on receiver
Aim handset at front panel
Check for obstructions Replace handset batteries
No signal found
Forgotten channel lock code
Re-
install channels to cancel
channel lock
The remote controller 1.
The batteries in your remote will not operate your controller need replacing
receiver 2.
SET TOP BOX There is an obstruction blocking the signal path between the remote controller and the receiver
1.
Replace the batteries
2.
Check that there is nothing blocking the path between the remote controller and the receiver
After moving the The aerial feed from new SET TOP BOX
point may come through a receiver to another distribution system which may
room you find
reduce the digital signal you are no longer able level to the SET TOP BOX
to receive the digital
receiver
reception
25
Try a direct feed from the antenna