1
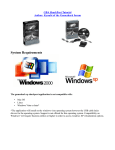
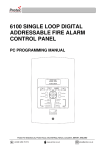
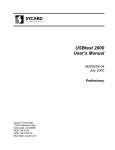
SHARKPORT PS2 MANUAL
INTRODUCTION
Congratulations! You have purchased the ultimate game enhancer management tool allowing you
to connect your PS2 to your PC in order to manage and store all your Game saves!! To get the
most out of your SharkPort, please visit us at www.gameshark.com to register your SharkPort
and receive all of the benefits of being a member and to get all of the hottest saves for the latest
games!!!
SharkPort lets you back-up all the saves you have on PS2 Memory Card to your PC, meaning
you can free up valuable space on your PS2 Memory Cards! You can also delete any saves you
no longer require at the click of a mouse button.
SharkPort allows you to download the coolest Game Saves and Cheats available for your games
from the dedicated website, www.gameshark.com, allowing you to Unlock Levels, Have All
Weapons, and Unlock Secret Characters.
1) GETTING STARTED
a) Requirements
To use SharkPort you must have a PC running Windows 98SE or above.
It is advisable to have over 300MB of disk space free for storing the saved games you transfer
from your PS2 Memory Card(s). Your PC will also need a CD-ROM drive and one free USB port.
A PC modem and account with an Internet service provider (ISP) or a dial-up Internet connection
is required to use SharkPort’s online features.
b) Setting up SharkPort for the First Time
Before you can start using SharkPort, you will have to install SharkPort on your PC, connect up
the supplied USB link cable and boot up the SharkPort PS2 CD on your console, all of which is
explained in the following steps below:
c) SharkPort PC Installation
1. Insert the SharkPort PC CD into the CD-ROM drive of your PC and close the drawer.
2. After a few seconds, the installation launch panel will appear. If the launch panel does not
automatically appear, double-click on the My Computer Icon, then double-click on the
CD-ROM icon, and lastly double-click on the SETUP.EXE file to bring up the launch
panel.
3. Follow the onscreen prompts to install SharkPort onto your PC.
d) Connecting the USB Link Cable
1. Connect the supplied USB cable by inserting one end into one of the USB sockets
located on the front of your PS2.
2. Connect the other end of the USB cable to a spare USB socket usually located at the
back of your PC.
3. Windows will ask for a path to install the required USB drivers. The USB drivers can be
found on the SharkPort PC CD inside the ‘FireLink Drivers’ folder.
e) Starting-up the SharkPort Interface
1. Make Sure the USB Link Cable is connected correctly to your PC and PS2.
2. Insert the SharkPort PS2 CD into your console.
3. Press reset on your PS2 and let the software boot-up until it settles on the final main
screen, this is the screen that has a flowing water effect in the background.
4. Turn on your PC and double-click the SharkPort icon.
5. The SharkPort Interface will now appear on your PC desktop.
2) AN OVERVIEW OF THE SHARKPORT INTERFACE
When you first start SharkPort, you will be presented with an interface consisting of 2 different
panels. Details of each panel and its functions are explained in more detail below.
a) PC Panel
This is the left panel that displays all Saves and Cheat Files stored on your PC. The Saves &
Cheat Files are stored in Group Folders so the user can manage their own Saves and Cheat
Files by simply grouping them together. Saves or Cheat Files can also be copied or moved into
different Group Folders within the PC Panel.
b) Memory Card Panel
This will be the right panel that displays saves that are stored on any PS2 Memory Cards inserted
into slot 1 or 2 on your console.
1.
2.
3.
4.
5.
6.
7.
8.
9.
10.
11.
12.
13.
14.
15.
16.
PC Panel – This panel displays all the saves and cheats you have stored on your PC.
Delete – Deletes highlighted saves from either the Memory Card or PC Panel.
Edit – Edit Group Folder Name or Save Description on the PC Panel.
Group – Creates new Group Folder on your PC.
Minimise – Minimises the Sharkport interface to the windows icon tray. If you want to
close down SharkPort, right-click your mouse on the GameShark icon in your windows
icon tray to select the close program function.
Refresh – Refreshes all lists.
Memory Card Panel – This panel displays all the saves and cheats you have stored on
your PS2 Memory Card.
Memory Card Capacity Bar – This bar displays the current amount of free space used
on the currently selected PS2 Memory Card.
Memory Card Save information Panel – Displays Save information for selected save
stored on the currently selected PS2 Memory Card.
GameShark Icon – Build & Version Information.
Backup Memory Card – Copies ALL the saves/cheats from the currently selected PS2
Memory Card to the PC.
Internet – Opens Internet Explorer at http://www.gameshark.com/playstation2/
Erase Memory Card – Deletes all the saves and cheats stored on the selected PS2
Memory Card.
Format Memory Card – This Formats the currently selected PS2 Memory Card.
Copy -> PC – Copies your selected saves/cheats on your PS2 Memory Card to the PC.
View Slot Number – This changes which PS2 Memory Card Slot you are currently
viewing.
17. PC Save information Panel – Displays Save information for currently selected save in
the PC panel.
18. Copy -> Memory Card – Copies your selected saves/cheats over to your PS2 Memory
Card.
19. Internet Connection – Opens the Internet Connection Panel, used to connect to the PS2
part of GameShark website to find new saves and cheat updates.
20. Saves – These are the actual saves stored on the PC
21. Group Folder – These are folders that contain the Saves and Cheat Files stored on the
PC.
22. Recycle Bin – If any saves or cheats are deleted from the PC Panel, they will be placed
here in the Recycle Bin.
3) MANAGING YOUR SAVES ON THE PC
SharkPort allows you to manage your Game Saves on your PC. You can quickly and easily copy,
delete and backup Game Saves from your PS2 Memory Cards to your PC.
You can then rename and add Save Descriptions to help you compile your own collection of
Game Saves stored on your PC that can be quickly transferred back to your PS2 Memory Cards
for use at anytime.
The following sections explain SharkPort’s numerous functions and capabilities in detail so you
can begin to manage your Game Saves straight away.
a) Group Folders
On the PC Panel, all Saves and Cheat Files are stored in Group Folders, which are designed to
make it easier for you to manage your Game Saves and Cheats stored on your PC. E.g. you
could have a Group Folder named ‘Game X’ and only store saves for ‘Game X’ inside.
You can open and close the Group Folders by simply double-clicking on them to show or hide the
files stored inside them.
b) Creating a new Group Folder
Follow these simple steps to create a new Group Folder:
1.
2.
3.
4.
Use your mouse to click the ‘GROUP’ button.
A dialogue box will now appear that asks you to enter a name for your new Group Folder.
Enter a name for the new Group Folder.
Press ‘RETURN’ or use the mouse to click on the ‘Save’ button and a new Group Folder
will be created and displayed in the PC panel.
5. If you don’t want to create a new Group Folder, use the mouse to click on ‘CANCEL’
PLEASE NOTE: If you create a new Group Folder with the same name as an existing Group
Folder, you will be asked if you want to replace the existing Group Folder. If you choose to
replace, all saves contained within the existing Group Folder will be lost forever.
c) Deleting a Group Folder
When deleting a Group Folder, all saves contained within that Group Folder will be placed in the
special Group Folder known as the ‘Recycle Bin’ where saves can be retrieved at anytime.
Follow the simple steps below to delete a Group Folder:
1. Highlight the Group Folder you wish to delete by clicking the mouse cursor on your
chosen Group Folder.
2. Press the ‘DELETE’ key on your PC keyboard or use the mouse and click the ‘DELETE’
button.
d) Renaming a Group Folder
Follow the steps below to can edit existing Group Folder:
1. Highlight the Group Folder you wish to edit by clicking the mouse cursor on your chosen
Group Folder name.
2. Use the mouse and click the ‘Edit’ button and a dialogue box will appear with the existing
Group Folder name.
3. Once you have finished editing the Group Folder name, use the mouse to click on ‘OK’ to
confirm your changes or click on ‘Cancel’ to discard any changes.
PLEASE NOTE: When renaming Group Folders, you will not be able to use an existing Group
Folder name.
e) Adding and Editing Save Descriptions on your PC
Information for each save is stored on your PC and will be shown in the bottom window of the PC
Panel. The information displayed in this window will include filename, created/modified dates, file
size, and a save description.
Save descriptions can be extremely useful for identifying each save stored on your PC, for
example a save description could read “My Save, All Characters unlocked”
Follow the steps below to edit or add a save description to saves stored on your PC:
1. Use your mouse to highlight your chosen save in the PC Panel.
2. Use the mouse to click the ‘Edit’ button.
3. A dialogue box will appear allowing you to edit or add your own save description.
4. Once you’ve edited the description, click your mouse on ‘OK’ to confirm your changes or
click on ‘Cancel’ if you do not wish discard any changes.
PLEASE NOTE: You can only edit or add save descriptions to saves that are stored on your PC.
Save descriptions will not be transferred onto your PS2 Memory Card from the PC.
f) Deleting Saves Stored on your PC
Once you have deleted a save file it cannot be recovered! Please use this function with caution,
especially if you don’t have a backup of your saves.
To delete saves from the PC Panel, simply use the mouse to select the saves you wish to delete
and press the ‘DELETE’ key on your keyboard or use the mouse and click the ‘Delete’ button.
TOP TIP
To delete more than one save at a time, simply hold down the “Ctrl” button on your keyboard
whilst selecting the saves you want to delete. Now when you delete, all the highlighted saves will
be deleted together.
4) MANAGING SAVES ON YOUR PS2 MEMORY CARDS
SharkPort has several functions that allow you to keep your PS2 Memory Cards in good order.
You can back-up & delete individual saves from your PS2 Memory Cards and even perform a full
format function.
Before you can use any of these functions you will need to know how to view the saves stored on
your PS2 Memory Cards within the SharkPort interface.
a) Viewing Saves Stored on your PS2 Memory Cards
Follow the simple steps below to learn how to view the saves stored on your PS2 Memory Cards
with the SharkPort interface:
1. Make sure you already have SharkPort running on your PC and PS2 before continuing
(refer to the Getting Started section)
2. Insert the PS2 Memory Card you wish to view into slot 1 or 2 on your PS2.
3. Use your mouse to click on the ‘View Slot Number’ button so the largest number shown
is the same as the slot number which the PS2 Memory Card you wish to view is inserted
in on your PS2.
4. Use the mouse to click on the ‘Refresh’ button, this will refresh all Panels and you should
now see the saves that are stored on your chosen PS2 Memory Card.
b) Backup your PS2 Memory Card Saves
You can quickly backup all the saves stored on your PS2 Memory Cards to PC.
Follow these simple steps below to backup your PS2 Memory Cards:
1. Make sure you have the correct PS2 Memory Card selected in the Memory Card Panel.
2. Use your mouse to click the ‘Backup Memory Card’ button.
3. You will then be asked to define a new Group Folder name where the saves can be
stored on your PC.
c) Deleting Saves Off your PS2 Memory Cards
Once you have deleted a save file it cannot be recovered! Please use this function with caution,
especially if you don’t have a backup of your saves.
To delete saves off your PS2 Memory Card, simply use the mouse to select the saves you wish
to delete in the Memory Card Panel and press the ‘DELETE’ key on your keyboard or use the
mouse and click the ‘Delete’ button.
TOP TIP
To delete more than one save at a time, simply hold down the “Ctrl” button on your keyboard
whilst selecting the saves you want to delete. Now when you delete, all the highlighted saves will
be deleted together.
If you want to delete all the saves off your PS2 Memory Card, simply use your mouse to click the
‘Erase Memory Card’ button.
PLEASE NOTE: All saves which are deleted from your PS2 Memory Card will be lost forever, so
make sure you want to do so or make a backup on your PC.
d) Formatting your PS2 Memory Card
To format your PS2 Memory Card, simply make sure you have the correct PS2 Memory Card
selected then use your mouse to click the ‘Format Memory Card’ button.
Your PS2 Memory Card will now be formatted.
PLEASE NOTE: All saves store on the PS2 Memory Card will be lost forever after formatting, so
make sure you want to do so or make a backup on your PC.
5) COPYING SAVES FROM PS2 MEMORY CARD TO PC
Before you can copy saves to or from your PS2 Memory Cards, you need to know how to view
the saves stored on your PS2 Memory Cards within the SharkPort interface. Refer to ‘Viewing
Saves Stored on your PS2 Memory Cards’ section 4) a) above.
a) Copying Saves Using the ‘Copy -> PC’ Button
1. Use the mouse to highlight the save displayed in the Memory Card Panel.
2. Now click the ‘Copy -> PC’ button.
3. You will be prompted to enter a new Group Name for the Saves to be stored into on the
PC.
4. IMPORTANT: If you select an existing Group Folder name, any saves already stored
within this existing Group Folder will be overwritten and lost forever. If you wish to copy
saves from PS2 Memory Card to an existing Group Folder, refer to the Drag & Drop
method below.
5. A progress bar will appear while the save is being transferred.
TOP TIP
To transfer more than one save at a time between panels, simply hold down the “Ctrl” button on
your keyboard whilst selecting the saves you want to transfer. All the saves will be highlighted.
Now simply click on the Copy -> PC button and all the highlighted saves will be transferred
together.
b) Copying Saves Using “Drag & Drop” Method
1. Use the mouse to highlight the save you wish to copy from the Memory Card Panel.
2. With the mouse cursor over the selected save, press and hold down the left mouse
button down and simply drag the save across to the desired Group Folder on the PC
Panel.
3. Release the left mouse button and the save will be copied to your chosen Group Folder.
A progress bar will appear while the save is being transferred.
TOP TIP
To Drag & Drop more than one save at a time between panels, simply hold down the “Ctrl” button
on your keyboard whilst selecting the saves you want to transfer. All the saves will be highlighted.
Now simply hold the mouse button down whilst the cursor is over one of your highlighted saves to
Drag & Drop them all into one of the existing Group Folders on the PC Panel. All of the saves will
be now transferred together.
6) COPYING SAVES FROM PC TO PS2 MEMORY CARD
Before you can copy saves to your PS2 Memory Card from the PC, you need to know how to
view your PS2 Memory Card saves within the SharkPort interface. Refer to ‘Viewing Saves
Stored on your PS2 Memory Cards’ section 4) a) above.
a) Copying Saves Using the ‘Copy -> Memory Card’ Button
1. Use the mouse to highlight the save displayed in the PC Panel.
2. Now click the ‘Copy -> Memory Card’ button.
3. If the save already exists, you will be asked if you want to overwrite. Click Yes or No to
continue.
4. A progress bar will appear while the save is being transferred.
TOP TIP
To transfer more than one save at a time between panels, simply hold down the “Ctrl” button on
your keyboard whilst selecting the saves you want to transfer. All the saves will be highlighted.
Now simply click on the Copy -> Memory Card button and all the highlighted saves will be
transferred together.
b) Copying Saves Using the “Drag & Drop” Method
1. Use the mouse to highlight the save you wish to copy from the PC Panel.
2. With the mouse cursor over the selected save, press and hold down the left mouse
button down and simply drag the save across to the Memory Card Panel.
3. Release the left mouse button and the save will be copied to your chosen PS2 Memory
Card. A progress bar will appear while the save is being transferred.
TOP TIP
To Drag & Drop more than one save at a time between panels, simply hold down the “Ctrl” button
on your keyboard whilst selecting the saves you want to transfer. All the saves will be highlighted.
Now simply hold the mouse button down whilst the cursor is over one of your highlighted saves to
Drag & Drop them all into the Memory Card Panel. All of the saves will be now transferred
together.
PLEASE NOTE: Detailed Save Descriptions will not be transferred onto the PS2 Memory Card.
7) MANAGING CHEAT FILES
You need to own a GameShark 2 V3 or higher in order to make use of cheats on your games.
You also require to have a Cheat File saved onto a PS2 Memory Card, refer to your GameShark
2 manual on how to create a saved Cheat File.
Cheat Files are basically a save file so they can be move, copied, deleted and stored on the PC
as described with Game Saves.
a) Copying a Cheat File to PC
1. Use the mouse to select the Cheat File you wish to copy.
2. With the mouse cursor over the selected Cheat File, press and hold down the left mouse
button down and simply drag the File across to the PC Panel into one of the Group
Folders in your the PC Panel. Then release the left mouse button.
3. The Cheat File will now be copied into your chosen Group Folder.
TOP TIP
Multiple Cheat files can be stored on the PC and these can be managed with Group Folder
Names in the same way as described with Game Saves.
b) Copying a Cheat File to a PS2 Memory Card
Copying a Cheat File to your PS2 Memory Card is achieved in the same way as you would with
Game Saves.
You can only have one Cheat file stored on your PS2 Memory Card at one time, when you copy
any cheats into the Memory Card Panel, a dialogue box will appear giving you the option to
merge or overwrite the Cheat file already stored on your PS2 Memory Card.
Merging means that all the Cheats contained in both Cheat Files will be merged together into a
single Cheat File on your PS2 Memory Card.
Overwrite means the original Cheat File stored on your PS2 Memory Card will be completely
replaced by the one your are copying to it. Be careful when you choose to overwrite as all the
cheats originally stored on the PS2 Memory Card will be lost forever, it is a good idea to backup
the Cheat File from your PS2 Memory Card to the PC first if you are not sure.
PLEASE NOTE: You require a Cheat File saved onto PS2 Memory Card; please refer to your
GameShark 2 manual to create a saved Cheat File.
8) DOWNLOAD THE LATEST GAME SAVES AND CHEATS
If you have Internet access on your PC, SharkPort can connect directly to our dedicated PS2 site,
allowing you to download the latest and hottest PS2 Game Saves and Cheats available. Viewing
and downloading PS2 saves from the GameShark website server has never been so easy. You
can search for the saves you want using SharkPort’s advanced Internet Search function.
a) Accessing the Internet Connection for the First Time
When you first select the ‘Internet Connection’ button that is located on the left side of the PC
Panel, a dialogue box will appear asking you for a Username, Email address, Password and
Product Key.
Please check you have entered a valid email address and the correct Product Key to access
SharkPorts online features.
Once you have entered all your details and the Product Key, click on ‘OK’ and the Internet
Connection Panel will slide out to the left.
If you wish to change any of your details at later date such as your contact email address, click on
the ‘CONFIGURE’ button found at the bottom of the Internet Panel.
b) Internet Connection Panel Overview
The Internet Panel looks like this:
1. Internet Panel – This panel will display the results of Internet searches.
2. Close – This button will close the Internet Panel.
3. Search Icon – Clicking this icon will allow you to search GameShark’s PS2 database for
the latest Game Saves and Cheats. See below for more information on how to use this
function.
4. Configure – Allows you change your User Name, Password and Product Key details.
5. Internet Panel Information Panel – This box shows extra information such as game
names, save/cheat descriptions of highlighted items within the Internet Panel.
c) The Search Function
Follow the steps below to learn how to search for new saves and cheats using SharkPort’s online
search function:
1. Use the mouse to click on the Search Icon in the bottom right of the Internet Panel and a
search dialog box will appear as shown above.
2. Use the mouse to select either “Game Saves” or “Cheats” from the dropdown box for
“Search Type”.
3. Enter the name of the game you want to search for in the “Game Name” box E.g. Tomb
Raider.
4. Use the mouse to click on ‘OK’ and SharkPort will now perform an online search for your
game name on the PS2 GameShark server.
5. Search results will be displayed in the Internet Panel. If you do not find what you are
after, you may want to make a more advanced search (see Advanced Searches below)
6. Remember you can use the mouse to highlight any of the files listed from the search
results displayed in the Internet Panel to view extra information such as Save
Descriptions, file size, and dates created.
d) Advanced Searches
You may want to refine your search more. To do this, simple check the “Advanced” tick box and
more options will become available to you as shown below:
The “Search Term” option allows you to search for certain terms such as “Unlimited”, the
dropdown box gives you different options of how your entered search term is used, these are
explained below:
1. Exact – This search will only return results that match exactly with your search term. This
option will return the least results.
2. Fuzzy – The search will return results that are similar, but not exactly the same as the
search term you entered. This option will return the most results, and is the best option if
you are unsure of a game save name.
3. Contains – The search will return results that contain one or more of the words in your
Search Term. This option is also a good option if you are unsure of a game save name.
PLEASE NOTE: The “Search Term” option is ONLY available when searching for Game Saves.
The “Date” option allows you to search for Saves or Cheats by date. Simply enter a date in the
“Date” box (it will currently display today’s date/time), the dropdown box gives you different
options of how you can search the date, these are explained below:
1. Before – The search will return saves that were uploaded to the GameShark server
before the date you have entered.
2. After – The search will return saves that were uploaded to the GameShark server after
the date you have entered.
3. On – The search will return saves that were uploaded to the GameShark server on the
exact day you have entered.
e) Downloading Game Saves and Cheats from the Internet Panel
The Game Saves and Cheats displayed in the Internet Connection Panel are on GameShark’s
servers; to use them you will have to download them to a PS2 Memory Card or the PC.
Downloading these files is as simple as copying file to & from the PC & PS2 Memory Card.
To download files from the Internet Panel, simply move the mouse cursor over your chosen Save
or Cheat File, press and hold the left mouse button and “drag” the file from the Internet Panel into
the location where you wish to save it.
TOP TIP
Download the files to your PC first as this will mean that any Save Descriptions or extra file
information will stay intact; you can always copy it to your PS2 Memory Card later. And this will
also mean you will always have a backup on your PC.
To download more than one file at a time, simply hold down the “Ctrl” button on your keyboard
whilst selecting the files you want to download. All the files will be highlighted. Now simply hold
the mouse button down whilst the cursor is over one of your highlighted files to ‘Drag’ them where
you want.
There can only be one cheat file present on a PS2 Memory Card at one time so when
downloading new cheats from the Internet Panel, it is advised to store them on your PC first or
backup the cheat file currently stored on your PS2 Memory Card.
f) Accessing GameShark’s Website
Alternatively you can just browse the GameShark website at www.gameshark.com for the latest
cheats, game reviews and information. Simple use your mouse and click the ‘INTERNET’ button
on found at the bottom of the Memory Card Panel.
9) Frequently Asked Questions
Q: I own a copy of GameShark 2 V4 but I can’t seem to get SharkPort to communicate with
it, why is this?
A: GameShark 2 V4 must be in the main menu screen before starting SharkPort on your PC.
A: Check you have connected your USB link cable up properly between your PC and PS2.
Q: Why can’t I copy cheats to my PS2 Memory Card?
A: You need to own a copy of GameShark 2 V3 or higher to make use of Cheat Files.
Q: I can’t seem to copy large amounts of saves in one go, why is this?
A: If you experience problems copying large groups of saves, try copying them one by one
instead.
Q: I get the message "Bad Comms Protocol", what can I do?
A: Make sure the SharkPort PC software is not running, then unplug the USB cable from the PS2
and plug back in. Now run the SharkPort PC software again and you will get comms once again.
Q: I have copied a file across from my PC to my PS2 Memory Card, but it does not appear
to be there. Why is this?
A: Try clicking the “Refresh” button with your mouse. This will refresh the Memory Unit panel, and
your save should show up.
Q: How do I move Saves or Cheats into different Group Folders in the PC Panel?
A: Use the Drag & Drop method to move files in the PC Panel by using the mouse to select the
file you wish to move/copy and simply keep the left mouse button down while dragging it to the
Group Folder of your choice then release the left mouse button. You will then be given the choice
to copy or move the file.
Q: It doesn’t read my PSX Memory Cards, why is this?
A: SharkPort only recognizes PS2 Memory Cards.
Q: How do I close down SharkPort completely? It only seems to minimize to the windows
icon tray.
A: If you want to close down SharkPort completely, simply right-click your mouse with the mouse
cursor over the GameShark icon in your windows icon tray to select close program.
Q: Why doesn't it work with Windows95 and Windows98?
A: These versions of Windows have been known to have issues with USB and today a majority of
users are running WindowsXP
Q: I seem to have various problems when running your software.
A: We suggest that if you have Internet access, you should use Windows Updates to update your
version of Windows. Microsoft continually develops Windows to improve and fix various issues.
We therefore recommend you keep your version of Windows as up to date as possible.
Q: Does it matter which Memory Slot I use?
A: No.
Q: Does it matter which USB port I plug the cable into on the PC?
A: No.
Q: Does it matter which USB port I plug the cable into on the PS2?
A: No.
Q: Can I plug it into a USB2.0/USB Hi-Speed port?
A: Yes, although the cable is a USB1.1 device.
Q: Can I plug the cable into a hub?
A: Yes, although if you have any problems, try plugging it directly into a USB port on your PC and
PS2.
Q: I plug it into a hub and it seems to be intermittent/fail to work
A: Although it should work through a hub, various factors could cause it to be unreliable. If you
have any problems, try plugging it directly into a USB port on your PC and PS2.
Q: Can I use a USB extension cable?
A: Yes, although if you have any problems, try plugging it directly into a USB port on your PC.
Q: Will this product cause damage to my PS2 Memory Card?
A: No.
Q: Will this product cause damage to my PlayStation?
A: No.
Q: Will I get free upgrades to the software?
A: Major versions will be released as new products, but minor versions may be released for free
as an upgrade at GameShark’s digression. Keep checking our web site for any information at
www.gameshark.com
Q: Can I use saves from other sites with SharkPort?
A: No, you can only use saves for SharkPort from GameShark.
Q: When I connect to the Internet side of SharkPort, will it give out information about me
or my PC?
A: No, it will only ask for your username, password, email address and product key. We use this
information in order to keep our services and products secure and to provide you with support
should you experience any difficulties.
Q: I have a suggestion that I think might be useful in this product.
A: Cool, Feel to write or email to us, letting us know what you like about our product.
Q: I have some saves which I think would be excellent for putting on your website, where
can I send them?
A: At present we're not accepting saves from anyone outside of GameShark. This doesn't mean
we will never will so in the meantime, store them on your PC with SharkPort ready for the future!
10) Customer Support
Please refer to the Frequently Asked Questions in the previous section before contacting our
customer service department.
If you still cannot resolve the problem, please contact us as follows:
Phone: 619.683.2815
E-Mail: [email protected]
World Wide Web: http://www.gameshark.com
Mailing Address: Mad Catz, Inc.
ATTN: GameShark Support
7480 Mission Valley Road Suite 101
San Diego, CA 92108
Warranty Information
To obtain warranty service within the warranty period:
IN THE USA: Return product to the place of purchase or send the defective item postage prepaid
with a copy of the sales receipt, return address and a brief description of the problems you are
experiencing to:
Mad Catz, Inc.
ATTN: GameShark Support
7480 Mission Valley Road Suite 101
San Diego, CA 92108
Mad Catz, Inc.
7480 Mission Valley Road Suite 101 • San Diego, CA 92108
©2003 Mad Catz, Inc. 7480 Mission Valley Rd., Suite 101, San Diego, CA 92108-4406. Mad
Catz, the Mad Catz logo is a trademark or registered trademarks of Mad Catz, Inc., its
subsidiaries and affiliates. GameShark is a registered trademark of Mad Catz, Inc. All other
trademarks or registered trademarks belong to their respective owners. Made in China. Printed in
Hong Kong. All rights reserved. Features, appearance and specifications may be subject to
change without notice. International and domestic patents pending. Please retain this information
for future reference. Mad Catz stands behind its products 100%. PlayStation 2 is a registered
trademark of Sony Computer Entertainment, Inc. This product is not sponsored, endorsed, or
approved by Sony.
PlayStation 2 is a registered trademark of Sony Computer Entertainment, Inc. This product is not
sponsored, endorsed, or approved by Sony.