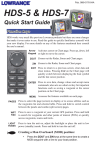
1
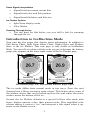
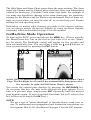
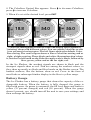
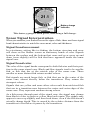
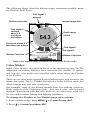
Pub. 988-0151-152 Addendum I X67C IceMachine Since the manual was written for the X67C, specialized features and accessories have been added to create the X67C IceMachine, a portable color ice fishing sonar. The IceMachine package includes the X67C sonar unit and the PPP-15 portable power pack. The PPP-15 includes a self-leveling ice fishing transducer, a rechargeable battery and a freezeresistant carry bag. Each X67C unit contains a menu command that allows you to switch the sonar in and out of IceMachine mode. If you purchased a regular X67C package with the Skimmer transom-mount transducer, you can buy the PPP-15 separately. If you purchased an IceMachine package, you can buy a Skimmer transducer separately with mounts for transom, trolling motor or portable suction-cup installations. These accessory combinations and the unit's digital flashers and scrolling chart display make the X67C the most versatile ice fishing sonar in its class. Owning an X67C is like having two fish finders in one, because it's equally at home on a boat in summer or on the ice in winter. The main manual, part number 988-0151-062, introduces you to the X67C, and it covers general warm weather operations. Introductory material is only discussed in the main manual. You should be familiar with those basic functions before you head for the ice. A good place to start is the Basic Sonar Operation section, beginning on page 27, or the one-page Basic Sonar Quick Reference, on page 34. This addendum covers the basic ice fishing functions and any other operational changes that may have occurred since the manual was published. In addition to the instructions found here, be sure to read the PPP-15 instruction booklet, part number 988-0147-871. It will tell you how to set up the ice fishing power pack and mount the X67C. Topics discussed in this document include: Introduction to IceMachine Mode • Your unit now has five pages that display sonar information. IceMachine Mode Operation • Sensitivity • ColorLine • Battery gauge. 1 Sonar Signal Interpretation • Signal band movement means fish. • Signal band color and fish position. • Signal band thickness and fish size. Ice Flasher Options • Split Zoom display mode • Color Modes. Scouting Through the Ice • You can hunt for fish before you ever drill a hole by scanning through the ice. Introduction to IceMachine Mode Your unit has five pages that display sonar information. In addition to Full Sonar Chart, Split Zoom Sonar Chart, Digital Data and Flasher, there is the Ice Flasher. This new page is only visible in IceMachine Mode. You can tell at a glance which mode you are in because the battery gauge only appears in the lower right corner of the Ice Flasher page. Ice Flasher page, left, and normal Flasher page, right. The ice mode differs from normal mode in two ways. First, the unit changes how it filters incoming sonar echoes. This helps reduce some of the surface clutter that can be picked up from the zone where the water surface meets the bottom of the ice. Second, the Ice Flasher defaults to a special IceView color mode with fewer, higher-contrast colors than normal mode. This simplified color scheme makes it easier to "see" and interpret a fish signal when it appears on the flasher screen. 2 The Split Zoom and Sonar Chart pages share the same settings. The chart pages, the Flasher and Ice Flasher pages each have their own independent controls for Sensitivity, ColorLine and sonar color mode. For example, if you make any Sensitivity changes to the sonar chart page, the sensitivity settings for the Flasher and Ice Flasher are unchanged. Each of these settings are saved when you turn the unit off, so you can keep your favorite settings for each operating mode. Remember, no matter what changes you make to the various settings, you can always restore the factory defaults by using the Reset Options command, which is described on page 55 in the manual. IceMachine Mode Operation To turn on the X67C, press and release the MENU key. (This is actually the Menu/Power key, but in the text we just refer to it as the "Menu" key for short.) The Backlight control will appear for five seconds and then automatically clear. You can adjust it with the ↓ and ↑ buttons, or clear it immediately by pressing the EXIT button. At left, X67C IceMachine opening screen, showing the Full Sonar Chart Page. The Backlight Level control bar automatically disappears after five seconds. At right, the Full Sonar Chart is shown. You access the various page displays by pressing the ENT/PAGES key. As you press this key, the unit cycles through the page options. To return to a previous page, simply press ENT repeatedly until the desired page appears again. (It serves multiple functions, but we'll refer to this key in the text as simply the ENT key.) NOTE: We use a type of "menu shorthand" to describe how to work your sonar. To understand our typographical and instruction conventions, see the segment How to Use this Manual on pages 3-4 in the X67 manual. 3 To enter the IceMachine mode: 1. From the Full Chart Sonar page, press ENT|ENT|ENT to switch to the normal Flasher page. 2. Press MENU|↓ to ICEMACHINE MODE|ENT|EXIT and the Ice Flasher appears. (To leave IceMachine mode and return to normal operation, just repeat step 2.) Flasher Page Menu, with IceMachine Mode command highlighted but turned off (box not checked). The following figure shows the various components of the Ice Flasher page display. Bottom ColorLine shows hard bottom Surface signal Temperature Surface clutter signal Bottom Signal indicator Small fish or bait signals Digital Depth Depth Range Scale Bigger fish signal at 15 feet. Battery capacity gauge Sensitivity Control Bar Echo Strength Color Scale Ice Flasher page. 4 Sensitivity Sensitivity and Auto Sensitivity are described in detail in the manual on page 55. To adjust sensitivity on the Flasher or Ice Flasher page, simply press ↑ to increase sensitivity and press ↓ to decrease sensitivity. The changes are displayed on the horizontal Sensitivity Control Bar. The Echo Strength Color Scale also changes as you adjust sensitivity. Important: Setting Sensitivity for Ice Fishing The IceMachine's basic operation is pretty easy, right out of the box. If you're a sonar novice, try operating the unit with the automatic factory default settings until you get a feel for how it's working. As you're learning the basics however, Sensitivity is the one important setting that you should adjust while ice fishing. We strongly recommend you try the following method for "tuning" your sensitivity to match the current water conditions. It will help you see your bait, cut through any clutter in the water and dramatically show fish when they move in to check your offering. As you learn to interpret the signals on the flasher screen, you'll be able to modify your presentation based on how fish react to your lure. To adjust sensitivity: 1. Start with your IceMachine showing the Ice Flasher page, in the default IceView color mode. 2. Drop your lure five to 10 feet directly below the transducer. You should be able to follow the fall of the bait on the flasher screen. 2. Use the arrow keys to turn the sensitivity up or down until the lure is barely visible as a black or blue signal band on the screen. 3. Now fish at the desired depth. When a fish approaches the bait, its signal will stand out from the lure because it will be a moving signal that is wider and a brighter color than your lure. ColorLine ColorLine is described in detail in the manual on page 43. ColorLine changes will be reflected in the Echo Strength Color Scale. This scale considers both sensitivity and ColorLine and then shows you the relationship of signal strength to signal color. To adjust the ColorLine level: 1. From the Ice Flasher Page, press MENU|↓ to COLORLINE|ENT. 5 2. The ColorLine Control Bar appears. Press ↓ to decrease ColorLine; press ↑ to increase ColorLine. 3. When it's set at the desired level, press EXIT. ColorLine distinguishes between weak and strong sonar signals by "painting" them with different colors. You can adjust ColorLine to suit your personal viewing tastes. The left figure shows the default ColorLine setting. The center figure shows a lower ColorLine setting and at right, a higher setting. These black and white illustrations don't show it, but the far left band on the Echo Strength scale is black, followed by blue, green, yellow and at the far right, red. In the Ice Flasher, the weakest signals are shown in black and the strongest signals show as red. Fish are among the weakest echoes, so they show up mostly as black and blue bands on the flasher screen. The hardest surfaces, like the bottom, show as red. Cover in the form of weed beds or submerged timber display in the blue to yellow range. Battery Gauge The Ice Flasher has a battery gauge that shows the capacity of the rechargeable battery. When the battery is fully charged, the gauge is filled with green. As power is consumed, the fill level drops and turns to yellow (70 percent charged) and red (30 percent). When the gauge shows 0 percent, you should turn off the unit to save your settings, and then recharge the battery. 6 Battery charge indicator This battery gauge is solid green, indicating a full charge. Sonar Signal Interpretation When you monitor your flasher screen for signs of fish, there are three signal band characteristics to watch for: movement, color and thickness. Signal band movement In a stationary setting like ice fishing, the bottom, structure and cover will show on the flasher screen as stationary bands of color. Signals between the surface and the bottom that come and go or move up and down (even slightly) will be fish that have appeared inside the sonar signal cone. Signal band color The color of the signal bands correspond to both fish size and their position in the sonar signal cone. Black and blue signals tend to be smaller fish, or fish that are at the outside edge of the sonar cone. These smaller or more distant fish return weaker echoes. Red signals are much larger fish, or fish that are in the center of the sonar cone, almost directly below the transducer. They return the strongest echoes. Signals that are yellow and some other color result from mid-sized fish that are in a transition zone between the center and outer edges of the sonar cone. They represent medium-strong echoes. As a fish moves through part of the signal cone, the signal may change from black to blue to green or yellow then back again. The signals may appear to move up slightly and then back down, even if the fish doesn't actually change depth. This is caused by the relative distance from the transducer to the fish as it passes by the transducer. 7 Signal band thickness Simply put, smaller fish return smaller echoes that result in thinner and fainter signal bands. A thin signal can also indicate a fish located toward the outer edge of the signal cone. As fish size increases, the echoes grow stronger and the signal band grows wider. Signal width also increases as a fish approaches the center of the sonar cone. Ice Flasher Options Split Zoom Display Mode When ice fishing season arrives, you're often searching for fish that are hugging the warmer water at the bottom of the lake. When walleye or perch are holding right on the bottom, your X67C IceMachine can separate those fish from the bottom with a remarkable Split Zoom display mode. In this mode, the right half of the flasher screen operates normally with the surface at the 12 o'clock position and the bottom of the depth range at the 6 o'clock position. The left half of the flasher zooms in on the six feet just above the bottom, with the bottom at the 6 o'clock position and 6 feet above the bottom at the 12 o'clock position. To switch to Split Zoom: 1. From a flasher page, press MENU|↓ to FLASHER OPTIONS|ENT. 2. Press ENT|↓ to SPLIT ZOOM|ENT. 3. Press EXIT|EXIT to return to the flasher page. 4. To return to normal mode, repeat these steps, but in step 2, select Normal instead of Split zoom At left, Flasher Page Menu with Flasher Options command highlighted. Center, Flasher Options Menu with Flasher Display Mode selected. At right, the Split Zoom option has been selected. 8 The following figure show the bottom target separation possible using the flasher's Split Zoom. Fish signal 1 zoomed Normal range side Bottom zoom side Fish signal 2 zoomed, about 3.5 feet above the bottom. Depth range 60 feet This scale shows 6 feet above the bottom Fish signal 1 Fish signal 2 Bottom ColorLine Bottom ColorLine Notice the bottom target separation with Split Zoom mode. Color Modes Sonar Color Mode is described in detail in the manual on page 59. The additional ice fishing features have increased the number of options and how the color modes are controlled while using either the Flasher or Ice Flasher. There are six color mode options for the flasher pages, and seven for the sonar chart page. The Ice Flasher default color is the IceView mode, but other settings may suit your eyes better. For example, some of our fishing friends favor the striking green-onblack contrast of the Nightview mode…they use it a lot, even in broad daylight! Experiment with the color modes to see which ones work best for you under various fishing and lighting conditions. To change the Flasher or Ice Flasher page color scheme: 1. From a flasher page, press MENU|↓ to FLASHER OPTIONS|ENT. 2. Press ↓ to FLASHER COLOR MODE|ENT. 9 3. Press ↑ or ↓ to Mode Name|ENT. 4. Press EXIT|EXIT to return to the flasher page. At left, Ice Flasher menu with Flasher Options selected. Center, Flasher Options menu with Flasher Color Mode selected. At right, Nightview color option is selected. Scouting Through the Ice Since the 1960s, Lowrance flasher sonars have helped anglers hunt fish beneath the ice without drilling holes. That's because your IceMachine works as well through ice as it does through water! This technique works best early in the winter fishing season, when ice is clear and free of bubble formation. There must also be wet, bubblefree contact between the transducer and the ice. To shoot through solid ice, first brush away any snow from the spot you want to search. Then, pour a small amount of non-toxic recreational vehicle antifreeze onto the surface and place the transducer (face down) in the puddle. Another variation used by some anglers requires a small plastic bag, such as a food storage bag. They fill the bag with a mixture of RV antifreeze and water. The bag is placed on the ice surface, and the transducer is rested in the "puddle" just as your head rests on a pillow. 10 Notes 11 This addendum contains information that has changed or was unavailable when the manual was printed. This addendum supplements the manual X67C, part number 988-0151-062. It also serves as a companion to instructions for the PPP15 Portable Power Pack for ice fishing, part number 988-0147-871 Pub. 988-0151-152 © Copyright 2003 All Rights Reserved Lowrance Electronics, Inc. Printed in USA 111303 12