1
Getting started with
Logitech® Alert™ 700e
2
1
!
3
1 Run Logitech Alert Commander
Before you begin the installation, read all instructions.
!
Logitech Alert Master System required.
Legal Warning
Certain uses of security camera
products and audio devices, such as
employee monitoring, surreptitious
viewing and recording of images and/or
audio, or the use, publication or
distribution of image and/or audio
recordings, are prohibited or restricted
by country, state and local laws.
6
5
4
Logitech
Quick-start
guide
Alert™ 700e/750e
ents
System Requirem
& Support Guide
Be sure to comply with the laws in your
country, state, and locality when using
Logitech Alert products and services.
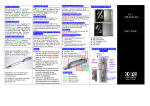
1 Logitech Outdoor Camera
2 Camera power supply
3 Power supply cable (yellow tips)
Add-On Camera
4 Mounting accessories
5 microSD™ card adapter
6 System Requirements Guide
1) Be sure that Logitech Alert Commander sotware is running on the PC
before beginning installation of camera.
2 Plug in Your Camera
Power Supply Install Note
When prompted to connect your camera:
The power supply unit is weatherproof and can be installed outdoors. Use these tips to
ensure reliable power supply usage. Make sure the outdoor outlet is weatherproof. Do
NOT place on the ground.
2) Unscrew the hatch from the power supply.
2a) Plug the yellow cable into the power supply port.
2b) Screw the hatch firmly in place.
2c) Mount the power supply unit to the wall.
2d) Plug the power connector into the plug slider and plug the power supply into an
outlet.
1) Unscrew the hatch from the back of the camera and lift.
1a) Plug the yellow cable connector into the port.
1b) Screw the hatch firmly in place.
1
1) Do NOT plug the power supply into a surge protector or power strip as they
interfere with the cameras. Surge protectors are built-in to the power supply and
protect the cameras.
2) Do NOT plug the power supply into the wall so that it lays horizontally or flat.
2
1a
3) Do NOT mount the power supply upside down. Keep the cable connector port on
the bottom.
2b
1b
1
2a
2d
2c
2
• Shortly after connecting, your camera will appear in Alert Commander software. You can now move the camera to its desired location.
Wall/Ceiling Mounting Instructions
The wall mount allows you to easily fasten your camera to a wall, post,
overhang, or other surface.
1) Start by pre-drilling holes into the base surface and then fastening the
mouting base with the included screws.
3
2) Assemble the mounting arm and attach it to the base.
3) Attach the camera to the mounting arm.
RECOMMENDATION:
Mount the Outdoor Camera under an eave or
other overhang so that it is not exposed to direct
sunlight.
1
4) Avoid direct sunlight.
2
!
3
4
or
!
CAUTION: If left in sunlight, surface may be hot to the touch.
FAQs
What do I do if I need a longer power supply cable?
Where can I find more information?
Commander Help
HELP
You can press the F1 key from any screen in the Alert
Commander to access the online Help system.
Logitech CAT-5e cables have been specially designed to create a weatherproof
seal when attached to the camera and power supply. We do not recommend
using after market cables. Longer cables are available for purchase at
www.logitech.com/dvs/ (Accessories).
Knowledge Base
Camera Reset Instructions
Troubleshooting camera connection:
What if camera/video disappears?
1) Test another outlet for your camera, perhaps one closer to your PC.
2) Verify that the camera power supply and the network bridge are plugged
directly into a power outlet and not a power strip.
Troubleshooting help is available at www.logitech.com/support
3) Check firewall settings or press the F1 key in Commander Software for
additional help.
Customer Support
4) Go to Settings > Cameras > Add/Find > Find Cameras.
Call 1.888.469.4543
Insert a paper clip into the reset hole located on the back of the camera and
press gently and then release.
5) Reset the camera. See instructions in “Camera Reset Instructions.”
Refer to System Requirements Guide.
Want to see more FAQs?
rt™ 700e/750e
Logitech Ale
Quick-start
System Requirements
guide
ort Guide
If the camera does not appear after reset, go to Settings > Cameras >
Add/Find > Find Cameras. If the camera still does not operate, contact
technical support.
Go to www.logitech.com/security/support
& Supp
Resetting the camera will not delete video recorded on the microSD card.
Reading the Diagnostic LEDs
Camera Diagnostic LED
Camera Diagnostic LED
Which LED colors indicate “camera is working”?
Motion LED
How do I know the camera is recording?
Camera is ready to record (Red)
Which LED colors indicate “camera is not working”?
Power Supply
Status LED
What do these LEDs tell me?
What do these LEDs tell me?
Connected to Internet (Green)
Camera boot-up failed * (Red blinking)
Traffic and data is flowing (Green)
Link to Power Supply (Green)
Connected to Alert Commander (Purple)
microSD card read/write failure - No microSD
card * (Alternating Red / Yellow, blinking)
Connection with Ethernet/LAN
(Yellow)
Shows network traffic (Blue)
Connected to Alert Commander & Internet (Blue)
Camera is recording (Red, blinking)
Power Suppy
Diagnostic LEDs
Upgrading Firmware (White)
Turning Off Motion and Diagnostic LEDs
Camera in standalone mode (Yellow)
You can turn off the motion and diagnostic LEDs in the
Settings > Camera dialog.
Not connected to Alert Commander or Internet (Light Blue)
See F1 Help for instructions.
* See Camera Reset Instructions for assistance.
Using the microSD™ card adapter
NOTE: Unplug the camera before removing, replacing, or upgrading your
microSD card.
microSD card comes pre-installed.
To review the video on the microSD card, we recommend you using
Logitech Alert Commander.
SMA
RTM
To review the video on the microSD card without Logitech Alert
Commander:
COM
EDIA
PAC
TF
LAS
H I/II
MMC/
SD
MS/M
S PRO
1) Open the hatch on the bottom of the camera and remove the microSD
card from its port.
2) Plug the microSD card into the adapter.
3) Plug the adapter into the PC’s SD card slot.
• View video recordings using the free Apple QuickTime player or other
player that supports H.264 video playback. (To download QuickTime, visit
http://www.apple.com/quicktime/download/)
1
2
3
www.logitech.com
© 2010 Logitech. All rights reserved. Logitech, the Logitech logo, and other Logitech marks are owned by Logitech and may be
registered. All other trademarks are the property of their respective owners. Logitech assumes no responsibility for any errors
that may appear in this manual. Information contained herein is subject to change without notice.
620-002016 rev005
!
microSD card must be installed in the camera for recording to
occur.
microSD Logo is a trademark of SD-3C, LLC.