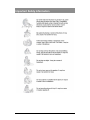
1
LG-Nortel GDC-400 User manual 3 The purpose of this manual is to give a user the right way to use a GDC-400H wireless terminal and its accessories. This manual lists the matters that a user has to avoid for right use and explains the features of the wireless terminal as a terminal of ipLDK24/100/300/300E systems. The features which are explained in this manual describe the user-interface for ipLDK series DECT key system of local sale. Also it illustrates the specifications of the terminal and its accessories. The wireless terminal, GDC-400H (GAP), is designed and manufactured for interface with ipLDK series DECT key system and LGNortel doesn’t guarantee inter-operability between any other GAP system and GDC-400H (GAP). Please, refer to ‘ipLDK System Installation Manual’ about applicable peripheral items. 4 Table of Contents 1. UNPACKING ........................................................................... 16 2. PHONE OVERVIEW................................................................ 17 2.1 FRONT AND BACK VIEW OF HANDSET ....................................................... 17 2.2 DESCRIPTION OF BUTTON ......................................................................... 18 2.3 LCD DISPLAY .......................................................................................... 20 2.4 MESSAGE DISPLAY................................................................................... 21 2.5 FRONT AND BACK VIEW OF BASE UNIT..................................................... 22 3. SETTING UP............................................................................ 23 3.1 INSTALLING THE BATTERY ........................................................................ 23 3.2 PUT THE BELTCLIP INTO HANDSET ............................................................ 23 3.3 CONNECTING THE CHARGER..................................................................... 24 3.4 CHARGING THE HANDSET ......................................................................... 24 3.5 WIRELESS TERMINAL (GDC-400H).......................................................... 25 4. BASIC FUNCTIONS................................................................ 26 4.1 MAKING A CALL ....................................................................................... 26 4.1.1 Making a External Call.....................................................................26 4.1.2 Making a Internal Call......................................................................26 4.2 PRE-DIALING CALL................................................................................... 26 4.2.1 Normal dialing..................................................................................26 4.2.2 Local Redialing ................................................................................26 4.2.3 Local Speed Dialing.........................................................................26 4.2.4 Dialing from Phonebook ..................................................................27 4.3 PLACING AN OUTSIDE CALL...................................................................... 27 4.3.1 Pre Dial............................................................................................27 4.3.2 Post Dial ..........................................................................................28 4.3.3Call Release .....................................................................................28 4.3.4 Assign CO Line/CO Line Group.......................................................28 4.4 ANSWERING A CALL ................................................................................. 29 4.4.1 Answering a External Call................................................................29 4.4.2 Answering a Internal Call.................................................................29 4.4.3 Ignoring a Call .................................................................................29 4.5 CALL TRANSFER ...................................................................................... 29 4.5.1 Screened Transfer ...........................................................................30 4.5.2 Unscreened Transfer .......................................................................30 4.5.3 Answering Screened Transfer .........................................................30 4.5.4 Executive/Secretary Transfer ..........................................................30 4.6 PLACING A CO CALL ON HOLD................................................................. 30 4.6.1 To retrieve the call ...........................................................................30 4.6.2 To make another call .......................................................................30 4.7 FLASH ...................................................................................................... 31 5 Table of Contents 4.8 GO TO DTMF FUNCTION .......................................................................... 31 4.9 ADJUST EARPIECE VOLUME ..................................................................... 31 4.10 MICROPHONE MUTING ............................................................................ 32 4.11 ADJUST RINGER VOLUME ....................................................................... 32 4.12 HANDSET POWER ON POWER OFF ......................................................... 32 5. PHONEBOOK.......................................................................... 33 5.1 PHONEBOOK MENU .................................................................................. 33 5.1.1 Find..................................................................................................33 5.1.2 Add Entry .........................................................................................33 5.1.3 Modify ..............................................................................................34 5.1.4 Delete ..............................................................................................36 5.2 FIND PHONEBOOK DIRECT MENU .............................................................. 36 6. PROGRAMMING FEATURES................................................ 37 6.1 CALL REGISTER ....................................................................................... 37 6.1.1 Missed Call ......................................................................................37 6.1.2 Received Call ..................................................................................38 6.1.3 Dialed Call .......................................................................................38 6.1.4 Delete Call .......................................................................................38 6.2 IMAGE & SOUND ....................................................................................... 39 6.2.1 Images.............................................................................................39 6.2.2 Sounds ............................................................................................39 6.3 PHONE REGISTER ..................................................................................... 40 6.3.1 Subscription.....................................................................................40 6.3.2 Base Choice ....................................................................................41 6.3.3 Modify PIN .......................................................................................41 6.3.4 Base ID............................................................................................41 6.3.5 Reset ...............................................................................................41 6.4 APPOINTMENT .......................................................................................... 42 6.4.1 Modify Date .....................................................................................42 6.4.2 Modify Text ......................................................................................43 6.4.3 Delete ..............................................................................................43 6.4.4 View Text .........................................................................................43 6.5 PHONE SETTINGS ..................................................................................... 44 6.5.1 Clock................................................................................................44 6.5.2 Alarm clock ......................................................................................44 6.5.3 Keypad Tones..................................................................................44 6.5.4 Display.............................................................................................44 6.5.5 Language.........................................................................................45 6.5.6 Silent Mode......................................................................................45 6.5.7 Keypad Lock....................................................................................45 6.5.8 S/W Version.....................................................................................46 6 Table of Contents 6.5.9 Edit Co Code ...................................................................................46 6.5.10 Missed Call Mode ..........................................................................46 6.5.11 Range Out beep ............................................................................46 6.5.12 Clock Display.................................................................................46 6.6 DIRECT CALL............................................................................................ 46 7. KEY SYSTEM FUNCTIONS ................................................... 47 7.1 CALL PARK .............................................................................................. 47 7.1.1 Call Park ..........................................................................................47 7.1.2 Retrieving a parked call ...................................................................47 7.1.3 Parking Location Number ................................................................47 7.2 CALL BACK .............................................................................................. 47 7.2.1 Call Back in case of Dialing to a Station in Busy State ....................47 7.2.2 Call Back in case of Dialing to a Station in DND Mode or No Answer .................................................................................................................47 7.3 ANSWERING A MESSAGE WAITING INDICATION ......................................... 48 7.4 PICK-UP.................................................................................................... 48 7.4.1 Group Call Pick-up ..........................................................................48 7.4.2 Directed Call Pick-up .......................................................................48 7.4.3 Auto Pick-up ....................................................................................48 7.5 SYSTEM SPEED DIAL ................................................................................ 48 7.5.1 Storing Speed Dial Numbers ...........................................................48 7.5.2 Using Station Speed Bin Numbers ..................................................49 7.5.3 Erasing Station Speed Bin Numbers ...............................................49 7.5.4 Storing System Speed Bin Numbers ...............................................49 7.5.5 Using System Speed Numbers........................................................49 7.6 SYSTEM REDIAL ....................................................................................... 50 7.6.1 To Redial Saved Number.................................................................50 7.6.2 To Redial Last Number ....................................................................50 7.6.3 Save a Current Number for Later Use.............................................50 7.7 CALL FORWARD ....................................................................................... 51 7.7.1 To Cancel Call Forward ...................................................................51 7.8 DO NOT DISTURB(DND) .......................................................................... 51 7.8.1 To Program Do Not Disturb (DND) ..................................................51 7.8.2 To Cancel Do Not Disturb (DND).....................................................51 7.9 AUTHORIZATION CODE ............................................................................. 52 7.9.1 To Register Access Authorization Code...........................................52 7.9.2 To Change Access Authorization Code ...........................................52 7.10 TEMPORAL COS(CLASS OF SERVICE) CHANGE ..................................... 52 7.10.1 Blocking Outside Calls...................................................................52 7.10.2 Restoring Outside Calls.................................................................53 7.11 UNIVERSAL NIGHT ANSWER ................................................................... 53 7.12 CALL WAIT VOICE OVER(CAMP-ON)....................................................... 53 7 Table of Contents 7.13 ANSWERING A CALL WAIT WITH VOICE OVER ......................................... 53 7.14 WAKE-UP CALL ...................................................................................... 54 7.14.1 To Register Wake-up Call ..............................................................54 7.14.2 To Register Wake-up Time ............................................................54 7.14.3 To Cancel Wake-up Call ................................................................54 7.15 STEP CALL ............................................................................................. 54 7.16 PAGING .................................................................................................. 55 7.16.1 To page..........................................................................................55 7.16.2 Answering Paging..........................................................................55 7.17 PROGRAMMING A NAME INTO DISPLAY ................................................... 55 7.18 STATION PROGRAM RECOVERY .............................................................. 56 7.19 PRE-SELECTED MESSAGES .................................................................... 56 7.20 PROGRAMMING USER CUSTOM MESSAGE .............................................. 57 7.21 FUNCTIONS RELATED WITH VMIB .......................................................... 57 7.21.1 Date & Time Prompt: .....................................................................57 7.21.2 Station Number Prompt .................................................................57 7.21.3 Station status prompt.....................................................................57 7.21.4 To record a greeting.......................................................................57 7.21.5 To delete the greeting ....................................................................58 7.21.6 To record a paging message .........................................................58 7.21.7 To delete a paging message..........................................................58 7.22 DATE/TIME DISPLAY ............................................................................... 58 7.23 LINKED STATION PAIRS .......................................................................... 58 8. DECT FUNCTIONS ................................................................. 59 8.1 MOBILITY MANAGEMENT FUNCTION.............................................. 59 8.1.1 Hand-Over .......................................................................................59 8.1.2 Range Out Indication.......................................................................59 8.1.3 Authentication ..................................................................................59 8.2 WIRELESS TERMINAL SERVICE FUNCTION................................... 59 8.2.1 Cradle On and Off Function (Charger Answer Function).................59 8.2.2 Ear Microphone Button Function .....................................................59 9. INSTALLATION OF WIRELESS TERMINAL ........................ 60 9.1 SYSTEM ID & AUTHENTICATION CODE ...................................................... 60 9.2 SUBSCRIPTION.......................................................................................... 61 9.3 DE-SUBSCRIPTION I .................................................................................. 63 9.4 DE-SUBSCRIPTION II ................................................................................. 64 9.5 AUTHENTICATION...................................................................................... 65 9.6 CHANGE OF SUBSCRIBED SYSTEM ........................................................... 65 10. USEFUL INFORMATION...................................................... 66 10.1 SYSTEM SPECIFICATION ......................................................................... 66 8 Table of Contents 10.2 HAND-HELD TYPE WIRELESS TERMINAL (GDC-400H) SPECIFICATION ... 67 10.3 CHARGER(400-SSC) SPECIFICATION ................................................... 67 11. TROUBLESHOOTING GUIDE ............................................. 68 APPENDIX A. USER MENU TREE ............................................ 70 APPENDIX B. FUNCTION SHORT-KEY TABLE...................... 71 APPENDIX C. THE LCD MESSAGES RELATED TO A CALL 73 9 Important Safety Information 10 Important Safety Information 11 Important Safety Information 12 Important Safety Information 13 Important Safety Information 14 Important Safety Information 15 1.Unpacking 1. Unpacking At first, make sure that you have all the parts shown below. 1 2 3 4 5 6 1. Handset 2. Base Unit 3. AC Adapter 4. Battery 2ea 5. User’s Manual 6. Belt Clip Warning This equipment is not designed for making emergency calls when the power fails. Make alternative arrangements for access to emergency services. 16 2.Phone Overview 2. Phone Overview Descriptions of the important phone components. 2.1 Front and Back View of Handset 1. Earpiece 2. Ring LED 3. Left Soft Button 4. Left Button 5. Talk Button 6. Flash/Clear Button 7. Call Back/Message Button 8. Microphone 9. LCD(Liquid Crystal Display) 10. Up/Down Button 11. Right Soft Button 12. Right/Transfer/Internal Button 13. END/Power Button 14. Speed/Program Button 15. Battery Cover 16. Charging Terminal 17 2.Phone Overview 2.2 Description of Button Button Function [TALK] Try to make a call Î Redial number saved in handset. [END/POWER] Pressing longer than 1 second : Power Off Î Pressing shorter than 1 second :Leave a call back or a message Pressing shorter than 1 second: Ignore an call during incoming. [LEFT SOFT / RIGHT SOFT] You can access to the current functions by pressing the soft button directly below this symbol. [FLASH/CLEAR] Talking Mode : Register recall Flash a call and retry next call When using pre-dial : Î Pressing longer than 1 second : All digits are cleared Î Pressing shorter than 1 second : 1 digit backspace Î When using local functional operation : Function cancel (It should be pressed longer than 1 second) [SPEED/PROGRAM] Post-Dial : Î Pressing shorter than 1 second : System speed dial(SPEED). Î Pressing longer than 1 second : Start/Finish a system program (PROGRAM). Same as the FUNCTION button of GDC-345H. [LEFT] In an idle state : To view missed call In MENU : LEFT [RIGHT/INTERNAL/TRANSFER/HOLD] Talking Mode : Î Pressing shorter than 1 second:Transfer a call to the other station(TRANS). Î Pressing longer than 1 second:Hold a call / release a holding call(HOLD). In an idle state : Î In MENU : right button Î Home DECT : Internal call Î Key-telephone DECT : Trying to make a intercom call or CO line call 18 2.Phone Overview Button Function [CALL BACK] Pressing shorter than 1 second : Leave a call back or a message 0~9 [UP/DOWN] Talking Mode : Up / Down the level of Rx volume, Call by name, CLIP Standby Mode : Î In Menu: Navigate and select among function items in a menu or submenu. No inputted state : Î UP : Local Redial Î DOWN : Phonebook list To lock Keypad (Pressing longer than 1 second) ‘#’ Display (Pressing shorter than 1 second) While Dialing: To insert pause (Pressing longer than 1 second) Talking Mode (Only when the Camp-On function is supported by ipLDK series) : Camp-On Standby Mode : Î ‘*’ is displayed (Pressing shorter than 1 second) Î Enable/disable manner mode(Pressing longer than 1 second) - Standard dial button 19 2.Phone Overview 2.3 LCD Display The LCD of GDC-400H GAP has 128 x 128 pixels that are capable to display 10 icons and 7 lines x 18 characters per line. The LCD shows different wireless states and displays visual feedback for the actions performed by user. Icon / Description & RSSI Icon ] [Antenna Icon The terminal is locked to a base station and the location registration is finished. Location registration is finished. Even though user may make a call or receive a call, may hear very severe noise. (Below –86dBm) User may make a call or receive a call and the may hear some noise. (-85dBm~-80dBm) User may make a call or receive a call and the call quality is normal. (-79dBm~-70dBm) User may make a call or receive a call and the call quality is good. (Upper -69dBm) [PHONE Icon] Indicates that a traffic channel is established. [EXTERNAL/INTERNAL CALL ICON] Indicates that the call is from and to where. EXT is external and INT is internal. [Manner MODE ICON] Indicates that the phone mode is manner mode. In manner mode, all sound is disabled and ring is replaced by vibration. [MESSAGE ICON] The icon indicates that the system has at least one new message for the wireless terminal. The message information is updated every 3 minute. The disconnection with the subscribed system makes impossible to update the message information and the icon is disappeared. And if the wireless terminal is connected with the system, this icon is displayed again on the LCD. If the station message is left, the reserved call is made by using CALLBACK button and this icon will be disappeared after the call. In case of voice message through VMIB, press FLASH button to delete a message after checking the message. When all messages are deleted, the message icon will be disappeared. Otherwise, this icon will be still remained. Applicable message: VMIB message, CLI message, Station message. [KEY LOCK ICON] Indicates that the phone is set to key lock mode. [Alarm clock ICON] Indicates that an alarm clock is set. 20 2.Phone Overview 2.4 Message Display Message area from System Local Message area of Phone Message STA xxxx CALL FROM STA xxxx CALL TO STA xxxx LN XXX RINGING HOLDING STA xxxx LN XXX Message Range Out No Channel Silent Mode Direct call Description Station number When a call is received from intercom, it indicates a call paging from station xxx When a call is made to intercom, it indicates a call paging to station xxx Display Duration Standby Mode During ringing and until cutting off a Call When received from CO line, it indicates a paging from CO line x It indicates a call is holding. During ringing Connected CO line number Description It indicates wireless terminal is out of range or not yet synchronized with a system. There is no available RF Channel It indicates this terminal is in silent mode It indicates this terminal is in Direct mode It indicates keypad is locked Keypad Locked 0~9, *, #, P, Local dialed digits D, R (P:Pause, D:Go to DTMF mode, R:Flash) 21 During ringing and until cutting off a Call During holding or transferring a call During holding CO line Display Duration During staying in out of range or until completing synchronization During no channel During silent mode During Direct mode While keypad is locked During dialing 2.Phone Overview 2.5 Front and Back View of Base Unit 1 Charging terminal Keep the charging terminal clean; Use cotton swab to remove stain from the terminal. 2 Charge / In use lamp Illuminates when the handset is on the base. Blinking when the phone is in use. 1. Adapter jack Connect the adapter to the base. 22 3.Setting Up 3. Setting Up 3.1 Installing the Battery Before inserting the battery, make sure the polarity is in correct position.(See figure below) Then close the battery cover and push upward until it clicks into place. When you replace the battery, press the latch on the cover and slide down to open. After then replace the new battery. You can purchase new battery in LG-Nortel SVC Center. 3.2 Put the Beltclip into Handset Note You can hang the handset on your belt or pocket using the beltclip. 23 3.Setting Up 3.3 Connecting the Charger Warning Use only the mains power adaptor supplied. Any other adaptor could damage your GDC-400H and invalid your warranty 1. Adapter 2. To AC OUTLET 3.4 Charging the Handset Please charge the battery for about 12 hours before initial use. The battery charge level is shown at the top right of the LCD screen. Display Icon Battery Status Description Battery is empty Need to be charged(Low) Battery is partially charged(Medium) Battery is fully charged(High) Bat. Type Duration Talking Mode 15 hours Full Charging Time More than 20 hours Standby Mode 150 hours < Battery duration and charging time > Note The battery has limited operating life and the period of warranty services for the battery is 6 months from purchasing date. The LCD backlight is automatically turned off in the low level to maximize time. 24 3.Setting Up 3.5 Wireless Terminal (GDC-400H) Rubber lid for ear-microphone ♣ A general ear-microphone can be used. Warning Do not insert any external substance except ear-microphone for GDC-400H in the hole. Inserting anything except for ear-microphone provided by general maker may cause severe damage to the terminal. 25 4.BASIC FUNCTIONS 4. BASIC FUNCTIONS 4.1 Making a Call To make a call by entering numbers on your keypad. 4.1.1 Making a External Call 1) 2) 3) 4) 5) Press button. ” and “EXT” symbol are displayed and you can hear the dial tone. “ Enter the dialing number. Press button again to end the call. The call duration and the current time are displayed. 4.1.2 Making a Internal Call 1) 2) 3) 4) 5) Press the button. “ “ and “INT” symbol are displayed and you can hear the dial tone. Enter the dialing number. Press button again to end the call. The call duration and the current time are displayed. 4.2 Pre-Dialing Call 4.2.1 Normal dialing 1) 2) 3) Enter the dialing number.(up to 24 digits). Press the Delete ( ) button if you want to delete the incorrectly entered number one by one. Press the button to dial the number entered. 4.2.2 Local Redialing 1) 2) 3) 4) 5) The last dialed 10 numbers are remembered in the Memory. Press the UP ( ) button. The dialed numbers are displayed. Select the desired number and press the Option ( ) button. Select Call in the Dialed Option menu and press the OK ( ) button then that number is dialed. 4.2.3 Local Speed Dialing In idle state, user can make an outgoing call pressing position number saved in the phonebook. The valid speed dialing range is from 1 to 60. 1) Press 1 or 2 digits for longer than 1 second. If the position number is stored in the phonebook, Speed dialing will be started. If not, it will be ignored. 26 4.BASIC FUNCTIONS 4.2.4 Dialing from Phonebook You can dial the dialing number from Phone book (60 locations). 1) Press the Names ( ) button. 2) Select Find in the Phonebook menu. 3) Search the desired name by the name searching method. 4) Press the OK ( ) button, then “Enter Name: “ is displayed. 5) Enter the desired name. (Ex : “KE” for KENNY). 6) Press the Find ( ) button to search it. (If you don’t enter the desired name and press the Find ( ) button, all phonebook names are displayed, and then you can select the desired name by pressing the UP/DOWN ( )buttons. 7) Press the Call ( ) button to dial the telephone number, if you find the desired name. Another method is as the below. 8) Press the DOWN( )button, then the names in the phonebook list are displayed. 9) Select the desired name and press the button to dial that number. 4.3 Placing an Outside Call 4.3.1 Pre Dial 1) 2) ipLDK-24/100 CO Line Access Code (9, 8+XX or 88+XX) → Phone Number → ipLDK-300/300E CO Line Access Code (9, 8+XX or 88+XXX) → Phone Number → → Connection → Connection You may dial telephone number in an idle state before pressing button (up to 24 digits). Since it is displayed only 11 digits per line on the LCD. If you dial a wrong digit, a user can erase last 1 digit by pressing Delete ( ) button once and if you want to erase all digit dialed, press Delete ( ) button for longer than 1 second. If you want to insert dialing pause among dial numbers, press “Option” button and select “Insert Pause”. Then “P” is displayed on the LCD. z z z z Dial phone number. Press TALK( ) button. ) icon is displayed on the LCD. Phone( The LCD message is displayed as the left figure and connection tone is heard when connection is completed. Note You can insert dialing pause pressing “#” button longer then 1 second in both pre-dialing and post dialing 27 4.BASIC FUNCTIONS 4.3.2 Post Dial 1) ipLDK-24/100 → CO Line Access Code (9, 8+XX or 88+XX) → Phone number → Connection ; (XX means CO line number). 2) ipLDK-300/300E → CO Line Access Code (9,8+XX or 88+XXX) → Phone number →Connection ; (XX means CO Group Number, XXX means CO line number). You may dial telephone number after pressing TALK ( ) button. When pressing CO line access code (9, 8 + XX, or 88 + XX), CO line dial tone is heard. Every time pressing each button, it is displayed on the LCD. If you dial a number late, “DIALING TOO LATE” message is displayed on the LCD. Note In case of ipLDK-24/100/300/300E system, if handset was registered by ‘TYPE 3’, it is displayed 12 digits per line on the LCD (This feature is available when MPB version of ipLDK-100/300/300E is 1.0Ba above and when MPB version of ipLDK-24 is available on all version. Please refer to ‘9.2 Subscription’ for details. z z z Press button. Connection tone is heard and phone( the LCD. Dial CO line access code. Î ipLDK-24/100 (9, 8 + XX, or 88 + XX). Î ipLDK-300/300E (9, 8 + XX, or 88 + XXX). Dial the desired phone number. ) icon is displayed on 4.3.3Call Release To release a call, press END ( ) button. The phone( wireless terminal will goes to an idle state. ) icon will be disappeared and the 4.3.4 Assign CO Line/CO Line Group Available CO lines can be grouped and the accessible CO line groups can be assigned to a station by Admin programming (For detail programming, refer to “CO LINE GROUPS” and “CO LINE ACCESS” of “Digital Key Telephone System Programming Manual”). All available CO lines are assigned to Group 01 by default. Accessing a CO line is done in three ways as above; (9, 8+CO line group # or 88+CO line #) and they are; 1) 9 (CO line Access Code): Connect an available CO line of the assigned CO line group to the station. CO line selecting method is programmable by Admin programming. 2) 8 + CO line group #: Connect an available CO line of the CO line group. The CO line group should be assigned to the station before by Admin programming. CO line selecting method is programmable by Admin programming. 3) 88 + CO line #: Connect the CO line directly. The CO line should be allowed to the station before by Admin programming. 28 4.BASIC FUNCTIONS 4.4 Answering a Call Receive a phone call using the handset. 1) When the phone is ringing, the “EXT” or “INT” symbol related to the incoming call flashes. In the LCD Message area from system, message from system is displayed. At the same time, in the Local message area, name and CID is displayed. The name is displayed only when there is matched telephone number in the phonebook. The user can accept an incoming internal or external call by pressing the button. z Auto Talk: While the phone is charging mode you can answer the call by lifting the handset from the base unit. This feature is enabled permanently. 4.4.1 Answering a External Call 1) 2) 3) Handset will ring and show a flashing “EXT” symbol. ” and “EXT” symbol is displayed steadily. Press button to answer a call “ Press button again to end the call.The call duration and the current time are displayed. 4.4.2 Answering a Internal Call 1) 2) 3) Handset will ring and show a flashing “INT” symbol. “ and “INT” symbol is displayed steadily. Press button to answer a call “ Press button again to end the call. The call duration and the current time are displayed. 4.4.3 Ignoring a Call 1) 2) 3) You can ignore a call if you do not want to answer it by pressing “END” ( ) for shorter than 1 second. All ring and vibration will be stopped. But, the caller will hear ring back tone. Press TALK ( ) to talk. 4.5 Call Transfer This function is to transfer a received call to another user. 1) Talk → (Press shorter than 1 second) → Intercom number → . While connected to a CO call (or intercom call). 1) Press TRANS ( ) button shorter than 1 second and then the call is put on hold state. 2) Dial intercom station number. (ex. ipLDK-24: 10~41, ipLDK-100: 100~227, ipLDK-300: 100~399, ipLDK-300E: 1000~1599) At this point, a user can make either a screened or unscreened call transfer. 29 4.BASIC FUNCTIONS 4.5.1 Screened Transfer When the called station answers, inform the transfer. 1) Press END ( ) button to complete the transfer. 4.5.2 Unscreened Transfer When the called station begins to ring, 1) Press END ( ) button to complete the transfer after ring back tone is heard. Then, a message is displayed on the LCD of the called station. If the call is not answered within 30 seconds, recall ring is ringing at both stations. At this time, press TALK ( ) button then a user will be connected with the transferred call again. 4.5.3 Answering Screened Transfer A user will hear intercom ring. 1) Answer intercom call and receive transfer notice. If the transferring party hangs up, the outside call will be connected. 4.5.4 Executive/Secretary Transfer 1) 2) If a station is designated as an Executive station and the station is busy or in DND (Do Not Disturb), all calls will go to its Secretary station. If a station is designated as a Secretary station, it may signal its Executive station which is in DND by using the Call Wait feature. 4.6 Placing a CO Call on Hold While you use a wireless terminal through CO line, you can use this function when you want to let the outside caller wait for a moment. 1) Talk → (Press longer than 1second) While connected to a CO call (not intercom call), 2) Press HOLD ( ) button longer than 1 second for exclusive hold. (Dial tone will be heard) A message is displayed on the LCD as shown, and the hold music is heard to the outside caller. You have two kinds of choice, one is to retrieve a call and the other is to make another call. 4.6.1 To retrieve the call 1) Press HOLD ( connected. ) button longer than 1 second, then the held outside call will be 4.6.2 To make another call 1) 2) 3) Press END ( ) button if you want to make another intercom or CO call. The wireless terminal goes to an idle state. Press TALK ( ) button again to make a call. 30 4.BASIC FUNCTIONS 4.7 Flash During conversation (through CO line or intercom), releasing current call and entering dialing mode can be done at once by Flash. The FLASH button is also used to transfer a CO line call through a PABX. 1) 2) 3) If you are talking with intercom line, press FLASH ( ) button to release a call. Then, dial tone will be heard and you may make another call or do the other operation, for example, programming using system function and so on. If you are talking with CO line, press FLASH ( ) button to release a call. Then, dial tone will be heard and you may make another CO call. If you want to transfer a CO call to a PABX, dial an internal station number of a PABX. When ring back tone is heard, hang up the call for unscreened transfer, or inform the transfer when the called party answers, then hang up the call for screened transfer. 4.8 Go to DTMF Function This function is that the pressed digit signal from the wireless terminal to CO. is generated to DTMF. Use this function in case that the outside PBX or phone requests DTMF tone. However, according to capability of the subscribed system, this function may be operated or not. This function will be used for Home DECT inter-operability and for ipLDK series. 1) Press button for longer than 1 second during pre-dialing or post-dialing. 2) The dial tone is transferred to DTMF tone. 4.9 Adjust Earpiece Volume During a call, the user can adjust the earpiece volume in the range 1 ~ 7. z Fast way Press UP/DOWN ( ) button. You don’t need to look at the LCD display. Change the hear volume level by pressing the UP/DOWN ( ) or LEFT/RIGHT ( ) button. 3) If you don’t press any button within 3 seconds, the volume level is automatically saved. It helps for you to concentrate upon the conversation with somebody. 4) If you press OK ( ) button within 3 seconds, the volume level is saved immediately. 1) 2) z 1) 2) 3) 4) Normal way Press the Option ( ) button during a call. The handset displays Call Options menu. Select Hear Volume in the Call Options menu and press the OK ( ) button. The handset displays Hear Volume level. It is the current level. Change the hear volume level by pressing the LEFT/RIGHT ( ) button, and then press the OK ( ) button to set with that level. 31 4.BASIC FUNCTIONS 4.10 Microphone Muting During a call, you can mute the microphone. 1) Press the Option ( ) button during a call. The handset displays Call Options menu. 2) Select Mute in the Call Options menu and press the OK ( ) button. 3) The handset displays “MUTED” on the center of the LCD. 4) When you press Enable ( ) button the function is deactivated. 4.11 Adjust Ringer Volume The user can adjust ringer volume in the range 1 ~ 9. 1) Press the Menu ( ) button to enter the menu. 2) Select Image & Sound menu. 3) Select Sounds menu and press the OK ( ) button. There are 3 menu displayed. External Ring, Internal Ring and Ringing Mode. 4) Select one of them and press the OK ( ) button. The sub menu are displayed. 5) Select Volume menu and press the OK ( ) button. The handset displays Volume level. It is the current level. 6) Change the hear volume level by pressing the LEFT/RIGHT ( ) button, and then press the OK ( ) button to set with that level. 4.12 Handset Power On Power off 1) Power On Long press button at Power off state. The handset will search for the base station and displays “Range Out”. After searching Base, “Range Out” is disappeared and the ” symbol is displayed on the LCD. “ 2) Power Off Long press (about 1sec) switched off. button at Idle Mode. After validation tone, handset is 32 5.Phonebook 5. Phonebook z In the Off-Hook Mode (reference 5.1 Phonebook Menu) While talking, press Option ( ) button and select Phone Book in Call Options menu. In the On-Hook Mode z Press Names ( z Press the DOWN( ) button (reference 5.1 Phonebook Menu) ) button (reference 5.2 Find Phonebook Direct Menu) 5.1 Phonebook Menu There are 4 sub menu. Use UP/DOWN( ) button to select sub menu. Find Add Entry Modify Delete In case of no number saved in Phonebook, “Phonebook Empty” is displayed and to add phone number Press Add ( ) button (reference 5.1.2 Add Entry). It is possible to save in the Phonebook up to 60 names and number, with the following characteristics. 5.1.1 Find 1) 2) 3) 4) To search number in Phonebook, you can enter some of names when cursor blinks. And press Find ( ) button. After compare names with phonebook directory, same names are shown or “No Name in Phone Book” is displayed in no matches. Search number in Phonebook, you can press Find ( ) button and all names are shown. After search completed, and press UP/DOWN ( ) button to enter option menu. There are 3 option menu: View, Modify, Delete. 5.1.1.1 View You can see whole name and number in detail. 5.1.1.2 Modify You can modify name and number and you can save it again. 5.1.1.3 Delete You can delete selected name and number. To delete the number press Delete ( ) button. 5.1.2 Add Entry 1) 2) 3) 4) 5) 6) Type phone book directory name, and press OK ( ) button. Use Delete ( ) button to delete 1 character. When name is entered, press OK ( ) button and type phone number using dial key. Select whether you use CO access code for CO line access or not. CO access code can be registered each base in the Edit CO code sub menu in the Phone Settings menu. The CODE-1 is for BASE-1 and CODE-2 is for BASE-2. Select position for speed function.You can use this number as speed dial in idle state. Its valid range is from 1 to 60. And press Save ( ) button. 33 5.Phonebook 5.1.3 Modify z z Search directory to modify (reference 5.1.1 Find). Modify name and number, to use or cancel CO access code or saved position. z English Mode KEY z Number to Repeat 1 2 3 4 5 6 7 8 1 @ : / < > ( ) 1 2 a b c 2 A B C 3 d e f 3 D E F 4 g h i 4 G H I 5 j k l 5 J K L 6 m n o 6 M N O 7 p q r s 7 P Q 8 t u v 8 T U V 9 w x y Z 9 W 0 & $ . , ? ! * * _ # # + - 9 R S X Y Z % 0 10 Italian Mode KEY Number to Repeat 1 2 3 4 5 6 7 8 1 @ : / < > ( ) 1 2 a b c 2 A B C á 3 d e f 3 D E F è 4 g h i 4 G H I ì 5 j k l 5 J K L 6 m n o 6 M N O ò 7 p q r s 7 P Q R 8 t u v 8 T U V ù 9 w x y Z 9 W X Y _ . , ? ! % 0 0 * * € $ # # & + - 34 9 S Z 10 5.Phonebook z Spanish Mode KEY Number to Repeat 1 2 3 4 5 6 7 8 1 @ : / < > ( ) 1 2 a b c 2 A B C á à 3 d e f 3 D E F é è 4 g h i 4 G H I í ì 5 j k l 5 J K L Ç 6 m n o 6 M N O ñ ó 7 p q r s 7 P Q R S 8 t u v 8 T U V ú ù 9 w x y Z 9 W X Y Z 0 . , ? ! % 0 * _ * € $ # & + 9 10 Ж З # z 9 10 ò - Russian Mode KEY Number to Repeat 1 2 3 4 5 6 7 8 1 @ : / < > ( ) 1 2 α σ в г Α Б В Г 3 д е ё ж з Д Е Ё 4 и й к л И Й К Л 5 м н о п М Н О П 6 р с т у Р С Т У 7 ф х ц ч Ф Х Ц Ч 8 ш щ ъ ы Ш Щ Ъ Ы 9 ь э ю Ь Э Ю Я 0 & $ . , ? ! % * * _ # # + - 35 0 5.Phonebook 5.1.4 Delete 5.1.4.1 Delete One 1) 2) Search directory to delete (reference 5.1.1 Find). Press Delete ( ) button to delete selected phonebook. 5.1.4.2 Delete All 1) All Phone Book directories will be deleted. 5.2 Find Phonebook Direct menu Press DOWN ( ) button. All Phone Book directory list showed. Using UP/DOWN ( button select phone book and enter option sub menu. View Modify Delete 36 ) 6.Programming Features 6. Programming Features To enter the programming features menu, the user has to press the Menu ( ) button during Idle Mode or during Not Subscribed Mode. During a call, either internal or external, no access to the programming feature is possible. The following list shows the programming features menu structures. Programming Features Menu 1) Call Register 2) Image & Sound 3) Phone Register 4) Appointment 5) Phone Settings 6) Direct Call You can select the desired menu by pressing the navigation buttons( ). And you can enter the desired menu by pressing the OK ( ) button. Pressing the Back ( ) button will terminate the programming menu and return to Idle Mode. 6.1 Call Register There are 4 menu in this menu. Missed Call Received Call Dialed Call Delete Call You can enter the desired menu by pressing the OK ( ) button. 6.1.1 Missed Call Missed call is the one that you didn’t receive or AOH set is automation setting they can be up to 100 calls(including the received calls) in total if there’s no received call. 1) In Standby mode, press the Menu ( ) button. 2) 3) 4) 5) Select Call Register menu and press the OK ( ) button. Select Missed Call menu and press the OK ( ) button. Missed call entry is displayed. Press the UP/DOWN ( ) button to browse missed calls. Press the Option ( ) button to do the optional tasks. There are 4 option menus. z Details z Save into Phbk z Delete z Call 6.1.1.1 Details The user can check the details on call such as caller’s number, and time. 1) In Option mode, select Details menu and press the OK ( ) button. z Caller’s number and time are displayed. 6.1.1.2 Save into Phbk The user can save missed call into phone book. 1) In Option mode, select Save into Phbk menu and press the OK ( ) button. “Add Entry” is displayed. 2) Enter name and press the OK ( ) button. “Entry Saved” is displayed and goes back to the previous menu. 37 6.Programming Features 6.1.1.3 Delete The user can delete call. 1) In Option mode, select Delete menu press the OK ( ) button. 2) Press the OK ( ) button to delete the selected number. z Selected number is deleted and goes back to the previous menu. 6.1.1.4 Call The user can make a call with the selected number. 1) In Option mode, select Call menu press the OK ( ) button. z Loop is occupied and call is made with the selected number. 6.1.2 Received Call Received call is the one that you received and they can be up to 100 calls(including the missed calls) in total if there’s no missed call. 1) In Standby mode, press the Menu ( ) button. 2) Select Call Register menu and press the OK ( ) button. 3) Select Received call menu and press the OK ( ) button. Missed call entry is displayed. 4) Press the UP/DOWN ( ) button to browse missed calls. 5) Press the Option ( ) button to do the optional tasks There are 4 option menus. z Details z Save into Phbk z Delete z Call 6.1.3 Dialed Call Received call is the one that you dialed and they can save up to 10 calls. 1) In Standby mode, press the Menu ( ) button. 2) Select Call Register menu and press the OK ( ) button. 3) Select Dialed Call menu and press the OK ( ) button. Dialed call entry is displayed. 4) Press the UP/DOWN ( ) button to browse missed calls. 5) Press the Option ( ) button to do the optional tasks. There are 4 option menus. z Details z Save into Phbk z Delete z Call 6.1.4 Delete Call The user can delete all corresponding calls. 1) In Standby mode, press the Menu ( ) button. 2) Select Call Register menu and press the OK ( ) button. 3) Select Delete Call menu and press the OK ( ) button. There are 4 option menus. z Missed Calls z Received Calls z Dialed Calls z All Calls 38 6.Programming Features 6.1.4.1 Missed Calls The user can delete all Missed Calls. 1) In Option mode, select Missed Calls menu press the OK ( ) button. 2) Press the OK ( ) button to delete all Missed Calls. z All Missed Calls are deleted and goes back to the previous menu. 6.1.4.2 Received Calls The user can delete all Received Calls. 1) In Option mode, select Received Calls menu press the OK ( 2) Press the OK ( ) button to delete all Received Calls. z ) button. All Received Calls are deleted and goes back to the previous menu. 6.1.4.3 Dialed Calls The user can delete all Dialed Calls. 1) In Option mode, select Dialed Calls menu press the OK ( ) button. 2) Press the OK ( ) button to delete all Dialed Calls. z All Dialed Calls are deleted and goes back to the previous menu. 6.1.4.4 All Calls The user can delete All Calls including Missed/Received / Dialed calls. 1) In Option mode, select All Calls menu press the OK ( ) button. 2) Press the OK ( ) button to delete All Calls. z All Calls are deleted and goes back to the previous menu. 6.2 Image & Sound Images. Sounds. You can enter the desired menu by pressing the OK ( ) button. 6.2.1 Images There is wallpaper in this menu. 1) You can view wallpaper by pressing the VIEW ( wallpaper by pressing the SET ( ) button. 6.2.2 Sounds 6.2.2.1 Ringing Set There are 3 menu in this menu. Internal Ring External Ring Ringing Mode 1) Internal Ring There are 2 menu in this menu. z Ringing Type. z Volume. 39 ) button.You can set as background 6.Programming Features Î Ringing Type You can hear melodies.(9 melodies) You can choose Ring by pressing the LEFT/RIGHT( ) button. You can set as External/ Internal Ring by pressing the SET ( ) button. Î Volume 9 volumes. You can choose volume by pressing the LEFT/RIGHT( ) button. Display “volume set” in LCD. 2) External Ring There are 2 menus in this menu. z Ringing Type z Volume Î These menus operate in same 6.2.2.1 Ringing Set – 1) Internal Ring menu. 3) Ringing Mode A user can select the one mode among By Ring (=Vibrator off), No Sound, By Vibrator (=Ring off), Ring and Vib, and Ring after vib. . This function is set by Ringing Mode setting operation in Sounds menu of Image & Sound Menu. When By Vibrator is selected, ring tone can’t be generated. But for being conscious of incoming call there is phone vibration. When Ring and Vib is selected, there is ring tone and vibration at the same time. When Ring after Vib is selected, there is ring tone after 10 seconds vibration. The initial state is Ring. z There are five ringing mode. You can choose ring by pressing LEFT/RIGHT ( ) button and set by SET ( ) button. Î By Ring: it generates ring sound whenever a call is incoming. Î No Sound: No ring sound. Only ring LED is blinking. Î By Vibrator: No ring sound. Only Vibration. Î Ring and Vib: Ring sound and Vibration at the same time. Î Ring after Vib: Ring sound after vibration for 10 seconds. 6.3 Phone Register To register a new portable to your base or to register the portable again after the base reset (see paragraph Base Reset). 6.3.1 Subscription This function is to subscribe a wireless terminal to the system. Please refer to ‘9.2 subscription’ for details. 1) Select Subscription and press OK ( ) button. 4 bases are displayed on the LCD. “BASE 1”,..., “BASE 4” The base(s) where the current handset is subscribed to is (are) displayed dimly. 2) Select the desired base and press OK ( ) button. And then “SEARCHING: x” is displayed where x means the base number. If the handset searches the base, the base RFPI is displayed in the handset. 3) Press OK ( ) button. And then AC: is displayed. z Enter the AC and press OK ( ) button, then the handset subscription is finished. From now on, “Range Out” is disappeared on the LCD in the idle mode. 40 6.Programming Features 6.3.2 Base Choice The wireless terminal, GDC-400H(GAP), can be subscribed to up to 4 GAP systems. However, the wireless terminal can’t use all systems at the same time. Only one system selected by a user is available for using the wireless terminal. This function is to select system that a user wants to use. Please refer to ‘9.6 Change of Subscribed System’ for details. If you are registered to more than one base, you can select which base to use, or let the handset choose the strongest connection signal automatically. 1) Select Base Choice and press OK ( ) button. BEST BASE and 4 bases are displayed on the LCD. “BEST BASE”, “BASE 1”,..., “BASE 4”. The base(s) where the current handset is subscribed to is displayed on the cursor when enter into this menu. The base(s) not subscribed is(are) displayed dimly. 2) Select the desired base and press OK ( ) button. If you select BEST BASE, the best base of all bases where the handset is subscribed to is selected. 6.3.3 Modify PIN The user can change H/S PIN Number. 1) Select Modify PIN menu and press OK ( ) button. z “HS PIN : ” is displayed. 2) Input HS PIN number and press OK ( ) button. z “NEW PIN : ” is displayed with valid tone. 3) Input new HS PIN number and press OK ( ) button. z “RETYPE : ” is displayed. 4) Retype new HS PIN number and press OK ( ) button. z PIN Number changes with valid tone and goes back to standby mode. 5) Default H/S PIN number :0000. 6.3.4 Base ID The user can identify Base ID. 1) In Standby mode, press OK ( ) button. 2) Select Phone Settings menu. 3) Select Base ID menu and press OK ( ) button. Base ID is displayed. 6.3.5 Reset The user can clear Direct Call Number, Phonebook Number, and initialize all H/S Registration Information, and H/S settings such as Language, Ring Type, Ring Volume, Display, Keypad Tones to the default setting made in production phase. 6.3.5.1 Clear Phonebook Memory 1) 2) 3) 4) Select Reset menu and press OK ( ) button. “HS PIN : ” is displayed. Input “HS PIN” and press OK ( ) button to move into Reset submenus. Select Phonebook menu and press OK ( ) button. Press OK ( ) button to clear phonebook memory and CLIP. Dialed Calls are not changed. 41 6.Programming Features 6.3.5.2 Reset Settings 1) 2) 3) 4) Select Reset menu and press OK ( ) button. “HS PIN : ” is displayed. Input “HS PIN” and press OK ( ) button to move into Reset submenus. Select Settings menu and press OK ( ) button. Press OK ( ) button to reset settings. 6.3.5.3 Reset Handset 1) 2) 3) 4) Select Reset menu and press OK ( ) button. “HS PIN : ” is displayed. Input “HS PIN” and press OK ( ) button to move into Reset submenus. Select Handset menu and press OK ( ) button. Press OK ( ) button to reset settings. This menu includes the above two menu, Phonebook and Settings. And in addition, Clip, Dialed Call and HS PIN Number are deleted. 6.4 Appointment This feature is needed to make an appointment with someone or for something important in future so that users can be informed by “Appointment” feature. If the appointment is not set yet, the handset displays “No Appointment Set”. 1) Press the Set ( ) button to set appointment. “Daily”, “Monthly”, “Annual” are displayed. 2) You can set only one appointment among 3 kinds of appointments. 3) Press the Set ( ) button to set appointment. 4) Select the desired appointment and press the OK ( ) button. 5) For the daily appointment enter the time, for the monthly appointment enter the day and time, for the annual appointment enter the day, month and time. If you enter the wrong number, you can modify the wrong number with the Delete ( ) and the LEFT/RIGHT ( ) button. 6) If you finish entering the time(day, month), press the OK ( ) button to enter the text. The text edit mode is displayed. 7) If you finish entering the text, press the OK ( ) button to finish. It is also possible to set the appointment without the text. And then the handset displays the time(day, month) and the text on the same screen. 8) text on the same screen. 9) You can change if the appointment is enabled or unable by pressing the Enable/Unable ( ) button, and the icon is also changed. There are 4 menu in the option menu. If you want to return to the idle mode, press button. z Modify Date z Modify Text z Delete z View Text 6.4.1 Modify Date 1) 2) 3) Select Modify Date and press the OK ( ) button. And then you can modify the time(day, month). If you finish modifying date, press the OK ( ) button. 42 6.Programming Features 6.4.2 Modify Text 1) 2) 3) Select Modify Text and press the OK ( ) button. And then you can modify the text. If you finish modifying text, press the OK ( ) button. 6.4.3 Delete 1) 2) 3) Select Delete and press the OK ( ) button. And then “Delete the Appointment” is displayed. If you are sure to delete, press the OK ( ) button. If you don’t want to delete the appointment, press the Back ( ) button. 6.4.4 View Text 1) Select View Text and press the OK ( ) button. Then you can see the text. If the appointment is already set, the appointment time (day, month) is displayed. 2) You can change if the appointment is enabled or unable by pressing the Enable/Unable ( ) button, and the icon is also changed. There are 4 menu in the option menu. If you want to return to the idle mode, press END ( ) button. z Modify Date z Modify Text z Delete z View Text 43 6.Programming Features 6.5 Phone Settings There are 9 menus in this menu. Clock Alarm clock Keypad Tones Display Language Silent Mode Keypad Lock S/W Version Edit CO Code Missed Call Mode RangeOut beep You can enter the desired menu by pressing the OK ( ) button. 6.5.1 Clock You should enter the present time to see the correct time in the phone. 1) Select Clock and press the OK ( ) button. 2) Enter the date as day, month and year. 3) If you finish entering the date, press the OK ( ) button. And then the time set mode is displayed. 4) Enter the time and press the OK ( ) button to finish the clock set menu. And then the time is displayed on the LCD in the idle mode. Note If you can’t see the time information on the phone, even though you set time in the Clock menu, please set Yes in the Clock Display menu. In actually, this Clock menu exists for old systems which are not mentioned in this manual. If you set Yes for Clock Display menu, you can see the clock information not you set but same as the system. 6.5.2 Alarm clock You can hear alarm sound in the desired time. Use, you should enter the present time at first and confirm the current time is correct. 1) Select Alarm clock and press the OK ( ) button. 2) Change the alarm state to Yes or No with the LEFT/RIGHT( ) buttons, and then press the OK ( ) button. 3) If the alarm clock is not set yet, the default alarm clock time is 07:00. 6.5.3 Keypad Tones This function adjusts the keypad tone enable or disable. 1) Select Keypad tones and press the OK ( ) button. 2) Change the keypad tone state to Yes or No with the LEFT/RIGHT ( then press the OK ( ) button. 6.5.4 Display 1) 2) Contrast Set Establish LCD contrast. Lighting Set LCD Backlight. 44 ) buttons, and 6.Programming Features 3) 4) 5) 6) 7) Dialing color When you set this function each number is displayed on screen with a different color. If you want to change the contrast, select Contrast Set and press the OK ( ) button. And then change the contrast with the LEFT/RIGHT( ) buttons, and press the OK ( ) button. If you want to change the lighting, select Lighting Set and press the OK ( ) button. And then select one of the menu, “Standard”, “Always On”, “Always Off”, “Sleep Mode”, and press the OK ( ) button. "Sleep Mode" can be selected with "Standard" and will be inactive when you select other mode. If you want to change the dialing color, select Dialing Color and change to Yes or No with the LEFT/RIGHT ( ) buttons, and then press the OK ( ) button. If you set sleep mode to “yes”, phone will be turn off LCD after 1minute after LCD backlight turning off. Note Standard : the lighting turns off after about 20 seconds from the last key pressure. 6.5.5 Language The four multi languages are provided. One of four, English, Italian, Spanish, Russian can be selected by pressing LEFT/RIGHT ( ) button, and press OK ( ) button. This sets only the language on the phone. To change the language of system, you should refer to system programming manual. 6.5.6 Silent Mode A user can make silent mode of the phone. Silent mode is set by pressing the button more than 1 second when the phone is in idle state and then there is one time vibration. In silent mode, there aren’t beep tones, key tones and rings. But for being conscious of incoming call there is phone vibration. To cancel the silent mode, pressing the button more than 1 second when the phone is in idle state, then confirmation tone is heard and silent mode function is disabled. Silent mode can be enabled or disabled by pressing the LEFT/RIGHT ( ) button, and press OK ( ) button. 6.5.7 Keypad Lock This function is to prevent from pressing any key unconsciously. In keypad lock mode, when a user receives a call, the mode is changed to the key-unlock mode automatically. When hanged up a call, the mode is returned to the keypad lock mode. A user can only receive an incoming call in this mode. 1) This function is set to ENABLE or DISABLE by Keypad Lock setting operation in Phone Setting Menu. The initial state is Unlock. Once this function is set to ENABLE, any key operation is not available except Unlock soft key. While setting this function, a user can receive a call if there is an incoming call. 2) You can also set Keypad Lock to enable by pressing button in standby mode directly. When key lock mode is set, “Keypad Locked” is displayed on the LCD and all keys can’t be entered except for key-unlock procedure. 1) To release the locked key, press Unlock ( ) button and OK( ) button. 45 6.Programming Features 6.5.8 S/W Version Selecting this sub-menu displays current software version on the LCD. 6.5.9 Edit Co Code A user can edit 4 CO access codes for each system. This means CODE-1 is for Base 1, CODE-2 is for Base 2 and CODE-4 is for Base 4. It is used when you select CO code to “yes” in phonebook. In the case of “yes”, you need not insert CO access code like ‘0’ in a telephone number. Automatically, this code number will be added for outgoing call. Please, input the first CO line access code like '0' or '9' for each system. It is not recommended to input CO line access group code like '8801'. If you do not use the first CO line access code, you can not see matched phonebook name when you receive an incoming call from a system. It is because system sends a CID including the first CO line access code for GDC-400H. 6.5.10 Missed Call Mode In the case of ring group, sometimes handset can get too many missed calls when other keyset answers an incoming call. If you do not want to display “XX missed calls” on the LCD in the case, you can disable to display missed call count by this menu. 6.5.11 Range Out beep You can enable and disable a beep tone when handset is located in the range out area. If you enable this feature, you will hear beep tone every 3 seconds when you go to a location where system signal can not be reached for longer than 1 minute. When you go out of office all day long with wireless terminal, this warning feature will help for you not to forget to turn it off. 6.5.12 Clock Display This function adjusts the clock display enable or disable on the idle screen. If you’d like to receive time information from your system automatically and see the clock information on the screen, please select ‘Yes’ in this menu and just do offhook and onhook on the phone. Then you can see the same time on the screen of the phone as the system. 1) 2) Select Clock Display and press the OK ( ) button. Change the clock display state to Yes or No with the LEFT/RIGHT ( then press the OK ( ) button. MPB Model LDK-50/100/300/600 LDK-24 ) buttons, and Applied version From version 3.7 WTIB WTIBE GDC-400H From version 1.0O From version 1.0Ba From version 1.0Ac 6.6 Direct Call Emergency call is named. In set up mode, number is transmitted input any key. 1) Select Direct Call and press the OK ( ) button. 2) Change the Direct call setting between Yes and No with the LEFT/RIGHT ( ) buttons, and then press the OK ( ) button. 3) If you select Yes, you can change the direct phone number, and then press the OK ( ) button. 46 7.Key System Functions 7. Key System Functions 7.1 Call Park A user can park using intercom call or CO line to CO line parking location. 7.1.1 Call Park While connected to an outside call; 1) Press TRANS ( ) button shorter than 1 second. 2) Dial a parking location. 3) The intercom call or CO line being used is on hold and the wireless terminal goes to an idle state. 7.1.2 Retrieving a parked call 1) 2) Press TALK ( ) or Accept ( Dial the parked location. ) button. 7.1.3 Parking Location Number SYSTEM ipLDK-24 ipLDK-100 ipLDK-300/300E PARKING LOCATION NUMBER 601~608 601~610 601~619 7.2 Call Back When you dial to a station that is busy or in DND mode, you can leave a call back indication message up to 5. 7.2.1 Call Back in case of Dialing to a Station in Busy State 1) After receiving intercom busy tone, press CALL BACK ( ) button. Note If the busy station earlier goes to an idle state before pressing button, the called station will have a message from the system. About the message, see the below “Answer a Message Waiting Indication”. When the busy terminal is idle, a reserved user’s terminal for call back will be ringing. 1) Answer the ring by pressing TALK ( ) button. 7.2.2 Call Back in case of Dialing to a Station in DND Mode or No Answer 1) 2) 3) 4) If you receive intercom busy tone or there is no answer after dialing to a station, press ) button. CALL BACK ( Then, if VMIB is installed in the system, a voice message is heard. Press “#” button to leave a message. If you want to stop leaving a message, press END ( ) button. And if VMIB is not installed in the system, only a station message is left in the system for the called station. A message icon is displayed in 3 minutes on the LCD of a reserved user’s station for call back. If a call back message is displayed on the LCD, press TALK ( ) or INT ( ) button shorter than 1 second and then press CALL BACK ( ) button to make a call to a station leaving a message. 47 7.Key System Functions 7.3 Answering a Message Waiting Indication If a message is displayed on the LCD, it indicates that a message is left to you. The first left message will be answered at first. 1) Press TALK ( ) button. 2) Press CALL BACK ( ) button. 3) The station that has left a message will be ringing if a station message has left. 4) If VMIB message has left, the first left VMIB message is heard. Press HOLD ( )button longer than 1 second to hear the next VMIB message again or press ) button to hear the same VMIB message. After checking a message, CALL BACK( if you want to erase the checked message, press FLASH ( ) button. 7.4 Pick-up This function is to pick up a call instead of another subscriber who is called. It can be used after programming at the attendant station. 7.4.1 Group Call Pick-up When you hear an unattended phone ring, 1) Press TALK ( ) button. 2) Press . 3) (ipLDK-24/100/300/300E : Press .) Caution A station should be in the same pick-up group with the ringing station. This feature should be programmed at the Admin. station before using. (See the pick-up function programming method at the ipLDK-24/100/300/300E WOTS programming manual) 7.4.2 Directed Call Pick-up 1) 2) 3) 4) You hear intercom or transferred outside line ring at a particular station. Press TALK ( ) button. Press and the station number of the ringing station. It will be connected to the calling party. 7.4.3 Auto Pick-up 1) Press TALK ( ) button. 7.5 System Speed Dial 7.5.1 Storing Speed Dial Numbers A user can use speed dial numbers stored personally in a station speed bin. One speed dial number can be dialed up to 24 digits. 1) 2) Press TALK ( ) button. Press PROGRAM ( ) button longer than 1 second. 48 7.Key System Functions 3) 4) Press SPEED ( ) button shorter than 1second. Dial speed bin number. (ipLDK-24/100/300/300E: 000~099) (Only available speed bin is displayed on the LCD. And only one speed bin number is displayed at every time using this function.) 5) Dial a phone number to be stored. 6) Press PROGRAM ( ) button longer than 1 second. 7) Enter the dial name. ( Refer to “programming a name into display”) 8) Press PROGRAM ( ) button longer than 1 second. 9) Press END ( ) button. 10) You can store speed dials by repeating the above procedure. STOP! ; If all speed bins are stored, speed bin number is displayed as ‘000’ on the LCD. ; You can newly edit speed bin that is already used. 7.5.2 Using Station Speed Bin Numbers 1) 2) 3) Press TALK ( ) button. Press SPEED ( ) button shorter than 1 second. Dial speed bin number (ipLDK-24/100/300/300E: 000~099). 7.5.3 Erasing Station Speed Bin Numbers 1) 2) 3) 4) 5) 6) Press TALK ( ) button. Press PROGRAM ( ) button longer than 1 second. Press SPEED ( ) button shorter than 1 second. Dial speed number bin to be erased. Press PROGRAM ( ) button longer than 1 second. (Confirmation tone will be heard) Press END ( ) button. 7.5.4 Storing System Speed Bin Numbers You can use commonly speed dial numbers stored in the system. 1) Storing system speed dial number can be done only at the admin station. 2) Available CO line can be assigned at that time storing system speed dial number. 7.5.5 Using System Speed Numbers 1) 2) 3) Press TALK ( ) button. Press SPEED ( ) button shorter than 1 second. Dial speed bin number. (ipLDK-24/100: 2000~3499, ipLDK-300: 2000~4999,ipLDK-300E: 2000~6999). STOP! ; When a user makes a call to some exclusive subscribers or all CO lines are reserved, error tone is heard. ; A speed dial number can be programmed as one that there is no limit about a long distance call. (Refer to “Digital Key Telephone System Installation and Programming Manual”) 49 7.Key System Functions 7.6 System Redial 7.6.1 To Redial Saved Number 1) 2) 3) Press TALK ( Press SPEED ( Press . ) button. ) button shorter than 1 second. Caution This feature doesn’t work at the intercom call. 7.6.2 To Redial Last Number The last dialed number to outside lines is saved automatically. To redial the number, 1) Press TALK ( ) button. 2) Press SPEED ( ) button shorter than 1 second and press . 3) Press UP/DOWN ( ) to find a phone number. (Max. 10 last dialed number can be stored in the directory) 4) To make a call, press HOLD ( ) button longer than 1 second when the phone number is displayed. Caution This feature doesn’t work at the intercom call. 7.6.3 Save a Current Number for Later Use To save a number dialed for the next use; 1) 2) Press SPEED ( ) button (Press button shorter than 1 second) twice during a call. If a used CO line is busy, a redial call is made through available another CO line out of the same group lines. Caution This feature doesn’t work at the intercom call. 50 7.Key System Functions 7.7 Call Forward When a user can’t receive calls, a user can forward all user’s calls to another subscriber’s station. 1) 2) Press TALK ( Press 3) Press the call forward type: Call Forward Type Call Forward Condition 0 Follow me 1 Unconditional 4) 5) ) button. . 2 Busy calls 3 No answer calls 4 Busy/No answer calls Call Forward Destination Station No. Station, Intercom Group, VMIB (#) Station, Intercom Group, VMIB (#) Station, Intercom Group, VMIB (#) Station, Intercom Group, VMIB (#) Speed Bin Speed Bin STOP! ; This feature lasts until canceled. ; This feature can’t be used in DND mode. ; This feature can be used by a subscriber that has permission. ; This feature should be programmed at the admin station before using. 7.7.1 To Cancel Call Forward Press TALK ( ) button. Press Call forward code (Confirmation tone will be heard.). or . 7.8 Do Not Disturb(DND) When a user doesn’t want to receive a call, this function can be used. 7.8.1 To Program Do Not Disturb (DND) 1) 2) Press TALK ( Press 3) (Confirmation tone will be heard) ) button. . 7.8.2 To Cancel Do Not Disturb (DND) 1) 2) or or or 5/8 Station off-net (Unconditional) 6/9 Station off-net (No Answer) # Remove Dial station number, intercom group, or # for VMIB where calls are to be received. (Confirmation tone will be heard.) Press TALK ( ) button. * In case of DVIB forward, recording a greeting message should be preceded. * In case of follow-me, dial Authorization Code after station number. 1) 2) or Press TALK ( Press ) button. or (Confirmation tone will be heard.) 51 7.Key System Functions 7.9 Authorization Code 7.9.1 To Register Access Authorization Code To prevent unauthorized outside call (DISA access or Trunk Access), a user can lock/unlock a station with an access authorization code. 1) Press TALK ( ) button. 2) Press PROGRAM ( ) button longer than 1 second and press . 3) Dial the station’s 5-digit Access Authorization code. 4) Press PROGRAM ( ) button longer than 1 second. (Confirmation tone will be heard.) The Auth code for a terminal should be unique, if the code entered is already used by another terminal, error tone is heard and the message “INVALID” is displayed on the LCD. 1) Press PROGRAM ( ) button longer than 1 second. (Confirmation tone will be heard.) Note An access authorization code should be registered. 7.9.2 To Change Access Authorization Code 1) 2) 3) 4) 5) 6) Press TALK ( ) button. Press PROGRAM ( ) button longer than 1 second and press . Dial the current Access Authorization code. (Confirmation tone will be heard.) Press PROGRAM( ) button longer than 1 second. (Confirmation tone will be heard) Dial a new 5-digit Access Authorization code. Press PROGRAM ( ) button longer than 1 second. (Confirmation tone will be heard.) Note An access authorization code should be registered. 7.10 Temporal COS(Class Of Service) Change When a user is in a situation that a user can’t receive a call, can make a user’s station possible to make only intercom call by changing service of class. It prevents another one from making a call. 7.10.1 Blocking Outside Calls 1) 2) 3) Press TALK ( ) button. Press PRORGAM ( ) button longer than 1 second and press . Press PROGRAM ( ) button longer than 1 second (Confirmation tone will be heard). Note An access authorization code should be registered. 52 7.Key System Functions 7.10.2 Restoring Outside Calls 1) 2) 3) 4) Press TALK ( ) button. Press PROGRAM ( ) button longer than 1 second and press . Dial the current Access Authorization code. Press PROGRAM ( ) button longer than 1 second (Confirmation tone will be heard). Note An access authorization code should be registered. STOP! ; If a user forgets the access authorization code, only the admin station can restore it. 7.11 Universal Night Answer When the system is in universal night answering mode, the subscriber’s station which is not ringing can receive a CO line call. 1) Press TALK ( ) button. 2) Press . A user will be connected to ringing outside line. 7.12 Call Wait Voice Over(Camp-on) When an intercom call is busy, alerting the busy station can be done by CALL WAIT. During the conversation (internal call or CO line call), the busy station is heard alerting tone (camp-on tone) which alerting another call is waiting. Voice over between two callers can be done by VOICE OVER. 1) If a user dials a busy station, CALL WAIT alerts call waiting to a busy station. 2) After receiving intercom busy tone, press or the last digit of the called station number. 3) The called station will hear camp-on tone. Then the called party can answers to a new call by pressing HOLD( ) button longer than 1 second. When caller, 1) 2) 3) a busy terminal engaged an internal or external call is called through camp-on by a new Press HOLD( ) button longer than 1 second to connect to the other calling station. The former calling party is on hold. Press HOLD( ) button longer than 1 second to voice over back to the former calling party . 7.13 Answering a Call Wait with Voice Over 1) A user hears camp-on tone. 2) Press HOLD ( )button longer than 1 second to connect to the second call. The first call is placed on hold. A user will be connected to the first call when the second call is released. 53 7.Key System Functions 7.14 Wake-up Call 7.14.1 To Register Wake-up Call The system automatically sends ring signal to a station that already registered a wake-up time. Two kinds of wake-up call exist; effective for one-day or effective until canceled. 7.14.2 To Register Wake-up Time 1) 2) 3) 4) 5) Press TALK ( ) button. Press PROGRAM ( ) button longer than 1 second. Press and 4 digits wake-up time (HHMM) in 24-hour mode. (HH = 00~23, MM = 00~59) Press for permanent use. Otherwise it is set for just one time use. Press PROGRAM ( ) button longer than 1 second. (Confirmation tone will be heard) 7.14.3 To Cancel Wake-up Call 1) 2) 3) 4) Press TALK ( ) button. Press PROGRAM ( ) button longer than 1 second. Press Press PROGRAM ( ) button longer than 1 second. (Confirmation tone will be heard). 7.15 Step Call Call the desired intercom party. 1) After hearing ICM busy tone, dial the last digit of desired intercom party in the same 10’s group.(e.g. If you dialed a busy station ‘112’, press to call station ‘114’.) 2) This feature can be used for external call by pressing “SPEED( ) + last digit”. 54 7.Key System Functions 7.16 Paging 7.16.1 To page 1) 2) 3) 4) Press TALK ( ) button. Dial page zone. (See the below table. Confirmation tone will be heard.) After the tone, speak in a normal tone of voice. Press TALK ( ) button. Page Zone All Call Internal Zone 1~n Conference Page Zone Internal All Call External Zone 1 External Zone 2 External Zone 3 External All Call ipLDK-24 549 501~505 ipLDK-100 549 501~510 ipLDK-300/300E 549 501~530 506~510 511~515 531~535 543 545 - 543 545 546 547 548 543 545 546 547 548 7.16.2 Answering Paging 1) 2) Press TALK ( Press ) button. and then paging party will be connected. 7.17 Programming a Name into Display A user can store program user’s station name. The name will be displayed instead of ICM station number on the LCD of DKTU station. 1) Press TALK ( ) button. 2) Press PROGRAM ( ) button longer than 1 second. 3) Press . 4) 5) Enter the station’s name. (See the below table. Up to 7 characters can be entered.) Press PROGRAM ( ) button longer than 1 second. (Confirmation tone will be heard.) A = [2][1] B = [2][2] C = [2][[3] D =[3][1] E = [3][2] F =[3][3] G = [4][1] H = [4][2] I = [4][[3] J =[5][1] K = [5][2] L =[5][3] M = [6][1] N = [6][2] O = [6][[3] P =[7][1] Q = [1][1] R =[7][2] S = [7][3] T = [8][1] U = [8][[2] V =[8][3] W = [9][1] X =[9][2] Y = [9][3] Z = [1][2] . = [1][[3] , =[*][3] : = [*][2] BLANK =[*][1] 0 = [0][0] 1 = [1][0] 2 = [2][0] 3 =[3][0] 4 = [4][0] 5 =[5][0] 6 = [6][0] 7 = [7][0] 8 = [8][0] STOP! ; The keyset making an intercom call should have the LCD display. 55 9 =[9][0] 7.Key System Functions 7.18 Station Program Recovery This function is to recover the previously programmed data. It will be certified by LCD display. The followings are programmed data to be recovered. Station number. Idle LCD message. Message icon. FORWARD message format. DND message format. 1) Press TALK ( ) button. 2) Press PROGRAM ( ) button longer than 1 second. z Press - Confirmation tone will be heard. - Station number and idle message will be displayed on the LCD. z FORWARD and DND message format will be displayed on the LCD, if programmed. The wireless terminal may be changed in the following situation after the above procedure. 1) When board configuration is changed. 2) When numbering plan is changed at ADMIN 01. (ipLDK-24/100/300/300E : ADMIN 104) 7.19 Pre-selected Messages A user can select a pre-assigned message to be displayed on the LCD of the calling terminal. 1) Press TALK ( ) button. 2) Press PROGRAM ( ) button longer than 1 second. 3) Press . 4) Dial the number of desired message. Date, time or station number if required. (See the below table.) 5) Press PROGRAM ( ) button longer than 1 second. (Confirmation tone will be heard.) No. Description 00 User Custom Message (See Programming User Custom Message) 01 02 LUNCH TILL / hh:mm VACATION / mm dd 03 OUT OFFICE TILL / hh:mm 04 OUT OFFICE / mm dd 05 OUT OFFICE UNKNOWN 06 T) (Telephone No. up to 17 digits) 07 IN OFFICE / STA xxx 08 MEETING / TILL hh:mm 09 AT HOME 10 AT BRANCH / OFFICE # 1 1~2 0 Cancel code Are used for customized messages which are programmed by an attendant. (See “Creating Customized Messages”) 56 7.Key System Functions 7.20 Programming User Custom Message A user may program a custom message to be displayed on the LCD of calling terminal. 1) Press TALK ( ) button. 2) Press PROGRAM ( ) button longer than 1 second. 3) Press . 4) 5) 6) (Confirmation tone will be heard.) Enter the message. (Up to 10 letters can be entered by using codes shown in the above “Programming A Name Into Display”) Press PROGRAM ( ) button longer than 1 second. (Confirmation tone will be heard.) 7.21 Functions Related with VMIB 7.21.1 Date & Time Prompt: 1) 2) 3) Press TALK ( ) button. Press PROGRAM ( ) button longer than 1 second. Press . 7.21.2 Station Number Prompt 1) 2) 3) Press TALK ( ) button. Press PROGRAM ( ) button longer than 1 second. Press . 7.21.3 Station status prompt 1) 2) 3) Press TALK ( ) button. Press PROGRAM ( ) button longer than 1 second. Press . z A user will hear below items, (a-h). (c-g) items will not be heard unless they are activated. Î Station number XXXX Î Listed message X Î Wake-up time XXXX AM or PM Î Do not disturb Î Forwarded to station XXXX Î Forwarded to speed bin/STA/HUNT XXX Î Locked (temporary COS change) Î COS X 7.21.4 To record a greeting 1) 2) 3) Press TALK ( ) button. Press PROGRAM ( ) button longer than 1 second. Press . 4) 5) Press # to start recording. Press PROGRAM ( ) button longer than 1 second or END ( 57 ) button. 7.Key System Functions 7.21.5 To delete the greeting 1) 2) 3) Press TALK ( ) button. Press PROGRAM ( ) button longer than 1 second. Press . 7.21.6 To record a paging message 1) 2) 3) Press TALK ( ) button. Press PROGRAM ( ) button longer than 1 second. Press . 4) 5) Press # to start recording. Press PROGRAM ( ) button longer than 1 second or END ( ) button. Caution This feature should be programmed at the admin station before using. 7.21.7 To delete a paging message 1) 2) 3) Press TALK ( ) button. Press PROGRAM ( ) button longer than 1 second. Press . 7.22 Date/Time Display * This feature is not available in ipLDK-24/100/300/300E. A current date and time will be displayed as; 1) Press TALK ( ) button. 2) Press PROGRAM ( 3) Press ) button longer than 1 second. . 7.23 Linked Station Pairs Two stations can be linked with each other by programming. When two stations are linked, the following functions are supported; 1) When a station is busy, the other idle linked station will not receive ring for CO lines, transferred ring or ICM calls. 2) If one of two linked stations receives ICM/DISA/DID calls, then the other linked station will receive ring together. 3) If any one station in a linked pair goes to DND state or pre-selected message display state, then the other goes to the same state automatically. Also, if any one station in a linked pair comes out of these states, then the other becomes to come out. 4) If one of two linked station is busy, the LCD of the other station will display “IN USE AT LINK”. 5) If you have set DND function, you should be sure that the wireless terminal be in DND state by pressing TALK ( ) button after setting DND function. Otherwise, because the system sends setting information related to message of the wireless terminal about every 3 minute, you should wait about 3 minutes. When you canceled DND function, you should be sure that the wireless terminal be not in DND state by pressing TALK ( ) button after canceling DND function for the same reason, too. 58 8. DECT Functions 8. DECT Functions 8.1 MOBILITY MANAGEMENT FUNCTION 8.1.1 Hand-Over Once a call has been made, it is still necessary to change physical channels without release of the call. Frequency band or time slot can be changed due to quality degradation or interference, the associated base stations can be changed due to the mobility of a user in a multi-cell environment. 8.1.2 Range Out Indication 1) 2) If the wireless terminal is getting too far from the base station to which it locks, then soft mute is occurred and warning tone will be heard once during a call or in an idle state. Then, “Range Out” message is displayed on the LCD as the left. To maintain a call, move closer to the base station. Bear in mind that walls, buildings, and especially large metal surfaces have strong screening effects. z When pressing TALK ( ) button in out of range, the wireless terminal displays “Range Out” message on the LCD and goes to an idle state. z Pressing TALK ( ) button is ignored in state the wireless terminal is not locked. 8.1.3 Authentication When the system requests authentication to a wireless terminal, a user should follow the following sequence to reply to the authentication. The authentication is requested by an attendant and the wireless terminal should have its authentication code (password) to answer the request. Refer to ‘Authentication Code’ to register or change the password. “PIN;” message is displayed on the LCD of the wireless terminal when the attendant requests the authentication, a user should follow the bellowing sequence. 1) Enter the password. The storing and changing method of the password may be different according to the subscribed system. 2) Press PROGRAM ( ) button longer than 1 second. 8.2 WIRELESS TERMINAL SERVICE FUNCTION These features give a user convenience to use the wireless terminal more powerfully. These features include the functions operated by each feature button and the functions operated by User Menu. Please refer to ‘6.Programming Features’ about operation. 8.2.1 Cradle On and Off Function (Charger Answer Function) When the terminal is on the charger and an intercom or CO ring is heard, just lift up the terminal, and then a call will be connected. To hang up, just put the terminal on the charger, and then a call will be disconnected. This function is set to Enabled permanently. 8.2.2 Ear Microphone Button Function If an Ear Microphone is attached to a GDC-400H, it can receive or release a call. Press the button on the Ear Microphone to receive the call while a ring sounds, and do the same action to release the call. Making a call by using the Ear Microphone is supported, too. If you press the button once on the Ear Microphone in the idle state, you can select one among the redial list and make a call if you press again the button. ※ Using noise canceling or unidirectional Ear Microphone /headset, whose Microphone impedance is below 1 KΩ may cause the abnormal operation (Self-answering without press button when incoming call and similar on-hook when if put Ear Microphone in/off in the middle of talking). In general, Ear Microphone impedance is 1~2.2KΩ. 59 9. Installation of Wireless Terminal 9. Installation of Wireless Terminal A user should do subscription procedure to use a wireless terminal with key system. The procedure is an auto mode subscription. A user has to get only AC from the system before subscription processing. The details are described in ‘9.2 Subscription’. The wireless terminal is allowed to be subscribed to up to 4 GAP systems. If a user want to subscribe to over 4 systems, the wireless terminal should be desubscribed from one of the previous subscribed systems. The subscription procedure can be used for that by a user. Two kinds of method are provided to desubscribe the wireless terminal from the key system. The first is a desubscription in the system and the wireless terminal at the same time. The details are described in ‘9.3 De-subscriptionⅠ’. The second is a local desubscription in the system or in the wireless terminal separately. The first procedure is recommended for a normal desubscription. Warning If a local de subscription is inevitably used by a user this should be informed to the attendant station in order to get rid of subscription information of a local de subscribed terminal in the system The details are described in ‘9.3 De-subscription II’. 9.1 System ID & Authentication Code System ID is given to the ipLDK system attached the wireless terminal for identification. System ID, which is PARK(Portable Access Rights Key), is written on the WTIB Board(System ID of ipLDK system, which is PARK, is written on the MPB Board). The detailed information is described in ‘Installation Manual’. Please, refer to the manual. Authentication code is entered at only attendant station, before you begin to subscribe GDC400H(GAP) to ipLDK system or Home-DECT base station. You should get AC and PARK from a system manager. The detailed information is described in ‘Installation Manual’. In addition to the above, you should get station number of the wireless terminal to be subscribed from a system manager. 60 9. Installation of Wireless Terminal 9.2 Subscription This procedure is for subscribing the wireless terminal to ipLDK-24/100/300/300E WOTS system. To subscribe GDC-400H, you should follow two steps. The First step is making the system be in subscription enabled state. While the system is in subscription enabled state, you should second step. The second step is making GDC-400H to try to subscribe onto the system. At the Attendant Station TRANS/PGM HOLD/SAVE + 0# + Flex. Button 1 + Station No. + Phone Type + 1) Press [TRAS/PGM] button. ([TRANS/PGM] LED flashes, and [MON] LED lights steady.) 2) Press ‘0#’ 3) Press Flexible button 1. 4) Enter the station number. 5) Enter the phone type. System ipLDK-24 Phone Type Press ‘3’ button Press ‘1’ button Below 1.0Ba MPB s/w version or below 1.0G WTIB s/w version. Press ‘3’ button Above 1.0Ba MPB s/w version and 1.0G WTIB s/w version ipLDK-100/300/300E 6) Supported Software Version Press [HOLD/SAVE] button and confirmation tone is heard. Caution Don’t press [MON] button until subscription procedure at the wireless terminal is finished and subscription confirmation tone is heard. 61 9. Installation of Wireless Terminal At the Wireless Terminal Menu ( ) + Select Phone Register menu + Select Subscription + Select empty BASE + AC code + OK ( ) 1) 2) 3) Press Menu ( ) button. Main Menu is displayed on the LCD. Select Phone Register menu by pressing Navigation ( ) button and OK ( ) button. 4) Phone Register menu is displayed on the LCD. 5) Select “Subscription” by pressing UP/ DOWN( ) button and OK ( ) button. 6) Select empty BASE number and press OK ( ) button. 7) A user needs not to input PARK value. The wireless terminal tries to search for the registrable system and “Searching..x” is displayed on the LCD. After locking into the system, a RFPI is displayed on the LCD. Press OK ( ) button if the RFPI of system is what your want to subscribe. Else, press No ( ) button to make wireless terminal to search next system. 8) Enter AC code for subscription. 9) Press OK ( ) button. 10) Success or failure of the subscription is notified with confirmation tone to the attendant and the wireless terminal. 11) If succeeded in subscription, the wireless terminal displays “Subscription Done” and its station number is displayed when you put wireless terminal into idle state. 12) If failed, repeat 3) ~ 6) steps of the attendant and 1) ~ 8) steps of wireless terminal. Note 1. According to the system or radio channel environment, the system or the wireless terminal may not recognize that the system has the subscribed wireless terminal or the wireless terminal is subscribed to the system. Once a user has done subscription, try to make a call first. Then, if a user can’t make a call, try to subscribe the wireless terminal again after doing local desubscription that is described in the following chapter. 2. If a user wants to subscribe the wireless terminal in Auto mode, it is recommended to remove all DECT systems except the system which the user want to subscribe to. 3. When a user tries to subscribe the wireless terminal continuously (in case of multiple subscription) in Auto mode or when the wireless terminal is reset (power reset or change of subscribed system), it is recommended to wait about 20 seconds, after that the wireless terminal is locked to the system and RSSI icon stops blinking, in order to try next subscription. 62 9. Installation of Wireless Terminal 9.3 De-subscription I De-subscription makes a wireless terminal loose access right to the ipLDK-24/100/300/300E WOTS. To de-subscribe the wireless terminal, it should be in an idle state. To De-subscribe At the Attendant Station TRANS/PGM 1) 2) 3) 4) 5) 6) 7) + 0# + Flex. Button 2 + Station No. + HOLD/SAVE Press [TRANS/PGM] button. ([TRANS/PGM] LED flashes and [MON] LED lights steady.) Press 0#. Press Flexible button 2. Enter the station number. Press [HOLD/SAVE] button and confirmation tone is heard. Success or failure of the de-subscription is notified with tone to the both attendant and the wireless terminal. If succeeded in de-subscription, the below LCD message will be displayed if there is no subscribed system. 63 9. Installation of Wireless Terminal 9.4 De-subscription II There is another way to de-subscribe locally. The subscription data of the phone (stored in MPB and WTIB or the wireless terminal) should be erased separately at both sides by 9.3 desubscriptionⅠ procedure. But you lost a phone or MPB and WTIB by accident, you can use this procedure. Then, you should be more careful in doing this procedure. It is because this procedure is for abnormal case. To De-subscribe users locally in the system At the Attendant Station To de-subscribe all of subscribed wireless terminal at once, TRANS/PGM + 0 #+ Flex. Button 7 + Password (147*) + HOLD/SAVE Please, refer to ‘Installation & Maintenance Manual’ about “Password” in detail. To de-subscribe one subscribed wireless terminal, TRANS/PGM 1) 2) 3) 4) 5) + 0 # + Flex. Button 8 + Station No + HOLD/SAVE Press [TRANS/PGM], then it will be the User Programming Mode(you will see the flashing [TRANS/PGM] LED (60 IPM Flash) and [MON] LED on ). Press 0#. Press Flexible button 7 or 8. Enter password or a station number. Press [HOLD/SAVE] button, and confirmation tone is heard. To De-subscribe locally in the wireless terminal At the Wireless Terminal Menu ( ) + Select Phone Register menu + Select Subscription + Select BASE to erase + R/C for longer than 1 second + OK ( ) 1) 2) 3) 4) 5) 6) 7) 8) Press Menu ( ) button. Main Menu is displayed on the LCD. Select Phone Register menu by pressing Navigation ( ) button and OK ( ) button. Phone Register menu is displayed on the LCD. Select “Subscription” by pressing UP/ DOWN( ) button and OK ( ) button. Select BASE number to erase and press R/C ( ) button for longer than 1 second. If you sure to erase, press OK ( ) button. If local desubscription is completed, phone goes to previous menu. 64 9. Installation of Wireless Terminal 9.5 Authentication The process by which the identity of a user of the wireless terminal is checked by the system. The User Personal Identification (UPI), manually entered by a user, is used for user authentication. To Authenticate a User At the Attendant Station TRANS/PGM 1) 2) 3) 4) 5) + 0# + Flex. Button 5 + Station No + HOLD/SAVE Press [TRANS/PGM], then it will be the User Programming Mode (A user will see the flashing [TRANS/PGM] LED (60 IPM Flash) and [MON] LED on ). Press “0 #’ (‘0 #’ in ipLDK-24/100/300/300E). Press Flexible button 5. Enter a station number to be authenticated. Press [HOLD/SAVE] button and confirmation tone is heard. At the Wireless Terminal When the attendant presses [HOLD/SAVE], a message for authentication will be displayed on the wireless terminal with confirmation tone. UPI (5 digit) + 1) 2) 3) OK Enter five-digit UPI. Press OK( ) Button longer than 1 second. Authentication result (fail or success) will be informed on the attendant's LCD with confirmation tone. 9.6 Change of Subscribed System The wireless terminal may have subscription information for 4 systems at the same time. The last subscribed system information or the subscribed system information which is selected as the following steps is only available system information currently. 1) Press Menu ( ) button. 2) The main menu is displayed on the LCD. 3) Select Phone Register menu by pressing Navigation ( 4) Select ‘Base Choice’ menu by pressing UP/DOWN ( 5) The cursor is located at the current base number are displayed on the LCD. 6) ) button. ) button. If necessary, press UP/DOWN ( ) button to select Base number and press OK ) button when the base number that a user want to use is displayed on the LCD. ( 7) And then, the wireless terminal searches for the selected system. 65 10. Useful Information 10. Useful Information 10.1 System Specification Standard Frequency band Typical distance from a base station to a wireless terminal Items 1. Board Name System Name ipLDK-24 ipLDK-100 ipLDK300/300E Items System Name ipLDK-24 ipLDK-100 ipLDK300/300E ∗ 2. Max. Cell Number (Base Station Num.) DECT/GAP 1880~1900MHz 70meters 3. Channels/Cell WTIB 3 2 WTIBE 4 4 WTIB (MAX. 2) 4(x2) 5 With WTIU (MAX. 2) 8(x2) 5 WTIBE (MAX.2) 4(x2) 4 With WTIUE (MAX. 2) 8(x2) 4 WTIB (MAX. 3) 4(x3) 5 With WTIU (MAX. 3) 8(x3) 5 WTIBE (MAX. 3) 4(x3) 4 With WTIUE (MAX. 3) 8(x3) 4 4. Registrable Max. Terminal Number 5. Max. Simultaneous Wireless Call 6. Applicable W version GDC-400H) 12 6 12 12 (16∗) 8~80 by step 8 32 8~80 by step 8 64 8~80 by step 8 32 8~80 by step 8 64 8~192 by step 8 48 8~192 by step 8 96 8~192 by step 8 48 8~192 by step 8 96 All version All version All version As hardware specification, maximum simultaneous wireless call is 16. But because registrable maximum terminal number is 12, maximum simultaneous wireless call is 12. 66 10. Useful Information 10.2 Hand-held Type Wireless Terminal (GDC-400H) Specification Item Size: Weight: Color: Maximum power: Modulation method: Battery Talking Mode: Standby Mode: Type: Programmable Ring Type: Display feature Icon: Type: Dialing mode: Phonebook Speed dial numbers: Re-dial numbers: Operating temperature: Spec 133mm ×44mm ×20mm(H ×W ×D) 92g Warm gray 250mW GFSK 15 hours 150 hours DC 2.4V/920mAh (NiMH) Internal, External ring: each 9 kind 10 LCD, 65K color DTMF 60 Phonebook Local: 60 System: Refer to ‘Speed Dial’ of ‘7.5 SYSTEM SPEED DIAL’ Local: 10 0 ~ +40°C 10.3 Charger(400-SSC) Specification Item Size Color: Mounting: Charging port: Operating temperature: Input power Type -Ⅰ Type -Ⅱ Type -Ⅲ Charging current: Indication: Spec 109mm ×109mm ×55mm( L ×W ×D) Dark Black Desk mount 1 0 ~ +40°C From Output Power Adaptor AC 230V 50Hz 50mA input DC 12V 200mA 2.4VA output AC 220V/110V 50/60Hz input DC 5V 1.5mA output, DC12V 200mA output AC 184V~276V 50/60Hz input DC 5V 1.5mA 7.5VA output Nominal 90mA Green color LED 67 11. Troubleshooting Guide 11. Troubleshooting Guide Problem Reason Solution Check the battery then, press the POWER button. Wait until a free channel is released. While connected to a call, z Press UP button. Adjust Ring volume level; z Refer to ‘HS Setting’. Subscribe the terminal. z Refer to ‘9.2 Subscription’. LCD is empty. No power “NO CHANNEL” is displayed when pressing TALK button. No free channel Small Voice Small voice level Small Ring Small ring volume level “UNREGISTERED” is displayed on the LCD. Not subscribed Low battery icon ( ) is flashing on LCD with warning tone. Low battery level Recharge the battery. Power-off right after power-on Almost fully discharged battery. Recharge the battery. No Base Lock State No tone is heard when pressing a digit. Tone Volume is off. Unexpected call disconnect or call failure Bad radio Environment. Different battery duration from the battery duration table Bad charging habit or kept the battery inadequate place. 1. 2. Subscript can’t be done. 3. 4. There is interference of other systems with subscription. A station is too far from the terminal. Wrong PARK value or (and) wrong AC code. There is no available wireless channel. 1 Wait until Base Locked or move to a place with good RSSI1. Adjust Key tone level; In an idle state Refer to ‘HS Setting’ Radio environment is changed unexpectedly even in the same place. Move to another place with good RSSI or wait until RSSI is recovered. Charge and keep the battery according to the suggested ways. Refer to ‘3.4 Charging the handset’. 1. 2. 3. 4. Remove other systems. Be sure a base station is close to the terminal. Be sure PARK value and AC code is correct. Wait until available wireless channel is free. If the subscription still fails, retry the power reset. RSSI : Radio Signal Strength Indication. Always a user can see RSSI icon while the terminal is operating. 68 11. Troubleshooting Guide Problem Reason When pressing TALK button, Phone icon ( ) is blinking several times and disappeared. Subscription Disagreement When pressing TALK button, nothing is happened. Out of Range 69 Solution Do desubscribe locally in both sides, the system and the terminal and subscribe the terminal in the system again. 1. Be sure the terminal is locked to a base station. 2. Be sure the system is operating properly. Appendix Appendix A. USER MENU TREE 1. Call Register 1_1 Missed Call 1_4_1 Missed Calls 1_2 Received Call 1_4_2 Received Calls 1_3 Dialed Call 1_4 Delete Call 2. Images & Sounds 1_4_3 Dialed Calls 1_4_4 All Calls 2_1_1 Wallpaper 1 2_2_1_1 Ringing Type Tone 1 ~ 9 2_1_2 Wallpaper 2 2_2_1_2 Volume Volume 1 ~ 9 2_1 Images 2_1_3 Wallpaper 3 2_2 Sounds 2_1_4 Blank By Ring No Sound 2_2_1 Internal Ring 2_2_2 External Ring 2_2_3 Ring Mode 3. Phone Register 3_1 Subscription 3_2 Base Choice 3_3 Modify PIN By Vibrator Ring and Vib Ring after Vib 3_1_1 BASE 1 3_1_2 BASE 2 3_1_3 BASE 3 3_1_4 BASE 4 PIN code? 3_4 Base ID 3_5 Reset 3_5_1 Phonebook 3_5_2 Settings 3_2_1 BEST BASE 3_5_3 Handset 3_2_2 BASE 1 3_2_3 BASE 2 3_2_4 BASE 3 3_2_4 BASE 4 4. Appointment 5. Phone Settings 4_1 Daily Daily Appoint. Text Appoint. 4_2 Monthly Monthly Appoint. Text Appoint. 4_3 Annual Annual Appoint. Text Appoint. 5_1 Clock Date Time 5_2 Alarm clock Yes/No Time 5_3 Keypad tones Yes/No 5_4 Display 5_4_2_2 Always On 5_5 Language 5_4_2 Lighting Set 5_4_2_3 Always Off 5_6 Manner Mode 5_4_3 Dialing Color 5_4_2_4 Sleep Mode 5_7 Keypad Lock English/Italian/Spanish/ Russian Yes/No 5_8 S/W Version 5_9 Edit CO Code Yes/No CODE-1 5_10 Missed Call Mode CODE-2 5_11 RangeOut Beep CODE-3 5_12 Clock Display CODE-4 Yes/No 6. Direct Call 5_4_2_1 Standard 5_4_1 Contrast Set Yes/No Phone Number 70 Yes/No Yes/No Appendix Appendix B. Function Short-Key Table 1. Function Short-Key Table related to Key System Call Service * ipLDK-24/100/300/300E FEATURE INPUT KEY Call Transfer (During a call) [TRANS] + STA # + END( Call Waiting/Camp On TALK( ) + STA # + (if busy tone is heard) Call Back TALK( ) + STA # + [CALL BACK] Attendant Call TALK( ) + 0 or Paging DND (Do Not Disturb) Call Forward TALK( ) )+9 Internal Zone ) + 5 + digit ( Refer to ‘7.16. TALK( Paging’. ) Internal All Zone TALK( )+5+4+3 Meet-me Page TALK( )+5+4+4 External Zone 1 TALK( )+5+4+5 External Zone 2 TALK( )+5+4+6 External Zone 3 TALK( )+5+4+7 External All Zone TALK( )+5+4+8 All Zone TALK( )+5+4+9 ) + 5 + 5+ 3 TALK( Follow Me ) + 5 + 5 + 4 + 0 + STA # TALK( (only the station which has its password can activate this function) Unconditional TALK( ) + 5 + 5 + 4 + 1 + STA # / Intercom Group # / #(for VMIB ) Busy Calls TALK( ) + 5 + 5 + 4 + 2 + STA #/ Intercom Group # / #(for VMIB) No Answer Calls TALK( ) + 5 + 5 + 4 + 3 + STA #/ Intercom Group # / #(for VMIB) Busy/No Answer Calls TALK( ) + 5 + 5 + 4 + 4 + STA #/ Intercom Group # / #(for VMIB) Station Off-net (Unconditional) TALK( BIN # ) + 5 + 5 + 4 + 5 + SPD Station Off-net (No-Answer) TALK( BIN # ) + 5 + 5 + 4 + 6 + SPD ) + 5 + 5 + 9 or 5 + 5 + 3/ TALK( ) + 5 + 5 + 9 or 5 + 5 + 4 DND (toggle)/Call Forward Cancel TALK( +# Call Parking Locations TALK( )+6+digit(ipLDK-300/300E: 01~19, ipLDK-100 : 01~10, ipLDK-24: 01~08) Call Pilot Number TALK( )+6+digit(ipLDK-300/300E:20~67, ipLDK-100 : 20~34, ipLDK-24: 20~29 ) Pick Up VMIB Group Call Pick Up TALK( )+5+6+6 Direct Call Pick Up TALK( ) + 7 + STA # Record Greeting TALK( ) + [PROGRAM] + 6 + 1 Current Date & Time Prompt TALK( ) + [PROGRAM] + 6 + 2 Station Number Prompt TALK( ) + [PROGRAM] + 6 + 3 Station Status TALK( ) + [PROGRAM] + 6 + 4 Record Paging Message TALK( ) + [PROGRAM] + 6 + 5 71 Appendix FEATURE INPUT KEY Delete Greeting TALK( ) + [PROGRAM] + 6 + 6 Delete Paging Message TALK( ) + [PROGRAM] + 6 + 7 Universal Night Answer TALK( CO Line Access TALK( )+8+digit(ipLDK-300/300E : 01~72. ipLDK-100 :01~24, ipLDK-24: 01~08) Individual CO Line Access TALK( ) + 8 + 8 + digit (ipLDK-300 : 001~200, ipLDK-300E : 001~400, ipLDK-100 : 01~40, ipLDK-24:01~12 ) Station Speed Dial TALK( Redial )+5+6+9 ) + [SPEED] + digit (000~099) Saved Number TALK( Last Number ) + [SPEED] + * or [REDIAL] 1. TALK( (This case is available only for CO line call.) 2. UP/DOWN] ( or ) 3. HOLD Last Tel. Number Display TALK( ) + [SPEED] + * Saved Tel. Number Display TALK( ) + [SPEED] + # ) + [SPEED] + # Set function TALK( ) + [PROGRAM] + 4 + 1 + Time(hh:mm) + (# for permanent use) + [PROGRAM] Reset function TALK( Register TALK( ) + [PROGRAM] + 3 + 1 + Password (5digits) + [PROGRAM] Change TALK( ) + [PROGRAM] + 3 + 2 + The current Password (5digits) + New password + [PROGRAM] Temporal Station COS Change (a password is necessary for this function) Change TALK( Recovery TALK( ) + [PROGRAM] + 2 + 2 + The current Password (5 digits) + [PROGRAM] Programming User Custom Message TALK( ) + [PROGRAM] + 5 + 2 + Input Message(within 23 characters) + [PROGRAM] Pre-Selected Message Display TALK( ) + [PROGRAM] + 5 + 1 + Digits(00~19, #) + [PROGRAM] Programming A Name Into Display TALK( END( ) + [PROGRAM] + 7 + 4 + Station Name + [PROGRAM] + Call-by-Name TALK( Save Last Tel. Number (During a call) [SPEED] + [SPEED] Entering CLI Message Display TALK( ) + [CALL BACK] + [UP/DOWN] Clear CLI Message Display TALK( ) + [CALL BACK] + [UP/DOWN] + [FLASH](C/R) Wake-Up Call Authorization Code (Password) ) + [PROGRAM] + 4 + 2 + [PROGRAM] ) + [PROGRAM] + 2 + 1 + [PROGRAM] ) ) + [SPEED] + [SPEED] Note REDIAL : Press button. UP/DOWN : Press button. TRANS : Press button shorter than 1 second. PROGRAM : Press button longer than 1 second. SPEED : Press button shorter than 1 second. CALL BACK : Press button. HOLD : Press button longer than 1 second. 72 Appendix Appendix C. The LCD Messages Related To a Call The followings describe messages displayed on the LCD of an attendant station and the wireless terminal in Talking Mode. At the DKTU 1. NO RESPONSE 1) Description: After key system requests a call to the wireless terminal, if there is no response from the wireless terminal, this message is displayed on the LCD of DKTU. ① Called station: Power-off ② Called station: Out-of-svc area 2. NO CHANNEL 1) Description: There is not enough system resource. If the message is displayed frequently on the LCD of DKTU, the system should be installed more. ① There is no available RF channel: WTIB side The reason is brought by WTIB. All RF channels are fully used. ② There is no available PCM Hi-way; MPB side The reason is brought by MPB. 3. INVALID 1) Description: When a station not subscribed is called. The reason is brought by MPB. 4. NO RESPONSE: STA xxx 1) Description: After key system requests a call to DKTU, if there is no response from the wireless terminal, this message is displayed on the LCD of DKTU. ① When a called DKTU does not respond; The reason is brought by MPB. It is not applicable to attendant station. STOP! ; The attendant station is not applicable for this case. When time-out is occurred, the call is released. 5. RELEASED: STA xxx 1) Description: After key system requests a call to the wireless terminal, if there is no response from the wireless terminal, this message is displayed on the LCD of DKTU. ① When a called WHTU does not respond; The reason is brought by WTIB. 6. DESUB. Fail 1) Description: While the wireless terminal is desubscribed at the attendant station, the desubscription processing is really failed in MPBCOMM, DPS or WHTU. 73 Appendix At the Wireless Terminal 1. NO CHANNEL 1) Description: There is not enough system resource. If the message is displayed frequently on the LCD of DKTU, the system should be installed more. ① There is no available RF channel. ② There is no available PCM Hi-way; MPB side The reason is brought by MPB. 2. INVALID 1) Description: When a not subscribed station is called. The reason is brought by MPB. 3. NO ANSWER STA xxx 1) Description: When a call made to the wireless terminal, there is no response from the wireless terminal in the below case. ① Called station: When there is no answer for ringing, ② The reason is brought by MPB. 4. NO RESP. STA xxx 1) Description: When a call made to the wireless terminal, there is no response from the wireless terminal in the below case. ① Called station: Power-off ② Called station: In Out-of-Service area 74