1
RT-208 2 Line DECT Manual CONTENT
1. General............................................................................................................................. 3
1-1 DECT and GAP..................................................................................................................................................................................................3
1-2 Features..................................................................................................................................................................................................................3
1-3 Default Status........................................................................................................................................................................................................4
2. Installation ....................................................................................................................... 5
2-1 Location.................................................................................................................................................................................................................5
2-2 Connecting power and phone line (Refer to following drawing)...........................................................................................................5
2-3 Charging the handset..........................................................................................................................................................................................6
2-4 Initial setting..........................................................................................................................................................................................................6
3. Key and Display .............................................................................................................. 6
3-1 Display...................................................................................................................................................................................................................6
3-2 Symbols.................................................................................................................................................................................................................7
3-3 Key Description...................................................................................................................................................................................................8
3-4 Key function.........................................................................................................................................................................................................8
4. Making call ...................................................................................................................... 9
4-1Answering.............................................................................................................................................................................................................9
4-2Adjust Receiver Volume.................................................................................................................................................................................10
4-3 Outgoing Call....................................................................................................................................................................................................10
4-3-1 External call with normal dialing....................................................................................................................................................10
4-3-2 External Call with Dial Preparation...............................................................................................................................................10
4-3-3 External Call from Phone Book.....................................................................................................................................................10
4-3-4 External Call from Caller ID List...................................................................................................................................................10
4-3-5 Redial.....................................................................................................................................................................................................10
4-3-6 External Call Line Select...................................................................................................................................................................10
4-4 Internal Calls between handsets....................................................................................................................................................................10
4-5 External Call Transfer.......................................................................................................................................................................................11
4-6 Three Way Conference....................................................................................................................................................................................11
4-7 Pause.....................................................................................................................................................................................................................11
4-8 Call Duration Display.......................................................................................................................................................................................11
4-9 Mute.....................................................................................................................................................................................................................12
4-10 Do not Disturb................................................................................................................................................................................................12
4-11 Power ON/OFF Handset.............................................................................................................................................................................12
4-12 Out of Range...................................................................................................................................................................................................12
4-13 Speaker Phone…………………………………………………………………………………………..…..12
4-14 Headset connection……………………………………………………………………………………… ...12.
5. Phone Book and Function Setting ................................................................................. 13
RT-208 Preliminary User Manual v1.0
1
5-1 Key locked.........................................................................................................................................................................................................13
5-2 Phone Book.......................................................................................................................................................................................................13
5-2-1 To <ADD> the new phone number in phone book ................................................................................................................13
5-2-2 To <EDIT> the Phone Book function.......................................................................................................................................14
5-2-3 To <DELETE> the PHONEBOOK...........................................................................................................................................14
5-2-4 To <READ> the PHONEBOOK ...............................................................................................................................................14
5-2-5 To <ERASE> the PHONEBOOK .............................................................................................................................................14
5-3 Caller –ID/CLIP Function.............................................................................................................................................................................14
5-4 Register New Handset....................................................................................................................................................................................15
5-5 Handset Setting ...............................................................................................................................................................................................16
5-5-1 Set external ring melody and volume............................................................................................................................................16
5-5-2 Set intercom ring melody and volume..........................................................................................................................................16
5-5-3 Turn ON/OFF Key tone...................................................................................................................................................................16
5-5-4 Input user name on the display (Max.8 letters).........................................................................................................................17
5-5-5 Change Handset Pin..........................................................................................................................................................................17
5-5-6 Baby Call..............................................................................................................................................................................................17
5-5-7Auto Pick up.........................................................................................................................................................................................18
5-5-8 Any key talk.........................................................................................................................................................................................18
5-5-9 Select Language..................................................................................................................................................................................18
5-5-10 Erase Caller ID list............................................................................................................................................................................18
5-5-11 Set Handset Default.........................................................................................................................................................................18
5-6 Base Setting........................................................................................................................................................................................................19
5-6-1 Change Dial mode.............................................................................................................................................................................19
5-6-2 Change Flash Time............................................................................................................................................................................19
5-6-3 Change Pause time.............................................................................................................................................................................19
5-6-4 Select External Line Priority............................................................................................................................................................20
5-6-5 Ring Group Setting..........................................................................................................................................................................20
5-6-5 Desubscribe the handset from the base.......................................................................................................................................21
5-6-6 Call Barring..........................................................................................................................................................................................21
5-6-7 LCR Function / Connect To PABX..............................................................................................................................................21
5-6-8 Change Base Pin.................................................................................................................................................................................23
5-6-9 Set Base Default..................................................................................................................................................................................23
5-7 Select Base.........................................................................................................................................................................................................24
Appendix 1 - Menu Tree.................................................................................................... 25
Appendix 2 – How to input the letters............................................................................... 26
RT-208 Preliminary User Manual v1.0
2
1. General
You have acquired a 2 lines cordless PABX for operation on the analogue network.
It offers a range of feature that will make the handling of telephone call easier. Up to eight handsets can be operated over
one base station will enable internal connections in order to increase the availability. The handset can be registered onto max. four
base stations in order to use the same handset in different locations. The handsets can be also used in connection to GAP-compliant
base stations of other manufactures.
Standard package include :
Base station with plastic stand
Handset * 2 pcs
Ni-Mh rechargeable battery * 6 pcs
Handset Belt Clip * 2pcs
Charger * 2pcs(with adapter)
AC-main adapter
Telephone line cord * 2pcs
Wall Mount screw * 2 pcs
Wall mount position sheet
User Manual
1-1 DECT and GAP
The handset uses a digital radio connection to the base station in accordance to the DECT-standard(Digital Enhanced
Cordless Telephone).With the appropriate use the digital channel ensure best voice quality without rustling and side noises
within the working range area. For effecting signals between handset and base station, the RT-208 uses the Generic Access
Profile (GAP).
Generic Access Profile (GAP) and the DECT-standard determine the procedures after which digital cordless telephone
effect connection. The GAP-standard is non-manufacture dependant, which enables the mixed use of base stations and
handsets of various producers. The basic functions (making calls, receives calls) are always possible under these
combination, other functions (LCR, Select line, indication of connection time) that are provided by the RT-208 base station
together with the handset might not be possible with units of other manufactures.
1-2 Features
2 line cordless system
Auto line select (Each handset can be set individually)
Auxiliary port for parallel connect with fax, answering machine or single line phone
Ring group setting (Do not disturb)
Assign operator setting
RT-208 Preliminary User Manual v1.0
3
FSK/DTMF CLIP (Calling Line Identification Presentation), 50 number listed, up to 25 digits for each No.
Call back for CLIP
Redialing, 3 number listed, up to 25 digits for each No.
Phone book with name and number (50-locations, 12 letters for each name and 25 digits for each No.).
Multi language selection
Baby Call.
Key Lock/Unlock
Call barring(5-locations, 5-digits for each location).
Any key talk (Number key only).
Auto pick up on/off
Internal calls
Call transfer of external calls
Adjustable Ringer Volume and melody.
Three way conference
Adjustable Handset Receiver volume.
Microphone Mute
Key-Click On/Off.
LCR(Least cost routing)
Low Battery and Out of Range warning beep.
Talk time display
Handset speaker phone
Headset connection jack on handset
1-3 Default Status
HANDSET :
Any key talk
– On
Auto pick up
– Off
Handset Receiver volume
– Level 6
Key click
– On
Intercom Melody / Volume
– 7/9
External Ring Melody / Volume
– 1/9
PIN
– 1590
BASE :
Dialing mode
– DTMF
Pause Time
– 3 Seconds
Pin
– 1590
Select Line
– Alternative
RT-208 Preliminary User Manual v1.0
4
2. Installation
2-1 Location
Place the base station at a central location where you want to use your telephone (not in the cellar or the attic).
The base station should be freely accessible and not operated behind walls or furniture.
Strong steel concrete walls and metal doors do heavily restrict the radio connection. Avoid the use at such locations.
For outdoor operation, the base station should be placed near to a window, but always indoors.
Charging unit, handset and complimentary units should not be placed near to :
Heating bodies, direct sun emission or unaired rooms
Appliances creating strong magnetic field, electric appliances, luminious lamps, computers, radio transmitters,
Television or Facsimile and telephone terminals.
Locations where the terminal is likely to be covered, its air supply restricted and liquid substances can make contact.
Dusty locations and places that are exposed to vibrations, shock or extreme temperature fluctuation.
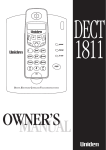
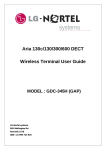
2-2 Connecting power and phone line (Refer to the drawing)
Handset :
Open the battery cover of the handset and insert 3 AAA Ni-MH batteries. Ensure the correct polarization of battery.
Connect the adaptor cable of charger into the power outlet on the wall. Ensure the correct power voltage.
Charger
Base Unit :
Power: Connect one end of the main adaptor cable to the power outlet and the other end to the power jack at the rear side of
the base
Telephone line: There are two phone jack and one auxiliary port on the base. Plug one end of the Line 1, Line 2 into telephone
line wall outlet and the other end into phone jack at the rear side of the unit. If you use only one line, you can plug in
either Line 1 or Line 2. AUX port is used to parallel another telephone, fax machine or answering machine.
RT-208 Preliminary User Manual v1.0
5
Power Jack
Auxiliary
Line 1/Line 2
Caution: 1. AUX port is paralleled with Line 1.
2. There is no Tel/Fax detection on the AUX port.
2-3 Charging the handset
When you place the handset onto the charger, you will hear the beep sound, and battery symbol flash.(Battery symbol
appear only when low battery or charging stage. If your battery symbol is empty and you hear warning beep, you have to
recharge your handset before you use it. Charge the handset for at least 12 hours before you use it for the first time.
Caution
Do not use normal batteries(primary cells)! The use of other battery types or primary cell will discharge the manufacture
from any form of liability for occurring malfunctions or damages. If you leave the handsets for over than one week for
trip, please put it back to charge or remove the battery form handset.
2-4 Initial setting
It is recommended to activate the following setting :
Change your PIN for the protection against unauthorized alterations of the settings.
Store frequently dialed telephone No.’s in your phone book.
Set the volume and tune of the ringer tone to your own liking.
In case that you want to use further handsets on this base station, please refer to page 14 register new handset.
3. Key and Display
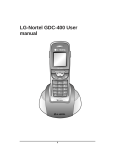
3-1 Display
Full Screen:
1st line To show a maximum of 16 numbers or letters.
2nd line
3rd line To indicate the operation status of handset.
1234567890123456
1234567890123456
RT-208 Preliminary User Manual v1.0
6
Stand by mode:
HS1
Base1
■ w/o user name
■With user name
Base 1 : Indicate the base No. which the handset is working on.
HS 1 : Indicate your handset No. which is registered on the base.(Total 15 handsets can be registered on one base).
3-2 Symbols
Antenna
When the antenna symbol appears on the display, this indicates that the handset is located within the working
range of the base unit. When the handset is out of working range, “Searching…..” will appear on the display.
Baby Call
When baby call was activated, the baby symbol will appear .
Function Setting
When you go into programming menu, the icon appear.
Off hook
The off hook symbol appears when the “Talk” key is pressed to call out or receive a call.
Internal Call
The INT symbol is used for internal calls between handsets.
Line Busy Indication
The icon appear “L 1” or “L2” in all handsets when one of the external line is connected. When both line was connected,
”12” appear on the display.
Missed Call
The missed call symbol appear when you have missed call or unread caller NO.
Mute
The symbol appear when you mute the microphone.
RT-208 Preliminary User Manual v1.0
7
Lock
The lock symbol is displayed when the handset is locked. The unit can only receive incoming calls.
Battery
The battery symbol appear only in “Charging” or “Low battery” status. You need to charge the battery when
Low battery symbol appear.
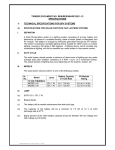
3-3 Key Description
Handset Unit
Base Unit
3-4 Key function
Talk/End/Speaker phone
RT-208 Preliminary User Manual v1.0
8
Take on calls and end the calls
There is two dialing mode. You can press
first and then press
first and then dial
phone # or you can dial phone #
key to start dialing.
To activate the speaker phone by pressing
button more than 2 seconds when it is at off hook mode.
R (Flash)
FOR PABX TRANSFER
Or Handset power on/off
Up/Down key
Activate the programming menu by press DOWN key.
OR
Start phone book by press “ UP” key .
INT/OK
Establish internal connection
OR
Confirm programming step.
Mute/C
Mute key (Microphone OFF in conversation)
OR
Correct mistake input (Clear)
OR
Escape from programming menu
Redial/Pause
Redialing key, browsing of lately dialed telephone No.’s by pressing the key repeatedly.
OR
Insert a dial pause for the storage of phone book No.
4. Making call
4-1 Answering
The user can accept an incoming internal or external call by pressing the
key or any number key
( when “any key talk” on).
The “INT”(Internal) or “External” call symbol related to the incoming call continues to flash on the display until
RT-208 Preliminary User Manual v1.0
9
the call is accepted. If caller ID service is available, you will see the caller No. (See page 13 Caller ID).
Note : When you are answering to Line 1 and simultaneously Line 2 call in, you will hear short beep tone to remind you
on L2.
4-2 Adjust Receiver Volume
You can adjust receiver volume by pressing
while the phone call is taking.
4-3 Outgoing Call
4-3-1 External call with normal dialing
Press the
key first, and then enter the dial digits. The No. will be dialed out instantly.
4-3-2 External Call with Dial Preparation
Enter the desired telephone number.
Press the
During the dialing, the number can be corrected by pressing the
button.
button.
4-3-3 External Call from Phone Book
Press UP key and going into phone book (Refer to 5-2 Phone Book Setting, Page12).
Scroll the phone book by pressing
Press
key and find the phone No. you want to call out.
key.
4-3-4 External Call from Caller ID List
Press the
Scroll the Caller ID List by pressing
Press
down key and go into Caller ID menu. Press
key.
key and find the phone no. you want to dial out.
key
4-3-5 Redial
Press the
Press the
button repeatedly to browse the different numbers in the Redial memory.
button.
4-3-6 External Call Line Select
You can select the L1, L2 or Alternative by setting from function menu so that you have optimum usage of telephone line.
Please refer to page 19, 5-6-4 “Select External Line Priority”
4-4 Internal Calls between handsets
Press the
Enter the number of the desired handset.
When the called handset starts to ring, press
button.
button to answer the incoming
RT-208 Preliminary User Manual v1.0
10
internal call.
Press the
button when you want to terminate the internal call.
Note : When a handset is in communication, you will hear a busy tone when you try to reach it.
4-5-1 External Call Transfer
You can transfer external call to another internal handset by following steps:
Press
As soon as the called handset answer the call (external caller was put “ON HOLD”),both handsets are now connected.
The first handset will transfer the external call to the second handset by pressing the
If the second handset doesn’t answer, press
button, followed by the number of the desired handset.
key.
button to return to the external call again.
4-5-2 To hold the line 1 external call and pick up line 2 incoming call
a. When you hear the beep sound of second incoming call when you are talking, to press the intercom key to hold the
first call, the other side of the calling party will hear a on hold music.
b. To on-hook the talk key.
c. To wait for the second incoming call ringing, pick up the second incoming call when you hear the ringing
d.
d-1. When you finish the second incoming call, on-hook the talk key, the first incoming call will ring, you can pick up the
call and continuously talk with the first calling party.
d-2 Or during you are talking with second incoming call, you also can hold the second incoming call by press the
intercom key and on-hook the talk key. The first incoming call will be ringing and you can pick up after the ringing.
4-6 Three Way Conference
You can connect two handsets to conference with external line by following steps:
In above 4-5 call transfer procedure step two.
When second handset was connected, press “#” key of first handset for more than one second, you can start conference
function.
4-7 Pause
While entering a phone number you can add a pause time to this number by pressing the
button for
connecting to PABX. It should not be the first digit of a telephone number otherwise the
button will
interpreted as a Redial button.
4-8 Call Duration Display
When the External/Internal call is connected, the call duration will display on the LCD. The time is
displayed in the following format :{hh : mm : ss}(hours : minutes : seconds)
RT-208 Preliminary User Manual v1.0
11
If you want to clear the time display and continue to dial, press “Mute” key.
4-9 Mute
You can deactivate the microphone during a conversation to prevent being heard by your correspondent.
Press the
When you want to continue the conversation, press the
button during a conversation.
is shown on the display.
button again.
4-10 Do not Disturb
To prevent disturb, you can set each handset to ring or not when call come in. Or you can assign all incoming
call to certain handset. Please refer to page 19, 5-6-5 “ Ring Group Setting”.
4-11 Assign one of handset as an operator
You can assign one of the handset as an operator. When call in, only the assigned handset will ring. Please refer to page 20,
5-6-6 “Ring Priority Setting”
4-12 Power ON/OFF Handset
The handset can be activated/deactivated by pressing the
button for more than 2 seconds.
You will hear beep tone while power ON/OFF
4-13 Out of Range
When the handset is out of the working range of the base unit or when it’s not subscribed to the
base unit, it will emit a warning tone.
You have to move closer towards the base unit or you have to subscribe the handset to the base unit.
4-14 Speaker Phone
The speaker phone can be activated by pressing the
It can be deactivated by pressing
button for more than 2 seconds when you are at talking mode.
button again.
4-14 Headset Connection
The handset of RT-208 provides a 2.5 mm headset connection jack to be connected to headset. When you connect the headset to
the handset, you control the on/off of the headset function by pressing the
RT-208 Preliminary User Manual v1.0
12
button on the handset.
5. Phone Book and Function Setting
The RT-208 was designed user friendly with
by press
menu. You can set your phone book and programming the handset
“DOWN” key, scroll the menu, select your preferable and confirm by pressing
menu by pressing
key or escape the
key. When finish the setting, you will hear the beep tone for confirmation. The detail menu
tree please refer to appendix one Menu Tree.
5-1 Key locked
When the handset is locked, outgoing calls are no longer possible. Incoming calls can still
be received without any problem.
Key lock
Scroll menu by press
DOWN key then press
while the “Key Lock
appear on the display.
-Locked-
You will hear a
beep tone and the handset key is locked.
Release
-Locked-
Press
-Unlock?-
When “Unlock” appear on the display, press
Down key
you hear a beep tone and
the key was unlock.
5-2 Phone Book
You can save 20 telephone numbers(25 digits) with name (12 letters) in the phone book.
Phone Book
Scroll menu by press
Down key then click
while the display show “Phone Book”.
5-2-1 To <ADD> the new phone number in phone book .
-AddName :
Number :
Stored
Press
Key in the name then press
Key in the phone no. then press
The phone No. is saved.
RT-208 Preliminary User Manual v1.0
13
(Refer to – Appendix 2 How to Input letters)
.
5-2-2 To <EDIT> the Phone Book function.
-Edit-
Press
Name/Phone
Press
Name
Use
or
to edit the name and confirm by
Phone No.
Use
or
to edit the phone No. and confirm by
Stored
The
revised phone No. is
.
.
saved.
5-2-3 To <READ> the PHONEBOOK .
Read
Name Phone#
Press
Press
, you can scroll the saved phone book by
key
to dial out.
5-2-4 To <DELETE> the PHONEBOOK
DELETE
Press
Name Phone #
Press
Are you sure ?
Press
to go into Delete Mode.
key to scroll the PHONEBOOK until the one you want to delete appear then press
to confirm.
5-2-5 To <ERASE> the PHONEBOOK .
Erase All
Are you sure?
Press
Press
to erase all phone no.
to confirm, or give up by pressing
5-3 Caller –ID/CLIP Function
When the unit receives a phone call, the caller’s phone number is shown on the handset’s display. The unit receives calls
In FSK(name, telephone number, date and time of call) as well as in DTMF(telephone number only). In case of the caller
deactivate the caller ID, you will see “PRIVAE” on the display. Or if the caller is out of service, you will see “OUT OF
AREA”. The phone can save 10 calls which can be reviewed later. When the memory is full, the old calls will be replaces by
the new ones in the memory.
RT-208 Preliminary User Manual v1.0
14
You will see the
be recorded without
icon on the display, if there is any missed call. If you answered the phone , the caller No. will
icon displayed.
Note : 1. If the L1 and L2 came in simultaneously. The display will show first caller’s no. and then switch to
second caller no. If you pick up the call, first call will be linked first.
2. Maximum 5 handsets will support Caller ID.(HS1 ~ HS5) If you have more than 5 handsets, some of the
handsets will not display Caller ID.
Caller ID
Press the
No.1 #####
Display will show the last 50 caller list. (No.1 means the newest call and total 10 memories
“Down” key and when display show “ Caller ID”, press
to scroll the stored Caller No. The
can be stored)Press
if the message is unread. As
icon will show on the display
long as you read the message, the
icon will disappear.
5-4 Register New Handset(All the registered handsets must be in Stand by mode.)
RT-208 base can be registered with up to 15 handsets (Include other manufacturer’s DECT product with GAP compatible)
5-4-1
To open the base for register: Pick up one of the registered handset and follow the procedure as below.
Base Setting
Press
Master Pin
Key in pincode then press
New H/S
Press “ ” key and go into “NEW HS” mode.
Sub Pin
Key in the sub PIN code then press
“Down key” and go into base setting mode.
Different with Master PIN.
5-4-2
. Default value 1590.
.
Sub PIN is temporary used for register which can be same or
Now you can start to register NEW HANDSET
To register NEW HANDSET : Pick up the new handset and follow the procedure as under below.
Register
Press
*Base 1
Select the base No. which you want to assigned on this handset (BASE 1 ~ BASE 4), then
press
#########
“Down key” and go into register mode.
. The base no. which has been registered will start with “*”.
Base ID code will display on the LCD. Press
RT-208 Preliminary User Manual v1.0
15
for confirmation.
Pin code:
Key in the handset SUB PIN code(Has to be same as 5-4-1 SUB PIN) and confirm by
key.
You will hear beep one and the new handset is ready to use.
Note:
1.You have to finish the new handset register procedure within 60 seconds as soon as the base opened.
The base will close for registration automatically after that.
2. The handset No. was generated by base from HS1 automatically, you cannot select it.
5-5 Handset Setting
When you have multi handsets, every handset can be set individually.
-HS setting-
then click
Scroll menu by press
while the display show “HS Setting”.
5-5-1 Set external ring melody and volume.
-Set extring-Ering #-Ering ##-
Press
Press
key to choose your preferable melody then press
Press
key to choose your preferable volume level, then press
5-5-2 Set intercom ring melody and volume.
-Set intring-Iring #-Iring ##-
Press
Press
key to choose your preferable melody then press
Press
key to choose your preferable volume level, then press
5-5-3 Turn ON/OFF Key tone
Set keytone
-On /Off-
Press
Press
key to choose On/Off key tone, then press
RT-208 Preliminary User Manual v1.0
16
5-5-4 Input user name on the display (Max.8 letters).
You can input your personal name on the display for identification.(Especially when you have more than
one handset).
User Name
Press
Name :
Key in the name and press
Name<1>
Display show your name and handset #
Base 1
5-5-5 Change Handset Pin
Some setting are protected against unauthorized alternation via PIN (Personal Identification No.).You can set
different PIN code in handset and base or make it same. This PIN has 4 digits; the default No. from factory
setting is 1590.You should alter PIN as soon as possible in order to ensure the protection. Please make sure
that you will always have available the last valid PIN because a reset to the default status can only be
effected against payment by authorized service personnel.
Set Pincode
Press
-HS pin:-
Key in the default pincode1590, then press
-New pin:-Retype :-
( at least 4 digits )
Key in the new pincode then press
Key in the new pincode again then press
for confirmation
5-5-6 Baby Call
The function allows you to program one specific number that will be dialed automatically no matter which
key has been pressed. One direct call number can be programmed per handset. Incoming calls can still
answered without any problem.
Baby Call
Press
-Empty-
The display show on Empty.
-########-
Key in the phone no. then press
Baby Call
Display show “ Baby Call”.
RT-208 Preliminary User Manual v1.0
17
.
Release baby call
Quick press the
Down key twice.
5-5-7 Auto Pick up
When the handset was on the charging status, you can pick up the incoming call without pressing
any key. (Just pick up the handset from base and start to talk).
Auto pick up
Press
On/off
Select ON/OFF by pressing
key and then confirm by
key.
5-5-8 Any key talk
When the call came in , you can press the
key or any
Any key talk
Press
On/off
Select ON/OFF by pressing
numerical key to answer the phone.
key and then confirm by
key.
5-5-9 Select Language
Provide various kinds of language for your convenience.
Language
Press
English/Deutsch/Francis/Netherlands
Select your preferable language by pressing
key and then confirm by
5-5-10 Erase Caller ID list
Erase CID
Are you sure ?
Press
Press
to confirm.
for confirmation, or give up by
5-5-11 Set Handset Default
You can reset your handset to an identification like configuration to the default status(see page 4).
The phone book memory will also be erased.
RT-208 Preliminary User Manual v1.0
18
key.
Set Default
Press
Pin :
Input handset Pin code. Default value 1590
Are you sure ?
Press
for confirmation, or give up by
5-6 Base Setting
You can change dial mode, flash time, base pin and so on in base, all the handsets which registered on the
base will be impacted by the new setting.
BS Setting
Press
Master Pin
Key in pin code then press
5-6-1 Change Dial mode
Dial Mode
Press
DTMF/Pulse
Press
.
key to select DTMF or PULSE mode then press
for confirmation.
5-6-2 Change Flash Time
Flash time will vary in different country or different PABX. It might cause mis-operation. Please check with
technical people before changing.
Flash Time
Press
Flash 100ms
Press
key to select you need
and then press
for confirmation.
5-6-3 Change Pause time
Pause is convenient when you need to dial out through PABX(To get a temporary dial pause).You can select the pause
time from 1 to 4 second.
Pause Time
Press
Pause 1 sec
Press
key to select and then press
RT-208 Preliminary User Manual v1.0
19
for confirmation
5-6-4 Select External Line Priority
You can set the priority when link to external PSTN line for optimum line efficiency. For instance, when line1 was
paralleled with fax machine, you might prefer to use line 2 first for external call. Every handset can have different setting.
Select Line
Press “
”.
HS1 Alternative
Press
HS2 L1, L2
to select the HS No. you want to change then press
. Now you have 6 options.
Alternative : Line1, Line2 consequence
Line 1 First : Line 1 first, if busy then Line2.
Line 2 First : Line 2 first, if busy then Line1
Line 1 only : Only use Line 1
Line 2 only : Only use Line 2
No: Can only receive call.
Alternative
Press
to select your option and press
for confirmation.
5-6-5 Ring Group Setting
You can assign certain handsets to Line 1 or Line 2 ring group to prevent disturb from external line. The
Handset which deactivate can only receive internal transfer call or dial out.
Ring Group
Press
Line1/Line2
Select L1 or L2 by
HS 1x3x5xx
Key in the handset # you want to disable from the L1 or L2 ring
key
key and
Press
key.
group. The H/S no. which was disable will appear with the “x” mark.
HS 10+xxxx
Press
Down key for HS No. 10~15 setting. Then press
for escape.
confirmation or
Note : If
for
you want to disable handset ring for both Line 1 and Line 2, you have to set for both..
RT-208 Preliminary User Manual v1.0
20
5-6-6
Ring Priority Setting(Assign operator)
You can assign one of the handset for L1 and L2 as an operator by ring priority setting. When call came in, only the operator
handset will ring. If no one pick up the phone for few rings(You can set the ring count.), the phone will transfer to ring other
handsets.(If you activate the ring group setting, the incoming call will follow your ring group setting.)
Ring Priority
Press
Line1/Line2
Select L1 or L2 by
H/S:off,1~15
Press
key to choose HS no. you want to assign as operator then
press
for confirmation.(“Off” means no operator was assigned.)
H/S: off, 1~15
Ring cnt: 1~20
key
key and
Press
key.
Select ring count numbers(From 1~20) by
key and press
key for confirmation.
5-6-7 De-subscribe the handset from the base
You can de-subscribe the registered handset from the base station (All the handsets must be power on and in stand by mode.).
Remove HS
H Desub 12M----
Press
You will see all the registered handset No. on the display(“M” means MASTER handset in
setting mode, ”-“ means no. register). Key in the handset No. to de-subscribe and press
for confirmation. The de-subscribed handset will beep and display “Not Sub”.
5-6-8 Call Barring
You can set 5 groups of No. to barrier the out going call.(1-5 digits for each group.)
For instance, long distance call,
GSM call and so on. You can also select each handsets of different barrier groups.
Call Barry
Press
No.1 : Empty
Input the No. you want to barrier and press
HS # xxxxxxx
No.2: Empty
.
Input the handset No. you want to activate the above barring No. then press
for
confirmation, the display will back to setting mode.
If you want to set 2nd group, go into call barring mode again and press
key to switch to
next group. Repeat above procedure to set next barrier No.. To deactivate the call barring, go
into the No. X and clear the No.(“Empty” appear on the display) then press
RT-208 Preliminary User Manual v1.0
21
5-6-9 LCR Function/Connect to PABX
The LCR function provide the user to choose the most economic router to make the call amount various telephone operators.
You can set the optimum provider number in the handset. RT-208 handset will automatically put your optimum provider
number in front of dialed no. and call out.
How to use LCR :
1. Set up your area “CODE”. For instance 123(depend on your telephone operator)
2.Set up your preferable “PROVIDER” No. For instance 456.
3.Turn the “ROUTER” ON
4. If you connect RT-208 under PABX, set up the PABX Prefix No. For instance 0 or 9.
5. Dialing example :
Normal
Connect To PABX
When you dial :
123
9999
0 123 9999
Actual dial out :
123
9999
0P 123 9999
When you dial :
234
9999
0 234 9999
Actual dial out :
456 234
9999
0P 456 234 999
6. You can temporary turn off the LCR by press “#” twice in front of dialing No.
How To Set The LCR
LCR Setting
Press
Provider: You can set the your optimum provider number here.(max.. 6 digits)
Provider
Press
Provider
Num: Empty
CODE:
Input the number your local provider then confirm by
You can set your area code which your home was located. (max. 6 digits)
Code
Press
Code
Num: Empty
Input the number of your area code then confirm by
RT-208 Preliminary User Manual v1.0
22
PABX CODE( Connect to PABX)
When you connect RT-208 under the PABX system, you can set the PABX prefix code. For instance, 0 or 9. (max. 2 digits)
You can use the PABX code independently without LCR function by just empty the code and provide no.
PABX CODE
Press
PABX Code
Num: Empty
Input your PABX prefix No.(E.g. 0 or 9)
then turn ROUTER ON.
RT-208 will give a pause time automatically when you dial out through PABX
ROUTER
You can activate or deactivate the LCR function here.
Router
Press
On/Off
Press
key to select you need
and then press
for confirmation.
5-6-10 Change Base Pin
Change Pin
Press
New Pin
Key in the new pincode then press
Retype :
Key in the new pincode again then press
( 4 ~ 8 digits )
5-6-11 Set Base Default
You can reset your base to the default status.
Set Default
Press
Are you sure ?
Press
for confirmation or give up by
RT-208 Preliminary User Manual v1.0
23
5-7 Select Base
Handset can be subscribed to 4 different base station. When a handset is subscribed to several base station, you can
choose which base station you want to work with. For example: You want to use your handset in the office as well as at
home. You therefore have to register the handset to both base stations.
Select Base
*Base No.:
Base Auto
Press
Press
key to select the base No. and confirm by pressing
( The available base No. will
start with “*”).
When you select “Base AUTO”, the handset will search automatically. The first reachable base
station will be selected and immediate operation status will be effected
RT-208 Preliminary User Manual v1.0
24
Appendix 1 - Menu Tree
Idle Mode
------ Key Lock
------ Phone Book
------- Add
------- Edit
------- Read
------- Delete
------- Erase all
------ Caller ID
------- HS Setting
------- Set Extring
------- Set Intring
------- Set keytone
------- User name
------- Set pincode
------- Select line
------ Ring group
------- Baby Call
------- Auto pick up
------- Any key talk
------- Language
------- Erase CID
------- Set default
--------
BS
Setting
--------
Flash Time
--------
Pause Time
--------
New HS
--------
Remove HS
--------
Call Barring
--------
LCR Setting
--------
Change PIN
--------
BS Default
--------
Select Base
--------
Base 2
--------
Base 3
--------
Base 4
--------
Base Auto
-- - - - - - - - Dial Mode
- - - - - - - - - Base 1
RT-208 Preliminary User Manual v1.0
25
-- - - - - - -
Register
--------
Base 2
--------
Base 3
--------
Base 4
- - - - - - - - - - Base 1
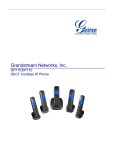
Appendix 2 – How to input the letters
Alphabet allocation chart
Key pressed
Once
Twice
1
3 times
4 times
5 times
(
)
-
A
B
C
2
,
D
E
F
3
:
G
H
I
4
+
J
K
L
5
%
M
N
O
6
/
P
Q
R
S
7
T
U
V
8
.
W
X
Y
Z
9
0
β
Ä
ö
ű
*
#
Operating method:
Press the key one ~ 5 times to get the alphabet your want.(Refer to above chart.)
Continue to input the alphabet by pressing other key until you finish the full name key in.
RT-208 Preliminary User Manual v1.0
26
Delete wrong alphabet by press
key.
If next alphabets is in the same key, please wait for the cursor move to next position.
Press
Press
“Up” key to move cursor to left side or press
“DOWN” key to move cursor to right..
key once, the alphabet will become small letter. Press
RT-208 Preliminary User Manual v1.0
27
key again to recover to big letter.