1
Operator Guide
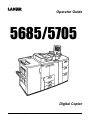
5685/5705
FPO
Digital Copier
you r docu m ent m an a ge m ent pa r tne r
When ordering supplies or requesting service for your
copier, you will need to provide the model and serial
number of your machine.
Please take a moment to enter your model and serial
numbers here.
MODEL NUMBER: __________________________
SERIAL NUMBER: __________________________
To order supplies, call: (
To request service, call:
)
(
)
Customer Vision® Our commitment to your
complete satisfaction
As an Energy Star Partner, Lanier Worldwide, Inc. has
determined that this product meets the Energy Star
guidelines for energy efficiency.
Lanier Worldwide, Inc. 2000
Introduction
This manual contains detailed instructions on the operation and maintenance of this machine. To get
maximum versatility from this machine all operators should carefully read and follow the instructions in
this manual. Please keep this manual in a handy place near the machine.
Please read the Safety Information before using this machine. It contains important information related
to USER SAFETY and PREVENTING EQUIPMENT PROBLEMS.
Notes
Some illustrations may be slightly different from your machine.
Certain options may not be available in some countries. For details, please contact your local dealer.
Operator Safety
This machine is considered a CDRH Class l laser device, safe for office/EDP use. The machine contains a 10-milliwatt, 770-810 nanometer wavelength, GaAIAs laser diode. Direct (or indirect reflected)
eye contact with the laser beam might cause serious eye damage. Safety precautions and interlock
mechanism have been designed to prevent any possible laser beam exposure to the operator.
Laser Safety:
The Center for Devices and Radiological Health (CDRH) prohibits the repair of laser-based optical unit
in the field. The optical housing unit can only be repaired in a factory or at a location with the requisite
equipment. The laser subsystem is replaceable in the field by a qualified Customer Engineer. The laser
chassis is not repairable in the field. Customer engineers are therefore directed to return all chassis
and laser subsystems to the factory or service depot when replacement or the optical subsystem is required.
Warning:
Use of controls or adjustment or performance of procedures other than those specified in this manual
might result in hazardous radiation exposure.
Two kinds of size notation are employed in this manual. With this machine refer to the inch version.
For good copy quality, Lanier recommends that you use genuine Lanier toner.
Lanier shall not be responsible for any damage or expense that might result from the use of parts other
than genuine Lanier parts in your Lanier office product.
Power Source
240V, 60Hz, 20 A or more
Please be sure to connect the power cord to a power source as above. For details about power source,
see ⇒ P.335 “Power Connection”.
In accordance with IEC 60417, this machine uses the following symbols for the main power switch:
a means POWER ON.
c means STAND BY.
Copyright © 1999
Safety Information
When using your equipment, the following safety precautions should always be
followed.
Safety During Operation
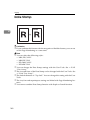
In this manual, the following important symbols are used:
R WARNING:
Indicates a potentially hazardous situation which, if instructions
are not followed, could result in death or serious injury.
R CAUTION:
Indicates a potentially hazardous situation which, if instructions are not
followed, may result in minor or moderate injury or damage to property.
i
R WARNING:
• Connect the power cord directly into a wall outlet and never use an extension cord.
• Disconnect the power plug (by pulling the plug, not the cable) if the
power cable or plug becomes frayed or otherwise damaged.
• To avoid hazardous electric shock or laser radiation exposure, do not
remove any covers or screws other than those specified in this manual.
• Turn off the power and disconnect the power plug (by pulling the plug,
not the cable) if any of the following conditions exists:
• You spill something into the equipment.
• You suspect that your equipment needs service or repair.
• Your equipment's cover has been damaged.
• Do not incinerate spilled toner or used toner. Toner dust might ignite
when exposed to an open flame.
• Disposal can take place at our authorized dealer or at appropriate collection sites.
• Dispose of the used toner bottle in accordance with the local regulation.
ii
R CAUTION:
• Protect the equipment from dampness or wet weather, such as rain, snow,
and so on.
• Unplug the power cord from the wall outlet before you move the equipment.
While moving the equipment, you should take care that the power cord will
not be damaged under the equipment.
• When you disconnect the power plug from the wall outlet, always pull the
plug (not the cable).
• Do not allow paper clips, staples, or other small metallic objects to fall inside
the equipment.
• Keep toner (used or unused) and toner bottle out of the reach of children.
• For environmental reasons, do not dispose of the equipment or expended
supply waste at household waste collection points. Disposal can take place
at an authorized dealer or at appropriate collection sites.
• The inside of the machine could be very hot. Do not touch the parts with a
label indicating the “hot surface”. Otherwise it could cause a personal burn.
• Our products are engineered to meet high standards of quality and functionality, and we recommend that you only use the expendable supplies available at an authorized dealer.
iii
How to Read this Manual
Symbols
In this manual, the following symbols are used:
R WARNING:
This symbol indicates a potentially hazardous situation that might result in
death or serious injury when you misuse the machine without following the instructions under this symbol. Be sure to read the instructions, all of which are included in the Safety Information section.
R CAUTION:
This symbol indicates a potentially hazardous situation that might result in minor or moderate injury or property damage that does not involve personal injury
when you misuse the machine without following the instructions under this
symbol. Be sure to read the instructions, all of which are included in the Safety
Information section.
• WARNINGS and CAUTIONS are notes for your safety.
Important
If this instruction is not followed, paper might be misfeed, originals might be
damaged, or data might be lost. Be sure to read this.
Preparation
This symbol indicates the prior knowledge or preparations required before operating.
Note
This symbol indicates precautions for operation or actions to take after misoperation.
Limitation
This symbol indicates numerical limits, functions that cannot be used together,
or conditions in which a particular function cannot be used.
Reference
This symbol indicates a reference.
[
]
Keys that appear on the machine's display panel.
{
}
Keys built into the machine's control panel.
iv
TABLE OF CONTENTS
What You Can Do with this Machine (Copy Mode).................................
Guide to Components ...............................................................................
Options .......................................................................................................
Control Panel .............................................................................................
Display Panel .............................................................................................
Common Displays and Keys .........................................................................
2
4
6
7
9
9
1. Basics
Starting the Machine ...............................................................................
Turning On the Main Power ........................................................................
Starting the Machine ...................................................................................
Shutting Down the Machine ........................................................................
Turning Off the Main Power ........................................................................
Originals ...................................................................................................
Sizes and Weights of Recommended Originals ..........................................
Sizes Detectable by Auto Paper Select ......................................................
Scannable Area from the Exposure Glass ..................................................
Copy Paper...............................................................................................
Recommended Paper Sizes and Types......................................................
Non-recommended Paper...........................................................................
Paper Storage .............................................................................................
Toner.........................................................................................................
Handling Toner............................................................................................
Toner Storage .............................................................................................
Used Toner .................................................................................................
13
13
14
14
14
15
15
16
17
18
18
20
20
21
21
21
21
2. Copying
Basic Procedure ......................................................................................
Setting Originals......................................................................................
Setting Originals on the Exposure Glass ....................................................
Setting Originals in the Document Feeder ..................................................
Original Orientation .....................................................................................
Setting Special Originals .............................................................................
Basic Functions.......................................................................................
Adjusting Copy Image Density ....................................................................
Choosing the Original Type.........................................................................
Selecting Copy Paper .................................................................................
Auto Reduce/Enlarge ..................................................................................
Copying onto OHP Transparencies ............................................................
Copying onto Tab Stock..............................................................................
Sort ...........................................................................................................
23
26
26
27
28
31
34
34
36
37
40
41
42
44
v
To stop scanning temporarily ...................................................................... 45
If memory reaches 0 % ............................................................................... 45
Stack ......................................................................................................... 47
Staple........................................................................................................ 49
Punch........................................................................................................ 52
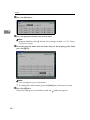
Programs.................................................................................................. 55
Storing a Program ....................................................................................... 55
Changing Stored Program .......................................................................... 57
Deleting a Program ..................................................................................... 58
Recalling a Program.................................................................................... 59
Job Preset ................................................................................................ 60
Editing Job Preset ....................................................................................... 61
Changing the Order of the Job Preset ........................................................ 64
Deleting Job Preset..................................................................................... 66
Other Functions....................................................................................... 68
Energy Saver Mode .................................................................................... 68
Interrupt Copy ............................................................................................. 68
User Codes ................................................................................................. 70
Auto Start .................................................................................................... 70
Original Tone............................................................................................... 71
Sample Copy............................................................................................... 71
Preset Reduce/Enlarge ........................................................................... 72
Zoom......................................................................................................... 75
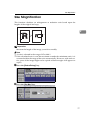
Size Magnification ................................................................................... 77
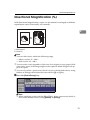
Directional Magnification (%) ................................................................. 79
Directional Size Magnification (inch)..................................................... 82
Duplex....................................................................................................... 84
1 Sided → 2 Sided ...................................................................................... 84
2 Sided → 2 Sided ...................................................................................... 88
Combine ................................................................................................... 90
1 Sided 2 Pages → Combine 1 Side........................................................... 92
1 Sided 4 Pages → Combine 1 Side........................................................... 94
1 Sided 8 Pages → Combine 1 Side........................................................... 95
1 Sided 4 Pages → Combine 2 Side........................................................... 97
1 Sided 8 Pages → Combine 2 Side........................................................... 99
1 Sided 16 Pages → Combine 2 Side....................................................... 101
2 Sided 1 Page → Combine 1 Side .......................................................... 103
2 Sided 2 Pages → Combine 1 Side......................................................... 105
2 Sided 4 Pages → Combine 1 Side......................................................... 107
2 Sided 2 Pages → Combine 2 Side......................................................... 109
2 Sided 4 Pages → Combine 2 Side......................................................... 111
2 Sided 8 Pages → Combine 2 Side......................................................... 113
Series Copies......................................................................................... 116
2 Sided→1 Sided ...................................................................................... 116
vi
Book → 1 Sided ........................................................................................ 118
Copying Book Originals........................................................................
Book→2 Sided ..........................................................................................
Multi → 2 Sided.........................................................................................
Booklet ......................................................................................................
Magazine...................................................................................................
Margin Adjustment ................................................................................
Border Erase ..........................................................................................
Center/Border Erase..............................................................................
Delete Area.............................................................................................
Delete Inside .............................................................................................
Delete Outside ..........................................................................................
Additional ...............................................................................................
3 Side Full Bleed .......................................................................................
Double Copies...........................................................................................
Image Repeat............................................................................................
Centering...................................................................................................
Front Cover ............................................................................................
Back Covers...........................................................................................
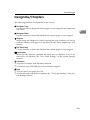
Designate/Chapters...............................................................................
Designate: Copy........................................................................................
Designate: Blank .......................................................................................
Chapters....................................................................................................
Slip Sheet Copy ........................................................................................
Slip Sheets .............................................................................................
Background Numbering........................................................................
Preset Stamp..........................................................................................
User Stamp.............................................................................................
Program/Delete User Stamp .....................................................................
Date Stamp.............................................................................................
Page Numbering ....................................................................................
Choosing How Copies Are Delivered ..................................................
Shift Tray Off In Sort/Stack .......................................................................
Separation.................................................................................................
Copy Face Up ...........................................................................................
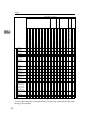
Combination Chart ................................................................................
120
120
123
125
127
130
132
135
138
138
140
142
142
143
145
146
149
151
153
154
156
158
160
163
165
167
171
174
180
183
190
190
191
192
193
3. Document Server
Overview................................................................................................. 195
Document Server Features ....................................................................... 195
Document Server Editor Features............................................................. 196
vii
Features and Benefits ...........................................................................
On Demand Printing .................................................................................
Scanned File Printing ...............................................................................
Scanning Originals................................................................................
Printing Saved Documents...................................................................
Sample Printing.........................................................................................
Print First Page .........................................................................................
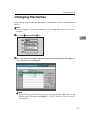
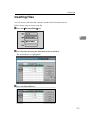
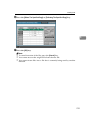
Changing File Names ............................................................................
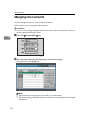
Merging Documents ..............................................................................
Inserting Files ........................................................................................
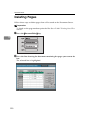
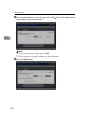
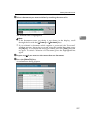
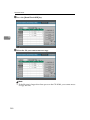
Deleting Pages.......................................................................................
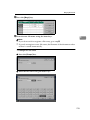
Deleting Saved Documents ..................................................................
Deleting Saved Documents in HDD ..........................................................
Deleting Saved Documents on the CD-ROM ............................................
Moving/Copying Files ...........................................................................
Moving/Copying files from HDD to CD-ROM ............................................
Moving/Copying files from CD-ROM to HDD ............................................
197
197
198
199
204
209
210
211
214
217
220
224
224
226
229
229
234
4. Connect Copy (Option)
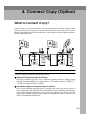
What is Connect Copy? ........................................................................
How Connect Copy Works....................................................................
Connectable Copier Models ......................................................................
Functions Not Available with Connect Copy .............................................
Interrupt Functions ....................................................................................
Before You Start........................................................................................
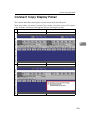
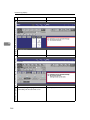
Connect Copy Display Panel................................................................
Using Connect Copy .............................................................................
Exiting Connect Copy Mode......................................................................
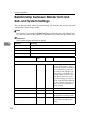
Relationship between Master Unit and Sub-unit System Settings ...
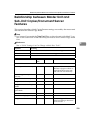
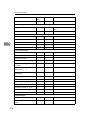
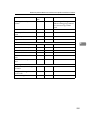
Relationship between Master Unit and Sub-Unit Copier/
Document Server Features ...............................................................
239
241
241
242
242
242
243
246
251
252
255
5. What to do if Something Goes Wrong
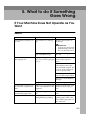
If Your Machine Does Not Operate as You Want................................
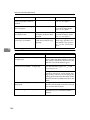
General .....................................................................................................
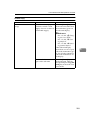
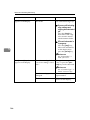
Display ......................................................................................................
If Connect Copy is Cleared .......................................................................
If You Cannot Exit Connect Copy .............................................................
If You Cannot Make Clear Copies ........................................................
If You Cannot Make Copies As You Want ...........................................
Adjust Image .............................................................................................
viii
261
261
265
268
269
271
272
272
Combine....................................................................................................
Duplex .......................................................................................................
Stamp........................................................................................................
Document Server ......................................................................................
Connect Copy ...........................................................................................
When Memory is Full ................................................................................
273
274
275
275
276
276
B Loading Paper...................................................................................
To load paper in tray 1 (Tandem Tray) .....................................................
Loading paper in Tray 2 or 3 .....................................................................
Loading Paper in the Large Capacity Tray................................................
Loading Paper in the Optional A3/11" × 17" Tray Kit ................................
D Changing the Toner Bottle ..............................................................
277
277
279
280
281
283
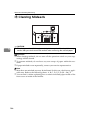
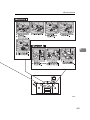
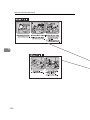
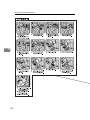
x Clearing Misfeeds............................................................................. 286
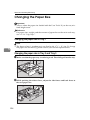
Changing the Paper Size ...................................................................... 294
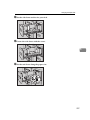
Changing the paper size in Tray 1 ............................................................ 294
Changing the paper size in Tray 2 and Tray 3 .......................................... 294
Changing The Paper Size Of The Optional Large Capacity Tray
(Tray 4 and Tray 5)................................................................................ 296
Changing The Paper Size Of The Optional Large Capacity Tray (Tray 6)... 298
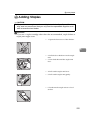
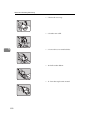
d Adding Staples ................................................................................. 299
e Removing Jammed Staples............................................................. 302
y Removing Punch Waste................................................................... 305
6. User Tools (Copier/Document Server Features)
Accessing User Tools (Copier/Document Server Features) .............
Exiting User Tools .....................................................................................
User Tools Menu (Copier/Document Server Features) ......................
Settings You Can Change with the User Tools ..................................
General Features ......................................................................................
Adjust Image .............................................................................................
Stamp........................................................................................................
Input/Output ...........................................................................................
Document Server...................................................................................
Key Operator Tools ...............................................................................
307
309
310
312
312
318
323
328
330
331
7. REMARKS
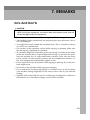
Do's And Don'ts.....................................................................................
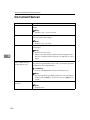
Where to Put Your Machine..................................................................
Machine Environment ...............................................................................
Power Connection.....................................................................................
Access to Machine ....................................................................................
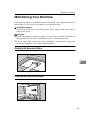
Maintaining Your Machine ....................................................................
333
334
334
335
336
337
ix
Cleaning the Exposure Glass.................................................................... 337
Cleaning the Document Feeder ................................................................ 337
Stapling Position ................................................................................... 338
8. Specification
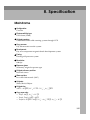
Mainframe...............................................................................................
Document Feeder ..................................................................................
Finisher...................................................................................................
CD-RW (Option) .....................................................................................
A3/11" × 17" Tray Kit (Option) ..............................................................
Punch Kit (Option).................................................................................
Large Capacity Tray (LCT) (Option).....................................................
Copy Connector Cable (Option)...........................................................
339
343
344
345
346
347
348
349
INDEX...................................................................................................... 350
x
This page is intentionally blank.
1
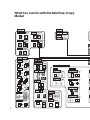
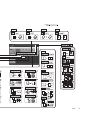
What You Can Do with this Machine (Copy
Mode)
2
3
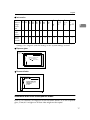
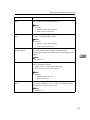
Guide to Components
1. Exposure glass
7. Paper tray
Position single-page originals here face
down for copying. See ⇒ P.15 “Originals”.
Set copy paper here.
Tray 1 is a tandem tray where the paper
on the left side automatically moves to
the right when paper on the right has run
out. See ⇒ P.277 “B Loading Paper”.
2. Document feeder (ARDF)
The document feeder automatically feeds
a stack of originals one by one.
3. Control panel
See ⇒ P.7 “Control Panel”.
4. On indicator
This indicator lights after you press the
operation switch.
Press to turn the main power on or off.
We recommend you only turn this switch
off when the machine is not going to be
used for an extended period of time (e.g.
over a vacation).
Press this switch when you wish to use
the machine. The On indicator lights
when this switch is pressed.
Note
❒ If the On indicator does not light
when you press the operation switch,
make sure the main power switch is
set to on.
6. Front cover
9. Toner cover
5. Operation switch
Open to remove misfed paper.
4
8. Main power switch
Open to change the toner bottle.
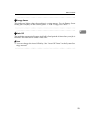
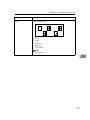
1. Ventilation hole
Prevents overheating. Do not obstruct
the ventilation hole by placing or leaning
an object near it. If the machine overheats, a fault might occur.
2. Circuit breaker
Do not touch this breaker.
5
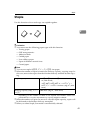
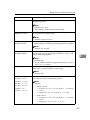
Options
1. Finisher
Sorts, stacks, staples and punches copies
(optional punch kit required.)
• A: Finisher proof tray
• B: Finisher shift tray
2. A3/11" × 17" Tray Kit
Holds A3/11" × 17" size papers.
Note
❒ If you install the A3/11" × 17" Tray kit
to your machine, you cannot use it as
a tandem tray.
3. CD-RW
Store your documents.
4. Large Capacity Tray (LCT)
Holds 4,550 sheets of paper.
Other options:
• Punch kit
• Connect Copy cable
6
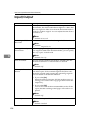
Control Panel
1. Status indicator
5. {Energy Saver} key
Color
Status
Press to switch to and from Energy Saver
mode. See ⇒ P.68 “Energy Saver Mode”.
Off
Ready to make
copies
6. {Clear Modes} key
Flashing green
Scanning originals
Press to clear any previously entered
copy job settings.
Lit green
Copying (You can
scan originals.)
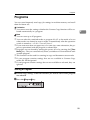
7. {Program} key
Flashing red
Toner has nearly
run out
Press to register or recall a program. See
⇒ P.55 “Programs”.
8. {Stop} key
2. {Screen Contrast} knob
Press to stop a copy job in progress.
Adjusts the brightness of the display panel.
9. {Start} key
3. {Language Selection} key
Press to change the display language.
4. {Interrupt} key
Press to make interrupt copies during a
copy run. See ⇒ P.68 “Interrupt Copy”.
Press to start copying. If pressed just after
the machine is turned on, the job will
start after the warm-up period. See ⇒
P.70 “Auto Start”.
10. {Sample Copy} key
Use this key to make a single sample
copy set before starting a long copy run.
7
By checking the finished set and making
any necessary changes to the image quality settings before you make multiple
copies, you can save time and paper. See
⇒ P.71 “Sample Copy”.
11. {Clear} key
Press to delete a number entered.
12. {#} key
Press to enter a value or confirm a setting.
13. Number keys
Use to enter the number of copies you
wish to make. Also use to enter values for
various features.
14. Feature keys
Press the appropriate key to choose any
of the following features:
• Copier
• Document Server
• Document Server Editor
15. Application Status indicators
These show the status of the above features:
• Green: the feature is active.
• Red: the feature has been interrupted.
16. Indicators
These indicators show errors or the status
of the machine.
See ⇒ P.261 “What to do if Something Goes
Wrong”.
17. {Counter} key
Press to check the total number of copies
made.
18. {User Tools} key
Press to access the User Tools menu
where you can customize the default settings to your preference.
19. Display panel
Shows operation status, error messages,
and function menus. See ⇒ P.9 “Display
Panel”.
8
Note
❒ You can adjust the angle of control
panel.
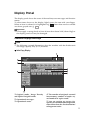
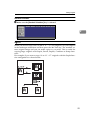
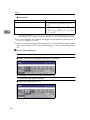
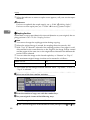
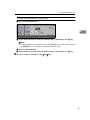
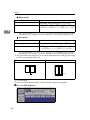
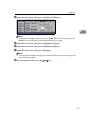
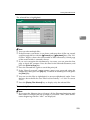
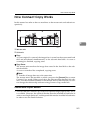
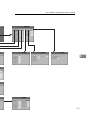
Display Panel
The display panel shows the status of the machine, error messages and function
menus.
To select items shown on the display, lightly press the item with your finger.
When an item is selected, it is highlighted e.g.
. Items that are not available
are shown grayed out e.g. OK .
Important
❒ Do not apply a strong shock or force of more than about 30 N (about 3 kgf) to
the display panel or it may be damaged.
Common Displays and Keys
Note
❒ The following example illustrations show the machine with the finisher unit
and Large Capacity Tray (LCT) installed.
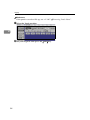
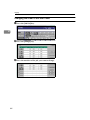
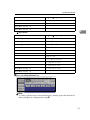
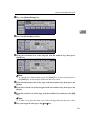
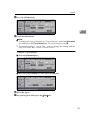
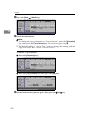
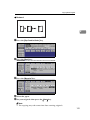
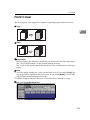
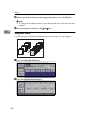
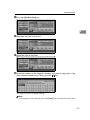
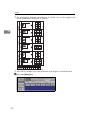
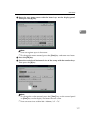
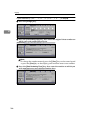
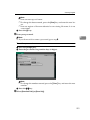
❖ Initial Copy Display
1. Original mode, Image Density
4. The number of originals scanned
and Special Original mode.
into memory, number of copies set,
and number of copies made.
2. Operational messages.
3. Operational status.
5. You can register up to two frequently used reduction/enlargement
ratios other than the fixed reduction/
enlargement ratios.
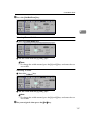
9
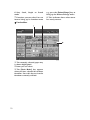
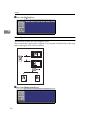
6. Sort, Stack, Staple or Punch
mode.
e.g. press the [Reduce/Enlarge] key to
bring up the Reduce/Enlarge menu.
7. Functions you can select. Press an
item to bring up its function menu
8. This indicator shows when toner
has nearly run out.
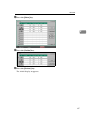
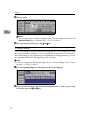
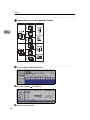
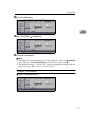
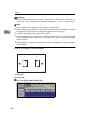
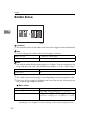
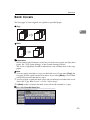
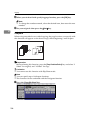
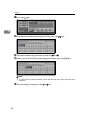
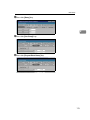
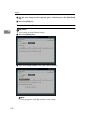
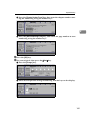
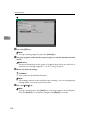
❖ Function Menu
1. The currently selected paper tray
is shown highlighted.
2. Items you can select.
3. The [Check Modes] key appears
when you have selected one or more
functions. Press this key to view the
functions currently selected.
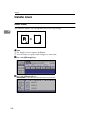
10
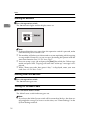
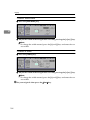
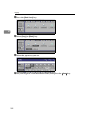
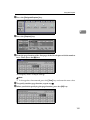
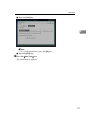
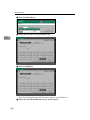
❖ Copy Server Display
1. Operational messages.
2. Display titles.
3. The number of originals scanned
into memory, number of copies set,
and number of copies made.
4. Operational keys.
11
12
1. Basics
Starting the Machine
To turn the machine on, press the operation switch.
Note
❒ This machine automatically enters Energy Saver mode or turns itself off if you
do not use the machine for a while. Please refer to “Energy Saver Mode—Saving Energy” and “Auto Off Timer” in the System Settings manual.
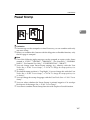
-Power Switches
This machine has two power switches:
❖ Operation switch (right front side of the document feeder)
Press this switch when you wish to use the machine. When the machine has
warmed up, you can make copies.
❖ Main power switch (left side of the machine)
Turn off the main power switch when the machine is not to be used for an extended period of time.
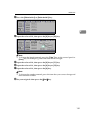
Turning On the Main Power
A Make sure that the power cord is plugged firmly into the wall outlet.
B Turn on the main power switch.
Main power indicator lights up.
13
Basics
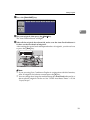
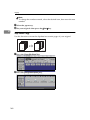
Starting the Machine
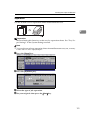
A Press the operation switch.
1
The On indicator lights and the display turns on.
Note
❒ If the machine does not start when the operation switch is pressed, make
sure the main power switch is on.
❒ The machine will take up to 360 seconds to warm up during which copying
is not possible. However, you can set up a job during this period with the
Auto Start function. See ⇒ P.70 “Auto Start”.
❒ You can set up a copy job and press the {Start} key while the “Select copy
mode and press Start. Copying will start after warm up.” message is displayed.
❒ When “Enter user code, then press # key.” is displayed, enter your user
code. See ⇒ P.70 “User Codes”.
Shutting Down the Machine
A Press the operation switch.
The On indicator goes out.
Turning Off the Main Power
A Press the Main Power switch.
The Main Power switch indicator goes out.
Note
❒ If you leave the Main Power switch off for more than 20 days, the date setting might be wrong. For how to set the date, see “Timer Settings” in the
System Settings manual.
14
Originals
Originals
Sizes and Weights of Recommended Originals
1
❖ Metric version
Where Original Is
Set
Original Size
Original Weight
Exposure glass
Up to A3
--
Document feeder
1-sided originals:
52 – 156 g/m2
A3L – A5KL
2-sided originals:
52 – 128 g/m2
A3L – A5KL
Thin Paper mode:
40 – 156 g/m2
A3L – A5K
❖ Inch version
Where Original Is
Set
Original Size
Original Weight
Exposure glass
Up to 11" × 17"
--
Document feeder
1-sided originals:
14 – 42 lb. Bond
11" × 17"L – 51/2" × 81/2"KL
14 – 34 lb. Bond
2-sided originals:
11" × 17"L – 51/2" × 81/2"KL
11 – 42 lb. Bond
Thin Paper mode:
11" × 17"L – 5 /2" × 8 /2"KL
1
1
Non-recommended Originals for the Document Feeder
Setting the following types of originals in the document feeder can cause paper
misfeeds or damage to the originals. Set these originals on the exposure glass instead.
• Originals of inappropriate weight or size see above.
• Stapled or clipped originals
• Perforated or torn originals
• Curled, folded, or creased originals
• Pasted originals
15
Basics
• Originals with any kind of coating, such as thermal fax paper, art paper, aluminum foil, carbon paper, or conductive paper
• Originals with perforated lines
• Originals with indexes, tags, or other projecting parts
• Sticky originals, such as translucent paper
• Thin originals with low stiffness
• Bound originals, such as books
• Transparent or translucent originals, such as OHP transparencies or tracing
paper
1
Sizes Difficult to Detect
It is difficult for the machine to automatically detect the sizes of the following
types of originals, so select the paper size manually instead.
• Originals with indexes, tags, or other projecting parts
• Transparent or translucent originals, such as OHP transparencies or tracing
paper
• Dark originals with many letters and drawings
• Originals which partially contain solid images
• Originals which have solid images running to their edges
• Originals other than those marked ❍ in the table that follows.
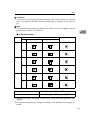
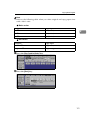
Sizes Detectable by Auto Paper Select
❖ Metric version
Size A3 B4
L L
Where
Original Is
Set
16
A4 B5
K K
L L
A5 A5
K L
11 "
×
17"
L
11 "
×
15"
L
81/2"
×
14"
L
81/2" ×
11"K
L
51/2" × 51/2"
81/2"
× 81/
K
2" L
Exposure
glass
❍
❍
❍
❍
❍
×
❍
❍
❍
❍
❍
×
Document
feeder
❍
❍
❍
❍
❍
❍
❍
❍
❍
❍
❍
❍
Originals
❖ Inch version
Size A3 B4
L L
Where
Original Is
Set
A4 B5
K K
L L
A5 B6
K K
L L
11" × 11" × 81/2"
17"
15"
×
L
L
14"
L
81/2" ×
11"K
L
51/2" × 81/2"
×
81/2"
13"L
K
Exposure
Glass
×
×
×
×
×
×
❍
×
❍
❍
×
×
Document
Feeder
×
×
❍
×
×
×
❍
❍
❍
❍
❍
❍
*1
1
*1
You can select from 81/2" × 13", 81/4" × 13" and 8" × 13" with the User Tools (System
Settings). See “Original: F/F4 Size Setting” in the “System Settings” manual.
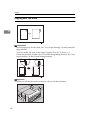
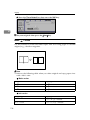
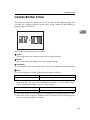
❖ Exposure glass
Reference
position
A3
Horizontal size
Vertical size
Maximum Scanning area
A3
(297x420mm)
11"x17"
(279x432mm)
A4 A3
CP01AEE
❖ Document feeder
Scannable Area from the Exposure Glass
Even if you correctly set originals in the document feeder or on the exposure
glass, 5 mm, 0.2" margins on all four sides might not be copied.
17
Basics
Copy Paper
Recommended Paper Sizes and Types
1
The following limitations apply to each tray:
Main
Machine
Large
Capacity
Tray
(LCT)
Tray
Metric Version
Inch Version
Paper
Weight
Paper Capacity
Tray 1 *1
(Tandem
tray)
A4K, 81/2" × 11"
K
A4K, 81/2" × 11"
K
52 – 163 g/
m2, 16 lb.
Bond – 90
lb. Index
1,000
sheets +
1,000
sheets
Tray 1 *1
(Optional
A3/11" ×
17" Tray
Kit)
A3L, B4L,
A4KL, 81/2" ×
11" KL, 81/2" ×
14"L
A3L, B4L,
A4KL, 81/2" ×
11" KL, 81/2" ×
14" L
52 – 163 g/ 1,000
sheets
m2, 16 lb.
Bond – 90
lb. Index
Tray 2 *2
A3L A4KL,
B5K L, A5K,
81/4" × 13"L,
81/2" × 13"L
11" × 17" L, 10" ×
14"L, 81/2" × 14"
L, 8" × 13"L,
81/2" × 11" KL,
8" × 101/2"L, 8" ×
10"L, 51/2" ×
81/2"KL
52 – 163 g/ 500 sheets
m2, 16 lb.
Bond – 90
lb. Index
Tray 3 *2
A3L A4KL,
B5K L, A5K,
81/4" × 13"L,
81/2" × 13"L
11" × 17" L, 10" ×
14"L, 81/2" × 14"
L, 8" × 13"L,
81/2" × 11" KL,
8" × 101/2"L, 8" ×
10"L, 51/2" ×
81/2"KL
52 – 163 g/ 500 sheets
m2, 16 lb.
Bond – 90
lb. Index
Tray 4, 5 *3
A4K, A5KL,
81/2" × 11" K,
51/2" × 81/2" KL,
B5K
A4K, A5KL,
81/2" × 11" K,
51/2" × 81/2" KL,
B5 K
52 – 216 g/ 1,000
sheets
m2, 16 lb.
Bond – 80
lb. Cover
A4K, A5KL,
81/2" × 11" K,
51/2" × 81/2" KL,
B5K
A4K, A5KL,
81/2" × 11" K,
51/2" × 81/2" KL,
B5K
52 – 163g/
m2, 16 lb.
Bond – 90
lb. Index
*4
Tray 6 *1 *3
*4
*1
18
2,550
sheets
The paper tray fence is fixed. If you wish to change the size of paper set in this tray,
please contact your service representative.
Copy Paper
*2
*3
*4
If you wish to copy onto non-standard size paper, select the size with User Tools. See
“Tray Paper Settings” in the System Settings manual.
If you wish to copy onto OHP transparencies or thick paper, select OHP or Thick Paper mode. See “Tray Paper Settings” in the System Settings manual.
When setting copy paper, make sure the stack height does not exceed the limit mark.
The maximum number of sheets you can set at once depends on the paper thickness
and condition.
1
Important
❒ If you use damp or curled paper, a misfeed, staple jam or mis-stapling might
occur. Try turning over the paper stack in the paper tray. If there is no improvement, change to copy paper with less curl.
❒ If you use damp or curled OHP transparencies, a misfeed might occur.
❒ When you set the Index tabs, use the end fence for Index tabs.
Note
❒ If you load paper of the same size in two or more trays, the machine automatically shifts to another tray when the tray in use runs out of paper. This function is called Auto Tray Switching. This saves interrupting a copy run to
replenish paper even when you make a large number of copies. You can turn
off this function. See ⇒ P.37 “Selecting Copy Paper”, “Auto Tray Switching”
and “Tray Paper Settings” in the System Settings manual.
❒ When you want to copy on translucent paper, set the copy paper following
illustrations. If do not, paper jam might occur.
1. Direction of paper grain
2. How to set the copy paper in the
paper tray
Limitation
❒ If you load recycled or special paper in the paper trays and use the Tray Paper
Settings in User Tools of the System Settings menu, this function is not available with these trays unless their settings are identical.
19
Basics
Non-recommended Paper
R CAUTION:
• Do not use aluminum foil, carbon paper, or similar conductive paper to avoid
1
a fire or equipment failure.
Important
❒ Do not use any of the following kinds of paper or a fault might occur.
• Thermal fax paper
• Art paper
• Aluminum foil
• Carbon paper
• Conductive paper
• Colored OHP transparencies
• Paper with perforations
• Paper that has already been copied or printed onto.
Note
❒ Do not use the following kinds of paper or a misfeed might occur.
• Bent, folded, or creased paper
• Torn paper
• Slippery paper
• Perforated paper
• Rough paper
• Thin paper that has low stiffness
• Paper coated with a lot of paper dust
❒ Copying onto rough grain paper can result in a blurred copy image and limited solid fill.
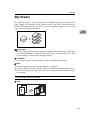
Paper Storage
Note
❒ When storing paper, the following precautions should always be followed:
• Do not store paper where it will be exposed to direct sunlight.
• Avoid storing paper in humid (greater than 70%) areas.
• Store on a flat surface.
❒ Keep open reams of paper in the package and store as you would unopened
paper. Store on a flat surface.
❒ Under high or low extremes of temperature/humidity, store paper in a vinyl
bag.
20
Toner
Toner
Handling Toner
1
R WARNING:
• Do not incinerate used toner or toner containers. Toner dust might ig-
nite when exposed to an open flame. Dispose of used toner containers
in accordance with local regulations for plastics.
R CAUTION:
• Keep toner (used or unused) and toner containers out of reach of children.
R CAUTION:
• Our products are engineered to meet high standards of quality and function-
ality, and we recommend that you only use the expendable supplies available at an authorized dealer.
Important
❒ If you use toner other than the recommended type, a fault might occur.
Reference
For how to change the toner bottle, see ⇒ P.283 “D Changing the Toner Bottle”.
Toner Storage
When storing toner, the following precautions should always be followed:
• Store toner containers in a cool, dry place free from direct sunlight.
• Store on a flat surface.
Used Toner
Note
❒ Used toner cannot be re-used.
21
Basics
1
22
2. Copying
Basic Procedure
A Make sure that the machine is in Copy mode.
B If user codes are turned on, enter your User Code with the number keys,
then press the [#] key.
Reference
⇒ P.70 “User Codes”.
C Make sure that no previous settings remain.
Note
❒ To clear any previous settings, press the {Clear Modes} key.
D Set your originals.
Reference
⇒ P.26 “Setting Originals”.
E Set your desired settings.
23
Copying
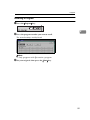
F Enter the number of copies required with the number keys.
2
Note
❒ The maximum copy quantity can be set between 1 and 9999 (default: 9999).
See “Maximum Copy Quantity” ⇒ P.312 “General Features”.
❒ To change the number entered, press the {Clear} key and enter the new
number.
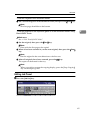
G Press the {Start} key.
The machine starts copying.
Note
❒ Usually, when you set a single original on the exposure glass or in the document feeder, the copies are delivered face-up. However, with some functions copies will be delivered face-down.
❒ You can choose to have copies delivered either face up or face down. See
“Face-up/down Eject From Platen” ⇒ P.328 “Input/Output”.
❒ To stop the machine during a multi-copy run, press the {Stop} key.
❒ To clear these copy job settings and return the machine to the initial condition after copying, press the {Clear Modes} key.
-Auto Reset
The machine automatically returns to the initial condition a fixed period of time
after your job is finished. This function is called “Auto Reset”.
Note
❒ You can change the Auto Reset delay. See “Copy Reset Timer” ⇒ P.312 “General Features”.
24
Basic Procedure
-Energy Saver
This indicator lights when the machine is saving energy. To exit Energy Saver
mode, press any key on the control panel. ⇒ P.68 “Energy Saver Mode”
2
-Auto Off
The machine automatically turns itself off a fixed period of time after your job is
finished. This function is called “Auto Off”.
Note
❒ You can change the Auto Off delay. See “Auto Off Timer” in the System Settings manual.
25
Copying
Setting Originals
Limitation
❒ Set originals after correction fluid and ink has completely dried. Not taking
this precaution could mark the exposure glass and cause marks to be copied.
Note
❒ Normally originals should be aligned to the rear left corner. However, some
copy functions may produce different results depending on the direction of
the originals. For details, see the explanations of each function in this manual.
2
Reference
See ⇒ P.15 “Originals”.
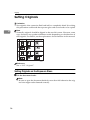
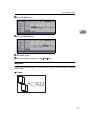
Setting Originals on the Exposure Glass
A Lift the document feeder.
Note
❒ Be sure to open the document feeder by more than 20° otherwise the original size might not be detected correctly.
26
Setting Originals
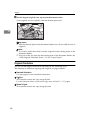
B Set the first page of your original face down on the exposure glass and align
it to the rear left corner.
1
2
2
ND1C01EE
1: Reference mark
2: Scale
C Lower the document feeder.
Setting Originals in the Document Feeder
Note
❒ The last page should be on the bottom.
❒ Do not stack originals beyond the limit mark on the side fence of the document feeder.
❒ When copying thin originals (40 – 52 g/m2, 11 – 14 lb, Bond), set one page at
a time in the document feeder or on the exposure glass to avoid damage due
to multi-sheet feeds (several pages fed together at the same time).
❒ Originals in pencil or other similar media may get slightly smudged after being scanned through the ARDF. To avoid this, you can set them on the exposure glass instead.
❒ As a rule, one-sided originals are delivered to the ARDF external tray, and
two-sided originals to the ARDF tray.
Reference
For originals that the document feeder can handle, see ⇒ P.15 “Originals”.
To set a stack of originals in the document feeder
A Adjust the guide to the original size.
27
Copying
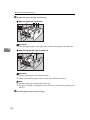
B Set the aligned originals face up into the document feeder.
Your originals are set correctly when the bottom plate rises.
2
TSPH040E
Important
❒ After the bottom plate of the document feeder rises, do not add or force in
originals.
Note
❒ To avoid a multi-sheet feed, fan the originals before setting them in the
document feeder.
❒ You can set the rise time for the bottom plate of the document feeder. See
“ADF Original Table Rise Time” ⇒ P.328 “Input/Output”.
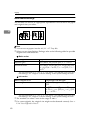
Original Orientation
You can set the original orientation separately in the following ways.
This function is useful for copying torn originals or large originals.
❖ Standard Orientation
Use copying for in the standard orientation.
❖ 90° Turn
This function rotates the copy image by 90°.
Use this function when you want to copy onto A3, B4, 11" × 17" paper.
❖ Rotate Original
This function rotates the copy image by 180°.
28
Setting Originals
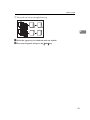
Standard Orientation
A Make sure the [Standard Orientation] key is selected.
2
90° Turn
When you want to copy onto A3, B4 or 11" × 17" size originals, set your original
in the landscape orientation and then press the 90° Turn key. The machine rotates original image and you can make copies as you wish. This is useful for
copying large originals with Staple, Punch, Duplex, Combine or Stamp functions.
For example, if you want to copy A3 or 11" × 17" originals with the Staple function configured it as shown below:
29
Copying
A Press the [90° Turn] key.
2
Rotate Original
This function rotates the copy image by 180°.
This is useful for copying torn originals. For example, if the left side of the original is damaged, set it as shown below:
A Press the [Rotate Original] key.
30
Setting Originals
Note
❒ It is recommended to use this function together with the Auto Paper Select
or Preset Reduce/Enlarge function.
❒ Copy results may differ depending on the combination of selected functions.
Setting Special Originals
2
Mixed Sizes Mode
Use this mode for copying an original that contains pages of different sizes.
If you copy this kind of original from the document feeder using standard copying, some parts of the original images may not appear on copies or misfeeds may
occur. However, if you choose Mixed Sizes Mode, the machine automatically
checks the size of each original and makes copies accordingly.
Limitation
❒ Acceptable original weights for this function are in the range 52 – 81 g/m2, 14
– 20 lb. Bond.
❒ Acceptable copy paper sizes for this function are as follows:
Metric version
A3 L, B4 L, A4 KL, B5 KL
Inch version
11" × 17"L, 81/2" × 14"L, 81/2" × 11" KL, 51/2" × 81/2"KL
❒ For smaller originals, the copy image might be skewed since the originals
might not be correctly aligned with the original guide.
❒ If you want to use the Staple function, originals must all be the same width.
❒ Maximum number of copies you can staple, A4-100 copies, A3-50 copies, A3/
A4-50 copies.
❒ If you want to have copies punched, only use paper sizes supported by the
Punch function. If you do not, the machine might stop copying.
A Press the [Mixed Sizes] key.
31
Copying
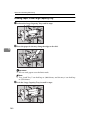
B Align the rear and left edges of the originals as shown in the illustration.
1
B4 A3
2
2
CP19AE
1: Direction in which to set originals in the ARDF.
2: Vertical size
Important
❒ If the originals are of different vertical sizes, put the longer originals on the
bottom otherwise the sizes might not be detected correctly.
C Adjust the guide to the width of the widest original.
D Set the aligned originals face up into the document feeder.
Thin Mode
Use Thin mode for copying thin originals from the document feeder.
A Press the [Thin Paper] key.
Batch/SADF Mode
You can stack up to 100 standard pages in the document feeder. If your original
contains more than 100 pages, use this mode to avoid having to press the {Start}
key after inserting each batch in the document feeder. Once the first 100 pages
have been scanned in, just set the next batch of pages and they will be scanned
in automatically and copying will continue.
Important
❒ This mode is also useful when copying special originals that need to be
scanned in one page at a time (e.g. translucent paper). Each time you insert a
single page into the document feeder, it will be fed automatically.
32
Setting Originals
A Press the [Batch/SADF] key.
2
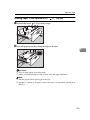
B Set your originals then press the {Start} key.
The Auto Feed indicator will light.
C After all the originals have been fed, make sure the Auto Feed indicator is
lit then set the next batch of originals.
After setting the second and subsequent batches of originals, you do not have
to press the {Start} key.
DF02E
Note
❒ If you are using Sort, Combine or Duplex in conjunction with this function,
after all originals have been scanned press the {#} key.
❒ You can change how long the machine keeps the Auto Feed indicator lit so
the next batch originals can be set. See “SADF Auto Reset Timer”⇒ P.328
“Input/Output”.
33
Copying
Basic Functions
The following functions are explained in this section:
❖ Copy Image Density
Auto Image Density, Manual Image Density, Combined Auto and Manual
Image Density
2
❖ Original Types
Text, Auto Text/Photo, Photo, Pale, Generation Copy
❖ Copy Paper Select
Auto Paper Select and Manual Paper Select
❖ Auto Reduce/Enlarge
Reduce and Enlarge
Note
❒ You can choose the default settings for all of the above features. The default
setting is the setting that is selected when Auto Reset is activated, Energy Saver mode is exited, or when the machine is powered on. See “General Features” in the System Settings manual or⇒ P.312 “General Features”.
❒ You also can change other defaults for these functions. See ⇒ P.312 “Settings
You Can Change with the User Tools”.
Adjusting Copy Image Density
The copy image density is the relative brightness or darkness of copies.
There are three ways to select copy image density:
❖ Auto Image Density
The machine automatically chooses a setting to match your original.
❖ Manual Image Density
If you require darker or lighter copies, you may adjust the image density.
❖ Combined Auto and Manual Image Density
Use when copying originals with a dirty background (such as newspapers).
You can adjust the foreground density while having the background density
selected automatically.
Note
❒ In Connect Copy mode, make adjustments to copy image density on the master unit.
34
• The image density level set on the master unit will be used by both units,
However, in order to produce similar images on both units, mark sure the
“Original Mode Level” settings are the same on each unit. If they are not
the same, the finish of images may differ. ⇒ P.314 “Original Mode Level”
Basic Functions
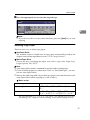
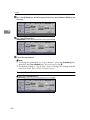
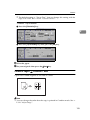
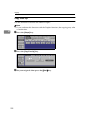
A Do one of the following:
To have image density selected automatically
A Make sure that the [Auto Image Density] key is selected. If it is not selected
press the [Auto Image Density] key.
2
Note
❒ If the [Auto Image Density] key is not selected, press the [Auto Image Density] key.
❒ If you do not wish to set any other functions, press the {Start} key to
start copying.
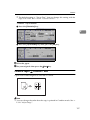
To select image density manually
A Press the [Auto Image Density] key to deselect Auto Image Density.
B Press the [Lighter] or [Darker] key to adjust the image density.
Note
❒ If you do not wish to set any other functions press the {Start} key to start
copying.
To combine Auto and Manual Image Density
A Make sure that the Auto Image Density is selected.
35
Copying
B Press the [Lighter] or [Darker] key to adjust the density.
2
Note
❒ If you do not wish to set any other functions press the {Start} key to start
copying.
Choosing the Original Type
The Original Type setting gives you control over the method used to make copies. Choose a type that best matches your original.
The following Original Type settings are available:
❖ Text
Select this mode when your originals contain only letters (no pictures).
❖ Photo
Delicate tones of photographs and pictures can be reproduced with this
mode.
❖ Auto Text/Photo
Select Auto Text/Photo when your originals contains photographs or pictures with letters.
❖ Pale
Select this mode for originals that have lighter lines written in pencil, or for
carbon copies. The faint lines will be clearly copied.
❖ Generation
If your originals are copies (generation copies), the copy image will be reproduced sharply and clearly.
Note
❒ You can adjust the quality level for each original type. See “Original Mode
Level” ⇒ P.314 “Original Mode Level”.
❒ You can have the Original Type keys displayed on the initial copy display.
See “Original Mode Display” ⇒ P.316 “Display/Panel Tone”.
❒ Make adjustments to the original type on the master unit.
36
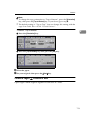
Basic Functions
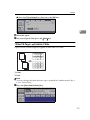
A Press the appropriate key to select the original type.
2
Note
❒ If you do not wish to set any other functions, press the {Start} key to start
copying.
Selecting Copy Paper
There are two ways to select copy paper:
❖ Auto Paper Select
The machine selects a suitable size of copy paper automatically based on the
original size and the reproduction ratio ⇒ P.39 “Image Rotation”.
❖ Manual Paper Select
Choose the tray containing the paper you wish to copy onto: Paper Tray,
Large Capacity Tray (LCT).
Note
❒ Auto Paper Select mode is intended for normal and recycled paper.
❒ If you set all the paper trays other than “Plain” or “Recycled Paper”, you cannot use Auto Paper Select.
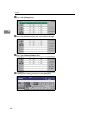
❒ Refer to the following table for possible copy paper sizes and directions with
Auto Paper Select (when copying at a ratio of 100 %):
❖ Metric version
Where Original Is Set
Paper Size and Direction
Exposure glass
A3 L, B4 L, A4 KL, B5 KL, A5 K, 81/2" × 13"
L *1
Document feeder
A3 L, B4 L, A4 KL, B5 KL, A5 KL, 11" × 17"
L, 11" × 15" L, 81/2" × 11" KL, 81/2" × 13" L *1
*1
You can select from 81/2" × 13", 81/4" × 13" and 8" × 13" with the User Tools (System Settings). See “Original: F/F4 Size Setting” in the System Settings manual.
37
Copying
❖ Inch version
Where Original Is Set
Paper Size and Direction
Exposure glass
11" × 17" L, 81/2" × 14" L, 81/2" × 11"
KL
Document feeder
A4 KL, 11" × 17" L, 11" × 15"L, 81/2" ×
14" L, 81/2" × 11" KL, 51/2" × 81/2"KL,
81/2" × 13" L *1
2
*1
You can select from 81/2" × 13", 81/4" × 13" and 8" × 13" with the User Tools (System Settings). See “Original: F/F4 Size Setting” in the System Settings manual.
❒ For some originals, the original size might not be detected correctly. See ⇒
P.16 “Sizes Difficult to Detect”.
❒ When you set recycled paper in the paper tray, you can have the kind of paper
shown on the display. See “Tray Paper Settings” in the System Settings manual.
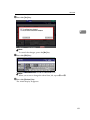
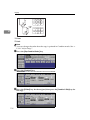
A Do one of the following
To have the machine select the copy paper automatically
A Make sure that the [Auto Paper Select] key is selected.
To select the copy paper manually
A Select the paper tray or LCT.
38
Basic Functions
-Image Rotation
If the direction in which your original is set (landscape or portrait) is different
from the paper you are copying onto, this function rotates the original image by
90° and fits it on the copy paper. This function works when the following functions are selected. Auto paper select, Auto Reduce/Enlarge, See ⇒ P.37 “Selecting Copy Paper” and ⇒ P.40 “Auto Reduce/Enlarge”.
Original
Paper OriOrientation entation
2
Copy Orientation
R
R
GCROTA0E
Limitation
❒ You cannot use the Image Rotation function with Auto Paper Select if the
Auto Tray Switching setting in the User Tools is set to “On (No Rotate)” or
“Off”. See “Auto Tray Switching” in the System Settings manual.
❒ You cannot use the Image Rotation function when enlarging onto B4 or A3
size paper. In this case, set your original in the landscape direction.
Original Size and Direction
A4,
B5, or
A5
portrait
when enlarg- B4,
ing to →
A3
R
You cannot
rotate:
Copy Paper Size and Direction
R
GCROTA1E
GCROTA2E
However,
you can rotate:
A4,
B5, or
A5
landscape
when enlarg- B4,
ing to →
A3
R
GCROTA3E
R
GCROTA4E
❒ You cannot use the Image Rotation function when “Top Slant” or “Top 2” is
selected for stapling or if the Punch function is selected. If you try, a “Check
paper size and direction” message is displayed. See ⇒ P.49 “Staple” and ⇒
P.52 “Punch”.
39
Copying
Auto Reduce/Enlarge
The machine can choose an appropriate reproduction ratio based on the paper
and original sizes you select.
2
Note
❒ You can not set papers into the A3/11" × 17" Tray Kit.
❒ When you use Auto Reduce/Enlarge, refer to the following table for possible
original sizes and directions:
❖ Metric version
Where Original Is Set
Original Size and Direction
Exposure glass
A3 L, B4 L, A4 KL, B5 KL, 81/2" × 13" L *1
Document feeder
A3 L, B4 L, A4 KL, B5 KL, A5 KL, B6 KL,
11" × 17" L,11" × 15" L, 81/2" × 11" KL, 81/2" ×
13" L *1
*1
You can select from 81/2" × 13", 81/4" × 13" and 8" × 13" with the User Tools (System Settings). See “Original: F/F4 Size Setting” in the System Settings manual.
❖ Inch version
Where Original Is Set
Original Size and Direction
Exposure glass
11" × 17" L, 81/2" × 14" L, 81/2" × 11"
KL
Document feeder
A4 KL, 11" × 17" L, 11" × 15"L, 81/2" ×
14" L, 81/2" × 11" KL, 51/2" × 81/2" KL,
81/2" × 13" L *1
*1
You can select from 81/2" × 13", 81/4" × 13" and 8" × 13" with the User Tools (System Settings). See “Original: F/F4 Size Setting” in the System Settings manual.
❒ The machine can select a ratio in the range 25–400 %.
❒ For some originals, the original size might not be detected correctly. See ⇒
P.16 “Sizes Difficult to Detect”.
40
Basic Functions
❒ You can set originals of different sizes in the document feeder at the same
time. See ⇒ P.31 “Mixed Sizes Mode”.
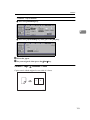
A Press the [Auto Reduce/Enlarge] key.
2
B Select the paper tray.
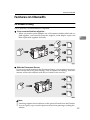
Copying onto OHP Transparencies
To make copies onto OHP transparencies, you need to specify the paper type.
For details, see “Tray Paper Settings” in the System Settings manual.
A Open designated OHP tray (Tray2-6).
B Lightly insert the OHP transparencies face up.
Note
❒ If you would like slip sheets (blank or copied) between your OHP transparencies, see ⇒ P.163 “Slip Sheets”.
❒ You cannot set the OHP transparencies into the Tandem Tray or optional
A3/11" × 17 " Tray Kit.
❒ To avoid paper misfeeds, fan the OHP transparencies before setting it in
the tray.
C Select the paper tray in which OHP transparencies are loaded.
D Set your originals then press the {Start} key.
Important
❒ When copying onto OHP transparencies, remove copied sheets one by
one.
41
Copying
Copying onto Tab Stock
2
Preparation
Set the paper tray for tab stock. See “Tray Paper Settings” in the System Settings manual.
You can set the tab stock in the Large Capacity Tray (LCT) Trays 4 - 5.
Check the position of index tab to avoid the image being sheared. See “Tray
Paper Settings” in the System Settings manual.
Important
❒ When you set the tab stocks in the tray, always use the end fence.
42
Basic Functions
❒ Tab stocks are always brought from top.
2
A Select the paper tray in which tab stock are loaded.
B Place your originals and press the {Start} key.
43
Copying
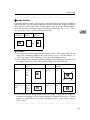
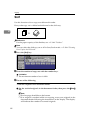
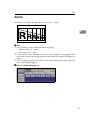
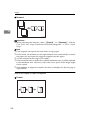
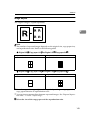
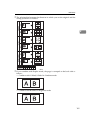
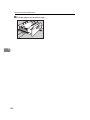
Sort
Use this function to have copy sets delivered in order.
Every other copy set is shifted and delivered to the shift tray.
2
2
3
123
123 123
1
Reference
For the paper capacity of the finisher, see ⇒ P.344 “Finisher”.
Note
❒ You can select the shift tray on or off in Sort/Stack mode. ⇒ P.190 “Choosing
How Copies Are Delivered”
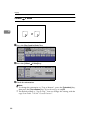
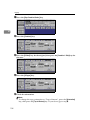
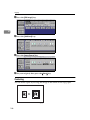
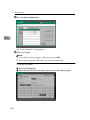
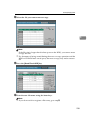
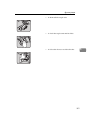
A Press the [Sort] key.
B Enter the number of copy sets with the number keys.
Limitation
❒ The maximum number of sets is 9999.
C Do one of the following:
To set the original in the document feeder
A Set the stack of originals in the document feeder, then press the {Start}
key.
Note
❒ The last page should be on the bottom.
❒ If an original is misfeed while sort copying, reset your originals in the
document feeder following the instructions on the display. The display
will indicate the number of scanned originals.
44
Sort
To set the original on the exposure glass or in the document feeder using
Batch/SADF mode
Reference
⇒ P.32 “Batch/SADF Mode”.
A Set the first page of your original, then press the {Start} key.
2
Note
❒ The last page should be on the bottom.
B After it has been scanned in, set the next original then press the {Start}
key.
Note
❒ Set the original in the same direction as the first one.
C After all originals have been scanned in, press the {#} key.
The copies are delivered to the tray.
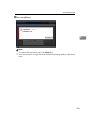
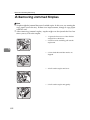
To stop scanning temporarily
A Press the {Stop} key to stop originals being scanned into memory.
To resume scanning
A Press the [No] key to resume scanning.
Note
❒ Scanned images in memory are not cleared.
To stop scanning and clear all scanned images from memory
A Press the [Yes] key.
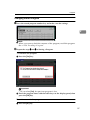
If memory reaches 0 %
Scanning will be stopped if the size of scanned image data exceeds memory capacity.
Note
❒ There is enough memory to store approximate 1,000 originals of A4, 81/2" ×
11" size. The number of originals that can be stored in memory varies depending on the memory settings and original type.
45
Copying
Reference
Scanning will stop when memory reaches 0 % during sorted copying. However, you can change this setting so that all the scanned pages are copied and
delivered to the tray first, then the machine automatically continues scanning
the remaining originals. See “Memory Full Auto Scan Restart” ⇒ P.328 “Input/Output”.
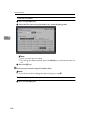
A Press the {Start} key.
2
The scanned pages are delivered to the tray. Then the image data in memory
is cleared.
B Remove the copies and continue copying by following the instructions on
the display.
46
Stack
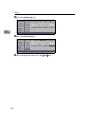
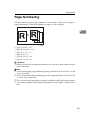
Stack
This function groups copies of each page in a multi-page original together.
Every other page stack is shifted for ease of separation. The finisher shift tray of
the finisher provides this function by sliding from side to side.
2
2
3
222
111 333
1
Reference
For the maximum tray capacity of the finisher, see ⇒ P.344 “Finisher”
Note
❒ You can change shift stack settings with the User Tools. See ⇒ P.190 “Shift
Tray Off In Sort/Stack”
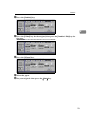
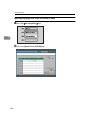
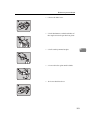
A Press the [Stack] key.
B Enter the number of copies with the number keys.
C Set your original in one of the following ways.
To set the original in the document feeder
A Set a stack of originals in the document feeder, then press the {Start} key.
Note
❒ The last page should be on the bottom.
❒ When you use duplex function, the copy paper will be output automatically after all pages are scanned.
47
Copying
To set the original on the exposure glass or in the document feeder using
Batch/SADF mode
Reference
See ⇒ P.32 “Batch/SADF Mode”.
A Set the original, then press the {Start} key.
2
Note
❒ Start with the first page to be copied.
B After it has been scanned in, set the next original then press the {Start}
key.
Note
❒ Set the original in the same direction as the first one.
48
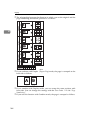
Staple
Staple
Use this function to have each copy set stapled together.
2
Limitation
❒ You cannot use the following paper types with this function:
•
•
•
•
•
•
•
Tracing paper
OHP transparencies
Adhesive labels
Curled paper
Low stiffness paper
Paper of different vertical sizes
Coated paper
Note
❒ You can not staple A5KL, 51/2" × 81/2"KL size paper.
❒ When the number of copies exceeds the shift tray capacity, copying stops. In
this case, remove the copies from the finisher shift tray and then resume copying.
Stapler capacity
• A4K, B5K, 81/2" × 11"K: 2 – 100 sheets (80g/
m2, 20 lb. Bond)
• A3L, B4L, A4L, B5L 11" × 17"L, 81/2" ×
14"L, 81/2" × 11"L: 2 – 50 sheets (80g/m2, 20 lb.
Bond)
Shift tray capacity (A4K, 81/2" × 3,000 sheets (80g/m2, 20 lb. Bond)
11"K) *1
*1
Depending on the number of sheets to be stapled and whether sheets have
punched holes or not, the maximum tray capacity might be reduced.
❒ When the number of copies for one set is over the stapler capacity, copies will
be delivered to the finisher shift tray unstapled.
❒ When you select Staple, Sort mode is automatically selected.
49
Copying
❒ When the indicator to remove staple waste appears, call your service representative.
Reference
For how to replenish the staple supply, see ⇒ P.299 “d Adding Staples”.
For how to clear staple jams, see ⇒ P.302 “e Removing Jammed Staples”.
2
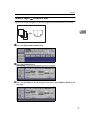
-Stapling Position
When there is copy paper identical in size and direction to your original, the stapling position is see ⇒ P.338 “Stapling Position”
Note
❒ You cannot change the stapling position during copying.
❒ When the original image is rotated, the stapling direction turns by 90°.
❒ With “Top” or “Bottom” selected as the stapling position, if no paper is available oriented in the same direction as the original, the image will be rotated
and the paper of the same size as the original but oriented in the different direction will be selected.
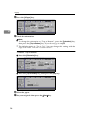
❒ You can select the image on the fourth staple key as “Bottom” or “Top 2”.
❒ The maximum original image size that can be rotated is as follows:
Metric version
A4
Inch version
81/2" × 11"
❒ You cannot use the Image Rotation function when “Top Slant”, “Left 2” or
“Top 2” is selected.
A Select one of the four stapling positions.
B Enter the number of copy sets with the number keys.
C Set your originals in one of the following ways.
To set the original in the document feeder
A Set a stack of originals in the document feeder, then press the {Start} key.
50
Staple
Note
❒ The last page should be on the bottom.
To set the original on the exposure glass or in the document feeder using
Batch/SADF mode
Reference
See ⇒ P.32 “Batch/SADF Mode”.
2
A Set the original, then press the {Start} key.
Note
❒ Start with the first page to be copied.
B When it has been scanned in, set the next original, then press the {Start}
key.
Note
❒ Set the original in the same direction as the first one.
C After all originals have been scanned, press the {#} key.
The copies are delivered to the tray.
51
Copying
Punch
The optional punch kit is required to use this function.
The function is used to make punch holes in copies.
❖ 2 holes
2
❖ 3 holes
❖ 4 holes
52
Punch
Limitation
❒ You cannot use the Image Rotation function if the Punch function is selected.
Set your original in the same direction (landscape or portrait) as the copy paper.
Note
❒ The relationship between the direction in which you set the original and the
punch hole positions is as follows:
2
❖ Punch Hole Positions
Direction in which Original Is Set
Exposure glass
2 holes
Punch Hole Positions
Document feeder
K
L
3 holes
K
L
4 holes
K
L
❒ Punchable paper sizes are as follows:
Metric version
A3L, B4L, A4K, B5KL, A5KL
Inch version
11" × 17"L, 81/2" × 14"L, 81/2" × 11"KL
❒ Since punch holes are made in each copy, the punch hole positions vary
slightly.
❒ The punch hole positions change according to the direction of the paper selected.
53
Copying
Reference
If the punch waste box fills up, see ⇒ P.305 “y Removing Punch Waste”.
A Select the Punch position.
2
B Set your originals then press the {Start} key.
54
Programs
Programs
You can store frequently used copy job settings in machine memory and recall
them for future use.
Limitation
❒ You cannot store the settings whether the Connect Copy function will be selected automatically in a program.
2
Note
❒ You can store up to 25 programs.
❒ You can select the standard mode or program No. 25 as the mode to be set
when modes are cleared or reset is made, or immediately after the operation
switch is turned on. ⇒ P.312 “General Features”
❒ If you store more than one paper tray of a same size, same orientation, the paper tray prioritized with the program is selected first.
❒ Programs are not cleared by turning the power off or by pressing the {Clear
Modes} key. They are canceled only when you delete or overwrite them with
another program.
❒ This function can be used for scanning in copy and document server mode.
❒ If your program contains settings that are not available in Connect Copy
mode, the will be ignored.
❒ If your program contains settings that are not available on sub-unit, they are
ignored.
Storing a Program
A Edit the copy settings so that all functions you want to store in this program
are selected.
B Press the {Program} key.
55
Copying
C Press the [Store] key.
2
D Press the program number you want to store.
Note
❒ Program numbers with m already have settings in them. ⇒ P.57 “Changing Stored Program”
E Enter the program name with the letter keys on the display panel. Then
press the [#] key.
Note
❒ You can register up to 18 characters.
❒ To change the name entered, press the [Clear] key and enter new letter.
F Press the [OK] key.
When the settings are successfully stored, the m indicator appears.
56
Programs
Changing Stored Program
A Press the stored program number key and make sure the settings.
2
Note
❒ When you want to check the contents of the program, recall the program.
See ⇒ P.59 “Recalling a Program”
B Repeat the steps A and D in Storing a Program.
To overwrite the program
A Press the [Yes] key.
Important
❒ If you select [Yes], the previous program is lost.
B Enter the program name with the letter keys on the display panel, then
press the [OK] key.
Do not to overwrite the program
A Press the [No] key.
57
Copying
Deleting a Program
A Press the {Program} key.
2
B Press the [Delete] key.
C Press the program number you want to delete.
D Press the [Yes] key.
Note
❒ To cancel the deletion, press the [No] key.
E To delete another program, repeat steps C and D.
58
Programs
Recalling a Program
A Press the {Program} key.
2
B Press the program number you want to recall.
The stored settings are displayed.
Note
❒ Only programs with m contain a program.
C Set your originals then press the {Start} key.
59
Copying
Job Preset
If a long copy job is in progress and you do not wish to wait for it to finish, you
can use this feature to set up the next copy job in advance. When the current
copy job is finished, your copy job will be started automatically.
Limitation
❒ You can not combine Job Preset function with Connect Copy function (option).
2
Note
❒ The maximum number of jobs sets that you can set with this feature is 10.
❒ You can use this feature for the documents stored in Document Server.
A Press the [New Job] key.
B Set up the next copy job.
Note
❒ To cancel this job, press the [Cancel Job] key.
C Set the originals.
60
Job Preset
To set the original in the document feeder
A Set a stack of originals in the document feeder, then press the {Start} key.
Note
❒ The last page should be on the bottom.
2
To set the original on the exposure glass or in the document feeder using
Batch/SADF mode
Reference
See ⇒ P.32 “Batch/SADF Mode”.
A Set the original, then press the {Start} key.
Note
❒ Start with the first page to be copied.
B When it has been scanned in, set the next original, then press the {Start}
key.
Note
❒ Set the original in the same direction as the first one.
C After all originals have been scanned, press the {#} key.
The copies are delivered to the tray.
Note
❒ When you wish to return the copying display, press the [Stop Copying]
key on the display panel.
Editing Job Preset
A Press the [Job List] key.
61
Copying
B Press the [Change] key.
2
C Press the number of the job you want to change.
D Press the [Change Settings] key.
E Change the setting, then press the [Exit] key.
62
Job Preset
F Press the [Yes] key.
2
Note
❒ To cancel the changes, press the [No] key.
G Press the [Exit] key.
Note
❒ When you want to change the other New Job, repeat C and F.
H Press the [Previous] key.
The initial display reappears.
63
Copying
Changing the Order of the Job Preset
A Press the [Job List] key.
2
B Press the [Change] key.
C Press the number of the job you want to change.
64
Job Preset
D Change the order using the [▲Forward] key or [▼Backward] key.
2
E Press the [Confirm] key.
F Press the [Previous] key.
The initial display reappears.
65
Copying
Deleting Job Preset
A Press the [Job List] key.
2
B Press the [Change] key.
C Press the number of the job you want to delete.
66
Job Preset
D Press the [Delete] key.
2
E Press the [Confirm] key.
F Press the [Previous] key.
The initial display reappears.
67
Copying
Other Functions
Energy Saver Mode
If you do not operate the machine for a certain period after copying, or when you
press the {Energy Saver} key, the display goes blank and the machine enters Energy Saver mode. When you press the {Energy Saver} key again, when the originals are set in the document feeder, or when the document feeder is opened, the
machine returns to the ready condition. In Energy Saver mode, the machine uses
less electricity.
Energy Saver mode makes a two-step reduction in electricity: one for the period
up to the time set for Panel Off & Energy Saver mode, the other for the period
after that time.
2
Note
❒ If you press the {Energy Saver} key during an operation, the current settings
will be cleared.
❒ It takes about 5 seconds to return to the ready condition from Energy Saver
mode.
❒ It takes about 40 seconds to return to the ready condition from Panel Off &
Energy Saver mode.
❒ If you press the [Connect] key on the master unit, the sub-unit exits Energy
Saver mode and enters Connect Copy mode.
❒ In Connect Copy mode, the sub-unit will not enter Energy Saver mode.
Reference
See “Panel Off Timer” and “Energy Saver Timer” in the System Settings manual for more information.
Interrupt Copy
Use this function if you wish to interrupt a long copy job to make urgently need
copies.
Note
❒ The procedure for making interrupt copies depends on which kind of operation the machine is currently carrying out.
❒ You can use Document Server mode in Interrupt Copy mode.
❒ In Connect Copy mode, you cannot use Interrupt Copy function on the subunit while the master unit is scanning an original.
❒ In Connect Copy mode, you cannot use Interrupt Copy function when memory on the sub-unit is full.
❒ Please exit the Interrupt mode after finishing the job.
68
Other Functions
To interrupt an original being fed
A Press the Interrupt key.
The Interrupt key lights up and scanning stops.
B Remove the originals that were being copied and set the originals you wish
to copy.
2
C Press the {Start} key.
The machine starts making your copies.
D When your copy job is finished, remove your originals and copies.
E Press the Interrupt key again.
The Interrupt key indicator goes out.
F When the display prompts you to, replace the originals that were being
copied before.
G Press the {Start} key.
The previous copy job settings will be restored and the machine will continue
copying from where it left off.
To interrupt copying after all originals have been fed
A Press the Interrupt key.
The Interrupt key lights.
Note
❒ Copying will not stop yet.
B Set your original.
C Press the {Start} key.
The machine stops the original job and starts copying your original.
D When copying is complete, remove your originals and copies.
E Press the Interrupt key again.
The Interrupt indicator goes out.
The previous copy job settings will be restored and the machine will continue
copying from where it left off.
69
Copying
User Codes
If the User Code function is turned on, operators must input their user codes before the machine can be operated. The machine keeps count of the number of
copies made under each user code.
Note
❒ When the machine is set for user codes, the machine will prompt you for your
user codes after the operation switch is on or the Auto Reset feature comes
into effect.
❒ You can adjust how long the machine waits before switching to the user code
input display. See “Copy Reset Timer” ⇒ P.312 “General Features”.
❒ To prevent others from making copies using your user code, press the {Clear
Modes} and {Clear} keys simultaneously after copying.
❒ You can turn User Codes on or off with the master unit System Settings. See
“User Codes:Copier/Document Server” in the System Settings manual.
❒ You can monitor the total number of copies mode by the master unit and subunit with the master unit User Codes function.
❒ If User Codes are set on in the sub-unit and a code has been entered before
Connect Copy was selected, the master unit cannot monitor the number of
copies mode.
❒ If User Codes are set only in the sub-unit, you can enter Connect Copy mode
and make copies without entering a code. In this case the number of copies
mode will not be monitored.
2
Reference
For how to set up user codes, see “Settings You Can Change With The User
Tools” in the System Settings manual.
For how to register, change and delete user codes, see “Program/Change/
Delete User Code” ⇒ P.331 “Key Operator Tools”.
Auto Start
If you press the {Start} key during the warm-up period, the {Start} key will blink
and your copies will be made as soon as the warm-up finishes.
Note
❒ Copying will start if “Ready” is displayed on the master unit in Connect Copy
mode.
A Make any adjustments to copy settings during the warm-up period.
B Set your originals.
70
Other Functions
C Press the {Start} key.
Copying automatically starts when the {Start} key indicator flashes red and
green and the machine is ready for copying.
Note
❒ To cancel Auto Start, press the {Stop} key.
❒ In Connect Copy mode, press the {Stop} key on the master unit to cancel
Auto Start.
2
Original Tone
The tone sounds and an error message is displayed when you leave your original on the exposure glass after copying, and set your originals in the document
feeder after copying.
Note
❒ To stop the Original Tone, see “Original Tone” ⇒ P.316 “Display/Panel Tone”.
Sample Copy
Use this feature to check a copy set before making a long copy run.
Limitation
❒ This function can be used only when the Sort function has been turned on.
Note
❒ This function is only available on the master unit in Connect Copy mode.
A Select Sort and any other functions, then enter the number of copies to be
made.
B Set the originals.
C Press the {Sample Copy} key.
One copy is delivered for proof copying.
D After checking the finish, press the [Print] key if the sample is acceptable.
The number of copies mode is the number you specified minus one for the
proof copy.
Note
❒ If you press [Stop] after checking change, return to step A to adjust the copy
settings as necessary. You can change some settings. e.g., staple, punch,
margin adjust settings
71
Copying
Preset Reduce/Enlarge
Use this feature to select a preset magnification ratio for copying.
2
Note
❒ You can select one of 12 preset ratios (5 enlargement ratios, 7 reduction ratios).
❒ You can change the preset ratios to other ratios you frequently use. See ⇒
P.314 “Set Ratio”.
❒ You can set and display two shortcut R/E ratios on the initial display. See
“Shortcut R/E” ⇒ P.314 “Set Ratio”.
❒ You can select a ratio regardless of the size of an original or copy paper. With
some ratios, parts of the image might not be copied or margins will appear on
copies.
❒ You can change the ratio on the key 71% displayed.
❒ If you press “Create Margin” key, the image is reduce 93% and moved center
of copy paper. You can change the ratio of this function. See ⇒ P.314 “Set Ratio”
❒ Copies can be reduced or enlarged as follows:
❖ Metric version
72
Ratio (%)
Original → Copy Paper Size
400 (enlarge area by 16)
--
200 (enlarge area by 4)
A5→A3
141 (enlarge area by 2)
A4→A3, A5→A4
122
F→A3, A4→B4
115
B4→A3
93
--
82
F→A4, B4→A4
75
B4→F4, B4→F
Preset Reduce/Enlarge
Ratio (%)
Original → Copy Paper Size
71 (reduce area by 1/2)
A3→A4, A4→A5
65
A3→F
50 (reduce area by 1/4)
A3→A5, F→A5
25 (reduce area by 1/16)
2
❖ Inch version
Ratio (%)
Original → Copy Paper Size
400 (enlarge area by 16)
--
200 (enlarge area by 4)
51/2" × 81/2"→11" × 17"
155 (enlarge area by 2)
51/2" × 81/2"→81/2" × 14"
129
81/2" × 11"→11" × 17"
121
81/2" × 14"→11" × 17"
93
--
85
F→81/2" × 11"
78
81/2" × 14"→81/2" × 11"
73
11" × 15"→81/2" × 11"
65
11" × 17"→81/2" × 11"
50 (reduce area by 1/4)
11" × 17"→51/2" × 81/2"
25 (reduce area by 1/16)
A Press the [Reduce/Enlarge] key.
Note
❒ To select a preset ratio in the initial display, directly press the shortcut reduce/enlarge key and proceed to step C.
73
Copying
B Select a ratio.
2
Note
❒ You can specify the reduce/enlarge ratios of the keys displayed when the
[Reduce/Enlarge] key is touched. See ⇒ P.314 “Set Ratio”
C Set your originals then press the {Start} key.
To create a margin
Use “Create Margin” mode to reduce the image by 93 % of its original size with
the center position as reference. You can register this function in a shortcut key
in the initial display. By combining it with the Reduce/Enlarge function, you can
also provide the Reduce/Enlarge copy with a margin.
Note
❒ You can change the Reduce/Enlarge ratio for “Create Margin”. See “Create
Margin” ⇒ P.314 “Set Ratio”.
A Press the [Create Margin] key displayed in the initial display.
B If you do not wish to use the Reduce/Enlarge function as well, set your originals then press the {Start} key.
74
Zoom
Zoom
Zoom lets you change the reproduction ratio in 1 % steps.
2
Note
❒ You can select a ratio within the following range:
• Metric version: 25 – 400 %
• Inch version: 25 – 400 %
❒ You can select a ratio regardless of the size of an original or copy paper. With
some ratios, parts of the image might not be copied or margins will appear on
copies.
❒ You can select a preset ratio which is near the desired ratio, then adjust the
ratio with the [+] or [−] key.
A Press the [Reduce/Enlarge] key.
75
Copying
B Enter the ratio.
To select the ratio with the [+] and [−] keys
A Select a preset ratio which is close to the desired ratio by using Preset Reduce/Enlarge.
2
B Adjust the ratio with the [+] or [−] key.
Note
❒ To change the ratio in 1 % steps, just press the [+] or [−] key. To change
the ratio in 10 % steps, press and hold down the [+] or [−] key.
To enter the ratio with the number keys
A Press the [Input Ratio] key.
B Enter the desired ratio with the number keys.
Note
❒ To change the ratio entered, press the [Clear] key and enter the new ratio.
C Press the [#] key.
D Press the [OK] key.
76
C Set your originals then press the {Start} key.
Size Magnification
Size Magnification
This function calculates an enlargement or reduction ratio based upon the
lengths of the original and copy.
2
A inch
a inch
Preparation
Measure the length of the image you wish to modify.
Note
❒ A ratio is selected in the range of 25 to 400 %.
❒ If the calculated ratio is over the maximum or under the minimum ratio, it is
corrected within the range of the ratio automatically. However, with some ratios, parts of the image might not be copied or blank margins will appear on
copies.
A Press the [Reduce/Enlarge] key.
B Press the [Size Mag.] key.
77
Copying
C Enter the length of the original with the number keys and press the [#] key.
2
Note
❒ You can enter sizes within the following ranges:
Metric version
1 - 999 mm (in 1 mm steps)
Inch version
0.1" - 99.9" (in 0.1" steps)
❒ To change the length entered, press the {Clear} key on the control panel or
[Clear] key on the display and enter the new length.
D Enter the length of the copy with the number keys and press the [#] key.
Note
❒ To change the length entered, press the {Clear} key on the control panel or
[Clear] key on the display and enter the new length.
❒ To change the length after pressing the [#] key, select [Original] or [Copy] key
and enter the desired length.
E Set your original, then press the {Start} key.
78
Directional Magnification (%)
Directional Magnification (%)
With Directional Magnification, copies can be reduced or enlarged at different
reproduction ratios horizontally and vertically.
a%
2
b%
CP2P01EE
a: Horizontal
b: Vertical
Note
❒ You can select ratios within the following range:
• Metric version: 25 – 400 %
• Inch version: 25 – 400 %
❒ You can select a ratio regardless of the size of an original or copy paper. With
some ratios, parts of the image might not be copied or blank margins will appear on copies.
❒ You can also select a preset ratio which is close to the desired ratio by using
Reduce or Enlarge, then adjust the ratio with the [+] or [−] key.
A Press the [Reduce/Enlarge] key.
Note
❒ When specifying a ratio with the [+] or [-] key, select a preset ratio which is
close to the desired ratio by using [Reduce] or [Enlarge].
79
Copying
B Press the [Direct. Mag.%] key.
2
To specify the ratio with the [+] and [−] keys
A Press the [+ − keys] key.
B Press the [Horizontal] key.
C Adjust the ratio using the [+] or [−] key.
Note
❒ Touching the [+] or [−] key changes the ratio in 1 % steps. Touching and
holding down the [+] or [−] key changes it in 10 % steps.
D Press the [Vertical] key.
E Adjust the ratio with the [+] or [−] key.
80
Directional Magnification (%)
To enter the ratio with the number keys
A Press the [Horizontal] key.
2
B Enter the desired ratio with the number keys, followed by the [#] key.
Note
❒ To change the ratio entered, press the {Clear} key on the control panel
or [Clear] key on the display and enter the new ratio.
C Press the [Vertical] key.
D Enter the desired ratio with the number keys, followed by the [#] key.
C Set your originals then press the {Start} key.
81
Copying
Directional Size Magnification (inch)
The suitable reproduction ratios will be automatically selected when you enter
the horizontal and vertical lengths of the original and copy image you require.
2
1
2
3
4
CP2M01EE
1: Horizontal original size
2: Vertical original size
3: Horizontal copy size
4: Vertical copy size
Preparation
Specify the vertical and horizontal sizes of the original and those of the copy,
as shown in the illustration.
Note
❒ You can enter sizes within the following ranges:
Metric version
1 – 999 mm (in 1 mm steps)
Inch version
0.1" – 99.9" (in 0.1" steps)
❒ You can select ratios within the following range:
• Metric version: 25 - 400%
• Inch version: 25 - 400%
❒ If the calculated ratio is over the maximum or under the minimum ratio, it is
corrected within the range of the ratio automatically. However, with some ratios, parts of the image might not be copied or blank margins will appear on
copies.
82
Directional Size Magnification (inch)
A Press the [Reduce/Enlarge] key.
2
B Press the [D. Size Mag. inch] key.
C Enter the horizontal size of the original with the number keys then press
the [#] key.
Note
❒ To change the value entered, press the {Clear} key on the control panel or
the [Clear] key on the display and enter the new value.
D Enter the horizontal size of the copy with the number keys then press the
[#] key.
E Enter the vertical size of the original with the number keys then press the
[#] key.
F Enter the vertical size of the copy with the number keys then press the [OK]
key.
Note
❒ To edit a size, press the item you wish to change and enter the new value.
G Set your originals then press the {Start} key.
83
Copying
Duplex
You can make two-sided copies in two ways:
❖ 1 Sided → 2 Sided
This mode makes two-sided copies from one-sided originals.
❖ 2 Sided → 2 Sided
This mode makes two-sided copies from two-sided originals.
2
Limitation
❒ You cannot use the following types of copy paper with this function:
•
•
•
•
•
Paper thicker than 163 g/m2, 90 lb. Index
Paper thinner than 64 g/m2, 16 lb. Bond
Tracing paper
Adhesive labels
OHP transparencies
1 Sided → 2 Sided
1
2
1
2
Note
❒ When original images are copied, the images can be shifted to create a binding margin. See “Front Margin: Left/Right” “Back Margin: Left/Right”
“Front Margin: Top/Bottom” “Back Margin: Top/Bottom” ⇒ P.318 “Adjust
Image”.
❒ A binding margin is automatically made on the back side. See “1 → 2 Duplex
Auto Margin Adjust” ⇒ P.318 “Adjust Image”.
84
Duplex
-Originals And Copy Direction
• Top to Top
2
Duplex1
• Top to Bottom
Duplex2
85
Copying
-Original Direction And Completed Copies
2
A Press the [Dup./Combine/Series] key.
B Press the [1 Sided → 2 Sided] key.
C Check the orientation.
86
Duplex
Note
❒ If you want to change the copy direction to “Top to Bottom” press the [Orientation] key, then press the [Top to Bottom] key. If you do not, go to step E.
❒ The default setting is “Top to Top”. You can change this setting with the
copy User Tools.⇒ P.312 “General Features”
To select “Top to Bottom”
2
A Press the [Orientation] key.
B Press the [Top to Bottom] key.
C Press the [OK] key.
D Set your originals in the following way.
When setting an original on the exposure glass or in the document feeder
using Batch/SADF mode
Reference
See ⇒ P.32 “Batch/SADF Mode”.
A Set the original, then press the {Start} key.
Note
❒ Start with the first page to be copied.
B Set the next original. When it is placed on the exposure glass, press the
{Start} key.
C When the number of originals is odd, press the {#} key after the last
original has been scanned.
87
Copying
2 Sided → 2 Sided
2
1
1
2
2
A Press the [Dup./Combine/Series] key.
B Press the [2 Sided → 2 Sided] key.
C Check the orientation.
Note
❒ To change the orientation to “Top to Bottom”, press the [Orientation] key,
then press the [Top to Bottom] key. If you do not, go to step E.
❒ The default setting is “Top to Top”. You can change this setting with the
copy User Tools. ⇒ P.312 “General Features”.
88
Duplex
To select “Top to Bottom”
A Press the [Orientation] key.
2
B Select the original orientation, then the copy orientation.
C Press the [OK] key.
D Set your originals in the following way.
When setting an original on the exposure glass or in the document feeder
using Batch/SADF mode
Reference
See ⇒ P.32 “Batch/SADF Mode”.
A Set the original, then press the {Start} key.
Note
❒ Start with the first page to be copied.
B Set the next original. When it is placed on the exposure glass, press the
{Start} key.
C Press the {#} key after the last original has been scanned.
89
Copying
Combine
Use this to combine two or more originals into one copy. 1 Sided Combine mode
is for one-sided copies, and 2 Sided Combine mode is for two-sided copies.
You can combine images in twelve ways:
❖ 1 Sided 2 Pages → Combine 1 Side
Copies two 1-sided originals on one side of a sheet
2
❖ 1 Sided 4 Pages → Combine 1 Side
Copies four 1-sided originals together on one side of a sheet.
❖ 1 Sided 8 Pages → Combine 1 Side
Copies eight 1-sided originals together on one side of a sheet.
❖ 1 Sided 4 Pages → Combine 2 Side
Copies four 1-sided originals on two sides of a sheet.
❖ 1 Sided 8 Pages → Combine 2 Side
Copies eight 1-sided originals on two sides of a sheet.
❖ 1 Sided 16 Pages → Combine 2 Side
Copies 16 1-sided originals together on both sides of a sheet.
❖ 2 Sided 1 Page → Combine 1 Side
Copies one 2-sided original on one side of a sheet.
❖ 2 Sided 2 Pages → Combine 1 Side
Copies two 2-sided originals on one side of a sheet.
❖ 2 Sided 4 Pages → Combine 1 Side
Copies four 2-sided originals on one side of a sheet.
❖ 2 Sided 2 Pages → Combine 2 Side
Copies two 2-sided originals together on both sides of a sheet.
❖ 2 Sided 4 Pages → Combine 2 Side
Copies four 2-sided originals together on two sides of a sheet.
❖ 2 Sided 8 Pages → Combine 2 Side
Copies eight 2-sided originals together on two sides of a sheet.
Note
❒ In this mode, the machine selects the reproduction ratio automatically. This
reproduction ratio depends on the copy paper sizes and the number of originals.
90
❒ The machine uses ratios in the following range:
• Metric version: 25 – 400 %
• Inch version: 25 – 400 %
Combine
❒ If the calculated ratio is under the minimum ratio, it is corrected within the
range of the ratio automatically. However, with some ratios, parts of the image might not be copied or blank margins appear on copies.
❒ You can have separation lines printed around the copy images. See “Combine
Separation Line” ⇒ P.318 “Adjust Image”.
❒ Even if the direction of originals is different from that of the copy paper, the
machine will automatically rotate the image by 90° to make copies properly.
❒ When making copies in Combine mode, the border of each original can be automatically erased by 3 mm, 0.1". See “Combine Orig. Shadow Erase” ⇒ P.318
“Adjust Image”.
❒ If the number of originals placed is less than the number specified for Combine, pressing the {#} key allows the last page(s) to be copied blank as shown
in the illustration.
12
1
3
2
2
3
❒ Direction of the originals and arrangement of combined images:
1 2 3 4
5 6 7 8
2
1
1
4
2
1 2
3
❖ Portrait (K) originals
8
GCSHUY1E
8
1
4
2
3
2
2
1
1
❖ Landscape (L) originals
1
3
5
7
2
4
6
8
GCSHUY2E
When you use portrait originals, you can change the order of the images with
the User Tools ⇒ P.312 “General Features”.
91
Copying
1 Sided 2 Pages → Combine 1 Side
Copies two 1-sided originals to a two-page spread.
2
1
2
1 2
❖ Direction in which to set originals in the document feeder
• Originals reading from left to right
1 2
3 4
1
2
3
4
Combine5
• Originals reading from top to bottom
2
1
4
3
4 3
2 1
Combine6
A Press the [Dup./Combine/Series] key.
92
Combine
B Press the [Combine] key.
2
C Press the [1 Sided] key for the original, then press the [Combine 1 Side] key for
the copy.
D Press the [2 Pages] key.
E Select the paper.
F Set your originals then press the {Start} key.
93
Copying
1 Sided 4 Pages → Combine 1 Side
Copies four 1-sided originals together to one side of a sheet.
1
2
2
3
1
2
3
4
4
GC SHVY 8J
Note
❒ You can change the order that the copy is printed in Combine mode. See ⇒
P.318 “Adjust Image”.
A Press the [Dup./Combine/Series] key.
B Press the [Combine] key.
94
Combine
C Press the [1 Sided] key for the original, then press the [Combine 1 Side] key for
the copy.
2
D Press the [4 Pages] key.
E Select the paper.
F Set your originals then press the {Start} key.
1 Sided 8 Pages → Combine 1 Side
Copies eight 1-sided originals together to one side of a sheet.
1
2
1 2 3 4
5 6 7 8
7
8
GC SHVY 3J
Note
❒ You can change the order that the copy is printed in Combine mode. See ⇒
P.318 “Adjust Image”.
95
Copying
A Press the [Dup./Combine/Series] key.
2
B Press the [Combine] key.
C Press the [1 Sided] key for the original, then press the [Combine 1 Side] key for
the copy.
D Press the [8 Pages] key.
E Select the paper.
F Set your originals then press the {Start} key.
96
Combine
1 Sided 4 Pages → Combine 2 Side
Copies four 1-sided originals to the two-page spread on both sides of a sheet.
1
2
1
2
2
3
4
4
3
GC SHVY 9J
A Press the [Dup./Combine/Series] key.
B Press the [Combine] key.
C Press the [1 Sided] key for the original, then press the [Combine 2 Side] key for
the copy.
97
Copying
D Press the [4 Pages] key.
2
E Check the orientation.
Note
❒ To change the orientation to “Top to Bottom”, press the [Orientation] key,
then press the [Top to Bottom] key. If you do not, go to step F.
❒ The default setting is “Top to Top”. You can change this setting with the
copy User Tools. ⇒ P.312 “General Features”.
To select “Top to Bottom”
A Press the [Orientation] key.
B Press the [Top to Bottom] key, then press the [OK] key.
F Select the paper.
G Set your originals then press the {Start} key.
98
Combine
1 Sided 8 Pages → Combine 2 Side
Copies eight 1-sided originals together to both sides of a sheet.
1
2
2
7
1 2
5 6
3 4
7 8
1
2
8
GCSHVYAE
1. Front
2. Back
Note
❒ You can change the order that the copy is printed in Combine mode. See ⇒
P.318 “Adjust Image”.
A Press the [Dup./Combine/Series] key.
B Press the [Combine] key.
99
Copying
C Press the [1 Sided] key for the original, then press the [Combine 2 Side] key for
the copy.
2
D Press the [8 Pages] key.
E Check the orientation.
Note
❒ To change the orientation to “Top to Bottom”, press the [Orientation] key,
then press the [Top to Bottom] key. If you not, go to step F.
❒ The default setting is “Top to Top”. You can change this setting with the
copy User Tools. See ⇒ P.312 “General Features”.
To select “Top to Bottom”
A Press the [Orientation] key.
100
Combine
B Press the [Top to Bottom] key then press the [OK] key.
2
F Select the paper.
G Set your originals then press the {Start} key.
1 Sided 16 Pages → Combine 2 Side
Copies sixteen 1-sided originals together to both sides of a sheet.
1
1 2 3 4
2
5 6 7 8
1
15
16
9 10 11 12
13 14 15 16
2
GCSHVY5E
1. Front
2. Back
Note
❒ You can change the order that the copy is printed in Combine mode. See ⇒
P.318 “Adjust Image”.
A Press the [Dup./Combine/Series] key.
101
Copying
B Press the [Combine] key.
2
C Press the [1 Sided] key for the original, then press the [Combine 2 Side] key for
the copy.
D Press the [16 Pages] key.
E Check the orientation.
Note
❒ To change the copy orientation to “Top to Bottom”, press the [Orientation]
key, then press the [Top to Bottom] key. If you do not, go to step F.
❒ The default setting is “Top to Top”. You can change this setting with the
copy User Tools. ⇒ P.312 “General Features”.
102
Combine
To select “Top to Bottom”
A Press the [Orientation] key.
2
B Press the [Top to Bottom] key then press the [OK] key.
F Select the paper.
G Set your originals then press the {Start} key.
2 Sided 1 Page → Combine 1 Side
Copies one 2-sided original to one side of a sheet.
1
1
2
2
GC SHVY OJ
103
Copying
A Press the [Dup./Combine/Series] key.
2
B Press the [Combine] key.
C Press the [2 Sided] key for the original, then press the [Combine 1 Side] key for
the copy.
D Press the [2 Pages] key.
E Check the orientation.
Note
❒ To change the copy orientation to “Top to Bottom”, press the [Orientation]
key, then press the [Top to Bottom] key. If you do not, go to step F.
104
Combine
❒ The default setting is “Top to Top”. You can change this setting with the
copy User Tools. See ⇒ P.312 “General Features”.
To select “Top to Bottom”
A Press the [Orientation] key.
2
B Press the [Top to Bottom] key then press the [OK] key.
F Select the paper.
G Set your originals then press the {Start} key.
2 Sided 2 Pages → Combine 1 Side
Copies two 2-sided originals to one side of a sheet.
Note
❒ You can change the order that the copy is printed in Combine mode. See ⇒
P.318 “Adjust Image”.
105
Copying
A Press the [Dup./Combine/Series] key.
2
B Press the [Combine] key.
C Press the [2 Sided] key for the original, then press the [Combine 1 Side] key for
the copy.
D Press the [4 Pages] key.
E Check the orientation.
Note
❒ To change the copy orientation to “Top to Bottom”, press the [Orientation]
key, then press the [Top to Bottom] key. If you do not, go to step F.
106
Combine
❒ The default setting is “Top to Top”. You can change this setting with the
copy User Tools. See ⇒ P.312 “General Features”.
To select “Top to Bottom”
A Press the [Orientation] key.
2
B Press the [Top to Bottom] key then press the [OK] key.
F Select the paper.
G Set your originals then press the {Start} key.
2 Sided 4 Pages → Combine 1 Side
Copies four 2-sided originals to one side of a sheet.
Note
❒ You can change the order that the copy is printed in Combine mode. See ⇒
P.318 “Adjust Image”.
107
Copying
A Press the [Dup./Combine/Series] key.
2
B Press the [Combine] key.
C Press the [2 Sided] key for the original, then press the [Combine 1 Side] key for
the copy.
D Press the [8 Pages] key.
E Check the orientation.
Note
❒ To change the copy orientation to “Top to Bottom”, press the [Orientation]
key, then press the [Top to Bottom] key. If you do not, go to step F.
108
Combine
❒ The default setting is “Top to Top”. You can change this setting with the
copy User Tools. See ⇒ P.312 “General Features”.
To select “Top to Bottom”
A Press the [Orientation] key.
2
B Press the [Top to Bottom] key then press the [OK] key.
F Select the paper.
G Set your originals then press the {Start} key.
2 Sided 2 Pages → Combine 2 Side
Copies 2-sided originals together to both sides of a sheet.
1
3
2
4
1
2
4
3
GC SHVY 1J
109
Copying
A Press the [Dup./Combine/Series] key.
2
B Press the [Combine] key.
C Press the [2 Sided] key for the original, then press the [Combine 2 Side] key for
the copy.
D Press the [4 Pages] key.
E Check the orientation.
Note
❒ To change the copy orientation to “Top to Bottom”, press the [Orientation]
key, then press the [Top to Bottom] key. If you do not, go to step F.
110
Combine
❒ The default setting is “Top to Top”. You can change this setting with the
copy User Tools. See ⇒ P.312 “General Features”.
To select “Top to Bottom”
A Press the [Orientation] key.
2
B Press the [Top to Bottom] key then press the [OK] key.
F Select the paper.
G Set your originals then press the {Start} key.
2 Sided 4 Pages → Combine 2 Side
Copies four 2-sided originals together to both sides of a sheet.
1
3
5
2
7
4
6
8
1 2
5 6
3 4
7 8
1
2
GCSHVY2E
1. Front
2. Back
111
Copying
Note
❒ You can change the order that the copy is printed in Combine mode. See ⇒
P.318 “Adjust Image”.
A Press the [Dup./Combine/Series] key.
2
B Press the [Combine] key.
C Press the [2 Sided] key for the original, then press the [Combine 2 Side] key for
the copy.
D Press the [8 Pages] key.
E Check the orientation.
112
Combine
Note
❒ To change the copy orientation to “Top to Bottom”, press the [Orientation]
key, then press the [Top to Bottom] key. If you do not, go to step F.
❒ The default setting is “Top to Top”. You can change this setting with the
copy User Tools. See ⇒ P.312 “General Features”.
To select “Top to Bottom”
2
A Press the [Orientation] key.
B Press the [Top to Bottom] key then press the [OK] key.
F Select the paper.
G Set your originals then press the {Start} key.
2 Sided 8 Pages → Combine 2 Side
Copies eight 2-sided originals together to both sides of a sheet.
113
Copying
1
1 2 3 4
3
5 6 7 8
2
4
1
13
15
2
14
16
9 10 11 12
13 14 15 16
2
GCSHVY6E
1. Front
2. Back
Note
❒ You can change the order that the copy is printed in Combine mode. See ⇒
P.318 “Adjust Image”.
A Press the [Dup./Combine/Series] key.
B Press the [Combine] key.
C Press the [2 Sided] key for the original, then press the [Combine 2 Side] key for
the copy.
114
Combine
D Press the [16 Pages] key.
2
E Check the orientation.
Note
❒ To change the copy orientation to “Top to Bottom”, press the [Orientation]
key, then press the [Top to Bottom] key. If you do not, go to step F.
❒ The default setting is “Top to Top”. You can change this setting with the
copy User Tools. See ⇒ P.312 “General Features”.
To select “Top to Bottom”
A Press the [Orientation] key.
B Press the [Top to Bottom] key then press the [OK] key.
F Select the paper.
G Set your originals then press the {Start} key.
115
Copying
Series Copies
Series copies are made by separately copying the front and back of a 2-sided
original or the two facing pages of a spread original onto two sheets of paper.
Two varieties of this feature are available:
❖ 2 Sided → 1 Sided
Copies the front and back of a 2-sided original to make two 1-sided copies.
2
❖ Book → 1 Sided
Copies the two facing pages of a spread original to make two 1-sided copies.
2 Sided→1 Sided
Use this function to make one-sided copies from two-sided originals.
1
1
2
2
A Press the [Dup./Combine/Series] key.
116
Series Copies
B Press the [Series] key.
2
C Press the [2 Sided → 1 Sided] key.
D Check the orientation.
Note
❒ To change the copy orientation to “Top to Bottom”, press the [Orientation]
key, then press the [Top to Bottom] key. If you do not, go to step F.
❒ The default setting is “Top to Top”. You can change this setting with the
copy User Tools. See ⇒ P.312 “General Features”.
To select “Top to Bottom”
A Press the [Orientation] key.
117
Copying
B Press the [Top to Bottom] key then press the [OK] key.
2
E Set your originals then press the {Start} key.
Book → 1 Sided
Use this function to make one-sided copies from two facing pages of a bound
original, e.g., a book or magazine.
1
2
1
2
Note
❒ Refer to the following table when you select original and copy paper sizes
with a 100 % ratio:
❖ Metric version
Original
Copy paper
A3L
A4 K × 2 sheets
B4L
B5 K × 2 sheets
A4L
A5 K × 2 sheets
❖ Inch version
118
Original
Copy paper
11" × 17"L
81/2" × 11" K × 2 sheets
81/2" × 11"L
51/2" × 81/2" K × 2 sheets
Series Copies
A Press the [Dup./Combine/Series] key.
2
B Press the [Series] key.
C Press the [Book → 1 Sided] key.
D Make sure that [Auto Paper Select] is selected.
E Set the book on the exposure glass, then press the {Start} key.
119
Copying
Copying Book Originals
A book is made by copying two or more originals in page order.
❖ Book → 2 Sided
Copies a two-page spread original onto both sides of a sheet.
❖ Multi → 2 Sided
Copies each two-page spread original as it is onto both sides of a sheet.
2
❖ Booklet
Make copies in page order for a folded booklet.
❖ Magazine
Copies two or more originals to make copies in page order (for when they are
folded and stacked).
Limitation
❒ The machine cannot copy originals different in size and direction.
Note
❒ The machine sets the reproduction ratio automatically to match the paper size
and copies the originals together onto the paper.
❒ The machine uses ratios in the range of 25 to 400 %.
❒ If the calculated ratio is under the available minimum ratio, it will be adjusted
to the minimum ratio. However, with some ratios parts of the image might
not be copied.
❒ Even if the direction of originals is different from that of the copy paper, the
machine will automatically rotate the image by 90° to make copies properly.
Book→2 Sided
Copies a two-page spread original onto both sides of a sheet.
1
2
1
2
120
Copying Book Originals
Note
❒ Refer to the following table when you select original and copy paper sizes
with a 100 % ratio:
❖ Metric version
Original
Copy Paper
A3L
A4 (2-sided)
B4L
B5 (2-sided)
A4L
A5 (2-sided)
2
❖ Inch version
Original
Copy Paper
11" × 17"L
81/2" × 11" (2-sided)
81/2" × 11"L
51/2" × 81/2" (2-sided)
A Press the [Dup./Combine/Series] key.
B Press the [Book] key.
121
Copying
C Press the [Book → 2 Sided] key.
2
D Check the orientation.
Note
❒ To change the copy orientation to “Top to Bottom”, press the [Orientation]
key, then press the [Top to Bottom] key. If you do not, go to step F.
❒ The default setting is “Top to Top”. You can change this setting with the
copy User Tools. See ⇒ P.312 “General Features”.
To select “Top to Bottom”
A Press the [Orientation] key.
B Press the [Top to Bottom] key then press the [OK] key.
E Set the book on the exposure glass, then press the {Start} key.
122
Copying Book Originals
Multi → 2 Sided
Copies each two-page spread original as it is onto both sides of a sheet.
1
2
3
1
2
2
3
Note
❒ Refer to the following table when you select original and copy paper sizes
with a 100 % ratio:
❖ Metric version
Original
Copy paper
A3L
A4 (2-sided)
B4L
B5 (2-sided)
A4L
A5 (2-sided)
❖ Inch version
Original
Copy paper
11" × 17"L
81/2" × 11" (2-sided)
81/2" × 11"L
51/2" × 81/2" (2-sided)
A Press the [Dup./Combine/Series] key.
123
Copying
B Press the [Book] key.
2
C Press the [Multi → 2 Sided] key.
D Check the orientation.
Note
❒ To change the copy orientation to “Top to Bottom”, press the [Orientation]
key, then press the [Top to Bottom] key. If you do not, go to step F.
❒ The default setting is “Top to Top”. You can change this setting with the
copy User Tools. See ⇒ P.312 “General Features”.
To select “Top to Bottom”
A Press the [Orientation] key.
124
Copying Book Originals
B Press the [Top to Bottom] key then press the [OK] key.
2
E Select the paper.
F Set your originals then press the {Start} key.
Note
❒ When placing one original on the exposure glass or in the document feeder
in Batch (SADF) mode, press the {#} key at the last original.
Booklet
Make copies in page order for a folded booklet as shown in the following illustrations:
❖ Forward
1
2
3
2
3
4
1
4
GCBOOK0E
❖ Backward
1
2
3
3
2
4
4
1
GCBOOK1E
125
Copying
Important
❒ Before selecting this function, select “Forward” or “Backward” with the User
Tools. See “Copy Orientation In Booklet/Magazine” ⇒ P.318 “Adjust Image”.
Note
❒ Four originals are copied onto each sheet of copy paper.
❒ In this mode, the machine sets the reproduction ratio automatically to match
the paper size and copies the originals together onto the paper.
❒ A ratio is selected in the range of 25 to 400 %.
❒ If the calculated ratio is under the available minimum ratio, it will be adjusted
to the minimum ratio. However, with some ratios, parts of the image might
not be copied.
❒ If the number of originals scanned is less than a multiple of 4, the last page is
copied blank.
2
How to fold copies to make a booklet
1
2
3
1
3
1
GCBOOK2E
1. Forward
2. Backward
A Press the [Dup./Combine/Series] key.
126
Copying Book Originals
B Press the [Book] key.
2
C Press the [Booklet] key.
D Select the paper.
E Set your originals then press the {Start} key.
Magazine
Copies two or more originals to make copies in page order when they are folded
and stacked.
❖ Forward
1
2
2
7
8
7
1
8
4
5
3
6
GCBOOK3E
127
Copying
❖ Backward
1
2
7
7
2
8
1
5
4
6
3
8
2
GCBOOK4E
Important
❒ Before selecting this function, select “ [Forward] ” or “ [Backward] ” with the
User Tools. See “Copy Orientation In Booklet/Magazine” ⇒ P.318 “Adjust
Image”.
Note
❒ Four originals are copied onto each sheet of copy paper.
❒ In this mode, the machine sets the reproduction ratio automatically to match
the paper size and copies the originals together onto the paper.
❒ A ratios selected in the range of 25 to 400 %.
❒ If the calculated ratio is under the available minimum ratio, it will be adjusted
to the minimum ratio. However, with some ratios, parts of the image might
not be copied.
❒ If the number of originals scanned is less than a multiple of 4, the last page is
copied blank.
How to fold copies to make a magazine
❖ Forward
7
1
5
3
5
1 3
GCBOOK5E
128
Copying Book Originals
❖ Backward
5
7
3
5
1
3 1
2
GCBOOK6E
A Press the [Dup./Combine/Series] key.
B Press the [Book] key.
C Press the [Magazine] key.
D Select the paper.
E Set your originals then press the {Start} key.
Note
❒ The copying may take some time after scanning originals.
129
Copying
Margin Adjustment
You can shift the image left, right, top or bottom to make a binding margin.
A
2
A
Limitation
❒ If you set too wide a margin, areas you do not want to delete might be erased.
Note
❒ You can change the width of the binding margin as follows:
Metric version
0 – 30 mm (in 1 mm steps)
Inch version
0" – 1.2" (in 0.1" steps)
❒ The margin width default is as follows. You can change this default setting
with the User Tools. See “Front Margin: Left/Right” “Back Margin: Left/
Right” “Front Margin: Top/Bottom” “Back Margin: Top/Bottom” ⇒ P.318
“Adjust Image”.
Metric version
• Front: 5 mm Left
• Back: 5 mm Right
Inch version
• Front: 0.2" Left
• Back: 0.2" Right
❒ When making two-sided copies from one-sided originals, you can set a binding margin for back pages. See “1 → 2 Duplex Auto Margin Adjust” ⇒ P.318
“Adjust Image”.
A Press the [Edit Image] key.
130
Margin Adjustment
B Press the [Margin Adj.] key.
2
C Set a front margin for a front page. Press the [→] and [←] keys when setting
the left and right margins, and the [↓] and [↑] keys when setting the top and
bottom margins.
Note
❒ You can adjust the width in the range of 3–50mm, 0,1"–2,0".
D Set a back margin the back page. Press the [→] and [←] keys when setting
the left and right margins, and the [↓] and [↑] keys when setting the top and
bottom margins.
Note
❒ You can specify the back margin only when the Duplex or the Two Sided
copy with Combine is selected.
❒ If you do not set a back margin, go to step E.
E Set your originals then press the {Start} key.
131
Copying
Border Erase
2
Limitation
❒ This function will not take effect if the size of the original cannot be detected.
Note
❒ You can change the width of the erased margin as follows:
Metric version
3 – 50 mm (in 1 mm steps)
Inch version
0.1" – 2.0" (in 0.1" steps)
Note
❒ The default width of the erased margin is as follows. You can change this settings with the User Tools. See “Border Erase Width” ⇒ P.318 “Adjust Image”
Metric version
10 mm
Inch version
0.4"
❒ .
❒ The width of the erased margin varies depending on the reproduction ratio.
❒ If the size of the original is different from sizes listed in the following chart,
the erased margin might be shifted.
❖ Metric version
Where Original Is Set
Paper Size and Orientation
Exposure glass
A3L, B4L, A4KL, B5KL, 81/2" × 13"L *1
Document feeder
A3L, B4L, A4KL, B5KL, A5KL, B6KL, 11"
× 17"L, 11" × 15"L, 82/1" × 11"KL, 81/2" × 13"L
*1
*1
132
You can select from 81/2" × 13", 81/4" × 13" and 8 " × 13" with the User Tools (System Settings). See “Original: F/F4 Size Setting” in the System Settings manual.
Border Erase
❖ Inch version
Where Original Is Set
Paper Size and Orientation
Exposure glass
11" × 17"L, 81/2" × 14"L, 81/2" × 11"KL
Document feeder
A4KL, 11" × 17"L, 11" × 15"L, 81/2" × 14"L, 81/
2
" × 11"KL, 51/2" × 81/2"KL, 81/2" × 13"L *1 1
*1
You can select from 81/2" × 13", 81/4" × 13" and 8 " × 13" with the User Tools (System Settings). See “Original: F/F4 Size Setting” in the System Settings manual.
2
❒ The position of the margin to be erased is determined according to the original size and reproduction ratio.
LCopy paper
KCopy paper
1
1
❒ 1: Erased part
A Press the [Edit Image] key.
B Press the [Border Erase] key.
133
Copying
To select “Same Width”
A Press the [Same Width] key.
2
B Adjust the width of the margin to be erased by pressing the [+] or [-] key.
Note
❒ To change the width entered, press the [+] and [-] keys and enter the correct width.
To Select “4 Sides”
A Press the [4 Sides] key.
B Adjust the width of the margin to be erased by pressing the [+] or [-] key.
Note
❒ To change the width entered, press the [+] and [-] keys and enter the correct width.
C Set your originals then press the {Start} key.
134
Center/Border Erase
Center/Border Erase
This function erases the center and/or all four sides of the original image. This
is useful for avoiding shadows on the copy image caused by the binding or
splayed pages of books etc.
2
Two modes of this feature are available:
❖ Center
This mode erases the Center margin of the original image.
❖ Border
This mode erases the edges area of the original image.
Limitation
❒ This function will not take effect if the size of the original cannot be detected.
Note
❒ You can change the width of the erased margin as follows:
Metric version
3 – 50 mm (in 1 mm steps)
Inch version
0.1" – 2.0" (in 0.1" steps)
❒ The default width of the erased margin is as follows. You can change this settings with the User Tools. See “Border Erase Width” ⇒ P.318 “Adjust Image”
and “Centre Erase Width” ⇒ P.318 “Adjust Image”.
Metric version
10 mm
Inch version
0.4"
❒ The width of the erased margin varies depending on the reproduction ratio.
❒ If the size of the original is different from sizes listed in the following chart,
the erased margin might be shifted.
135
Copying
❖ Metric version
Where Original Is Set
Paper Size and Orientation
Exposure glass
A3L, B4L, A4KL, B5KL, 81/2" × 13" L *1
Document feeder
A3L, B4L, A4KL,B5KL, A5KL, B6KL, 11"
× 17"L, 11" × 15"L, 82/1" × 11"KL, 81/2" × 13" L
*1
2
*1
You can select from 81/2" × 13", 81/4" × 13" and 8" × 13" with the User Tools (System Settings). See “Original: F/F4 Size Setting” in the System Settings manual.
❖ Inch version
Where Original Is Set
Paper Size and Orientation
Exposure glass
11" × 17"L, 81/2" × 14"L, 81/2" × 11"KL
Document feeder
A4KL, 11" × 17"L, 11" × 15"L, 81/2" × 14"L, 81/
1
1
1
*1
2" × 11"KL, 5 /2" × 8 /2"KL, 8 /2" × 13" L
*1
You can select from 81/2" × 13", 81/4" × 13" and 8" × 13" with the User Tools (System Settings). See “Original: F/F4 Size Setting” in the System Settings manual.
❒ The position of the margin to be erased is determined according to the original size and reproduction ratio.
L Copy Paper
K Copy Paper
1
3~50mm
1
❒ 1: Erased part
❒ You can use the Erase Center and Erase Border functions together.
A Press the [Edit Image] key.
136
Center/Border Erase
B Press the [Cntr/Brdr Erase] key.
2
Selecting “Same Width”
A Press the [Same Width] key.
B Set the width with the [+] and [-] keys.
Note
❒ To change the width entered, press the [+] and [-] keys and enter the correct width.
Selecting “4 Sides”
A Press the [4 Sides] key.
B Set the width with the [+] and [-] keys.
Note
❒ To change the width entered, press the [+] and [-] keys and enter the correct width.
C Set your originals then press the {Start} key.
137
Copying
Delete Area
Delete Inside
This function blanks out a designated area of the copy image.
2
Note
❒ The length you can input is 0-450mm.
❒ You can erase two parts of the image at a same time.
A Press the [Edit Image] key.
B Press the [Delete Area] key.
138
Delete Area
C Press the [Delete Inside 1] or [Delete Inside 2] key.
2
D Input the value of X1, then press the [#] key or [X2] key.
Note
❒ To change the length entered, press the {Clear} key on the control panel or
[Clear] key on the display panel and enter the new length.
E Input the value of X2, then press the [#] key or [Y1] key.
F Input the value of Y1, then press the [#] key or [Y2] key.
G Input the value of Y2, then press the [#] key.
Note
❒ To change the number entered, press the item that you want to change and
enter the new number.
H Set your originals then press the {Start} key.
139
Copying
Delete Outside
This function blanks out all areas of the copy image except the area you choose.
2
Note
❒ The length you can input is 0-450mm.
A Press the [Edit Image] key.
B Press the [Delete Area] key.
C Press the [Delete Outside] key.
140
Delete Area
D Input the value of X1, then press the [#] key or [X2] key.
2
Note
❒ To change the length entered, press the {Clear} key on the control panel or
[Clear] key on the display panel and enter the new length.
E Input the value of X2, then press the [#] key or [Y1] key.
F Input the value of Y1, then press the [#] key or [Y2] key.
G Input the value of Y2, then press the [#] key.
Note
❒ To change the number entered, press the item that you want to change and
enter the new number.
H Set your originals then press the {Start} key.
141
Copying
Additional
There are additional types of Edit Image mode:
❖ 3 Side Full Bleed
You can make an edge to edge to make with 3 side full bleed.
2
❖ Double Copies
One original image is copied twice on one copy.
❖ Image Repeat
The original is copied repeatedly.
❖ Centering
You can make copies by moving the image to the center of the copy paper.
3 Side Full Bleed
You can make the full image copy by cutting down the margin of Top, Bottom
and Right side.
This function is useful for the originals full of image.
A Press the [Edit Image] key.
142
Additional
B Press the [Additional] key.
2
C Press the [3 Side Full Bleed] key.
D Set your originals then press the {Start} key.
Double Copies
The one original image is copied twice on one copy as shown in the illustration.
Note
❒ You can insert lines between repeated images. See “Double Copies Separation
Line” ⇒ P.318 “Adjust Image”.
❒ Refer to the following table when you select original and copy paper sizes
with 100 % ratio:
143
Copying
❖ Metric version
2
Original Size and Direction
Copy Paper Size and Direction
A5L
A4K
A4K
A3L
A5K
A4L
❖ Inch version
Original Size and Direction
Copy Paper Size and Direction
51/2" × 81/2"L
81/2" × 11"K
51/2" × 81/2"K
81/2" × 11"L
81/2" × 11"K
11" × 17"L
A Press the [Edit Image] key.
B Press the [Additional] key.
C Press the [Double Copies] key.
D Set your originals then press the {Start} key.
144
Additional
Image Repeat
The original image is copied repeatedly.
2
Note
❒ The number of repeated images depends on the original size, copy paper size,
and reproduction ratio. Refer to the following table.
❖ Original: A5K/Copy paper: A4K or Original: A5L/Copy paper A4L
4 repeats (71 %)
16 repeats (35 %)
Repeat2
Repeat1
❖ Original: A5K/Copy paper: A4L or Original: A5L/Copy paper A4K
2 repeats (100 %)
8 repeats (50 %)
Repeat3
Repeat4
❒ Part of a repeated image might not be copied depending on copy paper size,
copy paper direction or reproduction ratio.
❒ You can insert separate lines between repeated images. See “Repeat Separation Line” ⇒ P.318 “Adjust Image”.
A Select the size of the copy paper and the reproduction ratio.
145
Copying
B Press the [Edit Image] key.
2
C Press the [Additional] key.
D Press the [Image Repeat] key.
E Set your original, then press the {Start} key.
Centering
You can make copies by moving the image to the center of the copy paper.
146
Additional
Limitation
❒ If the direction of originals is different from that of the copy paper, the machine will not rotate the image by 90°(rotate-copy).
❒ This function will not take effect if the size of original cannot be detected.
Note
❒ The original sizes and directions for Centering are listed below.
2
❖ Metric version
Original placed on:
Paper size and direction
Exposure glass
A3L, B4L, A4KL, B5KL, 81/2" × 13" L *1
Document feeder
A3L, B4L, A4KL, B5KL, A5KL, B6KL,
11" × 17"L, 11" × 15"L, 81/2" × 11"KL, 81/2" × 13"
L *1
*1
You can select from 81/2" × 13", 81/4" × 13" and 8" × 13" using the user tool (system
settings). See ”<F/F4> Size Setting” of the ”System Settings” manual.
❖ Inch version
Original placed on:
Paper size and direction
Exposure glass
11" × 17"L, 81/2" × 14"L, 81/2" × 11"KL
Document feeder
A4KL, 11" × 17"L, 11" × 15"L, 81/2" × 14"L, 81/
1
1
1
*1
2" × 11"KL, 5 /2" × 8 /2"KL, 8 /2" × 13" L
*1
You can select from 81/2" × 13", 81/4" × 13" and 8" × 13" using the user tool (system
settings). See “<F/F4> Size Setting” of the “System Settings” manual.
A Select the paper.
B Press the [Edit Image] key.
147
Copying
C Press the [Additional] key.
2
D Press the [Centering] key.
E Set your originals then press the {Start} key.
148
Front Cover
Front Cover
The first page of your originals is copied on specified paper sheets for covers.
❖ Copy
2
1
2
3
1
2
3
❖ Blank
1
2
3
1
2
3
Preparation
Before selecting this function, set the tray for front cover and slip sheet paper.
See “Tray Paper Settings” in the System Settings manual.
The cover or slip sheets should be identical in size and direction as the copy
paper.
Note
❒ You can specify whether to a copy on the front cover. If you select [Copy], the
first page will be copied on the cover sheet. If you select [Blank], a cover sheet
will just be inserted before the first copy.
❒ If Blank mode is selected, the front cover will not be counted as a copy.
A Press the [Cover/Slip Sheet] key.
149
Copying
B Press the [Front Cover] key.
2
C Select [Copy] or [Blank] key.
D Select the paper tray you use.
E Set your originals in the document feeder, then press the {Start} key.
150
Back Covers
Back Covers
The last pages of your originals are copied on specified paper.
❖ Copy
2
1
2
3
4
4
1
2
3
GCCOVE1J
❖ Blank
Preparation
Before selecting this function, set the tray for back cover paper and slip sheet
paper. See “Tray Paper Settings” in the System Settings manual.
The cover or slipsheets should be identical in size and direction as the copy
paper.
Note
❒ You can specify whether to a copy on the back cover. If you select [Copy], the
last page will be copied on the cover sheet. If you select [Blank], a cover sheet
will just be inserted after the last copy.
❒ You can specify to print the back cover side on the back or inside of the cover
sheet. See “Copy Back Cover” ⇒ P.318 “Adjust Image”.
❒ If [Blank] mode is selected, the back cover will not be counted as a copy.
A Press the [Cover/Slip Sheet] key.
151
Copying
B Press the [Back Cover] key.
2
C Select [Copy] or [Blank] key.
D Select the paper tray you use.
E Set your originals in the document feeder, then press the {Start} key.
152
Designate/Chapters
Designate/Chapters
The following functions are explained in this section:
❖ Designate: Copy
Use this function to designate certain pages of your original to be copied onto
slip sheets.
2
❖ Designate: Blank
Use this function to insert the slipsheet into certain pages of your original.
❖ Chapters
When using one-sided to two-sided copying, the page locations you specify
with this function will appear on the front of copy sheets beginning a new
chapter.
❖ Slip Sheet Copy
Use this function to insert the slipsheet into certain pages of your original.
Preparation
Before use this function, specified the paper tray for slipsheet. You can set
three trays for slipsheet. See “Tray Paper Settings” in the System Settings
manual.
Limitation
❒ You cannot combine with Slip Sheet function.
❒ You cannot copy with different size or direction originals.
Note
❒ You can specify the pages up to 20.
❒ You can use index tab stock for slipsheet. See “Tray Paper Settings” in the System Settings manual.
153
Copying
Designate: Copy
Use this function to designate certain pages of your original to be copied onto
slip sheets.
2
Note
❒ When “1 Sided → 2 Sided” has been selected, the page numbers you designate will always be copied onto the front of copies in the same way as Chapters mode.
A Press the [Cover/Slip Sheet] key.
B Press the [Designate/Chapters]
154
Designate/Chapters
C Press the [Designate: Copy] key.
2
D Select the tray you wish to use.
E Select the type of slipsheet.
F Enter the number of the original's location you want to copy onto a slip
sheet with the number keys. Then, press the {#} key.
This display shows example settings.
Note
❒ To change the value entered, press the {Clear} key and enter the new value.
G To specify another page number, repeat step D and E.
155
Copying
H When you wish to finish specifying page locations, press the [OK] key.
Note
❒ To change the number entered, select the desired item, then enter the new
number.
I Set your originals then press the {Start} key.
2
Designate: Blank
Use this function to insert the slipsheet into certain pages of your original.
A Press the [Cover/Slip Sheet] key.
B Press the [Designate/Chapters] key.
156
Designate/Chapters
C Press the [Designate: Blank] key.
2
D Select the tray you wish to use.
E Select the type of slipsheet.
F Enter the number of the original's location you want to copy onto a slip
sheet with the number keys. Then, press the {#} key.
This display shows example settings.
Note
❒ To change the value entered, press the {Clear} key and enter the new value.
G To specify another page location, repeat step D and E.
157
Copying
H When you wish to finish specifying page location, press the [OK] key.
Note
❒ To change the number entered, select the desired item, then enter the new
number.
I Set your originals then press the {Start} key.
2
Chapters
When using one-sided to two-sided copying, the page locations you specify with
this function will appear on the front of copy sheets beginning a new chapter.
Preparation
Before selecting this function, press the [Dup./Combine/Series] key and select “1
Sided” for original, and “2 Sided” for copy.
Limitation
❒ You cannot use this function with Slip Sheet mode.
Note
❒ You can specify up to 20 chapter locations.
❒ This function can be combined with the Designate function.
A Press the [Cover/Slip Sheet] key.
158
Designate/Chapters
B Press the [Designate/Chapters] key.
2
C Press the [Chapters] key.
D Enter the page location of the first page of the first chapter with the number
keys. Then, press the {#} key.
This display shows example settings.
Note
❒ To change the value entered, press the {Clear} key and enter the new value.
E To specify another page location, repeat step D.
F When you finish specifying the page location, press the [OK] key.
159
Copying
Note
❒ To change the number entered, select the desired item, then enter the new
number.
G Select the paper tray.
H Set your originals then press the {Start} key.
2
Slip Sheet Copy
Use this function to insert the slipsheet into certain pages of your original.
1
2
3
4
1
2
3
4
GCCOVE2J
A Press the [Cover/Slip Sheet] key.
B Press the [Designate/Chapters] key.
160
Designate/Chapters
C Press the [Slip Sheet Copy] key.
2
D Select the tray you wish to use.
E Select the type of slipsheet.
F Enter the number of the original's location you want to copy onto a slip
sheet with the number keys. Then, press the {#} key.
This display shows example settings.
Note
❒ To change the value entered, press the {Clear} key and enter the new value.
161
Copying
G Press the [∼] key.
2
H Enter the last number of the original. Then press the {#} key.
I To specify another page location, repeat step D and G.
J When you wish to finish specifying page location, press the [OK] key.
Note
❒ To change the number entered, select the desired item, then enter the new
number.
K Set your originals then press the {Start} key.
162
Slip Sheets
Slip Sheets
This function inserts a sheet of paper from a different paper tray between each
page copied. This function can be used to insert a slip sheet automatically between OHP transparencies or used as a way of separating pages. You can also
copy onto the inserted slip sheets.
2
Preparation
Before selecting this function, specify the paper tray for slip sheets. The paper
tray for the slipsheets is selected “Slip sheet: Tray 1” automatically. See “Tray
Paper Settings” in the System Settings manual.
Limitation
❒ You cannot use this function with Chapters and Designate modes.
Note
❒ Set the slip sheets in the same orientation as originals.
❒ You can specify whether to make copies onto the inserted slip sheets or not.
❒ If you do not copy onto slip sheets, they are excluded from the number of copies counted.
To Insert Slip/Copy Onto Sheets
❖ Copy
2
1
2
2
1
1
163
Copying
❖ Blank
2
1
12
2
Note
❒ When you want to set the OHP sheet in paper tray, see “Tray Paper Settings”
in the System Settings manual.
A Press the [Cover/Slip Sheet] key.
B Press the [Slip Sheet] key.
C Select [Copy] or [Blank] key.
D Select the paper tray containing the non-slip sheet paper.
E Set your originals then press the {Start} key.
164
Background Numbering
Background Numbering
Use this function to have numbers printed on the background of copies.
This function can help you to keep track of confidential documents.
2
Note
❒ You can change some settings (e.g., density) of the numbers with the User
Tools. See ⇒ P.323 “Background Numbering”.
❒ Numbers are printed on all pages.
❒ If you combine this function with other stamp functions, numbers might
overlap other stamps.
❒ You cannot combine Background Numbering function with staple or Punch
function.
❒ You can select whether the Background Numbering is printed negative if it
overlaps black parts of image ⇒ P.323 “Preset Stamp”.
❒ You can change the starting number of the Background Numbering (1-9999).
A Press the [Stamp] key.
165
Copying
B Press the [Background No.] key.
2
C To change the entered number, press the [Change] key. If you do not wish
to, go to step E.
D Enter the number to start counting from with the number keys. Then press
the [#] key.
Note
❒ To change the entered number, press the {Clear} key on the control panel
or press the [Clear] key on the display panel then enter the new number.
E Set your originals and press the {Start} key.
166
Preset Stamp
Preset Stamp
2
Limitation
❒ One message can be stamped at a time. However, you can combine with only
one user stamp.
❒ When you combine this feature with the Magazine or Booklet function, only
the first page is stamped.
Note
❒ One of the following eight messages can be stamped on copies with a frame
around it: “COPY”, “URGENT”, “PRIORITY”, “For Your Info.”, “PRELIMINARY”, “For Internal Use Only”, “CONFIDENTIAL”, “DRAFT”.
❒ You can change some Preset Stamp settings (e.g., density) with the User
Tools. See ⇒ P.323 “Preset Stamp”, ⇒ P.170 “To change the stamp position, size
or density”.
❒ The default stamp position is “Top Right”. You can change this with the User
Tools. See ⇒ P.323 “Preset Stamp”, ⇒ P.170 “To change the stamp position, size
or density”.
❒ You can change the stamp language with the User Tools. See ⇒ P.323 “Preset
Stamp”.
❒ You can select whether the Preset Stamp is printed negative if it overlaps
black parts of the image. See ⇒ P.323 “Preset Stamp”.
❒ You cannot combine Preset Stamp function with Staple or Punch function.
167
Copying
❒ The relationship between the direction in which you set the original and
stamp orientation/position is as follows:
2
A Press the [Stamp] key.
168
Preset Stamp
B Press the [Preset Stamp] key.
2
C Select the desired message by touching the appropriate key.
D Select the print page.
Note
❒ If you combine this feature with the magazine or Booklet function, “1st
Page Only” is selected automatically.
To have only the first page stamped
A Press the [1st Page Only] key.
169
Copying
To change the stamp position, size or density
A Press the [Change] key.
2
B Select the desired position, size and density by touching the appropriate
keys.
C Press the [OK] key.
E Set your originals then press the {Start} key.
170
User Stamp
User Stamp
Up to five messages which you use frequently can be stored in the machine's
memory and stamped on copies.
2
Preparation
Before using this function, you have to store your messages with the User
Tools. See ⇒ P.325 “User Stamp”.
Note
❒ The default stamp position is “Top Right”. You can change this with the User
Tools. See ⇒ P.325 “User Stamp”,⇒ P.173 “To change the stamp position”.
❒ If the position exceeds the page boundary, the stamp will not be printed on
copies.
❒ You can combine this feature with only one Preset Stamp.
171
Copying
❒ The relationship between the direction in which you set the original and
stamp Orientation/Position is as follows:
2
❒ You cannot combine User Stamp function with Staple or Punch function.
A Press the [Stamp] key.
172
User Stamp
B Press the [User Stamp] key.
2
C Touch a number to select the stamp you require.
D Select the stamp position and numbering format.
To have on the first page stamped
A Press the [1st Page Only] key.
To change the stamp position
A Press the [Change] key.
173
Copying
B Select the desired position by touching keys.
2
C Press the [OK] key.
E Set your originals then press the {Start} key.
Program/Delete User Stamp
A Make sure that the machine is in Copy mode.
B Press the {User Tools} key.
C Press the [Copier/Document Server Features] key.
174
User Stamp
D Press the [Stamp] key.
2
E Press the [User Stamp] key.
F Press the [Program/Delete Stamp] key.
175
Copying
To program the User Stamp
A Press the [Program] key.
2
B Press the stamp number (1-5) you want to program.
Note
❒ Stamp numbers with m already have settings in them.
❒ If the stamp number is already being used, the machine will ask you if
you wish to overwrite it - Press the [Yes] or [No] key.
176
User Stamp
C Enter the user stamp name with the letter keys on the display panel.
Then press the [#] key.
2
Note
❒ You can register up to 8 characters.
❒ To change the name entered, press the [Clear] key and enter new letter.
D Press the [OK] key.
E Enter the vertical and horizontal size of the stamp with the number keys.
Then press the [#] key.
Note
❒ To change the value entered, press the {Clear} key on the control panel
or [Clear] key on the display and enter the new value.
❒ You can enter sizes within 100 × 200mm, 3.9" × 7.8".
177
Copying
F Set the user stamp on the exposure glass, and then press the [Scan Start]
key.
G Press the [Exit] key.
To delete the User Stamp
Important
❒ You cannot restore deleted stamp.
2
A Press the [Delete] key.
B Press the stamp number (1-5) you want to delete.
Note
❒ Only programs with m contain a user stamp.
178
User Stamp
C Press the [Yes] key.
2
Note
❒ To cancel the deletion, press the [No] key.
D Press the [Exit] key.
G Press the {User Tools} key.
The initial display appears.
179
Copying
Date Stamp
2
Limitation
❒ If you combine this feature with the magazine or Booklet feature, you can not
set the Page Numbering at a same time.
Note
❒ You can select the following styles:
• MM/DD/YYYY
• MM.DD.YYYY
• DD/MM/YYYY
• DD.MM.YYYY
❒ You can change the Date Stamp settings with the User Tools. See ⇒ P.325
“Date Stamp”.
❒ The size and fonts of the Date Stamp can be changed with the User Tools. See
⇒ P.180 “Date Stamp”.
❒ The default direction is “Top Left”. You can change this setting with the User
Tools.
❒ The size, font and superimpose settings are linked with Page Numbering features.
❒ You cannot combine Date Stamp function with Staple or Punch function.
180
Date Stamp
❒ The relationship between the direction in which you set the original and the
stamp position is as follows:
2
❒ If you combine with Duplex mode, the page is stamped on the back side as
follows.
• Combine with 1 Sided/2 Sided in Combine mode
• Combine with Booklet or Magazine mode
181
Copying
A Press the [Stamp] key.
2
B Press the [Date Stamp] key.
To change the stamp position
A Press the [Change] key.
B Select the desired position of the Date Stamp with the keys on the display.
C Press the [OK] key.
C Set your originals then press the {Start} key.
182
Page Numbering
Page Numbering
Use this feature to print page numbers on your copies. There are six types of
page numbering (n is the total number of pages in your original):
2
•
•
•
•
•
•
Type A: P1,P2,…Pn
Type B: 1/n,2/n,...n/n
Type C: -1-,-2-,...-nType D: 1, 2…n
Type E: P.1,P.2,...P.n
Type F: 1-1,1-2,..1-n
Limitation
❒ When you set book or magazine function, you can not set date stamp function
at the same time.
Note
❒ You can change the page numbering settings with the User Tools. See ⇒ P.326
“Page Numbering”.
❒ The size and font of Page Numbering can be changed with the User Tools. See
⇒ P.326 “Page Numbering”.
❒ The size, fonts and superimpose settings are linked with Date Stamp features.
❒ You cannot combine Page Numbering function with Staple or Punch function.
183
Copying
❒ The relationship between the direction in which you set the original and the
page numbering orientation/position is as follows:
2
❒ If you combine with Duplex (Top to Top) mode, the page is stamped on the
back side as follows.
❒ If you combine with Duplex mode, you can stamp the same position with
front side. You can change this settings with the User Tools. ⇒ P.326 “Page
Numbering”
❒ If you use this function with Combine mode, the page is stamped as follows.
184
Page Numbering
• Combine with 1 Sided/2 Sided in Combine mode.
2
• Combine with Booklet or Magazine mode.
A Press the [Stamp] key.
B Press the [Page Numbering] key.
C Select the desired format and orientation by touching the appropriate keys
on display.
185
Copying
If you selected (P1,P2…, -1-,-2-…, P.1, P.2…, 1, 2…, ) in step C.
A Press the [Change] key.
2
B Press the [First Printing Page] key, then enter the original sheet number on
which you wish numbering to begin.
Note
❒ To change the number entered, press the {Clear} key on the control panel
or press the [Clear] key on the display panel and then enter a new number.
C Press the [Start Numbering From] key, then enter the number at which you
wish numbering to start with the number keys.
186
Page Numbering
D Press the [Last Number] key, then enter the page number at wish you wish
numbering to stop with the number keys.
2
Note
❒ If you wish to print onto the last page, press [To The End] key.
If you selected (1/5,2/5…) in step C
A Press the [First Printing Page] key, then enter the original sheet number on
which you wish numbering to begin.
Note
❒ To change the number entered, press the {Clear} key on the control panel or press the [Clear] key on the display and then enter a new number.
B Press the [Start Numbering From] key, then enter the page number to start
numbering using the number keys.
187
Copying
C Press the [Last Number] key, then enter the page number to stop numbering using the number keys.
2
Note
❒ If you wish to print onto the last page, press [To The End] key.
D Press the [Total Pages] key, then enter the total number of original pages
using the number keys.
If you selected (1-1, 1-2,…) in step C
A Press the [First Printing Page] key, then enter the original sheet number on
which you wish numbering to begin.
Note
❒ To change the number entered, press the {Clear} key on the control panel or press the [Clear] key on the display panel and then enter a new
number.
188
Page Numbering
B Press the [Chapter Number From] key, then enter the chapter number starting the numbering using the number keys.
2
C Press the [Start Numbering From] key, then enter the page number to start
numbering using the number keys.
D Press the [OK] key.
E Set your originals then press the {Start} key.
A Press the [Change] key.
B Select desired position of Page Numbering with the keys on the display.
189
Copying
Choosing How Copies Are Delivered
You can have copies delivered in the following ways:
❖ Shift Tray Off In Sort/Stack
Use this function have copies delivered with no shift in the Sort/Stack mode.
2
❖ Separation
You can insert separation sheets between sets or jobs.
❖ Copy Face Up
Use this function to deliver copies face up (in reverse order).
Shift Tray Off In Sort/Stack
A Press the [Output] key.
B Press the [Shift Tray Off In Sort/Stack] key.
C Set your originals then press the {Start} key.
190
Choosing How Copies Are Delivered
Separation
Use this feature to have separation sheets inserted between sets.
2
Preparation
Before selecting this function, set the tray for separation sheets. See “Tray Paper Settings” in the System Settings manual.
Note
❒ You can choose to have separation sheets inserted between every set, or every
n sets. See⇒ P.328 “Input/Output”.
A Press the [Output] key.
B Press the [Separation] key.
C Select the type of job separation.
D Set your originals then press the {Start} key.
191
Copying
Copy Face Up
Use this function to reverse the order of copies.
Note
❒ If you combine this function with the Duplex function, the copying may take
a certain time.
2
A Press the [Output] key.
B Press the [Copy Face Up] key.
C Set your originals then press the {Start} key.
192
Combination Chart
Combination Chart
The combination chart given below shows which modes can be used together.
❍
means that these modes can be used together.
→
means that these modes cannot be used together. The mode after you
select will be the mode you're working in.
×
means that these modes cannot be used together. The mode before
you select will be the mode you're working in.
2
The following shows the combinations of functions.
Mode before you Select
Output
Stamp
Edit Image
Batch/SADF
Mixed Sizes
Selecting Original
Selecting Copy Paper
Auto Reduce/Enlarge
Sort
Stack
Staple
Punch
Reduce/Enlarge
Create Margin
Zoom
Size Magnification
Duplex
Combine
Series
Book → 2 Sided
Multi → 2 Sided
Booklet
Magazine
Cover/Designate/Chapter
Slip Sheet
Double Copies
Delete/Save Area
Centre/Border Erase
Margin Adjustment
Repeat Copies
Centring
Preset Stamp/Page Numbering/
Date Stamp/Background Numbering
Shift Sort Off In Sort/Stack mode
Separation
Copy Face Up
Book
Cover/Slip Sheet
Mode after you Select
Batch/SADF
Mixed Sizes
Selecting
Original
Selecting Copy
Paper
Auto Reduce/
Enlarge
Sort
Stack
Staple
Punch
Reduce/Enlarge
Create Margin
Zoom
Size
Magnification
Duplex
Combine
Series
-- ❍ ❍ ❍ ❍ ❍ ❍ ❍ ❍ ❍ ❍ ❍ ❍ ❍ ❍ ❍ ❍ ❍ ❍ ❍ ❍ ❍ ❍ ❍ ❍ ❍ ❍ ❍ ❍
❍ -- ❍ ❍ ❍ ❍ ❍ ❍ ❍ ❍ ❍ ❍ ❍ ❍ ❍ ❍ ❍ × ❍ ❍ ❍ ❍ ❍ ❍ ❍ ❍ ❍ ❍ ❍
❍ ❍ -- ❍ ❍ ❍ ❍ ❍ ❍ ❍ ❍ ❍ ❍ ❍ ❍ ❍ ❍ ❍ ❍ ❍ ❍ ❍ ❍ ❍ ❍ ❍ ❍ ❍ ❍
❍❍❍
❍❍❍
❍❍❍
❍ ❍ ❍ -- → ❍ ❍ ❍ ❍ ❍ ❍ ❍ ❍ ❍ ❍ ❍ ❍ ❍ ❍ ❍ → → ❍ ❍ ❍ ❍ → ❍ ❍
❍❍❍
❍ ❍ ❍ → -- ❍ ❍ ❍ ❍ → ❍ → → ❍ ❍ ❍ ❍ ❍ ❍ ❍ ❍ ❍ ❍ ❍ ❍ ❍ → ❍ ❍
❍❍❍
❍
❍
❍
❍
❍
❍
❍
❍
❍
❍
❍
❍
❍
❍
❍
❍
❍
❍
❍
❍
❍
❍
❍
❍
❍
❍
❍
❍
❍
❍
❍
❍
❍ -- → ❍ ❍
❍ → -- → ❍
❍ ❍ → -- ❍
❍ ❍ ❍ ❍ -→❍ ❍ ❍ ❍
❍❍❍❍❍
→❍ ❍ ❍ ❍
→❍ ❍ ❍ ❍
❍❍
❍❍
❍❍
❍❍
-- ❍
❍ -→❍
→❍
❍❍❍
❍❍❍
❍❍❍
❍❍❍
→→❍
❍❍❍
-- → ❍
→ -- ❍
❍
❍
❍
❍
❍
❍
❍
❍
❍
❍
❍
❍
❍
❍
❍
❍
❍
❍
❍
❍
❍
❍
❍
❍
❍
❍
❍
❍
❍
❍
❍
❍
❍
❍
❍
×
❍
❍
❍
❍
❍
❍
❍
×
❍
❍
❍
❍
❍
❍
❍
❍
❍
❍
❍
❍
×
❍
×
❍
❍
❍
❍
❍
❍
❍
❍
❍
❍
❍
❍
❍
❍
❍
❍
❍
❍
❍
❍
❍
❍
❍
❍
❍
❍
❍
❍
❍
❍
❍
❍
❍
❍
❍
❍
❍
❍
❍
❍
❍
❍
❍
❍
❍
❍
❍
❍
❍
❍
❍
❍
❍
❍
❍
❍
❍
❍
❍
❍
❍
❍ ❍ ❍ ❍ ❍ ❍ ❍ ❍ ❍ ❍ ❍ ❍ ❍ -- → → → → → → ❍ × ❍ ❍ ❍ ❍ ❍ ❍ ❍
❍ ❍ ❍ ❍ ❍ ❍ ❍ ❍ ❍ ❍ ❍ ❍ ❍ → -- → → → → → ❍ × × ❍ ❍ ❍ × ❍ ❍
❍ ❍ ❍ ❍ ❍ ❍ ❍ ❍ ❍ ❍ ❍ ❍ ❍ → → -- → → → → × ❍ ❍ ❍ ❍ ❍ ❍ ❍ ❍
❍
❍
×
❍
❍
❍
❍
❍
❍
❍
×
❍
❍
❍
❍
❍
❍
❍
×
×
❍
❍
❍
❍
❍❍❍
❍❍❍
❍❍❍
193
Copying
Output
Stamp
Edit Image
Cover/Slip Sheet
Batch/SADF
Mixed Sizes
Selecting Original
Selecting Copy Paper
Auto Reduce/Enlarge
Sort
Stack
Staple
Punch
Reduce/Enlarge
Create Margin
Zoom
Size Magnification
Duplex
Combine
Series
Book → 2 Sided
Multi → 2 Sided
Booklet
Magazine
Cover/Designate/Chapter
Slip Sheet
Double Copies
Delete/Save Area
Centre/Border Erase
Margin Adjustment
Repeat Copies
Centring
Preset Stamp/Page Numbering/
Date Stamp/Background Numbering
Shift Sort Off In Sort/Stack mode
Separation
Copy Face Up
Book
Mode after you Select
Mode before you Select
Output
Stamp
Edit Image
Cover/Slip Sheet Book
2
Book →
2 Sided
Multi →
2 Sided
Booklet
Magazine
Cover/
Designate/
Chapter
Slip Sheet
Double
Copies
Delete/
Save Area
Centre/
Border Erase
Margin
Adjustment
Repeat
Copies
Centring
Preset
Stamp/Page
Numbering/
Date Stamp/
Background
Numbering
Shift Sort Off
In Sort/Stack
mode
Separation
Copy Face Up
❍ ❍ ❍ ❍ ❍ ❍ ❍ ❍ ❍ ❍ ❍ ❍ ❍ → → → -- → → → × × ❍ ❍ ❍ ❍ ❍ ❍ ❍
❍❍❍
❍ × ❍ ❍ ❍ ❍ ❍ ❍ ❍ ❍ ❍ ❍ ❍ → → → → -- → → × × ❍ ❍ ❍ ❍ ❍ ❍ ❍
❍❍❍
❍ ❍ ❍ ❍ ❍ ❍ ❍ ❍ × ❍ ❍ ❍ ❍ → → → → → -- → × × × ❍ ❍ ❍ × ❍ ❍
❍ ❍ ❍ ❍ ❍ ❍ ❍ ❍ × ❍ ❍ ❍ ❍ → → → → → → -- × × × ❍ ❍ ❍ × ❍ ❍
❍ ❍ ❍ × ❍ ❍ ❍ ❍ ❍ ❍ ❍ ❍ ❍ ❍ ❍ × × × × × -- → × ❍ ❍ ❍ × ❍ ❍
❍❍❍
❍❍❍
❍❍❍
❍ ❍ ❍ × ❍ × ❍ × ❍ ❍ ❍ ❍ ❍ × × ❍ × × × × → -- × ❍ ❍ ❍ × ❍ ❍
❍ × ❍
❍ ❍ ❍ ❍ ❍ ❍ ❍ ❍ ❍ ❍ ❍ ❍ ❍ ❍ × ❍ ❍ ❍ × × × × -- ❍ ❍ ❍ → ❍
×
❍❍❍
❍ ❍ ❍ ❍ ❍ ❍ ❍ ❍ ❍ ❍ ❍ ❍ ❍ ❍ ❍ ❍ ❍ ❍ ❍ ❍ ❍ ❍ ❍ -- ❍ ❍ ❍ ❍ ❍
❍❍❍
❍ ❍ ❍ ❍ ❍ ❍ ❍ ❍ ❍ ❍ ❍ ❍ ❍ ❍ ❍ ❍ ❍ ❍ ❍ ❍ ❍ ❍ ❍ ❍ -- ❍ ❍ ❍ ❍
❍❍❍
❍ ❍ ❍ ❍ ❍ ❍ ❍ ❍ ❍ ❍ ❍ ❍ ❍ ❍ ❍ ❍ ❍ ❍ ❍ ❍ ❍ ❍ ❍ ❍ ❍ -- ❍ ❍ ❍
❍❍❍
❍ ❍ ❍ × × ❍ ❍ ❍ ❍ ❍ ❍ ❍ ❍ ❍ × ❍ ❍ ❍ × × × × → ❍ ❍ ❍ -- ❍
×
❍❍❍
❍ ❍ ❍ ❍ ❍ ❍ ❍ ❍ ❍ ❍ ❍ ❍ ❍ ❍ ❍ ❍ ❍ ❍ ❍ ❍ ❍ ❍ ❍ ❍ ❍ ❍ ❍ -- ❍
❍ ❍ ❍ ❍ ❍ ❍ ❍ ❍ ❍ ❍ ❍ ❍ ❍ ❍ ❍ ❍ ❍ ❍ ❍ ❍ ❍ ❍ × ❍ ❍ ❍ × ❍ --
❍❍❍
❍❍❍
❍ ❍ ❍ ❍ ❍ ❍ ❍ →❍ ❍ ❍ ❍ ❍ ❍ ❍ ❍ ❍ ❍ ❍ ❍ ❍ ❍ ❍ ❍ ❍ ❍ ❍ ❍ ❍
-- ❍ ❍
❍❍❍❍❍❍❍ × ❍❍❍❍❍❍❍❍❍❍❍❍❍ × ❍❍❍❍❍❍ ❍
❍❍❍❍❍❍❍ × × ❍❍❍❍❍❍❍❍❍❍❍❍❍❍❍❍❍❍❍ ❍
❍ -- ❍
❍ ❍ --
* You cannot combine magazine with Background Numbering.
* If you select magazine or booklet mode, you can only select either Page Numbering or Date Stamp.
194
3. Document Server
Overview
The Document Server enables you to save documents in the machine memory
and then edit and print them as you want.
There are two ways to save documents:
• Scanning from the ARDF
• Scanning from the exposure glass
A Prepare the documents you want to save.
B Save the documents.
The documents are saved in the machine memory.
C Print the documents.
You can print saved documents with any settings you desire at any time.
Document Server Features
The following printing features are available with the Document Server.
❖ Scanning Originals
See ⇒ P.199 “Scanning Originals”
❖ Printing Saved Documents
See ⇒ P.204 “Printing Saved Documents”
195
Document Server
Document Server Editor Features
The following features are available with the Document Server Editor.
❖ Changing File Names
See ⇒ P.211 “Changing File Names”
❖ Merging Documents
See ⇒ P.214 “Merging Documents”
❖ Inserting Files
See ⇒ P.217 “Inserting Files”
3
❖ Deleting Pages
See ⇒ P.220 “Deleting Pages”
❖ Deleting Saved Documents
See ⇒ P.224 “Deleting Saved Documents”
❖ Moving/Copying Files
See ⇒ P.229 “Moving/Copying Files”
196
Features and Benefits
Features and Benefits
On Demand Printing
Use to print any saved document as required.
❖ Your current situation might be…
• When you need to print multiple sets of documents double-sided and stapled together, you normally print the originals, make duplex copies and
then staple them together manually.
❖ With the Document Server
If you save your document in the Document Server, you can print it out at any
time with the necessary print settings, such as duplex and stapling. Your documents will not be confused with those of others in the exit tray.
Note
❒ Punching requires the installation of the optional Punch kit in the Finisher.
❒ You can specify a password to prevent others from printing a reading documents.
197
3
Document Server
Scanned File Printing
You can combine multiple scanned documents into one print set.
❖ Your current situation might be…
You want to combine several originals that are different in density, size, and
paper weight, e.g.
• Damaged and pasted originals
• Photo originals
• One sided originals
• Two sided originals
3
❖ With the Document Server
You can save the originals individually by selecting the best settings for each
original, and then edit them as a file.
It doesn't matter whether the originals were scanned using the document
feeder (ADF) or the exposure glass. As you can specify the print order for several files, you can combine them as you want and print them as a file.
You can check the print result by printing a sample set before making a large
print run by pressing the {Sample Copy} key.
If you aren't satisfied with the print result of some pages of the set, you have
only to scan that part again.
198
Scanning Originals
Scanning Originals
Use this feature to scan originals you want to save in the Document Server from
the machine control panel. The originals can be set either on the exposure glass
or into the document feeder (ARDF).
The saved documents will automatically be named in the scanning order:
“Scan001”, “Scan002” and so on.
Note
❒ The maximum number of files you can store is 250 in the HDD, 50 in the CDRW (option).
❒ Make sure the machine's date setting is correct before scanning originals. See
“Date” and “Time” in the System Settings manual.
❒ Retain your original documents after storing them.
❒ You can set the timer to delete the documents stored in the document server.
See “Auto File Delete”⇒ P.330 “Document Server”
❒ You can select whether [Store And Print] or [Store Only] is displayed in the initial
display with the User Tools .⇒ P.330 “Document Server”
3
A Press the {Document Server} key.
The “File List” menu appears.
199
Document Server
B Press the [Store Originals] key.
3
The “Store Originals” menu appears.
C Enter a file name.
Note
❒ If you do not wish to register a file name, go to step D.
❒ If you do not register a file name, it is stored automatically.
To set the file name
A Press the [Change] key.
B Enter the new file name using the letter keys on the display panel.
200
Scanning Originals
Note
❒ You can enter up to 8 letters.
❒ To change the letter entered, press the [Clear] key and enter the new letter.
❒ You can register a file name identical to an existing file name. It is not
overwritten.
C Press the [#] key.
D Enter your password.
3
Note
❒ If you do not wish to enter a password, go to step E.
To set the password
A Press the [Change] key.
B Enter the password using number keys (4 digits).
Note
❒ To change the number entered, press the {Clear} key and enter the new
number.
C Press the {#} key.
E Select [Store And Print] or [Store Only].
201
Document Server
A
3
F Press the [OK] key.
Note
❒ To stop scanning originals, press the [Cancel] key.
G Set your originals either on the exposure glass or into the document feeder
(ADF).
Reference
For more information on the types of originals that can be set and how to
set them, see “Setting Originals” ⇒ P.26 “Setting Originals”.
H Make any desired settings.
Limitation
❒ You cannot use the Booklet function.
Note
❒ The settings remain in the machine after scanning. You can change these
settings when you want to print next time.
I Press the {Start} key.
Note
❒ To stop scanning, press the {Stop} key. A message appears on the display.
Press the [Print] key to continue, and press the [Stop] key to store.
202
Scanning Originals
If you set the original on the exposure glass
A After scanning all pages, press the [Storing Complete] key.
3
If you set the original in the document feeder
A After scanning all pages, the “File List” display appears.
203
Document Server
Printing Saved Documents
Preparation
If you select multiple files, the scan settings of the first selected file are used
when printing.
To check these settings, press the [Select Settings] key or use the Sample Copy
feature .
You can print any of the documents saved in the Document Server.
Follow these steps to select a document and print it out.
3
A Press the {Document Server} key.
The “File List” menu appears.
B Select the document you want to print.
Press the line for the document if it appears on the display.
204
Printing Saved Documents
The selected line is highlighted.
3
Note
❒ You can select multiple files.
❒ If the file name you desire is not shown and more than 9 files are stored,
scroll through the list with the [T Forward] and [U Backward] keys. The “No.
Of Files” display shows the total number of files followed by which page
of the search results is currently shown.
❒ If you can't recognize the document by its name, you can print the first
page to check the contents. Press the line for the desired document, and
press the [Print 1st Page] key.
❒ Press the selected line again to cancel the print job.
❒ If the “Enter Password” menu appears, enter your password using the
number keys then press the [OK] key. To delete an entered password, press
the [Clear] key.
❒ You can sort the files in alphabetical or reverse-alphabetical order. Press
the keys above the file list. See “File List Sort Priority” ⇒ P.330 “Document
Server”
❒ Press the [Display Files Selected] key to display only the selected files.
To search by file name
Note
❒ If you enter the filename (up to 8 letters), all the filenames beginning with
these letters are displayed. For example, if you enter “ABC”, then all filenames beginning with the “ABC” are displayed.
205
Document Server
A Press the [Search] key.
B Enter the file name using the letter keys.
3
C Press the [OK] key.
Only the files beginning with the letters appears on the File List.
D Select the line for the document you want to print.
206
Printing Saved Documents
When the “Enter Password” menu appears
A Enter your password using the number keys.
Note
❒ To delete an entered value, press the [Clear] key. To cancel selection of
the file, press the [Cancel] key.
B Press the [OK] key.
C To print more than one document, repeat step B to select the desired documents in the order you want to print them out.
The selected order is shown in the priority column next to the selected document(s).
3
Note
❒ To change the print order, press the highlighted lines to deselect the files,
then select them again in the order you want to print.
❒ To cancel selection, press the {Clear Modes} key.
D If you need to change any of the print settings, press the [Select Settings] key.
The “Set Job” menu appears.
207
Document Server
Note
❒ To save the new settings, press the [Save Setting] key.
E Enter the required number of prints with the number keys.
Up to 9999 can be entered.
Note
❒ If you print more than one set using the Sort function, you can check the
print result by printing out only the first set ⇒ P.209 “Sample Printing”.
❒ To delete the entered value, press the {Clear} key.
3
F Press the {Start} key.
The machine starts printing.
Note
❒ To pause the print job, press the {Stop} key. In the confirmation dialog,
press the [Print] key to resume printing or press the [Cancel] key to cancel
printing.
❒ After the print job is completed, the “File List” menu appears.
G To delete all the documents you have printed, press the [Delete] key.
208
Printing Saved Documents
H Press the [Delete] key.
3
Note
❒ If you do not want to delete the files, press the [Do Not Delete] key.
❒ You cannot delete file that are currently begin used by other functions.
Sample Printing
If you print multiple sets using the Sort function, you can check if the print order
or the print settings are correct by printing out only the first set using the {Sample
Copy} key.
Limitation
❒ Sample Printing can be done only when you are using the Sort function.
A Press the {Sample Copy} key.
209
Document Server
After the first set is printed out, press the [Print] key to print the rest of the
print job. Press the [Cancel] key to cancel it and return to the “Set Job” menu
where you can adjust the settings.
Print First Page
You can print the first page of the document selected in the “File List” menu to
check the contents.
If more than one document is selected, the first page of each document is printed.
3
A Select the desired document(s), and press the [Print 1st Page] key.
B Press the {Start} key.
The first page is printed out.
210
Changing File Names
Changing File Names
Follow these steps to edit the filenames of documents stored in the Document
Server.
Note
❒ You can register a file name identical to an existing file name. It is not overwritten.
A Press the {Document Editor} key.
3
B Press the line showing the document you want to change the file name of.
The selected line is highlighted.
Note
❒ If you stored a password, enter the password using the letter keys on the
display panel. Then press the [OK] key ⇒ P.207 “When the “Enter Password”
menu appears”.
211
Document Server
C Press the [Change File Name] key.
3
D Enter the new file name using the letter keys. Then press the [#] key.
Note
❒ To delete entered letters, press the [Clear] key.
❒ To cancel this operation, press the [Cancel] key.
212
Changing File Names
E Press the [OK] key.
3
Note
❒ If the selected file is currently being used by another function, you cannot
change the file name.
213
Document Server
Merging Documents
You can merge the two or more stored documents.
Follow these steps to merge the documents.
Limitation
❒ If you want to merge multiple documents, it may take a certain time. And you
cannot operate during the time.
A Press the {Document Editor} key.
3
B Press the lines showing the documents you want to merge.
Selected lines are highlighted.
Note
❒ The documents are merged in the order you select them.
❒ The scan settings of the document you select first are applied to the merged
documents.
214
Merging Documents
C Press the [Merge] key.
D Enter the new file name using the letter keys.
3
Note
❒ If you do not wish to register a file name, go to step E.
❒ If you do not register a new file name, the filename of the document selected first is stored automatically.
To change the file name
A Press the [Change] key.
B Enter the file name using the letter keys.
215
Document Server
Note
❒ You can enter up to 8 letters.
❒ To change the letter entered, press the [Clear] key and enter the new letter.
C Press the [#] key.
E Press the [OK] key.
Note
❒ To cancel merging, press the [Cancel] key.
3
❒ You cannot recover the original two files from the merged file.
❒ You cannot merge documents that are correctly being used by another
function.
216
Inserting Files
Inserting Files
You can insert a file into files already stored in the Document Server.
Follow these steps to insert your file.
A Press the {Document Editor} key.
3
B Press the line showing the document to be inserted in.
The selected line is highlighted.
C Press the [Insert File] key.
217
Document Server
D Select the file you want to insert into.
3
E Enter the page number to insert the file using number keys.
Note
❒ To change the entered number, press the [Clear] key.
218
Inserting Files
F Press the [Before The Specified Page] or [Following The Specified Page] key.
3
G Press the [OK] key.
Note
❒ To cancel insertion of the file, press the [Cancel] key.
❒ You cannot recover the original file from the new file.
❒ You cannot insert files into a file that is currently being used by another
function.
219
Document Server
Deleting Pages
Follow these steps to delete pages from a file stored on the Document Server.
Preparation
To check on the page numbers print the file. See⇒ P.204 “Printing Saved Documents”
A Press the {Document Editor} key.
3
B Press the line showing the document containing the pages you want to delete.
The selected line is highlighted.
220
Deleting Pages
C Press the [Delete Page] key.
D Enter the page number you want to delete using the number keys.
3
Note
❒ To stop deleting pages, press the [Exit] key.
221
Document Server
E If you want to delete a series of pages, press the [∼] key. Then enter the last
page number you want to delete.
3
Note
❒ If you want to only 1 page, go to step F.
❒ If you enter the last page number, the file is deleted.
F Press the [Delete] key.
222
Deleting Pages
G Press the [Yes] key.
3
Note
❒ To cancel the delete operation, press the [No] key.
❒ You cannot restore deleted pages.
❒ You cannot delete pages from a file that is currently being used by another
function.
223
Document Server
Deleting Saved Documents
This chapter describes how to delete saved documents.
Important
❒ You can save up to 250 documents on the Document Server. No more documents can be saved when there are 250 documents stored so you should delete any unnecessary documents.
❒ You can delete each document from the HDD automatically after a certain
times. To turn this feature on, See ⇒ P.330 “Document Server”.
3
Note
❒ You can delete all the saved documents in one operation. See ⇒ P.330 “Document Server”
Follow these steps to delete saved documents.
Deleting Saved Documents in HDD
A Press the {Document Editor} key.
The “File List” menu appears.
224
Deleting Saved Documents
B Select a document you want to delete by touching the name of it.
3
The selected name is highlighted.
Note
❒ If the document name you desire is not shown in the display, scroll
through the list with the [UForward] or [TBackward] keys.
❒ If you select a document which requires a password, the “Password” window appears. Input the password using the number keys then press the
[OK] key. If you input the wrong password, press the {Clear} key and try
again. To cancel selection of a document, press the [Cancel] key.
❒ To cancel a selected document, press the highlighted line again.
C Repeat step B if you want to select more than one document.
D Press the [Delete File] key.
A confirmation dialog appears.
225
Document Server
E Press the [Delete] key to delete the document(s).
3
Note
❒ You cannot delete files that are currently being used by other functions.
Deleting Saved Documents on the CD-ROM
A Press the {Document Editor} key.
The "File List" menu appears.
B Press the [Stored Files in CD-ROM] key.
226
Deleting Saved Documents
C Select a document you want to delete by touching the name of it.
The selected name is highlighted.
3
Note
❒ If the document name you desire is not shown in the display, scroll
through the list with the [UForward] or [TBackward] keys.
❒ If you selected a document which requires a password, the "Password"
window appears. Input the password using the number keys then press
the [OK] key. If you input the wrong password, press the {Clear} key and
try again. To cancel a selection of a document, press the highlighted line
again.
D Repeat step C if you want to select more than one document.
E Press the [Delete File] key.
A confirmation dialog appears.
227
Document Server
F Press the [Delete] key to delete the document(s).
3
Note
❒ You cannot delete files that are currently being used by other functions.
228
Moving/Copying Files
Moving/Copying Files
To use this function, optional CD-RW is required.
This section describes how to move files from the HDD to the CD-ROM and
vice-versa.
Preparation
Make sure the CD-RW power is turned on.
Make sure the CD-R/RW disk is set in the CD-RW.
Make sure an unformatted CD-R/RW disk, or a disk previously used with
this machine is inserted in the CD-RW.
3
This equipment can be installed with an optional CD-RW. However, it is prohibited
by copyright law to store or make copies of such works as books, paintings or photographs as digital data or to make copies of CD-RW using the CD-RW except when you
are allowed to do so for personal use only by law or by the owner of the copyright.
Important
❒ Do not turn the main machine power or CD-RW power off when the Document Editor indicator is lit or data might be lost.
Moving/Copying files from HDD to CD-ROM
A Press the {Document Editor} key.
229
Document Server
B Press the [Stored Files In HDD] key.
3
C Select the file you want to move or copy.
Note
❒ If the file size is larger than free space on the CD-ROM, you cannot move
or copy this file.
230
Moving/Copying Files
D Press the [Stored Files In CD-ROM] key.
3
E Enter the new file name using the letter keys.
Note
❒ If you do not wish to register a file name, go to step F.
To set the file name
A Press the [Change] key.
B Enter the file name using the letter keys on the display panel.
Note
❒ You can enter up to 8 letters.
❒ To change the letter entered, press the [Clear] key and enter a new letter.
❒ To cancel this operation, press the [Cancel] key.
C Press the [#] key.
231
Document Server
F Enter your password using the number keys.
Note
❒ If you do not wish to change the password, go to step G.
To set the password
A Press the [Change] key.
B Enter your password using the number keys.
3
Note
❒ To delete an entered value, press the {Clear} key.
C Press the {#} key.
G Press the [Copy File To CD] or [Move File To CD] key.
232
Moving/Copying Files
H Press the [OK] key.
3
Note
❒ To cancel this operation, press the [Stop] key.
❒ You cannot move or copy files that are currently being used by other functions.
233
Document Server
Moving/Copying files from CD-ROM to HDD
A Press the {Document Editor} key.
3
B Press the [Stored Files In CD-ROM] key.
234
Moving/Copying Files
C Select the file you want to move or copy.
3
Note
❒ If the file size is larger than the free space on the HDD, you cannot move
or copy this file.
❒ If a document is being stored during the move or copy operation and the
HDD or CD-ROM runs out of space, the move or copy may not be successful.
D Press the [Stored Files In HDD] key.
E Enter the new file name using the letter keys.
Note
❒ If you do not wish to register a file name, go to step F.
235
Document Server
To set the file name
A Press the [Change] key.
B Enter the file name using the letter keys on the display panel.
3
Note
❒ You can enter up to 8 letters.
❒ To change the letter entered, press the [Clear] key and enter the new letter.
C Press the [#] key.
F Enter your password using the number keys.
Note
❒ If you do not wish to change the password, go to step G.
To set the password
A Press the [Change] key.
236
Moving/Copying Files
B Enter your password using the number keys.
3
Note
❒ To delete an entered value, press the {Clear} key.
C Press the {#} key.
G Press the [Copy File To CD] or [Move File To CD] key.
237
Document Server
H Press the [OK] key.
3
Note
❒ To cancel this operation, press the [Stop] key.
❒ You cannot move or copy files that are currently in use by other functions.
238
4. Connect Copy (Option)
What is Connect Copy?
Connect Copy is a feature that allows you to connect two machines using a cable.
When you set up your copy job on one machine (the master unit), data is transferred to the other machine (the sub-unit) so that copies can be made on both machines simultaneously.
Connect copy benefits
Connect Copy provides the following benefits:
❖ High-speed copying for greater productivity
For large volume copy runs, two connected machines form a single system
that can complete the job in a shorter time. A 170 copies/minute (A4K, 81/2"
× 11"Ksize) speed will be available.
❖ Auto-backup system for less participation of operators
Even if one machine stops because of a paper jam, it has run out of toner, or
run out of paper, the other machine will take over and finish the job automatically. If the stopped machine is recovered, the machines will allocate the job
again and continue using Connect Copy to complete the job in a way that results in maximum productivity.
239
Connect Copy (Option)
Note
❒ You cannot make other copy jobs when the two machines are connected.
❒ The two machines automatically share the job for maximum productivity.
❒
key is described [Connect] key in this manual.
❒ To use the two machines separately, press the [Connect] key to disconnect
them.
4
240
How Connect Copy Works
How Connect Copy Works
In this manual we refer to the two machines as the master unit and sub-unit respectively.
4
1. Master unit
2. Sub-unit
❖ Copy
As your original is scanned, the image data is stored on the master unit hard
disk and transferred simultaneously to the sub-unit hard disk. As soon as
scanning has finished, copying starts.
❖ Copy Server
The master unit transfers the image data stored in the hard disk to the subunit hard disk.
As soon as transferal has completed, copying starts.
Note
❒ Transfer of image data may take some time.
The master unit is the machine at which you press the [Connect] key to enter
Connect Copy mode. When you do this, the other machine becomes the subunit. You can use either machine as the master unit or sub-unit, but you cannot change the relationship without exiting Connect Copy mode first.
Connectable Copier Models
• You can still use Connect Copy even if no optional large capacity tray (LCT)
is available. However, the optional finisher must be installed in both units in
order to use Staple functions, and the punch kit must be installed in both units
in order to use the Punch function.
241
Connect Copy (Option)
Functions Not Available with Connect Copy
The following functions are not available in Connect Copy mode:
• Job Preset
Interrupt Functions
• You cannot use Connect Copy when a job has been paused using the Interrupt function.
• You can use the Interrupt function on the sub-unit while in Connect Copy
mode, but only when the master unit is not scanning originals.
• You cannot use other functions in Connect Copy mode no matter how the
“Output Priority” of the User Tools (System Settings) is programmed.
• You cannot switch to other functions while in Connect Copy mode. To access
other functions you must exit Connect Copy mode.
• While you use other functions, you cannot use Connect Copy mode.
4
Before You Start
Both machines must have paper trays loaded with paper of the same size, direction and type that you wish to copy onto.
To make the most out of the Connect Copy feature, we recommend that :
• The paper tray settings of the master unit and sub-unit should match each
other.
• The “Original Mode Level”of the User Tools (Copier/Document Server Features) settings should be the same on each unit. If they are not the same, the
copied images may differ. See ⇒ P.314 “Original Mode Level”
• The User Stamp settings should be the same on each unit. If they are not the
same, the copied images may differ. See “Program/Delete Stamp” .⇒ P.174
“Program/Delete User Stamp”
242
Connect Copy Display Panel
Connect Copy Display Panel
This section describes the displays on the master unit and sub-unit.
Note that when you enter Connect Copy mode, you must access all Connect
Copy features and menus through the master unit display panel.
Sub-unit
Initial display in standard copy mode
Master unit
Initial display in Connect Copy mode
4
243
Connect Copy (Option)
Sub-unit
How many original pages have been
scanned by the master unit so far.
Not displayed on sub-unit.
Display when scanning originals on the master unit
Master unit
Number of originals Display when copying/Interrupt copying
4
244
Copy paper select
Copy counter Copy quantity
Connect Copy Display Panel
Master unit
Sub-unit
How many sets/copies to make.
Not displayed on sub-unit.
Displays how many sets/copies made
by the master unit so far.
Displays how many sets/copies made
by the sub-unit so far.
Only paper trays loaded with the paper
of the same size, direction and type installed in both the master unit and subunit are displayed.
Only paper trays loaded with the paper
of the same size, direction and type installed in both the master unit and subunit are available.
Other paper tray types will be grayed
out and you cannot select them.
Note that you can only select the copy
paper from the master unit operation
panel.
4
245
Connect Copy (Option)
Using Connect Copy
You can select Connect Copy mode from either of the two connected machines
by pressing the [Connect] key. The machine you use becomes the master unit,
and the other machine the sub-unit.
Limitation
❒ Once Connect Copy is selected, you must carry out all operations on the master unit.
A Make sure the machine is in copy mode.
4
Note
❒ If user codes are turned on, enter a user code programmed in the master
unit with the number keys (up to 8 digits) then press the [#] key. You don't
need to enter the user code for the sub-unit.
Reference
See ⇒ P.70 “User Codes”.
B Press the [Connect] key on the machine that is to be the master unit.
When the key darkens, the two machines are connected.
❖ Master unit display
246
Using Connect Copy
❖ Sub-unit display
4
Reference
If the [Connect] key is not visible or you cannot select it, see ⇒ P.265 “Connect Copy”.
If you press the [Connect] key and see the message and press the [Cancel]
key. See ⇒ P.269 “If You Cannot Exit Connect Copy”.
C Set your originals in the master unit.
Originals
R
Set in the
document
feeder
Set on the
exposure
glass
R
set1EE
R
R
set2EE
Reference
See ⇒ P.26 “Setting Originals”.
247
Connect Copy (Option)
D Make any settings you require on the master unit.
Note
❒ Any copy settings that were set up before you entered Connect Copy mode
will still remain in effect. The Punch function requires the optional Punch
kit to be installed on both the master and sub-unit.
❒ To exit Connect Copy mode, press the [Connect] key on the master unit
again.
E Enter the number of copies you require with the number keys.
4
Note
❒ You can enter up to 9999 copies.
❒ If you make a mistake, press the {Clear} key and enter a new number.
❒ Even though Connect Copy is selected, only the master unit will make copies in the following situations :
• When making a single copy set.
• When the original is a single sheet and you enter a low number of copies/sets.
F Press the {Start} key on the master unit.
Copying starts after the original has been scanned.
Note
❒ If you have set your originals in the document feeder (ARDF), copying
starts simultaneously in the master unit and sub-unit after all originals
have been scanned.
❒ When using the Batch /SADF mode, set your originals and press the
{Start} key. After all the previously set originals are scanned in, set the next
originals while the Auto Feed indicator is lit. When all pages have been
scanned in, press the {#} key. Copying starts simultaneously in the master
unit and sub-unit. See “Batch SADF mode”. ⇒ P.32 “Batch/SADF Mode”
248
Using Connect Copy
❒ When scanning from the exposure glass, set the next page(s) when scanning has finished, then press the {Start} key. When all pages have been
scanned in, press the {#} key. Copying starts simultaneously in the master
unit and sub-unit.
❒ To stop originals being scanned or copied, press the {Stop} key on the master unit and follow the instructions on the display, press the [Yes] key.
G Pick up your copies from the master unit and sub-unit.
Note
❒ The number of copy sets made by the master unit and sub-unit may differ.
❒ The master unit and sub-unit may not finish copying exactly at the same
time.
❒ When using the Sort/Staple function, copies are organized into copy sets.
If there is a paper misfeed in one machine during this process, it is not possible for the other machine to take over the copy set processing of the non
functional machine.
❒ When using Document Server functions, only the master unit will make
copies by the combination of the features.
4
-Copy output order
❖ When copying in Sort/Staple mode
e.g., copying 6-sets of a 3-sheet original
• Copying with the master unit (face-down output)—sub-unit (face-down
output)
1. Master unit
2. Sub-unit
When using Sort/Staple, your copies sets are not split between the master
unit and sub-unit.
249
Connect Copy (Option)
❖ When copying not in Sort/Staple mode
e.g., making 2 copies of each page of a 6–sheet original
• Copying with the master unit (face-down output)—sub-unit (face-up output)
4
1. Master unit
2. Sub-unit
Combine your copy stacks from the master unit and sub-unit as shown in
the diagram.
-Auto Reset
The machine exits Connect Copy mode and automatically returns to the initial
condition a certain period of time after your job has finished. This function is
called “Auto Reset”.
Note
❒ After the time that is set in “Copy Reset Timer” on the master unit have
passed, the master unit exits Connect Copy mode.
❒ While the sub-unit is using Interrupt Copy functions, the Interrupt Copying
function is released after the time that is set “System Reset” in the sub-unit.
Reference
See “Copy Reset Timer” in the copy User Tools ⇒ P.312 “General Features”
See “System Reset” in the System Settings manual.
250
Using Connect Copy
-Auto Off
The machine turns itself off automatically a certain period of time after your job
has finished. This function is called “Auto Off”.
Note
❒ The Auto Off function is available only for the main unit.
Reference
See “Auto Off Timer” in the System Settings manual.
Exiting Connect Copy Mode
4
A Press the [Connect] key on the master unit.
The [Connect] key will be deselected.
Note
❒ Settings which were selected on the master unit while in Connect Copy
mode will not be cleared.
❒ Press the {Clear Modes} key to cancel the master unit settings and return to
the initial state.
❒ The sub-unit will return to the state which is before entering Connect Copy
mode.
Reference
If you cannot exit Connect Copy mode, see ⇒ P.269 “If You Cannot Exit
Connect Copy”
251
Connect Copy (Option)
Relationship between Master Unit and
Sub-unit System Settings
This section describes which System Settings are used by the master unit and
sub-unit in Connect Copy mode.
Note
❒ In Connect Copy mode the {User Tools} key on the sub-unit is disabled. To access the user tools on the sub-unit, you need to exit Connect Copy mode first.
Reference
See System Settings manual for details.
4
Symbol
Meaning
✩
The master unit and sub-unit use each setting
←
Both units use the master unit setting
—
Unrelated
★
Depends on the function
Menu
Master
unit
Sub-unit
Remarks
Function Priority
—
—
When the time set in the
“Copy Reset Timer” of the
user tools (Copier/Document
Server Features) on the master unit passed and the Connect Copy is canceled, and
then the time set in the “System Reset”of the user tools
(System Setting) passed, it returns to the function defined
by the “Function Priority” of
the User Tools (System Settings) setting.
Panel Tone
✩
✩
Ready Panel Tone
✩
✩
Copy Count Display
—
—
The copy counter is always
displayed in count up mode.
System Reset
—
★
Interrupt mode on the subunit will be cleared by this
timer.
General
252
Relationship between Master Unit and Sub-unit System Settings
Menu
Master
unit
Sub-unit
Remarks
Function Reset Timer
—
—
Other function will begin after the connect copy mode is
canceled.
Energy Saver Timer
—
—
Panel Off Timer
—
—
Energy Saver modes. When
Connect Copy is exited, the
machine will enter Energy
Saver mode after certain period of time passed.
Auto Off Timer
✩
—
Auto Tray Switching
✩
✩
Copier/Document Server
Output Tray
✩
✩
Printer Output Tray
✩
✩
Print Priority
—
—
Interleave Print Pages
—
—
Status Indicator
✩
✩
Language Priority
✩
✩
Screen Color Setting
✩
✩
Original: F/F4 Size Setting
✩
—
Paper Tray Priority
✩
✩
Date
✩
✩
Time
✩
✩
Weekly Timers: Monday to
Sunday
✩
—
Key Operator Code for Off
Setting
—
—
Sub-unit will not be in Auto
Off mode during Connect
Copying.
4
Other function will begin after the connect copy mode is
canceled.
Timer Settings
The date setting depends on
the master unit.
This function is not available
on the sub-unit in Connect
Copy mode. When Connect
Copy is exited, the power will
be switched off at the time
specified by the timer.
253
Connect Copy (Option)
Menu
Master
unit
Sub-unit
Remarks
Tray1: Paper Type
✩
✩
Tray2: Paper Type
✩
✩
Tray3: Paper Type
✩
✩
Tray4: Paper Type
✩
✩
Tray5: Paper Type
✩
✩
We recommend that the master unit and sub-unit have the
same paper tray settings. This
is because only paper trays
with the same size, direction,
and type of paper can be used
in Connect Copy mode.
Tray6: Paper Type
✩
✩
Slip Sheet 1
✩
✩
Slip Sheet 2
✩
✩
Slip Sheet 3
✩
✩
Cover Sheet
✩
✩
Separation Sheet
✩
✩
✩
—
Key Counter: Copier Access
—
—
Key Counter: Printer Access
—
—
Key Card: Copier Access
✩
—
Key Card: Printer Access
✩
—
Memory Allocation
✩
✩
Key Operator Access
★
★
AOF (Keep It On.)
—
—
Check/Reset/Printer Copy
Counter
—
—
Tray Paper Settings
4
Key Operator Tools
User Codes:
Copier/Document Server
254
Access these settings on the
master unit. The master unit
settings override those of the
sub-unit.
Memory Allocation for the
copy function set in each unit
will be used for Connect
Copy mode.
Function in Connect Copy
mode. The power will go off
after you have exited Connect
Copy mode and the AOF Delay has elapsed.
Relationship between Master Unit and Sub-Unit Copier/Document Server Features
Relationship between Master Unit and
Sub-Unit Copier/Document Server
Features
This section describes which Copier Feature settings are used by the master unit
and sub-unit in Connect Copy mode.
Note
❒ In Connect Copy mode the {User Tools} key on the sub-unit is disabled. To access to the User Tools on the sub-unit, you need to exit Connect Copy mode
first.
Reference
See ⇒ P.312 “Settings You Can Change with the User Tools”.
Symbol
Meaning
✩
The master unit and sub-unit use each setting
←
Both units use the master unit setting
—
Unrelated
Menu
Master
unit
Sub-unit
Remarks
Auto Paper Select Priority
✩
—
Trays with the same size and
direction of paper will be selected from the master unit
and sub-unit automatically.
Auto Image Density Select
Priority
✩
—
Original Mode Priority
✩
—
Duplex Mode Priority
✩
—
Copy Orientation in Duplex
Mode
✩
—
Original Orientation In Duplex Mode
✩
—
Initial Mode Set
✩
—
Maximum Copy Quantity
✩
—
Copy Reset Timer
✩
—
4
General Features
Connect Copy will be cancelled according to the timer
on the master.
255
Connect Copy (Option)
Menu
Master
unit
Sub-unit
Job List Screen Timeout
✩
—
Paper Eject: Always Rotate
180°
✩
←
Manual Original Counter
Reset
✩
—
Preset Reduce/Enlarge
✩
—
Preset Reduce/Enlarge Priority
✩
—
Shortcut R/E
✩
—
Create Margin Ratio
✩
—
Image: Text
✩
✩
Image: Auto Text/Photo
✩
✩
Image: Photo
✩
✩
Image:Pale
✩
✩
Image: Generation
✩
✩
Original Mode Display
✩
✩
Special Original Display
✩
—
Paper Type Display
✩
—
Panel Features Default
✩
—
Image Adjustment Priority
✩
—
Staple Position
✩
—
Original Tone
✩
—
Job End Call
✩
✩
Remarks
Set Ratio
4
Original Mode Level
Display/Panel Tone
256
This function is available only
for the main unit. The sub-unit
display the type of paper
whether this function is selected or not.
When turned on, the tone
sounds only on the master
unit when copying is completed. Only if the “Panel Tone” of
the User Tools (System Settings) is on.
Relationship between Master Unit and Sub-Unit Copier/Document Server Features
Menu
Master
unit
Sub-unit
Copy Back Cover
✩
←
Front Margin: Left/Right
✩
←
Back Margin: Left/Right
✩
←
Front Margin: Top/Bottom
✩
←
Back Margin: Top/Bottom
✩
←
1 → 2 Duplex Auto Margin
Adjust
✩
←
Border Erase Width
✩
←
Combine Orig. Shadow
Erase
✩
←
Center Erase Width
✩
←
Repeat Separation Line
✩
←
Double Copies Separation
Line
✩
←
Combine Separation Line
✩
←
Copy Order In Combine
Mode
✩
←
Copy Orientation In Booklet/Magazine
✩
←
Front Cover Copy In Combine Mode
✩
←
Designated Slip Sheet Copy
In Combine Mode
✩
←
Size
✩
←
Density
✩
←
Superimpose
✩
←
Stamp Language
✩
←
Stamp Priority
✩
←
Stamp Format
✩
←
Remarks
Adjust Image
4
Stamp
Background Numbering
Preset Stamp
The master unit setting will be
applied. However, set the
same settings in both
257
Connect Copy (Option)
Menu
Master
unit
Sub-unit
Superimpose
✩
←
Program/Delete Stamp
✩
←
Stamp Format
✩
←
Format
✩
←
Font
✩
←
Position Priority
✩
←
Size
✩
←
Superimpose
✩
←
Format
✩
←
Font
✩
←
Position Priority
✩
←
Size
✩
←
Duplex Back Page Number
Position
✩
←
Page Numbering In Combine Mode
✩
←
Copy On Slip Sheet In Desig- ✩
nate Mode
←
Superimpose
✩
←
Position Priority: P1, P2
✩
←
Position Priority: 1/5, 2/5
✩
←
Position Priority: -1-, -2-
✩
←
Position Priority: P.1, P.2
✩
←
Position Priority: 1,2
✩
←
Position Priority: 1-1, 1-2
✩
←
SADF Auto Reset Timer
✩
—
ADF Original Table Rise
Time
✩
—
Remarks
User Stamp
Date Stamp
4
Page Numbering
Input/Output
258
Set the same stamp in the both
unit.
Relationship between Master Unit and Sub-Unit Copier/Document Server Features
Menu
Master
unit
Sub-unit
Remarks
Face-up/down Eject From
Platen
✩
—
The setting will be ignored
and the setting programmed
for Connect Copy will be
used.
Auto Sort Mode
✩
—
Memory Full Auto Scan Restart
✩
←
Shift Tray
✩
—
Separation Sheet
✩
←
File List Sort Priority
—
—
Store Mode Priority
✩
—
Auto File Delete
✩
✩
Delete All The Saved Files
—
—
Delete All The Saved Files In —
CD
—
CD Read/Write Speed Control
—
—
Check/Reset/Print Copy
Counter
—
—
Program/Change/Delete
User Code
—
—
Connect Copy Master
—
—
Document Server
4
Key Operator Tools
259
Connect Copy (Option)
4
260
5. What to do if Something
Goes Wrong
If Your Machine Does Not Operate as You
Want
General
Machine Status
Problem/Cause
Action
The machine instructs you
to wait.
The machine is warming
up.
Wait for the machine to
warm-up.
Reference
You can use Auto Start
mode during warm-up.
See ⇒ P.70 “Auto Start”.
Copy paper is moving in
tray 1 (Tandem Tray).
The machine cannot detect
the original size.
Please wait until paper has
moved.
Improper original is set.
Set non-standard size origSee ⇒ P.16 “Sizes Difficult to inals on the exposure
glass.
Detect”.
Input the both horizontal
and vertical sizes of the
non-standard original. See
⇒ P.26 “Setting Originals
on the Exposure Glass”.
Select paper manually. Do
not use Auto Paper Select.
Do not use Auto Reduce/
Enlarge.
Original is not set.
Set your originals.
The machine instructs you
to check the original direction.
There is no copy paper that Set the original in the same
is the same direction as the direction as the copy paoriginals.
per.
The machine instructs you
to check the paper size.
Improper original size is
set.
Staple mode has been reset. The paper size was
changed during stapling.
Select the proper paper
size.
You can only staple together pages of the same
size. Select copy paper of
the same size.
261
What to do if Something Goes Wrong
Machine Status
5
Problem/Cause
Action
The number of sheets that -can be stapled has been exceeded.
Check the stapler capacity.
See ⇒ P.49 “Staple”.
The machine cannot staple
this size paper.
--
Select a paper size that can
be used in Staple mode.
See ⇒ P.49 “Staple”
This paper is not available
in Duplex mode.
A paper size not available
in Duplex mode has been
selected.
Select a paper size that can
be used in Duplex mode.
See ⇒ P.84 “Duplex”
You cannot enter the desired copy set number.
The number of copies exceeds the maximum copy
quantity.
You can change the maximum copy quantity. See “
Maximum Copy Quantity” ⇒ P.312 “General Features”.
Document Server
Problem
Action
“Exceeded max. disk memory (50 files).”
is displayed.
The maximum number of files you can
store is 250 in the HDD, 50 files in the CDRW (option). Delete any unnecessary files
and then scan the document again.
“Insufficient memory. The selected file
cannot be transmitted.” is displayed.
Delete any unnecessary files and then
scan the document again. See ⇒ P.330
“Document Server”
Change the Memory Allocation. See
“Memory Allocation” in the System Settings manual. However if you change this
setting, the documents in the HDD will be
deleted. Print the stored documents in the
HDD.
262
“The selected file(s) currently in use.” is
displayed.
Change the disk in the CD-RW. The disk
must be unformatted one that has already
been used in this machine.
“Cannot recognize” is displayed.
Make sure the selected file is not using in
document server or document editor
function.
If Your Machine Does Not Operate as You Want
Connect Copy
Machine Status
Cause
Action
You cannot use Connect
Copy.
The sub-unit has a paper
misfeed or needs a fresh
supply of toner or other replenishable supply.
Press the [Cancel], key on
the master unit and follow
the instructions given on
the sub-unit display.
Reference
See ⇒ P.283 “D Changing the Toner Bottle”
See ⇒ P.286 “x Clearing Misfeeds”
See ⇒ P.302 “e Removing Jammed Staples”
If the sub-unit display
shows that a cover is open,
follow the instructions given. For all other situations,
follow the instructions on
the display.
The User Tools menu is
open on the sub-unit.
5
Press the [Cancel] key on
the master unit. Then on
the sub-unit press the {User
Tools} key to close the User
Tools menu.
263
What to do if Something Goes Wrong
Machine Status
Cause
Action
You cannot use Connect
Copy.
The sub-unit is busy copy- Press the [Cancel] key on
ing or printing with anoth- the master unit then stop
er function.
the sub-unit from copying/
printing.
The sub-unit is in Interrupt Press the [Cancel] key on
mode.
the master unit. Then press
the {Interrupt} key on the
sub-unit to exit Interrupt
mode.
Reference
See ⇒ P.68 “Interrupt
Copy”
The sub-unit has been
switched off automatically
by the Weekly Timer function and is waiting for the
Key Operator Off Code to
be entered.
5
Press the [Cancel] key on
the master unit. Then on
the sub-unit enter the code
and press the {#} key.
Reference
See “Key Operator
Code For Off Setting” in
the System Settings
manual
The sub-unit is not in Copy Press the [Cancel] key on
mode (i.e., Document Serv- the master unit. Then press
er mode).
the {Copy} key on the subunit to switch over to copy
mode.
The [Connect] key was
pressed simultaneously on
both the master unit and
sub-unit.
Press the [Cancel] key on
both the master unit and
sub-unit, then press the
[Connect] key on just one of
them.
M indicator is lit on the
sub-unit.
Follow the instructions
shown on the display.
You cannot use Connect
The master unit is not in
Press the [Cancel] key on
Copy. The other machine is Copy mode (i.e. Document the master unit. Then press
in use.
Server mode).
the {Copy} key on the master unit to switch over to
the copy function.
264
If Your Machine Does Not Operate as You Want
Display
Problem
Cause
Action
The display panel is off.
The screen contrast is set
too dark.
Turn the screen contrast
knob to adjust the contrast.
The machine is in Energy
Saver mode.
Press the {Energy Saver}
key to exit Energy Saver
mode.
The operation switch is
turned off.
Turn on the operation
switch.
Nothing happens when the The main power switch is
operation switch is turned turned off.
on.
Turn on the main power
switch. See ⇒ P.4 “Guide to
Components”
The circuit breaker has cut
out.
Call your service representative.
Machine Status
Cause
Action
The [Connect] key does not
appear on the display.
The main power switch on
the sub-unit is off.
Turn on the sub-unit main
power switch.
5
Connect Copy
The operation switch on the Press the operation switch
sub-unit is off.
on the right side of the operation panel. The On indicator will light.
Note
❒ The machine will be
ready to operate about
five minutes after turning power on.
The master unit is not in
Copy mode.
Press the {Copy} key on
the master unit to switch to
the copy function.
The master unit is in Interrupt mode.
Press the {Interrupt} key on
the master unit to exit Interrupt mode.
265
What to do if Something Goes Wrong
Machine Status
Cause
Action
The [Connect] key does not
appear on the display.
The master unit is in Preset Exit Preset Jobs mode in
Jobs mode.
one of the following ways.
❖ If you are still selecting
copy settings and
copying has not started
yet :
Press the [Clear] key
then remove the originals set in the master
unit document feeder.
❖ If Preset Jobs mode is
in progress :
Press the {Stop} key,
follow the instructions
on the display then
press the [Cancel] key.
5
Reference
See “Preset Jobs” ⇒
P.60 “Job Preset”
The [Connect] key does not
appear on the display.
The “Connect Copy” of
User Tools setting is set to
“No”.
Change the setting to
“Yes” or press the [Connect] key on the other unit.
Reference
See “Connect Copy” ⇒
P.265 “Connect Copy”
266
The Connect Copy cable is
damaged.
Please contact your service
representative.
L indicator is lit.
Follow the instructions
shown on the display.
If Your Machine Does Not Operate as You Want
Machine Status
Cause
The [Connect] key is grayed The master unit is now
out.
copying or copying will
start as soon as the warmup finished.
Action
Press the master unit
{Stop} key to cancel copying.
Copying has stopped beSolve the problem on the
cause there is a paper mis- master unit.
feed or toner has run out on
the unit you wish to use as
the master unit.
Functions are programmed Press the master unit
that cannot be used with
{Clear Modes} key to clear
Connect Copy.
the programmed functions.
Document Server
5
Problem
Cause
Nothing displayed when
you press the [Delete From
CD-ROM] key.
The power of the CD-RW is Press the power switch on
not turned on.
the CD-RW.
The disk in the CD-RW is
not a recommended one.
Action
Change the disk in the CDRW. The disk must be unformatted one that has already been used in this
machine.
The password dialog is dis- This document has been as- You cannot edit documents
played when you select the signed a password.
unless you know the passdocument.
word.
Note
❒ To delete all HDD files,
see ⇒ P.330 “Document
Server”
267
What to do if Something Goes Wrong
If Connect Copy is Cleared
Machine Status
Cause
Action
Exited Connect Copy.
The master unit main power switch has been turned
off or the operation switch
has been pressed.
On the master unit, either
turn on the main power
switch or press the operation switch, then press the
[Connect] key and start
your copy job again.
Either the sub-unit main
power switch has been
turned off or the operation
switch has been pressed.
A message requesting you
to check the sub-unit is displayed on the master unit.
Press the [Cancel] key to
clear connect-copying. Either turn on the main power switch on the sub-unit
or press the operation
switch. Then press the
[Connect] key.
5
The Weekly Timer function Press the master unit operhas automatically turned
ation switch. Then press
the master unit off.
the [Connect] key and copy.
Reference
See “Weekly Timer” in
the System Settings
manual.
An error message indicating a breakdown is shown
on the master unit display.
268
L indicator is lit.
Follow the instructions
displayed in the error message. Copying is not possible.
If Your Machine Does Not Operate as You Want
If You Cannot Exit Connect Copy
Machine Status
Cause
Nothing happens when
Originals are being
you press the [Connect] key. scanned or copied.
There is a paper misfeed in
either the master unit or
sub-unit.
Action
Press the master unit
{Stop} key and them press
[Yes] key to cancel scanning or copying.
Clear the paper jam in the
master unit or sub-unit.
Reference
See ⇒ P.286 “x Clearing Misfeeds”
See ⇒ P.302 “e Removing Jammed Staples”
If the “Cover Open” display appears, follow the
instructions given.
5
For any other problems,
follow the instructions that
are displayed.
To exit Connect Copy
mode, press the master
unit {Stop} key, then press
the [Connect] key.
The master unit {Stop} key
was pressed and scanning
of the original has been interrupted.
To exit Connect Copy
mode, follow the instructions on the display, then
press the [Cancel] key.
The {Stop} key was pressed
on either the master unit or
sub-unit and copying has
been interrupted.
To exit Connect Copy
mode, follow the instructions on the display, then
press the [Cancel] key.
269
What to do if Something Goes Wrong
Machine Status
Cause
Action
Nothing happens when
The master unit or sub-unit Solve the problem in the
you press the [Connect] key. needs a fresh supply of ton- appropriate unit.
er or staples.
Reference
See ⇒ P.277 “B Loading
Paper”
See ⇒ P.283 “D Changing the Toner Bottle”
See ⇒ P.299 “d Adding
Staples”
See ⇒ P.305 “y Removing Punch Waste”
For any other problems,
follow the instructions
that are displayed.
5
To exit Connect Copy
mode, press the master
unit {Stop} key. then
press the [Cancel] key.
A paper misfeed occurred
during stapling.
270
Remove the misfed paper.
To exit Connect Copy
mode, press the {Stop}
key, then press the [Connect] key.
If You Cannot Make Clear Copies
If You Cannot Make Clear Copies
Problem
Cause
Action
Copies appear dirty.
The image density is too
dark.
Adjust the image density
⇒ P.34 “Adjusting Copy Image Density”.
Auto Image Density is not
selected.
Select Auto Image Density.
The reverse side of an orig- The image density is too
inal image is copied.
dark.
A shadow appears on copies when copying pasted
originals.
Adjust the image density
⇒ P.34 “Adjusting Copy Image Density”.
Auto Image Density is not
selected.
Select Auto Image Density.
The image density is too
dark.
Adjust the image density
⇒ P.34 “Adjusting Copy Image Density”.
5
Set the original in a different direction.
Fix mending tape to the
pasted part.
The same copy area is dirty The exposure glass or docwhenever making copies.
ument feeder belt is dirty.
Clean them ⇒ P.337
“Maintaining Your Machine”.
Copies are too light.
The image density is too
light.
Adjust the image density
⇒ P.34 “Adjusting Copy Image Density”.
Damp or rough grain copy
paper is being used.
Use dry paper without a
rough grain.
Toner cartridge is almost
empty.
Add toner ⇒ P.283 “D
Changing the Toner Bottle”.
The original is not set correctly.
Set originals correctly ⇒
P.26 “Setting Originals”.
An improper paper size is
selected.
Select the proper paper
size.
Copies are blank.
The original is not set correctly.
Set originals correctly ⇒
P.26 “Setting Originals”.
A moiré pattern is produced on copies.
Your original has a dot pat- Place the original on the
tern image or many lines.
exposure glass at a slight
angle.
Parts of the image are not
copied.
R
,y
,y,y,y,y,y,y,y
,y,y,y,y,y
271
What to do if Something Goes Wrong
If You Cannot Make Copies As You Want
Problem
Cause
Action
Copies are not stapled.
There are jammed staples
in the stapler.
Remove jammed staples.
See ⇒ P.302 “e Removing
Jammed Staples”.
Note
❒ After removing
jammed staples, staples
might not eject properly the first few times
you try to use the stapler.
The number of copies exceeds the capacity of the
stapler.
Check the stapler capacity.
See ⇒ P.49 “Staple”.
Staples are wrongly positioned.
Originals are not set correctly.
Set originals correctly. See
⇒ P.49 “Staple”.
Misfeeds occur frequently.
The copy paper size setting Set the proper paper size.
is not correct.
See ⇒ P.294 “Changing the
Paper Size”.
5
Make sure the back fence
in the paper tray is set correctly.
You cannot combine sever- Selected functions cannot
al functions.
be used together.
Refer to the combination
chart. See ⇒ P.193 “Combination Chart”.
When sorting the pages are Memory ran out during
You can interrupt copying
divided into two blocks.
sorting and the pages were when memory runs out.
ejected in two blocks.
See “Memory Full Auto
Scan Restart” ⇒ P.328 “Input/Output”.
Adjust Image
272
Problem
Cause
Action
In Double Copies mode,
parts of the original image
are not copied.
The original and copy paper do not match.
Select the proper original
and copy paper. See ⇒
P.143 “Double Copies”.
If You Cannot Make Copies As You Want
Problem
Cause
Action
In Centre/Border mode,
parts of the original image
are not copied.
You set too wide an erased
margin.
Make the margin narrower
with the User Tools. See
“Border Erase Width” and
“Centre Erase Width” ⇒
P.318 “Adjust Image”.
In Margin Adjustment
mode, parts of the original
image are not copied.
Your original has narrow
margins on four sides.
You set too wide an erased
margin.
Set a narrower margin
with the User Tools. See
“Front Margin: Left/
Right” and “Back Margin:
Left/Right” ⇒ P.318 “Adjust Image”.
In Image Repeat mode, the You selected the same size Select copy paper larger
original image is not copied copy paper as originals,
than the originals.
repeatedly.
and did not select the propSelect the proper reproer reproduction ratio.
duction ratio.
5
Combine
Problem
Cause
Action
You cannot make a book
Combine Original Booklet Change the setting ⇒ P.90
from a booklet or magazine Format or Combine Origi- “Combine”.
by folding copies.
nal Magazine Format is not
correct.
Parts of the image are not
copied.
You specified an improper
reproduction ratio that
does not meet the sizes of
your originals and copy paper.
When you specify a reproduction ratio using Manual Paper Select mode,
make sure the ratio matches your originals and the
copy paper.
Note
❒ Select the correct reproduction ratio before using Combine mode.
Your originals are not iden- Use originals that are identical in size and direction.
tical in size and direction.
273
What to do if Something Goes Wrong
Problem
Cause
Action
Order of copies is not correct.
You set originals in the incorrect order.
When setting a stack of
originals in the document
feeder, the last page
should be on the bottom.
If you set an original on the
exposure glass, start with
the first page to be copied.
Duplex
5
Problem
Cause
Action
Order of copies is not correct.
You set originals in the incorrect order.
When setting a stack of
originals in the document
feeder, the last page
should be on the bottom.
If you set an original on the
exposure glass, start with
the first page to be copied.
Orientation of copies (Top You set originals in an inSet the original orientation
to Top, or Top to Bottom) is correct direction or the ori- to Select the correct oriennot correct.
entation setting is incorrect. tation, or set originals correctly ⇒ P.84 “Duplex”.,
P.28 “Original Orientation”
Note
❒ If you set A3, 11" × 17"
or B4, 81/2" × 14" originals as shown below,
select [Top to Bottom] to
make copies with “Top
to Top” orientation. Alternatively select [Top to
Top] to make copies
with “Top to Bottom”
orientation.
CP270-A
274
If You Cannot Make Copies As You Want
Stamp
Problem
Cause
Action
The wrong date is printed.
The machine main power
has been turned off for
more than 20 days.
Set the date correctly again.
See "Date Settings" in the
"System Settings".
The stamp position is
wrong.
The paper orientation is
wrong.
Check the paper orientation and stamp position.
The stamp does not appear. Stamp is too large to print.
Check the size of the user
stamp and register it again.
See ⇒ P.174 “Program/Delete User Stamp”
Document Server
Problem
Cause
Action
You want to find out what
is stored in a file.
--
Check the date/time column in the File List.
5
Print the first page of the
documents. See ⇒ P.210
“Print First Page”
Memory is full.
The Document Server
Memory is full.
Delete any unnecessary
files and then scan the document again. See ⇒ P.330
“Document Server”
Change the Memory Allocation. See “Memory Allocation” in the System
Settings manual. However
if you change this setting,
the documents in the HDD
will be deleted. Print the
stored documents in the
HDD.
You cannot store documents.
The Document Server is
full.
The maximum number of
files you can store is 250 in
the HDD, 50 files in the
CD-RW (option).
Delete any unnecessary
files and then scan the document again.
275
What to do if Something Goes Wrong
Connect Copy
Machine Status
Cause
Action
You can not use the Punch
function.
The sub-unit does not have Press the [Connect Copy]
the optional punch kit.
key to disconnect, then
start copying.
The copied images differ.
The “Original Mode” of the See ⇒ P.318 “Adjust Image”
user tools (Copy Features)
settings are not the same.
The user stamp settings are Register the same stamp in
not the same on the master each user stamp.
unit and sub-unit.
When Memory is Full
5
If the number of originals exceeds a certain limit, the machine will run out of
memory, for Connect Copy scans in all your originals into memory.
Limitation
❒ If memory is full on either the master unit or sub-unit, Interrupt will not be
available.
Note
❒ If you set the “Memory Full Auto Scan Restart” setting in the User Tools
(Copier/Document Server Features) to “Yes”, the memory overflow message
will not be displayed, but originals scanned so far will be copied automatically. Connect Copy continues scanning and copying until finishing the job.
Please note that copy sets will be printed out separated by scanning at this
time.
276
Machine Status
Action
The memory is full.
Press the [Output] key to copy scanned
originals and clear the scanning data.
Press the [Clear] key to clear the scanning
data and not copy.
The machine asks you whether you want
to scan the remaining originals.
To continue copying, remove all copies
then press the [Resume] key. To stop copying, press the [Cancel] key.
B Loading Paper
B Loading Paper
Note
❒ For how to change the paper size of tray 2 (500-sheet tray), see ⇒ P.294
“Changing the Paper Size”.
Reference
For information on paper types and sizes, see ⇒ P.18 “Copy Paper”.
To load paper in tray 1 (Tandem Tray)
Important
❒ When the paper on the right side in tray 1 runs out, the paper on the left side
will automatically move to the right side. While the paper on the left side is
moving, the machine instructs you to wait. At this time, do not pull out the
tray.
5
Note
❒ You can load paper even while you are copying onto paper loaded in Tray 1
by pulling out the left half of the tray.
❒ Load the same size and direction paper in the other half of the tray.
A Pull out the paper tray until it stops.
277
What to do if Something Goes Wrong
B Square the paper and set it in the tray.
❖ When the whole tray is pulled out:
Important
❒ Push the right paper to the right side, and the left paper to the left side.
5
❖ When the left half of the tray is pulled out:
Important
❒ Do not stack paper over the limit mark.
❒ Make sure that the paper stack is flush with the left side fence.
Note
❒ Fan the paper before placing it in the tray.
❒ If paper is curled or warped, correct the curl or warp before placing it in
the tray.
C Push the paper tray in until it stops.
278
B Loading Paper
Loading paper in Tray 2 or 3
A Pull out the paper tray until it stops.
B Square the paper and set it in the tray.
5
Important
❒ Do not stack paper over the limit mark.
❒ Make sure that the paper stack is flush with the right side fence.
Note
❒ Fan the paper before placing it in the tray.
❒ If paper is curled or warped, correct the curl or warp before placing it in
the tray.
C Push the paper tray in until it stops.
279
What to do if Something Goes Wrong
Loading Paper in the Large Capacity Tray
A Pull out the Large Capacity Tray until it stops.
B Place the paper in the tray along the edge on the left.
5
Important
❒ Do not stack paper over the limit mark.
Note
❒ Tray 4 and Tray 5 can hold up to 1,000 sheets, and the tray 6 can hold up
to 2,550 sheets.
C Push the Large Capacity Tray in until it stops.
280
B Loading Paper
Loading Paper in the Optional A3/11" × 17" Tray Kit
A Pull out the A3/11" × 17" Tray until it stops.
B Place the paper in the tray along the edge on the left.
5
Important
❒ Do not stack paper over limit mark.
❒ Make sure that the paper stack is flush with the right side fence.
Note
❒ Fan the paper before placing it in the tray.
❒ If paper is curled or warped, correct the curl or warp before placing it in
the tray.
281
What to do if Something Goes Wrong
C Push the paper tray in until it stops.
5
282
D Changing the Toner Bottle
D Changing the Toner Bottle
When D is displayed, it is time to supply toner.
R WARNING:
• Do not incinerate used toner or toner containers. Toner dust might ig-
nite when exposed to an open flame. Dispose of used toner containers
in accordance with local regulations for plastics.
R CAUTION:
• Keep toner (used or unused) and toner containers out of reach of children.
R CAUTION:
• Our products are engineered to meet high standards of quality and function-
ality, and we recommend that you only use the expendable supplies available at an authorized dealer.
5
Important
❒ If you use toner other than that recommended, a fault might occur.
❒ When changing toner, do not turn off the operation switch or your settings
will be cleared.
❒ Always add toner after the machine instructs you to.
❒ Do not add used toner. This will damage the machine.
❒ During the toner adding, the toner bottle is rotating. Do not touch the toner
bottle.
Note
❒ If the both toner bottles are empty, D will appear.
❒ You can still make about 200 copies after D appears, but replace the toner early to prevent poor copy quality.
❒ If one of the toner bottle is empty, you can keep copying by using the other
bottle.
❒ You can change the toner bottle during copying.
❒ If toner remain in the bottle, you cannot pull it out.
❒ When you change one toner bottle, do not touch the other one.
Reference
For how to store toner, see ⇒ P.21 “Toner Storage”.
283
What to do if Something Goes Wrong
• 1: Open the toner cover.
• 2: Push the green button to release the
toner bottle.
• 3: Pull out the toner bottle gently.
5
• 4: Shake the new toner bottle 1 or 2
times.
• 5: Remove the outer cap.
Note
❒ Do not remove the inner cap.
• 6: Place the toner bottle in position,
then push it in until the green button
clicks.
Note
❒ If you can't get it to click in, pull out
the toner bottle a little, slightly rotate it to the left or right, then try
again.
284
D Changing the Toner Bottle
• 7: Return the button under the toner
bottle to its original position.
• 8: Close the toner cover.
5
285
What to do if Something Goes Wrong
x Clearing Misfeeds
R CAUTION:
• The fusing section of this equipment might be very hot. You should be very
5
careful that you don't touch this section when removing the misfed paper.
Important
❒ When clearing misfeeds, do not turn off the operation switch or your copy
settings will be cleared.
❒ To prevent misfeeds, do not leave any torn scraps of paper within the machine.
❒ If paper misfeeds occur repeatedly, contact your service representative.
Note
❒ More than one misfeed area may be indicated. In this case, check every applicable area. Refer to the following charts: A, B, C, D, U, P, R (R1 – R6), Z
❒ You can find a sticker explaining how to remove misfeed paper inside of the
front cover or inside of the finisher.
286
x Clearing Misfeeds
5
This page is intentionally blank.
287
What to do if Something Goes Wrong
5
288
x Clearing Misfeeds
5
289
What to do if Something Goes Wrong
5
290
x Clearing Misfeeds
5
291
What to do if Something Goes Wrong
5
292
x Clearing Misfeeds
5
293
What to do if Something Goes Wrong
Changing the Paper Size
Important
❒ Always select the paper size loaded with the User Tools. If you do not, misfeeds might occur.
Reference
For paper sizes, weight, and the amount of paper that can be set in each tray,
see ⇒ P.18 “Copy Paper”.
Changing the paper size in Tray 1
Note
❒ The fences of tray 1 (tandem tray) are fixed to A4, 81/2" × 11" size. To change
the paper size for this tray, please contact your service representative.
5
Changing the paper size in Tray 2 and Tray 3
A Make sure that the paper tray is not being used. Then fully pull out the tray.
B While pushing the release lever, adjust the side fences and back fence to
the new paper size.
294
Changing the Paper Size
C Square the paper and set it in the tray.
Important
❒ Do not set more than the capacity of the tray.
❒ Make sure that the paper stack is flush with the right side fence.
Note
❒ Fan the paper before placing it in the tray.
5
❒ Correct the paper, if curled or warped, before placing it in the tray.
D Set the paper size selector at the outermost part of the tray to the new paper
size.
To adjust the paper size to one not available with the paper size selector
A Set the paper size selector knob to the p mark on the left.
B Press the {User Tools} key.
C Press the [System Settings] key.
D Press the [Paper Size Setting] key.
E Press the [Tray 2:Paper Size Setting] key.
F Select the paper size then press the [OK] key.
G Press the [Exit] key or press the {User Tools} key to exit the User Tools.
295
What to do if Something Goes Wrong
Reference
For details, see “User Tools” in the System Settings manual.
E Push the paper tray until it stops.
F Check the paper size displayed on the display panel.
Changing The Paper Size Of The Optional Large Capacity Tray
(Tray 4 and Tray 5)
A Make sure that the paper tray is not being used. Then fully pull out the tray.
5
B Pull out the screw fixed the side fence.
296
Changing the Paper Size
C Set the side fence on the size you wish.
D Fasten the side fence with the screw.
5
E Set the end fence along the paper size.
297
What to do if Something Goes Wrong
F Square the paper and set it in the tray.
Important
❒ Do not load up over the mark of the least upper bound.
Note
❒ Fan the paper before placing it in the tray.
❒ If paper is curled or warped, correct the curl or warp before placing it in
the tray.
5
G Set the paper size selector at the innermost part of the tray to the new paper
size.
Changing The Paper Size Of The Optional Large Capacity Tray
(Tray 6)
Note
❒ The fence of the optional large capacity tray (Tray 6) is fixed to A4, 81/2" × 11"
size.
❒ When you set the tab stocks in the tray, always use the end fence.
To change the paper size of this tray, contact your service representative.
298
d Adding Staples
d Adding Staples
R CAUTION:
• Our products are engineered to meet high standards of quality and function-
ality, and we recommend that you only use the expendable supplies available at an authorized dealer.
Important
❒ If you use a staple cartridge other than that recommended, staple failure or
staple jams might occur.
• 1: Open the front cover of the finisher.
5
• 2: Pull the lever R8 down in the staple
unit.
• 3: Turn knob R9 until the staple unit
rises.
• 4: Pull out the staple unit lever.
• 5: Pull out the staple unit gently.
• 6: Put down the staple unit on a level
surface.
299
What to do if Something Goes Wrong
• 7: Raise the cover up.
• 8: Set the new refill.
5
• 9: Lower the cover until it clicks.
• 10: Pull out the ribbon.
• 11: Turn the staple unit around.
300
d Adding Staples
• 12: Reinstall the staple unit.
• 13: Push the staple unit until it clicks.
5
• 14: Close the front cover of the finisher.
301
What to do if Something Goes Wrong
e Removing Jammed Staples
Note
❒ Staples might be jammed because of curled copies. In this case, try turning the
copy paper over in the tray. If there is no improvement, change to copy paper
with less curl.
❒ After removing jammed staples, staples might not be ejected the first few
times you try to use the stapler.
• 1: Open the front cover of the finisher
and pull lever R9 down.
• 2: Pull lever R8 and fully pull out the
staple unit.
5
• 3: Turn knob R9 until the marks are
aligned.
• 4: Pull out the staple unit lever.
• 5: Pull out the staple unit gently.
302
e Removing Jammed Staples
• 6: Raise the blue lever.
• 7: Push the buttons on the both sides of
the staple unit and open the face plate.
5
• 8: Pull out the jammed staples.
• 9: Lower the face plate until it clicks.
• 10: Lower the blue lever.
303
What to do if Something Goes Wrong
• 11: Reinstall the staple unit.
• 12: Push the staple unit until it clicks.
5
• 13: Replace the staple unit.
• 14: Close the front cover of the finisher.
304
y Removing Punch Waste
y Removing Punch Waste
Note
❒ While the y indicator is lit you cannot use the punch function.
A Open the front cover of the finisher.
5
B Pull out the punch waste box and remove punch waste.
C Reinstall the punch waste box.
D Close the front cover of the finisher.
The y indicator goes off.
305
What to do if Something Goes Wrong
Note
❒ If the indicator is still lit, reinstall the punch waste box.
5
306
6. User Tools (Copier/
Document Server Features)
Accessing User Tools (Copier/Document
Server Features)
This section is for the key operators in charge of this machine. The User Tools
permit you to change or set the machine's default settings.
Preparation
Always exit the User Tools menu when you have finished making settings.
Any changes you make with the User Tools remain in effect even if the main
power switch or operation switch is turned off, or the {Clear Modes} key is
pressed.
The key selected is highlighted.
Reference
For more information, see “Accessing The User Tools (System Settings)” in
the System Settings manual.
A Press the {User Tools} key.
B Press the [Copier/Document Server Features] key.
The main menu of the copy features is displayed.
307
User Tools (Copier/Document Server Features)
C Select the desired User Tools menu.
Reference
See ⇒ P.310 “User Tools Menu (Copier/Document Server Features)”.
D Change the settings by following the instructions on the display panel.
6
Then press the [OK] key.
Reference
See ⇒ P.312 “Settings You Can Change with the User Tools”.
Note
❒ [OK] key: Press to confirm the new settings and return to the previous
menu.
❒ [Cancel] key: Press to return to the previous menu without changing any
settings.
308
Accessing User Tools (Copier/Document Server Features)
Exiting User Tools
A Press the [Exit] key.
The initial copy display reappears and you can make copies.
6
Note
❒ User Tool settings are not canceled even if the operation switch is turned
off or the {User Tools} key is pressed.
❒ You can exit User Tools by touching the {User Tools} key.
309
User Tools (Copier/Document Server Features)
User Tools Menu (Copier/Document Server Features)
6
310
User Tools Menu (Copier/Document Server Features)
6
311
User Tools (Copier/Document Server Features)
Settings You Can Change with the User
Tools
Reference
For how to access the User Tools, see ⇒ P.307 “Accessing User Tools (Copier/
Document Server Features)”.
General Features
General Features
Menu
Description
Auto Paper Select Priority
By default, Auto Paper Select is selected. You can cancel
this setting.
Note
❒ Default: On
6
Auto Image Density Se- By default, Auto Image Density is selected. You can change
lect Priority
this setting.
Note
❒ Default: On
Original Mode Priority
By default, Text is selected as the Original Type. You can
change it to Auto Text/Photo, Photo, Pale, or Generation.
Note
❒ Default: Text
Duplex Mode Priority
You can select the type of Duplex function effective when
the machine is turned on, Energy Saver mode exited, or an
Auto Reset occurs.
Note
❒ Default: 1 Sided → 2 Sided
Original Orientation In
Duplex Mode
You can set the original orientation when making two-sided copies.
Note
❒ Default: Top to Top
312
Settings You Can Change with the User Tools
Menu
Description
Copy Orientation In
Duplex Mode
You can set the copy orientation when making two-sided
copies.
Note
❒ Default: Top to Top
Initial Mode Set
You can select the initial mode or Program No. 25 as the
mode effective when the machine is turned on, or modes
are cleared.
Note
❒ Default: Standard
Maximum Copy Quan- The maximum copy quantity can be set between 1 and 9999.
tity
Note
❒ Default: 9999
Copy Reset Timer
The machine returns to the initial condition automatically
after your job is finished. The time can be set from 10 to 999
seconds, or off.
6
Note
Default:
❒
60 Sec.
❒ To turn the Copy Reset Timer off, select “Off”.
❒ Note that when the Copy Reset Timer is turned off, the
machine will not return to the user code input display
automatically.
Job List Screen Timeout The machine returns to its initial condition automatically
from the Job List Screen. The time can be set from 10 to 999
seconds, or off.
Note
❒ Default: 15 Sec.
❒ To turn the Job List Screen Timeout off, select “Off”.
Paper Eject : Always
Rotate 180°
If you want to copy on the paper with letterhead, the machine rotate the image correctly. To use this function turn it
on.
Note
❒ Default: Off
Manual Original
Counter Reset
You can select the Manual Original Counter display turns
on or off. The Original Counter can be reset by touching this
key.
Note
❒ Default: Off
313
User Tools (Copier/Document Server Features)
Set Ratio
Menu
Description
Preset Reduce/Enlarge
When you use preset reduce/enlarge, you can select the ratios first displayed.
Note
❒ Default: 25, 50, 65, 73, 78, 85, 93, 121, 129, 155, 200, 400 %
Preset Reduce/Enlarge
Priority
You can select the ratio that is detected by priority in preset
reduce/ enlarge mode.
Note
❒ Default: 73%
Shortcut R/E
Up to 2 reproduction ratios which you frequently use can
be registered.
Note
❒ Default:
• Shortcut R/E 1 : 73 %
6
• Shortcut R/E 2 : 129 %
Create Margin Ratio
You can set the ratio of Create Margin.
The ratio can be set from 90 to 99 %.
Note
❒ Default: 93 %
Original Mode Level
You can adjust the quality level of copies for each of the original types (Text,
Auto Text/Photo, Photo, Pale, Generation).
Menu
Description
Text
A Adjust the sharpness of text.
B Adjust the density of text.
Note
❒ Default: Normal
❒ [Service Mode] is the value set during service setup.
❒ Choosing [Soft] or [Sharp] affects the outline sharpness of
text.
314
Settings You Can Change with the User Tools
Menu
Description
Auto Text/Photo
A When there are photo(s) and text on the original, this set-
ting determines whether photo or text takes priority.
B Adjust the density of Auto Text/Photo.
Note
❒ Default: Normal
❒ [Service Mode] is the value set during service setup.
❒ [Normal] achieves a good balance between text and photos.
Photo
A For a photo original, adjust the finish quality level to
match the type of photo original.
B Adjust the density.
Note
❒ Default: Normal
❒ If you change this setting during the document server
function is using the finish image may differ.
❒ [Service Mode] is the value set during service setup.
6
❒ Select [Press Print] for printed photo originals with
coarse dots, and [Glossy Photo] for printed photo originals with fine dots.
❒ ”Normal” is a well-balanced quality level for printed
Photo, Pale, Photo, and Text.
Pale
A Adjust the quality level for the finish of a pale original
with normal density.
B Adjust the density.
Note
❒ Default: Normal
❒ [Service Mode] is the value set during service setup.
Generation
A Adjust the quality level so as not to thicken the lines of
the finish image.
B Adjust the density.
Note
❒ Default: Normal
❒ [Service Mode] is the value set during service setup.
315
User Tools (Copier/Document Server Features)
Display/Panel Tone
Menu
Description
Original Mode Display
You can choose whether the original modes are shown on
the initial display.
Note
❒ Default: Display
❒ If you choose “Hide”, the display is shown as below.
6
Special Original Display
You can choose whether the special original modes are
shown on the initial display.
Note
❒ Default: Display
❒ If you choose “Hide”, the display is shown as below.
316
Settings You Can Change with the User Tools
Menu
Description
Paper Type Display
You can choose whether the available paper trays/sizes are
shown on the initial display.
Note
❒ Default: Display
❒ If you choose “Hide”, the display is shown as below.
When the [Auto Paper Select] is touched, paper sizes appear on the display.
Panel Features Default
6
You can select the other tab function that is selected automatically just after the machine is turned on or when modes
are cleared.
Note
❒ Default: Off
Image Adjustment Priority
You can select the function that is priority detected in Image Adjustment mode.
Note
❒ Default: Off
Staple Position
You can select the staple position to be displayed as the 4th
icon.
Note
❒ Default: Top 2
317
User Tools (Copier/Document Server Features)
Menu
Description
Original Tone
The tone sounds when you forget to remove originals after
copying.
Note
❒ Default: On
❒ If the Panel Tone is turned off, (see System Settings manual), the tone does not sound irrespective of the Original
Tone function setting.
Job End Call
You can choose whether or not the tone sounds when copying is complete. You can set the volume of the tone that with
the User Tools (System Settings), and the tone that sounds
when the paper tray runs out of paper or when there is a paper jam.
Note
❒ Default: On
Adjust Image
6
Menu
Description
Copy Back Cover
When copying single sided covers, choose whether the outside back cover is delivered face up or face down.
Note
❒ Default: Image Back Of Cover
Front Margin: Left/
Right
You can specify left or right margins on the front side of
copies in Margin Adjust mode.
Note
❒ Default:
• Metric version: Left 5 mm
• Inch version: Left 0.2"
Back Margin: Left/
Right
You can specify left or right margins on the back side of
copies in Margin Adjust mode.
Note
❒ Default:
• Metric version: Right 5 mm
• Inch version: Right 0.2"
318
Settings You Can Change with the User Tools
Menu
Description
Front Margin: Top/Bot- You can specify front top and bottom margins on the front
tom
side of copies in Margin Adjust mode.
Note
❒ Default:
• Metric version: Bottom 0 mm
• Inch version: Bottom 0.0"
Back Margin: Top/Bot- You can specify the top, or bottom margins on the back side
tom
of copies in Margin Adjust mode.
Note
❒ Default:
• Metric version: Bottom 0 mm
• Inch version: Bottom 0.0"
1 → 2 Duplex Auto
Margin Adjust
In 1 sided → 2 sided Duplex mode, you can specify whether
to automatically set the margins on the back side.
The margin is set the same value of the “Back Margin: Left/
Right”.
6
Note
❒ Default: On
Border Erase Width
The default width of erased margins in Border Erase mode
can be changed as follows:
• Metric version: 3–50 mm in 1 mm steps
• Inch version: 0.1–2.0" in 0.1" steps
Note
❒ Default:
• Metric version: 10 mm
• Inch version: 0.4"
Combine Orig. Shadow In Combine Copy or Booklet/Magazine Copy mode, you
Erase
can specify whether to erase a 3 mm, 0.1" binding margin
around all four edges of each copy.
Note
❒ Default: Yes
319
User Tools (Copier/Document Server Features)
Menu
Description
Center Erase Width
The default width of erased margins in Erase Center mode
can be changed as follows:
• Metric version: 3–50 mm in 1 mm steps
• Inch version: 0.1–2.0" in 0.1" steps
Note
❒ Default:
• Metric version: 10 mm
• Inch version: 0.4"
Repeat Separation Line
6
You can select a the kind of separation line in Image Repeat
mode from the following:
• 1: None
• 2: Solid
• 3: Broken 1
• 4: Broken 2
• 5: Crop Marks
Note
❒ Default: None
Double Copies Separation Line
You can select the kind of separation line in Double Copy
mode from the following:
• 1: None
• 2: Solid
• 3: Broken
• 4: Crop Marks
Note
❒ Default: None
320
Settings You Can Change with the User Tools
Menu
Description
Combine Separation
Line
You can select the kind of separation line in Combine mode
from the following:
• None
• Solid
• Broken 1
• Broken 2
• Crop Marks
Note
❒ Default: None
6
321
User Tools (Copier/Document Server Features)
Menu
Description
Copy Order In Combine Mode
You can set the copy order in Combine mode to “Left to
Right” or “Top to Bottom”.
6
Note
❒ Default: Left to Right
Copy Orientation In
Booklet/Magazine
You can select the type of originals for Booklet or Magazine
mode.
Note
❒ Default: Forward
Front Cover Copy In
Combine Mode
You can specify whether to make a combined copy on the
front cover sheet when you select [copy] in Front Cover
mode.
Note
❒ Default: Combine
Designated Slip Sheet
Copy In Combine
Mode
322
You can specify whether to make a combined copy on the
inserted slip sheets in Designate: Copy mode.
Note
❒ Default: Combine
Settings You Can Change with the User Tools
Stamp
Background Numbering
Menu
Description
Size
You can set the size of the numbers.
Note
❒ Default: Normal
• Small: 8 × 4mm, 0.32" × 0.16"
• Normal: 32 × 16mm, 1.28" × 0.64"
• Large: 64 × 32mm, 2.56" × 1.28"
Density
You can set the density of the numbers.
Note
❒ Default: Normal
Superimpose
You can select whether the numbering is printed negative
when it overlaps black parts of the image.
6
Note
Default:
❒
Off
Preset Stamp
Menu
Description
Stamp Language
You can select the language of the message that is printed
in Stamp mode.
Note
❒ Default: English
Stamp Priority
You can select the stamp type priority detected in Stamp
mode.
Note
❒ Default: COPY
323
User Tools (Copier/Document Server Features)
Menu
Description
Stamp Format
You can adjust the position, size, density and print page for the stamp.
Position Priority
You can set the stamp position.
Note
Default:
❒
• Metric version:
• Position: Top Right
• Top/Bottom Margin: 24mm
• Left/Right Margin: 24mm
• Inch version:
• Position: Top Right
• Top/Bottom Margin: 10"
• Left/Right Margin: 10"
❒
Size
6
You can set the size of the stamp.
Note
❒ Default: 1x
Density
You can set the pattern used to print the stamp.
Note
❒ Default: Normal
❒ Normal: The stamp is printed on the image. You cannot
confirm which parts overlap the image.
❒ Lighter: The image can be seen through the stamp.
❒ Light: You can see the image even more than the “Lighter” setting.
Print Page
You can select whether the stamp is printed on the first
page or all pages.
Note
❒ Default: All Pages
Superimpose
You can select whether the Preset Stamp is printed negative
when it overlaps black parts of the image.
Note
❒ Default: Off
324
Settings You Can Change with the User Tools
User Stamp
Menu
Description
Program/Delete Stamp
You can register up to 5 custom stamps with your favorite design. You can register/
change/delete your favorite design as a user stamp.
How to Program/Delete Stamp See ⇒ P.174 “Program/Delete User Stamp”
Position : Stamp Format You can set the position at which the stamp is printed.
1–5
Press the arrow keys to adjust the position.
Note
❒ Default:
• Metric version:
• Position: Top Right
• Top/Bottom Margin: 24mm
• Left/Right Margin: 24mm
• Inch version:
6
• Position: Top Right
• Top/Bottom Margin: 10"
• Left/Right Margin: 10"
Print Page
You can select whether the stamp is printed on the first
page or all pages.
Note
❒ Default: All Pages
Date Stamp
Menu
Description
Format
You can select the date format for Date Stamp mode.
Note
❒ Default: 01/01/2000
Font
You can select the Date Stamp font.
Note
❒ Default: Gothic
❒ This setting is linked with Page Numbering.
325
User Tools (Copier/Document Server Features)
Menu
Description
Position Priority
You can set the position at which the stamp is printed.
Press the arrow keys to adjust the position.
Note
❒ Default:
• Metric version
• Position: Top Left
• Top/Bottom Margin: 8mm
• Left/Right Margin: 32mm
• Inch version
• Position: Top Left
• Top/Bottom Margin: 0.3"
• Left/Right Margin: 0.8"
Size
You can set the Date Stamp size.
Note
❒ Default: Auto Select
6
❒ This setting is linked with Page Numbering.
Superimpose
You can select whether the Preset Stamp is printed negative
it overlaps black parts of the image.
Note
❒ Default: Off
❒ This setting is linked with Page Numbering.
Page Numbering
Menu
Description
Format
You can select the page number format that is printed in
Page Numbering mode.
Note
❒ Default: P1, P2
Font
You can select the font of the page number that is printed in
Page Numbering mode.
Note
❒ Default: Gothic
❒ This setting is linked with the Date Stamp.
326
Settings You Can Change with the User Tools
Menu
Description
Size
You can set the size of the stamp that is printed in Page
Numbering mode.
Note
❒ Default: Auto Select
❒ This setting is linked with the Date Stamp.
Duplex Back Page
Number Position
You can set the position of the duplex back page number
that is printed in Duplex mode.
Note
❒ Default: Opposite Position
Page Numbering In
Combine Mode
You can set how the pages are numbered when you use the
Combine function and Page Numbering function together.
Note
❒ Default: Per Original
Copy On Slip Sheet In
Designate Mode
You can select whether to print the page number onto slip
sheets when you use the Designate function, “Copy” and
Page Numbering together.
6
Note
❒ Default: Off
❒ If you combine with the Designate function, you can use
only 1-1, 1-2… format.
Superimpose
You can select whether page numbers are printed negative
when they overlap black parts of the image.
Note
❒ Default: Off
Position Priority
You can set the position.
Position : P1, P2,
Press the arrow keys to adjust the position.
Position : 1/5, 2/5
Position : -1-, -2Position : P.1, P.2
Position : 1, 2
Position : 1-1, 1-2
Note
❒ Default:
• Metric version
• Position: P.1, P1, 1, 1/5:Top Right, -1-, 1-1: Bottom
Center
• Margin: P.1, P1, 1, 1/5:12mm, -1-, 1-1: 8mm
• Inch version
• Position: P.1, P1, 1, 1/5:Top Right, -1-, 1-1: Bottom
Center
• Margin: P.1, P1, 1, 1/5:5", -1-, 1-1: 3"
327
User Tools (Copier/Document Server Features)
Input/Output
Menu
Description
SADF Auto Reset Timer When you set one original at a time in the optional document feeder, the Auto Feed indicator lights for a time after
the last original is fed to show that the document feeder is
ready for another original. You can adjust this time from 3
seconds to 99.
Note
❒ Default: 10 seconds
ADF Original Table
Rise Time
You can set the document feeder original table rise time.
Face-up/down Eject
From Platen
When copying an original placed on the exposure glass or
one original loaded in the document feeder, you can specify
the way copies are delivered.
6
Note
❒ Default: Original is Set
Note
❒ Default: Face Up
Auto Sort Mode
You can specify whether Sort mode is selected when the
machine is turned on or when modes are cleared.
Note
❒ Default: Off
Memory Full Auto Scan If memory runs out while scanning originals, the machine
Restart
can make copies of the scanned originals first, then automatically proceed with scanning the remaining originals.
You can enable or disable this function.
• If you select [On]:
When the memory becomes full, the machine stops allowing you to remove the copy pages delivered on the
output tray.
• If you select [Off]:
You can leave the machine unattended to make all the
copies, but the resulting sorted pages will not be in sequence.
Note
❒ Default: Off
Shift Tray
You can have copies shifted in sort or stack mode.
Note
❒ Default: Standard
328
Input/Output
Menu
Description
Separation Sheet
You can set the number of separation sheets that is inserted
(1-999).
Note
❒ Default: 1
6
329
User Tools (Copier/Document Server Features)
Document Server
Menu
Description
File List Sort Priority
You can select how files that are listed in Document Server
mode.
Note
❒ Default: Time : Sort Descending
Store Mode Priority
By default, “Store And Print” is selected.
You can cancel this setting.
Note
❒ Default: Store And Print
Auto File Delete
Old files stored on the Document Server can be deleted automatically.
Note
❒ Default: Do Not Delete
❒ When you select Delete, input the time using the number keys. The time can be set from 1 to 180 days in 1 day
steps.
6
Delete All The Saved
Files, Delete All The
Saved Files In CD
You can delete all saved files.
If you have registered the access code, you need to input the
code before you can delete files.
Limitation
❒ You can not delete files that are currently in use.
Note
❒ The message dialog is displayed. If you want to delete
all files, press [Yes] key, If you do not, press [No] key to
cancel.
CD Read/Write Speed
Control
330
You can select the access speed for CD-RW.
Note
❒ Default: Auto
Key Operator Tools
Key Operator Tools
If the key operator code has been registered beforehand, you cannot access the
Key Operator Tools unless you enter the key operator code (up to 8 digits).
Menu
Description
Check/Reset/Print Copy Counter
You can check or print the number of copies made under each user code.
You can also reset each user code counter to 0.
If more than 20 user codes are registered, you can view all the counters using the [Previous] or [Next] key.
Print Counter List
You can print the number of copies under each user code.
To start printing, press the [Print Counter List] key. To stop
printing, touch the [Cancel] key.
Reset Counters
You can reset each user code counter to 0.
Reset All Counters
You can reset all counters to 0.
6
Program/Change/Delete User Code
You can register, change, or delete user codes (8 digits or less).
Note
❒ Up to 500 user codes can be registered.
❒ Even if you have changed a user code, the counter value will not be cleared.
❒ When the user code is deleted, the counter value will be automatically deleted.
Program
You can register user codes.
A Press the [Program] key.
B Enter the User Code using the number keys.
C Press the [OK] key.
Change
You can change user codes.
A Press the [Change] key.
B Press the User Code you want to change.
C Enter new User Code using the number keys.
D Press the [OK] key.
Note
❒ The number of copies made under the old code is added
to that made under the new user code.
331
User Tools (Copier/Document Server Features)
Menu
Description
Delete User Code
You can delete user codes.
A Press the [Delete User Code] key.
B Press the User Code you want to delete.
C Press the [OK] key.
D Press the [Yes] key.
Delete All User Codes
You can delete all user codes.
A Press the [Delete All User Code] key.
B Press the [Yes] key.
Connect Copy Master
You can choose whether the original modes are shown on
the initial display.
Note
❒ Default: On
6
332
7. REMARKS
Do's And Don'ts
R CAUTION:
• Unplug the power cord from the wall outlet before you move the equipment.
While moving the equipment, you should take care that the power cord will
not be damaged under the equipment.
• Do not press areas on or around the fusing unit. These areas get hot.
• After making copies continuously, the exposure glass may feel warm—this is
not a malfunction.
• You might feel warm around the ventilation hole. This is caused by exhaust
air, and is not a malfunction.
• Do not turn off the operation switch while copying or printing. Make sure
that all copying or printing has finished.
• The machine might fail to produce good copy images if condensation forms
inside the machine due to rapid temperature change. To prevent this problem, the machine has an anti-condensation function. Even after the main
power switch is in the stand-by position, the anti-condensation heater is active, thus keeping the machine body slightly warm.
• Do not open the covers of machine while copying or printing. If you do, misfeeds might occur.
• Do not move the machine while copying or printing.
• If you operate the machine improperly or a failure occurs on the machine,
your machine settings might be lost. Be sure to take a note of your machine
settings.
• Supplier shall not be liable for any loss or damages resulting from a failure on
the machine, loss of machine settings, and use of the machine.
333
REMARKS
Where to Put Your Machine
Machine Environment
Your machine's location should be carefully chosen because environmental conditions greatly affect its performance.
Optimum Environmental Conditions
R CAUTION:
• Keep the equipment away from humidity and dust. Otherwise a fire or an
electric shock might occur.
• Do not place the equipment on an unstable or tilted surface. If it topples
over, it could cause injury.
R CAUTION:
• If you use the equipment in a confined space, make sure there is a continu-
ous air turnover.
•
•
•
•
Temperature: 10 – 32°C (50 – 89.6°F) (humidity to be 54 % at 32°C, 89.6°F)
Humidity: 15 – 80 % (temperature to be 27°C, 80.6°F at 80 %)
A strong and level base.
The machine must be level within 5 mm, 0.2" both front to rear and left to
right.
• To avoid possible buildup of ozone, make sure to locate this machine in a
large well ventilated room that has an air turnover of more than 30 m3/hr/
person.
7
Environments To Avoid
• Locations exposed to direct sunlight or strong light (more than 1,500 lux).
• Locations directly exposed to cool air from an air conditioner or heated air
from a heater. (Sudden temperature changes might cause condensation within the machine.)
• Locations close to such machines generating ammonia as diazo copy machine.
• Places where the machine might be subjected to frequent strong vibration.
• Dusty areas.
• Areas with corrosive gases.
334
Where to Put Your Machine
Power Connection
R WARNING:
• Only connect the machine to the power source described on the inside
front cover of this manual. Connect the power cord directly into a wall
outlet and do not use an extention cord.
• Do not damage, break or make any modifications to the power cord.
Do not place heavy objects on it. Do not pull it hard nor bend it more
than necessary. These actions could cause an electric shock or fire.
R CAUTION:
• Unplug the power cord from the wall outlet before you move the equipment.
While moving the equipment, you should take care that the power cord will
not be damaged under the equipment.
R CAUTION:
• When you disconnect the power plug from the wall outlet, always pull the
plug (not the cable).
• When the main switch is in the Stand-by position, the optional anti-condensation heaters are on. In case of emergency, unplug the machine's power cord.
• When you unplug the power cord, the anti-condensation heaters turn off.
• Make sure the plug is firmly inserted in the outlet.
• Voltage must not fluctuate more than 10 %.
7
335
REMARKS
Access to Machine
Place the machine near the power source, providing clearance as shown.
1. Rear: more than 20cm (7.8")
2. Right: more than 3cm (1.1")
3. Front: more than 55.5cm (21.6")
4. Left: more than 40cm (15.7")
Note
❒ For the required space when options are installed, please contact your service
representative.
7
336
Maintaining Your Machine
Maintaining Your Machine
If the exposure glass or document feeder belt is dirty, you might not be able to
make copies as you want. Clean them if you find them dirty.
❖ Cleaning the machine
Wipe the machine with a soft, damp cloth. Then, wipe it with a dry cloth to
remove the water.
Important
❒ Do not use chemical cleaner or organic solvent, such as thinner or benzene. If
they get into the machine or melt plastic parts, a failure might occur.
❒ Do not clean parts other than those specified in this manual. Such parts
should be cleaned by your service representative.
Cleaning the Exposure Glass
7
ND1C0200
Cleaning the Document Feeder
A1P0100E
337
REMARKS
Stapling Position
When there is copy paper identical in size and direction to your original, the stapling position is as follows:
7
338
8. Specification
Mainframe
❖ Configuration:
Console
❖ Photosensitivity type:
OPC drum (∅100)
❖ Original scanning:
One-dimensional solid scanning system through CCD
❖ Copy process:
Dry electrostatic transfer system
❖ Development:
Dry two-component magnetic brush development system
❖ Fusing:
Heating roll pressure system
❖ Resolution:
600 dpi
❖ Exposure glass:
Stationary original exposure type
❖ Original reference position:
Rear left corner
❖ Warm-up time:
Less than 360 seconds (23°C)
❖ Originals:
Sheet/Book/Objects
❖ Original size:
A3L – A5KL, 11" × 17"L – 51/2" × 81/2"KL
❖ Copy paper size:
• Tray1: A4K, 81/2" × 11"K
• Tray2, Tray3: A5K- A3L
• Tray4-6: A5KL- A4K, 51/2" × 81/2" LK- 81/2" × 11"K
339
Specification
❖ Copy paper weight:
• Tray 1 – Tray 3, Tray 6 : 52 - 163g/m2, 16 lb. Bond - 90 lb. Index
• Tray 4, Tray 5: 52 – 216g/m2, 16 lb. Bond - 80 lb. Cover
❖ Non-reproduction area:
• Leading edge: Less than 3 ± 2mm
• Trailing edge: More than 2 + 2/−1.7mm
• Left edge: More than 2 ± 1.5mm
• Right edge: More than 2 ± 1.5mm
❖ First copy time:
• 4.1 seconds or less
(A4 K, 81/2" × 11"K, 100 %, feeding from tray 1 to Finisher Proof Tray, on
the exposure glass, Text/Photo mode, Auto Image Density)
❖ Copying speed:
• 85 copies/minute (A4K, 81/2" × 11"K)
• 41 copies/minute (A3L, 11" × 17"L)
❖ Reproduction ratio:
Preset reproduction ratios:
Metric version
Inch version
400 %
400 %
200 %
200 %
141 %
155 %
122 %
129 %
115 %
121 %
Full Size
100 %
100 %
Reduction
93 %
93 %
82 %
85 %
75 %
78 %
71 %
73 %
65 %
65 %
50 %
50 %
25 %
25 %
Enlargement
8
Zoom: From 25 % to 400 % in 1 % steps.
❖ Maximum number of continuous copy sets
1 – 9999 copies
340
Mainframe
❖ Copy paper capacity:
• Tray 1 (Tandem tray) : 2,000 sheets (1,000 sheets × 2) (80g/m2, 20 lb Bond)
• Tray 2 (500-sheet tray) : 500 sheets (80g/m2, 20 lb Bond)
• Tray 3 (500-sheet tray) : 500 sheets (80g/m2, 20 lb Bond)
• Tray 4 (LCT): 1,000 sheets (80g/m2, 20 lb Bond)
• Tray 5 (LCT): 1,000 sheets (80g/m2, 20 lb Bond)
• Tray 6 (LCT): 2,550 sheets (80g/m2, 20 lb Bond)
❖ Power consumption:
Mainframe Only
Full System
Warm-up
about 1.25 kw
about 1.27 kw
Stand-by
about 0.1 kw
about 0.12 kw
Copying
about 1.5 kw
about 1.6 kw
Maximum
less than 1.75 kw
less than 3 kw
*1
*1
Mainframe with the finisher, large capacity tray
❖ Dimensions (W × D × H up to exposure glass):
2,096 × 735 × 1,476mm, 82.5" × 28.9" × 58.1"
❖ Space for main frame (W × D):
• 1,202 × 735 mm, 47.3" × 28.9" (ADF external extender is not used, optional
Output tray is installed.)
• 2,218 × 735 mm, 87.3" × 28.9" (ADF external extender is used for larger size
originals, optional Finisher Proof Tray is installed.)
• 2,314 × 735 mm, 91.1" × 28.9" (ADF external extender is used for larger size
originals, optional Finisher Proof Tray is installed.)
8
❖ Noise Emission *1 :
Sound Power Level
Mainframe Only
Complete System *3
When printing
74 dB (A) or less
78 dB (A) or less
Stand-by
59 dB (A) or less
63 dB (A) or less
Mainframe Only
Complete System *3
68 dB (A) or less
72 dB (A) or less
Sound Pressure Level *2
During printing
*1
*2
*3
The above measurements made ISO 7779 are actual value.
It is measured at the position of the bystander. During Printing.
Mainframe with the full options.
341
Specification
❖ Weight:
Approx. 252kg, 555.6 lb (mainmachine with document feeder)
8
342
Document Feeder
Document Feeder
❖ Mode:
ADF mode, ARDF mode, Batch/SADF mode, Mixed Sizes mode, Thin mode
❖ Original size:
• A3L–A5KL
• 11" × 17"L– 81/2" × 51/2"KL
❖ Original weight:
• 1-sided originals: 52 - 156g/m2 (14 - 42 lb. Bond)
• 2-sided originals: 52 - 128g/m2 (14 - 34 lb. Bond) (Duplex)
• Thin paper mode: 40 - 156g/m2 (11 -42 lb. Bond)
❖ Number of originals that can be set:
100 sheets (80g/m2, 20 lb. Bond) or less than 12 mm, 0.5"
❖ Copying speed:
72 copies/minute (A4K, 81/2" × 11"K, 1 to 1 copying)
❖ Power Source:
Power is supplied from the main frame.
Note
❒ Specifications are subject to change without notice.
8
343
Specification
Finisher
❖ Paper size:
Proof Tray: A3L– A5KL, 81/2" × 51/2"KL– 11" × 17"KL
Shift Tray: A3L– A5KL, 81/2" × 51/2"KL– 11" × 17"KL
Staple Mode: A3L– A4KL, 11" × 17"L, 81/2" × 11"KL– 11" × 17"KL
Punch Mode: A3L– A4KL, 11" × 17"L, 81/2" × 11"KL– 11" × 17"KL
❖ Paper weight:
Stack: 52 - 216 g/m2, 14 lb. Bond - 80 lb. Covers)
Staple: 64 - 80 g/m2, 17 - 20 lb. Bond)
Punch:
• 4 hokes: 52 - 128 g/m2, 14 lb - 34 lb. Bond)
• 2 or 3 holes: 52 - 163 g/m2, 14 lb. Bond - 90 lb. Index)
❖ Stack capacity:
Proof Tray:
• 500 sheets (A4, 81/2" × 11" or smaller) (80g/m2, 20 lb. Bond)
• 250 sheets (B4, 81/2" × 14" or larger) (80g/m2, 20 lb. Bond)
Shift Tray (without Punch):
• 3,000 sheets (A4, 81/2" × 51/2" or smaller) (80g/m2, 20 lb. Bond)
• 1,500 sheets (B4, 81/2" × 14" or larger) (80g/m2, 20 lb. Bond)
Shift Tray (with Punch):
• 2,500 sheets (A4, 81/2" × 51/2" or smaller) (80g/m2, 20 lb. Bond)
• 1,500 sheets (B4, 81/2" × 14" or larger) (80g/m2, 20 lb. Bond)
Shift Tray (with Staple):
• 10 - 100 originals = 200 - 30 sets (A4, 81/2" × 51/2" ) (80g/m2, 20 lb. Bond)
• 1,500 sheets (B4, 81/2" × 14" or larger) (80g/m2, 20 lb. Bond)
8
❖ Staple capacity:
• 2 - 100 sheets (A4, 81/2" × 11") (80g/m2, 20 lb. Bond)
• 2 - 50 sheets (Others) (80g/m2, 20 lb. Bond)
❖ Staple position:
Five positions (Top, Top Slant, Bottom, Left 2, Top 2)
❖ Power consumption:
140W (power is supplied from the main frame.)
❖ Dimensions (W × D × H):
800 × 728 × 980mm, 31.5" × 28.7 " × 38.6"
❖ Weight:
Approx. 50kg, 130.1 lb
Note
❒ Specifications are subject to change without notice.
344
CD-RW (Option)
CD-RW (Option)
❖ Storage: Number of files
Up to 50 files
❖ Power consumption:
100-240V, 50/60Hz
❖ Dimensions (W × D × H up to exposure glass):
350 × 215mm × 300mm, 13.7" × 8.4" × 11.8"
❖ Weight:
Approx. 2.5kg, 5.5 lb
8
345
Specification
A3/11" × 17" Tray Kit (Option)
❖ Paper Size:
A3L, B4L, A4KL, 11" × 17"L, 81/2" × 11"LK, LGL
❖ Paper weight:
52-163g/m2, 14 lb. Bond-90 lb. Index
❖ Copy paper capacity:
1000 sheets (80g/m2, 20 lb. Bond)
8
346
Punch Kit (Option)
Punch Kit (Option)
❖ Paper size:
2 holes
• A3L, B4L, A4KL, B5KL, A5KL, 11" × 17"L, 11" × 15"L, 10" × 14"L,
81/2" × 14" L, 81/2" × 13" L, 81/4" × 13" L, 8" × 13" L, 8 1/2" × 11"KL, 8"
× 101/2"L, 8" × 10"L, 51/2" × 81/2" K, 210 × 340mmL, 210 × 182mmK,
210 × 170mmL
3 holes
• A3L, B4L, A4K, B5K, 11" × 17"L, 11" × 15"L, 10" × 14"L, 81/2" × 11"K
❖ Paper weight:
• 2 holes version: 52 g/m2 – 128 g/m2, 14 – 34 lb
• 3 holes version: 52 g/m2 – 105 g/m2, 14 – 28 lb
• 4 holes version: 52 g/m2 – 128 g/m2, 14 – 34 lb
❖ Power consumption:
33.6 W (power is supplied from the mainframe.)
❖ Dimensions (W × D × H):
92 × 463 × 100 mm, 3.7" × 18.3" × 4.0"
❖ Weight:
Approx. 3kg, 6.6 lb
Note
❒ Specifications are subject to change without notice.
8
347
Specification
Large Capacity Tray (LCT) (Option)
❖ Paper size:
A4K– A5KL, 81/2" × 5"1/2" KL– 81/2" × 11"K
❖ Paper weight:
Tray 4, Tray 5
• 52 - 216g/m2, 16 lb. Bond - 80 lb. Covers
Tray 6
• 52 - 163g/m2, 16 lb. Bond - 90 lb. Index
❖ Paper capacity:
Tray 4, Tray 5
• 1,000 sheets (80 g/m2, 20 lb. Bond)
Tray 6
• 2,550 sheets (80 g/m2, 20 lb. Bond)
❖ Power consumption
Maximum. 60 W (power is supplied from the main frame.)
❖ Dimensions (W × D × H, option unit):
540 × 727 × 986mm, 21.3" × 28.6" × 38.8"
❖ Weight:
Approx. 78.8kg, 173.7 lb
8
Note
❒ Specifications are subject to change without notice.
348
Copy Connector Cable (Option)
Copy Connector Cable (Option)
❖ Continuous copying speed:
170 copies/minute models
❖ Dimensions (W × D × H):
310 × 310 × 65mm, 12.2" × 12.2" × 2.5"
❖ Weight:
Approx. 500g, 1.1 lb
❖ Length:
10m
8
349
INDEX
D
3 Side Full Bleed, 142
Date Stamp, 180
Delete Inside, 138
Delete Outside, 140
Designate/Chapters, 153
Directional Magnification (%), 79
Directional Size Magnification (inch), 82
Display, initial copy, 9
Display Panel, 8, 9
Document feeder, 4, 27, 248, 343
Cleaning, 337
Document Server, 195
Deleting, 224
Features and Benefits, 197
Printing, 204
Scanning Originals, 199
Do's And Don'ts, 333
Double Copies, 143
A
A3/11" × 17" Tray Kit, 346
Access to Machine, 336
Adding Staples, 299
Additional, 142
Auto Off, 25, 251
Auto Reset, 24, 250
Auto Start, 70
B
Back Cover, 151
Background Numbering, 165
Basic functions, 34
Batch (SADF) mode, 32
Book originals, copying, 120
Border Erase, 132
E
Energy Saver mode, 68
Enlarging, 72
Environment, 334
Erase
Border, 132
Center/Border, 135
Erase Center, 135
Exposure glass, 4, 15, 17, 26
Cleaning, 337
C
CD-RW, 345
Centering, 146
Changing Paper
Tray 2 or 3, 294
Changing the Paper Size, 294
Changing the Toner Bottle, 283
Chapters, 158
Clearing Misfeeds, 286
Clear key, 7
Clear Modes/Energy Saver key, 7
Combination Chart, 193
Combine, 90
Connect Copy, 239, 241, 246, 349
Document Server, 242
Exiting, 251
Interrupt, 242
Relationship, 252
Control Panel, 7
Control panel, 4
Copying
Connect Copy, 239
Copy Paper, 18
Cover
Back Cover, 151
Front Cover, 149
350
F
Finisher, 6, 241, 344
Front Cover, 4, 149
I
Image Density, 34, 35
Image Repeat, 145
Interrupt copy, 68
Interrupt key, 7
L
Large Capacity Tray (LCT), 6
LCT
Sheet Large Capacity Tray, 348
Loading Paper, 277
Large Capacity Tray, 280
Tray 1, 277
Tray 2 or 3, 279
M
Machine Environment, 334
Mainframe, 339
Main power switch, 4, 13
Maintenance, 337
Margin Adjustment, 130
Master Unit, 241
Messages, 261
Misfeeds, 286
Mixed sizes mode, 31
N
Numbering
Background Numbering, 165
Page Numbering, 183
Number keys, 8
O
On Demand Printing, 197
On indicator, 4
Operation switch, 4, 13
Options, 6
Original Mode Level, 242
Originals, 15, 247
Originals, setting, 26
Original Tone, 71
Original Type, selecting, 36
P
Page Numbering, 183
Panel Display, 243
Paper
Changing, 294
Loading, 277
Paper, having the machine choose, 38
Paper, selecting, 37
Paper tray, 4
Power Connection, 335
Preset Jobs, 60
Preset Stamp, 167
Program
Storing, 55
Program key, 7
Programs, 55
Programs, deleting, 58
Programs, recalling, 59
Punching copies, 52
Punch kit, 347
R
Reduce/Enlarge, 72
Reduce/Enlarge, Auto, 40
Reducing, 72
Remarks, 333
Removing Jammed Staples, 302
Removing Punch Waste, 305
Repeat
Image Repeat, 145
S
Safety information, i
Sample Copy, 71
Sample Copy key, 7
Save/Delete Area, 138
Scanned File Printing, 198
Screen Contrast Knob, 7
Series Copies, 116
Slip Sheets, 163
Sorting copies into sets, 44
Specification, 339, 344
Connect Copy, 349
Document Feeder, 343
Mainframe, 339
Punch Kit, 347
Sheet Large Capacity Tray (LCT), 348
Stack, 47
Stamp
Date Stamp, 180
Preset Stamp, 167
User Stamp, 171
Staple, 299
Staples
Removing Jammed Staples, 302
Stapling copies, 49
Start key, 7
Stop, 7
Sub-Unit, 241
System indicators, 8
T
Thin mode, 32
Toner Bottle
Changing, 283
Storage, 21
Toner Cover, 4
Two-sided Copies, 84
351
U
User Codes, 70
User Stamp, 171
User Tools
Copier/Document Server Features, 307
Document Server, 330
Settings, 312
User Tools/Counter key, 8
V
Ventilation hole, 5
Z
Zoom, 75
352
UE
USA
A294
Warranty
New Machine Warranty and Limitation of Liability
Warranty — 90 days
Lanier warrants that its equipment and accessories will be free from
defective parts and workmanship for a period of ninety (90) days from the
date of first installation by Lanier’s Authorized Dealer. Customers must
notify a Lanier servicing dealer or Lanier of a warranty claim within the
warranty period. For a listing of authorized Lanier servicing dealers or to
notify Lanier of a warranty claim, write to Lanier Worldwide, Inc., 2300
Parklake Drive, N.E., Atlanta, Georgia 30345-2979.
Warranty Exclusions
THE FOREGOING EXPRESS WARRANTY IS MADE IN LIEU OF ALL
OTHER PRODUCT WARRANTIES, EXPRESS OR IMPLIED,
INCLUDING MERCHANTABILITY AND FITNESS AND THOSE
ARISING FROM A COURSE OF DEALING OF USAGE OF TRADE.
The Express Warranty will not apply to drums, cleaning blades, fuser
cleaning felts, toner, developer or paper or to defects of damage incurred in
transportation, or due to accident; neglect; misuse such as use of harmful or
unapproved supplies; alterations; operator error; power surges; failure to
properly install, clean, maintain, or repair; improper operating environment;
or failure to provide proper utilities. The Express Warranty also will not
apply to used or refurbished Lanier equipment unless Lanier expressly
authorizes resale with its original equipment warranty.
Limitation of Liability
Fulfillment of Lanier’s warranty obligation shall be the Customer’s
exclusive remedy and Lanier’s and the Lanier Dealer’s limit of liability for
any breach of warranty or otherwise. In no event will Lanier or Lanier’s
Dealers be responsible or liable for special, incidental or consequential
losses or damages.
Customer Vision® _
our commitment to your
complete satisfaction
www.lanier.com
your document management partner
Lanier Worldwide, Inc. | 2300 Parklake Drive, N.E. | Atlanta, GA USA 30345