Download Lanier 5415 User's Manual
Transcript
Operator Guide 5415 Digital Copier y ou r d o cu me n t m an a ge m e nt p a rt n er When ordering supplies or requesting service for your copier, you will need to provide the model and serial number of your machine. Please take a moment to enter your model and serial numbers here. MODEL NUMBER: __________________________ SERIAL NUMBER: __________________________ To order supplies, call: ( To request service, call: ) ( ) Customer Vision® Our commitment to your complete satisfaction As an Energy Star Partner, Lanier Worldwide, Inc. has determined that this product meets the Energy Star guidelines for energy efficiency. © Lanier Worldwide, Inc. 2000 Printed in the U.S.A. August Table of Contents 1 Table of Contents 2 Important Safeguards 3 Important Safeguards ...................................................................................1 Agency Certifications .......................................................................1 1 2 3 4 Chapter 1 - Making Copies Turning the Copier ON............................................................................... 1-1 Placing Original Documents ........................................................................ 1-2 Using the Exposure Glass for Copying ............................................. 1-2 Using the Automatic Document Feeder for Copying (optional) ............. 1-2 Making a Copy ......................................................................................... 1-3 4 5 Chapter 2 - Component Identification Copier Components................................................................................... 2-1 Control Panel ................................................................................ 2-1 Message Display ............................................................................ 2-3 External Components...................................................................... 2-4 Internal Components ...................................................................... 2-5 Optional Equipment ........................................................................ 2-6 6 Chapter 3 - Copier Functions 7 Placing the Original Document .................................................................... 3-1 When using the Automatic Document Feeder ................................... 3-1 Setting Originals in the Automatic Document Feeder .......................... 3-2 Setting Original on the Exposure Glass.............................................. 3-3 Selecting the Paper Tray ............................................................................ 3-5 How to select a paper tray ............................................................. 3-5 Selecting Copy Quantity ............................................................................ 3-6 Selecting Copy Darkness ........................................................................... 3-7 Auto Mode ................................................................................... 3-7 Manual Mode ............................................................................... 3-7 Photo Mode ................................................................................. 3-8 Enlargement and Reduction Ratios .............................................................. 3-9 Specifying the Zoom Ratio ............................................................. 3-9 Using Preset Ratios ....................................................................... 3-9 Setting Zoom Manually ................................................................ 3-10 G I9 I I Chapter 4 - Copying Methods Bypass Copying ........................................................................................ 4-1 Loading Standard Size Paper into the Bypass Tray.............................. 4-2 Loading Non-Standard Size Paper into the Bypass Tray ....................... 4-3 Transparency Copying ............................................................................... 4-7 Setting OHP Transparencies or Tracing Paper ................................... 4-7 Function Mode ......................................................................................... 4-8 Selecting the Function Modes: F1, F2, F3, F4 ................................... 4-8 Using Function Modes .................................................................. 4-11 i Table of Contents 1 5 2 3 6 4 5 6 I 7 IG 7 I G I Chapter 5 - User Mode Total Check Function................................................................................ 5-1 Reading the Total Check Function Displays ...................................... 5-1 Count Displays ............................................................................. 5-1 Selecting a Total Count .................................................................. 5-2 Selecting PM Count ...................................................................... 5-2 User’s Choice Mode ................................................................................. 5-3 Overview of User’s Choice Codes and Functions .............................. 5-3 User’s Choice Functions............................................................................ 5-4 Selecting User’s Choice Settings ...............................................................5-10 Chapter 6 - Service and Supplies Improving Image Quality ........................................................................... 6-1 Correcting Functional Problems .................................................................. 6-3 Display Messages..................................................................................... 6-4 Toner Empty Indicator............................................................................... 6-6 Replacing the Imaging Cartridge ..................................................... 6-6 Paper Empty Indicator ............................................................................... 6-8 Loading Paper in the Paper Tray ..................................................... 6-8 Loading Paper in the Paper Feed Unit .............................................. 6-9 Paper Misfeed Indicators ..........................................................................6-11 Clearing Paper Misfeed PC ............................................................6-11 Clearing Paper Misfeed J2/J3 .......................................................6-13 Clearing Paper Misfeed J8 .............................................................6-16 Trouble Indicator .....................................................................................6-18 Resetting the Machine .................................................................6-18 Care and Maintenance .............................................................................6-19 Outer Covers ..............................................................................6-19 Exposure Glass ...........................................................................6-19 Control Panel ...............................................................................6-20 Original Pad ................................................................................6-20 Chapter 7 - Specifications Specifications .......................................................................................... 7-1 Copier ......................................................................................... 7-1 Automatic Document Feeder .......................................................... 7-2 Paper Feed Unit ............................................................................ 7-2 Agency Certifications ............................................................................... 7-3 USA RFI ...................................................................................... 7-3 Canada RFI .................................................................................. 7-3 UL .............................................................................................. 7-3 EPA Energy Star............................................................................ 7-4 Paper Sizes ............................................................................................. 7-5 Enlargement and Reduction Percentages ..................................................... 7-6 Glossary Copier Terms ........................................................................................... G-1 Index Copier Terms .............................................................................................I-1 Warranty New Machine Warranty and Limitation of Liability .......... inside back cover ii Important Safeguards Important Safeguards Always follow these important safeguards: 1 2 Read all of these instructions before using the unit. Plug the power cord into a 3-conductor (grounded) outlet. Check the Specifications chapter to make sure the outlet meets the ampere rating of this unit. • • • • Never ground the power cord to a gas pipe or a water pipe. Keep the power cord away from hot surfaces. Avoid using an extension cord if possible. If you must use an extension cord, use only a 3-conductor cord rated for the ampere rating of your unit. Refer to the Specifications Chapter for this value. Power cords rated for less can overheat and become a fire hazard. 3 Do not operate the unit if any part of it is damaged, or if any part has been dropped, until it is checked by a authorized Lanier Service Technician. 4 The fusing area is hot. Exercise care in this area. 5 Do not install the unit in areas that are: • • • • • • 6 7 Damp or humid Exposed to direct sunlight Extremely dusty Poorly ventilated Close to machines generating ammonia such as diazo copy machines. Subject to extreme temperature or humidity changes, for example, near an air conditioner or heater Place the unit on a firm, level surface. For proper ventilation and cooling, keep the unit at least 6 inches on the right and back sides of the copier. Agency Certifications Your unit complies with FCC rules, DOC requirements, and other agency certification requirements. Refer to the Specifications chapter of this Operator Guide for further details. 1 Chapter 1 Making Copies Chapter Overview This chapter provides basic instructions for making a copy. Included in this chapter are: • “Turning the Copier ON” on page 1-1 • “Placing Original Documents” on page 1-2 • “Making a Copy” on page 1-3 Making Copies Turning the Copier ON Turning the Copier ON The Main Power switch turns on the power to the copier. The Main Power switch is located on the right-hand side of the copier. 1 To turn the copier on, press the switch to the (I) ON position. • • • When the copier is turned ON, it automatically enters a warm-up mode. After about 30 seconds, the green Ready Indicator in the Start key turns ON. When the copier comes to its Ready condition, it automatically goes into the Initial Mode. Initial Mode Settings 2 Copy Quantity 1 Paper Drawer Paper Tray Zoom Ratio 100% Exposure Mode Auto Function Mode Non-Sort F1 To turn the copier off, press the switch to the (O) OFF position. Note: If you turn off the Main Power switch while the copier is in the sleep mode, the green indicator light in the Start switch will stay ON for a short time. Note: The Function Mode will change to Sort if the machine is equipped with an Auto Document Feeder and Expansion Memory. Note: The Initial Mode can be changed. See “User’s Choice Functions” on page 5-4. Making Copies 1-1 Placing Original Documents Placing Original Documents Using the Exposure Glass for Copying Place the original document face-down on the exposure glass. Using the Automatic Document Feeder for Copying (optional) Place the original document face-up in the document feeder. 1-2 Making Copies Making a Copy Making a Copy 1 Select the copy options from the Copy Options table below. Note: If you only want one copy with no options, proceed to Step 2. Copy Options You Can Select Making Copies Methods to Use for the Copy Options Copy Quantity Press the (1) key to enter quantities up to 9. Press the (10) key to enter copies in increments of 10 Press the (10) key in combination with the (1) key to enter other values. See “Selecting Copy Quantity” on page 3-6. Copy Darkness/ Lightness Automatic: Press the Auto Exposure key. Manual: Press the increase or decrease density keys. Photo: Press Auto Exposure key to select Photo mode. See “Selecting Copy Darkness” on page 3-7. Copy Reduction or Enlargement There are two modes for copy reduction or enlargement to choose from. Preset Ratios: Pre the Zoom key to select preset ratio. Manual Zoom keys: Press and hold the 10 Key and/or 1 Key. See “Enlargement and Reduction Ratios” on page 3-9. Copying Methods Refer to the Table of Contents or Chapter 4 - Copying Methods for detailed information on copying methods available. 2 Place the original document on the Exposure Glass or in the optional Automatic Document Feeder. 3 Press the Start key to begin copying. 1-3 Making a Copy Notes: 1-4 Making Copies Chapter 2 Component Identification Chapter Overview This chapter provides information on: • “Control Panel” on page 2-1 • “Message Display” on page 2-3 • “External Components” on page 2-4 • “Internal Components” on page 2-5 • “Optional Equipment” on page 2-6 Component Identification Copier Components Copier Components Control Panel Item Description 1. Start key Press to begin copying. 2. Clear/Stop Key Press Press Press Press 3. Paper Select Key Press to select the desired paper drawer. 4. Exposure Control Key (Lighter) Press to make the image lighter. Press for three seconds to enter the User’s Choice Mode. Component Identification to cancel a copy operation to reset copy quantity to 1 to return zoom ratio to 100% for three seconds to enable the total check function. 2-1 Copier Components Control Panel - continued Item 2-2 Description 5. Auto Exposure Mode Key Press to select either Auto exposure mode, Manual exposure mode, or photo mode. 6. Exposure Control Key (Darker) Press to make the image darker. 7. Zoom Key Press to change the zoom ratio. Use to select preset zoom ratios. 8. Copies/Function Key Use to change the Copy Settings and the Function Mode setting. 9. 10 Key Use to change the value for each setting. 10. 1 Key Use to change the value for each setting. Component Identification Copier Components Message Display Item Description 11. Add Toner Indicator 12. Add Paper Indicator Component Identification Indicates the toner supply is low. Replace the Imagine Cartridge. Indicates the selected paper drawer is out of paper. Add paper. 2-3 Copier Components External Components Item 2-4 Description 1. Copy Exit Tray Copies are sent to this tray. 2. Paper Tray Holds up to 250 sheet of copy paper. 3. Manual Bypass Tray Use to feed non-standard paper for copying such as letterhead, colored paper and transparencies. 4. Control Panel Use to control copy and other functions of the copier. 5. Power Switch Use to turn power ON and OFF to the copier. Component Identification Copier Components Internal Components Item Description 1. Lock Release Lever Pull this lever to raise the top of the copier. 2. Original Pad Secures the original for copying. 3. Exposure Glass Original is placed face-down on the glass for copying. 4. Upper half of copier Open when replacing Imaging Cartridge and when clearing a paper misfeed. 5. Imaging Cartridge Transfers the image onto the copy paper. Component Identification 2-5 Copier Components Optional Equipment Item Description Automatic Document Feeder: items 1-4 Feeds a stack of originals one sheet at a time. 1. Document Guide Plates Adjust to the size of the original document. 2. Document Feed Tray Place original document face-up in tray. 3. Document Feed Tray Extender Pull out to support large documents. 4. Document Exit Tray Receives the original document after it is copied. Paper Feed Unit: item 5 2-6 5. Paper Feed Unit Holds up to 500 sheets of copy paper. Memory for Copier (16MB/ 32MB) Expands the memory capacity of the machine. Fax Unit Allows the machine to support facsimile functions. Printer Controller Allows the machine to support printer functions. Twain Driver Allows the machine to support scanner functions. Component Identification Chapter 3 Copier Functions Chapter Overview This chapter includes the following information: • “Placing the Original Document” on page 3-1 • “Selecting the Paper Tray” on page 3-5 • “Selecting Copy Quantity” on page 3-6 • “Selecting Copy Darkness” on page 3-7 • “Enlargement and Reduction Ratios” on page 3-9 Copier Functions Placing the Original Document Placing the Original Document When using the Automatic Document Feeder With the Automatic Document Feeder, originals placed into the Document Feed Tray are fed in one sheet at a time, copied, then fed out. Please follow the instructions provided when using this device. Failure to follow these instructions may cause a misfeed, damage to the original or other complications. Originals should follow these standards Type of Paper:Plain paper(50–110 g/m2) Paper Size: LT - ST(A4L–A5L) Originals that are not compatible with the Automatic Document Feeder Typing paper, paraffin paper and other thin paper types. Thick paper. Sizes that are larger than LT(A4) or smaller than ST (A5). OHP transparencies, tracing paper or other transparent paper types. Wrinkled, folded, curled or torn originals. Originals that are stapled or are attached with paper clips. Carbon paper or paper with coated surfaces. To produce copies from an original document described above, place it on the Original Glass. • • • • • • • • • • Copier Functions 3-1 Placing the Original Document Setting Originals in the Automatic Document Feeder 1 Adjust the Document Guide Plates to the size of the document. 2 Set the document so that the side that you wish to copy is facing up. Note: The maximum number of originals that can be loaded is 50. Note: Make sure that the top of the stack does not exceed the mark. 3 3-2 Adjust the Document Guide Plates so that they make contact with the sides of the stack. The stack may not feed properly if the Document Guide Plates do not secure the stack in place. Copier Functions Placing the Original Document Setting Original on the Exposure Glass General Documents When copying plain or thick paper types original documents: 1 Open the Original Cover. 2 Set the document onto the exposure glass with the side that you wish to copy facing down. 3 Align the center of the original with the scale marker. 4 Close the Original Cover. Note: When copying larger documents that are bound together, such as the pages of a book, do not close the Original Cover of the machine. Note: Do not place documents that exceed 3 kg onto the Exposure Glass. Do not press or apply pressure upon original documents once they have been placed on top of the Exposure Glass as damage may result. Note: Do not look directly at the bright beam of light that is emitted through the Original Glass during operation. Copier Functions 3-3 Placing the Original Document Transparent Documents When copying OHP transparencies or tracing paper 3-4 1 Follow the same procedure as described for general documents. 2 Place a blank sheet of paper of the same size as the original on top of the original. 3 Close the Original Cover. Copier Functions Selecting the Paper Tray Selecting the Paper Tray How to select a paper tray 1 Press the Paper Select key to select the paper source. Paper Drawer • No indicators are ON when the Paper Drawer is selected Manual Bypass Tray • The “Manual Bypass” indicator turns ON when Manual Bypass tray is selected. Paper Feed Unit • The “Paper Feed Unit” indicator turns ON when the Paper Feed Unit is selected. Note: Be sure to change the “U7: Paper Size Select” User’s Choice setting whenever a different size of paper is loaded into the Paper Tray. See “U7: Paper Size Select” on page 5-6. The Paper Tray is prioritized when the Initial Mode is enabled. The Paper Feed Unit can be prioritized in the Initial Mode through the User’s Choice Mode. See “UA: Tray Priority (for Copier Mode)” on page 5-8. Should the paper supply run out while copies are being output from the Paper Tray, copying can continue through the Paper Feed Unit if the same size paper has been loaded into the Paper Feed Unit. This feature is called Auto Tray Switching. Copier Functions 3-5 Selecting Copy Quantity Selecting Copy Quantity 1 To make 1-9 copies, press the 1 Key until the appropriate number of copies is displayed. 2 To make 10 or more copies, press the 10 Key one or more times. The appropriate number is displayed. • • • • 3 3-6 Each time the 10 Key is pressed, the copy quantity is increased by 10. To make 10 copies, press the 10 Key one time. To make 20 copies, press the 10 Key two times. To make 15 copies, press the 10 Key one time and the 1 Key five times. Press the Clear/Stop key to change the copy quantity. Copier Functions Selecting Copy Darkness Selecting Copy Darkness Auto Mode Auto mode automatically selects the exposure setting that is optimal for the original document to be copied. 1 Press the Auto Exposure Key until all density level indicators light up. 2 Press the Auto Exposure Mode Key to switch between the Auto Exposure Mode, Manual Exposure Mode and the Photo Mode. • • The Auto Exposure Mode is designed to provide optimal density ratios for most applications, however, lighter and darker setting adjustments are possible through the User’s Choice Mode. The Auto Exposure Mode is the default Initial Mode setting. The Manual Exposure Mode or the Photo Mode can be specified through the User’s Choice Mode. Manual Mode Manual mode allows you to select from nine levels of exposure. Press the Exposure Control Keys to select the optimal level. • • Copier Functions Press the Exposure Control Key to increase the density of the copy. Press the Exposure Control Key to decrease the density of the copy. 3-7 Selecting Copy Darkness Photo Mode Photo Mode is optimal for copying documents containing halftones such as photos. This mode allows you to select from nine levels of exposure. 1 Press the Auto Exposure Mode Key to select the Photo Mode 2 Press the Exposure Control Keys to select the optimal level. • Both the Manual Exposure Mode and the Photo Mode allow you to select from nine levels of exposure. • • Indicators appear to indicate the selected exposure level. A higher darker density level indicates a darker exposure; a higher lighter density level indicates a lighter exposure. The Exposure Level Priority for the Manual Exposure Mode and the Photo Mode can be adjusted through the User’s Choice Mode. • 3-8 Copier Functions Enlargement and Reduction Ratios Enlargement and Reduction Ratios Specifying the Zoom Ratio The zoom ratio can be specified by pressing the Zoom Key. There are two modes to choose from: Standard Copy Zoom and Manual Zoom Select. Using Preset Ratios With this mode, the most often used preset zoom settings can be selected. 1 Press the Zoom Key to enable the Copy Zoom Setting Mode. • Copier Functions The following zoom settings can be selected by pressing the Zoom Key. 3-9 Enlargement and Reduction Ratios Setting Zoom Manually The zoom ratio can be adjusted in single increments with each press of the Keys. (Range: 50–199%) 1 Press and hold a or Key to rapidly change the zoom ratio. 2 Press the Zoom Key to enter the Copy Zoom Setting Mode. 3 Set the zoom ratio using the and Keys. • • 3 - 10 / To return the setting to 100%, press the Clear/Stop Key while in the Copy Zoom Setting Mode. After approaching the desired zoom ratio, press the / Keys to specify the exact setting. Copier Functions Chapter 4 Copying Methods Chapter Overview This chapter includes: • “Bypass Copying” on page 4-1 • “Transparency Copying” on page 4-7 • “Function Mode” on page 4-8 Copying Methods Bypass Copying Bypass Copying Use the Bypass Tray to copy documents onto paper that is not otherwise loaded into the machine or to copy onto OHP transparencies or specialty paper types. Types of Paper for use in Bypass Copying • • • Regular paper 16-24 Ibs - (60–90 g/m2) Thick paper 24-41.75 Ibs. - (90–163 g/m2) OHP transparencies Paper Size for use in Bypass Copying • • • LT-ST (A4 L, A5 L, B5 L, B6 L) Maximum: 8.5” x 14” (216 mm × 356 mm) Minimum:15” x 7.25” (128 mm × 182 mm) When the Manual Bypass Tray is selected, the paper size and type appear in the display. Use the Key and Key to change these settings to match the size and type of the installed paper. Each press of the keys changes the settings as shown below. Regular paper LT (A4) Thick paper LT (A4) OHP transparencies LT (A4) Free Size Copying Methods 4-1 Bypass Copying Loading Standard Size Paper into the Bypass Tray 1 Insert the paper as far as possible into the Manual Bypass Tray. Be sure to adjust the Document Guide Plates to fit the paper. • Feed the paper one sheet at a time. • Curl the edges of the paper upwards before setting the paper into the machine. 2 Select the Manual Bypass Tray by pressing the Paper Select Key. 3 Select the proper paper size and type using the and Keys. Be sure to set the paper type properly when copying onto OHP transparencies or thick paper. 4 4-2 Press the Start Key. Copying Methods Bypass Copying Loading Non-Standard Size Paper into the Bypass Tray 1 2 Insert the paper as far as possible into the Manual Bypass Tray. Be sure to adjust the Document Guide Plates to fit the paper. • Be sure to feed the paper one sheet at a time. • Curl the edges of the paper upwards before setting the paper into the machine. Press and hold the Exposure Control Key (Lighter) for three seconds. • • Copying Methods The User’s Choice Mode is be enabled “U1” appears in the display. 4-3 Bypass Copying 3 Press the Key or the display “U8”. 4 Press the Start Key. 5 Press the Key or the Key to display the paper width code. See “U8: Manual Feed Input Size” on page 5-6. (Example) Paper Width: 5.25” - 5.75” 6 Press the Start Key. 7 Press the Key or the Key to display the paper length code. • 4-4 Key to See “U8: Manual Feed Input Size” on page 5-6. (Example) Paper Length: 7.75” - 8” Copying Methods Bypass Copying • 8 Press the Start Key. 9 Press the Clear/Stop Key twice. 10 Copying Methods The value entered for the paper length must be larger than the entered paper width. Select the Manual Bypass Tray by pressing the Paper Select Key. 4-5 Bypass Copying 11 Press the 10 Key or the 1 Key to display “P”. Note: Be sure to set the paper type properly when copying onto OHP transparencies or thick paper. 12 4-6 Press the Start Key. Copying Methods Transparency Copying Transparency Copying Setting OHP Transparencies or Tracing Paper Copying Methods 1 Follow the same procedure as described for general documents. 2 Place a blank sheet of paper of the same size as the original on top of the original. 3 Gently close the Original Cover. 4 Place your copy paper in the Bypass Tray. 5 Press the Start key. 4-7 Function Mode Function Mode There are four modes to choose from: • • • • Non-Sort Mode 2in1 Non-Sort Mode Sort Mode 2in1 Sort Mode. Selecting the Function Modes: F1, F2, F3, F4 1 Press the Copies/Function Key to enable the Function Mode. 2 Press the 1 Key to scroll through F1, F2, F3, F4. • • • 4-8 F1: Non-Sort F2: 2 IN 1 Non-Sort F3: Sort Copying Methods Function Mode F1: Non-Sort Copies are made in the same order as the original document are loaded into the copier. F2: 2 in 1 Non-Sort • • Copying Methods This mode requires the optional ADF and expansion memory. This mode copies two original documents onto one sheet of paper and outputs the results in the same order as they were loaded into the machine. Originals must be set on the Exposure Glass. 4-9 Function Mode F3: Sort • • This mode requires the optional ADF and expansion memory. Copies a set of original documents while automatically sorting them into complete sets. F4: 2 in 1 Sort • • This mode requires the optional ADF and expansion memory. Copies two original documents onto one sheet of paper and automatically outputs them into complete sets. Note: The Initial Mode’s default setting when the Automatic Document Feeder and Expansion Memory are installed is the Sort Mode. However, this setting of the Initial Mode can be changed through the User’s Choice Mode. 4 - 10 Copying Methods Function Mode Using Function Modes The Function Mode Indicator • • The Function Mode indicator will become lit when settings other than the Initial Mode are selected. The Zoom indicator will become lit and the zoom ratio will automatically be decreased when F2 (2in1 Non-Sort) or F4 (2in1 Sort) are selected. 2in1 Copying When using the 2in1 function, it is important to set the original documents correctly to prevent them from being output in reverse order. Setting the Original Documents for 2 in 1 copying When using ADF When placing original on ex[posure glass F2: 2in1 Non-Sort Mode • • The Automatic Document Feeder supports this function. This function can also be performed by setting the document directly onto the Original Glass. Place each individual sheet of the original document onto the glass (in the order of first to last) and press the Start Key. Be sure to add a blank sheet of paper to an original document that consists of an odd number of sheets. F4: 2in1 Sort Mode • • Copying Methods The Automatic Document Feeder supports this function. This function cannot be used when copying documents that are placed directly onto the Original Glass. 4 - 11 Function Mode Notes: 4 - 12 Copying Methods Chapter 5 User Mode Chapter Overview This chapter describes: • “Total Check Function” on page 5-1 • “User’s Choice Mode” on page 5-3 • “User’s Choice Functions” on page 5-4 • “Selecting User’s Choice Settings” on page 5-10 User Mode Total Check Function Total Check Function Reading the Total Check Function Displays This machine can keep a count of the number of copies that it has generated since it was first set up. Total Count: Shows the total number of copies since the machine was installed. PM Count: Shows the number of copies taken since the last replacement of PM parts. • • Count Displays Total count and PM count displays appear as shown below. Total Count (Example) When 12,345 appears on the Total Count display: PM Count (Example) When 1,234 appears on the PM Count display: User Mode 5-1 Total Check Function Selecting a Total Count 1 Press and hold the Clear/Stop Key for three seconds. The Total Count will be displayed. 2 Press the Clear/Stop Key to return to the previous status mode Selecting PM Count 5-2 1 Press and hold the Clear/Stop Key again, for three seconds, to display the PM Count. 2 Press the Clear/Stop Key to return to the previous status mode. User Mode User’s Choice Mode User’s Choice Mode This mode allows you to determine the default settings for functions that are activated when the main power switch is turned on or the panel is reset with the Auto Panel Reset Function. The User’s Choice Mode is used to program the most commonly used settings of the machine into the Initial Mode. Overview of User’s Choice Codes and Functions Code User Mode Functions Code Functions U1 Auto Panel Reset Function U8 Manual Feed Input Size U2 Sleep Function U9 Density (Automatic Document Feeder) U3 Disable Sleep Function U0 Function Mode U4 Exposure Mode Priority UA Tray Priority (for Copier Mode) U5 Auto Exposure Level Priority Ub Image Density (for Printer Mode) U6 Manual Exposure Level Priority UC Tray Priority (for Printer Mode) U7 Paper Size Select 5-3 User’s Choice Functions User’s Choice Functions U1: Auto Panel Reset Function Sets the period before the Auto Panel Reset Function is enabled after a copy job is completed. One setting allows you to disable the Auto Panel Reset Function entirely. Code Setting oF Auto Panel Reset Function is not enabled. 05 Auto Panel Reset Function is enabled after 30 seconds. 1 Auto Panel Reset Function is enabled after 1 minute. 2 Auto Panel Reset Function is enabled after 2 minutes. 3 Auto Panel Reset Function is enabled after 3 minutes. 4 Auto Panel Reset Function is enabled after 4 minutes. Default U2: Sleep Function Sets the period before the Sleep Function is enabled after a copy job is completed. Code Setting oF Sleep Function is not enabled. 1 Sleep Function is enabled after 1 minute. : : 15 Sleep Function is enabled after 15 minutes. : : 120 Sleep Function is enabled after 120 minutes. Default Note: Be sure to select the U3 User’s Choice Function (Disable Sleep Function) to completely disable this function. U3: Disable Sleep Function Completely disables the Sleep Function Mode. Code 5-4 Setting 1 Turns OFF the Disable Sleep Function Mode. 2 Enables the Disable Sleep Function Mode. Default User Mode User’s Choice Functions U4: Exposure Mode Priority Allows you to select the optimal exposure mode or the Photo Mode from the Initial Mode. Code Setting 1 Auto Exposure Mode 2 Photo Mode 3 Manual Exposure Mode Default U5: Auto Exposure Level Priority The Auto Exposure Mode allows you to select from three exposure level settings. Allows you to select the initial exposure level settings for the Auto Exposure Mode. Code Setting 1 Darker 0 Normal -1 Lighter Default U6: Manual Exposure Level Priority Allows you to select the initial exposure level settings for the Manual Exposure Mode and the Photo Mode. Code Setting 4 Darker (Level 4) 3 Darker (Level 3) 2 Darker (Level 2) 1 Darker (Level 1) 0 Normal -1 Lighter (Level 1) -2 Lighter (Level 2) -3 Lighter (Level 3) -4 Lighter (Level 4) Default Note: A higher darker density level indicates a darker exposure; a higher lighter density level indicates a lighter exposure. User Mode 5-5 User’s Choice Functions U7: Paper Size Select Allows you to assign a particular paper size to the paper tray. Code Setting 1 Letter (L) A4 L 2 Legal (LG) A5 3 Half Letter (HL) - Invoice Default U8: Manual Feed Input Size Allows you to specify a paper size when loading non-standard size paper into the Manual Bypass Tray. Paper Width Code Setting 13 5” - 5.25” (128–134 mm) 14 5.25” - 5.75” (135–144 mm) 15 5.75” - 6.0” (145–154 mm) 16 6.0” - 6.5” (155–164 mm) 17 6.5” - 6.75” (165–174 mm) 18 7.0” - 7.25” (175–184 mm) 19 7.25” - 7.75” (185–194 mm) 20 7.75” - 8.0” (195–204 mm) 21 8.0” - 8.25” (205–216 mm) Default Note: After entering the Paper Width Setting, press the Start Key to enter the Paper Length Setting. 5-6 User Mode User’s Choice Functions Paper Length Code Setting 18 7.25” (182–184 mm) 19 7.25” - 7.75” (185–194 mm) 20 7.75” - 8.0” (195–204 mm) 21 8.0” - 8.5” (205–214 mm) 22 8.5” - 8.75” (215–224 mm) 23 8.75” - 9.25” (225–234 mm) 24 9.25” - 9.5” (235–244 mm) 25 9.75” - 10.0” (245–254 mm) 26 10.0” - 10.5” (255–264 mm) 27 10.5” - 10.75” (265–274 mm) 28 10.75” - 11.25” (275–284 mm) 29 11.25” - 11.5” (285–294 mm) 30 11.5” - 12.0” (295–304 mm 31 12.0” - 12.25” (305–314 mm) 32 12.5” - 12.75” (315–324 mm) 33 12.75” - 13.25” (325–334 mm) 34 13.25” - 13.5” (335–344 mm) 35 13.5” - 13.75” (345–356 mm) Default U9: Density (Automatic Document Feeder) Allows you to specify the density level when an original document is set into the Automatic Document Feeder. Code Setting 1 Recommended for general copying purposes (text documents). 2 Recommended when copying lighter or faded original documents. Default Note: Only displayed when the Automatic Document Feeder has been installed onto the machine. User Mode 5-7 User’s Choice Functions U0: Function Mode Allows you to specify the initial settings of the Function Mode. Code Setting F1 Non-Sort Mode F2 2in1Non-Sort Mode F3 Sort Mode F4 2in1Sort Mode Default Note: “F3: Sort Mode” will be enabled when the Automatic Document Feeder and expansion memory are installed. The “F1” and “F2” settings can be selected when the 16MB/32MB memory board is installed. The “F1” to “F4” settings can be selected when the 16MB/32 MB memory board and the Automatic Document Feeder are installed. UA: Tray Priority (for Copier Mode) Allows you to select the paper tray that will be prioritized for feeding paper to the machine when the power is turned ON. Code Setting 1 Paper Tray 2 Paper Feed Unit 3 Paper Tray with Auto Tray Switching enabled 4 Paper Feed Unit with Auto Tray Switching enabled Default Note: Only displayed when the Paper Feed Unit has been installed onto the machine. 5-8 User Mode User’s Choice Functions Ub: Image Density (for Printer Mode) Allows you to set the print density when outputting documents from a personal computer. Code Setting 3 Darker (Level 3) 2 Darker (Level 2) 1 Darker (Level 1) 0 Normal -1 Lighter (Level 1) -2 Lighter (Level 2) -3 Lighter (Level 3) Default Note: A higher darker density level indicates a darker exposure; a higher lighter density level indicates a lighter exposure. Note: This function is displayed only when the Printer Controller is installed. UC: Tray Priority (for Printer Mode) Allows you to set the prioritized tray for feeding paper into the machine when outputting documents from a personal computer. Code Setting 1 Auto Select 2 Paper Tray 3 Paper Feed Unit Default Note: This function is displayed only when the Printer Controller is installed. User Mode 5-9 Selecting User’s Choice Settings Selecting User’s Choice Settings 5 - 10 1 Press and hold the Exposure Control Key (Lighter) for three seconds to enter the User’s Choice Mode. “U1” will be displayed. 2 The User’s Choice Codes will rotate as shown below when the 10 Key and 1 Key are pressed. Stop when the desired User’s Choice Code is displayed. 3 Press the Start Key. The currently selected User’s Choice Code will be displayed. User Mode Selecting User’s Choice Settings 4 Display the desired User’s Choice Code using the 10 Key and the 1 Key. 5 Press the Start Key to register the selected setting. Repeat steps 2–5 to change additional User’s Choice Functions if necessary. 6 Press the Clear/Stop Key to return to the previous status mode. Note: The User’s Choice Mode will be cancelled and the previous status mode will be enabled. User Mode 5 - 11 Selecting User’s Choice Settings Notes: 5 - 12 User Mode Chapter 6 Service and Supplies Chapter Overview This chapter includes: • “Improving Image Quality” on page 6-1 • “Correcting Functional Problems” on page 6-3 • “Display Messages” on page 6-4 • “Toner Empty Indicator” on page 6-6 • “Paper Empty Indicator” on page 6-8 • “Paper Misfeed Indicators” on page 6-11 • “Trouble Indicator” on page 6-18 • “Care and Maintenance” on page 6-19 Service and Supplies Improving Image Quality Improving Image Quality Symptom The image is too light. The image is too dark. The copy appears blurred. The copy has unintended specks or spots. Service and Supplies Possible Cause Action A “lighter” exposure level for Adjust the Auto Exposure the Auto Exposure Mode has Level Priority of the User’s Choice Mode. been specified. Or, disable the Auto Exposure Mode and adjust settings manually through the Manual Exposure Mode. A “lighter” exposure level for Adjust the exposure setting the Manual Exposure Mode using the Exposure Control Keys. has been specified. The paper is damp. Replace the paper. A “darker” exposure level for Adjust the Auto Exposure the Auto Exposure Mode has Level Priority of the User’s Choice Mode. been specified. Or, disable the Auto Exposure Mode and adjust settings manually through the Manual Exposure Mode. A “darker” exposure level for Adjust the exposure setting the Manual Exposure Mode using the Exposure Control Keys. has been specified. The surface of the Original Wipe the Original Glass clean Glass is dirty. with a soft cloth. The original document is not Place the original document securely on the Original securely placed upon the Glass. Original Glass. The paper is damp. Replace the paper. The surface of the Original Wipe the Original Glass clean Glass is dirty. with a soft cloth. The Original Pad is dirty. Wipe the Original Pad clean with a soft cloth. Set a blank sheet of paper The original document is a over the original document. second-generation copy or an OHP transparency (or other translucent media), etc. Images from the backside of Lower the exposure level setting using the Exposure a double-sided document may be reproduced when the Control Key. front side is copied. 6-1 Improving Image Quality Symptom Possible Cause Unintended markings appear The Original Pad is dirty. along the edges of the copy. The selected paper size is larger than the original document (zoom ratio is set to full size 100%) The original document is not placed in the proper orientation on the Original Glass (zoom ratio is set to full size 100%) The zoom ratio setting does not match the size of the original document. The copy appears uneven or The original document has at a tilt. not been set properly. There is an obstruction on the Original Glass (when using the Automatic Document Feeder). 6-2 Action Wipe the Original Pad clean with a soft cloth. Specify a paper size that is appropriate to the original document. Place the original document correctly on the Original Glass. Select a suitable zoom ratio setting. Set the scale of the original document properly. Adjust the Document Guide Plates properly when the original document is placed into the Automatic Document Feeder. Remove the obstruction and wipe the Original Glass clean with a soft cloth. Service and Supplies Correcting Functional Problems Correcting Functional Problems Symptom Possible Cause Action Nothing is displayed on the Control Panel. Does the green light in the Start Key turn on? The Sleep Function has been enabled. Press the Start Key to disable this mode. Nothing happens when the Start Key is pressed. Has an Error or Trouble Indicator become lit? Follow the procedures provided. Has the machine just been turned on? The machine is warming up. Please wait a few moments. Has the power cord been unplugged? Plug in the power cord. The circuit breaker for the room is open. Close the circuit breaker. Do you turn off the Power Switch in sleeping mode? In Sleeping mode, it will take 23 seconds to turn off the green light of Start Key. The machine will not turn ON. The green light of Start Key will not turn OFF immediately. Note: If these procedures do not correct the problem, turn OFF the Power Switch, unplug the power cord from the power outlet and contact your Technical Representative. Service and Supplies 6-3 Display Messages Display Messages Error Indicator Action Toner Empty T he to ner sup ply in sid e o f the im ag ing cartrid ge h as been dep leted . R ep lace the im ag ing cartrid ge usin g th e p ro ced ure p ro vid ed. Paper Empty T he paper sup ply h as been depleted . R ep lenish th e p aper supp ly using th e p ro ced ure p ro vid ed. Paper Misfeed P aper has been m isfed som ew h ere w ith in the m achin e. C lear th e p aper m isfeed u sin g the p ro ced ure p ro vid ed. P aper has been m isfed som ew h ere w ith in the m achin e. C lear th e p aper m isfeed u sin g the p ro ced ure p ro vid ed. P aper has been m isfed as it w as being o utp ut from the m achin e. C lear th e p aper m isfeed u sin g the p ro ced ure p ro vid ed. A paper m isfeed has occurred at th e A uto m atic D ocum ent F eeder. C lear th e p aper m isfeed from th e A utom atic D ocum ent F eeder u sing the p ro ced ure p ro vid ed. T he m em ory cap acity of th e m achine h as b een ex ceed ed. R etu rn the m achin e to n orm al o peratin g statu s b y p ressin g any k ey o ther th an the S tart K ey. (D ata w ill be d eleted from th e m em ory.) A paper size erro r has o ccu rred. R etu rn the m achin e to n orm al o peratin g statu s b y p ressin g any k ey o ther th an the S tart K ey. C heck the p ap er size that is set in the m achin e and ch ang e th e U ser’s C hoice setting s accordin gly. Trouble 6-4 Possible Cause Service and Supplies Display Messages Error Indicator Cover Open Service and Supplies Possible Cause Action A n in tern al erro r has o ccu rred. R eset the m achin e using the proced ure p ro vid ed . T he U pper H alf of th e M achin e is o pen. M ake sure that the U p per H alf o f th e M ach ine is securely closed . T he A uto m atic D o cum en t F eed er is o pen. M ake sure that the A u tom atic D ocu m ent F eeder is secu rely clo sed. T he P aper M isfeed G u ide of the A uto m atic D ocum ent F eeder is o pen. M ake sure that the P ap er M isfeed G uide o f th e A u tom atic D ocum ent F eeder is secu rely clo sed. 6-5 Toner Empty Indicator Toner Empty Indicator The error indicator displayed here will appear when the toner supply inside of the imaging cartridge has been depleted. The machine will not be operable under these circumstances. Follow the procedure provided below to replace the imaging cartridge when this indicator is displayed. Replacing the Imaging Cartridge Note: Be careful not to touch the areas marked CAUTION: HOT, with bare hands. 1 Pull the Lock Release Lever and fold open the Upper Half of Machine. 2 Remove the imaging cartridge. Note: The metal parts within the machine are hot. Avoid placing your hands in direct contact with the metal fittings within the machine to avoid injury. Note: Be sure to properly dispose of the Imaging Cartridge. 3 6-6 Remove the new imaging cartridge from its protective packaging. Service and Supplies Toner Empty Indicator 4 Holding it with both hands, shake it 4 or 5 times in the direction of the arrows to distribute the toner evenly. 5 Install a new imaging cartridge. The imaging cartridge can easily be installed by aligning the front of the cartridge with the marker provided within the machine. 6 Gently swing down and lock the Upper Half of Machine. Then, close the Front Door. Note: Only use replacement imaging cartridges that were designed for use specifically with this machine. Use of other imaging cartridges may result in irregular machine performance. Service and Supplies 6-7 Paper Empty Indicator Paper Empty Indicator The indicator displayed here appears when the paper supply inside of the machine has been depleted. The machine will not be operable under these circumstances. Follow the procedure provided below to replenish the paper supply when this indicator is displayed. Loading Paper in the Paper Tray 1 Remove the Manual Bypass Tray. 2 Open the Document Guide Plates. 3 Set the paper into the tray so that its front side is facing up. Note: The paper should be loaded no higher than the (Max. Level Indicator). 6-8 Service and Supplies Paper Empty Indicator 4 Slide the Document Guide Plates up against the edges of the paper stack. 5 Replace the Manual Bypass Tray. Note: The following indicator will appear in the display after replenishing the paper: The copy job is still saved in the machine’s memory. 6 Press the Start Key to resume operations. Loading Paper in the Paper Feed Unit 1 Service and Supplies Slide out the Paper Drawer and press down the Paper Lifting Plate. 6-9 Paper Empty Indicator 2 Load the paper stack into the Paper Drawer so that its front side faces down. Make sure that the paper stack rests under the two catches of the Paper Drawer. Note: The paper should be loaded no higher than the (Max. Level Indicator) on the Edge Guide. 3 Gently slide the Paper Drawer back in. Note: The following indicator will appear in the display after replenishing the paper. The copy job is still saved in the machine’s memory. 4 6 - 10 Press the Start Key to resume operations. Service and Supplies Paper Misfeed Indicators Paper Misfeed Indicators If a paper misfeed occurs, the machine will stop operating, the letter “J” will flash alternately with a number or the “PC” indicator will flash. Clearing Paper Misfeed PC Paper Tray Service and Supplies 1 Remove the Manual Bypass Tray and remove the misfeed. 2 Remove the paper and reset it back into the Paper Tray. 3 Return the Manual Bypass Tray. 6 - 11 Paper Misfeed Indicators 4 Pull the Lock Release Lever to open and close the Upper Half of the Machine. Note: The following indicator will appear in the display after clearing the paper misfeed: The copy job is still saved in the machine’s memory. Press the Start Key to resume operations. Paper Feed Unit 6 - 12 1 Press in the tray stoppers, and then remove the Paper Drawer. 2 Remove the misfed sheet of paper. Service and Supplies Paper Misfeed Indicators 3 Make sure that the paper is correctly loaded in the Paper Drawer. 4 Gently slide the Paper Drawer back in. 5 Pull the Lock Release Lever to open and close the Upper Half of the Machine. Clearing Paper Misfeed J2/J3 Note: Be careful not to touch the areas marked CAUTION: HOT, with bare hands. 1 Pull the Lock Release Lever and fold open the Upper Half of Machine. 2 Remove the imaging cartridge. Note: The metal parts within the machine are hot. Avoid placing your hands in direct contact with the metal fittings within the machine to avoid injury. Service and Supplies 6 - 13 
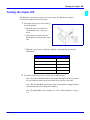
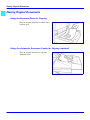
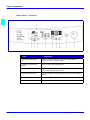
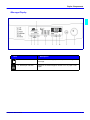
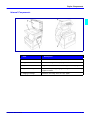
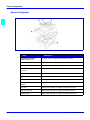
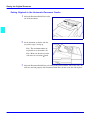
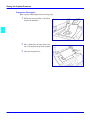
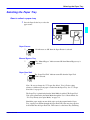
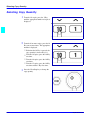
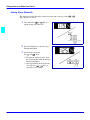
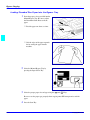
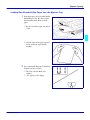
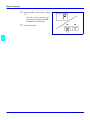
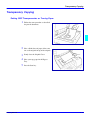
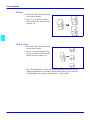
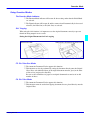
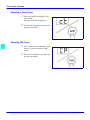
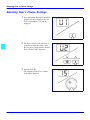
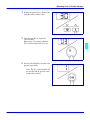
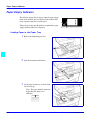
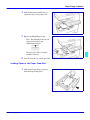
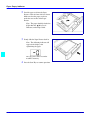
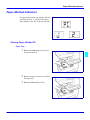
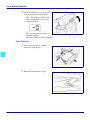
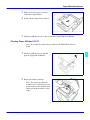
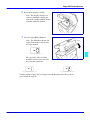
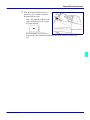
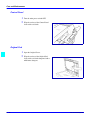
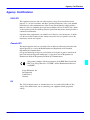
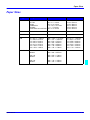
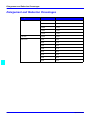
Paper Misfeed Indicators 6 - 14 3 Open the Guide Plates. 4 Remove the misfed sheet of paper. 5 Remove a misfed sheet of paper jammed in the Transport Section by pulling it from the bottom of the Fusing Unit. Service and Supplies Paper Misfeed Indicators 6 Re-install the imaging cartridge. Note: The imaging cartridge can easily be installed by aligning the front of the cartridge with the marker provided within the machine. 7 Close the Upper Half of Machine. Note: The following indicator will appear in the display after clearing the paper misfeed: The copy job is still saved in the machine’s memory. Press the Start Key to resume operations. Load the number of pages that are displayed into the Document Feed Tray again to proceed with the copy job. Service and Supplies 6 - 15 Paper Misfeed Indicators Clearing Paper Misfeed J8 6 - 16 1 Remove the original document from the Document Feed Tray. 2 Open the Paper Misfeed Guide and gently remove the paper misfeed. 3 Open the Automatic Document Feeder and gently remove the paper misfeed. 4 Close the paper misfeed guide. Service and Supplies Paper Misfeed Indicators 5 Place the original document that was removed in step 1 into the Automatic Document Feeder again. Note: The following indicator will appear in the display after clearing the paper misfeed. Load the number of pages that are displayed into the Automatic Document Feeder again to proceed with the copy job. Service and Supplies 6 - 17 Trouble Indicator Trouble Indicator If an error occurs within the machine, a “CXXXX” trouble code appears in the display. Resetting the Machine 1 Press the Power Switch to turn the machine off, then on again. 2 Should a “CXXXX” trouble code continue to appear in the display after resetting the machine, please contact your technical representative. Note: When calling your Technical Representative, give him or her the malfunction code shown on the Message Display. (Example) Malfunction Code: C0045 Note: After calling your Technical Representative, turn OFF the Power Switch and unplug the power cord. 6 - 18 Service and Supplies Care and Maintenance Care and Maintenance Outer Covers Wipe the exterior surface of the machine clean with a soft cloth. Exposure Glass Service and Supplies 1 Open the Original Cover. 2 Wipe the surface of the Original Glass clean with a soft cloth. 6 - 19 Care and Maintenance Control Panel 1 Turn the main power switch OFF. 2 Wipe the surface of the Control Panel clean with a soft cloth. Original Pad 6 - 20 1 Open the Original Cover. 2 Wipe the surface of the Original Pad clean with a soft cloth dampened with a mild home detergent. Service and Supplies Chapter 7 Specifications Chapter Overview This chapter includes: • “Specifications” on page 7-1 • “Agency Certifications” on page 7-3 • “Paper Sizes” on page 7-5 • “Paper Sizes” on page 7-5 Specifications Specifications Specifications Copier Item Specifications Description Platen Type Stationary Photo conductor OPC Copying System Electrostatic Dry Powdered Image Transfer Developing System Fine Micro-Toning System Fusing System Lamp-Heater Roller Document Reader CCD Line Sensor Resolution 600 × 600dpi Memory 8MB (Standard) Original Documents Formats: Sheet, Book Maximum Paper Size: 8.5” x 14” - (216 mm × 356 mm) Maximum Paper Weight: 6.5 lbs. (3 kg) Paper Varieties Plain Paper 16-24 lb. (60–90 g/m2) Recycled Paper Special Paper and Media: OHP, Thick paper 24-43.25 lbs. - (90– 163 g/m2) * Special paper and media must be fed through the Manual Bypass Tray. Paper Sizes Paper Tray: (Drawer) Legal (LG), Letter (LT), Half Letter (HL) - (A4 L, A5 L) Manual Bypass Tray: Legal (LG), Letter (LT), Half Page (HL) - (A4 L, A5 L, B5 L, B6 L) Maximum Paper Size: 8.5” x 14.0” (216 × 356 mm) Minimum Paper Size: 5.0” x 7.25”(128 × 182 mm) Paper Feeding System Drawer: 250 Sheets Manual Bypass Tray: 1 Sheet Warm-up Time 30 seconds or less at ambient temperature of 73°F (23 °C) First Copy 11 seconds or less (LT) Copy Speed LT: 15 copies/minute Magnification Ratios Fixed Ratios Full Size: 1: 1 ±1.0% Enlargement Ratios: Inch 154%, 129% Reduction Ratios: Inch 78%, 64% Zoom Ratios: From 50–199% (in 1% increments) Continuous Copies 1–100 Sheets 7-1 Specifications Item Description Exposure Control Auto Exposure Mode Photo Mode Manual Exposure Mode Power Requirements AC 120–60 Hz Power Consumption 715 W Dimensions Width 22.25” (562 mm) × Depth 20.75” (530 mm) × Height 17.5” (442 mm) (including Original Cover) Weight 62 lb. (28.1 kg) Automatic Document Feeder Item Description Original Documents Plain Paper 13 - 29 lbs. - (50–110 g/m2) Original Sizes Legal (LG), Letter (LT), Half Page (HL) - (A4 L–A5 L) Capacity Up to 50 sheets Dimensions Width 21.75” (552 mm) × Depth 15.5” (397 mm) × Height 6.25” (161 mm) Weight 8.75 lb. (4.0 kg) Paper Feed Unit Item 7-2 Description Paper Type Plain Paper 16 - 24 lbs (60–90 g/m2) Capacity 500 Sheets Paper Size Letter (LT) (A4 L) Dimensions Width 21.5: (548 mm) × Depth 17.75” (450 mm) × Height 5” (128 mm) Weight 12.25 lb. (5.5 kg) Specifications Agency Certifications Agency Certifications USA RFI This equipment generates and uses radio frequency energy. If not installed and used properly, i.e., in strict accordance with these operating instructions, it may cause harmful interference to radio communications. It has been tested and found to comply with the limits for a Class A computing device pursuant to Subpart J of Part 15 of FCC rules, which are designed to provide reasonable protection against such interference when operated in a commercial environment. Operation of this equipment in a residential area is likely to cause interference, in which case the user will be required to take whatever measures may be required to correct the interference at their own expense. Canada RFI This digital apparatus does not exceed the Class A limits for radio noise emissions from digital apparatus as set out in the Radio Interference Regulations of the Canadian Department of Communications. Cet appareil numerique ne depasse pas les limites de Categorie A pour les emissions de bruit radio emanant d'appareils numereques, tel que prevu dans les Reglements sur I'Interference Radio du Department Canadien de Communications. This product complies with the requirements of the EMC Directive 89/336/ EEC, Low Voltage Directive 73/23/EEC, and the Harmonisation Directive 93/68/EEC. Lanier Worldwide, Inc. Im Taubental 6 41468 Neuss 1 Germany UL The 5415 AG digital copiers are intended for use in areas with 120V, 60 Hz, AC line voltage. You should ensure you are connecting your equipment into the proper line voltage. Specifications 7-3 Agency Certifications EPA Energy Star The United States Environmental Protection Agency (EPA) has introduced a voluntary program, the Energy Star Program, to encourage the widespread and voluntary use of energy-efficient technologies that enhance the workplace, improve product performance, and prevent pollution. As an Energy Star Partner, Lanier Worldwide, Inc. has determined Lanier’s 5415 copier meets the Energy Star guidelines for energy efficiency. Energy Star guidelines require that all Energy Star copiers have an ’OFF MODE’ feature that automatically turns the copier off after a period of inactivity, ensuring night and weekend shut-off. In addition to the above requirements, the 5415 copier have been successfully been tested with the following recycled paper: Lanier Recycled Copy Paper: 50% of Fiber Weight recycled with minimum 20% post-consumer waste. • Note: Specifications are subject to change without notice. 7-4 Specifications Paper Sizes Paper Sizes Type Specifications Paper Size Size USA STATEMENT LETTER LEGAL COMPUTER LEDGER FOOLSCAP and OFFICIO 5.5 x 8.5 inches 8.5 x 11 inches 8.5 x 14 inches 10.125 x 14 inches 11 x 17 inches 8.5 x 13 inches 140 216 216 257 279 216 UK FOOLSCAP 8 x 13 inches 203 x 330mm EUROPE FOLIO 8.25 x 14 inches 210 x 356mm DIN A0=841 A1=594 A2=420 A3=297 A4=210 A5=148 A6=105 B0=1000 x 1414mm B1=707 x 1000mm B2=500 x 707mm B3=353 x 500mm B4=250 x 353mm B5=176 x 250mm B6=125 x 176mm C0=917 C1=647 C2=458 C3=324 C4=223 C5=162 C6=114 B-FORMAT ISO 216 JAPAN B4=353 x 250mm B4=364 x 257mm ISO 216 JAPAN B5=250 x 176mm B5=257 x 182mm ISO 216 JAPAN B6=176 x 125mm B6=182 x 129mm x x x x x x x 1189mm 841mm 594mm 420mm 297mm 210mm 148mm x x x x x x 216mm 279mm 356mm 356mm 432mm 330mm x x x x x x x 1297mm 917mm 648mm 458mm 324mm 223mm 162mm 7-5 Enlargement and Reduction Percentages Enlargement and Reduction Percentages Type Enlargement 7-6 Inch Version Metric Version 400% 400% 200% 200% 155% 141% 129% 122% 121% 115% Full Size 100% 100% Reduction 93% 93% 85% 87% 78% 82% 73% 71% 65% 65% 50% 50% 32% 35% 25% 25% Specifications Glossary Chapter Overview Included in this glossary are definitions of commonly used copy terms. Copier Terms % (percentage) The ratio of the original image size to the copied image size. If the copy image is larger than the original, the % number is larger. A copied image that is twice the size of the original is said to be 200%. If the copy image is smaller than the original, the % number is lower. A copied image that is half the size of the original is said to be 50%. 10-key pad The portion of the Control Panel with numerical keys. These keys are used primarily to input the desired number of copies and are also used to input numerical data into the copier during programming. Book Originals Any bound original that cannot be fed through the Feeder. Because the pages cannot be separated, they must be copied manually from the Exposure Glass. The Book Original features can be used to make the book copying process more efficient. Bypass Feed Tray A Tray used to feed single sheets of special or transparent stock into the copier to be copied. Because sheets from this tray feed straight through the copier paper path, the Tray is especially useful for feeding heavy stock. See also: Stack Feed Bypass Tray. Casual Operator An operator that uses the copier to make copies but does not have Key Operator responsibilities such as adding Toner or calling for service. Charge Corona A device located near the Drum that activates the light sensitivity of the Drum and prepares it to be exposed and imaged. Cleaning Unit An assembly that cleans any residual image toner from the Drum in preparation for the next image. Clear/Stop Key The Key used to stop a copy job while it is still running. It may also be used to clear program functions from a previous job and return to the default settings. Control Panel The surface at the front of the copier containing Keys used to control the operation of the copier. It usually also contains the display that shows the status of the copier or the job in progress. Copies The imaged paper output from a copier. It might be a direct reproduction of the input document or it can contain any number of changes as programmed into the copier such as Enlargement/Reduction, Trim/Mask, etc. Copies in Progress This display or part of a display shows how many copies of the total have been made. Copies Selected This display is the same as Copy Quantity, in that it shows the number of copies requested. G-1 G-2 Copy Paper See: paper Copy Quantity This display or part of a Touch Screen shows the requested number of copies. Copy Size Keys Keys used to input the desired size of the copy. Darker Copies This term refers to the amount of toner placed on the copy through the imaging process. The amount of toner is controlled by the “darkness” of the original and the amount of light used during the exposure process; more light means less toner or image density. Developer Material This is a supply used in the copier. It usually consists of two parts; a carrier material and the toner. The developer material is only used by a technician when installing a new unit or when cleaning a Developer Unit. Developer Unit An assembly located near the drum inside the copier that delivers the toner to the drum. It allow the correct amount of toner to be placed on the drum for each image. Display Panel This is an LCD panel showing: operation status, error messages, and function menus. Document Feed Tray The Tray where an original document is placed to feed into an ADF for automatic feeding and copying. Document Guide These Guides are located in the Document Feed Tray. When correctly positioned against the sides of an original document, they help to position the pages of the document. Document Receiving Tray A Tray used to accumulate the pages of an original document that have completed the copying process. Document Scale Two scales located to the front and left of the Exposure Glass intended to help locate original documents placed on the Glass for manual copying and to identify a part of an original during the Editing process. Documents The set of pages either placed on the Exposure Glass or in the ADF to be copied. Drum Assembly The unit located inside the copier that receives the image during the exposure and imaging process and transfers this image to the copy paper. It is light sensitive and should be protected from bright lights. Duplexed Copies Copies that have been imaged on both sides of the sheet. Energy Saver Key A Key used to place the copier into, or bring it out of an Energy Saver Mode. In the Energy Saver Mode, the amount of energy consumed by the copier is reduced. Energy Star A voluntary program introduced by the United States Environmental Protection Agency (EPA) intended to encourage the use of energyefficient technologies in the workplace. Requirements to qualify for certification vary based on the speed of a Copier. For specifics on your Copier, check the Specifications section of this Guide. Exit Tray A tray attached to the output end of the copier to collect copies. This tray is usually removed when a Sorter or Finisher is installed. In this case, the top tray of the Sorter or Finisher serves as the Exit Tray. Exposure Glass The glass surface located under the Document Cover or Document Feeder. The original is placed here to make a copy. If an RADF is present, it transports the original to this location. Once here, the original is exposed by the Exposure Lamp located directly below the glass. Exposure Lamp The light source located directly below the Exposure Glass. It is the light from this lamp that exposes the original, reflects off the original, travels through the optics and exposes the Drum. Exposure Pad A Pad located on the bottom side of a Document Cover used to hold an original in place on the Exposure Glass during the exposure process. Factory Default A setting in the copier that is set at the factory. You can change some of these settings. Others can be changed by a Service Technician. See also Initial Setting. Front Cover The Cover located at the front of the copier designed to allow access to the interior of the copier. This allows the operator to add supplies, remove paper misfeeds, or perform other maintenance as prescribed by the Operator Guide. Fused Toner The image, usually black, that adheres to the surface of the copy paper. This Toner is “Fused” to the surface of the paper using pressure and heat. Fuser Assembly The unit located inside the exit area of the copier that provides heat and pressure to attach the toner to the paper surface. Fuser Cleaning Pad In certain copiers, it is necessary to clean toner residue and paper dust from the Fuser Rollers. This provides extended life of the Rollers and cleaner copies. At certain intervals, this pad must be replaced. Graphic Display A Display that shows icons related to service or supply related error condition. In some copiers, these icons may be incorporated into a graphic representation of the copier to show the approximate position of an error. Gray Scale A term referring to the shades of gray between the black and the white areas on an original or copy. Normal copies reduce the shades of gray to produce very dense blacks and clean whites. During the photo copy modes, the copier is set to reproduce the shades of gray more faithfully, but usually at the expense of the black density. G-3 G-4 Initial Settings Those settings displayed by a copier when it comes to the READY condition. These settings may be either the Factory Default settings, or Factory Default settings that have been modified permanently by either you or your Service Technician to better fit your application. Interrupt Key The Key used to interrupt a long copy job in process in order to run a single copy. Interrupt copies are limited to one, and the interrupt original must be copied from the Exposure Glass. Key Operator The main operator responsible for the copier. This individual performs all operator prescribed maintenance and is the main contact in the event of a service call. LCC (LCT) This is the Large Capacity Cassette or sometimes referred to as LCT Large Capacity Tray. It is usually used as the main paper source. Lighter Copies This term refers to the amount of toner placed on the copy through the imaging process. The amount of toner is controlled by the “darkness” of the original and the amount of light used during the exposure process; more light means less toner or image. Message Display This display or part of a Touch Screen shows messages related to the status of the copier, Help messages and program information. On/Stand by Switch A switch located on the exterior of the copier used to control the power to the copier. Original Cover On copiers not equipped with a Document Feeder, a Cover protects the Exposure Glass and prevents stray light from entering the copier during the copy process. Unless copying a 3-dimensional object, the cover should be down. Original Direction Indicator This icon instructs the operator which direction to place the document in the Document Feeder or on the Exposure Glass. This is particularly helpful when different paper sizes are available and when certain features are used such as; when reducing a legal sheet to letter-size paper, the icon would instruct you to feed the original lengthwise. Paper Tray A paper carrier designed as part of the base of the copier. It is used to store and feed a stack of paper of one size. Some are designed to be adjusted but can only accommodate one size at a time. Paper Weight Throughout the Operator Guide there are references to 20 lb. or 24 lb. paper. This refers to a standard measuring technique. A certain number of sheets cut to a particular size weighs 20 or 24 pounds. The weight specification usually correlates with the thickness of the paper. It also generally implies stiffness with the lighter papers being more limber and the heavier papers being stiffer. Copiers are designed to feed certain weight papers through the Drawers or Cassettes. Heavier stock, such as cover stock, can be fed through the Bypass Feed Tray. Power Cord The cord used to connect the copier to the power receptacle. The plug design is specified depending on the amount of power the copier requires. Make sure the receptacle is the correct one for your copier. READY Indicator This is an indicator that shows when the copier has warmed up and is ready to make copies. It appears in several forms; a light, an icon, and the message itself. Release Lever The lever located inside the Front Cover used to release the Upper Unit for access to the paper path. Sample Key This key allows you to run a sample copy set using the finisher. Separation Corona One of the Coronas inside the copier. It is usually located near the Drum and separates the paper from the Drum. Because it attracts the toner, and since it is located below the paper, it has a tendency to get dirty. This can require the Key Operator to either clean the coronas or call for service. Sheet Feed Bypass A tray that opens from the side of the machine, usually just above the Primary Paper Tray or LCC. It is designed to feed a single sheet at a time. This tray can be used to feed paper or transparency stock that would normally not be placed in the Feed Drawers. Since it bypasses the normal paper feeding mechanism and feeds straight through the paper path, heavier stocks (like cover stock) feed better. Sorter An accessory attached to the output of a copier designed to perform a sorting function. The sort function allows you to make multiple copy sets of an original in such a way that the pagination matches the original document. Stack Feed Bypass Feed Tray A tray that opens from the side of the machine, usually just above the LCC or Primary Paper Tray, and is designed to feed a stack of paper. This tray can be used to feed paper or transparency stock that would normally not be placed in the Feed Drawers. Since it bypasses the normal paper feeding mechanism and feeds straight through the paper path, heavier stocks (like cover stock) feed better. Stack Key This key is used to program the Stack functions. This is available only if a Sorter or Finisher is present. In the stack mode, multiples of a single page of a document are placed in separate Sorter Trays or are offset in the Finisher Tray. Start Key This Key is used to start the copying process once all selections have been made. On a Lanier copier, it is always green in color. Toner The black powder that is used to form the image on copy paper. In a color copier, it would be colored. PLEASE NOTE: Toners are designed to operate specifically in a copier and differ greatly on the copier requirements. Toner from other copiers should never be mixed. At best, the image would be too light or too dark. At worst, it can damage your G-5 copier and require a service call to have the toner cleaned out and replaced with the correct toner. G-6 Toner Container A container designed to simplify the reloading of toner in your copier. Make sure the toner you add is correct for your copier before loading. See the NOTE above. Transparencies A clear plastic stock used to make an overhead transparency. Because they are clear, they don’t feed from paper Drawers or Cassettes. However, many Bypass Feed Trays are designed to handle transparency stock. Place your transparency stock in the Bypass Feed Tray and use a normal copy procedure. Transport Belt The rubber surface on the under side of an ADF. It grips an original and moves it across the Exposure Glass and returns it to the Document Exit Area of the Document Feeder. To keep it operating correctly and to prevent the buildup of dirt which can cause dirty copies, it must be cleaned periodically. User Codes An option, usually built into a copier that, when activated by a Technician, requires the operator to enter a User Code to make copies. The copier can contain many accounts thereby allowing the Key Operator to track copies made by individuals or departments. Zoom Keys The Zoom Keys are actually several keys that control the Enlargement or Reduction of the image on the copy. In most cases, there is a 100% (actual size) key, a key representing the highest Enlargement ratio, and a key representing the lowest Reduction ratio. Pressing these last two keys steps the copier optics in 1% increments. Pressing the 100% key returns the copier to the actual size mode. Index Chapter Overview This chapter provides page references to key items. Copier Terms Numerics 2 in 1 Copying 4-11 A ADF setting originals 3-2 using 3-1 Agency certifications Canada RFI 7-3 EPA energy star 7-4 USA RFI 7-3 Auto exposure 3-7 Auto Exposure Level Priority 5-3, 5-5 Auto exposure level priority 5-5 Auto Panel Reset Function 5-4 Auto panel reset function 5-4 Automatic Document Feeder 3-1 Automatic document feeder - see ADF 3-1 B Bypass copying loading non-standard size paper 43 loading standard size paper 4-2 paper sizes 4-1 types of paper 4-1 Bypass tray 3-5 C C 2-3 Care and maintenance control panel 6-20 exposure glass 6-19 original pad 6-20 outer covers 6-19 Certifications Canada rfi 7-3 EPA energy star 7-4 UL 7-3 F USA rfi 7-3 Choice settings 5-10 Cleaning 6-19 Clearing misfeeds PC 6-11 Clearing paper misfeeds 6-11 Control panel 2-1 Copier components control panel 2-1 external 2-4 internal 2-5 message display 2-3 optional equipment 2-6 Copy darkness 3-7 Copy quantity, selecting 3-6 Count displays 5-1 Counters 5-1 Cover open message 6-5 non-sort 4-8 F2 2in1 non-sort 4-9 F3 sort 4-9 F4 2in1 sort 4-9 Function mode 4-8, 5-8 F1 non-sort 4-8 F2 2in1 non-sort 4-9 F3 Sort 4-9 F4 2in1 sort 4-9 using 4-11 Functional problems correcting 6-3 D G Density (ADF) 5-7 Disable Sleep Function 5-4 Display indicators 6-4 Display messages,Toner empty 6-4 Glossary G-1 Glossary of copier terms G-1 E Energy star explained 7-4 Enlargement 3-9 Enlargement / reduction percentages 76 Enlargement and reduction percentage table 7-6 Exposure auto 3-7 manual 3-7 photo 3-8 Exposure glass setting originals 3-3 Exposure mode function 5-5 Exposure settings 3-7 External components 2-4 F1 I Image cartridge replacing 6-6 Image density - printer mode 5-9 Image quality 6-1, 6-2 Important safeguards 1 L Loading paper paper feed unit 6-8 paper tray 6-8 M Making copies 1-3 Manual exposure level priority 5-5 Manual exposure setting 3-7 Manual feed input size 5-6 Messages 6-4 I-1 O Optional equipment 2-6 Original document ADF 1-2 exposure glass 1-2 placement of 1-2 Original documents placing 3-1 P Paper international sizes 7-5 size comparisons 7-5 Paper drawer 3-5 Paper empty 6-4 indicator 6-8 loading paper 6-8 Paper feed unit 3-5 Paper misfeed 6-4 clearing paper misfeed J2/J3 6-13 clearing paper misfeed J8 6-16 clearing paper misfeed PC 6-11 indicator 6-11 Paper misfeeds paper feed unit 6-12 Paper size select 5-6 Paper size table 7-5 Paper sizes 3-1, 4-1 table 7-3 Paper tray loading paper 6-8 Paper trays selecting 3-5 I-2 Photo exposure 3-8 PM count 5-2 Power on 1-1 Preset ratios 3-9 R Ratios enlargement and reduction table 76 Reduction 3-9 Reset copier 6-18 S Sizes standard paper sizes 7-5 Sleep Function 5-4 Sleep function 5-4 Specifications automatic document feeder 7-2 copier 7-1 paper feed unit 7-2 T Toner empty 6-6 Total check function count displays 5-1 reading 5-1 Total counts selecting 5-2 Tracing paper 4-7 Transparencies 4-1 Transparency copying 4-7 Tray priority 5-8 Tray priority mode - printer mode 5-9 Trouble indicator 6-18 Troubleshooting 6-2 Turning copier on 1-1 U U1 Auto panel reset function 5-4 U1 auto panel reset function 5-4 U10 function mode 5-8 U2 sleep function 5-4 U4 exposure mode function 5-5 U5 auto exposure level priority 5-5 U6 manual exposure level priority 5-5 U7 paper size select 5-6 U8 manual feed input size 5-6 U9 density (ADF) 5-7 UA tray priority 5-8 Ub image density - printer mode 5-9 UC tray priority - printer mode 5-9 UL 7-3 User’s choice function 5-4 User’s choice mode 5-3 User’s choice settings 5-10 Z Zoom 3-9 setting manually 3-10 Warranty New Machine Warranty and Limitation of Liability Warranty — 90 days Lanier warrants that its equipment and accessories will be free from defective parts and workmanship for a period of ninety (90) days from the date of first installation by Lanier’s Authorized Dealer. Customers must notify a Lanier servicing dealer or Lanier of a warranty claim within the warranty period. For a listing of authorized Lanier servicing dealers or to notify Lanier of a warranty claim, write to Lanier Worldwide, Inc., 2300 Parklake Drive, N.E., Atlanta, Georgia 30345-2979. Warranty Exclusions THE FOREGOING EXPRESS WARRANTY IS MADE IN LIEU OF ALL OTHER PRODUCT WARRANTIES, EXPRESS OR IMPLIED, INCLUDING MERCHANTABILITY AND FITNESS AND THOSE ARISING FROM A COURSE OF DEALING OF USAGE OF TRADE. The Express Warranty will not apply to drums, cleaning blades, fuser cleaning felts, toner, developer or paper or to defects of damage incurred in transportation, or due to accident; neglect; misuse such as use of harmful or unapproved supplies; alterations; operator error; power surges; failure to properly install, clean, maintain, or repair; improper operating environment; or failure to provide proper utilities. The Express Warranty also will not apply to used or refurbished Lanier equipment unless Lanier expressly authorizes resale with its original equipment warranty. Limitation of Liability Fulfillment of Lanier’s warranty obligation shall be the Customer’s exclusive remedy and Lanier’s and the Lanier Dealer’s limit of liability for any breach of warranty or otherwise. In no event will Lanier or Lanier’s Dealers be responsible or liable for special, incidental or consequential losses or damages. Customer Vision® _ our commitment to your complete satisfaction www.lanier.com your document management partner Lanier Worldwide, Inc. | 2300 Parklake Drive, N.E. | Atlanta, GA USA 30345 T1202-5037