1
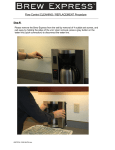
BREW EXPRESS
™
Operation GUIDE
model no.
For more information see our instructional video online at wwww.BrewExpress.com.
by
BE-112
Cont en ts
1. Safety
1
2. Features
3
3. Controller Functions
4
4. Start Up
5
5. Operation
6. Maintenance
6 -7
8
7. Troubleshooting
9 - 11
8. Parts & Service
12
9. Frequently Asked Questions
10.Warranty Information
13 - 15
16
Safety
Safety
IMPORTANT SAFEGUARDS
When using electrical appliances, basic safety precautions should always be followed, including the following:
1. Read all Instructions.
2. Do not touch hot surfaces. Use handles or knobs.
3. The voltage and frequency of the supply connections should conform to those of the rating label.
4. Close supervision is necessary when any appliance is used by or near children.
5. Allow to cool before putting on or taking off parts, and before cleaning the appliance.
6. Do not operate any appliance after the appliance malfunctions, or has been damaged in any manner.
Return appliance to the nearest authorized service facility for examination, repair or adjustment.
7. The use of accessory attachments not recommended by the appliance manufacturer may result in fire,
electric shock or injury to persons.
8. Do not use outdoors.
9. Check specifications on page 4 for proper water pressure requirements of this product, or no less than 30 psi.
10. Do not place on or near a hot gas or electric burner, or in a heated oven.
11. The appliance should be installed in a place not easily reached by children.
IMPORTANT:
Please read and follow instructions carefully before starting your BREW EXPRESS™ in-the-wall COFFEE SYSTEM.
The BREW EXPRESS™ dispenses extremely hot water. Hot liquids may cause severe burns if it contacts skin. Use
extreme caution when handling hot liquids dispensed by the BREW EXPRESS™. KEEP HANDS AWAY FROM SPRAY
HEAD, BREW BASKET, CARAFE OR MUG DURING BREW CYCLE
•
DO NOT use carafe or mug that is cracked or damaged.
•
DO NOT remove the brew basket while brewer is in operation
•
DO NOT place carafe in microwave or place on stove top
12. Do not use appliance for other than intended use.
13. To reduce the risk of shock, discontinue use of the appliance if water leakage occurs.
14. The convenience receptacle provided is rated maximum 15 A. Disconnect appliances when not in use.
15. To reduce the risk of fire, do not place any heating or cooking appliance beneath the appliance.
16. To reduce the risk of fire, do not mount unit over or near any portion of a heating or cooking appliance.
17. To reduce the risk of electric shock, do not mount over a sink.
18. To reduce the risk of fire, do not store anything directly on top of the appliance surface when the appliance
is in operation.
SAVE THESE INSTRUCTIONS
1
2
Features
Controller Functions
Display Panel
Convenient and practical.
Brew Express™ is plumbed into
the wall and fills on command so
you never have to manually
fill with water.
Handsome Euro design
compliments any decor.
Patented in-the-wall
design saves
precious counter space.
Need additional outlets?
Brew Express™
offers you two.
Unique brew basket allows
for removal of carafe
without spilling.
Large, bright and easy
to read LED display.
Stylish and sturdy
stainless steel construction
designed for years of use and
trouble-free maintenance.
Programmable
timer and clock.
AM/PM Indicator
Indicates AM or PM for clock.
Clock
Continuously displays current time and is used for setting automatic brew time.
Auto Indicator Light
Light is on when waiting for automatic brew cycle to start.
Program Button
Used when setting automatic brew time. Press and hold while setting time.
Hour/Minute Buttons
Used when setting clock and automatic brew time. Time advances
automatically when buttons are held down.
On-Off Auto Switch
Starts the manual or automatic brew cycle.
Adjustable Cup Selector
Selects the amount of water to be used during brew cycle.
2 cup (9oz), 1/2 carafe (27oz), full carafe (54oz) amounts may vary.
Status Indicator light
Is on when brewing cycle is in process, blinks when detection sensor does
not see a mug or carafe.
AM/PM Indicator
Adjustable cup selector
for the exact amount
of perfect coffee.
Exclusive Pause-N-Brew
detection sensor knows
when carafe is removed
and stops the brew cycle.
Clock
Auto Indicator
Light
Hour Button
Stainless steel pad
never gets hot so it won't
burn fingers or scorch coffee.
Easy clean thermo
carafe is both functional
and beautiful, keeping
beverages hot.
Status Indicator
Light.
Program Button
Minute Button
On Off Auto
Switch
Adjustable Cup Selector
Program Display Panel
3
4
Start Up
Operation
IMPORTANT:
Please read and follow instructions carefully before starting your BREW EXPRESS™ in-the-wall COFFEE SYSTEM.
Carafe
Brew Basket
Did you purge water lines during installation to remove any foreign particles (debris) in lines?
Debris in water lines can clog brewer system causing failure, and VOID ALL WARRANTIES.
1. Set Clock
The BREW EXPRESS™ dispenses extremely hot water. Hot liquids may cause severe burns if it contacts skin. Use extreme caution when handling hot liquids dispensed by the BREW EXPRESS™. KEEP HANDS AWAY FROM SPRAY HEAD,
BREW BASKET, CARAFE OR MUG DURING BREW CYCLE.
1. Make sure water is “ON” prior to starting BREW EXPRESS™. The BREW EXPRESS™
will not operate if there is no water or water pressure is less than 30 psi.
2. Make sure power is supplied to the BREW EXPRESS™. Power is supplied when the LED
display is illuminated on the display panel.
3. With the selector switch OFF, set clock by holding down buttons to advance hours, minutes
noting the AM/PM indicator light.
4. F lush brewing system by running two cycles of water through the brewer. Place brew basket under spray head without
coffee or filter, place empty carafe under brew basket, select a full carafe, and move the switch from OFF to ON. After
brewing cycle is complete, empty carafe and repeat.
5.
Wash carafe and brew basket with warm soapy water.
Single Cup
Brew Basket
Time advances when hour/minute buttons are held down, note AM/PM indicator.
2. Set Up Brew Basket
For brewing into the carafe use the carafe brew basket (with stopper). For brewing into a mug use the single cup brew
basket (without stopper). Select the appropriate filter and place into brew basket. Add desired amount of coffee
for taste preference (typically 1 tbsp per cup). Slide the brew basket into the brewer.
CAUTION – Ensure brew basket is completely inserted, otherwise problems may occur such as excessive steam
or overfilling.
Coffee Filter Selection – The carafe brew basket uses a 10-12 cup filter. Filters vary in height. It is important to
select a filter that extends to the top of the brew basket, otherwise coffee grounds may overfill the filter. The BUNN
brand of filters is recommended, the height is correct.
The single cup brew basket uses a #4 cone type filter.
3. Position Carafe or Mug
Position an EMPTY carafe or mug in the BREW EXPRESS™ under the brew basket outlet hole. The detection sensor
will not allow the brewer to operate unless the carafe or mug is positioned under the brew basket. The brew light on
the display panel will blink if nothing is detected. The sensor is designed to recognize a variety of materials.
The sensor may not detect a mug that is flat black or clear glass. If this occurs, use a different colored mug.
WARNING: ALWAYS EMPTY CARAFE OR MUG PRIOR TO STARTING THE UNIT OR OVERFILLING WILL OCCUR.
4. Select Water Volume
IMPORTANT REMINDERS
Select the amount of coffee to be brewed by rotating the selector knob to the desired setting. The approximate
volume of water for each setting is 9 oz. (2 cup), 27 oz. (1/2 carafe) and 54 oz. (full carafe).
• Always empty carafe prior to starting the unit, otherwise overfilling can occur.
The volume of water for each setting can be increased if desired. This is done by increasing the brew time.
The procedure is as follows:
1.
2.
3.
4.
5.
6.
• Use appropriate brew basket with carafe and mug.
5
Set slide switch to off position
Set selector knob to desired setting to change
Press and hold in the PROG button until the brew time is displayed (seconds)
Press the MIN button to increase the time (2 second increments)
Rotate the selector knob to change other brew times
Press the PROG to resume normal operation
6
Operation
maintenance
5. Manual Brew Cycle
To manually start a brew cycle move the slide switch from OFF to ON. If the switch is already in the ON position,
switch it to the OFF position and then back to ON. The brew light will turn on once the cycle has started. If brewer
is cold, the heater will preheat the water before starting the brew cycle. After the selected amount of water is
dispensed, the brew light will remain on for 40 seconds. At that time the BREW EXPRESS™ will beep five times.
Cleaning
Carafe
Clean the carafe and lid after each use with warm water and a mild dish soap.
Brew Basket
The brew basket should also be cleaned after each use with mild dish soap and warm water.
The brew basket is dishwasher safe (top rack only).
6. Automatic Brew Cycle
To automatically start a brew cycle set the automatic brew clock. Hold down the program button and press the
minute / hour buttons until the desired time (am or pm) is displayed. Slide switch to the auto position. Place carafe
or mug into the BREW EXPRESS™ under brew basket. The brew cycle will start automatically at the preset time.
NOTE: AUTOMATIC BREW CYCLE WILL NOT START IF THE CARAFE OR MUG ARE NOT PROPERLY IN PLACE.
7. Pause-N-Brew Feature
The BREW EXPRESS™ carafe can be removed during brew cycle to pour a cup of coffee. The detection sensor will
stop the flow of water and the valve on the brew basket will prevent existing water from spilling. Once carafe is
returned operation will continue. If carafe is missing for over 5 minutes BREW EXPRESS™ will shut off automatically.
8. Outlet
The maximum current rating for the outlet is 15 amps. The outlet does not work during the brew process.
Spray Head
It is recommended the spray head be cleaned occasionally with mild soap and warm water depending
on the amount of use. When the unit is cool, remove the spray head by gently rotating it by hand counter
clockwise. After cleaning reinstall the spray head, hand tighten only. Be careful not to damage spray head.
Brewer Exterior
Clean the exterior of the brewer with a soft damp cloth. Avoid getting excessive water around the
display panel and detection sensor. DO NOT use abrasive cleansers, they will damage the surface
of the brewer. Be careful when using stainless cleaner or polish around plastic parts.
Removing Brewer from Wall
If brewer must be removed from wall for repair or cleaning. Follow this procedure.
1. Place cardboard or towel on counter in front of brewer to protect counter surface.
2. Remove screws (4) from the sides of brewer.
3. Firmly grab side edges of brewer with both hands and gently pull straight forward
until brewer moves approximately 1”.
4. Gently rotate the left side of brewer (display panel side) away from the wall until
there is sufficient room to reach inside the rough-in-box.
5. Carefully reach behind brewer and disconnect the water supply line by pressing
on the gray button on the connector from the water line to the brewer.
For more assistance call (866) 268-5953. Also, there is a video for removing the brewer on the Lance Larkin website.
7
8
Troubleshooting
Troubleshooting
Display is not illuminated
Water overflow from brew basket
•
Ensure the power to the rough-in box is turned on (check circuit breaker).
•
•
Ensure brewer is fully pressed into the rough-in box.
•
Ensure the outlet inside the rough-in box is properly wired. Remove the brewer
and check outlet with volt meter. If power is on and no voltage is detected at the
outlet, wiring is incorrect. Turn off power. Remove power panel cover (two screws)
and check wire source connection.
•
Check wire connection at source.
Paper filter is not high enough and grounds are flowing over and plugging brew basket (use higher filter)
We suggest purchasing Bunn Brand Filters.
Excessive Steam
•
•
•
•
Inlet water line connected to hot water supply (connect to cold water).
Water pressure is too low, below 30 psi (increase water pressure).
Spray head is plugged (remove spray head, and clean or replace).
Water flow is too low, confirm by running a full carafe and checking volume. If water level in carafe is low,
call for technical service.
Water does not flow from spray head
•
If the BREW EXPRESS™ has not been used for 30 minutes or longer, it will PREHEAT
the water for 30 seconds. You may be waiting for the preheat cycle to end.
•
Ensure water has been turned on to the BREW EXPRESS™ (check valve at source).
• Ensure the carafe or mug is centered under the brew basket. BREW EXPRESS™
will not start if the detection sensor does not see a carafe or mug. Status light will blink.
The detection sensor may not see a flat black or clear surface. If mug or carafe is flat black
or clear, then switch to a different type of container.
•
Ensure the water line is properly connected inside the rough-in box. Remove The four
mounting screws on the side and pull out brewer. Check for pinched or kinks in the water
supply line. The quick connector from the brewer must be pressed securely into quick
connector from water source.
•
Ensure the water pressure is adequate. The BREW EXPRESS™ will not operate if water
pressure is under 30 PSI. LED display will flash EEEE if water pressure is too low.
•
Check the water filter (if present) at the supply. If filter is clogged replace filter.
•If problem persists, then coffee system maybe clogged by debris.
Contact Lance Larkin™ for service at (866) 268-5953 or send an email to [email protected]
Water overflow from carafe
•
•
•
Carafe was not emptied before brew cycle started (empty carafe).
Carafe lid is not allowing fluid into carafe. Heat retention door inside lid may be stuck. Remove lid and run warm
water or blow through opening in lid.
Flow rate too high, confirm by running 2-3 pots of water, if flow rate is still too high call for technical service.
9
Taste Not Acceptable
•
•
•
•
Quality or Quantity of coffee is not high enough (purchase better quality coffee)
Spray head is plugged and water is boring hole in grounds (clean or replace spray head)
Check temperature inside of a full carafe of water. It is possible heater is not working properly or thermostat
sensor is not working properly.
Check volume of water on a full carafe setting. If it is overfilling and temperature is wrong, call for technical service.
Brewer turning on and off during cycle
•
•
•
•
The brewer turns on and off the heater to control the water temperature. The amount depends on many factors
(inlet water temperature, water flow rate, heat wattage, supply voltage).
Excessive on and off will also result in excessive steam. See excessive steam for more information.
Clicking noise: This is temperature control and it is normal operation.
Brewing light flashing: IRD problem.
Water temperature cold or luke warm
•
•
•
•
•
Carafe not keeping coffee hot long enough. Consider if you are brewing a full pot or half pot. Half pot will not keep
coffee hot as long as the inner wall of carafe is heated by incoming coffee fluid. Pre-heat carafe for better and longer performance of a half pot.
Check supply voltage is maybe is too low, below low 115 VAC (increase supply voltage).
Water flow rate too high, confirm by running 2-3 pots of water first then call for technical service.
Heater failed, call for technical service.
Internal electrical connection failed, call for technical service.
10
Parts & Service
Troubleshooting
Carafe or Mug not detected (flashing brew light)
•
•
•
•
IRD cannot detect flat black or clear glass mug (change mug color)
IRD window is dirty (wipe with moist towel and dry)
Mug not close enough to IRD (move farther into brewer)
IRD is not set properly, call for technical service.
Water dripping from spray head
•
•
•
•
Spray head plugged (replace or clean spray head)
Normally, some water will drip from the spray head shortly after brewing
Slight valve leak (debris inside valve, disconnect water and reconnect, run 1-2 full cycles of water in carafe to
dislodge debris and check)
Valve leak permanent, call for technical service.
Spare parts are available from Lance Larkin™ (866) 268-5953 or email [email protected].
Contact Lance Larkin™ for all service and warranty issues.
• Spray head
•
Brew Basket(s)
•
Carafe and lid
•
Mounting screws
•Auxiliary water pump and (5) gallon jug.
For installation in areas without water supply.
Water dripping down walls of carafe area
•
•
Spray head plugged (replace or clean spray head)
Spray head leak around threads, (remove spray head, clean and re-install for tight fit)
Coffee not staying warm
•
•
•
Possible carafe vacuum failure (if carafe is warm to touch, replace carafe)
Preheat carafe before brewing coffee especially if used for half pot. (run brew cycle without filter or coffee)
Check volume of water by running a full cycle of water without coffee. If carafe overfills call for technical service.
Water leak from back of brewer
•
•
•
Check quick connect (push connectors together firmly and slightly twist)
Poly line leak at brewer, call installer to repair.
Valve connection leak, call for technical service.
11
12
frequently asked questions
frequently asked questions
What type of coffee filter do I use?
How long will the coffee stay hot in the carafe?
For
Between 2 - 3 hours (based upon Full Carafe volume); it is a thermal vacuum sealed carafe (no glass).
*Coffee tastes its best within an hour of brewing according to the SCAA
Please Note: Depending upon volume brewed or amount retained in carafe will decrease the time for keeping coffee hot.
Standard size Brew Basket:
Flat 10 to 12 cup filter (recommended brand Bunn or Brew Rite)
*Please Note: A 8-12 cup filter will not work properly because the sides of the filter are not high enough to hold
all the coffee grounds appropriately.
For Elongated 2 cup Brew Basket:
Cone filter (recommended Melita #4)
Does hard water affect the Brew Express?
Yes, the Mr. Coffee or Brew Rite 10-12 cup gold mesh filter works well.
Mineral deposits may attach to components while water is being heated. The water never boils within any of the Brew Express components. The water is heated while it travels through the Brew Express into the brew basket and never gets the
opportunity to boil. Therefore you should not have any water deposit build up within the unit. Although we recommend you
use a filter for better taste, and to filter out any hard water deposits and debris particles. Geographic locations with a high
mineral water content and hard water are required to install a filter that prevents calcium.
How much coffee will it brew at a time?
Is a water filter Required?
There are three different settings.
2 cup (9oz) = 1 full coffee mug
½ carafe (27oz) = 6 cups (coffee/euro standards) = 3 full coffee mugs
Full carafe (54oz) = 12 cups (coffee/euro standards) = 6 full coffee mugs
Depending upon your water quality and hardness will determine the need for a filter. It will be required upon the following
conditions:
Can I use a gold mesh coffee filter?
Please Note: Volume may vary slightly do to input water pressure.
How long does it take to brew coffee?
The
unit pre-heats for 30 seconds, after it preheats it will take …
7 minutes for a full carafe
3 ½ minutes for half a carafe
70 seconds for 1 full mug/2 cup mode
If your water is noted to be “Hard Water” we require that a filter be installed. The filter should be a special filter to
reduce lime scale and calcification.
If your water has high quantity of sediment such as a well may produce we require a sediment style filter.
Please note: If you already have a filter system on the home or if you are using an alternate water source such as a
water jug with a pump system, a filter will not be required.
Additionally, remember to run water through filter prior to connecting the Brew Express, or you may clog the Brew Express with the initial filter particles. It is highly recommended to read filter instructions and purge water through it until water is clear.
What type of filter is required?
At what temperature does the Brew Express brew coffee?
For Sediment, a simple ice maker style filter will work. There are several filters on the market, like the GE Smart Filter that
is easy to install and goes under the sink.
The Brew Express is set to brew coffee at the prescribed temperature in accordance to the standards of the Specialty
Coffee Association of America (SCAA). The water entering the basket of grounds will be at the temperature is between
195 to 205 degrees Fahrenheit for a period of 90% of the brew cycle time. This is the best brewing temperature according to the SCAA. After brewing a full carafe, the coffee entering the carafe will be approximately 178 degrees or higher.
For Hard Water we recommend brands like Cuno or Everpure. It maybe a good suggestion to research filters with your local
water filtration supplier.
13
Remember: Make sure you purge water through the water filter before you attach it to the Brew Express otherwise charcoal
from the filter may clog the water valve within the machine.
14
frequently asked questions
Water Pressure: What is minimum and maximum water pressure?
The Brew Express specifications require a minimum of 30 psi to a maximum of 90 psi. If it is lower than 30 psi, it is
possible the pressure sensor will not allow the Brew Express to work. You will get an “EEEE” message. This can mean
no water; low pressure, kinked water line or your water filter is plugged. In some installations the brewer may run fine if
it is the only appliance using water. But, when someone turns on the water at the same time, “EEEE” might appear.
What about RO or Reverse Osmosis system?
Yes, we believe our system will run fine, but again water pressure must be met; at least 30 psi. The Brew Express has
metal components. One should check with the RO system installer to ensure excessive corrosion will not be a concern.
If your water is a distilled water system, it is not to be connected to the Brew Express.
Why does the outlet on the Brew Express not work while I’m brewing coffee?
The outlet does not function during brewing so it will allow over loading the circuit in the machine. Running both the
coffee system and another accessory at the same time may cause the circuit to be over loaded.
Warranty
2 YEAR LIMITED WARRANTY
This limited warranty is the only one that applies to this product, and sets forth all the responsibilities of Lance Larkin™
regarding this product. There is no other warranty, other than that described herein.
BREW EXPRESS™ is warranted, to the original purchaser only, to be free of defects for parts and labor for a period of 2
years from the date of purchase. This warranty does not extend to subsequent purchasers, or purchases through a
non-authorized dealer or auction site. Lance Larkin™ will not be held responsible for any amount of damage in excess of
the retail purchase price of the BREW EXPRESS™ coffee system under any circumstances. Incidental and consequential
damages are specifically excluded from coverage from this warranty.
The BREW EXPRESS™ coffee system is not intended for commercial food service use. This warranty does not apply to
accessories or damage to unit from misuse or incorrect installation. It is further noted that using the brewer without a
water filter or filtered water system (entire house filter) may void the warranty. This applies to areas where the water is not
treated for sediment, high mineral content or hard-water characteristics.
RETURN/REPAIR POLICY: Any BREW EXPRESS™ unit found to be defective may be returned to Lance Larkin™ after proper
authorization. Defective units returned to Lance Larkin™ within 1 year from the original date of purchase will be replaced.
Units returned to Lance Larkin™ more than 1 year after the original purchase date, but less than 2 years from the original
purchase date, Lance Larkin™ will have the option to repair or replace the unit with either a refurbished or new unit. The
repaired or replaced unit will then be warranted under the terms of the remainder of the warranty period. The customer
is responsible for all shipping charges of returned units. During the warranty period Lance Larkin™ will be responsible for
shipping charges back to the customer.
LIMITATIONS: This warranty does not cover accessories (brew baskets, carafes, etc) and defects resulting from normal
everyday use, such as but not limited to chips, scratches, abrasions, and discoloration. Also, this warranty does not cover
defects due to failure to follow installation or operation instructions, improper care, abuse, accidents, damage during
shipping and unauthorized repair or alterations. All or any acts of nature or abnormal conditions causing malfunction or
product failure are considered not to be the responsibility of Lance Larkin and this warranty. Any damage resulting from this
condition will be sustained solely by purchaser.
STATE LAW RIGHTS: This warranty gives you specific legal rights. Some states do not allow limitations on how long an
implied warranty lasts or the exclusions or limitations of incidental or consequential damages, so the inclusions or
limitations stated herein may not apply. This warranty gives the purchaser specific rights; other rights which vary from state
to state may also apply.
REQUEST FOR WARRANTY SERVICE: Contact Lance Larkin™ technical support by telephone, fax or mail. We suggest that
you keep the original packaging in case it may be necessary to ship the unit. When returning the unit, include you name,
address, phone number, and dated sales receipt (or copy) along with product serial number and description of the reason
for return.
WARRANTY ACTIVATION: Please complete warranty card and mail to Lance Larkin™ for activation within 30 days of
purchase. Mail completed card to: Lance Larkin™, 2700 NW Front Avenue, Portland, Oregon 97210.
15
16
www.brewexpress.com
Printed in CHINA.
BE112-OG/02_07 R-1
© LANCE LARKIN 2005