1
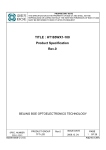
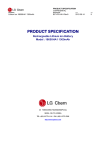
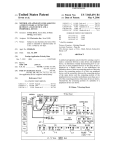
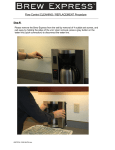
BREW EXPRESS™
OPERATION GUIDE
MODEL BE112
Contents
1. Safety
1
2. Features
2
3. Controller Functions
3
4. Start up
4
5. Operation
5
6. Maintenance
6
7. Troubleshooting
7
8. Parts & Service
8
9. Warranty & Registration
9
Safety
IMPORTANT:
Please read and follow instructions carefully before starting your BREW EXPRESS™ in-the-wall COFFEE SYSTEM.
WARNING
The BREW EXPRESS™ dispenses extremely hot water. Hot liquids may cause severe burns if it contacts skin. Use
extreme caution when handling hot liquids dispensed by the BREW EXPRESS™. KEEP HANDS AWAY FROM SPRAY
HEAD, BREW BASKET, CARAFE OR MUG DURING BREW CYCLE.
• DO NOT use carafe or mug that is cracked or damaged.
• DO NOT remove the brew basket while brewer is in operation
• DO NOT place carafe in microwave or place on stove top
1
Features
Convenient and Practical.
Brew Express™ is plumbed into
the wall and fills on command so
you never have to manually
fill with water.
Handsome Euro Design
Compliments any Decor.
Patented In The
Wall Design Saves
Precious Counter Space.
Need Additional Outlets?
BREW EXPRESS™
Offers you Two.
Unique Brew Basket Allows
for Removal of Carafe
Without Spilling
Large Bright Easy
to Read LED Display
Stylish and Sturdy
Stainless Steel Construction
Designed for Years of Use and
Trouble Free Maintenance.
Programmable
Timer and Clock
Adjustable Cup Selector
for the Exact Amount
of Perfect Coffee.
Exclusive Pause-N- Brew
Detection Sensor Knows
when Carafe is Removed
and Stops the Brew Cycle.
Stainless Steel Pad
Never gets Hot so it Won't
Burn Fingers or Scorch Coffee.
Easy Clean Thermo
Carafe is Both Functional
and Beautiful Keeping
Beverages Hot.
2
Controller Functions
Display Panel
A/M/PM Indicator
Indicates AM or PM for clock.
Clock
Continually displays current time and is used for setting automatic brew time.
Auto Indicator Light
Light is on when waiting for automatic brew cycle to start.
Program Button
Used when setting automatic brew time. Press and hold while
setting time.
On-Off Auto Switch
Starts the manual or automatic brew cycle.
Adjustable Cup Selector
Selects the amount of water to be used during brew cycle.
2 cup - 1 mug (9oz), 1/2 carafe or full carafe (12 cups).
Status Indicator light
Is on when brewing cycle is in process, blinks when detection sensor does
not see see a mug or carafe.
Hour/Minute Buttons
Used when setting clock and automatic brew time. Time advances
automatically when buttons are held down.
AM/PM Indicator
Clock
Auto Indicator
Light
Hour Button
Status Indicator
Light.
Program Button
Minute Button
On Off Auto
Switch
Adjustable Cup Selector
PROGRAM DISPLAY PANEL
3
Start Up (Initial First Time Use)
IMPORTANT:
Please read and follow instructions carefully before starting your BREW EXPRESS™ in-the-wall COFFEE SYSTEM.
WARNING
Did you purge water lines during installation to remove any foreign particles (debris) in lines?
Debris in water lines can clog brewer system causing failure, and VOID ALL WARRANTIES.
WARNING
The BREW EXPRESS™ dispenses extremely hot water. Hot liquids may cause severe burns if it contacts skin. Use
extreme caution when handling hot liquids dispensed by the BREW EXPRESS™. KEEP HANDS AWAY FROM SPRAY
HEAD, BREW BASKET, CARAFE OR MUG DURING BREW CYCLE.
1. Make sure water is "ON" prior to starting BREW EXPRESS™. The BREW EXPRESS™
will not operate if there is no water or water pressure is less than 30 psi.
2. Be sure power is supplied to the BREW EXPRESS™ Power is supplied when the LED
display is lit on the display panel.
3. With the selector switch OFF, Set clock by holding down buttons to advance hours, minutes
noting the AM/PM indicator light.
4. ALWAYS empty carafe prior to starting the unit or overfilling can occur.
5. Use appropriate brew basket with carafe or single cup.
6. RUN (2) CYCLES OF WATER ONLY THE FIRST TIME BREW EXPRESS™ IS USED TO FLUSH BREWING SYSTEM.
7. Empty carafe after each time of use.
8. Rinse/wash carafe and brew basket prior to each use.
4
Operation
Brew Basket
with Stopper
Brew Basket
without Stopper
1. Set Clock
Time advances when hour/minute buttons are held down, note AM/PM indicator.
2. Set Up Brew Basket
For brewing into the carafe use the brew basket with the Pause-N-Serve stopper. For brewing into a mug use the brew
basket without the stopper. Place a No# 10-12 flat bottom filter into the brew basket. Add desired amount of coffee for
taste preference. Typically, use 1 tablespoon for each cup. Place brew basket into BREW EXPRESS™.
WARNING: BE CERTAIN BREW BASKET IS COMPLETELY INSERTED, OTHERWISE STEAM WILL ESCAPE FROM
THE FRONT OF THE UNIT.
3. Position Carafe or Mug
Position carafe or mug in the BREW EXPRESS™ under the brew basket outlet hole. The detection sensor will not allow
the brewer to operate unless the carafe or mug is positioned under the brew basket. The brew light on the display
panel will blink if nothing is detected. The sensor is designed to recognize a variety of materials. The sensor may not
detect a mug that is flat black. If this occurs, use a different colored mug.
WARNING: ALWAYS EMPTY CARAFE OR MUG PRIOR TO STARTING THE UNIT OR OVERFILLING WILL OCCUR.
4. Select the Volume
Select the amount of coffee to be brewed by rotating the adjustable cup select to the desired amount to be dispensed
from the BREW EXPRESS™. Mug ( ) 200 ml, 1/2 carafe 800 ml or full carafe 1600 ml.
5. Manual Brew Cycle
To manually start a brew cycle move the slide switch from OFF to ON. If the switch is already in the ON position,
switch it to the OFF position and then back to ON. The brew light will turn on once the cycle has started. If brewer is
cold, the heater will preheat the water before starting the brew cycle. After the selected amount of water is dispensed,
the brew light will remain on until all liquid has drained. At that time the the BREW EXPRESS™ will beep five times.
6. Automatic Brew Cycle
To automatically start a brew cycle set the automatic brew clock. Hold down the program button and press the minute /
hour buttons until the desired time (am or pm) achieved. Slide switch to the auto position. Place carafe or mug into the
BREW EXPRESS™ under brew basket. The brew cycle will start automatically at the preset time.
NOTE: AUTOMATIC BREW CYCLE WILL NOT START IF THE CARAFE OR MUG ARE NOT PROPERLY IN PLACE.
7. Pause-N-Brew Feature
The BREW EXPRESS™ carafe can be removed during brew cycle to pour a cup of coffee. The detection sensor will
stop the flow of water and the valve on the brew basket will prevent existing water from spilling. After brew cycle is
complete water will stop flowing.
5
Maintenance
IMPORTANT:
Please read and follow instructions carefully before starting your BREW EXPRESS™ in-the-wall COFFEE SYSTEM.
Cleaning
1. Carafe
Clean the carafe and lid after each use with warm water and a mild dish soap. Optional cleaning tablets
are available from Lance Larkin™ for cleaning carafe.
2. Brew Basket
The brew basket should also be cleaned after each use with mild dish soap and warm water.
The brew basket is dishwasher safe.
3. Spray Head
It is recommended the spray head be cleaned occasionally with mild soap and warm water depending
on the amount of use. When the unit is cool remove the spray head by gently rotating it by hand counter
clockwise. After cleaning reinstall the spray head, hand tighten only. Be careful not to damage spray head.
4. Brewer Exterior
Clean the exterior of the brewer with a soft damp cloth. Avoid getting excessive water around the
display panel and detection sensor. DO NOT use abrasive cleansers, they will damage the surface
of the brewer.
Removing Brewer from Wall
If brewer must be removed from wall for repair or cleaning. Follow this procedure.
1. Place cardboard or towel on counter in front of brewer to protect counter surface.
2. Remove screws (4) from the side of brewer.
3. Firmly grab side edges of brewer with both hands and gently pull straight forward
until brewer moves approximately 1".
4. Gently rotate the brewer (display panel side) to the left away from the wall until
there is sufficient room to reach inside the rough-in-box.
5. Carefully reach behind brewer and disconnect the water supply line by pressing
on the gray button on the connector from the water line to the brewer.
6
Troubleshooting
Display is not lit
1. Ensure the power to the rough-in box is turned on (check circuit breaker).
2. Ensure brewer is fully pressed into the rough-in box.
3. Ensure the outlet inside the rough-in box is properly wired. Remove the brewer
and check outlet with volt meter. If power is on and no voltage is detected at the
outlet, wiring is incorrect. Turn off power. Remove power panel cover (two screws)
and check wire source connection.
4. Check wire connection at source.
Water does not flow from spray head
1. If the BREW EXPRESS™ has not been used for 20 minutes or longer, it will PREHEAT
the water for 30 seconds. You may be waiting for the preheat cycle to end.
2. Ensure water has been turned on to the BREW EXPRESS™ (check valve at source).
3. Ensure the carafe or mug is centered under under the brew basket. BREW EXPRESS™
will not start if the detection sensor dose not see a carafe or mug. Operation light should blink.
The detection sensor may not see a flat black surface. If mug or carafe is flat black,
then try a different color.
4. Check the water filter at the supply. If filter is clogged replace filter.
5. Ensure the water line is properly connected inside the rough-in box. Remove the four
screws on the side and pull out brewer. Check for pinched or kinks in the water supply
line. The connector from the brewer must be pressed securely into connector from from
water source.
6. Ensure the water pressure is adequate. The BREW EXPRESS™ will not operate if water
pressure is under 30 PSI. LED display will flash EEEE if water pressure is too low.
7. If problem persists as EEEE indicates, and no water filter is installed (at source) coffee system
maybe clogged by water debris. Contact dealer or Lance Larkin™ for service. 1(866)268-5953
7
Parts & Service
Spare parts are available only from your dealer or direct from Lance Larkin™.
Contact local dealer for all service and warranty issues.
a. Spray head
b. Brew Basket(s)
c. Carafe
d. Mounting screws
e. Inlet water filter
f. Coffee Filters
g. Cleaning tablets
h. Mug stand... Elevates mug closer to brew basket (prevents splashing)
I. Auxiliary water pump and (5) gallon jug. For installation in areas
without water supply.
8
Warranty
2 YEAR LIMITED WARRANTY
This limited warranty is the only one that applies to this product, and sets forth all the responsibilities of
Lance Larkin™ regarding this product. There is no other warranty, other than that described herein.
BREW EXPRESS™ is warranted, to the original purchaser only, to be free of defects in parts and labor
for 2 years from the date of purchase. This warranty does not extend to subsequent purchasers or users.
Lance Larkin™ will not be held responsible for any amount of damage in excess of the retail purchase
price of the BREW EXPRESS™ coffee system under any circumstances. Incidental and consequential
damages are specifically excluded from coverage from this warranty.
The BREW EXPRESS™ coffee system is not intended for commercial food service use. This warranty
does not apply to accessories or damage to unit from misuse or incorrect installation. Misuse includes
uses such as incorrect wiring or power supply installation, damage from incorrect filter or water line
installation, and improper maintenance or use.
RETURN/REPAIR POLICY: Any BREW EXPRESS™ unit other than accessories found to be defective
may be returned postage paid to Lance Larkin™. Any defective BREW EXPRESS™ unit other than
accessories returned to Lance Larkin™ within 1 year from the original date of purchase will be replaced
free of charge. Any unit returned to Lance Larkin™ more than 1 year after the original purchase date
but less than 2 years from the original purchase date, Lance Larkin™ will repair the unit. The repaired
or replaced unit will then be warranted under the terms of the remainder of the warranty period.
The customer is responsible for all shipping charges of returned units. During the warranty period
Lance Larkin™ will be responsible for the return shipping charges.
LIMITATIONS: This warranty does not cover accessories, brew baskets, carafe, mug stand, defects
resulting from normal wear and tear including chips, scratches, abrasions, discoloration due to improper
care, neglect and abuse, accidents, damage during shipping to our service facility, unauthorized repair
or alterations, failure to follow instructions for installation, operation and maintenance.
STATE LAW RIGHTS: This warranty gives you specific legal rights. Some states do not allow
limitations on how long an implied warranty lasts or the exclusions or limitations of Incidental or
consequential damages, so the inclusions or limitations stated herein may not apply. This warranty
gives the purchaser specific rights; other rights witch vary from state to state may also apply.
REQUEST FOR WARRANTY SERVICE: Contact Lance Larkin™ Technical Support by telephone, fax
or mail. We suggest that you keep the original packaging in case it may be necessary to ship the unit.
When returning the unit include you name, address, phone number, and dated sales receipt, (or copy)
along with product serial number and description of the reason for return.
WARRANTY ACTIVATION: Please complete warranty card and mail to Lance Larkin™ for activation
within 30 days of purchase along with a copy of dated sales receipt. BREW EXPRESS™ warranty card
must be registered within 30 days to activate warranty. Mail completed card to:
Lance Larkin™
3551 N.W. YEON AVE.
PORTLAND, OR 97210
(866) 268-5953
FAX (360) 578-3705
9
Printed in CHINA
BE112-OG/09-04 R-0
© LANCE LARKIN™ 2004