1
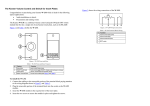
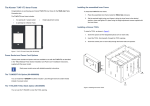
The Kramer T-RC-8IR TBUS Mounting Insert Kit for RC-8IR
Congratulations on purchasing your Kramer insert kit for the RC-8IR. The T-RC-8IR lets you
add the RC-8IR to TBUS inner frames that include dual power socket openings. (The
TBUS-1Axl, TBUS-10xl and TBUS-18xl).
Installing the T-RC-8IR Insert Kit for RC-8IR
To install the T-RC-8IR insert:
1.
Unscrew the two faceplate
attachment screws and remove the
RC-8IR faceplate.
Figure 2: RC-8IR Faceplate Holes Insert Kit for RC-8IR
2.
Place the T-RC-8IR over the RC-8IR enclosure so that both faceplate holes are aligned
with the faceplate holes on the RC-8IR enclosure and the IR IN receiver fits into the IR
IN opening (see Figure 3).
3.
Insert the faceplate screws through the T-RC-8IR and RC-8IR enclosure faceplate
holes, and tighten.
Figure 1: T-RC-8IR Insert Kit for RC-8IR (P/N: 80-000599)
!
Note that you can only use the EUROPEAN VERSION of the
RC-8IR with the T-RC-8IR when installing in a TBUS. Other
versions will not fit the T-RC-8IR.
Figure 3: T-RC-8IR Installation
4.
Place the assembled T-RC-8IR+ RC-8IR under the dual socket opening.
5.
Insert the two screws (supplied with the kit) to fix the T-RC-8IR in place, and tighten
them.
K R A ME R E LE CT R O N IC S L TD .
Installation
Instructions
MODEL:
T-RC-8IR
Insert Kit for RC-8IR
European Version Only
Figure 4: Fix the T-RC-8IR in Place
Connecting the Cables
To connect the cables:
1.
Insert the cables to their appropriate connectors from underneath.
2.
Secure the cables to the tie holes on the TBUS.
Do not secure the cables too tightly or too loosely. Leave a small amount of slack.
After the unit is connected to mains power and the proper cables, it is ready for use.
For the latest information on our products and a list of Kramer
distributors, visit our Web site where updates to these installation
instructions may be found
We welcome your questions, comments, and
feedback.
Web site: www.kramerelectronics.com
E-mail: [email protected]
!
For more detailed
information regarding
this product scan the
QR code:
SAFETY WARNING
Disconnect the unit from the power
supply before opening and servicing
P/N: 2900-300060 Rev 4
P/N:
2900- 300060
Rev:
4