1
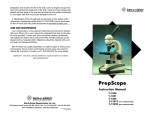
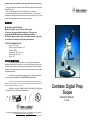
INSTRUCTIONS FOR CHARGING YOUR CORDLESS DIGITAL PREP SCOPE
1. Plug in the square pin connector of the USB cable to the back of the Cordless
Digital Prep Scope.
2. Then connect the opposite end to the USB port of your computer.
3. While your computer is on the microscope will recharge. You can use your
computer for other applications while the microscope is recharging. NOTE: you do
not have to fully discharge or drain the battery to recharge.
WARNING
Nickel Metal Hydride Battery
Regular charge 8 hours - Do Not Overcharge
Do not use non-rechargeable batteries. Only use the
rechargeable NIMH battery provided by Ken-A-Vision.
Do Not put battery pack in fire or mutilate, battery may burst
or release toxic materials that may cause burns!
SYSTEM RECOMMENDATIONS:
Pentium II 433 mhz
Mircosoft Internet Explorer 5.0
128mb of RAM
Windows 98, 2000, ME, XP
8mb video (24bit color)
Direct X 8.1
CARE AND MAINTENANCE
Your Cordless Digital Prep Scope is a fine precision instrument and
should be treated with care. When not in use it should be protected from dust by
the plastic cover provided. Lenses and eyepieces should be cleaned periodically
with optical lens tissue which is soft and lint free. Painted surfaces can be cleaned
with a moistened cloth.
Ken-A-Vision has qualified technicians on staff to repair and service all
your microscopes. Contact us at 1.816.353.4787 for more details.
Ken-A-Vision reserves the right to make design improvements and other changes in accordance with the latest technology. There is no obligation to make changes in products already manufactured. Copy Right 2003 Ken-A-Vision Corporation.
WARRANTY: ONE YEAR (CAMERA) AND TEN YEAR MICROSCOPE WARRANTY AGAINST DEFECTIVE PARTS AND WORKMANSHIP.
Cordless Digital Prep
Scope
Instruction Manual
T-1252C
5615 Raytown Road, Kansas City, MO 64133 U.S.A Tel. 816-353-4787 Fax. 816-358-5072
Email: [email protected] www.ken-a-vision.com
INS-SC50DVPC
Cordless Digital Prep Scope
Focus
APPLICATION
With the Cordless Digital Prep Scope connected to the USB port place a prepared slide under the stage clips and move into position for viewing. Use the 4x
objective first. Raise the stage until it will go no higher. Then lower the stage to
bring into focus. (View the image on the computer screen or through the eyepiece) Once the image is sharp you should be able to simply turn the nosepiece
to the next higher objective lens and do minor adjustments with the focus knob.
Thank you for purchasing your Ken-A-Vision Cordless Digital Prep Scope.
Recharged by the USB port in your computer, this unit will operate as a cordless microscope and a digital microscope. A unique feature designed to offer
you the best value.
TECHNICAL SPECIFICATIONS
* 10x Widefield eyepiece with pointer
* DIN Objective lens: 4x, 10x, 40xR
* Coarse & Fine Focal Adjustment
* Power Source: Rechargeable NiMH Battery
* Light Source: “Proprietary Light Board” Technology Equivalent to a 20 watt
bulb
* “Light Board” Life 100,000 hours
* Cool Operating Temperature Less than 25 Degrees C
* Built-In CMOS Camera (640 x 480) VGA Resolution
CORDLESS DIGITAL MICROSCOPE PREPARATION
Check the focus adjustment. The oversized knobs are designed for better gripping. The focus knob should turn easily to change the focus, but the
stage will not drift or slip on its own.
Check the stage stop safety feature. This has been preset from the
factory and should not need adjustment. However, when checking be sure the
stage moves up and down when turning the focusing knob. The stage stop is a
thumb screw with a lock nut found just behind the stage. To check the stop, first
place a prepared slide in position for viewing. With the 4x objective in position
for viewing, move the focus knob until the stage is as high as it can be. Turn the
40x objective into place. This objective should be very close to the slide, but not
touching.
OPERATION
Loading the Software:
Simply insert CD-Rom provided into your CD-Rom drive and select Vision
Viewer/Pupil CAM drivers. Next, select Install drivers. Then follow the prompts.
For more detailed information, please refer to the software instruction manual.
Connecting The USB Cable:
Please note that you must first install the supplied software before connecting
the USB cable to your computer. For the initial setup to be complete, before
connecting the USB cable to your computer be sure the software CD supplied is
still in your CD Rom.
Diopter
After obtaining focus of the specimen the computer, using the microscope
focus adjustments, adjust the diopter, located on eyepiece tube, for individual
eye correction when viewing through the microscope.
Disk Diaphragm
The rotating disk is located under the stage. (2 = smallest, and 8 = largest)
The different sized holes are used to control the amount of light that is projected
upward into the slide. Simply bring one of the different sized holes in line with
the stage opening. This is no set rule regarding which setting to use with a particular lens.
Built-In Illuminator
The light source life is approximately 100,000 hours. The DC power from the
USB port in your computer recharges the NiMH battery for use as a cordless
microscope off a computer.
Eyepiece
The widefield eyepiece is locked into place to avoid loss. Thier should be no
need to tighten. An eyepointer is built-in to the eyepiece. The diopter on the
eyepiece tube allows for focus adjustment while viewing specimens.
INSTRUCTIONS FOR REPLACEMENT OF BATTERY
Remove the connector cable marked battery from the light board (Part #
SCPCB-2). Next remove the old NIMH battery (Part # VFBATU4) and properly
discard.
To replace the NIMH battery simply plug
in the cables to the terminal as indicated
below. Secure the velcro strips to the battery and affix to the bottom of your microscope.