1
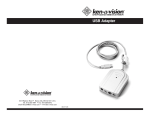
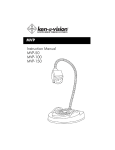
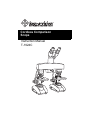
Cordless Comparison
Scope
Instruction Manual
T-1924C
Thank you for purchasing a Cordless Comparison
Scope.
Packing List
Dust Cover
Power Supply / Charger
Allen Wrench
Instruction Manual
Warranty Card & Sheet
Application
The Ken-A-Vision Cordless Comparison Scope is a useful addition to
a forensic curriculum, the teaching of Embryology, Histology, Geology or
any subject involving the comparison of two specimens, side-by-side. It
comes in two versions. The T-1924C has the features of the
Ken-A-Vision Cordless Comprehensive Dual Purpose Scope, which
means it may be used for standard microscope slides with up to 400x
magnification, and/or to view macro or opaque objects in a manner similar
to a stereo or dissecting microscope. Both are shipped as cordless units,
with an enclosed charger/power cord adapter.
The T-1924C has 2x, 4x, 10x and 40xR DIN objectives and a floating
stage with stage clips allowing for the specimen to be moved along both
the x and y axis. This microscope has both a sub-stage and a Supra
stage illuminator, for use depending upon whether a microscope slide or
an opaque (or macro) specimen is being looked at.
SPECIFICATIONS
Catalog Number
T-1924C
10x Widefield Eyepiece with Pointer
X
Seidentopf Binocular Head
X
4 Hole, Reversed Nose Piece
X
2x, 4x, 10x, 40xR DIN Objective Lenses
X
Bridge Assembly - adjust for left/right/split
viewing
X
Coarse and Fine Coaxial Focal Adjustment
X
Supra-Stage Incident Lighting
(Above-Stage Light)
X
2
Catalog Number
T-1924C
Sub-Stage Transmitted Lighting
(Below-Stage Light)
X
x/y Floating Stage
X
Powered by Ken-A-Vision Cool Lighting
X
Power source- NiMH Batteries
X
Light Rheostat to adjust lighting
X
Contour Base
X
Specifications subject to change without notice
1.
2.
4.
3.
6.
5.
7.
8.
1.
3.
5.
7.
Seidentopf Binocular Head
Bridge Assembly
Fine & Coarse Focusing
Microscope
2.
4.
6.
8.
Eyepiece Tubes
Bridge Assembly Head Socket
Stage
Microsocpe
Microscope Preparation and Assembly
Step 1. Open packing boxes carefully. There will be two large boxes,
each containing a microscope base, and two smaller, one with the
bridge assembly and one with the Seidentopf binocular head that fits
onto the bridge. Lift each microscope base out of shipping container.
Note that the serial numbers on the bottom of the units end in either
an L (left base) or an R (right base). Remove all packing materials on
stage and illuminator.
Unpack the bridge assembly and the
Seidentopf binocular head. Place microscopes side by side as
shown, with the "L" scope to the left, and the "R" scope to the right
and with the arms of the miscroscopes toward the back.
3
Step 2. At the top of the head socket of each microscope base find three
screw holes. There are "saftey screws" in each hole, removable
using a small screwdriver. Underneath these "saftey screws" there
are set screws. Using the small Allen wrench provided, back off the
set screws two or three turns, until flush with the inside rim of the
head socket of the base. (the points of these screws are initially
visible, back them off until they disappear).
Step 3. Place the bridge onto the two microscope bases with the Ken-AVision logo and X-axis control facing toward you. Tighten the set
screws so the bridge is locked on tight, and replace the saftey screws
to prevent students from tampering.
Step 4. Remove the dust cover from the Bridge Assembly Head Socket,
and loosen the set screw located on the right side until the screw tip
is flush with the wall of the head socket.
Step 5. Place the Seidentopf binocular head into the socket, sliding in
from the right, until it is flush in socket opening. Tighten the set
screw.
Step 6. Insert eyepieces into the eyetubes.
Step 7. Plug both microscopes into wall socket and allow them to charge
overnight. Your Cordless Comparison Scope is now ready to use.
Microscope Use and Instructions
Visit the Ken-A-Vision Web site, http://www.ken-a-vision.com/pdf/
MicroscopePrimer.pdf, for a Microscope Primer on general microscope
usage.
Operation
The NiMH batteries of your microscope need to be charged. Plug in
the round pin adapter from the supplied battery charger (or a Ken-AVision Multicharger SCGN06) into the back of your microscope. Connect
the opposite end to an electrical outlet. Charge the unit overnight
(approximately 12 hours or more) and your microscope is now ready for
up to 40 hours of continuous operation.
Power Switch
There is a separate power switch located at the right back side of
each base. On the T-1924C, the switch on each base is a double switch,
with the middle position being OFF. Depressing the right side of the
switch controls the bottom illuminator (sub-stage light), providing light
4
through the condenser for a standard microscope slide. Depressing the
left side switch turns on the supra-stage light for macro and opaque
objects.
Built-in Illuminator(s)
T-1924C - There are two illuminators built into to each of the microscope
bases, one is sub-stage and one is supra-stage. The supra-stage
illuminator is necessary for macro or opaque specimens where light
from the sub-stage illuminator can not come through. Only one of
these illuminators can be on at a time (not both), but both will change
their intensity by using the rheostat.
Focus
Be sure the X-axis (in the middle of the Bridge Assembly) control
knob lever is in the "unlock" position, and while looking through the
eyepieces make sure the X-axis control knob is in the middle. Each
microscope works independently and must be focused independently.
Note - In the T-1924C, be sure that the floating stage is centered directly
over the sub-stage illuminator, so light comes through. - The floating
stage can actually cover up the sub-stage illuminator so no light comes
through.
Place a specimen slide on the stage of the microscope, and move the
specimen into place for viewing. First, put the 4x objective in position of
use. Using the coarse adjust knob (larger of two) raise the stage until it
will go no higher. Now looking through the eyepieces, lower the stage
(again using the coarse adjust), bringing the specimen into focus. Use
the fine adjust knob (smaller of two) to now sharpen the focus and attain
maximum resolution. Now rotate the 10x objective into place, and you
should only have to use the fine adjust to achieve a crisp focus (The
microscope is Parfocal). Now the 40x objective can be similarly utilized if
needed.
Note - on the T-1924C you may start with the 2x objective if you choose
to.
With coaxial focusing, both the coarse focus (large knob) and fine
focus (small knob) are on the same axis. Having both sets of knobs on
the same axis makes it easier to switch from one focus knob to the other
without moving eyes away from the eyepieces. Repeat this procedure
with each of the two microscope bases.
5
Now using the X-axis knob set for split screen, one can view the left
microscope specimen on the left, the right microscope specimen on the
right, or roll the knob and see only the left or the right specimens.
Specimen Manipulation
The T-1924C comes with a "floating stage". Place the specimen on
the stage (use stage clips for a microscope slide), and then grasp the
stage between the thumb and forefinger, and move the whole stage,
specimen and all, left-right, forward-backward.
Because of the
lengthened working distance of this microscope, it is not practical to have
a mechanical stage.
Seidentopf Binocular Head
The Cordless Comparison Scope has two eyepieces with a diopter
on one eyepiece to compensate for differential visual acuity between an
individual's eyes. The Seidentopf binocular head allows adjustment for
interpupillary (interocular) adjustment. The eyepieces will move to
exactly match the distance between the user's eyes.
Care and Maintenance
Your microscope is a fine precision instrument and should be treated
with care. When not in use, it should be protected from dust by the plastic
cover provided. Lenses and eyepieces should be cleaned periodically
with optical lens tissue which is soft and lint free. Painted surfaces can be
cleaned with a moistened cloth.
Ken-A-Vision has quality technicians on staff to repair or service your
microscopes. Ken-A-Vision recommends service every two years for
optimal life of the product. Contact Ken-A-Vision at 1.816.353.4787,
Extension 5620 for more details.
Technical Specifications for Model No. T-192X Series
Microscopes
For the technical specifications on the Cordless Comparison Scope
visit the Ken-A-Vision Web site, www.ken-a-vision.com /t1922.asp
6
Equipment Rating:
Connection
Description
of
Input
Output
This is a 2.5 mm barrel style center pin, with a 5.5 volt, 300mA, output
supply which may be used with 110v, 220v, 230v, or 240v input systems.
The power supply /charger is made exclusively for the Ken-A-Vision
Cordless Microscope. Failure to use Ken-A-Vision parts, will void the warranty of your microscope.
7
Batteries
The supplied batteries (3) type is a 1.2V 2000mA NiMH (Nickel Metal
Hydride). Should you need battery replacement visit the Ken-A-Vision
Web site, http://store.kenavision.com/catalog/ or contact your local KenA-Vision Dealer for (Cordless Comprehensive Scope Replacement
batteries). USE OF NON-RECHARGEABLE BATTERIES WILL VOID
ANY WARRANTY.
To replace the batteries, loosen the silver thumbscrew in bottom of
the base. Drop the door down, remove the battery cover and replace the
batteries.
Accessories
If you are interested in purchasing accessories or replacement parts
for your Cordless Comparison Scope visit the Ken-A-Vision Web site,
http://store.kenavision.com/catalog/ or contact your local
Ken-A-Vision Dealer.
TUV
PRODUCT SERVICE
geprufte
sicherhelt
!
Ken-A-Vision reserves the right to make design improvements and other changes in accordance with the
latest technology. There is no obligation to make changes in products already manufactured. Patents
Pending Copyright 2008 Ken-A-Vision Corporation.
5615 Raytown Road • Kansas City, MO 64133 U.S.A.
Tel.: 816-353-4787 • Fax: 816-358-5072
email: [email protected] • www.ken-a-vision.com
INS-SC81922