1
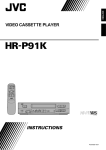
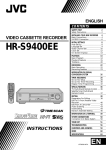
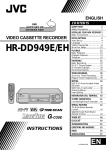
English
VIDEO CASSETTE PLAYER
HR-P82A
IB.E.S.T.
PICTURE
OPERATE
STANDBY
AUDIO
MONITOR
VIDEO CASSETTE
PLAYER
HR-P82A
NTSC
PLAYBACK
ON PAL TV
[L]
HiFi
[R]
NTSC3.58
NTSC4.43
OFF
PAL NTSC
ON
B.E.S.T.
PAL NTSC
INSTRUCTIONS
LPT0002-0G3A
Table of contents
Precautions
Thank you for purchasing this JVC video cassette player. To
ensure optimum performance of this unit, please read this
instruction manual thoroughly.
The rating plate and the safety caution are on the rear of the unit.
Precautions ........................................................................... 2
Controls and terminals .......................................................... 3
Wireless remote control ........................................................ 4
Connections .......................................................................... 5
Setting the video channel ...................................................... 6
The video cassette ................................................................ 6
Playback ................................................................................ 7
Playback features .................................................................. 8
Recording .............................................................................. 9
Editing ................................................................................... 9
B.E.S.T. picture system ....................................................... 10
Troubleshooting .................................................................. 11
Specifications ...................................................................... 11
WARNING: DANGEROUS VOLTAGE INSIDE
WARNING: TO PREVENT FIRE OR SHOCK
HAZARD, DO NOT EXPOSE
THIS UNIT TO RAIN OR
MOISTURE.
The OPERATE button does not completely shut off mains
power from the unit, but switches operating current on and
off.
This unit is produced to comply with Standard IEC Publ. 65.
Features
•
•
•
•
•
•
•
•
•
•
•
•
3 system (PAL/MESECAM/NTSC)
Hi-Fi sound
NTSC playback (on PAL television)
RF output G/K switchable
Digital auto tracking
HQ (High Quality)
B.E.S.T (Biconditional Equalized Signal Tracking) picture
Auto playback function
Repeat playback
Shuttle search
Still and slow motion
Line recording
Automatic features
Auto power on
The video cassette player is automatically turned on when the
tape is inserted.
Auto rewind
The video tape is automatically rewound when the end of the
tape is reached during the play, recording or shuttle search
forward mode.
Auto playback
If the video cassette’s safety tab has been removed, playback
will begin automatically when the tape is inserted into the video
cassette player.
Power off eject
Even when the video cassette player’s power is off, pressing the
eject button will turn the power on and eject the tape. Once
ejected, the power will be turned off again automatically.
Auto head cleaning
When a tape is loaded or ejected the VCP video head is cleaned
automatically.
PAL NTSC
7 Only cassettes marked “VHS” can be used with this video
cassette player.
2
Please follow these precautions. Not doing so may result
in damage to the VCP, remote control, or video cassette.
•
•
•
•
•
•
•
•
•
•
•
•
Avoid extreme heat and direct sunlight.
Avoid extreme cold.
Avoid extreme humidity.
Avoid dust.
Avoid places subject to vibrations.
Avoid strong magnetic fields.
Do not block the VCP’s ventilation openings.
Do not place anything heavy on the VCP or remote
control.
Do not place anything which might spill on top of the
VCP or remote control.
Do not place the VCP on cushions, pillows, or thick
carpeting.
Use the VCP in a stable, horizontal position only.
Place cassettes in cassette cases and store vertically.
Beware of moisture condensation
Moisture in the air will condense on the VCP when you move it
from a cold place to a warm place, or under extremely humid
conditions — just as water droplets form on the surface of a
glass filled with cold liquid. Moisture condensation on the head
drum will cause damage to the tape. In conditions where
condensation may occur, keep the VCP’s power turned on for
a few hours to let the moisture dry.
When transporting
7 Be sure to remove cassette from VCP before packing.
7 Avoid violent shocks to the VCP during packing and transport.
Controls and terminals
Front panel
1
2
3 4 5 6
IB.E.S.T.
PICTURE
OPERATE
STANDBY
AUDIO
MONITOR
NTSC
PLAYBACK
ON PAL TV
VIDEO CASSETTE
PLAYER
HR-P82A
[L]
HiFi
[R]
NTSC3.58
PAL NTSC
NTSC4.43
OFF
ON
B.E.S.T.
#
1
2
3
@
!0
987
OPERATE button
To turn the power on and off (standby mode).
0
Remote sensor window
For remote control operation.
Cassette loading slot
Load the video cassette here.
!
Colour System Output switch
Select to watch an NTSC tape.
B.E.S.T. PICTURE button
To turn the B.E.S.T. (Biconditional Equalized Signal Tracking) function on and off.
@
Mode indicators
OPERATE indicator
• Lights when the power turns on.
• Blinks while a cassette is ejected.
STANDBY / Rewind indicator
• Lights when the power turns off (Standby mode).
• Blinks during rewind mode.
• Blinks slowly during rewind power off mode.
Play / Fast forward indicator
• Lights during playback mode.
• Blinks during fast forward mode.
• Blinks slowly during repeat playback mode.
HiFi L and R/B.E.S.T. ON and OFF indicators
• Lights the selected audio output.
• Lights to indicate the B.E.S.T. function is on or off.
Record indicator
• Lights during recording mode.
• Blinks during recording pause mode.
#
AUDIO MONITOR button
To select the audio output.
4
Rewind 1 button
To rewind the video tape and to start reverse shuttle search
playback mode.
5
Play # button
To start playback.
6
Fast forward ¡ button
To fast forward the video tape and to start forward shuttle
search playback mode.
7
Pause 8 button
To freeze the picture during playback. Also to engage the
recording pause mode.
8
Stop/Eject§button
To stop playback and to eject the video tape.
9
Record ¶ button
To start recording.
Rear panel
1
2 3
10-
40
5
4
IN
OUT
L
32
RF OUT
AUDIO
K
G
R
ANT.
IN
1-
7 6
VIDEO
1
2
3
4
5
6
7
AC power cord
RF channel adjustment screw
RF. OUT terminal
AUDIO/VIDEO IN terminals
AUDIO/VIDEO OUT terminals
ANT. IN terminal
TV system switch
3
Wireless remote control
When using the remote control for operation of the video
cassette player, make sure that it is pointed at the remote
sensor window.
You can also use the player’s remote control to operate a JVC
television.
IB.E.S.T.
PICTURE
OPERATE
STANDBY
AUDIO
MONITR
NTSC
PLAYBACK
ON PAL TV
VIDEO CASSETTE
PLAYER
HR-P82A
[L]
NTSC3.58
[R]
HiFi
PAL NTSC
NTSC4.43
OFF
ON
B.E.S.T.
1
2
3
TV
-
TVCH
+ OPERATE
- VOLUME + TV/VIDEO
9
0
VIDEO
4
5
6
7
8
TV/VIDEO
AUTO
OPERATE
- TRACKING +
(+
-
+(
[
L
J
!
@
#
$
%
REMOTE CONTROL UNIT
Transmitting window
5
Digital AUTO TRACKING button
To cancel the Auto tracking mode.
6
Rewind 1 + button
To rewind the video tape. Also to start reverse shuttle
search playback.
7
Play 3 button
To start playback.
8
Record ¶ button
Press the Record ¶ and Play 3 buttons together, to start
recording.
9
OPERATE (TV) button
To turn the TV power on and off.
0
TV/VIDEO (TV) button
To switch TV between TV and VIDEO (or AV).
!
OPERATE (Player) button
To turn the power on and off (standby mode).
@
TRACKING –/+ buttons
To adjust tracking during playback.
#
Fast forward ¡ Z button
To fast forward the video tape. Also to start forward shuttle
search playback.
$
Pause * button
To freeze the picture during playback. Also to engage the
recording pause mode.
%
Stop & button
To stop playback.
TV channel –/+ buttons
TV VOLUME –/+ buttons
TV/VIDEO (Player) button
Not function
• The maximum operating distance of the remote control is
about 8 m.
Installing batteries
4
1
2
3
4
1
Slide the battery compartment cover upward and
insert two AA, R6, UM-3 or equivalent size batteries,
observing the correct + and – polarities (refer to the
illustration).
2
1
Replace the battery compartment cover.
2
Connections
Make sure that the power to the video cassette player and TV
is off before making the following connections.
Connection A
10-
40
IN
OUT
R
32
RF OUT
AUDIO
K
G
L
ANT.
IN
1-
VIDEO
Connection B
Note:
If you put a TV set directly on this VCP or install it too close to
a TV set, noise may occur. If this noise occurs, separate the
VCP and the TV set.
Connection A (basic)
In order to use the video cassette player it must be connected
between the antenna and the TV.
1
Connect your TV antenna cable to the video cassette
player’s ANT. IN terminal.
2
Connect one end of the provided RF antenna cable to
the video cassette player’s RF. OUT terminal and the
other end to the TV’s antenna terminal.
3
Connect the power cord to your household AC outlet.
Connection B
For connection of a TV that has VIDEO/AUDIO IN/OUT terminals. This connection is necessary to record TV programmes.
Use RCA type pin connection cords (available from audio/video
stores) for connection. This connection is in addition to connection A.
1
Follow steps 1 and 2 of “Connection A”.
2
Connect the TV’s VIDEO OUT and AUDIO OUT terminals to the video cassette player’s VIDEO IN and AUDIO IN terminals.
3
Connect the TV’s VIDEO IN and AUDIO IN terminals to
the VCP’s VIDEO OUT and AUDIO OUT terminals.
4
Connect the power cord to your household AC outlet.
TV system
The TV system switch should be set as follows.
K position: Set to this position for K system areas (Eastern European countries).
G position: Set to this position for G system areas (Western European countries for example).
K
G
Note:
• When connection B is used to connect the TV and video
cassette player, setting the TV system switch is not
necessary.
5
Setting the video channel The video cassette
To watch videos on your TV, it must be set to the same UHF
channel as the video cassette player. This channel is used as
the video channel.
This video cassette player has been preset to UHF channel 36.
Note:
• When you have connected the VIDEO/AUDIO OUT terminals of this video cassette player to your TV’s video/audio in
terminals (connection B of the “Connections” section), setting the video channel is not necessary. In this case simply
set the TV’s TV/VCR switch to VCR.
1
Turn the video cassette player’s power on and load a
pre-recorded video tape.
2
Turn on the TV and set it to UHF channel 36.
Inserting a cassette
IB.E.S.T.
PICTURE
OPERATE
STANDBY
[L]
[R]
AUDIO
MONITOR
NTSC
PLAYBACK
ON PAL TV
VIDEO CASSETTE
PLAYER
HR-P82A
HiFi
NTSC3.58
PAL NTSC
NTSC4.43
OFF
ON
B.E.S.T.
IB.E.S.T.
PICTURE
OPERATE
STANDBY
[L]
[R]
AUDIO
MONITER
If UHF channel 36 is being used for broadcasting in
your area:
Adjust the TV’s channel selector a little at a time until the TV
screen is blank (set it towards a higher or lower channel).
Adjust the RF channel adjustment screw on the rear panel
of the video cassette player a little at a time until the
playback picture appears on the TV screen.
Higher channel
40
32
Lower channel
VIDEO CASSETTE
PLAYER
HR-P82A
NTSC
PLAYBACK
ON PAL TV
HiFi
NTSC3.58
NTSC4.43
OFF
PAL NTSC
ON
B.E.S.T.
7 Insert the cassette as shown and push it gently into the
video cassette player.
The video cassette player will be turned on automatically and
the cassette will be loaded.
7 Press the Stop/Eject § button to eject a cassette.
During playback or recording, press the § button twice
(once to stop the tape and once more to eject it).
Notes:
• If the cassette’s safety tab has been removed, playback will
start automatically when the cassette is inserted.
• A cassette can also be ejected when the power is off.
• The OPERATE indicator blinks while the cassette is ejected.
Special note on Video Cassettes
• If the TV’s channel selector was set to a higher channel
than channel 36, turn the RF channel adjustment screw
to the right and vice versa.
3
Adjust the TV picture with the TV’s tuning controls.
Using the TV while the video cassette player is connected
To watch a normal TV broadcast, select a TV station with
the TV’s channel selector.
6
To prevent accidental recording on a recorded cassette, remove its safety tab. To record on it later, cover the hole with
adhesive tape.
Safety tab
Playback
NTSC, PAL and MESECAM video tapes can be played back on
this video cassette player. Refer to the “Colour system output
mode selection” section for details.
Before proceeding:
• Turn on the power of the TV and video cassette player.
• Make sure that the TV is set to the video channel or that the
TV’s TV/VIDEO switch is set to VIDEO (refer to the “Setting
the video channel” section for details).
2
-
TVCH
+ OPERATE
- VOLUME + TV/VIDEO
To watch an NTSC tape, it will be necessary to select one of the
following output modes.
VIDEO
TV/VIDEO
AUTO
OPERATE
- TRACKING +
IB.E.S.T.
PICTURE
OPERATE
STANDBY
[L]
[R]
AUDIO
MONITOR
NTSC
PLAYBACK
ON PAL TV
HiFi
OFF
ON
B.E.S.T.
(+
-
+(
[
L
J
NTSC3.58
NTSC4.43
• The vertical size of the playback picture will shrink and some
picture “noise” may appear on the screen.
• The playback picture may roll. In this case adjust the picture
with the TV’s vertical hold knob (with some TV’s this adjustment may not be possible).
• The colour of the playback picture may differ from the
original.
• In the forward/reverse shuttle search or still modes there
may be no colour depending on the TV and video cassette
player combination.
Colour system output mode selection
TV
1
NTSC Playback on PAL TV
PAL NTSC
2
REMOTE CONTROL UNIT
Selecting the NTSC PLAYBACK ON PAL TV mode
Select this mode to watch NTSC tapes on a PAL system TV.
NTSC
PLAYBACK
ON PAL TV
NTSC3.58
NTSC4.43
1
Load a pre-recorded cassette.
If the safety tab on the cassette is removed, playback will
start automatically.
2
Press the Play £ button to start playback.
Selecting the NTSC 3.58 mode
Select this mode to watch NTSC tapes on a NTSC system TV.
NTSC
PLAYBACK
ON PAL TV
NTSC3.58
7 Press the Stop/Eject § button or the remote control’s
Stop & button to stop playback.
To fast forward or rewind the tape:
7 From the stop mode, press the Fast forward ¡ or
Rewind 1 button.
NTSC4.43
Selecting the NTSC 4.43 mode
Select this mode to watch NTSC tapes on a multi-system TV
(that has an NTSC 4.43 setting).
NTSC
PLAYBACK
ON PAL TV
NTSC3.58
NTSC4.43
7
Playback features
Slow motion playback
Slow motion playback is 1/6 of the normal playback speed. The
sound will be cut during slow motion playback.
Repeat playback
Use this feature to repeat playback of a cassette 20 times.
During playback:
During playback:
1
Press the Pause 8 button for 2 seconds.
7 Press the Play 3 button to return to the normal playback
speed.
1
Press the Play 3 button for more than 5 seconds.
The Play indicator will blink slowly and playback of the
cassette will repeat 20 times automatically.
the Stop 7 button to stop repeat playback.
2 Press
Tape playback will be stopped and the repeat playback
mode will be cancelled.
Notes:
• If the picture shakes during the slow mode, use the manual
tracking +/– buttons to correct the picture.
• There will be some picture disturbance and loss of colour
during slow motion playback.
Still picture and frame advance
Use this feature to freeze the playback picture and to advance
one frame at a time. The sound will be cut during this mode.
During playback:
1
2
Press the Pause 8 button.
The picture will be frozen.
Press the Pause 8 button repeatedly to advance frames.
Each time the button is pressed the still picture will advance
one frame.
Rewind power off
When the tape has finished rewinding, the VCR will turn itself
off.
During stop:
1 Press the Rewind 1 button.
the OPERATE button within 2 seconds.
2 Press
The STANDBY indicator will blink.
Tracking adjustment
Automatic tracking is adjusted each time a cassette is inserted
in the video cassette player, you may wish to adjust tracking
manually during playback.
Manual tracking
7 Press the Play 3 button to resume normal playback.
Notes:
• If the picture shakes during the still mode, use the manual
tracking +/– buttons to correct the picture.
• After the picture has been frozen for approx. 5 minutes, the
still mode will disengage to protect the video tape.
Shuttle search playback
Use this feature during playback to visually locate any point on
a recorded cassette. The sound will be cut during shuttle search
operation.
During playback:
1
Press the Fast forward ¡ or Rewind 1 button to
engage shuttle search forward or reverse.
7 Press the Play 3 button to resume normal playback.
Press the remote control’s AUTO button.
Press the remote control’s TRACKING + or – button to
adjust tracking.
7 Press the AUTO button to return to automatic tracking.
Notes:
• Tracking may need to be adjusted each time a different video
tape is inserted for playback.
• Tracking will be automatically set to the reference position
when the cassette is ejected.
Soundtrack selection
Your video player is capable of recording three soundtracks
(HIFI L, HIFI R and NORM) simultaneously, and playing back
the selected soundtrack.
During Playback:
the AUDIO MONITOR button to change the
1 Press
soundtrack.
Track (LED indicators)
= L+R
=
for main audio of bilingual tapes
R
for sub audio of bilingual tapes
=
=
No indication (normal)
L + R (blink)
8
Use
for Hi-Fi stereo tapes
L
=
Notes:
• When the video cassette player is in the stop mode, press the
Play 3 button to start playback before engaging the shuttle
search mode.
• For short searches, keep Fast forward or Rewind button
pressed for more than 2 second. When released, normal
playback will continue.
• Disturbances in the shuttle search picture are normal and do
not indicate a problem with the video cassette player.
1
2
for audio-dubbed tapes
mixed normal and L+R audio
Note:
• Normally use the “L+R” position. Then Hi-Fi stereo tapes are
played back in stereo, and tapes with normal audio only are
played back automatically in the normal mode.
Recording
Editing
Use the following procedure to record TV programmes on a
blank video tape.
Editing To/From Another Recorder
Player
Before proceeding:
• To record TV programmes, the video cassette player must
be connected to the TV as shown in connection B of the
“Connections” section.
• Turn on the power of the TV and video cassette player.
• Make sure that the video cassette’s safety tab is intact. If it
has been removed, cover the hole with adhesive tape.
10-
40
IN
OUT
R
32
RF OUT
AUDIO
K
G
L
ANT.
IN
1-
VIDEO
Audio/Video signals
1
2
TV
-
TVCH
+ OPERATE
- VOLUME + TV/VIDEO
VIDEO
TV/VIDEO
IB.E.S.T.
PICTURE
OPERATE
STANDBY
[L]
[R]
AUDIO
MONITOR
NTSC
PLAYBACK
ON PAL TV
HiFi
NTSC3.58
NTSC4.43
OFF
AUTO
OPERATE
- TRACKING +
(+
-
+(
[
L
J
PAL NTSC
ON
B.E.S.T.
2
10-
40
RF OUT
L
ANT.
IN
1
Load a blank video tape.
2
Press the Record ¶ button to start recording. (On the
remote control unit press the Record ¶ and Play 3
button at the same time.)
The recording indicator will light during recording.
7 Press the Stop/Eject § button or the remote control’s
Stop & button to stop recording.
To stop recording temporarily:
7 Press the Pause 8 button.
The recording indicator will blink.
Press the Play 3 button to resume recording.
Notes:
• To engage recording standby, press the Record ¶ button
and then press the Pause 8 button. The recording indicator
will blink during recording standby. Press the Play 3 button
again to start recording.
• If the Record button does not work, check to see if the
cassette safety tab has been removed.
• The player automatically stops when record-standby continues for more than 5 minutes.
• The video tape will be rewound automatically when the end
of the tape is reached.
OUT
AUDIO
K
G
REMOTE CONTROL UNIT
IN
R
32
1-
VIDEO
Recorder
TV
Receiver
VIDEO CHANNEL
the player’s AUDIO and VIDEO OUT connectors
1 Connect
to the recorder’s AUDIO and VIDEO IN connectors.
2 Put the player in the Play mode.
3 Put the recorder in the Record mode.
Notes:
• NTSC tapes being played back in the NTSC PLAYBACK ON
PAL TV mode cannot be dubbed to another recorder.
• When you dub an NTSC tape using your recorder as the
playback deck, select NTSC 3.58 (or 4.43) with the Colour
System Output switch.
Important:
7 To edit, both the player and the recorder must be of the
same colour system. Press your recorder’s Colour system switch to select the appropriate colour system.
9
B.E.S.T. picture system
The B.E.S.T. (Biconditional Equalized Signal Tracking) system
checks the condition of the tape in use during recording and
playback, and compensates to provide the highest-possible
recording and playback pictures. The default setting for both
recording and playback is “ON”.
Recording
1
Insert a cassette with the record safety tab intact.
7 The recorder power comes on automatically.
2
The default setting is “ON”.
7 If this is the case, go to step 3. If not, press B.E.S.T.
PICTURE button to set B.E.S.T. on and B.E.S.T. ON indicator blinks for 2 seconds.
3
Press and hold Record ¶ and Play 3 buttons on the
remote, or press Record ¶ button on the recorder.
7 The recorder spends approximately 7 seconds assessing
the condition of the tape, then begins recording.
Notes:
• The B.E.S.T. system works only after a tape has been
inserted and the Record mode is first initiated. It does not
work during recording.
• Once the cassette is ejected, the B.E.S.T. data is cancelled.
The next time the cassette is used for recording, B.E.S.T is
re-performed.
ATTENTION:
Since the B.E.S.T. system works before recording actually
starts, there is a delay of approximately 7 seconds after
Record ¶ and Play 3 buttons on the remote are pressed, or
Record ¶ button on the recorder is pressed. To make sure
you record the desired scene or programme in its entirely,
first perform the following steps:
1 Press and hold Pause/Still 8 and Record ¶ buttons to
engage the Record Pause mode.
• The recorder then automatically check the condition of
the tape and, after approximately 7 seconds, reenters
Record Pause.
2 Press Play 3 button to start recording.
• If you want to bypass the B.E.S.T. system and begin
recording immediately, press B.E.S.T. PICTURE button to set B.E.S.T. off and the B.E.S.T. OFF indicator
blinks for 2 seconds.
10
Playback
The recorder assesses the quality of the tape once you initiate
playback.
When watching a tape recorded with B.E.S.T. set to on, it is
recommended that you leave B.E.S.T. on during playback as
well.
1
Press Play 3 button to start playback.
7 The recorder adjusts the playback picture quality based on
the quality of the tape in use.
7 B.E.S.T. is active during Auto Tracking.
Notes:
• When watching a rental tape, or one recorded on another
video recorder, set B.E.S.T to on or off to your preference by
pressing B.E.S.T. PICTURE button.
• B.E.S.T. ON indicator only lights at the beginning of automatic tracking. Even though it doesn’t appear after that, the
B.E.S.T. function is operative.
Troubleshooting
Problem
No power
Tape cannot be ejected
No picture
No colour
Shuttle search does not
function
Disturbances in playback
picture
Remote control does not
function
Auto playback does not
function
Recording does not function
The video cassette player
does not function properly
Check point
Is the power cord plugged
in?
Is the power turned on?
Was the video cassette
player’s § button pressed?
Is the TV set to the video
channel?
Is a cassette loaded?
Are the connections correct?
Set the Colour System Output switch according to the
recorded tape system.
When playing a MESECAM
tape, select the NTSC 4.43
mode.
Is the video cassette player
in the playback mode?
Is tracking adjusted properly?
Is the TV adjusted properly?
Install this VCP a little way
apart from the TV set.
The batteries are weak.
Replace the batteries.
The video cassette’s recording safety tab has not been
removed.
Are the connections correct?
Was the Record button
pressed?
The video cassette’s recording safety tab is removed.
Microcomputer malfunction.
Disconnect the power plug
from the AC outlet and then
re-insert it.
The microcomputer will be
reset to its initial mode.
Specifications
Format ................................ VHS Standard
Video recording system ..... Rotary, slant azimuth two-head
helical scan system
Rotary heads ...................... 2 video heads
RF output ........................... System G/K type modulation
UHF ch 32 – 40 adjustable (preset
ch 36)
Recording (line input) ......... PAL, SECAM (MESECAM tape)
NTSC 3.58, NTSC 4.43
Playback (line output) ........ PAL, SECAM (MESECAM tape)
NTSC 3.58
NTSC 4.43
Simulated PAL (NTSC tape)
Video
Line input level ................. 0.5 – 2.0 Vp-p/75 ohms, unbalanced
Line output level ............... 1.0 Vp-p/75 ohms, unbalanced
S/N ratio ........................... More than 45 dB
Horizontal resolution ........ More than 250 lines
(PAL/MESECAM)
More than 220 lines (NTSC)
Audio
Line input level ................. –8 dBm/50 k ohms, unbalanced
Line output level ............... –6 dBm/1 k ohm, unbalanced
Frequency response ........ 100 Hz to 10 000 Hz
Recording/Playback time
CCIR ................................ 240 min. with E-240 cassette
NTSC ............................... 160 min. with T-160 cassette
Tape speed
CCIR ................................ 23.39 mm/sec.
NTSC ............................... 33.35 mm/sec.
FF, REW time .................... Approx. 2 min. 30 sec. with E-180
cassette
Power requirements
Rating .............................. AC 110 – 240 V, 50/60 Hz
Operating ......................... AC 90 – 260 V, 50/60 Hz
Power consumption ........... 14 W
About Head cleaning
7 If the picture playback becomes blurred, it does not mean
that the recorded program has been erased.
7 Dirt accumulated on the video heads after long periods of
use causes such troubles. In this case, head cleaning
requiring highly technical care is necessary.
7 For head cleaning, consult the nearest JVC dealer.
Operation temperature ....... 5°C to 40°C
Dimensions ........................ 400 (W) × 94 (H) × 276 (D) mm
Weight ................................ 3.6 kg
Standard accessories
Remote control unit ............................................................... 1
Batteries for remote control ................................................... 2
RF antenna cable .................................................................. 1
• Design and specifications subject to change without notice.
11