1
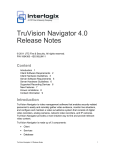
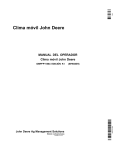
AgLogic™ SSI Adapter INSTALLATION INSTRUCTIONS AgLogic™ SSI Adapter PFP11260 08JUN11 (ENGLISH) John Deere Ag Management Solutions PFP11260 (08JUN11) LITHO IN U.S.A COPYRIGHT © 2011 DEERE & COMPANY Moline, Illinois All rights reserved. A John Deere ILLUSTRUCTION ® Manual PFP112601908JUN11 Overview This document is an installation instruction for the AgLogic™ SSI Adapter which allows data to come across from the Agvance® System from Software Solutions Integrated, LLC (SSI) into the AgLogic™ System. It is to be used by IT personnel and Network Administrators. In general, the steps directly following will configure the SSI Adapter. MM97743,000031B 1913SEP101/1 Database Preparation this user will need the db_ddladim persmission. This additional permission can be removed when the setup is complete. The AgLogic™ SSI Adapter requires MS SQL Server 2000 or greater. The username and password of a “SQL Server Authentication Account” for the database will be needed during installation. If such a user does not yet exist, a new user should be created that has access to the Agvance® database and will need db_datareader and db_datawriter permissions. Additionally when installing the adapter The “SQL Server Authentication Account” should be configured such that its password never expires and never needs to be changed. Servername and database instance (if used) of the Microsoft SQL Server used to store the Agvance® data will be needed during installation. Please have this information readily available. MM97743,000031C 1908SEP101/1 PC13099 —UN—04MAR11 AgLogic™ Web Application Setup Add User Ensure your Organization has been created in the AgLogic™ web application. Please refer to the email with subject line “Your John Deere AgLogic™ Order – Action Required” for further details. A unique username and password (example: SSI_myOrg) created in the AgLogic web application will be needed during the installation. If such a user does not yet exist, please follow these instructions: 2. 3. 4. 5. Click on the “Management” tab Click on the “Users” tab Select “Add User” Fill in the Username, Password, First Name, Last Name 6. Check the “Organization Admin” box 7. Click “Save” 1. Log into the AgLogic™ System at https://aglogic.deere.com Continued on next page PFP11260 (08JUN11) 1 CZ76372,00002A1 1904MAR111/3 060811 PN=3 PC13101 —UN—06DEC10 Edit Organization Detail The Organization’s Back Office will need to be set so that the Agvance/SSI adapter will be available to download. 1. Click on the “Management” tab 2. Click on the “Organization” tab 3. Select “Edit Organization Details” 4. In the Back Office drop down select “Agvance/SSI” 5. Click “Save” PC13100 —UN—04MAR11 CZ76372,00002A1 1904MAR112/3 Download Agvance/SSI Adapter A new link will become available on the Organization tab. This link will be used in the next section. CZ76372,00002A1 1904MAR113/3 PFP11260 (08JUN11) 2 060811 PN=4 Installation 1. Log onto the Server which contains the Agvance® Program Files 2. Create a “SSI_Adapter” folder where a zip file will be placed. This folder will be referred to as <adapterFolder> in this doc from now on to avoid confusion with any SSI installation folders. 3. Download the AgLogic™ SSI Adapter from the link shown in the previous section. 4. Unzip the “AgLogic_SSIAdapter.zip” file into <adapterFolder> which was created in step 2. 5. Once the “AgLogic_SSIAdapter.zip” file has been unzipped, open the <adapterFolder> 6. If you plan to export Shape files from Agvance® into AgLogic™ please follow these additional steps: (If you do not plan to export shape files from Agvance® then please proceed to the Configuration step.) a. Copy Agv2Shp.exe (this file is located in the <adapterFolder>) into the Program Files\AgVance on the same server b. Once the Agv2Shp.exe is in the Program Files\AgVance folder, right click the file and select: create shortcut. Name the shortcut: Agv2Shp.exe and place the shortcut inside of the <adapterFolder> created in step 2. c. Right click the new shortcut for Agv2Shp.exe and select Properties, change the Target: to where the Agv2Shpe.exe was placed, in the Program Files of Agvance®. (Example: “E:\Program Files\AgVance\Agv2Shp.exe”) Also change the Start In: to where the AgVance® Database resides. NOTE: This could be a Mapped drive. (Example: “I:\AvData”) NOTE: The information to setup the shortcut will match the properties of the AgVance® Icon properties. d. Once the Agv2Shp.exe shortcut has been setup, save the changes for the Properties of the shortcut. e. Double Click the New Agv2Shp.exe shortcut (the shortcut will be in the <adapterFolder>) and a “Map Export Type” popup will appear. f. Select the map export type for your AgVance® installation and click "Save". NOTE: If you are unaware of the Map Export Type that the shapefiles are created in, please contact Agvance® for assistance. CZ76372,00002A2 1904MAR111/1 Configuration: Use the AgLogic™ SSI Adapter Wizard to complete the installation and configuration of the adapter. The wizard can be started by clicking on SSIWizard.bat in the <adapterFolder>. Step 1: Welcome • PC12808 —UN—24AUG10 • This document, and any updates made to it, can be found by clicking the “SSI Adapter Installation Document” link. Click Save & Exit at any time to save your changes and exit the installation wizard. Welcome Continued on next page PFP11260 (08JUN11) 3 CZ76372,00002BE 1905APR111/8 060811 PN=5 Step 2: Connecting to AgLogic™ • Enter in the Username/Password created above under “AgLogic™ Web Application Setup” • The Username/Password will be validated against the PC12809 —UN—24AUG10 • AgLogic™ Web Application when the ‘Next’ button is clicked. An error will appear if the validation could not be completed or invalid data has been entered. Both fields are required CZ76372,00002BE 1905APR112/8 Step 3: Connecting to your Database • Enter in the information that connects to your MS SQL Server Database • The Connection URL will automatically update as you enter in your information, but can be modified, if needed. NOTE: Instance is optional and should be supplied only if your MS SQL Server configuration requires it. • The adapter will attempt to connect to your database when the ‘Next’ button is clicked. An error will appear if the adapter was unable to connect. PC12810 —UN—24AUG10 • 1433 is the default value for the Port in MS SQL Server. CZ76372,00002BE 1905APR113/8 Step 4: Integration Options • • • option instructs the adapter to load any additional Work Order comments from Agvance®. Comment Delimiter defaults to a semicolon (;). Process Location is checked by default. This indicates that the adapter should create a Location for a Work Order based on data in Agvance®. If your organization does not use Locations in AgLogic™ this option should be unchecked. Ignore Orders that have Product Inventory relieved is unchecked by default. This option should be checked if work orders that have been delivered on should not appear in AgLogic™. Continued on next page PFP11260 (08JUN11) 4 PC13094 —UN—24JAN11 • Load Additional Comments is checked by default. This CZ76372,00002BE 1905APR114/8 060811 PN=6 Step 5: Fields to Ignore • • integrity. These placeholders are unnecessary in AgLogic™. If you wish to ignore those placeholders you can specify their names here. For example many work orders are created with Field Name “All”. Specify names of any Fields that you would like the adapter to ignore. To remove a field from the Ignored Fields List, highlight the field and click ‘Remove’ These fields are not required PC12812 —UN—24AUG10 • Agvance® may use placeholder fields to ensure data CZ76372,00002BE 1905APR115/8 Step 6: UOM Mappings • Configure the Unit Of Measure Mappings for Dry and Liquid Work Orders • All fields have default values. Change these values to match the UOMs you wish to use in AgLogic™. PC12813 —UN—24AUG10 These fields are not required Continued on next page PFP11260 (08JUN11) 5 CZ76372,00002BE 1905APR116/8 060811 PN=7 Step 7: Field Boundary Processing If you plan to export Shape files from Agvance® into AgLogic™, check "Process Field Boundary Information". • In the Agvance® Version drop down select your current • • version of Agvance®. If version 5.0 is selected, the Data Path entry becomes greyed out, because it is not required. However, if version 4.X is selected, the Data Path is required. Enter or browse to the location of the Agvance® Database. This should be the same path provided in the "Start In" property of the Agv2Shp.exe.lnk. If "Process Field Boundary Information" is checked the “Next” Button will not be available until a valid Data Path has been entered. PC13229 —UN—30MAR11 “Always Upload Boundaries” is checked by default. If the boundary is available, this option will upload boundaries into AgLogic when an work order is changed for the associated field. NOTE: If needed, reference step 6 of the Installation section earlier in this instruction. CZ76372,00002BE 1905APR117/8 Step 8: Complete Installation • • • triggers in the MS SQL Server database needed for integration. To associate SSI information with AgLogic, please check the synchronize box along with Customers, Farms, and Fields. Install Service will create the windows service that runs the adapter. Click Finish, to complete the install process. A popup window will appear, indicating “Install Successful”. PC12815 —UN—24AUG10 • Install Tables and Triggers will create the tables and CZ76372,00002BE 1905APR118/8 Starting the Service To start the aglogicintegrator service: 1. In windows click Start >> Settings >> Control Panel >> Administrative Tools >> Services 2. In the services dialog find aglogicintegrator, rightclick and “Start” the service. 3. The service should already be set to automatic to ensure the service will still run if the machine is restarted. MM97743,0000320 1925AUG101/1 PFP11260 (08JUN11) 6 060811 PN=8 Test b. Click on the Customer/Farm/Field tab To ensure that the installation of the AgLogic SSI Adapter was successful, follow these steps: 1. Create orders in Agvance®. These orders need to be marked as “Custom Apply” in order to be displayed in AgLogic™ 2. Validate on the AgLogic™ Schedule Page that open orders were transferred successfully. c. Search for a Customer, Farm and/or Field d. View results 4. View the “Integration Errors” box to see if any open orders had errors when coming into the AgLogic™ System. b. Click on the Schedule tab The “Integration Errors” box can be found on the AgLogic™ Home page. If the number in this box is “0,” there are no errors. If the number is greater than “0” please proceed through the following steps: c. Verify that the new orders are available on the righthand pane and on the map a. Click on the hyperlinked number in the “Integration Errors” box. a. Log into AgLogic™ 3. Review the Customer/Farm/Field tab in AgLogic™ to ensure that information came in from Agvance®. b. View the report describing the errors and troubleshoot as needed. NOTE: If you need additional information or help please see the Additional Help section a. Log into AgLogic™ MM97743,0000321 1908SEP101/1 FAQ’s Q: If I host multiple locations within my organization on one server, can I limit the work orders that come into the AgLogic™ System? A: Yes, any work order marked as “Custom Apply” from AgVance® will come into the AgLogic™ System. Marking any work order as “Loaded” will not send the work order into the AgLogic™ System. MM97743,0000322 1925AUG101/1 Additional Help For general use questions about the AgLogic™ Mobile and Web applications, a complete help library can be found in the upper right hand corner of any page in the AgLogic™ web application. If you need more help in completing any of the steps, please contact our Customer Contact Center at 888GRNSTAR or [email protected] MM97743,0000323 1925AUG101/1 Upgrade Instructions Upgrades to the AgLogic™ SSI Adapter will be automatic to your system. Notifications that the AgLogic™ SSI Adapter has been updated will display in the “What’s New” on the AgLogic™ System Home screen. MM97743,0000324 1925AUG101/1 PFP11260 (08JUN11) 7 060811 PN=9 PFP11260 (08JUN11) 8 060811 PN=10 PFP11260 (08JUN11) 9 060811 PN=11 PFP11260 (08JUN11) 10 060811 PN=12