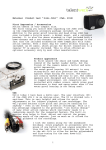
1
Owner’s Manual
������
�
�����
�����
�
�
��
��
�������������
���
�
�����
�
��
��
��
��
��
�
����
��
�
�
�
��
��
�������
2
GB
Content
General remarks
4
1. First use
6
2. How SPECTATOR functions
9
1.1. Introduction
1.2. Safety instructions
1.3. Scope of delivery
1.4. Charging the battery
1.5. Switching on / off
6
6
7
7
8
2.1. Product Function Diagram
2.2. OPERATION
9
10
3. Connect to the PC
20
4. Warranty and Service
24
3.1. Minimum systems requirements
3.2. Driver Windows 98/ME/XP/VISTA, Linux 2.4.x, MacOS 10.2.x
3.3. Log off SPECTATOR under Windows
3.4. SPECTATOR format for hard disks
3.6 Connect to PC
4.1. Warranty conditions
4.2. Contact/Service
4.3. STATEMENT & CAUTIONS
4.4. Technical specifications
3
20
20
20
20
23
24
25
25
26
General remarks
1. Liability
The manufacturer only guarantees suitability for the original purpose of this
product. Furthermore the manufacturer cannot be held responsible for the damage
of data. This also includes the loss of data as well as any consequential damage resulting from the use of this product. The manufacturer reserves the right to further
develop the product continuously. Any such changes can be made without being
directly described in this manual. Thus, information contained in this manual must
not necessarily reflect the state of technical execution. For information on updates
please go to our Internet page under www.jobo.com.
2. Safety instructions
- Work on the product must only be carried out by appropriately qualified staff of
JOBO AG.
- Please, read this manual carefully and observe the appropriate instructions
when installing the device.
- Do not open the product or try to make changes to it. Never insert metallic
objects into the product as this may cause an electric shock, fire, a short circuit
or hazardous emissions. The components cannot be serviced by the user. If the
device does not function properly it must be examined by a qualified staff member of the JOBO Technical Service. In this context please observe the warranty
conditions listed in Chapter 4.
- Never expose the device to rain and keep it away from water and moisture.
Never place liquid-filled containers on the device as its contents might penetrate into the opening of the drive as a result of which the danger of an electric
shock, a short circuit, a fire or an injury would be increased.
3. Instructions for use
- Never expose the device to temperatures outside the range of between 5° C
and 40° C (41 F and 104 F). This could result in damage to the drive or other
electronic components. Do not place the device in the proximity of heat sources
and do not expose it to direct sun light (also not through a window). Excessively cold or damp environments may also cause damage to the drive.
- Always pull the mains cable from the socket when there is the danger of
lightning or when the drive is not being used for an extended period of time
4
GB
-
-
because otherwise the danger of electrical shocks, of fire or of short circuits will
increase.
Do not place the drive next to other electrical devices like television sets, radios or loudspeakers as this may impair the functioning of these other devices.
Do not place the drive next to sources of magnetic interferences like computer
screens, television sets or loudspeakers. Magnetic interferences may impair the
operation and the stability of the drive. Do not place any heavy objects on the
drive and do not exert any excessive force or pressure on the device.
During use or storage keep the device as free of dust as possible. Dust may
accumulate on the inside of the device and thus increase the danger of damage
or dysfunction.
Never clean the surface of the device with solvents, paint thinners, cleaning
agents or any other chemical products. Instead clean the device by wiping it
down with a soft, dry cloth.
In security checks at airports, customs stations etc. the device should be
treated like a laptop and not be put through X-ray machines or other control
systems.
Do not switch on SPECTATOR above an altitude of 3,000 m above sea level. The
hard disk could be damaged by this and as a result data could be lost.
Attention!
If the above instructions for use are not observed the warranty for this device may
lapse.
4. Waste disposal of batteries
Batteries do not belong into household waste. As a consumer you are legally
obliged to return spent batteries to the point of purchase. Under no circumstances
must batteries be disposed of in an open fire, in a trash can, in a recycling
container unsuitable for batteries or in any other way that might constitute an
environmental hazard.
5
1. First use
1.1. Introduction
Many thanks for choosing the JOBO SPECTATOR. The SPECTATOR is the perfect
solution if you want more than just storing your data! With the new SPECTATOR
you can already view your pictures in superb quality while you are still traveling,
no matter where you are – and you can do so without a PC!
On the large 2.5“ high brilliance TFT color LCD you can look at your most beautiful
photos in breathtaking quality and you can even zoom in and out. The high resolution display with 16 million colors makes it possible to view images accurately
no matter where you happen to be. The SPECTATOR supports all the conventional
memory cards and also boasts a USB port as well as a TV OUT connection. The
small memory miracle which is available with a 40, 80 or 120 GB hard disk starts
the data transfer with an automatic „Verify“ process so that you can be certain
that the transfer of you valuable pictures to the device has been successfully completed. The integrated Li-Ion battery makes the SPECTATOR your ideal companion
with which you can store, view and show your photos wherever you are.
For more information on all JOBO premium class storage products please go to
www.jobo.com
1.2. Safety instructions
The hard disk of the SPECTATOR is factory-formatted.
In order to prevent short circuits and electrical discharges you must avoid exposing this product under all circumstances to water, rain or moisture. Please, also
observe the warranty provisions in Chapter 4.
In security checks at airports, customs stations etc. the device should be treated
like a laptop and not made to go through an X-ray machine or other control
systems.
Do not switch on SPECTATOR above an altitude of 3,000 m above sea level. The
hard disk could be damaged by this and as a result data could be lost.
6
GB
1.3. Scope of delivery
The package contains the following parts:
- JOBO SPECTATOR
- integrated battery
- integrated hard disk
- mains adapter
- driver CD including software
- USB cable
- video cable
- manual
1.4. Charging the battery
The device has an integrated Li-Ion battery with 2000 mAh. Please, charge the
battery once completely for 12 hours before the first use by way of the mains
adapter supplied with SPECTATOR. Only use the original mains adapter that comes
with the device for charging. The internal battery will then be charged via the
mains adapter. If the SPECTATOR is connected to a computer the charging is effected via the USB cable as long as the computer is switched on. Since the battery is
a Li-Ion battery the so-called memory effect is eliminated, which means you can
recharge the battery to be on the safe side when it is still half full. The charging
level of the battery is indicated by the battery symbol in the display.
The battery must not be exchanged by anyone other than the manufacturer.
7
1.5. Switching on / off
1.5.1. Switching on SPECTATOR
On the right-hand side there is the „ON / OFF” sliding switch by which to switch
on SPECTATOR. In order to avoid switching on the device by mistake the switch
needs to be held in the “ON” position for 2 seconds to activate the device. Make
sure that the battery is sufficiently charged.
1.5.2. Switching off SPECTATOR
In order to switch off the device you again operate the “ON / OFF” sliding switch
on the right-hand side for about 2 seconds. The display will confirm that the
device has been switched off.
The device has an energy saving function that you can activate in the systems
menu or by way of a timing function. With this function the display is switched
off after a pre-selected time. This measure relieves the internal battery and thus
saves energy. In order to use the device again press the “ON/OFF“ sliding switch.
8
GB
2. How SPECTATOR functions
2.1. Product Function Diagram
In order to familiarize you with SPECTATOR all keys and their functions are explained in the following diagram:
1.
2.
3.
4.
5.
6.
7.
8.
9.
10.
11.
12.
13.
14.
15.
16.
17.
18.
19.
RESET
Power
Hold
TV Out
: Restart the machine
: Pull 3 seconds to turn on or turn off
: Lock the current status (except On/Off button)
: Connect to TV
: USB port
DC-5V
: Input 5V
LED Power : Light on or off for power on or off
LED Battery Charging : Light on while charging battery
LED Battery Full
: Light off when battery is full
LCD
: 2.5TFT LCD Display
: Enter or confirm, view file
: Select Up file, or pan the picture up
: Select Down file, or pan the picture down
: Back to previous menu or file, pan the picture left
: Next menu or file, pan the picture right
+
: Zoom out
: Zoom in
: View slideshow/image, edit or copy file
: Back to the Start Up Menu, Thumbnail Menu or Exit
Battery Status:
When battery is full, battery status will show full green
When battery is low, battery status will show red meaning you need to recharge
the battery in time.
9
2.2. OPERATION
2.2.1. COPYING FILES to Hard Disk
After power on, the start up screen will give you three modes to choose from. The
device is also immediately in standby mode to copy files from memory cards to
internal Hard Disk. If you insert a card then press
the file will be copied to
Hard Disk automatically. The card type is detected as well.
During the copying process the data is automatically verified. Thus you have the
safety to have same data on your memory card and on the hard disk after the
copying process is finished.
After the files are copied you are asked if you want to view the copied files or not.
Press
if you do not wish to view the files, or press
for “yes” to take a look.
10
GB
Important:
Under no circumstances should you remove the memory card during the copying
process. This may lead to the complete freezing of the SPECTATOR which can only
be released by a Reset.
For a copying process involving a large data volume it is recommended to check
the battery capacity by observing the battery symbol on the display. If the capacity is low you should first recharge the battery or connect the mains adaptor to the
device during copying.
If the device cuts out during copying the battery must be recharged and the
copying process repeated.
2.2.2. FILE MODE
The file mode gives you the opportunity to browse through the whole HDD, as
well as the inserted memory cards. In this mode you can copy, paste and delete
files and folders. This gives you the opportunity to move data from the HDD to
the memory card and vice versa as well. In this mode you can see the whole HDD
structure with all files, not just image files.
2.2.2.1 Select FILE mode
On the start up screen, you can use the buttons
or
to select one of the
three modes; FILE, IMAGE or SYSTEM mode. To confirm press the
button. The
selected mode is highlight ed in red.
11
2.2.2.2. Functions of buttons in FILE mode
In the FILE mode the buttons have the following functions:
a.) down to next folder in folder structure
b.) pan after zoom to right side
a.) up to previous folder in folder structure
b.) pan after zoom to left side
a.) Select a file or folder in folder structure
b.) confirm to display an image
c.) confirm “copy, paste or delete”
d.) zoom back to full screen size, when image is displayed
a.) moving up in folder structure
b.) pan after zoom to the top
a.) moving down in folders
b.) pan after zoom to the bottom
activates the menu “copy paste delete”
takes you back to previous menu
+
Zoom in while image is displayed
-
Zoom out while image is displayed
2.2.2.3. COPY – PASTE – DELETE
Being in the FILE menu and pressing the button
activates the menu “copy
paste delete” on the right-hand side of the screen. You can either select a whole
folder or just one file, with this feature you can move the data everywhere you
want – even back to memory card.
First of all you have to choose the location in which you want to activate the
menu “copy paste delete”. To do so you either select the Hard Disk or one of the
memory slots. To confirm just press the
button.
12
GB
The red highlighted button for example “copy” can be confirmed by pressing the
button. After doing so the menu disappears, this is also the confirmation
that the process has worked.
If you choose the “delete” button, there is a security step added. Once you confirmed “delete” with the
button an extra window appears asking if you really
want to delete the file.
13
Press:
to finally delete the file or folder
to go back to previous menu.
2.2.3. IMAGE MODE
The image mode gives you all the possibilities to view your images: You can
preview the images, there is a thumbnail view, slideshow mode, zoom function and
you can use the “TV out” to present your pictures on TV. In the IMAGE mode all
files except images are hidden.
2.2.3.1 Select IMAGE mode
On the start up screen, you can use the buttons
or
to select one of the
three modes; FILE, IMAGE or SYSTEM mode. To confirm press the
button. The
selected mode is highlighted in red.
14
GB
2.2.3.2 Functions of buttons in IMAGE mode
In the IMAGE mode the buttons have the following functions:
a.) next picture
b.) down to next folder in folder structure
c.) pan after zoom to right side
a.) previous picture
b.) up to previous folder in folder structure
c.) pan after zoom to left side
a.) Select a file or folder in folder structure
b.) confirm to display an image
c.) zoom back to full screen size when image is displayed
a.) moving up in folder structure
b.) pan after zoom to the top
a.) moving down in folders
b.) pan after zoom to the bottom
a.) activates “Thumbnail view”
b.) in “Thumbnail view” it activates the “slideshow” mode
a.) takes you back to previous menu
b.) takes you back from “Slideshow” mode to “Thumbnail view”
+
Zoom in while image is displayed
-
Zoom out while image is displayed
2.2.3.3 Preview Image
When in the IMAGE mode select a folder containing images. The images in the
folder are displayed as preview pictures on the right-hand side of the screen. In
addition the size of the picture is shown underneath the image. If you scroll up
or down
the corresponding picture will be shown.
15
2.2.3.4 Thumbnail view / Slideshow mode
When you have selected a folder, press
button for thumbnail view. Then 8
pictures are displayed on the screen. You can move through the whole folder by
using the buttons:
,
,
and
.
To start the slideshow press
button again and the slideshow will start automatically. The pictures change automatically as well.
To get back to the “Thumbnail view” just press again
button.
2.2.4. SYSTEM MODE
The SYSTEM mode allows you to adjust the SPECTAOR perfectly to your requirements,
such as on screen menu language, brightness and contrast of the display etc.
16
GB
2.2.4.1 Select SYSTEM mode
On the start up screen you can use the buttons
or
to select one of the
three modes; FILE, IMAGE or SYSTEM mode. To confirm press the
button. The
selected mode is highlighted in red.
2.2.4.2 Functions of buttons in SYSTEM mode
In the SYSTEM mode the buttons have the following functions:
and
change options
and
selecting functions
takes you back to main menu
2.2.4.3 Settings in the SYSTEM menu
17
You have the following options to adjust:
1.
a.
b.
c.
d.
e.
f.
g.
Language of the on-screen menu
English
German
French
Spanish
Dutch
Swedish
Italian
2.
Brightness
Range from 5 to 55
3.
Contrast
Range from 5 to 55
4.
TV
You can choose between:
S-PAL
C-Pal
C-NTSC
S-NTSC
5.
LCD Off
This is a power saving function you, can choose to turn off the display after 5sec,
15sec, 30sec or never.
6.
Update
You can update the firmware if there is a new release with new functions.
Warnings: If you wish to update the firmware to a new version, please download a
correct updated firmware from JOBO first and store it on a memory card; insert the
memory card in the slot, and press
button to update the system. At the same
time, the screen will turn black but it still works (LED power light on). Please DO
NOT shut off power or pull out the memory card!
When finished, the power indicator light will turn off. Restart the machine. A new
version has been updated.
18
GB
2.2.5. SPECTATOR as external HDD or USB card reader
Connect the SPECTATOR to your computer with the USB cable. Then you can select
that the device will be identified as an HDD or CARD REARDER. Press
button
to confirm your choice.
After confirming your choice the device will power off automatically and the
screen will turn black
Your computer will now automatically recognize the connected device. The hard
disk of the SPECTATOR will now be available to you as a new letter code drive. You
can new copy, move or delete all types of files in the Windows Explorer by `Drag
and Drop`.
2.2.6. Connect SPECTATOR to TV
In order to use the SPECTAOR with a TV you have to connect the yellow plug of the
video cable on one side to the TV OUT on the SPECTATOR, and another side to TV
related ports (red/white/yellow).The screen is now shown on the TV as well.
Make sure that you have selected the right TV format in the system mode (NTSC, PAL).
19
3. Connect to the PC
3.1. Minimum systems requirements
- Microsoft Windows TM 98/ Me/ 2000/ XP, MacOS 10.2 or higher, Linux 2.4.x or
higher
- CD-ROM drive
- Pentium2, 400 MHz
- RAM 32MB (Windows ME, 2000) – 64MB (Windows XP)
- 20MB hard disk memory
- USB interface
3.2. Driver Windows 98/ME/XP/VISTA, Linux 2.4.x,
MacOS 10.2.x
For these operating systems no drivers are required. Please, make sure that you
have installed the most recent Service Packs of the operating systems in question.
3.3. Log off SPECTATOR under Windows
Windows 2000/ME/XP users click on the ‚Remove or eject hardware’ symbol in the
bottom right-hand corner of the systems tray (next to the clock). Now select ‚USB
mass memory’ and click on the ‚End’ button.
Windows 98 users must use the ‚Device Manager’ to log off SPECTATOR. Find the
SPECTATOR in the ‘Device Manager` and click on the name with the right-hand
mouse key. After having selected ‚Remove’ you can disconnect SPECTATOR from
your PC.
3.4. SPECTATOR format for hard disks
The hard disk of SPECTATOR is factory-formatted.
SPECTATOR is a hard-disk based product. In the event of malfunctions the internal
hard disk can be reformatted.
It is imperative that this is done in the FAT32 format.
For Windows XP you need the program „Swissknife“ or „FAT32API.exe“ in order
to do the formatting. You will find the „FAT32API.exe“ program under www.jobo.
com (SPECTATOR formatting program) and „Swissknife“ on the enclosed driver CD.
20
GB
For the formatting on MAC you do not need any additional program. The hard disk
must be formatted in the MS-Dos mode.
3.4.1 Installing Swissknife
Install the „Swissknife“ program on a computer with a Windows operating system
(WIN 2000, ME, XP). The installation is either automatic or after inserting the CD
you can activate the program with > Start / Execute / Jobo / Swissknife / and a
double click on „Swissknife.exe“. All the installation queries can be confirmed. The
computer may have to be re-started after the installation.
3.4.2 Prepare formatting
1. To be on the safe side unplug all connections to external hard disk drives.
2. Connect the SPECTATOR via the USB cable to the computer and switch it on (ON).
3. Open the „Swissknife“ program.
3.4.3 Formatting
The formatting is done in two steps:
1. Delete data
2. Format hard disk (Create)
IMPORTANT: Make sure that during all activities involving the formatting program
that the USB area (Devices) for the SPECTATOR has been selected. You should
under all circumstances avoid going to „Internal“ or „Primary“!
Click on „Delete“
The following queries can all be answered in the affirmative > Yes.
21
All data on the hard disk is now deleted and you can proceed to re-format.
Important settings for the re-formatting process:
The File System must be adjusted to FAT 32 > 2
Under Volume label enter the name SPECTATOR and this drive description will then
also appear in the connection with the computer in the drive structure > 1
Click on Create > 3
This completes the re-formatting of the SPECTATOR. Under Partition the system will
show the available storage space under the drive name (Volume label) SPECTATOR.
The capacity indication in the SPECTATOR will return to the maximum storage
capacity as a result of the re-formatting of the hard disk. .
22
GB
3.6 Connect to PC
If there are any problems in the USB connection to the PC or MAC these can be
removed by connecting a USB HUB between the SPECTATOR and the computer.
23
4. Warranty and Service
4.1. Warranty conditions
This product is subject to the legal warranty periods relating to manufacturing
faults and defects.
Substance of the warranty:
1. In the event of malfunctioning caused by manufacturing defects JOBO AG will
repair or replace the defective product at its own discretion.
2.
JOBO AG and its suppliers do not assume any liability for data losses
occurring during operation of the device or consequential damage resulting
from this. Under no circumstances will JOBO AG assume liability for any direct,
concrete or special damage or consequential damage like for example damage
to or loss of property or devices, loss of profits or sales, costs for spare parts,
expenditure or inconvenience caused by the interruption of service or any other
damage. The user will be exclusively responsible for the loss, damage or destruction of data during the operation of a JOBO product. Under no circumstances
will JOBO AG be liable for the recreation of such data. Under no circumstances
can claims be lodged that exceed the purchase price of the product.
3. The following repairs are not covered by the warranty and must be paid for
separately:
- Malfunctions after the end of the legal warranty periods
- Change of battery after the end of the warranty period
- Change of hard disk after the end of the warranty period
- Malfunctions due to incorrect operation by the user (if device is not used as
described in the manual)
- Malfunctions caused by other devices
- Changes or damage to the device not caused by the manufacturer; especially,
warranty claims will lapse if the device has been opened by anyone other than
by a JOBO AG repair workshop
- Damage caused by natural disasters (acts of God)
- A hard disk change during the warranty period must only be performed by JOBO.
Such a change by any other party will entail the loss of all warranty claims.
24
GB
If you want to make any claims under the warranty you are asked to contact the
Technical Service of JOBO AG. You will be expected to quote the serial number of
the JOBO product and may also have to submit proof of purchase to show that the
warranty period has not yet elapsed.
4.2. Contact/Service
If you have any questions on or need help with our products please do not hesitate to get in touch with our Technical Service. You can reach our service people by
phone under the telephone number indicated below from Monday through Thursday
from 9:00 am to 4:00 pm and on Friday from 9:00 am to 1:00 pm. Independently
of these service times you can also get in touch by e-mail, fax or mail:
JOBO AG
Kölner Straße 58
D-51645 Gummersbach
Tel. 0049 2261 545-72
Fax: 0049 2261 545-42
E-mail: [email protected]
www.jobo.com
4.3. STATEMENT & CAUTIONS
In order to maintain excellent service the contents of the manual may be subject
to change.
Yet, product changes in terms of performance and function will no longer be
announced.
If you find that the methods of use and the settings are not the same as in the
manual please visit our website to check the latest product information.
- Do not use the product under adverse conditions like excessive heat, cold, dust,
humidity, etc.
- Keep it out of the reach of children, avoid it being struck or dropped
- Please do not change the battery by yourself! CAUTION: The battery may explode and hurt people
- When you use the product do not allow it to fall or collide with other object
otherwise the cover, battery or other parts may be damaged.
- Try not to avoid use under too dry condition. Try to block out static.
- Do not shut off power suddenly while you are uploading/downloading, otherwise it will result in driver errors
25
- When you use the hard disk please make sure to operate the file correctly. If you
lose any file because of wrong operation we will not assume any responsibility.
- Regarding your personal data stored in the machine we suggest that you copy it
to your PC in time
- Hard disk partition should be at most 3, because you may not see the files
stored outside the third partition in the machine; yet when connected to the PC
the files will display in the PC
4.4. Technical specifications
Basic Data
Dimensions
Card support
Format
Power
Temperature
Display
USB
Display Type
Active Area (HxW)
Number of Dots (HxW)
Dot Pitch (HxW)
Color Arrangement
Color Numbers
Outline Dimensions (H x W x D)
Weight
Panel surface treatment
Transfer speed
23.7 x 78 x 129 mm
CFI/CFII, SD, MMC, MS, MD
FAT32
Built-in: 3.7 V Li-on battery (2000mAh) /
100V ~ 240V power adapter
Store temperature: -40° ~ 60° /
Operating temperature: 0° ~ 60°
2.5" TFT LCD
USB2.0 HS
Supports USB charge
Transmissible
50.91 x 38.16 mm
214 x 240 (640 RGB x 240) Dots
0.053 x 0.159 mm
RGB Delta
16 million
61.7 x 44.5 x 2.68 (approx.) mm
183 G
Hard Coating (3H)
Card to HD: 0.9MB/s to 1.5MB/s
26
GB
27
JOBO AG • 51645 Gummersbach • Kölner Straße 58 • Tel: 02261 / 545-0 • Fax: 02261 / 545-46 • Mail: [email protected] • www.jobo.com • 07007 (86 554)
28