1
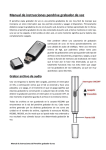
DIGITAL MEDIA PLAYER
USER MANUAL
SMPV-2GBLB
PLEASE READ THIS OPERATING MANUAL COMPLETELY
BEFORE OPERATING THIS UNIT AND RETAIN THIS BOOKLET
FOR FUTURE REFERENCE.
DEAR JENSEN® CUSTOMER
Selecting fine audio equipment such as the unit you've just purchased is only the start of your
musical enjoyment. Now it's time to consider how you can maximize the fun and excitement
your equipment offers. This manufacturer and the Electronic Industries Association's
Consumer Electronics Group want you to get the most out of your equipment by playing it at a
safe level. One that lets the sound come through loud and clear without annoying blaring or
distortion and, most importantly, without affecting your sensitive hearing. Sound can be
deceiving. Over time your hearing "comfort level" adapts to higher volumes of sound. So what
sounds "normal" can actually be loud and harmful to your hearing. Guard against this by
setting your equipment at a safe level BEFORE your hearing adapts.
To establish a safe level:
- Start your volume control at a low setting.
- Slowly increase the sound until you can hear it comfortably and clearly and without distortion.
Once you have established a comfortable sound level:
- Set the dial and leave it there.
Taking a minute to do this now will help to prevent hearing damage or loss in the future. After
all, we want you listening for a lifetime.
We Want You Listening For a Lifetime
Used wisely, your new sound equipment will provide a lifetime of fun and enjoyment. Since
hearing damage from loud noise is often undetectable until it is too late, this manufacturer and
the Electronic Industries Association's Consumer Electronics Group recommend you avoid
prolonged exposure to excessive noise.
Customer's Record:
The serial number of this product is found on the unit. You should note the serial number of
this unit in the space provided as a permanent record of your purchase to aid in identification in
the event of theft of loss.
Model Number: SMPV-2GBLB
Serial Number:
2
WARNING
!
Do not throw the product into fire to avoid danger of explosion.
!
Do not immerse into water or get soaked since the battery charging function will be lost.
!
Place the product far away from heat sources, and protect the product from direct
sunlight.
!
Do not charge the internal rechargeable battery longer than specified to prevent danger of
fire. Overcharging rechargeable batteries may shorten their life span.
!
Do not unplug the unit during file transfer. It may cause malfunction to your PC and the
unit.
!
Do not plug in the earbuds or audio cable during file transfer.
!
Do not use the product where electric appliances are prohibited.
!
Protect the product from violent impact and vibrations.
!
No compensation responsibility for malfunctions caused by improper use.
!
It is prohibited to conduct illegal audio recording.
!
Downloading can be delayed if there are too many folders or files.
!
Do not attempt to disassemble or alter any part of the unit that is not expressly described
in this guide. Internal inspections, alternations and repairs should be conducted by
qualified service personnel.
!
Save the data in the memory of the product to other storage device before repair. No
compensation responsibility if the data are lost during repair.
BATTERY INFORMATION
On first use of the product, we recommend you to fully charge your unit. Connect the unit with
the provided USB cable to the USB port of your personal computer correctly. Once the unit
connects with the PC, it starts charging. It takes about 3 hours to fully charge the battery. The
battery indicator in the top right corner of the LCD screen will appear with all 4 segments lit.
NOTE:
-
To prolong the life of a rechargeable battery, completely discharge it before fully charging it
again.
-
Recharge the unit when below status shows:
-
low battery;
-
unit turns off on its own;
-
operation button not working normally.
3
INTRODUCTION
!
Support MP3, WMA and WAV music formats
!
View JPEG, GIF and BMP picture format
!
Supports AMV video format (AMV video conversion software provided on the CD-Rom)
!
USB mass storage device
!
Voice can be recorded through a microphone and saved as a voice file in WAV or ACT
format
!
FM radio with 20 preset channels
!
7 different EQ modes and different repeat modes
!
Auto power-off function
!
Electronic book function
!
Win2000, Win ME, Win XP and Vista system compatible
!
Built-in Li-ion battery that can be charged via the PC USB port
!
USB 2.0 interface for file transfer
Location of Control
Function Definition
1. PLAY: Power On / Play / Stop / Rec (when POWER ON/OFF is set to “ON”)
2. MODE: Select / Enter
3. POWER ON/OFF: Main Power On/Off Slide Switch
4. NEXT: Next / Fast Forward ( )
5. PRE: Previous / Fast Reverse ( )
4
6. REC: Record/ Repeat A to B replay mode
7. VOL+: Volume up/ Fast volume up
8. VOL-: Volume down/ Fast volume down
9. USB: USB Connector for PC file transfer
Definition of Button Action
Button action includes: Press, Tap and Press & Hold. Unless otherwise specified, “Press”
takes priority of other button actions.
Press: Normal Press (1-2 seconds) the button to invoke the function.
Tap: Quickly press the button to activate the function.
Press & Hold: Press & hold a button to speed up the function of that control, such as volume or
LCD black screen time, Sleep Time adjust and Fast Forward/Reverse.
LCD Display
Please refer to below illustration for the icon in main menu.
Music
Movie
Record
Voice
FM Mode
View
Picture
Sys Set
Ebook
Operation Guide
IMPORTANT: Before first use we recommend you charge this unit a minimum of 3
hours by connecting it to the USB port on your computer.
1.
Power On/Off
- Slide the POWER Switch to the ON position, the unit will turn on automatically.
- Press & Hold the PLAY button to turn off when the unit is on.
- Press & Hold the PLAY button to turn on the unit again.
- Slide the POWER Switch to the OFF position to power off the unit completely.
5
2. Music mode
2.1 Music Mode Interface
2.2 Music Operation
After turning the unit on, select the Music icon from the main menu using the
/
buttons. Press the MODE button to enter.
1) Press the PLAY button to start playing the current track shown.
2) While playing, press the PLAY button to pause and then press again to resume.
3) To adjust the volume level, press the VOL button, and then press VOL+ or VOL- to
adjust the volume up or down. This unit has a built-in speaker that is active when the
earbuds are not plugged in.
4) To skip to the previous or next track, press the
/
/
buttons. Press & Hold the
buttons to search within the song track.
5) While playing, tap the MODE button and then Press & Hold the MODE button again to
return it to the main menu.
2.3 Lyrics display
While a song is playing and if the lyrics file is present, you can view the lyrics by pressing &
holding the MODE button. Press the MODE button again to exit lyrics mode.
Note: This unit supports “XXXX.LRC” lyric files. It will run the lyrics on the display in sync
with the music. Just make sure the lyric file and the song file have the same file name.
For example:
Song file name is: sky.mp3
6
Lyric file name is: sky.lrc
2.4 Music Setting Mode
In the music playing mode, tap the MODE button to enter music setting mode.
2.4.1 Repeat Setting
/
Press the
enter. Press
/
buttons to choose Repeat and then press the MODE button again to
to select the repeat mode you prefer and press the MODE button again
to confirm. The following repeat modes are available: Normal, Repeat One, Folder, Repeat
Folder, Repeat All, Random and Intro.
!
Normal: All songs tracks will play one after the other until all the songs on the list finish
playing;
!
Repeat One: Select one song track to play repeatedly;
!
Folder: Plays all song tracks inside a selected folder once;
!
Repeat Folder: Plays all song tracks inside a selected folder repeatedly;
!
Repeat All: Play all song tracks repeatedly;
!
Random: Play all song tracks in random order;
!
Intro: Play every song track for 10 seconds sequentially before skipping to the next.
2.4.2 Equalizer (EQ) setting
After choosing the Equalizer submenu, press the
/
buttons to
choose the EQ mode. There are 7 EQ modes available: Normal, Rock,
Pop, Classical, Soft, Jazz and DBB. Press the MODE button to confirm.
2.4.3 Tempo rate setting:
After choosing the Tempo rate submenu, press the
/
buttons to set the rate of
playback. There are 17 levels from -8 to +8 in which -8 is the lowest, +8 is the highest and 0
means original speed. Press the MODE button to confirm.
2.4.4 Replay (A to B) setting
Choose the “Replay” submenu, and “A” starts to blink on the
screen. Press the
button to select the start point “A”, then “B” will
start to flash for end point selection. Press the
button to set the
replay end point B. “A-B” stops flashing and now it automatically
starts to replay the passage between markers A and B.
If you want to change the marker points for a new replay
passage, just press
, then “A” starts to flash and then repeat the above steps to complete.
If you want to cancel the replay mode, press the MODE button once and the “A-B” icon
will disappear.
7
2.4.5 Replay time setting
Replay time means the number of times the replay passage will be played. Choose from
/
1 to 10 by pressing the
buttons and then press the MODE button to confirm.
2.4.6 Replay gap setting:
Replay gap is the pause time between successive replays. Choose from 1 to 10 seconds
by pressing the
/
buttons and then press the MODE button to confirm.
2.4.7 Exit
Choose EXIT to return to music mode.
2.5 Music Pause Mode
When the music playback is paused, tap the MODE button to enter
the music folder/file mode. The following options are present.
2.5.1 Local folder
Press the
/
buttons to choose and then press the MODE
/
button to enter. Select the desired local folder using the
buttons
and then press the MODE button to confirm.
2.5.2 Delete file
After choosing the Delete file submenu, press the
/
buttons to
select the file you want to delete and then press the MODE button to
confirm. Press the
/
buttons to select “Yes” or “No”. If you choose
“Yes” and press the MODE button to confirm, the selected file will be
deleted. If you choose “No”, you will exit the delete file mode.
2.5.3 Delete all
After choosing the Delete all submenu, press the
/
buttons to select “Yes”, and
press the MODE button to confirm. If you choose “No”, you will exit the Delete all mode.
2.5.4 Exit
Choose EXIT to return to music pause mode.
Note: No matter where you enter the MUSIC mode, you will always enter in stop mode and at
the same stop point in the song as where you were before exiting.
8
3. Movie Mode
Select the Movie icon from the main menu using the
button to enter. Press the
/
/
buttons. Press the MODE
buttons to choose video you desire and then press PLAY to
watch. If you want to pause, press & hold the PLAY button and then press PLAY again to
resume. If the video is paused, press the MODE button and you will find the following options:
Local folder; Delete file; Delete all; Exit and
Repeat
It is similar to music mode and includes the following repeat modes: Normal, Repeat One,
Folder, Repeat Folder, Repeat All, Random and Intro.
Note: this device can only play videos in amv format. You must convert all other video formats
including wmv, mp4, mov and mpeg etc, into amv before playing. A “Media Player Software
Utilities” CD is included which will install the conversion program automatically onto your PC.
For full details of the conversion procedures, please refer to the attached software quick
instruction guide.
4. Record Mode
After turning the unit on, select the Record icon from the main menu
/
using the
buttons. Press the MODE button to enter record
standby mode. Before starting, we strongly recommend you fully charge
up the battery for stable recording results. This unit allows 99 recording
files to be stored in each directory. You just press the REC button directly
to start the recording process.
When not recording, tap the MODE button to enter the record
setting mode. The following options are present.
Local folder:
Press the
/
buttons to choose and then press the MODE button again to enter. Select
the desired local folder using the
/
buttons and press the MODE button again to
confirm.
Press the PLAY button to confirm the selected folder and the unit will return to Record feature
and starts recording automatically.
Note: The recorded file will always begin with filename “REC001” and go up as you record
more files, REC002, REC003, etc.
REC type:
After choosing the Record type submenu, press the
/
buttons to set the desired
recording format. There are 4 different formats to choose from (see table below). Press the
9
MODE button to confirm.
Fine REC
In WAV format
(good sound quality)
Long REC
In ACT format
(average sound quality)
Fine VOR
In WAV format
(good quality voice-controlled recording :
recording will pause if no sound)
Long VOR
In ACT format (average quality voice-controlled recording :
recording will pause if no sound)
Note on warning messages:
“Over Record” - It means there is no more room for new recording files. Please delete
file(s) not to be kept to free up memory space.
“Catalog is Full” - It means there are already 99 recording files in the current folder. Please
change to another folder.
Exit:
Choose EXIT to return to record standby mode.
After all settings are determined, press the PLAY button once to start recording. You can press
“PLAY” at anytime to stop recording and then press “PLAY” again to resume. Press & hold the
MODE button to stop recording and save the sound file.
5. VOICE mode
Select the Voice icon from the main menu using the
/
buttons. Press the MODE
button to enter.
5.1 Press the PLAY button to start playing the current track.
5.2 While playing, press the PLAY button to pause and press again to resume.
5.3 To adjust the volume level, press the VOL button, and then use the
/
buttons for
volume up/down adjustment. This unit has a built-in speaker that is active when the
earbuds are not plugged in.
5.4 To skip to the previous or next track, use the
/
buttons. Press & hold the
/
buttons to search within the track.
5.5 While playing, tap the PLAY button and then by pressing & holding the MODE button, you
will always return to the main menu.
5.1 Voice playing mode
When the recorded voice starts to play, tap the MODE button to enter the voice setting mode.
The following options are present (similar to the Music Mode).
10
Repeat:
Is similar to music mode and includes the following repeat mode features: Normal, Repeat
One, Folder, Repeat Folder, Repeat All, Random and Intro.
Tempo rate:
Press either
/
to set the rate of playing. There are 17 levels from -8 to +8 in which -8 is
the lowest, +8 is the fastest and 0 means normal speed. Press the MODE button to confirm.
Replay:
Choose Replay by pressing the MODE button. Now “A” starts to blink on the screen. Press the
button to select the start point “A”, then “B” will start to flash for end point selection. Press
the
button to set the replay end point B. “A-B” stops flashing and now it automatically starts
to replay the passage between markers A and B.
If you want to change the marker points for a new replay passage, just press
again, then
“A” starts to flash and repeat above steps to complete.
Exit: exit from the submenu.
Note on warning message:
“Empty Disk!” - It means the player does not have any record files or all record files have
been deleted.
Attention: For WAV file play, this player swill only play WAV format files from this
player. It will not play WAV files copied from a PC.
5.2 Voice standby mode
When voice playback pauses, tap the MODE button to enter voice folder/file mode. The
following options are available (similar to Music Mode).
Local folder; Delete file; Delete all and Exit
6. FM Radio
Select the FM Mode icon from the main menu using the
/
buttons. Press the MODE
button to enter.
6.1 Manual Adjustment
Use the
/
buttons to step up or down the FM band in 100 kHz (0.1MHz) increments.
6.2 Auto station setting
11
6.2.1 Press & hold the
or
buttons to start auto scanning within
the FM frequency band (87-108MHz);
6.2.2 When a strong station is received the tuning will stop and broadcast will be heard;
6.2.3 Press the MODE button and then select SAVE to store this station to the preset as
Channel 1;
6.2.4 You can save up to 20 stations. Retrieve a preset station by pressing the PLAY button.
6.3 Further Options
Press the Mode button and you will access the following options:
6.3.1 Save: Save the present station to a preset channel location, starting from location 01 up
to location 20.
6.3.2 Record: Record the content of present frequency/station, the display will switch to the
RECORD mode but you can still listen to the radio during the record process. The record
procedures remain unchanged, as mentioned in RECORD mode.
6.3.3 Delete
6.3.4 Delete All
6.3.5 Auto Search: It is as same as (5.2)
6.3.6 Normal Band: 87.0 to 108.0MHz (Commonly use in most countries)
6.3.7 Japan Band: 76.0 to 89.0MHz (use in Japan only)
6.3.8 Exit
7. Picture Browsing
Select the “View Picture” icon from the main menu using the
/
buttons.
Press the MODE button to enter. You can browse a
folder that contains pictures you have saved. Select a file and press
PLAY to view the picture. Pictures in JPEG, GIF and BMP format can
be viewed. From within the same folder, press the MODE button once,
and the following options will be available (similar to Music Mode).
Local folder; Delete file; Delete all; Exit and
Play Set:
When viewing a picture, press
to view the next photo, or choose Play Set from this
sub-menu to choose to play a set of pictures in a specific folder automatically or manually. You
need to set the viewing time (1-10s) for each picture if “Auto Play” is chosen.
8. System Setting
Select the “Sys Set” icon from the main menu using the
button to enter.
12
/
buttons. Press the MODE
Use
or
to select the setting option and tap the MODE button to confirm.
Press and hold the MODE button to return to the main menu.
8.1 Date and Time
Tap the VOL button to select the year, month, date, hour, minute or
second and then use
/
buttons to modify the selection.
Finally, press the MODE button to confirm the setting and exit from
the system time menu.
IMPORTANT: The date will revert to 2008-05-01 when you switch
the main POWER On/Off to “OFF”. Be sure to setup the System
Time again before making future live recordings after switching off
the main power.
8.2 LCD Setting
Set a fixed period of time (in seconds) for the screen to turn off if no button operations are
performed. If “0” is selected the backlight will remain on. Press the MODE button to enter
“Black Screen Time” and select the LCD OFF time using the
/
buttons to modify it.
8.3 Language setting
You are able to choose the user interface language in this mode.
After selecting the Language submenu, press the MODE button to enter. Use
or
to
select the desired language from the list and press the MODE button to confirm.
19 different languages are available: Simplified Chinese, English (default), Traditional Chinese,
Japanese, Korean, German, French, Italian, Spanish, Swedish, Czech, Dutch, Portuguese,
Danish, Polish, Russian, Thai, Turkish and Hebrew are available.
13
8.4 Power Saving
There are two options: Off time and Sleep time.
Off time: Is if no operation is performed or buttons are pressed during the chosen period of
time, the system will go into sleep mode automatically. Choose from 0-60 seconds. If “0” is
selected, the unit will remain on and not turn off automatically.
Sleep time: Is after playing for the chosen period of time, the system will automatically go
into sleep mode. Choose from 0-120 minutes. If “0” is selected, the unit will remain on and not
turn off automatically.
Note: Sleep mode is only available once when it has been set. The system will delete the
setting automatically after it has expired. If you want to use this function again, repeat the
steps above to reset the Sleep Time.
8.5 Replay mode
There are two options: Manual replay and Auto replay.
Manual replay:
Auto replay:
When using the A-B repeat function, it cannot be set automatically.
Is used for language learning. The system will pause between the
first sentence and the second sentence automatically.
8.6 Online mode
Multi driver: User can see the Normal section and Encrypted section of the device memory on
your computer.
Normal only: Only the Normal section of the device memory will be shown on your computer.
Encrypted only: only the Encrypted section of the device memory will be shown on your
computer. To understand the difference between normal and encrypted drives please refer to part 4
of “Media Player Software Utilities” quick start guide.
8.7 Memory info
Choose this feature to check the usable memory available in the following format:
Usable memory in MB <percentage of memory used>
8.8 Firmware (FW) version:
Choose this to show the current software version of the unit.
8.9 Exit
9. Electronic Book
Select the “ebook” icon from the main menu using the
/
buttons.
Press the MODE button to enter.
Use the
/
buttons to select the Text file (in .txt format) and tap the
14
PLAY button to confirm.
Use the
/
buttons to choose the page you want to read from the text file.
Pressing PLAY will take you back to the “ebook” folder. Press & hold the MODE button will take
you back to the main menu.
In the same folder, press the MODE button once, and the following options are available
(similar to Music Mode): Local folder; Play Set; Delete file; Delete all and Exit
10. Download/ Upload File
To download music to the player, connect the player to your computer first, then:
10.1 Select the track you want to download to the player by clicking on the icon.
(If you want to choose more than one song, press and hold the Ctrl or Shift button on the
computer keyboard when selecting.)
10.2 Right-click on the files, a menu appears, click “Copy”.
10.3 Connect the player to PC by USB cord and the Removable Disk window appears.
10.4 Choose “Open folder to view files”, then right-click on the Removable Disk window and
click “Paste” in the menu.
10.5 When uploading a file from the player to the PC, just follow the similar procedure (1) to
(4)
10.6 When downloading or uploading files, the LCD screen shows:
Connected Status
Uploading
Downloading
10.7. Unplug the USB cord from PC after the upload or download has finished.
Media Player Software Utilities
The CD included in the package contains the following programs:
IMPORTANT: The Media Player Software Utilities are compatible with Windows Operating
Systems only. Mac operating systems are not compatible.
1. ACT to WAV conversion
You can convert the recorded ACT file to WAV format so it can be played with Windows Media
15
Player or another audio software program or device. The procedures are as follows:
1.1 Connect the player to your PC;
1.2 From your PC, choose the folder “MP3 Player Utilities” and then select “Media Manager”.
1.3 A window appears and a list of audio files inside the player will be displayed.
1.4 Left click on the ACT file you want to convert, right click and choose “Convert to WAV”, the
file will be converted to WAV format automatically.
2. AMV file conversion
This device will play video files saved in AMV format only. Please refer to the instruction guide
on the included CD for installation and working procedures.
3. Audio/Video player on PC
You can play the audio/video files (MP3, WMA, WUV, WAV, ACT and AMV format) via the
audio/video player on your PC. The procedures are as follows:
For audio files
3.1 Install the driver from the CD onto your PC, choose folder “MP3 Player Utilities” and then
select “Media Manager”.
3.2
A window appears and no audio file will be displayed in the list.
3.3 Choose “Add File”, and add audio files to the list. You can also connect
your player to a PC and the audio files from the player will also be
displayed in the list.
3.4 Click to select the audio file that you want to listen to. Click the PLAY
button.
For video files
3.5 Choose “AMV player” from the folder “MP3 Player Utilities”.
3.6 Click the “Add file” icon to choose the video files (in AMV format) you
want to watch.
3.7 Press the “Play” button to play the video file.
4. Drive Encryption
This device has 2 memory drives, one is normal and the other one is encrypted which requires
a password to access. The encryption procedures are as follows:
4.1 Connect the device to a PC via the USB cord.
4.2 Install the driver from the CD onto your PC, choose the “MP3 Player Utilities” and then
“MP3 Player Disk Tool”.
4.3 A window will appear, please choose “Separate and Encrypt”
4.4 Choose the size for the encrypted drive, input the username and password. Press START
to confirm and you will need to restart your PC to activate this setting.
16
4.5 Connect the device to the PC to upload/download files, 2 windows will appear
simultaneously (If Sys Set/Online Mode/Multi Drive is chosen), one is for normal drive and
the other is for the encrypted drive.
4.6 Double click the file “RdiskDecrypt.exe” in the window of Encrypted drive. Input the
username and password, then you can enter the drive and upload/download files as usual.
Troubleshooting
Problems
Unit does not turn on
Possible Solutions
Make sure Power Switch is set to on.
The battery may be exhausted. Please connect the player to
No display when I turn on the
your computer USB port for recharging. Try to restart it 10
unit.
minutes later. It takes about 3 hours to fully recharge an
exhausted battery.
Make sure the volume is not set to zero and check out the
No sound coming from the
connection between earbuds and the unit.
earbuds or speaker
MP3 files may be corrupted. Please download from your
computer again.
System Time always reverts to
Try not to set POWER On/Off switch to “Off”. Set unit to
default setting
sleep mode by pressing PLAY button instead.
Strange Characters Displayed
on the Screen
Check that the correct display language was chosen.
Make sure the USB connection to your computer is good and
Unable to Download Music
the connecting cable is not broken.
Make sure memory space of your player is not full.
Unusual font on the screen
Make sure the correct language is chosen.
17
Specification
Dimensions
2.44” x 1.84” x 0.56”
Weight
51.5g
Power
Built-in Li-ion Rechargeable battery DC 3.7V
Display Screen
2” TFT color display
Connection With Computer
USB 2.0
Memory
Flash Memory 2GB
Playing Time
Music Format
About 7.5 hours using earbuds; 2.5 hours using built-in
speaker
MP1, MP2, MP3, WMA and WAV
Simplified Chinese, Traditional Chinese, English (default),
19 User Interface
Japanese,
Korean,
German, French,
Italian,
Spanish,
Languages
Swedish, Czech, Dutch, Portuguese, Danish, Polish, Russian,
Thai, Turkish and Hebrew
Operation Systems
Supported
1. Windows ME / 2000 / XP/ Vista; included software for
Windows operating systems only.
2. Plug and play for Mac OS9 or above
SERVICE
Please refer to the instructions on the enclosed warranty card for returning your unit for
service.
Distributed by:
Spectra Merchandising International, Inc.
Chicago Industry Tech Park
4230 North Normandy Avenue
Chicago, IL60634, U.S.A.
Please have model number ready, for Customer Service, call 1-800-7777-5331
Printed in China
18