1
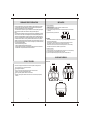
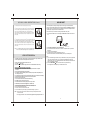
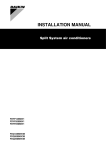
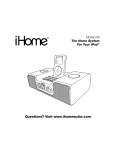
DOCKING SPEAKER STATION FOR iPod ®
OWNER'S MANUAL
JiSS-330
(iPod® Not Included)
PLEASE READ THIS OPERATING MANUAL COMPLETELY BEFORE OPERATING
THIS UNIT AND RETAIN THIS BOOKLET FOR FUTURE REFERENCE
JISS-330 US IB V.02
: 148.5 X 210mm
8 210 x 297mm
32
80gms
bk+bk
2007.05.30
TABLE OF CONTENTS
DEAR JENSEN® CUSTOMER
IMPORTANT SAFETY INSTRUCTIONS
COMPLIANCE WITH FCC REGULATIONS
PRODUCT FEATURES
INSTALLATION
LOCATION OF CONTROLS
iPod ADAPTORS
SYSTEM PLACEMENT
iPod DOCKING
DOCKING 1st AND 2nd GENERATION iPod nanos
VIDEO OUT FROM THE iPod
AUXILIARY INPUT
SUBWOOFER OUTPUT
CARE AND MAINTENANCE
TROUBLESHOOTING GUIDE
SPECIFICATIONS
SERVICE
iPod , iPod mini, iPod nano and iPod shuffle are trademarks of Apple Inc.,
2
3
4
4
5
5-6
7
8
9
10
10
11
12
12
13
14
14
DEAR JENSEN CUSTOMER
Selecting fine audio equipment such as the unit you've just purchased is only the start of your musical
enjoyment. Now it's time to consider how you can maximize the fun and excitement your equipment offers.
This manufacturer and the Electronic Industries Association's Consumer Electronics Group want you to get
the most out of your equipment by playing it at a safe level. One that lets the sound come through loud and
clear without annoying blaring or distortion and, most importantly, without affecting your sensitive hearing.
Sound can be deceiving. Over time your hearing "comfort level" adapts to higher volumes of sound. So what
sounds "normal" can actually be loud and harmful to your hearing. Guard against this by setting your
equipment at a safe level BEFORE your hearing adapts.
To establish a safe level:
Start your volume control at a low setting.
Slowly increase the sound until you can hear it comfortably and clearly, and without distortion.
Once you have established a comfortable sound level:
Set the dial and leave it there.
Taking a minute to do this now will help to prevent hearing damage or loss in the future. After all, we want
you listening for a lifetime.
We Want You Listening For a Lifetime
Used wisely, your new sound equipment will provide a lifetime of fun and enjoyment. Since hearing damage
from loud noise is often undetectable until it is too late, this manufacturer and the Electronic Industries
Association's Consumer Electronics Group recommend you avoid prolonged exposure to excessive noise.
Customer's Record:
The serial number of this product is found on its bottom cover. You should note the serial number of this unit
in the space provided as a permanent record of your purchase to aid in identification in the event of theft of
loss.
Model Number: JiSS-330
Serial Number:
2
IMPORTANT SAFETY INSTRUCTIONS
When used in the directed manner, this unit has been designed and manufactured to ensure your personal safety.
However, improper use can result in potential electrical shock or fire hazards. Please read all safety and operating
instructions carefully before installation and use, and keep these instructions handy for future reference. Take
special note of all warnings listed in these instructions and on the unit.
1.Water and Moisture
The unit should not be used near water. For example: near a bathtub, washbowl, kitchen sink, laundry tub,
swimming pool or in a set basement.
2.Ventilation
The unit should be situated so that its location or position does not interfere with its proper ventilation.
For example, it should not be situated on a bed, sofa, rug or similar surface that may block the ventilation openings.
Also, it should not be placed in a built-in installation, such as a bookcase or cabinet, which may impede the flow
of air through the ventilation openings.
Minimum distances (10cm) around the apparatus for sufficient ventilation; the ventilation should not be impeded
by covering the ventilation openings with items such as newspaper, table-cloths, curtains etc.
3.Heat and Flame
The unit should be situated away from heat sources such as radiators, heat registers, stoves or other appliances
(including amplifiers) that produce heat.
No naked flame sources such as lighted candles should be placed on the apparatus.
4.Power Source
The unit should be connected to a power supply only of the type described in the operating instructions or as
marked on the appliance.
5.Cleaning
The unit should be cleaned only as recommended. See the section "Care and Maintenance" of this manual for
cleaning instructions.
6.Object and Liquid Entry
Care should be taken so that objects do not fall and liquids are not spilled into any openings or vents located on
the product.
7.Attachments
Do not use attachments no recommended by the product manufacturer.
8.Lightning and Power Surge Protection
Unplug the unit from the wall outlet and disconnect the periods of time. This will prevent damage to the product due
to lightning and power-line surges.
9.Overloading
Do not overload wall outlets, extension cords, or integral convenience receptacles as this can result in a risk of fire
of electric shock.
10.Damage Requiring Service
This unit should be serviced by qualified service personnel when:
A.The power supply cord or plug has been damaged.
B.Objects have fallen into or liquid has been spilled into the enclosure.
C.The unit has been exposed to rain.
D.The unit has been dropped or the enclosure damaged.
E.The unit exhibits a marked change in performance or does not operate normally.
11.Periods of Nonuse
If the unit is to be left unused for an extended period of time, such as a month or longer, the AC adaptor should be
unplugged from the unit to prevent damage or corrosion.
12.Environment
Attention should be drawn to the environmental aspects of battery disposal; the use of apparatus in moderate
climates.
13.Servicing
The user should not attempt to service the unit beyond those methods described in the user's operating
instructions. Service methods not covered in the operating instructions should be referred to qualified service
personnel.
3
INSTALLATION
COMPLIANCE WITH FCC REGULATIONS
This device complies with Part 15 of the FCC Rules. Operation is subject to the following two conditions:
(1) This device may not cause harmful interference, and (2) this device must accept any interference
received, including interference that may cause undesired operation.
In accordance with FCC requirements, changes or modifications to this unit not expressly approved by the
party responsible for compliance could void the user's authority to operate the equipment.
NOTE:
This equipment has been tested and found to comply with the limits for a Class B Digital Device, pursuant
to Part 15 of the FCC Rules. These limits are designed to provide reasonable protection against harmful
interference in a residential installation. This equipment generates, uses and can radiate radio frequency
energy and, if not installed and used in accordance with the instructions, may cause harmful interference
to radio communications. However, there is no guarantee that interference will not occur in a particular
installation. If this equipment does cause harmful interference to radio or television reception, which can be
determined by turning the equipment off and on, the user is encouraged to try to correct the interference by
one or more of the following measures:
- Reorient or relocate the receiving antenna.
- Increase the separation between the equipment and receiver.
- Connect the equipment into an outlet on a circuit different from that to which the receiver is connected.
- Consult the dealer or an experienced radio/TV technician for assistance.
Remote Control battery
The battery compartment is located on the bottom of the Remote Control.
(1) Remove the battery compartment door.
(2) Follow the polarity diagram shown inside the compartment and install 2 x "AAA" batteries
(included).
(3) Replace the battery compartment door.
WARNING:
- Be sure that the batteries are installed correctly. Wrong polarity may damage the Remote Control.
- Do not mix old and new batteries.
- Do not mix alkaline, standard (carbon-zinc) or rechargeable (nickel-cadmium) batteries.
- Only batteries of the same or equivalent type as recommend are to be used.
- If the Remote Control is not to be used for an extended period of time, remove the battery.
- Do not dispose of batteries in fire, batteries may explode or leak.
AC Adaptor Connection
The unit is powered by an external AC Adaptor with an output of 15V DC , 1100 mA (included).
(1) Firmly and securely plug the AC Adaptor into AC main outlet.
(2) Insert the AC Adaptor output plug to the power input jack on the back of the unit.
LOCATION OF CONTROLS
PRODUCT FEATURES
JiSS-330 is a Docking Speaker Station for iPod which incorporates the following features :
Main Unit
Top view
4
1
2
Front view
3
5
Player / Re-charger for iPod , iPod mini and iPod nano
Interchangeable iPod Adaptors
Video Line-out provides video signal output when iPod with video is docked
Audio line-in for connecting other digital audio player
Built-in 3 High Fidelity Speakers with surround sound effect.
Subwoofer output signal is available for the connection of an external active(self-powered)
subwoofer.
Rear view
7 8
4
9 10 11 12
5
6
LOCATION OF CONTROLS
1. iPod ® docking bay
2. iPod ® docking connector
3. ON/STANDBY
button ----- To turn the unit on or off.
4. VOLUME + / - button ----- Adjust volume level up or down.
5. Three Speakers
6. Remote Infrared Sensor
7. DC15V IN jack ----- For the connection of external DC power supply.
8. S-VIDEO Jack ----- S-Video signal output
9. RCA VIDEO Jack ----- Composite video signal output
10. Subwoofer Out ----- For the connection of external active(self-powered) Subwoofer.
11. AUX Input Jack ----- For the connection of external audio input source.
12. Audio Input Selector switch ----- Select iPOD or Auxiliary input.
iPod ADAPTORS
Please see below for the iPod Adaptor included in the package:
iPod Adaptor
iPod Models
Docking Cover
Align
1s t G en
iP od nano
here
iPod nano
Align
2nd G en
iP od nano
here
iPod mini
Remote Control
1
3Gen iPod 10/15GB
4Gen iPod 20GB
iPod Photo 20/30GB
2
3
3Gen iPod 30/40GB
4Gen iPod 40GB
4
6
5
iPod Photo 40/60GB
NOT E : No adaptors are provided for iP od with video 30G B , 60G B and 80G B . P leas e us e the adaptors
included with thes e iP ods at time of purchas e. T hey will fit properly into the docking bay of
this s ys tem.
1.
2.
3.
4.
5.
6.
Infra-red Transmitter
ON/STANDBY
button ----- To turn the unit on or off
iPod PLAY / PAUSE
button
/
buttons ----- Skip iPod tracks Forward/Backward or perform high-speed search.
VOLUME + / - button ----- Adjust volume level up or down.
Battery Compartment -----located on bottom of the Remote Control.
6
7
SYSTEM PLACEMENT
iP od DOC K ING
We recommend that you place the JiSS-330 properly on your desk, counter or table.
The unit produces exceptional sound from any listening position in the room.
However, the best quality sound and surround sound effects will be heard with the unit
placed directly in front of you and facing you.
Not Preferred
Preferred
PC
PC
USER
USER
1-6ft
T his model includes adaptors for adopting different iP od models . If the docking bay will not be us ed for
an extended period of time, it is recommended to us e the "Dock C over" ins ert to help protect the docking
connector.
1. S elect a s uitable adaptor for your iP od and ins ert it into the docking bay .
2. Y our iP od can now be docked by placing the connector on the bottom of
the iP od directly over the dock connector located in the docking bay.
S eat the iP od on the dock connector to as s ure a proper connection.
F or docking an iP od nano, s lide the dock connector to the left and als o
s ee note on " DOC K ING 1s t AND 2nd G E NE R AT ION iP od nanos "
s ection of this ins truction manual.
F or other iP od models , s lide the dock connector to the right ( center pos ition)
and ins ert the iP od adaptor for the type of iP od you are us ing.
3. Ins ert your iP od with the connector facing down and pos itioned directly over the dock connector located
in the docking bay. S eat the iP od on the dock connector to as s ure a proper connection.
Not Preferred
Preferred
Ins e rt the iP od
a da ptor into the
doc king bay
PC
PC
1-6ft
USER
USER
Refer to your iPod operation manual to adjust the "EQ" setting on your iPod. This will enhance the
sound and also help adjust the sound to the room you are using it in.
4.
5.
6.
7.
8.
9.
D oc k your iP od
with the c onne c tor
in the doc king ba y
Note: When docking your iP od, pleas e be careful to avoid damaging the 30-pin connectors located on
the iP od and in the docking bay.
S lide the A udio Input S elec tor s witch on the back of the unit to iP od pos ition.
P res s the ON/S T A NDB Y
button to turn On the main unit.
P res s the P L A Y / PA US E
button from the R emote C ontrol to paus e or res ume iP od playback.
Adjus t the s ound level by pres s ing the V OL UME + / - buttons .
Note : T he V olume level c annot be adjus ted us ing the volume c ontrol on your iP od when
doc ked.
T he iP od charges even during playback.
To remove the iP od from the Docking bay, pres s and hold the P L A Y /PA US E button for three s econds
to s witch off the iP od. You can now gently remove it from the docking bay.
iP od playbac k c ontrol from remote c ontrol:
- P res s the P L A Y /PA US E
button to paus e or res ume the iP od playback;
- P res s the iP od S kip/S earch F orward
or B ackward
button to s kip to the next or previous s ong;
- P res s and hold the iP od S kip/S earch F orward
or B ackward
button for fas t-forwarding or
fas t-rewinding during playback.
8
9
st
D O C K IN G 1 A N D 2
nd
G E N E R A T IO N iP o d n a n o s
F irs t ins ta ll the iP od na no bra c ke t into the J iS S -330 B a y.
st
AUXILIARY INPUT
This model provides an auxiliary audio signal input for connecting an external audio device.
You may connect an audio cable with 3.5 mm stereo plug (included) to the AUX IN Jack located on
the back of the unit. Connect the other end of the cable to the Line Out Jack or Headphone Jack of
your MP3 player, CD player and other non-dockable iPods.
You can now listen to your external source through the speakers of this system.
st
1 G e n e r a tio n iP o d n a n o : A lign your 1 ge ne ra tion iP od na no to the
L E F T s ide of the ope ning in the na no bra c ke t (F igure 1 ). Ma ke s ure
the c onne c tor on the bottom of the na no is pos itione d ove r the
c onne c tor in the J iS S -330 doc k prior to s e a ting the na no. C a re fully
s lide the na no down onto the c onne c tor in orde r to ins ure a s e c ure
c onne c tion.
1. Connect an audio cable with 3.5 mm stereo plug to the AUX IN Jack located on the back of the
unit.
Figure 1
nd
nd
2 G e n e r a tio n iP o d n a n o : A lign your 2 ge ne ra tion iP od na no to the
R IG H T s ide of the ope ning in the na no bra c ke t ( F igure 2 ) . Ma ke s ure
the c onne c tor on the bottom of the na no is pos itione d ove r the
c onne c tor in the J iS S -330 doc k prior to s e a ting the na no. C a re fully
s lide the na no down onto the c onne c tor in orde r to ins ure a s e c ure
c onne c tion.
N o te : B e c a re ful not to da ma ge the c onne c tor whe n doc king the na no.
N e ve r us e forc e whe n doc king the na no onto the c onne c tor.
3.5mm
Stereo plug
External Audio Device
Figure 2
VIDEO OUT FROM THE iPod
You are able to view videos and photos stored in your 5th Generation iPod on a larger television screen
or monitor using the built-in Video Output jacks on the back of the unit.
Two video output jacks are available on the back of the unit.
(1) S-VIDEO
S-Video signal.
(2) RCA VIDEO
composite video signal (most common on standard televisions with video in).
2. Slide the Audio Input Selector switch to AUX IN position.
3. Connect the other end of the cable to the Line Out Jack or Headphone Jack of your external
audio device.
4. Turn on the external audio device.
5. The volume level can now be controlled using the main unit.
Operate all other functions on the attached auxiliary device as your normally would.
Note:
(1) If your connected using the Line Out Jack of your external device, then you can only adjust the
volume using the JiSS-330 control. If your connected using the Headphone Jack of your
external device, then you may need to adjust both the volume controls (JiSS-330 and external
device) to get the best volume level.
(2) Press the ON/STANDBY
button to turn off the unit when you finish listening.
Don't forget to switch off the power of your external device as well.
Video Out (For 5th Generation iPods with video ONLY)
1. You can connect this unit to a television or other video display that has S-video or composite
video inputs.
2. Securely dock the iPod with video in the docking bay.
3. Connect the S-video cable (included) into the rear S-video jack or yellow RCA cable (included) to rear
RCA video jack on the unit.
4. Connect the other end of the S-video or yellow RCA cable to VIDEO IN on your television or video display.
5. Slide the Audio Input Selector switch on the back of the unit to iPod position.
6. Select a movie from your iPod menu.
7. iPod: On the main menu choose video then select video setting.
8. iPod: Make sure the TV Out section is set to “ON”.
9. iPod: Switch back to the movie library and play the movie of your choice.
For Photo view (For iPod with color display ONLY - excludes nano)
1. Slide the Audio Input Selection switch on the back of the unit to iPod position.
2. Securely dock the iPod with color display.
3. iPod: At TV Out section, make sure it is set to “ON”
4. iPod: Go to Photo Library and then press play. The slideshow will play on your device.
Note: 1. The RCA Video input connector on a television is usually color coded yellow to match the
color on the AV cable.
2. When playing slideshows or videos, the audio will only playback through the speakers on this unit.
10
11
SUBWOOFER OUTPUT
This unit provides a seperate subwoofer output jack for connecting an external active
(self-powered) subwoofer speaker (not included). This will enhance and expand your sound by
adding an extra deep rich bass channel to the unit. The Subwoofer Output Jack is located on the
back of the unit.
TROUBLESHOOTING GUIDE
Symptom
Possible Problem
Solution
The unit does
not respond (no power)
AC Adaptor is not plugged into a
wall outlet or the output connector
is not plugged into the DC15V IN
jack on the back of the unit.
Plug the AC adaptor into a wall
outlet and plug the output connector
into the DC15V IN jack on the unit.
iPod does not
dock properly
CARE AND MAINTENANCE
iPod does not respond
to the speaker system
- Do not subject the unit to excessive force, shock, dust or extreme temperature.
- Do not tamper the internal components of the unit.
- Clean your unit with a damp (never wet) cloth. Solvent or detergent should never be used.
- Avoid leaving your unit in direct sunlight or in hot, humid or dusty places.
- Keep your unit away from heating appliances and sources of electrical noise such as fluorescent lamps
or motors.
Wall outlet is not functioning.
Plug another device into the same
outlet to confirm the outlet is working.
Using no/wrong iPod Adaptor.
Make sure the dock insert is the
proper fit for your iPod.
iPod does not install properly.
Remove your iPod from the dock
and check for obstruction on the
connectors in the dock and on your
iPod. Then reseat it in the dock.
iPod is not installed properly.
Remove your iPod from the dock
and check for obstruction on the
connectors in the dock and on your
iPod. Then reseat it on the dock.
Your iPod is locked up.
Please make sure that your iPod is
working properly before docking into
the unit. Please refer to your iPod
manual for info on resetting the iPod.
iPod mode is not selected.
Slide the Audio Input Selection
switch at the back of the unit to
iPod position.
iPod is not installed properly.
Remove your iPod from the dock
and check for obstruction on the
connectors in the dock and on your
iPod. Then reseat it in the dock.
iPod is locked up/ frozen.
iPod battery has problem.
Please make sure your iPod is
working properly before docking into
the unit. Please refer to your iPod
manual for details on resetting.
Volume level is set too high.
Decrease the volume.
iPod does not
charge up
Sound is distorted
Unit gets warm after
extended play at
high volume
12
If the iPod original sound source is of
poor quality, distortion and noise are
easily noticed with high-power
speakers. Try a different audio source
such as a music CD.
Sound source is distorted.
This is normal.
If you are using an external sound
source like older generation of iPod,
try reducing the output volume on the
device itself. Also try turning bass
boost OFF or change the EQ setting.
Turn the unit off for a period of time or
lower volume.
13
SPECIFICATIONS
Power Requirement
Main unit
DC input :
DC 15V, 1100 mA
Remote Control
2 x DC1.5V "AAA" (UM-4) Batteries
Frequency Response
100 - 16000Hz
Total Power Output
10W max
SERVICE
Please refer to the instructions on the enclosed warranty card for returning your unit for service. When
returning the unit, please remove batteries to prevent damage to the unit in transit and/or from possible
leakage. We are not responsible for batteries returned with the product or for the cost of replacement.
Distributed by:
SPECTRA Merchandising International, Inc.
Chicago Industry Tech Park
4230 North Normandy Avenue
Chicago, IL 60634, U.S.A.
Please have model number ready, for Customer Service, call 1-800-777-5331.
*The specification and external appearance of the set are subject to change without prior notice.*
Printed in China
14