1
Dishmachine Stand
Installation Instructions
FOR JACKSON MODEL:
M24STD-6
August 7, 2006
P/N 07610-003-26-13 Rev. A
Jackson MSC, INC.
P.O. BOX 1060
HWY. 25E
BARBOURVILLE, KY. 40906
FAX (606) 523-9196
PHONE (606) 523-9795
www.jacksonmsc.com
M24STD-6 INSTALLATION INSTRUCTIONS
Tools Required:
• Standard Allen wrench set
• Tube of food-grade silicon
• Silicon gun
• Rag
Time Requirements:
It is expected that it will take 30 minutes to
install the M24STD-6 dishmachine stand.
Notes:
Ensure that the dishmachine stand is
level prior to placing the dishmachine
on the stand.
• Never attempt to lift a dishwasher on
your own. Always use other personnel
to help or the appropriate lifting devices
to prevent accident and injury.
•
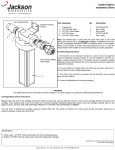
Figure 1—Leg socket showing set screw
•
•
Steps:
• Inspect the assembly to ensure that
there has been no freight damage. If
there is any damage, contact the
freight carrier immediately.
• Your package should contain the following:
• Stand platform weldment
• (4) legs
• Instructions
• If any of these items are missing, immediately contact Jackson Technical
Service at 1-888-800-5672.
• Remove the items from the box.
• Ensure that the set screws are located
within the leg sockets. If they are missing, immediately contact Jackson
Technical Service (See Figure 1).
• Verify that the foot of each leg can be
turned; this is how the stand will be adjusted in order to level it. Please note
that when assembled, there should be
a minimum of 6” (152.4mm) of space
between the bottom of the stand and
the finished floor.
Place the legs fully into the leg sockets
of the platform and tighten down the
set screws to secure them in place.
(See Figure 2).
Once all of the legs are tightly in place,
Figure 2—Tightening the legs
•
flip the dishmachine stand over and set
it down on all four legs. Ensure that the
legs are stable.
If stable, take a small amount of silicon
and apply it to the set screw to cover
any exposed threads and to fill in the
hole for the Allen wrench. (See Figure
3). Note: do not use excessive
amounts of silicon; only enough to
complete the task.
Installation Instructions 07610-003-26-13
Issued: 08-10-2006 Revised: N/A
2
M24STD-6 INSTALLATION INSTRUCTIONS
Figure 3—Applying silicon
• To mount the undercounter dishmachine,
remove the feet from the frame bottom by unscrewing them.
•Set the unit on top of the stand (minus the
feet) on the platform, lining up the holes in the
frame to the corresponding holes in the platform.
•Secure the unit to the platform by reinserting and tightening the feet.
•Verify that the unit is level prior to making
any utility connections. If the unit is not level,
it may operate inefficiently.
After Maintenance Actions:
• Wipe down the stand to remove any
excess silicon.
• Once the dishmachine is fully hooked
up and operational (per the manufacturer’s instructions), operate the machine and observe it to ensure that
there is no excessive vibration or any
other source of concern.
Preventative Maintenance:
• Keep the area under the platform free
of dirt, soil and debris.
• Clean the stand regularly with a wet
towel to prevent the build-up of residue
and soil.
Installation Instructions 07610-003-26-13
Issued: 08-10-2006 Revised: N/A
3