1
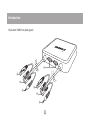
User Manual (GCS634U)
Welcome
Thank you for purchasing one of the most feature-rich keyboard, video, and mouse switches on the
market. IOGEAR®’s 4-Port USB KVM switches are first-rate connectivity accessories designed to
help reduce the frustration of managing multiple computer systems. With the 4-Port USB KVM by
IOGEAR®, you can access up to four USB computers from a single USB console (USB keyboard,
USB mouse and monitor). The 4-Port USB KVM allows you to change ports easily by entering Hot Key
combinations from the keyboard. Setup is fast and easy – simply plug the cables into their appropriate
ports with no drivers needed.
We hope you enjoy using your 4-Port USB KVM, yet another first rate connectivity solution from
IOGEAR®.
©2006 IOGEAR. All Rights Reserved. PKG-M0320
IOGEAR, the IOGEAR logo, MiniView, VSE are trademarks or registered trademarks of IOGEAR, Inc. Microsoft and
Windows are registered trademarks of Microsoft Corporation. IBM is a registered trademark of International Business
Machines, Inc. Macintosh, G3/G4 and iMac are registered trademarks of Apple Computer, Inc. IOGEAR makes no
warranty of any kind with regards to the information presented in this document. All information furnished here is for
informational purposes only and is subject to change without notice. IOGEAR, Inc. assumes no responsibility for any
inaccuracies or errors that may appear in this document.
3
Table of Contents
Package Contents
05
System Requirements
08
Features
07
Introduction
09
Installation
11
Operation
12
Technical Support
20
Specification
19
Limited Warranty
21
4
Package Contents
This package contains:
• 1 4-Port KVM Switch (two cables built-in)
• 2 Detachable custom KVM cables
• 1 User Manual
• 1 Quick Start Guide
• 1 Warranty Registration Card
If any items are damaged or missing, please contact your dealer.
5
Overview
Introducing the four port 4-Port USB KVM switch from IOGEAR® – A simple solution for those with more
PCs than hands. Use one USB keyboard, one monitor and one USB mouse to control up to four USB
computers. This self-powered KVM switch features the unique USB sniffing technology for USB mouse
& keyboard emulation to ensure smooth operation, as well as support for Plug-n-Play monitors and most
wheel mice. Our patented VSE Video Signal Enhancement® technology provides rich, 32-bit color at
resolutions up to 2048 x 1536.
Another big plus of this switch is the capability to provide audio support, it allows you to share your multimedia speakers among the two connected computers. This switch also offers multi-platform support, it is
compatible with Macs and Sun Solaris workstations. IOGEAR® made a huge breakthrough in supporting
Mac and Sun, by allowing Mac and Sun special keys to be functional, either with the Mac or Sun
keyboard as the console keyboard, or with a standard PC keyboard. When using a PC keyboard, a
special set of hot keys are designated to emulate the Mac and Sun special keys.
With all KVM cables included with the unit, all you need to do is to plug in your computers, and you’ve
got a complete KVM solution from IOGEAR®.
6
Features
• Use one USB keyboard, monitor and USB mouse to control up to four USB computers.
• Two 6’ long molded-in cables to simplify setup, with two additional detachable cables to reduce clutter.
• Share your multimedia speakers among the connected computers.
• Full support for Mac and Sun systems.
• Supports special keys on Mac and Sun keyboards.
• Port selection through convenient Hot Keys.
• USB sniffing technology allows complete USB mouse and keyboard emulation for error-free boot-up.
• Plug-n-Play monitor support.
• Support video resolutions up to 2048 x 1536
• No software required.
• Built in AutoScan mode.
• LEDs allow for easy status monitoring.
• 3 Year Limited Warranty.
7
System requirement
Console
• A VGA, SVGA, or Multisync monitor capable of the highest resolution that you will be using on any
computer in the installation
• A USB Keyboard
• A USB Mouse
Computers
The following equipment must be installed on each computer that is to be connected to the system:
• A VGA, SVGA or Multisync card
• A USB type A port
• A multimedia sound card for audio sharing
Speakers
• Only 2-channel, powered speakers are supported
8
Introduction
1)
2)
3)
4)
5)
6)
7)
8)
9)
Port LEDs
USB Keyboard Port
USB Mouse Port
VGA Monitor Port
Stereo Speaker Port
USB Plug (black)
VGA Plug (blue)
Audio Plug (light green)
Custom KVM Plug (dark green)
1
6
9
7
8
9
2
3
4
5
Introduction
10) Custom KVM Ports (dark green)
10
6
7
8
6
7
8
10
Installation
1. Plug your keyboard and mouse into the correct USB ports on the side of the switch. If using a
wireless keyboard and mouse whose receiver has only one USB plug, make sure it is inserted into
the keyboard port and not the mouse port.
2. Plug your monitor into the VGA port on the side of the switch.
3. Plug your powered speakers into the audio jack on the side of the switch.
4. Plug the extra KVM cables into the green ports on the back of the switch using the custom green
connectors. (You may skip both or only one of these cables if only using two or three computers)
5. Plug the VGA, USB, and audio connections on each of the KVM cables into each of your computers.
11
Operation
Switching between computers (Toggle keys)
By default, all of the following commands begin by pressing the [Scroll Lock] key twice. A few PC
keyboards and all Apple keyboards do not have a [Scroll Lock] key. If you have one of these keyboards
you must use the alternate toggle key of [Control] instead. Enter advanced hotkey mode as described
in the next section and press [T]. Then all of the following commands will work by simply pressing the
[Control] key in place of the [Scroll Lock] key.
[Scroll Lock] [Scroll Lock] [Enter] – This will switch everything (KVM and sound) to the next port with
a computer that is powered on. If only one computer is on, this will have no effect.
[Scroll Lock] [Scroll Lock] (number) [Enter] – This will switch everything (KVM and sound) to the
exact port number typed. The number must be between 1 and 4, and you must use the numbers across
the top of the keyboard, not the number pad. This command will work even if the computer on that port
is not powered on.
[Scroll Lock] [Scroll Lock] [K] [Enter] – This will switch the KVM (keyboard, video, and mouse) to the
next port with a computer that is powered on. The sound will not switch, allowing you to remain listening
to the same computer as before.
[Scroll Lock] [Scroll Lock] (number) [K] [Enter] – This will switch the KVM (keyboard, video, and
12
Operation
mouse) to the exact port number typed. The number must be between 1 and 4, and you must use the
numbers across the top of the keyboard, not the number pad. The sound will not switch, allowing you to
remain listening to the same computer as before.
[Scroll Lock] [Scroll Lock] [S] [Enter] – This will switch only the speakers to the next port with a
computer that is powered on. The keyboard, video, and mouse will remain where they were.
[Scroll Lock] [Scroll Lock] (number) [S] [Enter] – This will switch only the speakers to the exact port
number typed. The number must be between 1 and 4, and you must use the numbers across the top of
the keyboard, not the number pad. The keyboard, video, and mouse will remain where they were.
13
Operation
Advanced Hotkeys
You may enter advanced hotkey mode by pressing and holding [Num Lock] on the number pad, then
pressing the [-] key on the number pad and immediately releasing both keys. On Apple keyboards the
[Clear] key on the number pad should be used in place of [Num Lock]. If you have done this correctly
the Caps Lock and Scroll Lock lights on the keyboard should begin flashing. This means you are in
hotkey mode, which will be shortened to just [HKM] below. If you are having trouble entering hotkey
mode press [Esc] and try again.
[HKM] [T] – This will change the toggle key used to switch between computers. Each time you enter
this command the toggle key will switch between the default of [Scroll Lock] and the alternate of
[Control].
[HKM] [H] – This will change the hotkey used to enter hotkey mode. Each time you enter this command
the keys used to enter HKM will switch between the default of [Num Lock]+[-] and the alternate of
[Control]+[F12]. Please note that you must hold [Control] while pressing [F12] in exactly the same way
you must hold [Num Lock] while pressing [-].
[HKM] [A] [Enter] – This will put the switch into Auto Scan mode, disabling the keyboard and mouse
but switching the display every 5 seconds to the next computer. This is a good way to monitor all your
computers without continuously pressing hotkeys. Press [Esc] or [Space] to cancel Auto Scan mode.
14
Operation
[HKM] [A] (number) [Enter] – This will put the switch into Auto Scan mode, disabling the keyboard
and mouse but switching the display every few seconds to the next computer. The number typed in
determines the number of seconds the switch will remain on each port. Press [Esc] or [Space] to cancel
Auto Scan mode.
[HKM] [F2] – This will manually set the operating system of the currently active port to Macintosh. This
will allow the KVM to emulate special keys that are normally only present on an Apple keyboard.
[HKM] [F3] – This will manually set the operating system of the currently active port to Sun. This will
allow the KVM to emulate special keys that are normally only present on a Sun keyboard. On some Sun
computers it is necessary to set up the KVM in this way before the system will properly boot up.
[HKM] [F10] – This will set the operating system of the currently active port to Automatic. The KVM will
auto-detect the type of computer on that port to allow emulation of whatever keys are most appropriate
to that computer. This is the default setting for all ports and is appropriate for PC systems.
[HKM] [F4] – This will type out a list of current KVM settings. Open a word processor before using this
command in order to see how the KVM is configured.
[HKM] [F5] – This will reset the USB ports on the switch, and may clear up any keyboard or mouse
problems.
15
Operation
[HKM] [X] [Enter] – This will disable all toggle key functions. Neither [Scroll Lock] nor [Control] will
allow you to change ports until this command is entered again.
[HKM] [R] [Enter] – This will reset all KVM settings to their defaults.
16
Operation
Using a PC keyboard to emulate a Sun
Keyboard
PC Keyboard
After you set up the appropriate Keyboard Platform,
you will be able to use a PC (101/104) key keyboard
to emulate the functions of the Sun keyboard when
the Control key [Ctrl] is used in conjunction with
other keys. The corresponding functions are shown
in the table to the right.
NOTE: When using [Ctrl] combinations, press and release
the [Ctrl] key, then press and release the activation key.
Sun Keyboard
[Ctrl] [T]
Stop
[Ctrl] [F2]
Again
[Ctrl] [F3]
Props
[Ctrl] [F4]
Undo
[Ctrl] [F5]
Front
[Ctrl] [F6]
Copy
[Ctrl] [F7]
Open
[Ctrl] [F8]
Paste
[Ctrl] [F9]
Find
[Ctrl] [F10]
Cut
[Ctrl] [1]
[Ctrl] [2]
[Ctrl] [3]
[Ctrl] [4]
[Ctrl] [H]
Help
Compose
Meta
17
Operation
Using a PC keyboard to emulate a Mac Keyboard
After you set up the appropriate Keyboard Platform,
you will be able to use a PC (101/104) key keyboard
to emulate the functions of the Mac keyboard. The
corresponding functions are shown in the table to
the right.
NOTE: When using key combinations, press and release the
first key [Ctrl] or [Alt]), then press and release the activation
key.
18
PC Keyboard
Mac Keyboard
[Shift]
Shift
[Ctrl]
Ctrl
[Win]
[Ctrl] [4]
[Alt]
L Alt/Option
[Prt_Sc]
F13
[Scroll Lock]
F14
[Desktop Menu]
=
[Enter]
Return
[Back Space]
Delete
[Ins]
Help
[Ctrl] [Win]
F15
[Ctrl] [1]
Mult
[Ctrl] [2]
V_DN
[Ctrl] [3]
V_UP
Specification
Function
CPU Ports
Specification
4
Port Selection
Hotkeys
CPU
USB
Connectors
VGA
4 x Type-A (M)
Speaker
Console
Keyboard
Connectors
Mouse
VGA
Speaker
LEDs
4 x HDB-15 (M)
4 x Audio Jack (M)
1 x Type-A (F)
1 x Type-A (F)
1 x HDB-15 (F)
1 x Audio Jack (F)
4 x Green
Keyboard / Mouse Emulation
USB (PC, Mac, Sun)
Scan Interval
5 Seconds
Resolution
2048 x 1536, DDC2B
Power Mode
Bus powered
Operating Temperature
0o C - 50o C
Storage Temperature
-20o C - 60o C
Humidity
0 - 80% RH Noncondensing
Housing
Plastic
Weight
800g
Dimensions (L x W x H)
109.1 x 97.23 x 25.45 mm
19
Technical Support
If you need technical support, please check out our IOGEAR Tech Info Library (T.I.L.) at
www.iogear.com/support for the latest tips, tricks, and troubleshooting. The IOGEAR T.I.L. was designed
to provide you with the latest technical information about our products. Most of the answers to your
questions can be found here, so please try it out before contacting technical support.
Technical support is available Monday through Friday from 8:00 am to 5:00 pm PST and can be reached
at 866-9-IOGEAR or 866-946-4327
20
Limited Warranty
IN NO EVENT SHALL THE DIRECT VENDOR’S LIABILITY FOR DIRECT, INDIRECT, SPECIAL, INCIDENTAL OR CONSEQUENTIAL DAMAGES RESULTING FROM THE USE OF THE PRODUCT, DISK
OR ITS DOCUMENTATION EXCEED THE PRICE PAID FOR THE PRODUCT.
The direct vendor makes no warranty or representation, expressed, implied, or statutory with respect to
the contents or use of this documentation, and especially disclaims its quality, performance, merchantability, or fitness for any particular purpose.
The direct vendor also reserves the right to revise or update the device or documentation without obligation to notify any individual or entity of such revisions, or updates. For further inquires please contact
your direct vendor.
21
Contact Info.
Hubble
•
Irvine, CA 92618
•
(P) 949.453.8782
•
(F) 949.453.8785
•
www.iogear.com