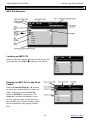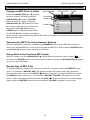
1
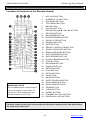
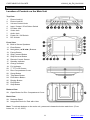
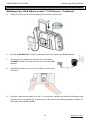
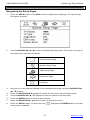
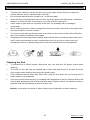
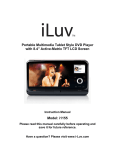
Portable Multimedia Tablet Style DVD Player with 7” Active-Matrix TFT LCD Screen i1055 INSTRUCTION MANUAL Please read this manual carefully before operating and save it for future reference. Have a question? Please visit www.i-Luv.com PORTABLE DVD PLAYER V10M10_IM_EN_09182006 1 www.i-Luv.com PORTABLE DVD PLAYER V10M10_IM_EN_09182006 USER SAFETY GUIDE IMPORTANT SAFETY PRECAUTIONS The lightning flash with an arrowhead symbol within an equilateral triangle is intended to alert the user of the presence of un-insulated “dangerous voltage” within the unit’s cabinet that may be of sufficient magnitude to constitute a risk of electric shock. The exclamation point within an equilateral triangle is intended to alert the user of the presence of important operating, maintenance and servicing instruction in the manual accompanying the unit. WARNING: To prevent fire or shock hazard, do not expose this appliance to rain or moisture. CLEANING Always disconnect unit from power supply before attempting to clean it. Use soft cloth moistened with soapy water, and wipe gently. Do not use solvents or abrasive materials. LASER SAFETY This unit uses laser technology. Only a qualified professional should remove the cover or attempt to service this device, due to possible eye injury. CAUTION – CLASS 1 LASER PRODUCT Use of controls adjustments and/or performance of procedure other than specified herein may result in hazardous radiation exposure. DANGER Invisible laser radiation when open and interlock failed or defeated. Avoid direct exposure to beam. CAUTION: HAZAROUS LASER RADIATION WHEN OPEN AND INTERLOCK DEFEATED. 2 www.i-Luv.com PORTABLE DVD PLAYER V10M10_IM_EN_09182006 USER SAFETY GUIDE IMPORTANT SAFETY PRECAUTIONS You can help to protect the environment! Please remember to respect the local regulations: Bring all non-working electrical equipment to an appropriate waste disposal center. FOR RECHARGEABLE BATTERY Attention: NI-MH must be recycled and disposed of properly. IMPORTANT SAFETY WARNINGS 1. FCC regulations state that any change or modification to the equipment, not expressly approved by maker or its authorized parties, could void user’s authority to operate this equipment. 2. To prevent fire or electric shock, do not expose the unit to water, rain, or moisture. 3. Never attempt to open the cabinet. Dangerous high voltages are present in the unit. Always refer servicing to a qualified technician. 4. Before using the player please ensure that your local AC voltage is suitable for this unit. IMPORTANT SAFETY INSTRUCTIONS 1. READ INSTRUCTIONS - All the safety and operating instructions should be read before the appliance is operated. 2. RETAIN INSTRUCTIONS - The safety and operating instructions should be retained in a secure place for future reference. 3. HEED WARNINGS - All warnings on the appliance and in the operating instructions should be adhered to. 4. FOLLOW INSTRUCTIONS - All operating and use instructions should be followed. 5. WATER AND MOISTURE - The appliance should not be used near water. For example: near a bathtub, kitchen sink, laundry tub, and/or swimming pool. 6. VENTILATION - The appliance should be situated so that its location and position does not interfere with its proper ventilation. For example, the appliance should not be situated on a bed, sofa, rug or similar surface that may block the ventilation openings; or, be placed in a built-in installation, such as a bookcase or cabinet that may impede the flow of air through the ventilation openings. 7. HEAT - The appliance should be situated away from heat sources such as radiators, heat 8. POWER SOURCES - The appliance should be connected to a power supply only of the 9. POWER CORD PROTECTION - Power supply cords should be routed so that they are not registers, stoves, or other appliances (including amplifiers) that produce heat. type described in the operating instructions or as marked on the appliance. likely to be walked on or obstructed by items placed on or against them. Pay particular attention to cords at plugs, convenience receptacles, and the point at which they connect to the appliance. 3 www.i-Luv.com PORTABLE DVD PLAYER V10M10_IM_EN_09182006 USER SAFETY GUIDE IMPORTANT SAFETY INSTRUCTIONS – CONTINUED 10. CLEANING - The appliance should be cleaned with a dry cloth. 11. NONUSE PERIODS - The power cord of the appliance should be unplugged from the outlet when the appliance is to be left unused for an extended period of time. 12. OBJECT and LIQUID ENTRY - Care should be taken so that objects do not fall and liquids are not spilled into the device’s openings. 13. CARTS AND STANDS - The appliance should be used only with a cart or stand that is recommended by the manufacturer. An appliance and cart combination should be moved with care. Quick stops, excessive force, and uneven surfaces may cause the appliance and cart combination to overturn 14. DAMAGE REQUIRING SERVICE - The appliance should be serviced by qualified service professional when: a. The power-supply cord or plug has been damaged. b. Objects have fallen into, or liquid has been spilled into the appliance’s apertures. c. The appliance has been exposed to rain. d. The appliance has been dropped and suffered damage. e. The appliance does not appear to operate normally, or exhibits a change in performance. 15. SERVICING - The user should not attempt to service the appliance beyond what is described in the user's operating instructions. All other servicing should be referred to qualified service professional. 16. BATTERY USAGE – To prevent battery leakage, which may result in bodily injury, property damage or damage to the unit, follow these instructions: a. Install all batteries correctly according to the polarity (+ -) as marked on the unit. b. Do not mix old and new batteries, carbon and alkaline, etc. c. Remove batteries from the unit when the device will not be used for an extended period of time. 17. LEAD AND MERCURY - This product may contain lead and/or mercury. Disposal of these materials may be regulated by your local authorities due to environmental considerations. For more detailed disposal or recycling information, please contact your local authorities or the EIA (Electronic Industries Alliance) – http://www.eiae.org FCC RULE This device complies with Part 15 of the FCC Rules. Operation is subject to the condition that this device does not cause harmful interference. Note: Changes or modifications not expressly approved by the party responsible for compliance could void the user’s authority to operate the equipment. 4 www.i-Luv.com PORTABLE DVD PLAYER V10M10_IM_EN_09182006 TABLE OF CONTENTS GETTING STARTED Compatibility. …..………..…………………………………………………………………… 7 General features ………………………………………………………………………………9 Location of controls on the remote control …………………………………………………10 Location of controls on the main unit ……………………………………………………… 11 How to make your player stand …………………………………………………………… 12 First time to use the remote control …………………………………………………………12 Remote control battery installation ………………………………………………………… 12 Using the AC adapter ……………………………………………………………………… 12 Charging your DVD player ………………………………………………………………… 13 Battery low indication …………………………………………………………………………13 Using the cigarette lighter adapter ………………………………………………………… 13 Installing the dock adapter for your iPod ………………………………………………… 13 Charging your iPod ………………………………………………………………………… 13 Connecting headphones …………………………………………………………………… 14 Connecting the DVD player to a TV set by AV cable …………………………………… 14 Connecting the DVD player to a TV set by S-Video cable …………………………….. 14 Connecting other media to the DVD player ……………………………………………… 14 BASIC OPERATION Watching your iPod videos on the 7” LCD screen ……………………………………… 15 Playing a DVD / VCD / Audio CD / MP3 Disc………………………………………………17 MP3 file browser ……………………………………………………………………………. 18 Loading an MP3 CD ………………………………………………………………………… 18 Playing an MP3 file in the root folder ……………………………………………………… 18 Playing an MP3 File in a folder …………………………………………………………… 19 Selecting the MP3 file using numeric buttons …………………………………………… 19 Going back to the previous folder ………………………………………………………… 19 Repeat play of MP3 files …………………………………………………………………… 19 Playing a JPEG CD ………………………………………………………………………… 20 OPERATIONAL FEATURES Panel key lock ………………………………………………………………………………. 21 Invalid icon …………………………………………………………………………………… 21 LCD screen on / off function ………………………………………………………………. 21 DVD menu feature ……………………………………………………………………………21 Subtitle feature ……………………………………………………………………………… 21 Audio menu feature ………………………………………………………………………… 21 Audio mode ……………………………………………………………………………………21 Mute function ………………………………………………………………………………… 21 3D sound ………………………………………………………………………………………22 5 www.i-Luv.com PORTABLE DVD PLAYER V10M10_IM_EN_09182006 TABLE OF CONTENTS OPERATIONAL FEATURES – CONTINUED Zoom function …………………………………………………………………………………22 PBC function ………………………………………………………………………………… 22 Random function …………………………………………………………………………… 22 Skip and search function …………………………………………………………………… 22 Title / chapter search function ……………………………………………………………… 23 Title / time search function ………………………………………………………………… 23 Repeat function ……………………………………………………………………………… 23 A-B repeat function …………………………………………………………………………. 24 Viewing from a different camera angle (multi-angle) …………………………………… 24 Programmed playback ……………………………………………………………………… 24 Display feature ……………………………………………………………………………… 25 Bookmark feature …………………………………………………………………………… 25 Digest function ……………………………………………………………………………… 26 SETTING UP YOUR DVD PLAYER Navigating the setup pages ………………………………………………………………… 27 General setup pages …………………………………………………………………………28 Speaker setup pages………………………………………………………………………… 28 Video Setup Page……………………………………………….…………………………… 29 Preference Setup Page…………………………………………………………………….…29 CARE AND MAINTENANCE GUIDE Cleaning the unit ………………………………………………………………………………30 TROUBLESHOOTING GUIDE Q & A about the product………………………………………………………………………31 TECHNICAL INFORMATION Specifications………………………………………………………………………………… 33 6 www.i-Luv.com PORTABLE DVD PLAYER V10M10_IM_EN_09182006 GETTING STARTED COMPATIBILITY AUDIO AND 1. Disc Size: 12cm / 8cm 2. Disc Type: DVD VIDEO AUDIO AND VIDEO AUDIO CD MP3 CD iPod® DIGITAL MEDIA PLAYER a. Single side, single layer b. Single side, double layer c. PAL / NTSC 1. Disc Size: 12cm / 8cm 2. Disc Type: SVCD / VCD 3. Playback time 74 min./ 24 min. max 1. Disc Size: 12cm / 8cm 2. Disc Type: CD 1. Disc Size: 12cd / 8cm 2. Disc Type: CD 3. File Format: MP3 (MPEG 1 Audio Layer 3) 4. Bit Rate: 32Kbps ~ 320Kbps 1. Made for iPod with video (30GB, 60GB) only. 2. iPod is a trademark of Apple Computer, Inc. DISC ERROR This compact disc player has built-in error compensation circuits to correct for minor defects in a disc. There are limits, however, to the amount of correction available. In some cases, the DVD player may skip some tracks, or parts of tracks, on a disc during disc play. This problem may be caused by defects (such as scratches) in the disc being played, which are too large for the error compensation circuits to handle. If you encounter this problem, try a new disc before having this unit serviced. If the DVD player operates normally, the skipping problem is probably due to a defective disc. Note: Only the above types of discs can be played on this unit. Some CD-R, CD-RW discs cannot be played depending on the condition of the disc. 7 www.i-Luv.com PORTABLE DVD PLAYER V10M10_IM_EN_09182006 GETTING STARTED MP3 (MPEG 1 Audio Layer 3) MP3, technically referred to as MPEG 1 Audio Layer 3, is one of the popular digital audio encoding and lossy compression formats. This encoding format was developed to reduce the amount of data (or audio information) required to represent audio, yet to still reproduce audio as same as the original uncompressed audio for most listeners. This product incorporates copyright protection technology that is protected by method claims of certain U.S. patents and other intellectual property rights owned by Macrovision Corporation and other rights owners. Use of this copyright protection technology must be authorized by Macrovision Corporation, and is intended for home and other limited viewing uses, only unless otherwise authorized by the Macrovision Corporation. Reverse engineering or disassembly is prohibited. Apparatus claims of US Patent Nos. 4,631.603; 4,819.098; 5,315.448 and 6,516.132; licensed for limited viewing uses only. 8 www.i-Luv.com PORTABLE DVD PLAYER V10M10_IM_EN_09182006 GETTING STARTED Thank you for purchasing i1055. Unpack the unit and make sure all the accessories are put aside so they will not be lost. We recommend that you retain the original carton and packaging materials for future use, should you transport or ship the unit in the future. 7” Portable Multimedia Tablet Style DVD Player for Your iPod with video Features for Your iPod • Play back video content from your iPod through the 7” widescreen (16:9 aspect ratio) TFT LCD • Charge your iPod with video* • Integrated dock for your iPod with video (30GB, 60GB) Features for DVD Player • Play back DVD video through the 7” widescreen (16:9 aspect ratio) TFT LCD • Watch your favorite video on TV through S-Video output • Enhanced user interface with detailed controls • Convenient OSD (On-Screen Display) • Multiple subtitle, angle, and audio functions • Slow or fast motion playback and zoom operation • Supports 3-way power sources • o AC Power Adapter o Cigarette Lighter Adapter o Built-in Ni-MH Rechargeable Battery Playable Media: DVD / VCD / Audio CD / MP3 CD In the Box • Main unit • Remote control (battery included) • Cigarette lighter adapter • AC adapter • AV cable • Strap for car-seat display • Instruction manual • Warranty card * The included power adapters must be connected to the main unit in order to charge your iPod. 9 www.i-Luv.com PORTABLE DVD PLAYER V10M10_IM_EN_09182006 GETTING STARTED Location of Controls on the Remote Control 1. KEY LOCK BUTTON 2. NUMBER 0 TO 9 BUTTON 3. DVD MENU BUTTON 4. TITLE MENU BUTTON 5. PBC BUTTON 6. DISPLAY BUTTON 7. NAVIGATION (W / X / S / T) BUTTON 8. RETURN BUTTON 9. BOOKMARK BUTTON 10. SLOW REVERSE BUTTON 11. PAUSE / STEP BUTTON 12. RANDOM BUTTON 13. MUTE BUTTON 14. REPEAT / REPEAT A-B BUTTON 15. SEARCH FORWARD BUTTON 16. SEARCH REVERSE BUTTON 17. SKIP FORWARD BUTTON 18. SKIP REVERSE BUTTON 19. SLOW FORWARD BUTTON 20. STOP BUTTON 21. PROGRAM BUTTON 22. SEARCH BUTTON 23. ENTER BUTTON 24. PLAY BUTTON 25. SETUP BUTTON 26. 3D BUTTON 27. ANGLE BUTTON 28. SUBTITLE MENU BUTTON 29. AUDIO MENU BUTTON IMPORTANT NOTE 30. AUDIO MODE BUTTON The included remote control doesn’t 31. ZOOM BUTTON have any control on your iPod. To 32. CLEAR BUTTON control your iPod, please use the 33. DIGEST BUTTON control buttons on your iPod. 34. STANDBY ON / OFF BUTTON 35. SCREEN ON / OFF BUTTON Point the remote control unit no more than 6m from the remote sensor and within about 30° of the front of the unit. 10 www.i-Luv.com PORTABLE DVD PLAYER V10M10_IM_EN_09182006 GETTING STARTED Location of Controls on the Main Unit Top View 1. Phone Jack #1 2. Phone Jack #2 3. Volume Control Knob 4. Input / Output / iPod Select Switch 5. S-Video Jack 6. Video Jack 7. Audio Jack 8. Power On / Off Switch 9. DC IN Jack Front View 10. Built-in Stereo Speakers 11. Enter Button 12. Navigation (▲/▼/◄/►) Buttons 13. Pause Button 14. Skip Forward Button 15. Skip Reverse Button 16. Remote Control Sensor 17. Standby Indicator 18. Charge Indicator 19. Full Indicator 20. 7” TFT LCD Screen 21. Disc Compartment Cover 22. Setup Button 23. Title Menu Button 24. DVD Menu Button 25. Display Button 26. Play Button 27. Stop Button Bottom View 28. Open Button for Disc Compartment Cover Back View 29. Desktop Stand 30. Integrated Dock for iPod with video Note: To activate buttons on the main unit, press and release the button each time. (From button no. 11-15, 22-27) 11 www.i-Luv.com PORTABLE DVD PLAYER V10M10_IM_EN_09182006 GETTING STARTED How to Make Your Player Stand Follow the illustrations below to make your player stand. Pull out the STAND at the back of the unit gently. Then, carefully stand the unit. First time to Use the Remote Control The battery is pre-installed in the remote control with the insulation plate. Before starting to operate the remote control, please pull out the insulation plate from the battery compartment. Remote Control Battery Installation If the remote control does not work or the signal gets weaker, the battery might weaken. In that case, please replace the battery. 1. Pull out the battery holder as shown right. 2. Place one battery (CR 2025) as shown right. Make sure that the polarity (+/–) of battery matches the marks inside the unit. 3. Insert the battery holder into its compartment as shown right. Note: Do not attempt to recharge, short-circuit, disassemble, heat or throw the batteries into a fire. Using the AC Adapter 1. Insert the DC plug at the end of the adapter cord into the DC IN jack at the top side of the player. 2. Plug the other end into an AC wall outlet. Note: Only use with the supplied AC adapter. Using with another AC adapter could cause damage. Remove both the DC plug and AC plug to disconnect the AC adapter when not necessary. 12 www.i-Luv.com PORTABLE DVD PLAYER V10M10_IM_EN_09182006 GETTING STARTED Charging Your DVD Player Before using this unit with the built-in Ni-MH rechargeable battery, please FULLY CHARGE THE BATTERY first. If this is not done, the discharging time will be short. The battery will be operated normally with maximum capacity after 4~5 times of charging and discharging. After a period of storage, or non-usage for an extended period of time, please fully charge the battery again before using it. The battery is fully charged for approximately 4-5 hours after the AC adapter is connected. 1. Connect to the AC adapter according to the instructions in the section “Using the AC Adapter”. 2. Switch the unit OFF to recharge the battery. The battery recharge circuit operates in the OFF mode. While the battery is charging, the CHARGE indicator at the front will light up RED. When charging is complete, the FULL indicator will light up GREEN. 3. Disconnect the AC adapter plugs from both the player and the AC outlet, when charging is complete or not necessary. Battery Low Indication When using the rechargeable battery to play and the battery is nearly exhausted, the STANDBY indicator in the front of the player will begin blinking. After some time, the power will turn OFF automatically. Refer to the instructions in the section “Charging the Battery” to recharge the battery. Using the Cigarette Lighter Adapter Plug the small end of the cigarette lighter adapter into the DC IN jack and then plug the other end into the cigarette lighter socket. Installing the Dock Adapter for Your iPod Open the dock cover on the back of the main unit and install the correct dock adapter for your iPod. The “30GB” dock adapter is for iPod with video (30GB), and the “60GB” dock adapter is for iPod with video (60GB). Charging Your iPod The player cannot supply the power to charge the iPod without the AC adapter connected. 1. Insert your iPod into the dock carefully and close the dock cover. 2. Connect the supplied AC adapter to the unit. It will automatically charge your iPod. 3. Disconnect the AC adapter when not necessary. Note: Only use with the supplied AC adapter. Using another AC adapter can damage this unit or the iPod. 13 www.i-Luv.com PORTABLE DVD PLAYER V10M10_IM_EN_09182006 GETTING STARTED Connecting Headphones Use 3.5mm stereo headphones with this product. Note: Please note that hearing experts advise not to use headphones with high volume for long periods of time. It may damage your hearing to do so. Connecting the DVD Players to a TV Set by AV Cable Use the AV cable (3.5mm to RCA) to connect the DVD player to the TV set and amplifier. The yellow-colored plug is used for Video. The white-colored plug is for Audio L and the red-colored plug for Audio R. Connecting the DVD Player to a TV Set by S-Video Cable (S-Video Cable NOT Included) Use the S-Video cable (3.5mm to DIN) to connect the DVD player and TV set. Connecting Other Media to the DVD Player Use the AV cable (3.5mm to RCA) to connect from other media to the DVD player. The yellow-colored plug is used for Video. The white-colored plug is for Audio L and the redcolored plug for Audio R. Note: Slide the LINE SELECT switch to the IN position to receive the AV signal from other external devices. To receive an AV signal from iPod with video, please slide the LINE SELECT switch to the iPod position. 14 www.i-Luv.com PORTABLE DVD PLAYER V10M10_IM_EN_09182006 BASIC OPERATION Watching Your iPod Videos on the 7” LCD Screen To see your favorite iPod videos on the 7” LCD screen, follow the instructions below: 1. On the menu screen of your iPod, select the “Videos” option. 2. On the next menu screen, select the “Video Settings” option. 3. On the next menu screen, select the “TV Out” option and set it on. 4. Open the dock cover on the back of the main unit and install the correct dock adapter for your iPod if you haven’t installed the dock adapter yet. 15 www.i-Luv.com PORTABLE DVD PLAYER V10M10_IM_EN_09182006 BASIC OPERATION Watching Your iPod Videos on the 7” LCD Screen – Continued 5. Insert your iPod into the dock carefully and close the dock cover. r s r 6. 7. Set the “LINE SELECT” switch on the top of the main unit to the “iPod” position. Connect the AC adapter to the main unit and set the “POWER” switch on the top of the main unit to the “ON” position. 8. Navigate the menu screen of your iPod to your favorite video file. 9. Play the video file and watch it on the 7” LCD screen. Please note that the DVD player and remote control don’t have any control on your iPod due to the limited navigation system of iPod with video (30GB, 60GB). 16 www.i-Luv.com PORTABLE DVD PLAYER V10M10_IM_EN_09182006 BASIC OPERATION Playing DVD / VCD / Audio CD / MP3 CD 1. To power the unit on, slide the POWER switch at the top of the unit to the ON position. a. To select the type of the power source, please refer to the portion of the manual entitled as “GETTING STARTED”. b. To see a movie on the LCD screen of i1055, the LINE SELECT switch must be in the OUT position. 2. Press the OPEN button to open up the disc compartment cover. The OPEN indication will appear on the LCD screen. 3. Place the disc with the label side facing up into the disc compartment. Hold the disc without touching either of its surfaces while placing it in to the disc compartment. 4. Push the cover down to close and secure. The disc will start playback automatically. a. If playing a DVD disc, the MENU options will appear on the LCD screen, depending on a DVD disc. Use the NAVIGATION (W / X / S / T) buttons to select the PLAY option. Press the ENTER button to play the disc. b. If playing a VCD disc or Audio CD, it will automatically play the video or audio track. If not automatically played, press the PLAY (X) button to start playing. c. For a MP3 disc, the disc reading time may exceed a little bit longer, due to the large number of songs compiled onto one disc. Select the song and press the ENTER or PLAY (X) button to play. 5. 6. Adjust the VOLUME CONTROL knob to set the volume to a comfortable sound level. Press the STOP () button once while playing a DVD disc and the indication “Press PLAY Key to Continue” will appear on the screen. The player then memorizes the point where you stopped. When you press the PLAY (X) button again, it will start playing the movie automatically from the point where it was stopped. 7. Press the STOP () button twice while playing a movie to completely stop the playback. Note: When i1055 is in the PLAY mode and the STANDBY indicator is blinking, it signifies the battery is nearly exhausted and must be recharged. Refer to the “Charging the Battery” section to recharge the battery. 17 www.i-Luv.com PORTABLE DVD PLAYER V10M10_IM_EN_09182006 BASIC OPERATION MP3 File Browser Loading an MP3 CD After the MP3 file browser appears on the screen, the root folder and the STOP “” indication will appear. Playing an MP3 File in the Root Folder Press the NAVIGATION (S / T) buttons to select your desired MP3 file in the root folder, and then press the PLAY (X) button or ENTER to start playing. The PLAY “X” indication will appear on the screen, and the player will continuously play all MP3 files in the root folder. It will stop automatically after playing all MP3 files. 18 www.i-Luv.com PORTABLE DVD PLAYER V10M10_IM_EN_09182006 BASIC OPERATION Playing an MP3 File in a folder Press the NAVIGATION (S / T) buttons to select a folder, and then press the NAVIGATION (X) button or ENTER button to enter the folder. Press the NAVIGATION (S / T) buttons to select your desired MP3 file in the folder, and then press the PLAY (X) button or ENTER button to start playing the MP3 file. The PLAY “X” indication will appear on the screen. It will continuously play all MP3 files in the folder and will stop automatically after playing all MP3 files. Selecting the MP3 File Using Numeric Buttons During the playback, press the corresponding NUMERIC buttons to the MP3 file number to select your desired MP3 file. It will jump to the selected MP3 file. Then press the ENTER button or the PLAY (X) button to play the selected MP3 file. Going Back to the Previous MP3 Folder When in a folder, use the NAVIGATION (S / T) buttons to select the folder symbol ( ) and press the ENTER button to go to the previous folder, or press the NAVIGATION (W) button to go to the previous folder. Repeat Play of MP3 Files To repeat a MP3 file, simply select and play a MP3 file. And then, press the REPEAT button once. The indication “REPEAT ONE” will appear on the LCD screen, and it will repeat the selected file continuously until the STOP () button is pressed. To repeat all MP3 files, press the REPEAT button once more. The indication “REPEAT FOLDER” will appear on the LCD screen, and it will repeat all MP3 files until the STOP () button is pressed. To exit the repeat mode, press the REPEAT button until the indication “FOLDER” appears on the screen. 19 www.i-Luv.com PORTABLE DVD PLAYER V10M10_IM_EN_09182006 BASIC OPERATION Playing a JPEG CD Please note that graphic files must be stored in the “JPEG” format (file extension .jpg). Otherwise, they will not be recognized. When you have inserted a CD with JPEG files, you will see a screen showing the folders and files contained on the CD. 1. Use the NAVIGATION (S / T) buttons to select the desired folder, and press the ENTER button to see the files inside the folder. 2. Use the NAVIGATION (S / T) buttons to select the desired file. The selected picture will be shown as a thumbnail picture on the right frame. Press the ENTER button to display the picture. It will also start the slide show of the pictures automatically until all the pictures in the CD have been shown on the screen once. 3. Press the PAUSE (||) button to hold the current picture on the screen. To continue the slide show, press the PLAY (X) button again. 4. Use the SKIP (|WW / XX|) buttons to move to the previous or next picture. 5. Press the STOP () button to stop the slide show and return to the menu folder. 6. If you press the REPEAT button once, the current displayed picture will constantly be shown on the screen. Press the REPEAT button once more to have all pictures in the current folder repeated. Press the REPEAT button again to cancel the repeat mode. Note: When you’ve selected the “REPEAT ONE” mode in the slide show, the selected picture will be displayed constantly. In this case, you cannot skip to the next or previous picture using the SKIP (|WW / XX|) buttons. To skip to the next or previous picture, please disable the “REPEAT ONE” mode. 20 www.i-Luv.com PORTABLE DVD PLAYER V10M10_IM_EN_09182006 OPERATIONAL FEATURES Panel Key Lock Press the KEY LOCK button on the remote control, and the indication “Key Lock On” will appear on the screen. At that point, the function buttons on the main unit are disabled. To make all the buttons function again, press the KEY LOCK button once more. Invalid Icon The invalid icon “ ” will appear on the LCD screen if the corresponding function cannot be performed either on the inserted disc or in the selected mode. Please note that some functions depend on the disc type and the media on the disc. LCD Screen On / Off Function When playing an audio CD, MP3 CD or other audio media disc, you can press the SCREEN ON/OFF button to turn off the LCD screen temporarily. This will save more power when using the built-in rechargeable battery for playing. Title Menu Feature Press the TITLE button. The title menu of the disc will appear on the screen. Use the NAVIGATION (W / X / S / T) buttons to select the desired option, and then press the ENTER button to confirm. Some discs may not support this feature. DVD Menu Feature Press the DVD MENU button to go to the main menu of the disc. Use the NAVIGATION (W / X / S / T) buttons to select the desired option on the main menu, and then press the ENTER button to confirm. Some discs may not support this feature. Subtitle Feature Press the SUBTITLE button to select a subtitle language. To turn off the subtitle, press the SUBTITLE button repeatedly. Some discs may not support this feature. Audio Menu Feature The AUDIO MENU button will allow you to change the audio language from the one selected at the initial settings to a different language when this function is available on DVD discs. Audio Mode Press the AUDIO MODE button to cycle through the audio modes while playing an audio CD or VCD. The audio modes vary depending on the disc inserted, but include MONO LEFT, MONO RIGHT, MIX MONO, STEREO, etc. The indication “DISC NOT SUPPORT” will appear on the screen if a disc does not support this feature. Mute Function Press the MUTE button once to mute the sound. The indication “MUTE” will appear on the LCD screen. Press the MUTE button again to restore the sound. 21 www.i-Luv.com PORTABLE DVD PLAYER V10M10_IM_EN_09182006 OPERATIONAL FEATURES 3D Sound During the playback of a disc, press the 3D button repeatedly to change the sound mode as follows: SURROUND ROCK Ö SURROUND POP Ö SURROUND LIVE Ö SURROUND DANCE Ö SURROUND TECHNO Ö SURROUND CLASSIC Ö SURROUND SOFT Ö SURROUND OFF Ö SURROUND ROCK Zoom Function This player can magnify a picture. Press the ZOOM button to zoom in or out the screen in the normal, slow or still play mode. It zooms in a picture by x2, x3, and x4. Use the NAVIGATION (W / X / S / T) buttons to select the desired part of the zoomed picture. PBC Function When playing a VCD with PBC function, you can enjoy the simple interaction feature of VCD. By turning on this function, desired tracks can be selected by pressing the NUMERIC buttons. This feature is enabled only when a VCD2.0 disc supports the PBC feature. After selecting a track, press the ENTER button to start playing the selected track. Press the PBC button to activate and deactivate the PBC feature. Random Function 1. Press the RANDOM button once. The indication “RANDOM” will appear on the LCD screen. 2. Press the PLAY (X) button. The unit will play all the tracks in the random order. After all tracks have been randomly played, the unit will automatically stop playing and enter into the STOP mode. 3. To cancel the random function, press the RANDOM button a second time. The indication “OFF” will appear on the LCD screen. Skip and Search Functions 1. SKIP REVERSE (|WW) and SKIP FORWARD (XX|) buttons: Use these buttons to go to the previous or next chapter on a DVD (or track on a CD). 2. SLOW FORWARD and SLOW REVERSE buttons: Use these buttons to play a movie in the forward (or reverse) slow motion at 1/2, 1/4, 1/8, and 1/16 of a normal speed without the sound. This player does not support the slow-motion feature for Audio CD and MP3 CD. It also doesn’t support the backward slow-motion feature for VCD. The invalid icon “ ” will appear on the LCD screen if you press the SLOW REVERSE button while playing a VCD disc. 3. PAUSE / STEP (||) button: Use this button to pause the playback. 4. SEARCH REVERSE (WW) and SEARCH FORWARD (XX) buttons: These buttons allow searching chapters or tracks forward or backward with the speed of up to 16 times faster than the normal speed. Each press of the search buttons will change the speed as follows: x2 Ö x4 Ö x8 Ö x16. Press the PLAY (X) button to resume the normal playback. 22 www.i-Luv.com PORTABLE DVD PLAYER V10M10_IM_EN_09182006 OPERATIONAL FEATURES Title / Chapter Search Function Use this feature to directly go to a specific title and/or chapter. 1. While in the PLAY mode, press the SEARCH button once. 2. Use the NAVIGATION buttons (W / X) to select TITLE. 3. Use the NUMERIC buttons to input the desired title number. 4. Use the NAVIGATION buttons (W / X) to select CHAPTER. 5. Use the NUMERIC buttons to input the desired chapter number. Title / Time Search Function Use this feature to directly go to a specific title and/or time. 1. While in the PLAY mode, press the SEARCH button twice. 2. Press the NAVIGATION buttons (W / X) to select TITLE. 3. Use the NUMERIC buttons to select the desired title number. 4. Press the NAVIGATION buttons (W / X) to select TIME. 5. Use the NUMERIC buttons to select the desired time. Note: If the search function is attempted during the playback, you can only go to a specific chapter or time. You cannot change the title number. If you enter a time that exceeds the time limit of DVD, the indication INPUT INVALID will appear on the LCD screen. When playing a VCD, the numeric buttons can only be used to select the desired track or time in the search mode. Repeat Function 1. DVD Disc a. While in the PLAY mode, press the REPEAT button once, and the indication “ CHAPTER” will appear briefly on the LCD screen. Then, the current playing chapter will repeat continuously. b. While in the PLAY mode, press the REPEAT button again, and the indication “ TITLE” will appear briefly on the LCD screen. Then, the current playing title will repeat continuously. c. 2. Press the REPEAT button once more to cancel the REPEAT function. Audio CD / VCD Disc a. To repeat a track, simply select the track as described in the “Skip and Search” section, and then press the REPEAT button once. The indication “ TRACK” will appear on the LCD screen. The selected track will then repeat continuously until the STOP () button is pressed. b. To repeat all tracks on an Audio CD or VCD, press the REPEAT button again. The indication “ ALL” will appear on the LCD screen. All tracks will then repeat continuously until the STOP () button is pressed. c. To cancel the repeat play, press the REPEAT button until the indication “OFF” appears on the LCD screen. 23 www.i-Luv.com PORTABLE DVD PLAYER V10M10_IM_EN_09182006 OPERATIONAL FEATURES A-B Repeat Function This player can repeatedly play a specific section of a track or chapter. This function does not work with a MP3 CD. 1. While in the PLAY mode, press the A-B button to define where you want the section to start. 2. Press the A-B button again to define where you would like the section to end. The unit will play the selected area continuously. 3. To cancel the A-B REPEAT mode, press the A-B button again until the icon disappears on the screen. Viewing from a Different Camera Angle (Multi-Angle) Some DVD discs may contain scenes which have been shot simultaneously from a number of different camera angles. This function depends on the disc. 1. Play a DVD disc that is recorded with multiple angles. 2. Press the ANGLE button. If a different angle is available, the camera icon “ ” will appear on the screen. 3. Press the ANGLE button again to see the movie with the different angle. Each press of the ANGLE button will show the movie with a different angle. 4. To return the normal angle view, press the ANGLE button until the camera icon “ “ disappears. Programmed Playback This unit has the programmable memory that allows you to program up to 20 tracks (or chapters) on any disc for playback in any desired order. You can also program certain tracks (or chapters) to play more than once. This feature doesn’t support MP3 discs. To perform the programmed playback, proceed as follows: 1. While in the STOP mode, press the PROGRAM button. The program window will appear on the screen. 2. Press the NUMERIC buttons to input two numbers for each track: one for title and the other for chapter. After inputting two numbers, the cursor will automatically jump to the next program track, awaiting the input of the next numbers. 3. Repeat step 2 until all the desired titles and chapters have been programmed (up to 20). You can repeat a title and a chapter more than once if desired. 4. Use the NAVIGATION (W / X / S / T) buttons to select the START option, and then press the PLAY (X) button to begin the programmed play. 5. To cancel the program function, press the STOP () button twice. 24 www.i-Luv.com PORTABLE DVD PLAYER V10M10_IM_EN_09182006 OPERATIONAL FEATURES Display Feature Press the DISPLAY button to show the elapsed and remaining time of the playing disc. Each time the DISPLAY button is pressed, the displayed time mode will change on the screen as follows: 1. DVD: Title Elapsed Ö Title Remain Ö Chapter Elapsed Ö Chapter Remain Ö Display Off 2. VCD & AUDIO CD: Single Elapsed Ö Single Remain Ö Total Elapsed Ö Total Remain Ö Display Off 3. MP3 CD: Single Elapsed Ö Single Remain Bookmark Feature Storing bookmarks in the memory to be viewed later is similar to marking your page in a book. You can quickly go to any point on the disc with this bookmark feature. Some discs may not support this feature. 12 bookmarks can be memorized for a disc. 1. To Program Bookmarks: a. Press the BOOKMARK button to enter the bookmark mode in the play mode. b. Use the NAVIGATION (W / X) buttons to go to the empty bookmark space. c. Press the PLAY (X) button to mark the desired position. d. Press the BOOKMARK button to exit the bookmark mode. e. Press the SKIP (|WW / XX|) or SEARCH (WW / XX) buttons to go to the desired position in another chapter or title. f. 2. Repeat step a through step e to program the remaining bookmarks. To Play Programmed Bookmarks: a. Press the BOOKMARK button to enter the bookmark mode. b. Use the NAVIGATION (W / X) buttons to select your desired bookmark, and then press the PLAY (X) button to confirm. It will automatically go to the bookmarked position and start playing the disc at the position. c. 3. Repeat step a and step b to play other bookmarked positions. To Clear Bookmarks: a. Press the BOOKMARK button to enter the bookmark mode. b. Use the NAVIGATION (W / X) buttons to select the old bookmark, which you c. Press the CLEAR button to erase the old bookmark. want to clear. d. Exit the bookmark mode by pressing the BOOKMARK button. e. Or open the disc compartment cover. 25 www.i-Luv.com PORTABLE DVD PLAYER V10M10_IM_EN_09182006 OPERATIONAL FEATURES Digest Function 1. DVD / VCD DIGEST a. Press the DIGEST button during the playback, and the screen will switch to a thumbnail view. There are two types of digest screens available from the “Select Digest Type” menu, Track Digest and Disc Interval. b. Track Digest (Title Digest & Chapter Digest) i. The screen will show the starting picture of all tracks (or chapters). Enter the desired track (or chapter) number by using the NUMERIC buttons, and then press the ENTER button to confirm. It will play from that track (or chapter) onwards. ii. The screen will only show only 6 tracks (or chapters). If there are more than 6 tracks (or chapters) available on a disc, press the SKIP FORWARD (XX|) button to look at the remaining tracks (or chapters) on the next screen. c. iii. Choose the EXIT option to exit the “Track Digest” screen. iv. Choose the MENU option to return to the “Select Digest Type” menu. Disc Interval (Title Interval & Chapter Interval) i. The screen shows the starting picture of 10-minute intervals on the screen simultaneously. Enter your desired interval by using the NUMERIC buttons, and then press the ENTER button to confirm it. It will play from that interval onwards. ii. The screen will only show only 6 intervals. If there are more than 50 minutes available on a disc, press the SKIP FORWARD (XX|) button to look at the remaining intervals on the next screen. 2. iii. Choose the EXIT option to exit the “Disc Interval” screen. iv. Choose the MENU option to return to the “Select Digest Type” menu. AUDIO CD DIGEST a. Press the PLAY (X) button to start CD playback from track No. 1 b. Press the DISPLAY button to display the elapsed time. c. Press the DIGEST button to activate the CD scanning function. d. The first 6 seconds of each track on the CD will display on the screen until all the CD tracks finish playing the 6-second introduction. 26 www.i-Luv.com PORTABLE DVD PLAYER V10M10_IM_EN_09182006 SETTING UP YOUR DVD PLAYER Navigating the Setup Pages 1. Press the SETUP button in the STOP mode to display the setup page. The Setup Page will appear as below: 2. Use the NAVIGATION (W / X) buttons to browse the setup menu. The icons on the top of the setup menu represent as follows: General Setup Page Speaker Setup Page Video Setup Page Preference Page Exit Setup 3. Move to one of the options available in the selected setup page, using the NAVIGATION (S / T) buttons. 4. Press the NAVIGATION (X) button to access the sub-menu of the selected option. 5. Use the NAVIGATION (S / T) buttons to select an option in the sub-menu. 6. Press the ENTER button to confirm your selection. 7. Press the NAVIGATION (◄) button to return to a previous menu. 8. Press the SETUP button, or select the icon “ ” and press the ENTER button to exit the setup menu completely. 27 www.i-Luv.com PORTABLE DVD PLAYER V10M10_IM_EN_09182006 SETTING UP YOUR DVD PLAYER General Setup Page 1. TV DISPLAY: Normal/PS, Normal/LB, Wide a. Normal/PS: “PS” stands for “Pan Scan”. Select this option when the unit is connected with a normal (4:3 aspect ratio) TV. If a wide-screen image is displayed on the screen, some left and right edges of the image are cut out automatically. b. Normal/LB: “LB” stands for “Letter Box”. Select this option when the unit is connected with a normal (4:3 aspect ratio) TV. If a wide-screen image is displayed on the screen, the displayed image is automatically fit into the screen, and the image will be displayed with some degree of distortion. c. Wide: Select this option when the unit is connected to a wide-screen (16:9 aspect ratio) TV. 2. TV TYPE: NTSC / PAL a. NTSC: When connected to a NTSC TV system, this option must be selected to display an image correctly. b. PAL: When connected to a PAL TV system, this option must be selected to display an image correctly. 3. ANGLE MARK: ON / OFF a. ON: If selected, it will show the angle mark on the screen when playing a DVD recorded with the multi-angle view. This only works when there is an angle mark on the disc. b. OFF: If selected, the angle mark will not be shown on the screen. 4. OSD LANG: English / Spanish / German / French / Italian 5. SCREEN SAVER: ON / OFF a. a. Used to change the on-screen display language. ON: Activate the screen saver i. The screen saver image appears when the unit stops or the image is motionless for approximately 1 minute. This saver can keep the screen from being damaged. b. OFF: Disable the screen saver Speaker Setup Page 1. Speaker Setup: LT/RT, STEREO a. LT/RT: Select to hear the sound in the theatrical Downmix mode. b. STEREO: Select to hear the sound in the stereo Downmix mode. 28 www.i-Luv.com PORTABLE DVD PLAYER V10M10_IM_EN_09182006 SETTING UP YOUR DVD PLAYER Video Setup Page 1. Sharpness – To adjust the sharpness of a picture a. Use the NAVIGATION (S / T) buttons to select your desired level. The color bar will appear on the screen while adjusting the sharpness. b. 2. Press the ENTER button to confirm. Brightness – To adjust the lightness and darkness of a picture 3. Contrast – To increase or decrease picture contrast 4. Color – To increase or decrease color intensity 5. Tint – To increase or decrease the phases of color a. Use the NAVIGATION (S / T) buttons to increase or decrease the level of tint. b. Press the ENTER button to confirm. Preference Setup Page 1. Audio – To change the audio language, choose the language using the NAVIGATION (S / T) buttons and press the ENTER button to confirm. 2. Subtitle – To change the subtitle language, choose the language using the NAVIGATION (S / T) buttons and press the ENTER button to confirm. 3. Disc Menu – To change the language of the menu, choose the language using the NAVIGATION (S / T) buttons and press the ENTER button to confirm. 29 www.i-Luv.com PORTABLE DVD PLAYER V10M10_IM_EN_09182006 CARE AND MAINTENANCE GUIDE • Treat the disc carefully. Handle the disc only by its edges. Never allow your fingers to contact with the shiny, unprinted side of the disc. • • Do not attach adhesive tape, stickers etc., to the disc label. Clean the disc periodically with soft, lint-free, dry cloth. Never use detergents or adhesive cleaners to clean the disc. If necessary, use a CD or DVD cleaning kit. • If disc skips or gets stuck on a section of the disc, it is probably dirty or damaged (scratched). • When cleaning the disc, wipe in straight lines from the center of the disc to the edge of the disc. Never wipe in circular motions. • To remove a disc from its storage case, press down on the center of the case and lift the disc outs, holding it carefully by the edges. • Fingerprints and dust should be carefully wiped off the disc's recorded surface with a soft cloth. Unlike conventional records. compact disc have no groove to collect dust and microscopic debris, so gently wiping with a soft cloth should remove most particles. Cleaning the Unit • To prevent fire or shock hazard, disconnect your unit from the AC power source when cleaning. • The finish on the unit may be cleaned with a dust cloth and cared for as other furniture, Use caution when cleaning and wiping the plastic parts. • If the cabinets become dusty wipe them with a soft dry dust cloth. Do not use any wax or polish sprays on the cabinets. • If the front panel becomes dirty or smudged with fingerprints it may be cleaned with a soft cloth slightly dampened with a mild soap and water solution. Never use abrasive cloths or polishes as these will damage the finish of your unit. Caution: never allow any water or other liquids to get inside the unit while cleaning. 30 www.i-Luv.com PORTABLE DVD PLAYER V10M10_IM_EN_09182006 TROUBLESHOOTING GUIDE It doesn’t display the iPod videos on the 7” LCD screen. • Turn on the DVD player. You can find the power switch on top of the DVD player, named as “POWER”. Set the “POWER” switch to the “ON” position. • Check whether the “LINE SELECT” switch is set to the “iPod” position. In order to display your iPod videos on the 7” LCD screen, it must be set to “iPod”. • Check the TV settings of your iPod. The “TV out” option of your iPod must be set to “On”. You can refer to the section “Watching Your iPod Videos on the 7” LCD Screen” in this manual for the related instructions, or you can also refer to the user manual of your iPod. • Your iPod is not in the play mode. Play the video on your iPod. It doesn’t charge the iPod. • Check whether the AC adapter is connected. In order to charge your iPod, the AC adapter must be connected to the DVD player. • Check whether your iPod is properly installed into the dock. The remote control and control buttons on the main unit doesn’t work on iPod. • It is normal. This unit doesn’t have a control on your iPod due to the limited navigation system of iPod with video (30GB, 60GB). No power on the unit • Insert the AC power plug securely into the power outlet. It fails to start playing even when the PLAY (X) button is pressed. It will start playing but then stop immediately. • Condensation has been formed. Wait about 1 to 2 hours to allow the player to dry out. • This player cannot play a disc other than DVD, Video CD and CD. • The disc may be dirty and may require cleaning. • Ensure that the disc is installed with the label side up. No picture on the LCD screen • Ensure that the LINE SELECT switch is properly set. • Ensure that the external video device or iPod is properly connected. No sound or distorted sound • Ensure that the LINE SELECT switch is properly set. • Ensure that the external device or iPod is properly connected. • Ensure that the input settings for the external audio device or iPod are properly set. Picture is distorted during the rapid advance or rapid reverse. • The picture will be somewhat distorted at times. This is normal. 31 www.i-Luv.com PORTABLE DVD PLAYER V10M10_IM_EN_09182006 TROUBLESHOOTING GUIDE No rapid advance (or rapid reverse) playback • Some discs may have sections which prohibit the rapid advance (or rapid reverse.) No 4:3 (16:9) picture display • Choose the correct “TV SCREEN” option in the video setup page. No operations can be performed with the remote control unit. • Check the batteries are installed with the correct polarities (+ and –). • The batteries may be exhausted. Replace them with new ones. • Point the remote control unit at the remote control sensor and attempt operation. • Operate the remote control at a distance of not more than 6m from the remote control sensor. • Remove the obstacles between the remote control unit and remote control sensor. No key operation (with the main unit and/or the remote control unit) is effective. • Press the POWER button to set the player to the standby mode and then switch back on. • Press the POWER button to set the player to the standby mode, disconnect the power plug, and then reconnect it. No menu play • This function works only for Video CDs with playback control. Audio and/or subtitle language are not shown on the disc or not in the setup menu. • If the audio and/or subtitle language does not exist on the language selected in the setup menu, it will not be seen or heard. No subtitles • • Subtitles appear only with discs which contain them. Subtitles are cleared from the TV monitor. Perform the steps in the subtitle setup instruction to display the subtitles. Alternative audio (or subtitle) language fails to be selected. • An alternative language is not selected with discs which do not contain more than one language. The movie angle cannot be changed. • This function is contingent on software availability. Even if a disc has a number of angles recorded, these angles may be recorded for specific scenes only. When an AC adapter is plugged in for a while, the FULL and CHARGE indicators blink. Then, the CHARGE indicator will light up RED, but the rechargeable battery is released. • It is a system test for the recharge circuit, which is not a malfunction. 32 www.i-Luv.com PORTABLE DVD PLAYER V10M10_IM_EN_09182006 SPECIFICATIONS • Power Requirements o Main Unit: DC 10V – 11V, Max 1.4A o AC Adapter o Input: AC 100V – 240V, 60Hz/50Hz Output: DC 10V, 1.4A Car Adapter Input: DC 12V – 24V Output: DC 10V, 1.6A • Power Consumption: 11W max. • Signal System: NTSC / PAL • Operating Temperature Range: 5°C to 35°C (41°F to 95°F) • Operating Humidity Range: 5% to 90% (no condensation) • Battery Charging Time: Approximately 4 - 5 hours • Battery Life (Fully charged): 2.5 hours • Video Output Level: 1Vpp • Audio Output Level: 1Vrms (1 kHz, 0dB) • Frequency Responses o o DVD (Linear Audio) 20Hz-20kHz (48kHz Sampling) 20Hz-20kHz (96kHz Sampling) CD Audio 20Hz-20kHz • S/N Ratio: 70dB • Wow and flutter: below measurable level • Pickup o Wave length: 655nm o Laser power: CLASS 1 * Specifications are subject to change without prior notice. 33 www.i-Luv.com PORTABLE DVD PLAYER V10M10_IM_EN_09182006 34 www.i-Luv.com PORTABLE DVD PLAYER V10M10_IM_EN_09182006 TEL: 516-626-7188 FAX: 516-626-7105 website: www.i-Luv.com e-mail: [email protected] iLuv is a trademark of jWIN Electronics Corp. iPod is a trademark of Apple Computer Inc. All logos and brands are property of their respective owners. iPod is not included in this package. Features and specifications are subject to change without prior notification. © 2006 jWIN Electronics Corp. All rights reserved. No portion of this printing material or product enclosed herewith including design, shape and graphics, may be not reproduced or transmitted in any form without the expressed written consent of jWIN Electronics Corp. by any means, electronics or mechanical, including photocopy, recording or information storage and retrieval system. Any unauthorized distribution or reproduction of this printing material or product, or any portion there of, will be prosecuted to the fullest possible extent of the law. 35 www.i-Luv.com