1
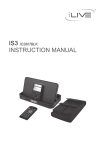
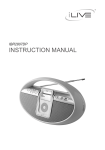
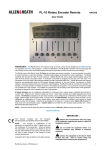
IC308B
INSTRUCTION MANUAL
Contents
Warnings and Precautions................................................................................ 2
Important Safety Instructions............................................................................. 3
In the Box & Features........................................................................................ 4
Powering the Unit.............................................................................................. 5
Setting the Clock............................................................................................... 6
Setting the Alarms & Connecting to an Audio Player using the Aux Input......... 7
Listening to the Radio & Saving a Station to the Units Memory........................ 8
Docking an iPod & Playing an iPod................................................................... 9
Location of Controls & Control Definitions....................................................... 10
Service Information......................................................................................... 12
Warnings and Precautions
TO PREVENT FIRE OR SHOCK HAZARDS, DO NOT EXPOSE THIS UNIT TO
RAIN OR MOISTURE.
This symbol, located on back or bottom of the unit, is
intended to alert the user to the presence of uninsulated
“dangerous voltage” within the product’s enclosure that
may be of sufficient magnitude to constitute a risk of
electric shock to persons.
This symbol, located on back or bottom of the unit, is
intended to alert the user to the presence of important
operating and maintenance (servicing) instructions in
the literature accompanying the appliance.
CAUTION: TO PREVENT ELECTRIC SHOCK,
MATCH WIDE BLADE OF PLUG TO WIDE SLOT,
FULLY INSERT.
To reduce the risk of electric shock, do not remove
cover (or back). There are no user-serviceable parts
inside. Please refer any servicing to qualified service
personnel.
WARNING: Changes or modifications to this unit
not expressly approved by the party responsible for
compliance could void the user’s authority to operate
the equipment.
NOTE: This equipment has been tested and found to
comply with the limits for a Class B digital device,
pursuant to Part 15 of the FCC Rules. These limits
are designed to provide reasonable protection against
harmful interference in a residential installation. This
equipment generates, uses, and can radiate radio
frequency energy and, if not installed and used in
accordance with the instructions, may cause harmful
interference to radio communications. However, there
is no guarantee that interference will not occur in a
particular installation. If this equipment does cause
harmful interference to radio or television reception,
which can be determined by turning the equipment
off and on, the user is encouraged to try to correct the
interference by one or more of the following measures:
• Reorient or relocate the receiving antenna.
• Increase the separation between the equipment and
receiver.
• Connect the equipment into an outlet on a circuit
different from that to which the receiver is
connected.
• Consult the dealer or an experienced radio/TV
technician for help.
Important Safety Instructions
1. Read these Instructions.
2. Keep these Instructions.
12.Use only with a cart, stand, tripod, bracket, or
table specified by the manufacturer, or sold with
the apparatus. When a cart is used, use caution
when moving the cart/apparatus combination to
avoid injury from tip-over.
3. Heed all Warnings.
Portable Cart Warning
4. Follow all instructions.
5. Do not use this apparatus near water.
6. Clean only with a dry cloth.
7. Do not block any of the ventilation openings.
Install in accordance with the manufacturers
instructions.
8. Do not install near any heat sources such
as radiators, heat registers, stoves, or other
apparatus (including amplifiers) that produce
heat.
9. Do not defeat the safety purpose of the polarized
or grounding - type plug. A polarized plug
has two blades with one wider than the other.
A grounding type plug has two blades and a
third grounding prong. The wide blade or the
third prong are provided for your safety. When
the provided plug does not fit into your outlet,
consult an electrician for replacement of the
obsolete outlet.
10.Protect the power cord from being walked on
or pinched particularly at plugs, convenience
receptacles, and the point where they exit from
the apparatus.
11.Only use attachments/accessories specified by
the manufacturer.
13.Unplug this apparatus during lightning storms
or when unused for long periods of time.
14.Refer all servicing to qualified service
personnel. Servicing is required when the
apparatus has been damaged in any way, such
as power-supply cord or plug is damaged, liquid
has been spilled or objects have fallen into the
apparatus, the apparatus has been exposed to
rain or moisture , does not operate normally, or
has been dropped.
*The apparatus should not be exposed to dripping
or splashing and that bo objects filled with
liquids, such as vases, shall be placed on
apparatus.
*Main plug is used as disconnect device and it
should remain readily operable during intended
use. In order to disconnect the apparatus from
the mains completely, the mains plug should
be disconnected from the mains socket outlet
completely.
*Excessive sound pressure from earphones or
headphone can cause hearing loss.
*The rating plate and Caution marking are located
at the bottom enclosure
In the Box
IC308B
Brackets for iPod
Documentation
iPod BRACKETS (7)
Features
Powering the Unit
Power the unit by connecting it to a standard AC outlet (120V ~ 60Hz)
via the attached AC cord.
Battery Information
Battery power for Back-up only. Battery back-up will save the clock
times in case of a power outage.
The unit must be unplugged when installing the back-up battery. If
you experience problems while installing the back-up battery, press the
Reset Button, using a paperclip or like object, to reset the unit.
Setting the Clock
1. Press the Standby/AL Off Button to turn the unit off.
2. Press and hold the Clock Adj/Sleep Button until the hour begins to flash on the
LCD Display.
3. Press the Skip/Search Buttons to adjust the hour.
4. Press the Clock Adj/Sleep Button to set the hour, and the minute will begin to
flash on the LCD Display.
5. Press the Skip/Search Buttons to adjust the minute.
6. Press the Clock Adj/Sleep Button to set the minute.
Using the Projection Display
1. Press the Standby/AL Off Button to turn the unit on.
2. Press and hold the Dimmer/Projector Button to activate the Projection Display.
3. Turn the Focus Dial to focus the light coming from the Projection Display.
The unit will need to be relatively close to a wall or surface for the projected time
to be readable.
Setting the Alarms
1. Press the Standby/AL Off Button to turn the unit off.
2. Press and hold the Mem Set/AL 1 or Mem Up/AL 2 Button until the alarm 1 or
alarm 2 hour begins to flash on the LCD Display.
3. Press the Skip/Search Buttons to adjust the hour.
4. Press the Mem Set/AL 1 or Mem Up/AL 2 Button to set the hour, and the minute
will begin to flash on the LCD Display.
5. Press the Skip/Search Buttons to adjust the minute.
6. Press the Mem Set/AL 1 or Mem Up/AL 2 Button to set the minute.
7. Press the Mem Set/AL 1 or Mem Up/AL 2 Button consecutively to cycle through
the wake options for alarm 1 or alarm 2.
The unit can be set to wake to a buzzer, the radio, a docked iPod, or 1 of 5 nature
sounds.
8. When the alarm is set to sound to nature sounds, indicated by “NS” on the LCD
Display, press the Nature Sounds/Play/Pause Button to cycle through the 5
nature sounds.
Connecting to an Audio Player using the Aux Input
When connecting two products using an RCA Cable, match the colored ports with
the same colored connection. (Red to Red, White to White, and Yellow to Yellow)
1. Plug one end of a 3.5 mm Cable (not included) or a 3.5 mm - RCA Cable (not
included) into the AUX (Auxiliary) Input on the unit.
2. Plug the other end of the 3.5 mm Cable into the audio output/headphone output on
an Mp3 Player or Other Audio Source.
3. Press the Standby/AL Off Button to turn the unit on.
4. Press the Function Button to switch the unit to Aux mode.
5. Audio played from the Mp3 Player or Other Audio Source will now be heard on
the unit.
If connecting to the headphone output of an audio source, the source’s volume
controls may need to be adjusted for optimal sound.
Listening to the Radio
1. Press the Standby/AL Off Button to turn the unit on.
2. Press the Function Button to switch the unit to radio mode.
3. Press the Stop/Band Button to switch between AM and FM radio.
4. Press the Skip/Search/Tune Buttons to tune the radio.
Saving a Station to the Units Memory
1. After tuning the radio to the desired station, press the AL 1/Mem Set Button.
The radio station will save to the next available memory slot.
2. Press the AL 2/Mem Up Button to select a memory slot to save.
3. Press the AL 1/Mem Set button to save .
Listening to a saved station
1. Press the AL 2/Mem Up Button to cycle through the saved radio station.
Docking an iPod
1. Locate the numbered Bracket that fits
the iPod that will be docked.
Each included Bracket has a number
on it, indicating which iPod model
that bracket is compatible with. See
the separate bracket chart page to
identify which bracket is needed.
2. Snap the Bracket into place over
the iPod connector in the Docking
Station.
All Brackets will only fit one way onto
the Dock.
When inserting an iPod nano (first
or second generation), slide the
Dock connection on the unit so that it
matches the opening on the iPod nano
(first or second generation).
3. Connect the iPod to the iPod
connector inside the Docking
Station.
Once an iPod is connected to the
Docking Station, the unit will play
and charge the docked iPod.
Playing an iPod
1. Dock an iPod onto the unit.
2. Press the Standby/Al Off Button to turn the unit on.
3. Press the Function Button to switch the unit to iPod mode.
4. Press the Play/Pause/Nature Sounds Button to play and pause the docked iPod.
Location of Controls
1
2
3
4
10
5
11
12
13
6
14
7
8
9
15
Control Definitions
1
Focus Dial
Turn the Focus Dial to focus the light from the Projection Display.
Control Definitions
2
Projection Display
The Projection Display projects the time onto wall.
3
Dock for iPod
Use the Dock for iPod to dock an iPod onto the unit.
4
Standby/AL Off Button
Press the Standby/AL Off Button to turn the unit off and on.
Press the Standby/AL Off Button after an alarm sounds to turn the alarm off.
5
Volume Buttons
Press the Volume Buttons to adjust the volume of the unit.
6
Mem Set/AL 1
Press the Mem Set/AL 1 Button to save a radio station to the unit’s memory.
Press the Mem Set/AL 1 Button to set alarm 1.
7
Snooze/Display
Press the Snooze/Display Button after the alarm sounds to delay the alarm for an additional 9 minutes.
Press the Display Button to toggle between the radio frequency view and the clock view.
8
Function Button
Press the Function Button to switch between iPod, Radio, Aux and NS mode.
9
Clock Adj/Sleep Button
Press the Clock Adj/Sleep Button to set the clock.
Press the Clock Adj/Sleep Button to set the sleep timer between 10-90 minutes in 10 minute increments.
10 Tune/Skip/Search Buttons
Press the Tune/Skip/Search Buttons to tune the radio.
Press the Tune/Skip/Search Buttons to skip between tracks on a docked iPod.
Press and hold the Tune/Skip/Search Buttons to search through an individual track on a docked iPod.
11 Stop/Band Button
Press the Stop/Band Button to stop an iPod during play.
Press the Stop/Band Button to switch between AM and FM in radio mode.
12 Play/Pause/Nature Sounds Button
Press the Play/Pause/Nature Sounds Button to play or pause a docked iPod.
Press the Play/Pause/Nature Sounds Button to cycle through the nature sounds.
13 Mem Up/AL 2 Button
Press the Mem Up/AL 2 Button to cycle up through the saved radio stations.
Press the Mem Up/AL 2 Button to set alarm 2.
14 Dimmer/Projecter Button
Press the Dimmer/Projector Button to dim the LCD Display.
Press and hold the Dimmer/Projector Button to activate the Projection Display.
15 Reset
Press the RESET button to reset the unit to it’s default factory settings.
Service Information
Address
Phone Fax
Email Website
2116 Carr Street, St. Louis MO, 63106
1-314-621-2881
1-314-588-1805
[email protected]
www.ilive.net
To download this Instruction Manual in English, Spanish, or French
visit the Support section at
www.ilive.net.
Para descargar este manual de
instrucción en inglés, español, o
francés visite la sección de la ayuda en www.ilive.net.
Pour télécharger ce manuel
d’instruction en anglais, espagnol,
ou le Français visitez la section de
soutien à www.ilive.net.
© 2007 DPI, Inc. iPod not included. iPod is a trademark of Apple Inc., registered in the U.S. and other countries. TruBass, SRS and the SRS
logo are trademarks of SRS Labs, Inc. All other trademarks appearing herein are the property of their respective owners.