1
Lotus Learning Management System R1
®
Version 1.0.4
March 2004
Installation Guide
G210-1784-00
Copyrights
Disclaimer
THIS DOCUMENTATION IS PROVIDED FOR REFERENCE PURPOSES ONLY. WHILE EFFORTS WERE MADE
TO VERIFY THE COMPLETENESS AND ACCURACY OF THE INFORMATION CONTAINED IN THIS
DOCUMENTATION, THIS DOCUMENTATION IS PROVIDED "AS IS" WITHOUT ANY WARRANTY
WHATSOEVER AND TO THE MAXIMUM EXTENT PERMITTED, IBM DISCLAIMS ALL IMPLIED
WARRANTIES, INCLUDING WITHOUT LIMITATION THE IMPLIED WARRANTIES OF MERCHANTABILITY,
NONINFRINGEMENT AND FITNESS FOR A PARTICULAR PURPOSE, WITH RESPECT TO THE SAME. IBM
SHALL NOT BE RESPONSIBLE FOR ANY DAMAGES, INCLUDING WITHOUT LIMITATION, DIRECT,
INDIRECT, CONSEQUENTIAL OR INCIDENTAL DAMAGES, ARISING OUT OF THE USE OF, OR OTHERWISE
RELATED TO, THIS DOCUMENTATION OR ANY OTHER DOCUMENTATION. NOTWITHSTANDING
ANYTHING TO THE CONTRARY, NOTHING CONTAINED IN THIS DOCUMENTATION OR ANY OTHER
DOCUMENTATION IS INTENDED TO, NOR SHALL HAVE THE EFFECT OF, CREATING ANY WARRANTIES
OR REPRESENTATIONS FROM IBM (OR ITS SUPPLIERS OR LICENSORS), OR ALTERING THE TERMS AND
CONDITIONS OF THE APPLICABLE LICENSE AGREEMENT GOVERNING THE USE OF THIS SOFTWARE.
Copyright
Under the copyright laws, neither the documentation nor the software may be copied, photocopied, reproduced,
translated, or reduced to any electronic medium or machine-readable form, in whole or in part, without the prior
written consent of IBM, except in the manner described in the documentation or the applicable licensing agreement
governing the use of the software.
Copyright (c) 1998 - 2004 International Business Machines Corporation.
All rights reserved.
Lotus Software
IBM Software Group
One Rogers Street
Cambridge, MA 02142
US Government Users Restricted Rights - Use, duplication or disclosure restricted by GS ADP Schedule Contract
with IBM Corp.
List of Trademarks
Lotus Discovery Server, LearningSpace Forum, IBM Directory Server, AIX, Cloudscape, Notes, xSeries, and Domino
are trademarks of Lotus Development Corporation and/or IBM Corporation in the United States, other countries, or
both. IBM, Lotus, DB2, Lotus Notes, LearningSpace, RS/6000, Sametime, and WebSphere are registered trademarks
of Lotus Development Corporation and/or IBM Corporation in the United States, other countries, or both.
Crystal Reports is a registered trademark of Crystal Decisions Corporation in the United States, other countries, or
both.
Java, JavaServer Pages, JavaBeans, JavaScript, J2EE, JDBC, Sun Enterprise, and Sun Solaris are trademarks of Sun
Microsystems, Inc. in the United States, other countries, or both.
JReport and JReport Designer are trademarks of Jinfonet Software, Inc. in the United States, other countries, or both.
Macromedia and Dreamweaver are registered trademarks of Macromedia, Inc. in the United States, other countries,
or both.
Netscape and Netscape Navigator are registered trademarks of Netscape Communications Corporation in the
United States and other countries.
Oracle is a registered trademark of Oracle Corporation in the United States, other countries, or both.
PKZIP is a registered trademark of PKWARE, Inc. in the United States, other countries, or both.
SmartForce is a trademark of SkillSoft Corporation in the United States, other countries, or both.
SQL Server and Internet Explorer are trademarks of Microsoft Corporation in the United States, other countries, or
both. Windows, Windows NT, and Outlook are registered trademarks of Microsoft Corporation in the United States,
other countries, or both.
UNIX is a registered trademark of The Open Group in the United States and other countries.
Other product, company, and service names mentioned herein may be the trademarks, registered trademarks, or
service marks of their respective owners.
Contents
Chapter 1 About the IBM Lotus Learning Management System ............................................................1
Introduction ............................................................................................................................................................................... 1
What is the Learning Management System? ......................................................................................................................... 1
Understanding the Learning Management System Architecture....................................................................................... 1
Chapter 2 Learning Management System Requirements .......................................................................3
Database server requirements ................................................................................................................................................. 3
Learning Management System server requirements ........................................................................................................... 3
Learning Management System client requirements............................................................................................................. 3
Chapter 3 Learning Management System Installation Overview ...........................................................5
Packaging overview.................................................................................................................................................................. 5
Some words about the Learning Management System settings & configuration information ...................................... 5
An outline of the installation process..................................................................................................................................... 6
Chapter 4 Identifying Learning Management System Hardware Assets .............................................11
Allocating server responsibilities.......................................................................................................................................... 11
Creating a new database or upgrading an existing database ........................................................................................... 11
Learning Management System Hardware requirements .................................................................................................. 12
Chapter 5 Installing the WebSphere Core ..............................................................................................13
Enabling SSO in WebSphere.................................................................................................................................................. 14
Chapter 6 Installing or Identifying the LDAP Directory.........................................................................17
Installing the IBM Directory Server LDAP Directory: an example .................................................................................. 17
Chapter 7 Installing the Learning Management System Server Application Files .............................21
Installer program information............................................................................................................................................... 21
Installing the Learning Management System Server application software .................................................................... 22
Chapter 8 Installing the Delivery Server (DS) Application Files...........................................................29
Installer program information............................................................................................................................................... 29
Installing the Delivery Server application software........................................................................................................... 30
Chapter 9 Installing and Configuring Database Servers and Schema ................................................37
Database Creation Overview................................................................................................................................................. 37
Table of Contents iii
DB2 database creation and configuration for the Learning Management System: an example................................... 38
Oracle database creation for the Learning Management System ..................................................................................... 44
MS SQL Server database creation for the Learning Management System ...................................................................... 45
Additional information about running scripts in different environments...................................................................... 46
Chapter 10 Installing the Network Deployment (ND) Module ...............................................................49
Chapter 11 Configuring JDBC Data Sources .........................................................................................53
Data source overview ............................................................................................................................................................. 53
Defining the JDBC provider .................................................................................................................................................. 54
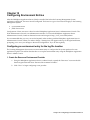
Chapter 12 Configuring Environment Entries........................................................................................63
Configuring an environment entry for the log file location .............................................................................................. 63
Chapter 13 Configuring WebSphere Application Server Security .......................................................71
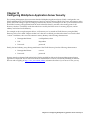
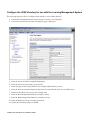
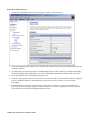
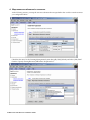
Configure the LDAP directory for use with the Learning Management System........................................................... 72
Chapter 14 Deploying the Learning Management System Server Application...................................75
Chapter 15 Deploying the Delivery Server (DS) Application ................................................................85
Starting the application and regenerating web server plug-in ......................................................................................... 85
Chapter 16 Deploying the Learning Management System and DS Components onto Separate WAS
Application Servers ..................................................................................................................................87
Chapter 17 Starting the Applications......................................................................................................89
Starting the Learning Management System Server application ................................................................................... 89
Starting the Delivery Server application.......................................................................................................................... 89
Regenerating the web server plug-in ............................................................................................................................... 90
Running the Updater.......................................................................................................................................................... 90
Chapter 18 Post-Installation Tasks .........................................................................................................92
Configuring on-line help........................................................................................................................................................ 92
Adding the Delivery Server to the Learning Management System application............................................................. 92
Deploying the Offline Learning Client................................................................................................................................. 93
Installing the Authoring Tool ................................................................................................................................................ 93
Installing the Command Line Import Utility (CLIMP)...................................................................................................... 93
Migrating LearningSpace data .............................................................................................................................................. 94
Installing XVFB on UNIX platforms to enable reporting .................................................................................................. 94
iv IBM Lotus LMS Release 1 Installation Guide
Determining the correct SSO settings for the Learning Management System................................................................ 96
Chapter 19 Special Installation Issues ...................................................................................................99
Using SSL with the Learning Management System ........................................................................................................... 99
Using the Directory Server Web Administration Interface with Linux........................................................................... 99
Chapter 20 Removing the IBM Lotus Learning Management System ...............................................101
Uninstalling the Learning Management System Server and Delivery Server applications........................................ 101
Removing the installed Learning Management System files.......................................................................................... 101
Removing the Learning, DS, and Audit databases........................................................................................................... 101
Appendix A LMS Performance and Fine-tuning Information..............................................................103
Moving static LMS elements to the Web Server ............................................................................................................... 103
Tuning LDAP performance ................................................................................................................................................. 105
Tuning database server performance................................................................................................................................. 106
Tuning TCP/IP settings on LMS servers ........................................................................................................................... 107
Tuning HTTP servers............................................................................................................................................................ 109
Tuning performance using the WebSphere Application Server Administrative Console.......................................... 114
Tuning the LMS applications .............................................................................................................................................. 118
Index ........................................................................................................................................................122
Table of Contents v
vi IBM Lotus LMS Release 1 Installation Guide
Chapter 1
About the IBM Lotus Learning Management System
Introduction
This document provides information on the IBM® Lotus® Learning Management System installation process as
well as information on packaging and layout. The intended audience for this document is system administrators,
developers, and other users who wish to install the Learning Management System.
What is the Learning Management System?
The IBM Lotus Learning Management System is a scalable, flexible platform for managing both classroom-based
and e-learning activities, resources, curriculums, and courseware catalogs across the enterprise. The product is an
end-to-end fully integrated learning solution that is comprised of the following modules: Learning Management
System Server, Authoring Tool, Delivery Server, and an Offline Learning Client to support disconnected use.
Learning Management System organizes and delivers courses, tracks and reports on student activities, and reserves
instructors and resources, enabling customers to manage their entire training program from a single platform.
Using a web browser, students can review the online course catalog to enroll in both instructor-led classroom
training and e-learning offerings, then receive confirmations and/or notifications of schedule changes. Training
managers are able to reserve resources to avoid scheduling conflicts, develop curriculums for various audiences,
and provide managers with reports on their employees' training activities. The Learning Management System
product streamlines the overall management of an organization's training activities, increasing efficiencies and
saving time and expenses.
With the product's support for industry standards, organizations can offer a wide variety of courseware developed
with third party products such as Macromedia® Dreamweaver™, or they can develop their own courses in house
with the Learning Management System authoring tool. Subject matter experts can create courses on their own, with
no programming skills required.
Understanding the Learning Management System Architecture
Learning Management System components
Learning Management System framework can include some or all of the following components:
•
Learning Management Server
•
Delivery Server
•
WebSphere® Application Server
•
Relational database management system
•
Authoring tools
•
Domino™ servers
•
LDAP
•
IBM® Lotus® Virtual Classroom (LVC)
Chapter 1: About IBM Lotus Learning Management System 1
Relational database management system
The Learning Management System stores user, course, and assessment data in a relational database, which consists
of a series of tables. The database management software can reside on the same machine as the Learning
Management System software for a small installation, but generally resides on a separate machine for data security
and performance reasons. A Learning Management System specific database is created with the database
management system and then customized during the Learning Management System installation. This database
interacts with the Learning Management System Server. When users run the Learning Management System, the
Learning Management System Server initiates database transactions to retrieve and update information about
course structure, user permissions, and assessment questions. For more information on the Learning Management
System and its many components, refer to the rest of the documentation shipped with this product.
2 IBM Lotus LMS Release 1 Installation Guide
Chapter 2
Learning Management System Requirements
The Learning Management System is supported on a specific set of hardware and software components. Whether
you are installing the Learning Management System for the first time on a server or upgrading from an earlier
release of LearningSpace®, you may need to upgrade hardware and/or software before the Learning Management
System can function on that machine.
Using the Learning Management System with unsupported hardware or software may result in data loss, as well as
problems accessing the system. Before installing the Learning Management System, verify that you have installed
the required hardware and software described in this chapter.
Database server requirements
You’ll need a relational database management system with the Learning Management System. When you install the
Learning Management System, you’ll create a database specifically for use with the Learning Management System.
Refer to the README.TXT file and the Release Notes shipped with this product for more information on supported
databases and additional requirements.
Learning Management System server requirements
Learning Management System servers need the hardware and software specified below in order to properly support
the product.
Hardware requirements
For the most up-to-date server hardware requirements, refer to the README.TXT file and the Release Notes
shipped with this product.
Software requirements
For the most up-to-date server software requirements, refer to the README.TXT file and the Release Notes shipped
with this product.
Time zone settings
Remember the following guidelines regarding time zone settings. All user-viewable time zone settings are stored as
GMT/UTC.
•
Make sure that you have set WAS server time zone settings set correctly
•
Collaboration servers may use different time zones
•
During Live sessions, clients will see their own time zones reflected in date/time stamps.
Learning Management System client requirements
Learning Management System client machines’ hardware and software is described below.
Chapter 2: LMS System Requirements 3
Client hardware requirements
For the most up-to-date client hardware requirements, refer to the README.TXT file and the Release Notes shipped
with this product.
Client software requirements
For the most up-to-date client software requirements, refer to the README.TXT file and the Release Notes shipped
with this product.
Audio and video requirements
For the most up-to-date client audio and video requirements, refer to the README.TXT file and the Release Notes
shipped with this product.
Packaging and layout of the Learning Management System software components
For more information on the packaging and layout of the Learning Management System software components, refer
to the README.TXT and Release Notes shipped with this product.
4 IBM Lotus LMS Release 1 Installation Guide
Chapter 3
Learning Management System Installation Overview
The following information provides an outline of the Learning Management System installation process.
Packaging overview
The functional components of the Learning Management System product are J2EE™ web applications. J2EE
provides the packaging for these components as a standard.
The important units of the Learning Management System packaging as J2EE applications are
•
.war (web application archive) files
•
.ear (enterprise application archive) files
Both of these package types are zip-format archives containing standardized metadata. These files are identified by
the .war and .ear filename extensions, respectively.
Of these two, the .war file is the lower level entity. An .ear file may contain multiple .wars, each with its own URL
context and the needed information to resolve bindings implied by the .war file. An important binding involves
security. A .war file may refer to a security-role that it uses, but the .ear file has the information to bind that role to a
specific subject or user group.
The Learning Management System packages its two functional servers as separate .ear files. .Ear files can contain
resource references and environment entries. These are items that the application has identified as required services or
settings. An example resource reference would be a reference to a JDBC™ connection, which the Learning
Management System uses to access the relational database.
When an .ear file that contains resource references or environment entries is deployed on a J2EE application server
(for example, a WAS server), the application server generally presents a means where you can resolve those
references or environment values. With a WAS server this is done via the Administration Console user interface. By
representing the Learning Management System setup requirements as either resource references or environment
entries, you can the use the WebSphere Application Server deployment process to gather the needed install-time
settings.
Some words about the Learning Management System settings &
configuration information
Most Learning Management System settings are stored in either of two places:
•
XML-format text files located in the web-application WEB-INF/classes directory. The relevant file for the
Learning Management System Server is named settings.xml, and the corresponding file for the Delivery
Server is named ds-settings.xml. When the servers first start, they read settings from these files.
•
The Learning Management System application database. After the servers read settings from the XML files,
they read additional settings from the database. When a setting is specified in both the database and the
XML files, the one in the database overrides the setting specified in the XML file.
When you specify application settings using the Learning Management System Installer or, subsequently, the
Learning Management System user interface, those settings are stored in the application database. You can change
settings that you specified with the Learning Management System Installer by using the Learning Management
System Updater, a utility that resides in the /update directory. The Updater presents you with the necessary
screens, pre-populated with your original settings data. After you have made the necessary settings changes, the
Chapter 3: LMS Installation Overview 5
Updater then creates two update SQL scripts - one for the Learning Management System server (updateLMM.sql)
and one for the Delivery Server (updateDS.sql). These scripts are then run to change the respective databases.
You can change settings through the user interface at any time. Since virtually all required application settings can
be specified through the Installer or the user interface, it is unlikely that you would ever need to modify the XML
files.
Finally, some Learning Management System application settings come from the WebSphere application server itself.
The Learning Management System application is packaged containing references to Objects that are retrieved from
the application server environment at runtime. For example, the Learning Management System uses JDBC
datasources it retrieves from the environment via JNDI. By changing the definition of the datasource in the
WebSphere console, you can change the database that the Learning Management System connects to without
modifying the Learning Management System directly.
An outline of the installation process
The following steps outline the Learning Management System installation/deployment process. They should be
followed in this order to avoid version skew among the various components to be installed:
1. Identify hardware assets
The Learning Management System can be installed on various types and configurations of servers. The
expected capacity of the installation is the key factor in determining the requirements for servers. The install
process described in this document assumes that the desired server or servers have been identified and
configured such that required products can be installed.
For more information, refer to “Chapter 4 Identifying Learning Management System Hardware Assets.”
Refer also to your WebSphere documentation for guidelines on the various server configuration options that
are available for your Learning Management System deployment.
2. Install the database server software
The Learning Management System runs against the following back-end relational databases:
•
DB2®
•
Oracle®
•
SQL Server™
You must install one or another of these before you install the Learning Management System software.
3. Install WebSphere core
You are required to have the WAS (WebSphere Application Server) Core installed on the desired systems.
This can be a single server or multiple servers. If multiple servers are used, you must also install the
Network Deployment module. The WebSphere Core installation is accomplished by using the GUI installer
that is standard with WAS.
For more information, refer to “Chapter 5 Installing the WebSphere Core.”
4. Install or identify the LDAP Directory
The Learning Management System requires an LDAP directory for product operation. Either an IBM
Directory Server™ 4.1 directory is installed or configured, or a pre-existing LDAP directory must be
identified. Also, at least two user names that are recorded in the directory must be identified. These are for
6 IBM Lotus LMS Release 1 Installation Guide
the WebSphere and the Learning Management System administrator (who may be one and the same
person).
The organization of the LDAP directory is a key factor in operating the Learning Management System. Many
aspects of the Learning Management System operation require that directory path expressions be specified.
An example is rostering. While users can be rostered in the application manually, large deployments will
either employ the "roster from file" capability, where a directory LDIF file is imported into the system, or will
employ "auto rostering" where a directory path or group indicating users who should be given access is
specified.
For more information, refer to “Chapter 6 Installing or identifying the LDAP Directory.”
5. Run the Learning Management System Installer to install the necessary Learning
Management Server and Delivery Server files
The Learning Management System Installer installs all of the files necessary for the eventual deployment of
the Learning Management System and Delivery Servers. The Installer also gives you the option to install
additional Learning Management System-related utilities and tools. The final deployment of each
application is then carried out via the application server Admin console (explained later in this section).
For more information, refer to “Chapter 7 Installing the Learning Management Server application files” and
“Chapter 8 Installing the Delivery Server application files.”
6. Install and/or configure logical database servers and schema
The Learning Management System requires a number of different logical databases to function. They are the
Learning, Audit, and Delivery databases. The needed database server software must be installed on the
desired systems. Vendor-supplied database utilities are then used to run SQL scripts supplied with the
Learning Management System product. These SQL scripts create and initialize the needed databases for the
Learning Management System to operate.
The scripts are named for their logical database and database platform. For example, the script to create the
Audit database on IBM’s DB2 is audit_db2.sql while lmm_oracle.sql creates the Learning
Management System database on an Oracle system. To create and initialize the three databases, keeping
them logically separated, perform the following steps:
•
If you are running Oracle, obtain three separate accounts for your DB system: one each for Audit,
Learning, and Delivery databases. If you are running SQL Server or DB2, you will create three separate
databases rather than a single partitioned database.
•
Do the following using your database vendor’s tools:
o
Log in using your Audit database account.
o
Execute the supplied Audit SQL script for your database platform.
o
Log in using your Learning Management System database account.
o
Execute the supplied Learning Management System SQL script for your database platform.
o
Log in using your Delivery account.
o
Execute the supplied Delivery Server SQL script for your database platform.
Be sure to follow the database software guidelines for sizing the installation and configuring an efficient
physical architecture for the database. You may need to take extra action, for example, to create separate
tablespaces. You may also need to edit the database scripts before execution.
Chapter 3: LMS Installation Overview 7
At this time you should also identify the LDAP username for the Learning Management System
administrator. This value is used to make an entry in the USER table and represents the only rostered user
when the application starts.
For more information, refer to “Chapter 9 Installing and configuring database servers and schema”.
7. Install the Network Deployment module (optional)
The Network Deployment (ND) module configures and controls multi-server WAS installations. If you
intend to deploy the Learning Management System on more than one application server, then ND must be
installed to manage the cluster, which you can then do from a single machine. The ND module can be
installed on a node where WAS Core has been installed.
For more information, refer to “Chapter 10 Installing the Network Deployment (ND) Module.”
8. Configure JDBC data sources
Access to JDBC connections is made via JNDI lookup of a named data source. These data sources have wellknown names that are embedded in the Learning Management System .ear file. Using the WAS admin
console, you must configure three data sources. For example, the default data sources are Learning, Audit,
and Delivery.
For more information, refer to “Chapter 11 Configuring JDBC Data Sources.”
9. Configure environment entries
The Learning Management System uses J2EE environment entries to obtain some needed settings. Similarly
to the JDBC data sources, these have well-known names that are embedded in the Learning Management
System application. The needed environment entries must be created and their values specified with the Was
Admin console.
For more information, refer to “Chapter 12 Configuring Environment Entries.”
10. Configure WebSphere Application Server security
Learning Management System relies on WAS LDAP authentication. The WAS admin console must be used
to configure LDAP as the active user registry. To perform this, an LDAP username must be selected as the
WAS administrator; also bind credentials to the LDAP directory must be specified. This information was
obtained in step 2 and is now used as input into the WAS configuration .
For more information, refer to “Chapter 13 Configuring WebSphere Application Server Security.”
11. Deploy the Learning Management Server application
After the application files have been installed with the Learning Management System Installer, you must
then deploy the application via the Application Server Admin console. The Learning Management System
product package includes separate application .ear files for the Learning Management System Server and the
Delivery Server. The Learning Management System Server should be deployed first.
Using the Admin console, the .ear file is read and validated. A series of "wizard" pages is then presented to
let you finalize the application settings. The main activity here is the binding of the references included in
the .ear file to the specific JDBC data-sources and environment entries created in the earlier steps of this
outline.
8 IBM Lotus LMS Release 1 Installation Guide
For more information, refer to “Chapter 14 Deploying the Learning Management Server application “ and
“Chapter 16 Deploying the Learning Management System and DS components onto separate WAS App
Servers.”
12. Deploy the Learning Management System Delivery Server (DS) application
The Learning Management System Delivery Server (DS) also has its own .ear file. The DS .ear file must be
also be deployed and all bindings resolved just as for the Learning Management System Server.
For more information, refer to “Chapter 15 Deploying the Delivery Server (DS) application.” and “Chapter
16 Deploying the Learning Management System and DS components onto separate WAS Application
Servers.”
13. Start the applications
At this point, the Learning Management System applications are ready to start. Again, the WAS Admin
console is used to start the applications. Both the WAS logs and the Learning Management System logs
should be examined to verify correct initialization. At this point, the applications can be accessed via
browser. The administrator (identified in installation), must login to the Learning Management System
application and roster users, provide for importing content, and perform the tasks needed for actual learning
to be delivered to users.
For more information, refer to “Chapter 17 Starting the Applications.”
14. Complete post-installation tasks
Refer to “Chapter 18 Post-Installation Tasks” and “Chapter 19 Special Installation Issues” for more
information on any additional tasks that may be needed to run the Learning Management System more
successfully. These tasks include the following:
•
Configuring on-line help
•
Adding the Delivery Server to the Learning Management System application
•
Deploying the Offline Learning Client
•
Installing the Learning Management System Authoring Tool
•
Installing the Command Line Import Utility
•
Migrating LearningSpace data
•
Installing XVFB on UNIX platforms to enable reporting
•
Determining the correct SSO settings for the Learning Management System
To complete these tasks, make sure that you have logged into the Learning Management System as the
Administrator. Refer to the Administrator’s Guide for more information.
Finally, should you need to remove the Learning Management System, the procedure for doing so is
described in “Chapter 20 Removing the IBM Lotus Learning Management System.”
Chapter 3: LMS Installation Overview 9
10 IBM Lotus LMS Release 1 Installation Guide
Chapter 4
Identifying Learning Management System Hardware Assets
The Learning Management System can be installed on various types and configurations of servers. The expected
capacity of the installation is the key factor in determining the requirements for servers. The install process
described in this document assumes that the desired server or servers have been identified and configured such that
required products can be installed.
The following are some guidelines for making the best of your hardware configuration.
Allocating server responsibilities
Installation of the Learning Management System server software includes three server components: the database
server, the Learning Management Server, and the Delivery Server (DS). These server components can be installed on
a single machine for evaluation purposes, but in a production environment you should use a different machine for
each component. This guide assumes you have already installed DB2, Oracle, or SQL Server on the database server.
Installing and setting up the content server is not part of the Learning Management System installation. Consult the
documentation in your HTML authoring system for instructions about installation.
If you are upgrading from an earlier releases of LearningSpace, see the Migration Guide for instructions.
Refer to your WebSphere Application Server documentation for information on the various server configuration
options available for your Learning Management System deployment as well as for server and application
deployment guidelines.
Creating a new database or upgrading an existing database
If you are installing the Learning Management System for the first time, you’ll need to create a new database to use
with it. You can create the new database before installation (which allows you to set up the data source ahead of
time), or you can use the help of the Learning Management System scripts to create it for you (requiring you to
create or select a data source as you proceed). The instructions in this guide direct you to create the database before
installing the Learning Management System, so you can verify that the database and the corresponding data source
are configured correctly before you attempt to use them. Refer to the chapter “Installing and configuring database
servers and schema” for more information on this subject.
If you are upgrading from LearningSpace 4.11 or 5.01, you already have a database, which must be upgraded to
reflect the structure used in the Learning Management System. Perform the database upgrade during installation or
after. In all cases you need to install the Learning Management System complete with the databases. The migration
procedures will then connect to the source (LearningSpace 4 or 5) database to unload the data and load it into the
Learning Management System database.
For additional information on information migration, refer to the “Information Migration” chapter or the Learning
Management System Migration Guide. For more information on databases, refer to the chapter “Installing and
configuring database servers and schema.”
Chapter 4: Identifying LMS Hardware Assets 11
Learning Management System Hardware requirements
For the most up-to-date hardware requirements, refer to the README.TXT file and the Release Notes shipped with
this product.
12 IBM Lotus LMS Release 1 Installation Guide
Chapter 5
Installing the WebSphere Core
To successfully run the Learning Management System, you are required to have the WAS (WebSphere Application
Server) Core installed on the desired systems. This can be a single server or multiple servers. The following
instructions explain how to install this component.
Note: For more complete information on installing WAS, refer also to http://www3.ibm.com/software/webservers/appserv/library/index.html.
If multiple servers are used, you must install the Network Deployment module. Refer to “Chapter 10 Installing the
ND Module” for more information.
The following instructions explain how to install the WebSphere Core:
•
For remote UNIX users only, set up X session for a remote install from a local Linux machine as follows:
1.
Open a terminal window on your local machine.
2.
Type # ifconfig Note your IP address;
3.
Type # xhost remote_hostname + (where remote_hostname is the name of the host to which
you will connect in order to install WAS).
4.
Login to the remote machine as the root user.
5.
Configure the remote machine to use your local machine as its graphical display. For a remote AIX
host, type the following:
# DISPLAY=x.x.x.x:0 xhost (where x.x.x.x = the IP address of your local machine)
For a remote Sun Solaris™ host, type the following:
# DISPLAY=x.x.x.x:0 (where x.x.x.x = the IP address of your local machine)
# EXPORT DISPLAY
•
If necessary, unzip the WAS5 installer into a temporary directory (unzip must be installed on the AIX and
Sun Solaris machines for this purpose).
•
Launch the installer by executing LaunchPad.sh (for UNIX hosts) or install.bat (for Windows).
Note: Before running .sh files in a UNIX environment, make sure that the “execute” permission is set.
•
Follow the prompts of the install display, accepting its defaults with the following exceptions:
1.
Choose “Custom Install.”
2.
Deselect “Embedded Messaging” because the Learning Management System does not use Java
Messaging Service (JMS).
3.
For Windows users, drop “\Program Files” from the install path of both the WebSphere Application
Server and IBM HTTP Server products. You may not need to install the HTTP server, for example if
you have previously installed IBM Directory Server 4.1 on the same machine.
Important Note for AIX and Linux users: The WebSphere Application Server installation contains the IBM
HTTP Server. AIX and Linux can also include an HTTP server. This server should be removed or
reconfigured before the installation of the WAS and HTTP server to avoid port conflicts.
4.
Make sure that the Node Name (first field) for your machine is not a qualified DNS name, but that
there is an IP address or fully-qualified Host Name in the second field.
Chapter 5: Installing the WebSphere Core 13
5.
For Windows users, choose to run both WebSphere Application Server and IBM HTTP Server as
services.
6.
Do not register the product.
7.
Once the installer completes, the First Steps window will open. Select “Verify Installation” to launch
the Installation Verification Tool (IVT). Its output will be written to the terminal (or command)
window “behind” the First Steps GUI.
8.
Verify that IBM HTTP Server has set the server’s name correctly in its configuration file. Open the file
$HTTP_SERVER_ROOT/conf/httpd.conf and search for the ServerName directive. Be sure it is
set to the desired host name of your WAS server.
9.
Be sure to review the WebSphere release notes (especially platform-specific notes).
To start and stop WAS, use the startServer and stopServer scripts and/or (on Windows) Start Menu shortcuts. Once
WAS Global Security has been enabled, you must provide a username and password to the stopServer script and
shortcut.
On UNIX systems, use the following to start and stop WAS where $SERVERNAME is the name of the WAS
Application Server to start or stop and $USERNAME and $PASSWORD are defined in the configuration of the Active
User Registry for which WAS Global Security is enabled:
/$WAS_ROOT/bin/startServer.sh $SERVERNAME
/$WAS_ROOT/bin/stopServer.sh $SERVERNAME
/$WAS_ROOT/bin/stopServer.sh $SERVERNAME –username $USERNAME –password $PASSWORD
On a Windows system, use the following:
\$WAS_ROOT\bin\startServer.bat $SERVERNAME
\$WAS_ROOT\bin\stopServer.bat $SERVERNAME
\$WAS_ROOT\bin\stopServer.bat $SERVERNAME –username $USERNAME –password $PASSWORD
For Windows systems you must also modify the properties of the Start Menu shortcut (Start -Programs -IBM
WebSphere -Application Server -Stop the Server) to append -username $USERNAME –password $PASSWORD in
the Target field.
Enabling SSO in WebSphere
Single Sign-On (SSO), also known as single logon, is the process which permits users to move between different
Web applications or different parts of the same Web application hosted by the same or different physical machines,
without being prompted for a user name and password (or certificate) every time.
For example, if SSO is not used, you will have to log in to the Delivery Server every time you launch a course from
the LMM server. As such, SSO considerations should be carefully considered in your Learning Management System
deployment planning to allow for the greatest efficiency in logging in users.
Use the following procedure to set up SSO for your configuration.
1.
Start your browser and log into your WAS Administration Console: http://hostname:9090/admin. At
this point security is not enabled.
2.
You will notice new features here. Under System administration, you will have Node Agents and Nodes. The
Node Agent is the physical machine. You can stop or restart the node here but to start the node you have to
do it from the command line. On the Nodes panel it is very important that the Node is synchronized, this can
take a few minutes to synchronize.
3.
Enable SSO by doing the following:
14 IBM Lotus LMS Release 1 Installation Guide
•
Expand the Security panel on the left side.
•
Expand Authentication Mechanisms.
•
Click LTPA.
•
Enter the password for LTPA (for example, wasadmin)
•
Click Save.
•
On the LTPA panel, click Single Sign On at the bottom of the panel.
•
Check that SSO is enabled.
•
Enter the domain name (for example, acme.com).
4.
Enable Security (for more information, refer to the “Enable WAS Global Security” section of Chapter 13
Configuring WebSphere Application Server Security).
5.
Stop the servers. Stop the nodes first then stop the manager.
•
For Unix use: WebSphere/AppServer/bin/stopNode.sh
•
For Windows 2000 use: WebSphere\AppServer\bin\stopNode
•
For Unix use: WebSphere/DeploymentManager /bin/stopManager.sh
•
For Windows use: Websphere\DeploymentManager\bin\stopmanager
6.
Start the servers by first starting the manager then starting the nodes.
7.
Once security is enabled, you will have to provide the proper credentials when stopping the node or the
manager.
8.
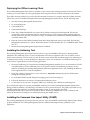
If you need to disable security, do it in security.xml located in
DeploymentManager/config/cells/hostNetwork.
9.
Regenerate the HTTP plug-in. The plugin config is written to
DeploymentManager\config\cells\plugin-cfg.xml. You need to copy file to
AppServer\config\cells.
10. Edit the file and change the references from DeploymentManager to AppServer.
11. Restart the Apache server.
For further information on the Learning Management System and SSO refer to Chapter 5 Managing Users in the
IBM Lotus Learning Management System Release 1 Administrator's Guide.
Chapter 5: Installing the WebSphere Core 15
16 IBM Lotus LMS Release 1 Installation Guide
Chapter 6
Installing or Identifying the LDAP Directory
The Learning Management System requires an LDAP directory for product operation.
Either an IBM Directory Server 4.1 directory is installed or configured, or a pre-existing LDAP directory is
identified. Also, at least two user-names that are recorded in the directory must be identified. These are for the
WebSphere and the Learning Management System administrator.
Note: There are no naming conventions for these administrator names. Any valid user name will do for either.
The organization of the LDAP directory is a key factor in operating the Learning Management System. Many
aspects of the Learning Management System operation require that directory path expressions be specified. An
example is rostering; while users can be rostered in the application manually, large deployments will either employ
the "roster from file" capability, where a directory LDIF file is imported into the system, or will employ "auto
rostering" where a directory path or group indicating users who should be given access is specified.
Note: Some of the IBM components necessary for secure identity management (for example, IBM Directory Server)
are not shipped with this product. Refer to www.ibm.com/software/directory for more information on obtaining
the necessary components.
Installing the IBM Directory Server LDAP Directory: an example
The following information provides instructions for installing the IBM Directory Server 4.1 on a Windows 2000
server. Before you begin, you must make sure that a web server (IBM HTTP Server, Apache, or IIS) is installed on
your machine. It is needed to access the IBM Directory Server web-based administrative interface.
Important Note for AIX and Linux users: The WebSphere Application Server installation contains the IBM HTTP
Server. AIX and Linux can also include an HTTP server. This server should be removed or reconfigured before the
installation of the WAS and HTTP server to avoid port conflicts.
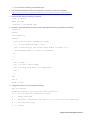
To begin, make sure you are logged on as a user with administrative privileges prior to starting the installer. Run
the setup.exe program in the directory containing the program files and perform the following steps.
Installation Steps
1.
At the ‘Select a language’ window select English (default) then click OK.
2.
At the ‘Welcome to the InstallShield Wizard for IBM Directory Server 4.1’ click Next to continue.
3.
At the ‘Software License Agreement’ window ensure that “I accept the terms in the license agreement” is
selected and then click Next.
4.
Click Next at the informational window indicating what Web Servers are installed.
5.
Click Next to install the IBM Directory Server 4.1 in the default location.
6.
In the ‘Select the language for IBM Directory’ window, select English and then click Next.
7.
In the ‘Choose the setup type that best suits your needs’ window, select Custom and then click Next.
8.
In the ‘Select the features to install’ window ensure that the following are selected:
•
Client SDK 4.1
•
*DMT 4.1 & Java™ 1.3
•
Server 4.1
Chapter 6: Installing or Identifying the LDAP Directory 17
9.
•
DB2 V7.2 (if necessary)
•
GSKit5
•
IBM HTTP Server 1.3.19 (if necessary)
Click Next.
10. In the ‘Select the components to configure’ window, ensure that all three options are selected, and then click
Next.
11. If you elected to install the IBM HTTP server, enter a user id, password, and password confirmation.
12. In the ‘Enter a new LDAP Administrator distinguished name and password’ window enter the following:
•
An Administrator distinguished name, for example, cn=root.
•
An Administrator password
13. Tab and reenter the password.
14. Click Next.
15. If you elected to install DB2, at the ‘Enter the userid and password for the DB2 system window, enter a user
id, password and password confirmation, and then click Next.
16. At the next window, ensure that ‘Create a Universal DB2 database (UTF8)’ is selected and then click Next.
17. At the next window, choose a drive for the DB2 database files and then click Next.
18. The next window is informational only, so simply click Next.
19. Click OK in the DB2 installation window. The installation of all selected software will take several minutes.
Do not interrupt the process.
20. Click OK at the ‘GSKit Installation’ window.
21. The ‘Please read the information below’ window is informational only, select Next to continue.
22. The next ‘Please read the information below’ window is informational only, click Next to continue.
23. Click Next at the ‘Yes, restart my system window.’
24. Click Finish.
After the system reboots the ‘Starting IBM Directory Server Configuration’ begins. This operation takes a few
minutes. Do not cancel.
When the machine reboots the ldapcfg.exe will automatically run and setup the DB2 database it uses as a repository.
Directory Configuration Steps
Administering the directory – do the following to administer the directory:
1.
Start the Directory Server Administrative interface and do the following:
•
Open a browser session.
•
Type in the URL to invoke the administrative interface: http://machine/ldap where machine is the DNS
name of your machine.
2.
Login to the administrative interface and type in the administrator name (defined during the install process)
and password and click Logon.
3.
Add a suffix to the directory by doing the following:
•
Choose Setting - Suffixes in the Directory Server pane.
•
Enter a suffix (for example, o=yoursuffix) in the Suffix DN text box.
18 IBM Lotus LMS Release 1 Installation Guide
•
Click Update. You should see your suffix appear in the list of suffixes known to the directory server.
Note: The Web administration interface for Directory Server is also not supported on Linux. Refer to the
Special Installation Issues chapter in this guide for a workaround for this issue.
4.
Restart the directory server by choosing Current state - Start/Stop from the Directory Server pane.
5.
Click the Start button. Eventually you should see a message that the directory server is currently running.
6.
Logoff from the administrative interface by doing the following:
•
Choose Logoff from the Directory Server pane.
•
Click Logoff. All options (except Introduction and Logon) should disappear from the Directory Server
pane.
•
Close the browser session.
Populating the directory – do the following to administer the directory:
7.
Start the Directory Management Tool: Start - Programs - IBM Directory Server - Directory Management Tool.
8.
Logon as the directory administrator and do the following:
9.
•
Choose Server - Rebind on the ldap://hostname:389 tab.
•
Click the Authenticated button on the Rebind pane.
•
Enter the directory administrator's DN and password in the appropriate text boxes.
•
Click OK. You'll probably see a warning that the suffix you created earlier doesn't contain any data.
Define the suffix by doing the following:
•
Choose Directory tree - Browse tree from the ldap://hostname:389 tab.
•
Click the Add button in the Browse tree pane. The Add an LDAP Entry screen appears.
•
At the Add an LDAP Entry screen do the following:
o
Choose Organization in the Entry type drop down.
o
Leave Parent DN blank.
o
Enter the DN of the suffix (e.g. o=yourentry) in the Entry RDN text box.
o
Click OK. The Add an LDAP Entry screen expands to include additional attributes.
o
Click Add. The entry should appear in the directory tree.
10. Exit the Directory Management Tool by clicking the Exit button in the lower left hand pane.
Chapter 6: Installing or Identifying the LDAP Directory 19
Creating WebSphere and Learning Management System Administrator Accounts
You need at least two accounts in the LDAP directory to complete the installation of the IBM Lotus Learning
Management System: an account for the WebSphere administrator and an account for the Learning Management
System administrator. To create these accounts, you can either import an LDIF file or create the entries by hand. For
instructions on importing LDIF files in IBM Directory Server, please consult the Directory Server Online Help. To
create these entries by hand:
1.
Start the Directory Management Tool: Start - Programs - IBM Directory Server - Directory Management Tool.
Note that each time you start the Directory Management Tool, you need to include a binding and password
that identifies the administrator of the directory. These are created when Directory Server is installed. The
default binding created during installation is cn=root.
2.
Choose Directory tree - Browse tree.
3.
Select the entry in the tree under which you want to add the new entry, and then click Add. For example, to
add the user accounts at the organization level, select your organization identifier, such as o=ibm, and then
click Add.
4.
Select the User Entry type.
5.
For Parent DN, enter the distinguished name of the tree entry you selected (for example, o=ibm) if this is
different from the entry selected in the tree—the Parent DN should automatically default to the entry
selected in the tree.
6.
Entry RDN – Enter the relative distinguished name (RDN) of the entry that you are adding (for example,
cn=wasadmin).
7.
Click OK to continue and to open the ‘Add and LDAP User dialog:
8.
In the ‘Add an LDAP User’ dialog, select inetOrgPerson for object class (which is the default object class for
new entries). The DN (distinguished name) should be populated automatically, as should the Common
Name. It is not necessary to enter a value for sn for this account. You must enter a userPassword on the
Business tab and a uid on the Other tab, and you may fill in any other details you wish.
9.
Repeat these steps to create the lmsadmin account.
WebSphere Application Server and LDAP User filter strings
In WAS, you must specify an LDAP user filter that searches the registry for users. This option is typically used for
Security Role to User assignments. It specifies the property by which to look up users in the directory service.
For example, in the syntax example (&(uid=%v)(|(objectclass=inetOrgPerson)(objectclass=ePerson))), users are looked
up based on their user IDs and the fact that the person entries have either inetOrgPerson or ePerson (or both) set as
their objectclass attribute. For more information about this syntax, see the LDAP Directory Service documentation.
To view this administrative page in the WAS Administration Console, click Security- User Registries- LDAPAdvanced LDAP settings.
Additional LDAP information and guidelines
When setting up a Domino LDAP directory with the Learning Management System, make sure that it has full text
indexing enabled as this significantly shortens the time for user rostering by file.
20 IBM Lotus LMS Release 1 Installation Guide
Chapter 7
Installing the Learning Management System Server Application
Files
Before deploying the complete Learning Management System, the Learning Management System Server files should
first be installed on the Application Server.
Note: If you are installing and deploying the Learning Management System Server and the Delivery Server onto
separate WAS servers, refer also to Chapter 16 Deploying the Learning Management System and DS Components
onto Separate WAS Application Servers for further information.
The important unit of packaging in the Learning Management System application install/deployment process is the
.ear (enterprise application archive) file. This package is a zip-format archive containing standardized metadata.
These files are identified by the .ear filename extension.
Installer program information
The Learning Management System comes with an Installer that lays down all of the files necessary for the eventual
deployment of the Learning and Delivery Servers. The Installer also gives you the option to install additional
Learning Management System-related utilities and tools.
After the initial application files are installed with the Installer, the application .ear file can then be read and
validated from the WAS Admin Console via a series of "wizard" pages. These pages let you finalize the application
settings for deployment.
The Learning Management System Installer comes packaged in four platform-specific sets of files: ibmlms_nt.zip,
ibmlms_aix.tar, ibmlms_linux.tar, and ibmlms_sun.tar.
The following table describes where the LAUNCHER and INSTALLER files are depending on the platform:
PLATFORM
LAUNCHER
INSTALLER
Windows 2000 and XP
Install.bat
Installer.exe
AIX™
install.sh
AIXInstaller.bin
Linux
install.sh
LinuxInstaller.bin
Sun
install.sh
SolarisInstaller.bin
Note: Before running the .sh files in a UNIX environment, make sure that the “execute” permission is set.
To start the Installer you must invoke the launcher for the platform you are installing on. The launcher will start the
Installer using the platform specific JDK that is included on the disk.
Note: The actual .ear and .war files are archived within setup.jar. The Authoring Tool is not archived and is available
to copy directly (if desired) from the install image. You need to use the Installer to install the utilities because, if you
don’t, the JDK won’t be installed.
The following steps explain the Learning Management System Server file install procedure using the Installer.
Chapter 7: Installing the LMS Server Application Files 21
Note: You can install the Learning Management System Server and Delivery Server application files at the same
time, even if you plan to deploy the applications to different machines. Since some of the settings are used for both
the Learning Management System Server and Delivery Server (LDAP settings, for example), installing both
applications together allows you to specify those settings only once.
Installing the Learning Management System Server application software
1.
Start the Installer.
2.
At the Language Selection Installer screen, select the language to be used by the Installer from the drop down
list.
3.
Click OK to continue.
4.
At the Welcome screen, click Next.
5.
Read the license agreement and click Accept if you agree to its terms. Translated versions of the IBM and
Learning Management System license agreements are installed in the Learning Management System license
subdirectory. Use any text viewer to read or print them in English or in the language configured on your
machine.
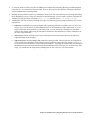
Select the Learning Management System features to install
6.
At the Features Screen, select the Learning Management System Server. The information you enter in the
screens that follow is collected and written to a settings_init.sql file under the lmm directory of the
destination folder.
7.
Select the Authoring Tool and/or Utilities if so desired. The Authoring Tool zip file is copied to the authoring
tool directory of the destination folder. All utilities are copied to the utilities directory of the destination
folder.
8.
Click Next to continue. You will now be shown the LDAP Settings screen.
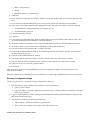
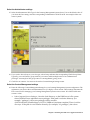
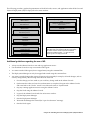
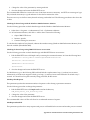
Select the correct LDAP settings and test the LDAP connection
9.
Enter the following LDAP Settings for your Learning Management System configuration:
•
Provider URL – Enter the URL of the LDAP provider. An example setting would be:
ldap://myserver.acme.com:389
•
Base Distinguished Name – Enter the Base Distinguished Name of the LDAP provider, indicating the
starting point for directory searches. An example setting would be: o=ibm (or, if the directory
configuration includes the country, o=ibm,c=us). Learning Management System logins will not work if
you do not include the country code in the Installer when the LDAP country attribute is used in
directory entries.
•
LDAP User ID – Enter the Distinguished Name (DN) of a user the Learning Management System Server
can use to authenticate to the LDAP provider. This user must have at least read access to the portion of
directory starting at the Base Distinguished Name. You may specify the Directory Server administrator
(for example, cn=root) or another LDAP user.
22 IBM Lotus LMS Release 1 Installation Guide
Note: The text on the LDAP Settings screen is incorrect; instead of "LDAP User ID" it should read "LDAP
User Distinguished Name (DN)."
•
LDAP Password – Enter the password used for accessing and further authenticating you to the LDAP
provider.
•
LDAP Provider – Select the LDAP provider that you use from the drop down list of supported
providers.
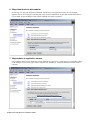
10. After you have entered all of the LDAP settings, validate them to make sure they are correct.
11. To test these settings, click on the Test LDAP Connection button. If you have entered valid settings you will
receive a message box stating that you have a successful connection otherwise you will be informed that you
connection has failed.
12. Click Next to continue.
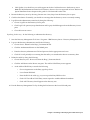
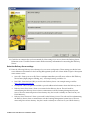
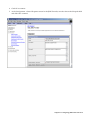
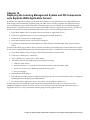
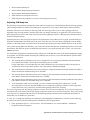
Select the Learning Management System Server settings
13. Enter the following Learning Management System Server Settings for your Learning Management System
configuration:
•
Base URL – Enter the base URL for accessing the Learning Management System Server. An example
setting would be: http://lms.acme.com/lms-lmm
•
Description – this is an optional text field to provide additional information about the Learning
Management System Server.
•
User Name and Password– Enter a user name and password for the Learning Management System
Server. These will be used for authenticating the Learning Management System Server when it
Chapter 7: Installing the LMS Server Application Files 23
communicates with the Delivery Server. The user name and password are arbitrary: they don’t need to
identify an actual user in your LDAP directory. During the install of the DS Server, the Learning
Management System username and password is asked again. Make sure that you provide there the same
Learning Management System Server password that you are providing here.
14. Click Next to continue after you have entered all of the settings. You are now shown the Administrator
Settings screen.
24 IBM Lotus LMS Release 1 Installation Guide
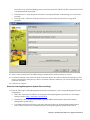
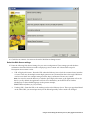
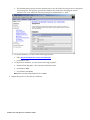
Select the Administrator settings
15. Select the Administrator Role Type for the Learning Management System Server. User is the default value. If
you select the User setting, enter the corresponding Administrators LDAP User ID. An example of this user
name is: jsmith.
16. If you wish to have Group as your role type, select Group and enter the corresponding LDAP Group Name.
Typically, you would enter a group name if you want to enable multiple users to have administrator
privileges. An example of this group name is: Learningadmins/group/acme.
17. Click Next to continue. You are now shown the Content Manager Settings screen.
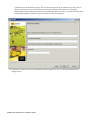
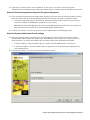
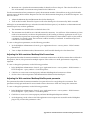
Select the Content Management settings
18. Enter the following Content Management Settings for your Learning Management System configuration. The
information you enter at this screen determines how you deploy course content. These settings determine the
FTP source used for managing your Learning Management System course content. All of these fields must
contain a value.
•
Path to Imported Course Packages – Enter the local directory on the LMM server's file system
where LMM will store uploaded course packages. If the path is a relative directory (for
example, "packages"), the course packages will be stored at
<WASInstallPath>\InstalledApps\<NODE>\LMM.ear\lms-lmm-complete-23.war\<relative
directory>. If the path is a non-relative directory (for example, "d:\packages"), the course
Chapter 7: Installing the LMS Server Application Files 25
packages will be stored on the LMM server in the specified directory without adding the
LMM's ear file installation path to the beginning of the directory.
•
FTP User Name for Deploying Content – Enter a user name for accessing the FTP server(s) that will
manage course content. This is the account that the Content Manager will use to access any content
deployment servers that want content transferred to them via FTP. Any content deployment server
(defined in a Delivery Server screen) that will use FTP must create an account with the specified FTP
User Name / Password for the Content Manager. This is a global setting used when defining the FTP
servers to deploy the content to the content servers. Since it is a global value, all content servers must be
setup with the same FTP username and password.
•
FTP Password for Deploying Content – Enter the password associated with the user name used for
accessing the FTP server(s) that will manage course content. This is a global setting used when defining
the FTP servers to deploy the content to the content servers. Since it is a global value, all content servers
must be setup with the same FTP username and password
•
Notification E-mail Format – Select the e-mail format that will be used for notifying you of course
package FTP transfers.
19. Click Next to continue. You are now shown the Destination screen.
Select the installation destination and complete the installation
20. Click Next to install the Learning Management System server to the default directory or click Browse to
select and install to a different directory.
21. Before the installation begins you are shown a Summary screen displaying all of your selected installation
options.
26 IBM Lotus LMS Release 1 Installation Guide
22. Click Next to install the Learning Management System Server software as specified by your selected options.
A Progress screen will let you monitor the progress being made while the Learning Management System
installs.
23. Enter the appropriate information in the product Registration screen as the installation completes. When the
install is complete and successful you are shown a Completed screen.
24. Click Finish to exit the Installer.
Note: If you wish to change installation settings after initially installing the Learning Management System you can
do so by running the Updater, which is included with the Learning Management System Installer program in the
/update directory. This option presents you with the necessary screens, pre-populated with your original settings
data. After you have made the necessary settings changes, the Updater then creates two update SQL scripts - one for
the Learning Management System Server (updateLMM.sql) and one for the Delivery Server (updateDS.sql). These
scripts are then run to change the respective databases. The Updater is described in more detail in Chapter 17:
Starting the Applications.
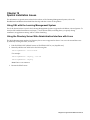
Starting the Learning Management System Server application
For details on starting this application, refer to “Chapter 17 Starting the Applications.”
Chapter 7: Installing the LMS Server Application Files 27
28 IBM Lotus LMS Release 1 Installation Guide
Chapter 8
Installing the Delivery Server (DS) Application Files
Before deploying the complete system, the Delivery Server files should first be installed on the Application Server.
Note: If you are installing and deploying the Learning Management System Server and the Delivery Server onto
separate WAS servers, refer also to Chapter 16 Deploying the Learning Management System and DS Components
onto Separate WAS Application Servers for further information.
The important unit of packaging in the Learning Management System application install/deployment process is the
.ear (enterprise application archive) file. This package is a zip-format archive containing standardized metadata.
These files are identified by the .ear filename extension.
Installer program information
The Learning Management System comes with an Installer that lays down all of the files necessary for the eventual
deployment of the Learning Management System and Delivery Servers. The Installer also gives you the option to
install additional Learning Management System-related utilities and tools.
After the initial application files are installed with the Installer, the application .ear file can then be read and
validated from the WAS Admin Console via a series of "wizard" pages. These pages let you finalize the application
settings for deployment.
The Learning Management System Installer comes packaged in four platform-specific sets of files:
ibmlms_nt.zip, ibmlms_aix.tar, ibmlms_linux.tar, and ibmlms_sun.tar. The following table
describes where the LAUNCHER and INSTALLER files are depending on the platform:
PLATFORM
LAUNCHER
INSTALLER
Windows 2000 and XP
Install.bat
Installer.exe
AIX
install.sh
AIXInstaller.bin
Linux
install.sh
LinuxInstaller.bin
Sun
install.sh
SolarisInstaller.bin
Note: Before running the .sh files in a UNIX environment, make sure that the “execute” permission is set.
To start the Installer you must invoke the launcher for the platform you are installing on. The launcher will start the
Installer using the platform specific jdk that is included on the disk.
Note: The actual .ear and .war files are archived within setup.jar. The Authoring Tool is not archived and is available
to copy directly (if desired) from the install image. You need to use the Installer to install the utilities because, if you
don’t, the JDK won’t be installed.
The following steps explain the Delivery Server file install procedure using the Installer.
Chapter 8: Installing the Delivery Server (DS) Application Files 29
Installing the Delivery Server application software
1.
Start the Installer.
2.
At the Language Selection Installer screen, select the language to be used by the Installer from the drop down
list.
3.
Click OK to continue.
4.
At the Welcome screen, click Next.
5.
Read the license agreement and click Accept if you agree to its terms. Translated versions of the IBM and
Learning Management System license agreements are installed in the Learning Management System license
subdirectory. Use any text viewer to read or print them in English or in the language configured on your
machine.
Select the Learning Management System features to install
6.
At the Features Screen, select the Delivery Server. The information you enter in the screens that follow
is collected and written to a settings_init_ds.sql file under the ds directory of the destination folder.
7.
Select the Authoring Tool and/or Utilities if so desired. The Authoring Tool zip file is copied to the authoring
tool directory of the destination folder. All utilities are copied to the utilities directory of the destination
folder.
8.
Click Next to continue. You will now be shown the LDAP Settings screen.
Select the correct LDAP settings and test the LDAP connection
9.
Enter the following LDAP Settings for your Learning Management System configuration:
•
Provider URL – Enter the URL of the LDAP provider. An example setting would be:
ldap://myserver.acme.com:389
•
Base Distinguished Name – Enter the Base Distinguished Name of the LDAP provider. An example
setting would be: o=ibm
•
LDAP User ID – Enter the user ID for authenticating the Learning Management System server to the
LDAP provider. An example setting would be: cn=ldap.
•
LDAP Password – Enter the password used for accessing and further authenticating you to the LDAP
provider.
•
LDAP Provider – Select the LDAP provider that you use from the drop down list of supported
providers.
30 IBM Lotus LMS Release 1 Installation Guide
10. After you have entered all of the LDAP settings, validate them to make sure they are correct.
11. To test these settings, click on the Test LDAP Connection button. If you have entered valid settings you will
receive a message box stating that you have a successful connection otherwise you will be informed that you
connection has failed.
12. Click Next to continue.
Select the Learning Management System Server settings
13. Enter the following Learning Management System Server Settings for your Learning Management System
configuration:
•
Base URL – Enter the base URL for accessing the Learning Management System Server. An example
setting would be: http://lms.acme.com/lms-lmm.
•
Description – this is an optional text field to provide additional information about the Learning
Management System Server.
•
User Name – Enter a user name for the Learning Management System Server. This will be used for
authenticating the Learning server when it communicates with the Delivery Server. The user name
provided here must be identical to the user name that was provided in the same install screen during the
installation of the Learning Management System Server.
•
Password – Enter the password to be used for accessing the Learning Management System Server. This
will be used for authenticating the Learning Management System Server when it communicates with the
Delivery Server. The password provided here must be identical to the password that was provided in
the same install-screen during the installation of the Learning Management System Server.
Chapter 8: Installing the Delivery Server (DS) Application Files 31
14. Click Next to continue after you have entered all of the settings. You are now shown the Delivery Server
Definition screen. Use this screen to enter all the necessary information for accessing the Delivery
Server.
Select the Delivery Server settings
15. Enter the following Delivery Server Settings for your server configuration. These settings provide the basic
server definition information for the Learning Management System. All of these fields except for Description
must contain a value.
•
Server ID – Enter your server ID. This is a unique name that you will use to refer to this Delivery
Server later (deploying an offering, etc.). An example setting would be: ds1.
•
Base URL – Enter the base URL you wish for the Delivery Server. An example setting would be:
http://ds1.acme.com/lms-ds.
•
Description – this is an optional text field to provide additional information about the Delivery Server.
•
Delivery Server User Name – Enter a user name for this Delivery Server. This will used for
authenticating the Delivery Server when it communicates with the Learning Management System
Server. The user name and password are arbitrary: they don’t need to identify an actual user in your
LDAP directory.
•
Delivery Server Password – Enter a password for this Delivery Server. This will used for authenticating
the Delivery Server when it communicates with the Learning Management System Server. The user
name and password are arbitrary: they don’t need to identify an actual user in your LDAP directory.
32 IBM Lotus LMS Release 1 Installation Guide
16. Click Next to continue. You are now shown the Web Server Settings screen.
Select the Web Server settings
17. Enter the following Web Server Settings for your server configuration. These settings provide the basic
information about the Web Server used for deploying course content. All of these fields except for
Description must contain a value.
•
URL of Deployed Content – Enter the URL where the Delivery Server looks for content when it launches
a course. There may be multiple content deployment servers (clustered) but this is the single URL that is
used to access them. An example setting would be: http:/contentserver.acme.com/content.
Note: You need to create the directory in which to place deployed content, as the application will not do
this for you. By default, the application will look for a subdirectory in the HTTP server’s htdocs
subdirectory for the installed language (in the present example,
IBMHTTPServer\htdocs\en_US\content).
•
Tracking URL – Enter the URL to the tracking servlet on the Delivery Server. This is pre-populated based
on the "Base URL" you entered previously for the DS and generally will not need to be changed.
Chapter 8: Installing the Delivery Server (DS) Application Files 33
18. Click Next to continue. You are now shown the Content Deployment Settings screen. This screen lets you
define the content deployment servers. For any server you can choose between FTP and File system as a
deployment type. If you choose FTP, then the Content Manager will deploy content to the FTP Host you
specify, in the location you specify (if any), using the FTP User Name and Password you defined on the
Content Manager Settings. If you choose File System, then the Content Manager will deploy content to the
absolute file location you specified in the preceding step. The Servers list simply allows you to see the servers
you have created and gives you the ability to remove them.
Select the Content Deployment settings for FTP deployment
19. If you selected FTP from the Deployment Type drop-down list, enter the following settings for each server
that you wish to add to the FTP server list on the right. Selecting this option means that the Learning
Management System will locate an FTP server for deployed content. If you selected File System as the type
go to the next section.
•
Location for Deployed Content – Enter the URL that Indicates where on the FTP host the content is
stored. For example, if you’ve specified IBMHTTPServer\htdocs\en_US\content as your directory for
deployed content, you need to configure the FTP server so that this directory is accessible. If the FTP
server is set up to map that physical directory to the FTP root directory course_content, you would enter
“course_content” as the Location for Deployed Content.
•
FTP Host – Enter the URL of the FTP host where the content is located.
20. After you have entered the settings, click Add to add the server to the server list. Click Remove Server to
remove any server from the list.
21. Add any additional servers using the same procedure.
34 IBM Lotus LMS Release 1 Installation Guide
22. Click Next to continue when you have added all of your servers. You are now shown the System
Administrator E-mail Settings screen. Skip to that section below to continue with the installation instructions.
Select the Content Deployment settings for file system deployment
23. If you selected File System from the Deployment Type drop-down list, enter the following setting. Selecting
this option means that the Learning Management System will search a file path for deployed content.
•
Location for Deployed Content – Enter the file path that indicates where on the server the content is
stored (for example, F:\IBMHttpServer\htdocs\en_US\content).
Note: Because the Content Manager runs on the Learning Management System Server, the location you
specify here must be accessible by the Learning Management System Server.
24. Click Next to continue. You are now shown the System Administrator E-mail Settings screen.
Select the System Administrator E-mail settings
25. Enter the following settings for setting up System Administrator E-mail. The DS will send out system
administration emails when certain events occur. The addresses you enter here let you specify who the emails should go to as well as what address they should be coming from. Both fields are required.
•
E-mail To Address – Enter the address that you want the System Administrator e-mail sent to.
•
E-mail From Address – Enter the address that you displayed as to where the System Administrator email originated from.
26. Click Next to continue. You are now shown the Destination screen.
Chapter 8: Installing the Delivery Server (DS) Application Files 35
Select the installation destination and complete the installation
27. Click Next to install the Delivery Server to the default directory or click Browse to select and install to a
different directory.
28. Before the installation begins you are shown a Summary screen displaying all of your selected installation
options.
29. Click Next to install the Delivery Server software as specified by your selected options. A Progress screen
will let you monitor the progress being made while the Delivery Server installs.
30. Enter the appropriate information in the product Registration screen as the installation completes. When the
install is complete and successful you are shown a Completed screen.
31. Click Finish to exit the Installer.
Important: Editing settings files created during installation incorrectly can result in data loss. Most of the needed
settings changes can be made via the Learning Management System Administrator’s Console. Refer to the
Administrator’s Guide for more information on changing settings via the Learning Management System
Administrator’s Console. If you wish to change installation settings after initially installing the Learning
Management System you can also use the Updater that comes with the Learning Management System Installer
program in the /update directory. This option presents you with the necessary screens, pre-populated with your
original settings data. After you have made the necessary settings changes, the Updater then creates two update
SQL scripts - one for the Learning Management System Server (updateLMM.sql) and one for the Delivery Server
(updateDS.sql). These scripts are then run to change the respective databases. The Updater is described in more detail
in Chapter 17: Starting the Applications.
Starting the Delivery Server application
For details on starting this application, refer to “Chapter 17 Starting the Applications.”
36 IBM Lotus LMS Release 1 Installation Guide
Chapter 9
Installing and Configuring Database Servers and Schema
The Learning Management System requires a number of different logical database schemas to function. These are
the following:
•
LMM database – this database resides on the Learning Management System Server and stores all
information about courses, users, progress, resources, deployment, status, etc. It is used for learning
management and reporting.
•
Audit database – this database stores information about all actions taken on the Learning Management
System Server.
•
DS (Delivery Server) database – this database contains a subset of the information on the Learning
Management System Server. It has the information that is required to deliver and track content to learners. It
only contains information about courses that are deployed to an individual delivery server. You can have
multiple delivery servers for a single Learning Management System Server. Each Delivery Server will be
associated with a unique Delivery Server database - the database is not shared among several distinct
Delivery Servers).
There is an LMM and Audit schema to support the Learning Management System on the Learning Management
System Server and one schema for each DS database.
To begin, make sure that the desired database server software is installed on all the desired systems. After you have
done that, use your vendor-supplied database utilities to run the SQL scripts supplied with the Learning
Management System product. These SQL scripts create and initialize the needed databases.
The scripts are named for their logical database and database platform. For example, the script to create the Audit
database on IBM’s DB2 is audit_db2.sql while lmm_oracle.sql creates the Learning Management System
database on an Oracle system.
Database Creation Overview
To create and initialize the three databases as well as keep them logically separated, perform the following steps:
1.
If you are running Oracle, obtain three separate accounts for your DB system: one each for Audit, Learning,
and Delivery databases. If you are running SQL Server or DB2, you will create three separate databases
rather than a single partitioned database.
2.
Do the following general tasks using your database vendor’s tools:
o
Log in using your Audit database account
o
Execute the supplied Audit SQL script for your database platform
o
Log in using your Learning Management System database account
o
Execute the supplied Learning Management System SQL script for your database platform
o
Log in using your Delivery account
o
Execute the supplied Delivery Server SQL script for your database platform
The procedure for each database platform is basically the same. The major difference is the set of SQL scripts that
are run. As mentioned, there is a specific set of scripts for each database platform.
Chapter 9: Installing and Configuring Database Servers and Schema 37
Be sure to follow your database software’s guidelines for sizing the installation and configuring an efficient physical
architecture for the database. You may need to take extra action, for example, to create separate table spaces. You
may also need to edit the provided database scripts before execution.
For more information on the Learning Management System databases and database schemas, refer to the
Administrator’s Guide.
DB2 database creation and configuration for the Learning Management
System: an example
In this DB2 database creation example, the database schemas are logically distinct and can be located on the same
DB2 instance or different instances.
The database can be located on the application server, but for performance and security reasons it is best to have it
on a dedicated database server.
This installation example involves the following
•
copying the database creation scripts to the database server
•
editing the scripts for site specific considerations (for example, file placement and size)
•
running the scripts
•
running a script that creates site specific seed data.
Installation Requirements
You must have the following to complete this example procedure successfully
•
An installed and running DB2 instance.
Note: Refer to http://www-3.ibm.com/cgibin/db2www/data/db2/udb/winos2unix/support/v7pubs.d2w/en_main for more information DB2 and how
to install it.
•
Unicode codeset. For multilingual support, a unicode (UTF-8) codeset must be used for database creation.
An example script is supplied with the product. Note: You create a database for each schema with DB2. See
the example below for more information.
•
Sufficient disk space and memory. Refer to your DB2 documentation for these requirements.
Before you begin
•
If you are installing on a system that currently has the Learning Management System databases, you must
either back up and drop those databases OR edit the supplied scripts to provide new database names.
•
You must be running JDBC 2.0 or higher.
•
UNIX USERS: Before running scripts in a UNIX environment, make sure that the “execute” permission is set.
•
SOLARIS USERS: Before installing the DB2 for Solaris product using the DB2Setup Utility or the DB2_install
and PKGADD commands, you may have to update your system's kernel configuration parameters. The
following lines should be added to the file, /etc/system. You must reboot your machine after updating
any kernel configuration parameters:
set msgsys:msginfo_msgmax=0xFFFF
set msgsys:msginfo_msgmnb=0xFFFF
38 IBM Lotus LMS Release 1 Installation Guide
set msgsys:msginfo_msgmap=0x102
set msgsys:msginfo_msgmni=0xFF
set msgsys:msginfo_msgssz=0x10
set msgsys:msginfo_msgtql=0x400
set shmsys:shminfo_shmmax=0x20000000
set shmsys:shminfo_shmseg=0x32
set shmsys:shminfo_shmmni=0x12C
set semsys:seminfo_semmni=0x400
set semsys:seminfo_semmap=0x400
set semsys:seminfo_semmns=0x800
set semsys:seminfo_semmnu=0x800
set semsys:seminfo_semume=0x32
The settings can be verified with these commands:
# ipcs –a
# sysdef | egrep MSG\|SEM\|SHM
This information is also available in the DB2 knowledge base at: http://www-3.ibm.com/cgibin/db2www/data/db2/udb/winos2unix/support/document.d2w/report?fn=db2v7ixdb2ix31.htm#HDR
UPDATE_SOLARIS_KERNEL.
•
LINUX USERS: Running DB2 on a Linux 2.4 server requires changes to the Linux kernel parameters.
Recompile the kernel source as explained below before you install DB2 on the server.
•
Change the msgmni parameter to 256 with the following command:
echo 256 > /proc/sys/kernel/msgmni
This resets the maximum number of SYSV IPC message queues from the default of 16 to 256.
•
Increase SEMMNI from 128 to 2048.
This specifies the maximum number of semaphore IDs allowed in the kernel; the upper limit for this
value is 32768.
•
Increase SEMMSL from 250 to 500.
This specifies the maximum number of semaphores per sem ID; the upper limit for this value is 8000.
•
Increase SEMOPM from 32 to 256.
This specifies the maximum number of operations allowed per semop() call; the upper limit for this value
is 1000.
•
Increase the number of open files using the command:
echo 32768 > /proc/sys/fs/file-max
Chapter 9: Installing and Configuring Database Servers and Schema 39
This specifies the maximum number of open files, system-wide, to 32K.
Database creation details
The following procedures provide detailed instructions on installing and creating the necessary DB2 databases for
use with the Learning Management System:
Creating an Audit database
1.
Copy the script files to the database server. The files required are: cr_db2db_audit.bat (for Windows) or
cr_db2db_audit.sh (for UNIX®) and audit_db2.sql.
Note: The default location that the Installer places these files is \Program Files\IBM\lms\scripts. However
if you plan to run the scripts from a DB2 command window, \Program Files\SQLLIB\bin is a more
convenient location.
Note: When UNIX shell scripts are copied, they may need to be made executable by using the following
command: chmod +x *.sh
Note: When running the .bat files to create the Audit, LMM, and DS databases, you can edit each .bat file to
run all of the other DB scripts automatically. This is done by removing the REM comments from within the
file. Each of the 3 batch files allows this.
2.
Log into the DB2 server using the DB2 administrator account. The database creation must happen on the
actual database server. The script cannot be run from a database client machine. The cr_db2db_audit.bat
(Windows) or cr_db2db_audit.sh (UNIX) scripts create a unicode. Your database administrator should
review and edit this file for your environment.
3.
If desired, edit the cr_db2db_audit.bat or cr_db2db_audit.sh file. Changes that might have to be made
include specifying multiple database files, increasing file size, and increasing bufferpool size.
4.
Open a DB2 command window and run the cr_db2db_audit.bat or cr_db2db_audit.sh file. For example, in
Windows use the following command: cr_db2db_audit.bat > audit_db.log. For example, in UNIX
use the following command: ./cr_db2db_audit.sh > audit_db.log. This step creates a database
named “lsaudit”, and creates the buffer pools required for any Learning Management System schema.
5.
If desired, edit the audit_db2.sql script.
6.
From a DB2 command window, run the script with the following command: db2 -tvf audit_db2.sql >
audit_schema.log.
7.
From the DB2 command window, run the Audit seed data script db2 -tvf audit_data.sql
Creating the LMM database
1.
Copy the script files to the database server. The files required are: cr_db2db_lmm.bat (for Windows) or
cr_db2db_lmm.sh (for UNIX) and lmm_db2.sql.
Note: When UNIX shell scripts are copied, they may need to be made executable by using the following
command: chmod +x *.sh
2.
Log into the DB2 server using the DB2 administrator account. Database creation must happen on the actual
database server. This script cannot be run from a database client machine.
3.
If desired, edit the cr_db2db_lmm.bat or cr_db2db_lmm.sh file. Changes that might have to be made
include specifying multiple database files, increasing file size, and increasing bufferpool size - temporary and
database tablespaces with a 16K blocksize, and bufferpools with a 16K blocksize. Your database
administrator should review and edit this file for your environment.
40 IBM Lotus LMS Release 1 Installation Guide
4.
Open an DB2 command window and run the cr_db2db_lmm.bat or cr_db2db_lmm.sh file. For example:
cr_db2db_lmm.bat > lms_db.log. This creates a database named lmm, and creates the buffer pools
required for any Learning Management System schema.
5.
If desired, edit the lmm_db2.sql script for file size and placement. From a DB2 command window, run the
script with the following command: db2 -tvf lmm_db2.sql > lms_schema.log
6.
From the DB2 command window run the seed data scripts. For example: db2 -tvf
permission_data.sql AND db2 -tvf settings_init.sql.
Creating the DS database(s)
1.
Copy the script files to the database server. The files required are: cr_db2db_ds.bat (for Windows) or
cr_db2db_ds.sh (for UNIX) and ds_db2.sql.
Note: When UNIX shell scripts are copied, they may need to be made executable by using the following
command: chmod +x *.sh
2.
Log into the DB2 server using the DB2 administrator account. Database creation must happen on the actual
database server. The script cannot be run from a database client machine.
3.
If desired, edit the cr_db2db_ds.bat or cr_db2db_ds.sh file. Changes that might have to be made include
specifying multiple database files, increasing file size, and increasing bufferpool size - temporary and
database tablespaces with a 16K blocksize, and bufferpools with a 16K blocksize. Your database
administrator should review and edit this file for your environment.
4.
Open a DB2 command window and run the cr_db2db_ds.bat or cr_db2db_ds.sh file. For example:
cr_db2db_ds.bat > ds_db.log. This creates a database named ds, and creates the buffer pools required
for any Learning Management System schema.
5.
If desired, edit the ds_db2.sql script for file size and placement. From a DB2 command window, run the
script with the following command db2 -tvf ds_db2.sql > ds_schema.log.
6.
From the DB2 command window, run the DS seed data script. For example: db2 –tvf
settings_init_ds.sql.
Connecting the DB2 client to a remote database
In order to run applications using remote DB2, you must do the following:
•
Install the DB2 client on the same machine where the WebSphere Application Server (WAS) is installed (see
“Chapter 6 Installing the WebSphere Core” for more information).
•
Verify the DB2 client (UNIX only).
•
Add the remote databases to the DB2 client’s catalog.
•
Modify WAS environment to use DB2 drivers.
Installing the DB2 client
Use the following instructions to install the DB2 client for AIX:
1.
Refer to the IBM DB2 Universal Database for Unix Quick Beginnings for requirements and change the kernel
parameters as needed.
2.
If DB2 has not been installed run db2setup from the directory where DB2 is located and install the
Administration client. If DB2 is already installed run /usr/lpp/db2_07_01/install/db2setup.
3.
Select the “To create a DB2 instance” option, Admin Server and click Enter.
4.
Select the “To create a DB2 instance” option. A panel for db2inst1 user is presented.
Chapter 9: Installing and Configuring Database Servers and Schema 41
5.
Create a password for db2inst1.
6.
Select OK. The installation may take up to 15 minutes. When installation has completed a notice window
informs you whether the installation was successful.
7.
Highlight OK when finished and click Enter.
8.
If errors are found check the DB2 error log on /tmp.
Use the following instructions to install the DB2 client for Windows:
1.
From CD ROM, run setup.exe.
2.
Select Administration Client.
3.
Select the default values.
Verify the DB2 client (UNIX only)
1.
Check the DB2 instance profile.
2.
Login as db2inst1.
3.
Verify that .profile has the following content. If it is not there, add it to the client:
if [ -f /home/db2inst1/sqllib/db2profile ]; then
. /home/db2inst1/sqllib/db2profile
fi
4.
Update the root environment file by logging in as the root.
5. Add the following to .profile:
# Set up DB2 environment for root user.
if [ -f /home/db2inst1/sqllib/db2profile ]; then
. /home/db2inst1/sqllib/db2profile
fi
6. Log out.
Configure JDBC 2.0
Although WebSphere requires JDBC 2.0 drivers for its JDBC data sources, DB2 uses JDBC 1.0 by default. You must
configure DB2 to use its supplied JDBC 2.0 drivers in order for WebSphere to connect to DB2 databases using JDBC.
On Windows systems:
1.
Stop any running DB2 processes.
2.
Open a command prompt and navigate to the …\sqllib\java12 directory.
3.
Execute the file jdbc2.bat.
4.
You can now restart DB2 processes.
On UNIX systems:
42 IBM Lotus LMS Release 1 Installation Guide
1.
Log in as the DB2 instance owner (for example, db2inst1).
2.
Type
cd $HOME/sqllib
3.
Add the following line to the file userprofile:
. /$DB2_INSTALL_PATH/java12/usejdbc2
where /$DB2_INSTALL_PATH is the actual path where DB2 is installed on the machine, NOT an
environment variable.
Note: You should update each user account profile for your database system with the
.$HOME/sqllib/java12/usejdbc2 command.
4.
Save your changes to the file.
5.
Stop any running DB2 processes.
6.
Log out and log back in.
7.
You can now restart DB2 processes.
Catalog the remote databases
Use the following instructions for AIX:
1.
Catalog a TCP/IP node.
2.
Login as db2inst1.
3.
Run the startup script INSTHOME/sqllib/db2profile.
4.
Catalog the node as follows:
db2 catalog tcpip node db2node remote serverhost server port_number
5.
Catalog the database as follows:
db2 catalog database database_name as database_alias at node node_name
6.
Repeat for this procedure for the DS and Audit databases.
7.
Test the client-to-server communication by doing the following:
•
Connect to remote databases as follows:
db2 connect to database_alias user userid using password
•
Try the following command:
Select tabname from syscat.tables
Use the following instructions for Windows configurations:
1.
Start Programs - IBM DB2 - Client Configuration Assistant.
2.
Click Add.
3.
Select Manually configure a connection to a database and click Next.
4.
Select TCP/IP protocol. Click Next.
5.
Enter the Hostname.
6.
Enter the Port number.
7.
Click Next.
8.
Enter the Database name (for example, Learning Management System).
Chapter 9: Installing and Configuring Database Servers and Schema 43
9.
Enter the Database alias (for example, Learning2).
10. Click Next.
11. Unselect Register this database for ODBC and click Next.
12. Click Next on Step for Add Database Wizard.
13. Check Configure security options and click Next.
14. Click Finish and test your connection.
15. Repeat for this procedure for the DS and Audit databases.
Oracle database creation for the Learning Management System
In this example, the Learning Management System requires several distinct schemas to operate. There is an LMM
and Audit schema to support LMM on the Learning Management System Server and one schema for each DS
database.
These schemas are logically distinct, and can be located on the same Oracle instance - or different instances. The
database can be located on the application server but for performance and security reasons is usually on a dedicated
database server. This installation involves the following
•
editing the scripts for site specific considerations (for example, file placement and size)
•
running the scripts
•
running scripts that create site-specific seed data (these are called from the schema creation scripts)
Installation requirements
•
Client and server should have the same version of Oracle. There are known problems running an Oracle 8i
client (JDBC driver) against an Oracle 9i RDBMS.
•
Installed Oracle software.
•
Unicode codeset. For multilingual support, a unicode (UTF-8) codeset must be used for database creation.
An example database creation script is included.
•
Sufficient disk space and memory.
Database creation details
Oracle instance database creation can be done during the Oracle software GUI installation. Specify the UTF-8
character set during the installation.
If you want to create a database outside of the GUI, example scripts cr_oradb_8i.sql or cr_oradb_9i.sql can be
edited and run to create an Oracle 8i or Oracle 9i database.
Use the following procedures to create the Oracle databases.
Creating a Learning Management System schema
1.
Create a user to be the database owner. You can do this by editing the cr_oraown_lmm.sql script and then
running it. (The script actually creates two users: lmm, which designates the database owner, and lmm_app,
which you can ignore.) To run the script from the sqlplus command line, type the following:
sqlplus system/<password>@<database> @cr_oraown_lmm.sql
2.
Run the schema creation script for the Learning Management System owner account created in the previous
step as follows. This script will also call the seed data script.
44 IBM Lotus LMS Release 1 Installation Guide
sqlplus lmm/lmm@<database> @lmm_oracle.sql
Creating an Audit schema
1.
Create a user to be the database owner. You can do this by editing the cr_oraown_aud.sql script and then
running it. . (The script actually creates two users: lmm, which designates the database owner, and lmm_app,
which you can ignore.) To run the script from the sqlplus command line, type the following:
sqlplus system/<password>@<database> @cr_oraown_aud.sql
2.
Run the schema creation script for the Learning Management System owner account created in the previous
step. This script will also call the seed data script.
sqlplus aud/aud@<database> @audit_oracle.sql
Creating the DS schema(s)
1.
Create a user to be the database owner. You can do this by editing the cr_oraown_ds.sql script for file and
then running it. . (The script actually creates two users: lmm, which designates the database owner, and
lmm_app, which you can ignore.) To run the script from command line sqlplus, type:
sqlplus system/<password>@<database> @cr_oraown_ds.sql
2.
Run the schema creation script for the Learning Management System owner account created in the previous
step.
sqlplus ds/ds@<database> @ds_oracle.sql
JDBC driver information
Make sure that you install the same version of Oracle client software on the application server as that which was
installed on the database server (for example, 9i database = 9i client). This will install Oracle’s thin JDBC driver,
which is used in the examples for configuring WAS.
MS SQL Server database creation for the Learning Management System
There is a Learning and Audit schema to support the Learning Management System on the Learning Management
System Server and one schema for each DS database. These databases are logically distinct, and can be located on
the same SQL Server instance, or different instances.
The database can be located on the application server, but for performance and security reasons are usually will on a
dedicated database server. This installation involves the following
•
editing the scripts for site specific considerations (for example, file placement and size)
•
running the scripts
•
running a script that creates site specific seed data
Installation requirements
•
Installed and running MS SQL Server instance.
•
MS SQL Server client installed on the machine from which Install is run.
•
Sufficient disk space and memory.
Database creation details
Use the following procedure for creating the databases. Observe the following when running the scripts from the
command line:
Chapter 9: Installing and Configuring Database Servers and Schema 45
•
The “-S” server name option can be omitted if the script is being run on the database server itself.
•
The name that you will give for the server is the server alias you created with the “client network utility.”
•
The “-e” option should be omitted unless you are debugging installation problems.
•
If you have DB2 installed, you may need to rename the isql.bat file in the DB2 directory to isqldb2.bat, in
order to prevent conflicts.
Creating an Audit database
•
If desired, have the Database Administrator edit the cr_mssqldb_audit.sql script for the correct file size and
placement.
•
From a DOS command line, Run the scripts with the commands:
C:>isql -S <server_name> -U sa -i cr_mssqldb_audit.sql > auditdb.log
C:>isql -S <server_name> -d <audit_db> -U sa [-e] -i audit_mssql.sql >
audit.log
C:>isql -S <server_name> -d <audit_db> -U sa -i audit_data.sql > auditseed.log
Creating a Learning Management System database
•
If desired, have the Database Administrator edit the cr_mssqldb_lmm.sql script for the correct file size and
placement.
•
From a command window, run the scripts with the commands:
C:>isql -S <server_name> -U sa -i cr_mssqldb_lmm.sql > lmmdb.log
C:>isql -S <server_name> -d lmm_db -U sa [-e] -i lmm_mssql.sql > lmm.log
C:>isql -S <server_name> -d lmm_db -U sa -i permission_data.sql
C:>isql -S <server_name> -d lmm_db -U sa -i settings_init.sql
Creating a DS database(s)
•
If desired, have the Database Administrator edit the cr_mssqldb_ds.sql script for the correct file size and
placement.
•
From a command window, run the scripts with the commands:
C:>isql -S <server_name> -U sa -i cr_mssqldb_ds.sql > dsdb.log
C:>isql -S <server_name> -d ds_db -U sa [-e] -i ds_mssql.sql > ds.log
C:>isql -S <server_name> -d ds_db -U sa [-e] -i settings_init_ds.sql
•
Repeat these steps for each database instance that requires an delivery server database
JDBC Driver information
If you need to get copies of these drivers go to http://msdn.microsoft.com/downloads/.
Additional information about running scripts in different environments
The Learning Management System provides you with a variety of scripts for creating the Learning Management
System databases in a variety of DBMS and OS environments. The following are some guidelines to keep in mind
when running these scripts:
46 IBM Lotus LMS Release 1 Installation Guide
•
To meet the need for UNIX script files for DB2 that accomplish the same thing that the provided DB2 DOS
batch files do, ".sh" scripts have been provided. There is one script for each database. These files should be
read and edited before executing them.
•
Both the DOS and UNIX scripts have comments in them to provide some instruction in running and editing
them. Depending on how a script was installed on the DB machine, you may need to make it executable (for
example, by using the UNIX command chmod +x *.sh) and then run it ( ./cr_db2db_lmm.sh).
•
All databases can also be built by running one script. The following points present information on how this
can be done:
•
DB2 users: Commands for creating schemas and populating seed data are added to the ".sh" and ".bat"
scripts, but are commented out. System administrators can uncomment the scripts and run the .sh or .bat
script to build the whole database. On the other hand, you can still run the commands as described
earlier in this chapter while using the remarked commands as documentation of what is needed to run
all of the scripts manually.
•
Oracle users: Schema creating scripts are provided that call seed data scripts (this has already been
explained earlier in this chapter).
•
SQLServer users: The run_mssql_*.bat scripts have been provided. These scripts run all commands to
create an SQLServer database, create schema, and run seed data scripts. These are written to run as "sa"
or sysadmin, but can be edited to work for their environment. The batch file assumes that it is running on
the database server and creates the directory that the database files will be put into. As with every other
script, you should edit the script if these assumptions are not correct for your environment.
Chapter 9: Installing and Configuring Database Servers and Schema 47
48 IBM Lotus LMS Release 1 Installation Guide
Chapter 10
Installing the Network Deployment (ND) Module
You are required to have the WAS (WebSphere Application Server) Core installed on the desired systems. This can
be a single server or multiple servers.
If multiple servers are used, you must install the Network Deployment module. The Network Deployment (ND)
module configures and controls multi-server WAS installations. If the intent is to deploy the Learning Management
System on a cluster of servers for capacity and high availability, then ND must be installed to manage the cluster.
The ND module can be installed on a node where WAS Core has been installed. The following instructions explain
how to install ND
1.
Obtain the ND software from your Learning Management System software package.
2.
Unzip the file in a temporary directory.
3.
Run the LaunchPad (launchPad.bat for Windows, launchPad.sh on UNIX).
Note: Before running .sh files in a UNIX environment, make sure that the “execute” permission is set.
4.
During installation, accept all default values except for the following:
•
Deselect the Embedded Messaging install.
•
Windows users, drop “\Program Files” from the path.
5.
The installation creates the WebSphere/DeploymentManager directory. The DeploymentManager
directory is similar to AppServer directory.
6.
Stop any WebSphere servers (identifiable in Windows Task Manager of using ps in UNIX as Java processes
which consume 80-100 MB+ of RAM) that are running.
7.
Start the manager, and wait for the “Open for e-business” message.
8.
9.
•
For Unix use: WebSphere/DeploymentManager /bin/startManager.sh.
•
For Windows 2000 use: Websphere\DeploymentManager\bin\startmanager
Add your existing WAS node. This will add the existing server into the configuration. You can also migrate
applications at the same time. This command is run from the AppServer not the DeploymentManager,
directory:
•
For Unix use: WebSphere/AppServer/bin/addNode.sh nodename –includeapps –username
youruser –password yourpassword
•
For Windows 2000 use: WebSphere\AppServer\bin\addNode nodename –includeapps –
username youruser –password yourpassword
Check for error messages.
10. Run startNode, wait for message “open for e-business.”
•
For Unix use: WebSphere/AppServer/bin/startNode.sh
•
For Windows 2000 use: WebSphere\AppServer\bin\startNode
11. Start your browser and log into your admin console: http://hostname:9090/admin. At this point
security is not enabled.
12. You will notice new features here. Under System administration, you will have Node Agents and Nodes. The
Node Agent is the physical machine. You can stop or restart the node here but to start the node you have to
do it from the command line. On the Nodes panel it is very important that the Node is synchronized, this can
take a few minutes to synchronize.
Chapter 10: Installing the Network Deployment (ND) Module 49
13. Enable SSO by doing the following:
•
Expand the Security panel on the left side.
•
Expand Authentication Mechanisms.
•
Click LTPA.
•
Enter the password for LTPA (for example, wasadmin).
•
Click Save.
•
On the LTPA panel, click Single Sign On at the bottom of the panel.
•
Check that SSO is enabled.
•
Enter the domain name (for example, acme.com)
14. Enable Security (for more information, refer to the “Enable WAS Global Security” section of Chapter 13
Configuring WebSphere Application Server Security).
15. Stop the servers. Stop the nodes first then stop the manager.
•
For Unix use: WebSphere/AppServer/bin/stopNode.sh
•
For Windows 2000 use: WebSphere\AppServer\bin\stopNode
•
For Unix use: WebSphere/DeploymentManager /bin/stopManager.sh
•
For Windows use: Websphere\DeploymentManager\bin\stopmanager
16. Start the servers by first starting the manager then starting the nodes.
17. Once security is enabled, you will have to provide the proper credentials when stopping the node or the
manager.
18. If you need to disable security, do it in security.xml located in
DeploymentManager/config/cells/hostNetwork.
19. Regenerate the HTTP plug-in. The plugin config is written to
DeploymentManager\config\cells\plugin-cfg.xml. You need to copy file to
AppServer\config\cells.
20. Edit the file and change the references from DeploymentManager to AppServer.
21. Restart the Apache server.
50 IBM Lotus LMS Release 1 Installation Guide
The following provides a graphical representation of the WAS nodes, servers, and applications when WAS Core and
Network Deployment (ND) are deployed on the same machine:
Single Physical Host
WebSphere Node: $Hostname
WebSphere Node: $HostnameManager
WebSphere Application Server process:
LMS LS Server
WebSphere Application Server process:
dmgr
WebSphere Enterprise Application:
LMS LMS Server
WebSphere Enterprise Application:
adminconsole
WebSphere Application Server process:
LMS DS Server
WebSphere Enterprise Application:
filetransfer
WebSphere Enterprise Application:
LMS Delivery Server
WebSphere Application Server process:
nodeAgent
WebSphere Enterprise Application:
$Hostname
WebSphere Application Server process:
server1*
WebSphere Enterprise Application:
DefaultApplication
*server1 will still be present (but should NOT be started) if
a WAS Base node was migrated to ND after it had already
been started. Server1 will not be present if WAS Base
and ND were installed together -- i.e., Base was never
brought up prior to the deployment of ND.
WebSphere Enterprise Application:
SamplesGallery
Additional guidelines regarding the use of ND
•
Always use the Admin Console to start and stop application servers.
•
Use the Admin Console to stop or restart the Node Agent.
•
You must start the Node agent (from a stopped state) using the command line.
•
The Deployment Manager can only be stopped and started using the command line.
•
Any time you make changes that require all servers to be restarted (for example, cell-wide changes, such as
security configuration), the following order MUST be observed:
1.
Save the change you have made as you would any change made in the Admin Console.
2.
Synchronize the nodes and wait for synchronization to complete. Navigate in the Admin Console
and come back to the “Nodes” screen to see if the node status is “Synchronized.
3.
Stop any running application servers using the Admin Console.
4.
Stop the Node using the Admin Console.
5.
Logout of the Admin Console and close its browser window.
6.
Stop the Deployment Manager.
7.
Start the Deployment Manager.
8.
Wait until the Manager has started (the “open for e-business” message).
9.
Start the Node Agent.
Chapter 10: Installing the Network Deployment (ND) Module 51
52 IBM Lotus LMS Release 1 Installation Guide
Chapter 11
Configuring JDBC Data Sources
After the WebSphere Application Server (WAS) is installed, but before the Learning Management System
application is deployed, resources must be configured. There are two types of resources that apply to the Learning
Management System:
•
environment entries
•
JDBC data sources
Configuration of these resources is done from the WebSphere Application Server’s Administrative Console. The
WAS Administrative Console is its administrative interface. To access the WebSphere Application Server
Administrative Console, launch an Internet browser and navigate to http://was_server:9090/admin.
Data source overview
The Learning Management System Server uses two logical databases in its operation. The first is referred to as the
default database. This database stores all core application data. The second is the audit database. This database is
required for application server operation, even if Auditing is disabled. It holds entries that record application
operations performed by Learning users.
The Delivery Server uses its own logical database. It is frequently abbreviated as DS.
In order to access these databases from WAS, the JDBC drivers for the database engine must be installed on the
WAS server machine. In some cases, this will require that a database run-time client be installed. Other times, a
single zip file containing the drivers can simply be copied into the machine’s file system.
The Learning Management System requires a JDBC datasource for each of these logical databases. The following
information explains how to define and configure these JDBC data sources.
Chapter 11: Configuring JDBC Data Sources 53
Defining the JDBC provider
The first step is to define the overall JDBC Provider. This corresponds to the specific driver and database vendor.
Defining the JDBC provider for a DB2 database
In the following example, you are shown how to configure a provider named “DB2 JDBC Provider.” This provider
is for the DB2 database server.
1.
Using the WebSphere Application Server’s Admin Console, expand the Resources section in the left-hand
navigation bar and select JDBC Providers.
2.
Click New to begin configuring a new provider. A drop-down list shows all the supported provider types.
3.
Select DB2 JDBC Provider.
54 IBM Lotus LMS Release 1 Installation Guide
4.
Click OK to continue.
5.
At the Configuration - General Properties screen for the JDBC Provider, note the value in the Classpath field
and click OK to continue.
Chapter 11: Configuring JDBC Data Sources 55
The classpath uses an environment variable that must be verified or set. Use the following procedure to do this:
•
From the starting screen of the Admin console, navigate to Environment -Manage WebSphere Variables and
locate the variable referenced by the classpath in the JDBC Providers Configuration screen. In this example,
it is DB2_JDBC_DRIVER_PATH.
•
Make sure the value is set or set the value to the directory that contains the JDBC drivers for your database.
56 IBM Lotus LMS Release 1 Installation Guide
Defining the JDBC provider for a SQL Server database
1.
Install SQL Server 2000 Driver for JDBC Service Pack 2 on the WAS node(s) that will host the LMM and DS.
If you don't have the MSSQL jars, you can get them from the Microsoft site.
The URL for the SP2 drivers is:
http://www.microsoft.com/downloads/details.aspx?FamilyID=9f1874b6-f8e1-4bd6947c-0fc5bf05bf71&DisplayLang=en
2.
Access the WAS Admin Console.
3.
Navigate to Environment --> Manage WebSphere Variables and set the
MSSQLSERVER_JDBC_DRIVER_PATH variable to the lib directory under the path to which you installed
the JDBC drivers.
This is the directory that contains the .jar files of the JDBC driver:
msbase.jar
mssqlserver.jar
msutil.jar
spy.jar ("spy.jar" may be in a different location from the rest of them)
4.
Navigate to Resources-->JDBC Providers.
5.
Click New and select Microsoft JDBC Driver for MSSQL Server 2000.
Do not select the XA version of the driver.
Defining the JDBC data sources
The next step is to define the JDBC data sources. Access to JDBC connections is made via JNDI lookup of a named
data source. These data sources have well-known names that are embedded in the Learning Management System
.ear file. Using the WAS admin console, three data sources must be configured: LMM (Default), LSAUDIT (Audit),
and DS (Delivery). The following steps provide the instructions for completing these tasks. This section describes
the procedure to create data sources and configure DB connections.
Create the J2C Authentication Data Entries
1.
Expand Security on the left panel of the WAS console.
2.
Expand JAAS Configuration.
3.
Click J2C Authentication Data.
4.
Click New.
5.
Enter your data base information. For example:
•
Alias: db_name - This identifier is used to identify the authenticated data entry. When configuring
resource adapters or JDBC data sources, the administrator can specify which authentication data to
choose for the corresponding alias.
•
User ID: your_id - This is the user identity of the intended security domain. For example, if a particular
authentication data entry is intended to be used to open a new connection to DB2, this entry would
contain a DB2 user identity.
•
Password: your_password - This password of the user identity is encoded in the configuration
respository.
6.
Click Apply. This creates an entry like hostnameManager/db_name.
7.
Repeat for the other two databases.
Chapter 11: Configuring JDBC Data Sources 57
Create the data sources
1.
Expand Resources on the WAS console left panel.
2.
Click JDBC Providers.
3.
On the right panel, erase the entry on Node.
4.
Click Browse Nodes.
5.
Select Node.
6.
Click Apply. The changes will apply only at the node level.
7.
Click New.
8.
From the JDBC providers drop down, select you database provider (DB2 for this example).
9.
Click OK
10. Click OK. Under JDBC provider you will now have a new entry for your database provider.
11. Click DB JDBC provider.
12. Click on Data Sources at the bottom of the screen. To create the entries each database, do the following:
•
Click New to access the screen to enter the database information.
58 IBM Lotus LMS Release 1 Installation Guide
13. Enter the following information:
•
Name: dbname (for example, lmm, ds, audit)
•
JNDI name: jdbc/dbname
•
Statement Cache Size: 0
•
Component-managed Authentication Alias: $hostnameManager/db_name
•
Container -managed Authentication Alias: $hostnameManager/db_name
14. Click Apply.
15. Change the database Max connection pool size by doing the following:
•
Click on dbname.
•
Click on Connection Pool at bottom of the screen.
•
Set Max Connections to 30.
Chapter 11: Configuring JDBC Data Sources 59
•
Click Apply.
16. Repeat this procedure for the two remaining databases.
60 IBM Lotus LMS Release 1 Installation Guide
Change the Custom Properties for each data source depending on the database type
1.
Go to Data Sources.
2.
Click on the desired db_name.
3.
Click on Custom Properties.
4.
Depending on the database type you may change the following properties. The entries presented are for
example purposes only.
•
DB2 databases:
•
databaseName: db_name - this is the database alias used when cataloging the remote database. The
following screen shows the custom properties for a DB2 example.
Chapter 11: Configuring JDBC Data Sources 61
•
•
•
The databaseName property has been selected and you are shown the following screen to change this
custom property. This property provides the database alias used when cataloging the remote
database. The value used in the following example for databaseName is “lmm.”
For Oracle databases, you may see the following properties:
•
URL: jdbc:oracle:thin:@server.acme.com:1521:name
•
portNumber: 1521
For SQL Server databases, you may see the following properties:
•
databaseName: db_name – this is the remote data base name.
•
portNumber: 1433
•
serverName: servername
Note Make sure that Select Method is set to cursor.
5.
Repeat this process for the other two databases.
62 IBM Lotus LMS Release 1 Installation Guide
Chapter 12
Configuring Environment Entries
After the WebSphere Application Server (WAS) is installed, but before the Learning Management System
application is deployed, resources must be configured. There are two types of resources that apply to the Learning
Management System:
•
environment entries
•
JDBC data-sources
Configuration of these resources is done from the WebSphere Application Server’s Administrative Console. The
WAS Administrative Console is its administrative interface. To access the WebSphere Application Server
Administrative Console, launch an Internet browser and navigate to http://was_server:9090/admin.
It is recommended that you save your work frequently when working with the WebSphere Application Server’s
Administrative Console. When you make a change, a message box will appear at the top of the right-hand frame,
prompting you to save your changes to the master configuration. Try to do this regularly.
Configuring an environment entry for the log file location
The Learning Management System uses an environment entry to configure the file-system path used to store
application log files. This section describes how to set up this environment entry using the WebSphere Application
Server’s Admin Console.
1. Create the Resource Environment Provider
a.
Using the WebSphere Application Server’s Admin Console, expand the “Resources” section in the lefthand navigation bar and select “Resource Environment Providers.”
b. Click “New” to begin configuring a new provider.
Chapter 12: Configuring Environment Entries 63
2. Enter the provider information
a.
Enter the name, for example, “LMS Provider,” and an optional description for the provider.
b. Click OK. A new provider appears in the list of defined providers.
64 IBM Lotus LMS Release 1 Installation Guide
3. Enter the provider details
a.
Click the name of the newly entered provider to go to the details page of that provider.
b. Enter the desired details.
4. Configure the Referenceable
Before environment-entries can be made, a Referenceable must be defined. A Referenceable is a class of object that is
able to handle bindings for specific reference values. A single Referenceable must be defined.
a.
Click Referenceables in the provider details page to see the list of defined Referenceables.
b. Click New to get to the detail page for defining a new Referenceable.
Chapter 12: Configuring Environment Entries 65
c.
For Factory Classname, enter com.lotus.elearn.naming.StringObjectFactory.
d. For Classname, enter java.lang.String.
e.
Click OK.
5. Configure the Resource Environment entries
After the Referenceable has been defined, the specific environment entries need to be defined.
a.
Go back to the Provider Details page.
b. Click Resource Environment Entries. You should see an empty list.
66 IBM Lotus LMS Release 1 Installation Guide
c.
Click New to go to the page to define an entry. Enter LMS_LOG as both the name and JNDI name for the
new entry.
d. Click OK. This will bring you back to the Env-Entries list page. You now need to define properties for the
new entry.
Chapter 12: Configuring Environment Entries 67
e.
Click that link and define a new Custom Property with the name LMS_LOG_PATH . For the value, enter
the name of the directory where the Learning Management System should store application log files, for
example, C:\lms_logs.
Note: You need to create this directory by hand as the application won’t do it for you and will not start
properly without it.
f.
Click OK to complete this entry and its properties.
g. Create two additional resource environment entries: LMS_TRUE and LMS_FALSE. These are used to set
the resource environment references HTTPS_LOGIN and HTTPS_APPLICATION when deploying the
LMS and DS .ear files in WAS and are used to enable SSL for login or for the whole application. These
instructions assume that a resource environment provider named LMS Provider already exists:
1.
Go to the Resource Environment Providers page.
2.
Make sure the appserver node is selected and not the DM node.
3.
Click the LMS Provider link.
4.
Click the Resource Env Entries link.
5.
Click New.
6.
Set Name to LMS_TRUE.
7.
Set JNDI Name to LMS_TRUE.
8.
Click OK.
9.
Click LMS_TRUE.
10. Click Custom Properties.
11. Click New.
12. Set Name to value.
68 IBM Lotus LMS Release 1 Installation Guide
13. Set Value to true.
14. Click OK
15. Click the Resource Env Entries link in the trail.
16. Click New.
17. Set Name to LMS_FALSE.
18. Set JNDI Name to LMS_FALSE.
19. Click OK.
20. Click LMS_FALSE.
21. Click Custom Properties.
22. Click New.
23. Set Name to value.
24. Set Value to false.
25. Click OK.
26. Save your work.
Chapter 12: Configuring Environment Entries 69
70 IBM Lotus LMS Release 1 Installation Guide
Chapter 13
Configuring WebSphere Application Server Security
The Learning Management System assumes that the WebSphere Application Server (WAS) is configured to use
LDAP authentication. The WAS Administrative Console is used to configure LDAP as the active user registry and to
specify the LDAP settings as part of setting up WAS Security. Before you attempt to do this, your LDAP server must
be installed, running, and populated with the node within the directory tree that is the starting point for all
directory searches—an identity under this node that is used by the WAS server for security purposes, and an
identity used to bind to the directory.
For example, in the set-up description below, we’ll assume you’ve created an LDAP directory using the IBM
Directory Server V4.1 called “ldapserver.ibm.com” that runs on default port 389 and contains a root node called
“o=ibm”. In addition, the root node contains a security identity with following characteristics:
Distinguished Name:
cn=ldapadmin,o=ibm
Uid:
ldapadmin
Password:
password
Finally, the bind identity (setup during installation of the LDAP directory) has the following characteristics:
Distinguished Name:
cn=root
Password:
password
Security must be configured and enabled after WAS is installed but before the Learning Management System
application is deployed. This is done from the WAS Administrative Console; accessed by launching an Internet
browser and navigating to http://was_server:9090/admin (substitute the name of your server for was_server).
Chapter 13: Configuring WebSphere Application Server Security 71
Configure the LDAP directory for use with the Learning Management System
The following steps show how to configure WAS security to use an LDAP directory:
1.
Launch the WAS Administrative Console and go to Security - User Registries.
2.
Click on the LDAP link. The LDAP User Registry page is displayed.
3.
Enter the Server User ID (for example, ldapadmin).
4.
Enter the Server User Password (e.g. password).
5.
Select the Type from the drop-down box (for example, IBM_Directory_Server).
6.
Enter the Host (for example, ldapserver.ibm.com). This should be the name of your LDAP server.
7.
Make sure the LDAP port is correct (for example, 389).
8.
Enter the Base Distinguished Name (for example, o=ibm).
9.
Enter the Bind Distinguished Name (for example, cn=root).
10. Enter the Bind Password (for example, password).
11. Update the remaining settings as needed.
72 IBM Lotus LMS Release 1 Installation Guide
12. Click Apply. Note that a Message(s) section appears at the top of the page and indicates that you’ll need to
Save these changes.
13. Click the Advanced LDAP Settings link. You’ll see the Advanced LDAP Settings page.
If your LDAP directory has been customized you may need to change the User Filter, the User ID Map, the
Group Filter or the Group ID Map. Get this information from you LDAP directory administrator and update
the appropriate fields accordingly.
14. Click OK. You’ll return to the LDAP User Registry page. The value in the Type drop-down box may change
if you update any values in the Advanced LDAP Settings page. This is perfectly normal. Do not change the
Type back to its previous value.
15. Click Save in the Message(s) section at the top of the page. You’ll see the Save to Master Configuration page
appear.
16. Click Save.
17. Click OK.
These changes will most likely change the value of the Type field on the LDAP User Registry page to Custom. This
is perfectly normal. Do not change the Type back to its previous value.
Chapter 13: Configuring WebSphere Application Server Security 73
Enable WAS Global Security
1.
Launch the WAS Administrative Console and go to Security – Global Security.
2.
Check the Enabled checkbox and (if it isn’t automatically checked when security is enabled) the Enforce Java
2 Security checkbox.
3.
Assuming that you followed the steps for enabling Single Sign-On (SSO) outlined in “Chapter 10 Installing
the Network Deployment (ND) Module,” the Active Authentication Mechanism field has the value LTPA.
4.
Select LDAP In the Active User Registry drop-down box.
5.
Click OK. At this point the Server User Id and Server User Password you entered in the LDAP User Registry
page are validated. If there is a problem then you’ll get an error and you’ll have to correct it before
proceeding.
6.
Restart the WAS server for the security changes to take effect. You must now provide a username and
password when executing the stopServer script. In addition, you’ll have to specify the Server User Id and
Password when you open the WAS Administrative console.
74 IBM Lotus LMS Release 1 Installation Guide
Chapter 14
Deploying the Learning Management System Server Application
Application deployment refers to the process where an application package has been installed and is then configured
on an application server to create a running instance of that application.
The important unit of packaging in the Learning Management System application deployment process is the .ear
(enterprise application archive) file. This package is a zip-format archive containing standardized metadata. These
files are identified by the .ear filename extension.
The WebSphere Application Server Admin Console provides a multi-step process for deploying an .ear file and
resolving the needed bindings and settings. This chapter describes the steps for deploying the Learning
Management System Server .ear file. Refer to the Release Notes for complete information regarding browser
requirements.
The following steps provide the information on the process of deploying the Learning Management System Server
application (one piece of the complete Learning Management System deployment) from an .ear file from the WAS
Admin Console.
1. Select the .ear file for deployment
Select “Install New Application” from the left-hand navigation window in WAS Administrative Console.
Use the browse button to select the desired Learning Management System .ear file stored on your file
system. Refer to the Release Notes for the exact name of this file. When finished, click Next to continue.
Chapter 14: Deploying the LMS Server Application 75
2. Prepare for application install
It sometimes takes a few minutes for WAS to read and validate an .ear file. When this has completed, the
“Preparing for application installation” screen is displayed.
You can make selections here that change how the next steps are performed. You should accept the defaults.
When finished, click Next to continue.
76 IBM Lotus LMS Release 1 Installation Guide
3. Provide options to perform the installation
At the next screen, select some options for the application deployment; for example you can pre-compile all
JSPs.
With the exception of the Application Name, accept the defaults.
Caution The Application Name should not include spaces, because the Learning Management System
Installer generates a WAS .ear directory using that name. Even if you want to use the default name as shown
above, you should edit the name and remove all the spaces.
When finished, click Next to continue.
Chapter 14: Deploying the LMS Server Application 77
4. Map resources references to resources
At the following screens, you map the resource references that are specified in the .ear file to actual resources
you configured in WAS.
Check the first entry for the Learning Management System data (jdbc/LMS_Default) and select “jdbc/lmm”
from the “Specify existing Resource JNDI name" drop-down list.”
78 IBM Lotus LMS Release 1 Installation Guide
This list is populated with the names of data source definitions that have been defined and lets you resolve
JDBC data source references. For each data source referenced in the .ear file, an entry is displayed. Clicking
the IBM Lotus Learning Management System checkbox and then specifying select “jdbc/lmm” from the
“Specify existing Resource JNDI name" drop-down list maps that resource reference to the correct resource.
Click Apply when finished.
Check the second entry for the Audit data source (jdbc/LMS_Audit) and select “jdbc/audit” from the
“Specify existing Resource JNDI name" drop-down list. Click Apply when finished.
When finished, click Next to continue.
5. Map resource env (environment) entry references to resources
After the data source references have been resolved, you must do the same for all environment entries.
If you know the JNDI name of the environment entry already, you may enter it directly. If not, click the
“Apply Multiple Mappings” control to get a dropdown of available entries. Map LMS_LOG_PATH to
LMS_LOG, HTTPS_LOGIN to LMS_FALSE, and HTTPS_APPLICATION to LMS_FALSE. When you have
finished, click Next to continue.
Chapter 14: Deploying the LMS Server Application 79
6. Map virtual hosts to web modules
In this step, you map web modules to different virtual hosts. The application server can run multiple,
separate servers. For example, by default, the server runs the admin host on port 9090 and the default host
on port 9080. Accept the default value. When finished, click Next to continue.
7. Map modules to application servers
It is possible to have several application servers defined for a given host. At this point you can define which
of the multiple servers (if any) you want to map the web modules to. Accept the defaults and click Next to
continue.
80 IBM Lotus LMS Release 1 Installation Guide
8. Map security roles to users/groups
In this step, map references to security roles in the application to specific user registry groups or application
server special subjects. The .ear file already contains a default security binding. Accept the default value
(ALL_AUTHENTICATED) by clicking Next to continue.
Chapter 14: Deploying the LMS Server Application 81
9. View summary and confirmation information
When you have completed these steps, you are shown a summary of the options you have selected.
Review them and if they are correct, click Finish to continue.
82 IBM Lotus LMS Release 1 Installation Guide
The application performs some final processing to finalize all the selections. Status information on this
process is printed to the console.
When complete processing is complete, you are presented with a link to save the new configuration. It is
recommended you perform the Save at this time.
10. Starting the application and regenerating web server plug-in
At this point, refer to “Chapter 17 Starting the Applications” for information on starting your Learning
Management System Server application.
Chapter 14: Deploying the LMS Server Application 83
84 IBM Lotus LMS Release 1 Installation Guide
Chapter 15
Deploying the Delivery Server (DS) Application
For complete information on the process of deploying the Delivery Server application portion of the Learning
Management System installation, follow the same steps outlined in “Chapter 14 Deploying the Learning
Management System Server application.”
The only difference for deploying the Delivery Server is in” Step 4. Map resources references to resources.” In this
step you should check the entry for the Delivery Server data (jdbc/LMS_Delivery_Default) and select “jdbc/ds”
from the “Specify existing Resource JNDI name" drop-down list.
Clicking the Delivery Server checkbox and then specifying select “jdbc/ds” from the “Specify existing Resource
JNDI name" drop-down list maps that DS resource reference to the correct DS resource. Click Apply when finished.
Starting the application and regenerating web server plug-in
At this point, refer to “Chapter 17 Starting the Applications” for information on starting your Delivery Server
application and regenerating the web server plug-in.
Chapter 15: Deploying the Delivery Server (DS) Application 85
86 IBM Lotus LMS Release 1 Installation Guide
Chapter 16
Deploying the Learning Management System and DS Components
onto Separate WAS Application Servers
By default, new Application Servers created in the WAS Admin Console generate their own unique HTTP ports.
WAS assigns ports incrementally, beginning with port 9080, which is usually assigned to the Application Server
server1. Subsequent servers will be assigned incrementally higher ports. Frequently, the Learning Management
System Server’s Application Server uses port 9081 and the Delivery Server’s Application Server uses port 9082. You
should verify the ports used by the different applications servers. Use the following procedure to do so:
1.
In the WAS Admin Console, navigate to Servers and click on Application Servers.
2.
Click on the application server you are investigating (for example, lmsServer)
3.
In that server’s screen, click on Web Container.
4.
In the Web Container screen, click on HTTP Transports.
5.
Note the port number that has SSL Enabled set to False. This port should be 908n. Write the port number
down.
In order for the HTTP plug-in and for WAS to function with all the port numbers, they must be added to the virtual
host in use by Learning Management System WAS Application Servers. To enable this, use the following procedure:
1.
In the WAS Admin Console, navigate to Environment and click on Virtual Hosts.
2.
Click on the “default_host” virtual host.
3.
In the “default_host” screen, click on Host Aliases.
4.
Add a Host Alias for each additional port by doing the following:
a.
Click the “Add” button.
b. Set the hostname to “*” (asterisk, do NOT enter the quotes in the “Hostname” field).
c.
Set the Port to one of your additional Application Server ports.
d. Save your changes.
5.
Regenerate the HTTP plug-in.
6.
Edit and copy the HTTP plug-in configuration file plugin-cfg.xml. For more information, refer to “Chapter 10
Installing the Network Deployment (ND) Module.”
7.
Stop and restart the application servers whose ports you just added to default_host.
To help ensure the successful deployment of both the Learning and Delivery Servers, you must also set an
additional WebSphere variable, ConnectionIOTimeOut, must be set for both the Learning and Delivery Server’s
Application Servers. To set it, perform the following steps for each application server:
Chapter 16: Deploying the LMS and DS Components onto Separate WAS Application Servers 87
1.
In the WAS Admin Console, navigate to Servers and click on Application Servers.
2.
Click on the Application Server.
3.
In the Application Server’s screen, click Web Container.
4.
In the Web Container screen, click on HTTP Transports.
5.
In the HTTP Transports screen, click on the asterisk associated with the port for which “SSL enabled” is set to
False.
6.
In the port’s screen, click on Custom Properties.
7.
Click the New button.
8.
Set the name to ConnectionIOTimeOut and the value to 1000.
88 IBM Lotus LMS Release 1 Installation Guide
Chapter 17
Starting the Applications
At this point, the Learning Management System applications are ready to start. The WAS admin console is used to
start these applications. Both the WAS logs and Learning Management System logs should be examined to verify
correct initialization. At this point, the applications can be accessed via browser. The administrator identified during
installation must login to the Learning Management System application and roster users, provide for importing
content, and otherwise perform the tasks needed for actual learning to be delivered to users. The following
information provides more details on starting the applications.
Starting the Learning Management System Server application
After the Learning Management System Server has been installed, the application can be started.
1.
Go to the WAS Enterprise Application selection at the Administrative Console.
2.
Click the Learning Management System Server checkbox.
3.
Click Start. After a short time for startup-processing, the display will update to show the new application
status.
4.
Once the application is deployed, click on it in the Applications window.
5.
In the application’s window (for example, the “Learning Management System” window in the current
example), scroll down and click the “View Deployment Descriptor” link. Expand the + sign next to “Web
Modules” and expand the + sign next to the specific Web module for the application.
6.
Make a note of the “Context-root.” Appended to your WAS server’s hostname, this value forms the URL for
your application. For example, if the Context root for your Learning Management System Server application
is lms-lmm and you deployed it to a WAS server called xyz.acme.com, the publishable URL for the Learning
Management System is http://xyz.acme.com/lms-lmm (case-sensitive).
7.
To verify that the Learning Management System Server is running properly, simply enter
http://xyz.acme.com/lms-lmm in a browser.
Starting the Delivery Server application
After the Delivery Server has been installed, the application can be started.
1.
Go to the WAS Enterprise Application selection at the Administrative Console.
2.
Click the Delivery Server checkbox.
3.
Click Start. After a short time for startup-processing, the display will update to show the new application
status.
4.
Once the application is deployed, click on it in the Applications window.
5.
In the application’s window (for example, the “Delivery Server” window in the current example), scroll
down and click the “View Deployment Descriptor” link. Expand the + sign next to “Web Modules” and
expand the + sign next to the specific Web module for the application.
6.
Make a note of the “Context-root.” Appended to your WAS server’s hostname, this value forms the URL for
your application. For example, if the Context root for your Delivery Server application is lms-ds and you
deployed it to a WAS server called xyz.acme.com, the publishable URL for the Delivery Server is
http://xyz.acme.com/lms-ds (case-sensitive).
Chapter 17: Starting the Applications 89
7.
To verify that the Delivery Server is running properly, you can enter the following URL in a browser:
http://xyz.acme.com/lms-ds/about.ds. This displays the About box.
Regenerating the web server plug-in
With J2EE servers such as WebSphere, high-volume deployments (such as the Learning Management System) that
have static HTTP assets (for example, .html or .gif files) have them served by a dedicated HTTP server. The
application server then is responsible for serving requests for dynamic pages (such as, servlet or .jsp requests).
Important Note for AIX and Linux users: The WebSphere Application Server installation contains the IBM HTTP
Server. AIX and Linux can also include an HTTP server. This server should be removed or reconfigured before the
installation of the WAS and HTTP server to avoid port conflicts.
In WebSphere, the key step in using this type of configuration is the "Create Plug-in Configuration" command. This
creates the needed configuration files/settings for the HTTP server plug-in that routes requests to the application
server. For all deployed applications to run correctly and for the Application Server to have all of the most recent
information on deployed applications, you must then regenerate the Web sever plug-in after any major changes. The
following steps outline this procedure:
1.
In the WAS Administrative Console, go to Environment-Update Web Server Plug-in.
2.
Click OK to regenerate the plug-in. A confirmation message will appear indicating that it was successfully
regenerated.
3.
If you don’t want to wait for the HTTP server to poll the plug-in for updates, manually restart the HTTP
server with one of the following commands:
Windows example: \HTTP_INSTALL_ROOT\Apache –k restart
UNIX example: /HTTP_INSTALL_ROOT/apachectl restart
Running the Updater
If you have a problem starting either the Learning Management System Server or Delivery Server application, it
may be because you entered one or more incorrect settings when you ran the Installer. You can remedy this
situation by running the Updater.
The Updater is a batch file (updateSettings.bat for Windows and updateSettings.sh for UNIX) that resides in the
/update directory. When you run updateSettings.bat (or updateSettings.sh), the following screens are displayed,
primed with the settings you entered when you ran the Installer (as described in chapters 7 and 8 above):
1.
LDAP Settings
2.
Learning Management System Server Settings
3.
Content Management Settings
4.
Delivery Server Settings
5.
Web Server Settings
6.
Content Deployment Settings
7.
System Administrator E-mail Settings
When you have finished making your changes, the Updater creates two SQL scripts (updateLMM.sql for the
Learning Management System Server, and updateDS.sql for the Delivery Server). When you run these, the
respective databases are updated with the new settings you specified in the Updater. You can then try to start the
Learning Management System Server and Delivery Server applications again.
90 IBM Lotus LMS Release 1 Installation Guide
Chapter 17: Starting the Applications 91
Chapter 18
Post-Installation Tasks
After you have installed the Learning Management System, there are other tasks that must be completed to make
full use of your installation. These include the following:
•
Configuring on-line help
•
Adding the Delivery Server to the Learning Management System application
•
Deploying the Offline Learning Client
•
Installing the Authoring Tool
•
Installing the Command Line Import Utility
•
Migrating LearningSpace data
•
Installing XVFB on UNIX platforms to enable reporting
To complete these tasks, make sure that you have logged into the Learning Management System as the
Administrator. Refer to the Administrator’s Guide for more information.
Configuring on-line help
The Learning Management System on-line help is contained in a .war. Refer to the product Release Notes and
README for more information on the correct file name.
To configure this help, create a directory for files in your HTTP Server’s document root (for example,
/usr/IBMHttpServer/htdocs/en_US on an AIX system) to store the help files. Unzip the help .war file into this
directory.
Note: UNIX and AIX users creating directories must have root privileges. Remember also not to use spaces when
creating directory names.
Next, access the Learning Management System start page at
http://$LMM_HOSTNAME/$LMM_CONTEXT_ROOT (for example, http://xyz.acme.com/lms-lmm) and
navigate to Settings-LMM General Settings-General tab.
In the URL entry for the help system, enter http://$LMM_HOSTNAME /$HELP_DIR/ (for example,
http://xyz.acme.com/help_dir/) where $HELP_DIR is the help directory created previously within the HTTP
server’s document root.
Adding the Delivery Server to the Learning Management System application
1.
To add the Delivery Server to the Learning Management System Server application, access the Learning
Management System Server start page at http:// $LMM_HOSTNAME /$LMM_CONTEXT_ROOT (for
example, http://xyz.acme.com/lms-lmm).
2.
Go to Settings-Delivery Server and click Add.
3.
Enter a name, description, username and password for the DS. The Delivery Server URL is http://
$DS_HOSTNAME/$DS_CONTEXT_ROOT (for example, http://xyz.acme.com/lms-ds).
4.
Click Save.
92 IBM Lotus LMS Release 1 Installation Guide
Deploying the Offline Learning Client
The Learning Management System allows students to take courses without being connected to the network. When
working on a course offline, all course prerequisites and navigation features are fully functional for the student.
The Offline Learning Client lets you access the disconnected use feature. To properly deploy the Offline Learning
Client after you have installed and deployed the Learning Management System Server, use the following steps:
1.
Start the Learning Management System Server.
2.
Go to the Settings tab.
3.
Click LMM Server.
4.
Click General Settings.
5.
Enter "duc/OfflineClientWin32.exe" in the URL of Offline Learning Client Software field. This should
correspond to wherever the client software is deployed. If you want to put the Offline Learning Client on
another web server, the URL could point to "http://someotherserver/offlineclient/OfflineClientWin32.exe"
or another similar URL.
6.
Enter the version of the Offline Learning Client that is being deployed in the Version field. The Learning
Management System Server “About" document contains a version number like "1.0 - eu20021122_M12." Enter
the “1.0.”
7.
Restart the Learning Management System Server if needed.
Installing the Authoring Tool
The Learning Management System provides the option to copy an installable Authoring Tool during product
installation. The Authoring Tool is a course development tool with two separate modes. You use Planner mode to
build a course structure. You use Authoring mode to create course content and assessment pages. The authoring tool
is designed to be used by a course developer working at his or her own workstation. To install the Authoring Tool
after you have copied the files, use the following procedure:
1.
Download Authoring_Tool.zip from the Learning Management System Server to your workstation. This file
is installed when you select Authoring Tools as an option in the Server installation procedures. See the
chapters “Installing the Learning Management System Server application files” and “Installing the Delivery
Server application files” for more information.
2.
Unzip the contents of the zip file to your root directory. Important: Maintain the zip file's folder names
during the unzipping process.
3.
Go to the Disk1 folder created during the unzipping process and run setup.exe.
4.
Follow the instructions on screen to complete the installation process.
5.
To start the tool, choose Start - Programs - IBM Lotus Authoring Tool - IBM Lotus Authoring Tool.
If you selected the option for copying an installable Authoring Tool to the Learning Management System Server
during product installation, an Authoring Tool Guide was also copied to the server. The guide is provided as a zip
file that contains the Authoring Tool Guide and sample courses. To use the guide, download
AuthoringToolGuide.zip to your local workstation. Extract AuthoringToolGuide.pdf to your workstation and
follow the instructions in Chapter 1 for installing and using the sample courses.
Installing the Command Line Import Utility (CLIMP)
The Learning Management System provides the option to copy an installable Command Line Import Utility during
product installation. The Learning Management System Command Line Import Utility (CLIMP) is a Java
application.
Chapter 18: Post-Installation Tasks 93
CLIMP allows you to import SCORM 1.2 course package files into the Learning Management System, making them
available for deployment. Course package files can contain new courses, or updates to previously-deployed courses.
Course packages are created by content vendors using the Learning Management System Authoring Tool, or by
using some other tool that can produce SCORM 1.2 content.
Note: It is not necessary to use CLIMP with the Authoring Tool, since the Authoring Tool provides the same
capabilities to import courses that CLIMP does.
CLIMP can be used to both upload course package files and then import them into the Learning Management
System or just to import course packages that are already available on an FTP or file server. After the file has been
uploaded, CLIMP initiates the import operation by sending an HTTP request to Content Manager servlet, which
runs on the Learning Management System Server. A single CLIMP command can process multiple files, although
the Content Manager will import those files one at a time. With CLIMP, you can optionally specify one or more email addresses to receive e-mail notifications about the status of the import operation. After a new course has been
successfully imported, it appears as an unregistered master in the Learning Management System course master
catalog.
You need a Java run-time environment (JRE) installed and on your search path in order to run CLIMP. CLIMP is
built using JDK 1.3 and may not work with other JDK versions. The name of the installed zip file (if you chose to
install Utilities during the Learning Management System installation) is climp.zip. To install the utility, use the
following procedure:
1. Create a directory on your local workstation in which to install CLIMP. The climp.zip is installed when you
select Utilities as an option in the Server installation procedures. See the chapters “Installing the Learning
Management System Server application files” and “Installing the Delivery Server application files” for more
information.
2.
Unzip the contents of climp.zip into the CLIMP directory.
3.
For UNIX only, change the permissions of CLIMP shell script as follows: chmod +x climp
4.
Change your CLASSPATH to include the directory where you installed CLIMP (if it not already in
CLASSPATH).
Migrating LearningSpace data
If you need to migrate information from a previous version of LearningSpace into the new Learning Management
System deployment, consult the documentation for the migration utilities posted to the Web.
To obtain the migration utility and quarterly updates of the documentation, please go to
http://www-1.ibm.com/support/search/index.html and search on Learning Management System Migration
Utility and Quarterly Documentation Updates.
Installing XVFB on UNIX platforms to enable reporting
If you run the Learning Management System on a UNIX platform, you must install XVFB (Xserver Virtual Frame
Buffer) to enable the reporting feature. XVFB provides a virtual Xserver that runs without a head or graphics card,
releasing you from the requirement of running a real Xserver.
XVFB installation and configuration differs for Linux and AIX.
Installing XVFB on Linux
XVFB for Linux is a freeware and can be obtained from x.org's X11R6 distribution.
1.
Check the directory /usr/X11R6/bin for a file named Xvfb.
•
If you have this file, skip to step 4.
94 IBM Lotus LMS Release 1 Installation Guide
•
2.
If you don't have this file, proceed with step 2.
Download the XVFB file from the following link to a directory on the Linux machine:
ftp://ftp.xfree86.org/pub/XFree86/4.2.0/binaries/Linux-ix86-glibc22/
3.
Extract the file with the following commands:
chmod +x extract
mkdir /etc/X11
./extract -C /usr/X11R6 Xvfb
4.
Generate a script file named /etc/init.d/xvfb containing the following, and make it executable:
#!/bin/sh
mode=$1
case "$mode" in
'start')
# start the X Virtual Framebuffer (Xvfb)
if [ -f /usr/X11R6/bin/Xvfb ]; then
echo "***Starting up the Virtual Frame Buffer on Screen 1***"
/usr/X11R6/bin/Xvfb :1 -screen 0 1152x900x8 &
fi
;;
*)
echo " Usage: "
echo " $0 start (start XVFB)"
echo " $0 stop (stop XVFB - not supported)"
exit 1
;;
esac
exit 0
chmod +x xvfb
5.
Change the run-level to 3 by doing the following:
Edit etc/inittab
# Default run-level. The run-levels used by RHS are:
#
0 - halt (Do NOT set initdefault to this)
#
1 - Single user mode
#
2 - Multiuser, without NFS (The same as 3, if you do not have networking)
#
3 - Full multiuser mode
#
4 - unused
Chapter 18: Post-Installation Tasks 95
#
5 - X11
#
6 - reboot (Do NOT set initdefault to this)
#
id:5:initdefault:
Change id:5:initdefault: to id:3:initdefault:
Note: If you use a different run-level, be sure to match it when you set up the soft link in the next step.
6.
Create soft link:
ln -s /etc/init.d/xvfb /etc/rc3.d/S75xvfb
This example uses run-level 3. If you intend to use XVFB in a different run-level, set up the soft link to the
appropriate /etc/rcx.d directory. (The run-level of your Linux system is specified in your /etc/inittab file ).
Note: Always make sure to check the setting and exporting of the DISPLAY variable and to start XVFB from
the soft link to help with consistent reporting performance.
7.
Restart the server.
8.
Verify that XVFB is running with the following command:
ps -ef | grep Xvfb
9.
Set DISPLAY from the command line using:
DISPLAY=hostname:1.0
export DISPLAY
Previous lines can be added to .bash_profile or whatever profile you're using.
10. Start Servers.
Installing XVFB on AIX
For complete instructions for XVFB see the AIXwindows Programming Guide, Appendix E. The X Virtual Frame
Buffer is http://publib16.boulder.ibm.com/pseries/en_US/aixprggd/aixwnpgd/xvfb.htm#xvfb.
1.
Add the following line to /etc/initab:
xvfb:2:respawn:/usr/bin/X11/X -force -vfb -x abx -x dbe -x GLX :1 > /dev/null
2.
Set DISPLAY by adding the following line to .profile:
DISPLAY=`hostname`:1.0
export DISPLAY
3.
Restart the server machine.
4.
Disable JIT on application server(s).
Determining the correct SSO settings for the Learning Management System
Single Sign-On (SSO), also known as single logon, is the process which permits users to move between different
Web applications or different parts of the same Web application hosted by the same or different physical machines,
without being prompted for a user name and password (or certificate) every time.
For example, if SSO is not used, you will have to log in to the Delivery Server every time you launch a course from
the LMM server. As such, SSO considerations should be carefully considered in your Learning Management System
deployment planning to allow for the greatest efficiency in logging in users. For further information on the Learning
96 IBM Lotus LMS Release 1 Installation Guide
Management System and SSO refer to Chapter 5 Managing Users in the Administrator's Guide and the Installing the
WebSphere Core chapter in this guide.
Chapter 18: Post-Installation Tasks 97
98 IBM Lotus LMS Release 1 Installation Guide
Chapter 19
Special Installation Issues
For information on special issues related to this release of the Learning Management System, refer to the
ReadMe.html and ReleaseNotes.html files that ship with this version of the product.
Using SSL with the Learning Management System
Use of the Secure Sockets Layer for the Learning Management System is supported with Release 1.0a and greater. To
switch to SSL-enabled transactions, use https:// in all relevant URLs, including those you specify during
installation, at application startup, and for content launching.
Using the Directory Server Web Administration Interface with Linux
The Web Administration interface for Directory Server is not supported on Linux. You can work around this issue
by manually creating the suffix, as follows:
1.
Edit SLAPD32.CONF (default location of SLAPD32.CONF is /etc/slapd32.conf).
2.
Manually add the new suffix below the following line:
ibm-slapdSuffix: cn=localhost
For example:
ibm-slapdSuffix: o=myorg, c=us OR
ibm-slapdSuffix: o=myorg
Note: Unix is case-sensitive.
3.
Restart the LDAP server.
Chapter 19: Special Installation Tasks 99
100 IBM Lotus LMS Release 1 Installation Guide
Chapter 20
Removing the IBM Lotus Learning Management System
The Learning Management System does not include an automated uninstall program. To remove the Learning
Management System component technologies (IBM Directory Server, IBM DB2 7.2, and IBM WebSphere Application
Server 5), use the Windows Add/Remove Programs utility in the Control Panel. To remove the Learning
Management System software from your system, you must remove each installed component manually.
Uninstalling the Learning Management System Server and Delivery Server
applications
To remove the Learning Management System Server and Delivery Server enterprise applications from within
WebSphere:
1.
From the WebSphere Administration interface, expand Applications.
2.
Click Enterprise Applications.
3.
Select IBM Lotus Learning Management System LMM and IBM Lotus Learning Management System DS.
4.
Click Stop.
5.
Select IBM Lotus Learning Management System LMM and IBM Lotus Learning Management System DS.
6.
Click Uninstall.
7.
When the uninstall process has completed, click Save to save your changes to the Master Configuration.
Note: To uninstall the Learning Management System Server and Delivery Server applications from UNIX platforms,
use the same WebSphere procedure just described.
Removing the installed Learning Management System files
To remove the Learning Management System files from your hard drive:
1.
Navigate to the install directory for the Learning Management System. By default, this directory is
X:\Program Files\IBM\lms, where X is the letter of your hard drive.
2.
Delete the lms folder.
Note: To remove the Learning Management System files in UNIX installations, delete the correct directory in your
UNIX installation. The example above was given for a Win32 installation.
Removing the Learning, DS, and Audit databases
To remove the Learning, DS, and Audit databases from your database program:
1.
Back up the database.
2.
For an Oracle database, in SQLPlus, type DROP USER <schema owner username> CASCADE. For a DB2
database, connect to the database and type DB2 DROP DATABASE <database name>. For a SQLServer
database, connect using ISQL, type DROP DATABASE <database name>, then type GO on the next line to
execute the statement.
Note: These are destructive commands and, for that reason, a DBA is required to issue them.
Chapter 20: Removing the IBM Lotus Learning Management System 101
102 IBM Lotus LMS Release 1 Installation Guide
Appendix A
LMS Performance and Fine-tuning Information
This chapter discusses post-installation tasks related to the running, maintenance, and fine-tuning of LMS
operations. These tasks are not necessary to get LMS running, but are recommended for improving and correcting
system performance.
The appendix contains the following sections:
•
Moving static LMS elements to the Web Server
•
Tuning LDAP performance
•
Tuning database server performance
•
Tuning TCP/IP settings on LMS servers
•
Tuning HTTP servers
•
Tuning performance using the WebSphere Application Server Administrative Console
•
Tuning the LMS applications
For the sections on TCP/IP, Web Server, and WebSphere Application Server tuning, some of the information was
taken from the WebSphere Application Server 5.0 Tuning Guide. This online document can be found at:
http://publib7b.boulder.ibm.com/wasinfo1/en/info/tuning/50TuneGuide.html
Moving static LMS elements to the Web Server
In a three-tier LMS configuration, you should consider moving static LMS user interface elements to the Web server.
For best performance, the static elements of the LMS user interface should be located directly on the HTTP server
where you installed the WebSphere plug-in.
For this purpose, the LMS installation comes with two Web archive (.WAR) files containing the static elements of the
Learning Server and Delivery Server. After you extract the .WAR files to the HTTP server, you modify the
WebSphere plug-in configuration file so that it does not redirect requests for static elements to WAS. Since .WAR
files are actually zip files, you can use any program that can handle zip files to extract the compressed files.
Note: A very small (and free) Windows zip program with a graphical user interface is the 100 K Zipper, which
can be found at: http://www.quickzip.org/. A free command line tool for decompressing zip files, which is
provided for a wide variety of operating systems, is Info-ZIP’s UnZip, located at: http://www.infozip.org/pub/infozip/UnZip.html.
Installing static files for the Learning Server user interface
Use the following steps to install the static elements on the Learning Server:
1.
Copy the lms-lmm-http.war file to the HTTP server. The war file can be found in the web-apps directory of
the LMS installation folder.
2.
Install a program on the HTTP server for decompressing zip files.
3.
Create a directory lms-lmm in the document root of the HTTP server, or create it somewhere else and
configure it as virtual directory lms-lmm.
4.
Extract the war file to the lms-lmm directory. If you installed the unzip command, you would use, for
example: unzip lms-lmm-http.war -d d:\IBMHttpServer\htdocs\en_US\lms-lmm
Appendix A: LMS Performance and Fine-tuning Information 103
5.
Edit the WebSphere plug-in configuration file (plugin-config.xml) and search for the following line:
<Uri AffinityCookie="JSESSIONID" Name="/lms-lmm/*"/>
Replace this line by the following lines:
<Uri AffinityCookie="JSESSIONID" Name="/lms-lmm"/>
<Uri AffinityCookie="JSESSIONID" Name="/lms-lmm/"/>
<Uri AffinityCookie="JSESSIONID" Name="/lms-lmm/*.do"/>
<Uri AffinityCookie="JSESSIONID" Name="/lms-lmm/*.jsp"/>
<Uri AffinityCookie="JSESSIONID" Name="/lms-lmm/*.jsv"/>
<Uri AffinityCookie="JSESSIONID" Name="/lms-lmm/*.jsw"/>
<Uri AffinityCookie="JSESSIONID" Name="/lms-lmm/anon-api/*"/>
<Uri AffinityCookie="JSESSIONID" Name="/lms-lmm/auth-api/*"/>
<Uri AffinityCookie="JSESSIONID" Name="/lms-lmm/ContentServlet"/>
<Uri AffinityCookie="JSESSIONID" Name="/lms-lmm/import"/>
<Uri AffinityCookie="JSESSIONID" Name="/lms-lmm/j_security_check"/>
<Uri AffinityCookie="JSESSIONID" Name="/lms-lmm/services/*"/>
<Uri AffinityCookie="JSESSIONID" Name="/lms-lmm/servlet/AxisServlet"/>
<Uri AffinityCookie="JSESSIONID" Name="/lms-lmm/status"/>
These lines direct the WebSphere plug-in to forward requests for static elements to the local Web server.
Static elements are recognized by the WebSphere plug-in based on URLs. URLs of requests that match any of
the patterns defined by the Name parameter of the Uri tags are identified as requests for static elements.
Installing static files for the Delivery Server user interface
Use the following steps to install the static elements on the Delivery Server:
1.
Copy the lms-ds-http.war file to the HTTP server. The war file can be found in the web-apps directory of the
LMS installation folder.
2.
Install a program on the HTTP server for decompressing zip files.
3.
Create a directory lms-ds in the document root of the HTTP server or create it somewhere else and configure
it as virtual directory lms-ds.
4.
Extract the war file to the lms-lmm directory. If you installed the unzip command you would use, for
example: unzip lms-ds-http.war -d d:\IBMHttpServer\htdocs\en_US\lms-ds
5.
Edit the WebSphere plug-in configuration file (plugin-config.xml) and search for the following line:
<Uri AffinityCookie="JSESSIONID" Name="/lms-ds/*"/>
Replace this line with the following lines:
<Uri AffinityCookie="JSESSIONID" Name="/lms-ds"/>
<Uri AffinityCookie="JSESSIONID" Name="/lms-ds/"/>
<Uri AffinityCookie="JSESSIONID" Name="/lms-ds/*.ds"/>
<Uri AffinityCookie="JSESSIONID" Name="/lms-ds/*.jsp"/>
104 IBM Lotus LMS Release 1 Installation Guide
<Uri AffinityCookie="JSESSIONID" Name="/lms-ds/*.jsv"/>
<Uri AffinityCookie="JSESSIONID" Name="/lms-ds/*.jsw"/>
<Uri AffinityCookie="JSESSIONID" Name="/lms-ds/j_security_check"/>
<Uri AffinityCookie="JSESSIONID" Name="/lms-ds/services/*"/>
<Uri AffinityCookie="JSESSIONID" Name="/lms-ds/servlet/AxisServlet"/>
<Uri AffinityCookie="JSESSIONID" Name="/lms-ds/track"/>
Note: When you are installing customization sets for the user interface, you will also have to copy all images and
style sheets to the appropriate directories on the HTTP servers.
Tuning LDAP performance
The LMS user management functions assume an LDAP directory as the primary container of user and group
information. The LDAP directory contains the attributes that describe each user (for example, first name, last name,
department number, organization, phone number, etc.), and it is used to authenticate each user that logs onto LMS.
When a user successfully authenticates (this process is actually handled by the WebSphere Application Server),
LMS searches the user's entry in the LDAP directory and retrieves the values of all required user attributes. These
attribute values are cached by LMS by storing them in the USR table of the relational databases (LMM and DS) so
that they may be reused during the session. This prevents repeated queries against the LDAP directory and
improves overall performance of the application.
Every time a user logs in, LMS checks if the user’s attributes have changed in the LDAP directory and updates the
value stored in the USR table. If the LDAP attributes of a user changes while a user is logged in, LMS will not be
aware of these changes during this session. The user will have to log in again. This is the trade-off to the cache
mechanism, but not a very high price to pay for performance.
LDAP tuning guidelines
Every LDAP directory vendor supports some mechanism for performance tuning. Some vendors allow you to
control caching or buffering options while some allow you to create indexes on the data in the directory. Use the
following guidelines when tuning your LDAP directory to increase the performance of LMS:
1.
Make sure that the user attributes that are important to LMS are defined in the LDAP section of the settings
files (settings.xml, ds-settings.xml). This section contains the mappings for each of these attributes to the
corresponding LDAP attributes for each vendor and object class. It is a good idea to ensure that each user’s
entry in the LDAP directory is populated with the critical attributes (such as the display name). This saves
LMS from having to calculate those from other attributes.
2.
LMS uses the user name specified in the login screen to look up a user's entry in the LDAP directory. You
should make sure that the corresponding LDAP attribute (for example, uid) is indexed by the database that
powers your LDAP directory.
3.
When a user logs in, LMS attempts to determine whether the user is a manager (having other people
reporting to the user). If the user’s LDAP entry does not have an attribute that specifies this information (for
example, isManager), LMS has to perform an additional query against the LDAP directory. This query
determines if at least one other user has this user as manager. The user will only be presented with the first
LMS screen after all lookups have been completed. Especially on large directories this search can be very
time-consuming and significantly slow down the login process. To accelerate this you should ensure that the
users’ manager attribute is indexed in the database that powers the LDAP directory. If this is not possible or
does not speed up the query enough, you can defer the IsManager lookup until after the login is complete
(see the details in “Deferring the IsManager lookup” below). Essentially, a separate thread performing the
LDAP query is started that updates the user's entry afterwards.
Appendix A: LMS Performance and Fine-tuning Information 105
4.
There are several user attributes that are used quite often when searching for users (first name, last name,
organization, etc.). For a faster response, you can index these attributes in the LDAP server’s database.
Indexing LDAP attributes
Every vendor provides different ways on how to index the information in their LDAP directory. In the case of Lotus
Domino, for example, you just need to create a full text index on the address book (names.nsf) of the Domino server
hosting the LDAP process. This can boost the performance significantly.
With IBM Directory Server 5.1, you can indicate which fields you want to index, using the Web administration
interface. IBM Directory Server 4.1 does not provide this feature in the administration interface. There you will have
to create the index manually using DB2 utilities.
Deferring the IsManager lookup
As described above, in some cases you need to defer the IsManager lookup to speed up login and rostering
processes. You can advise LMS to do this by setting the value of the deferIsManagerLookup field in the settings.xml
and the ds-settings.xml from Disabled to Enabled. After the change you will need to restart the applications.
The settings.xml is located in the Learning Server installation directory at:
<WAS_install_path>\installedApps\<NODENAME>\LMSLMM.ear\lms-lmm-complete23.war\WEB-INF\classes\settings.xml
The ds-settings.xml is located in the Delivery Server installation directory at:
<WAS_install_path>\installedApps\<NODENAME>\LMSDS.ear\lms-dscomplete23.war\WEB-INF\classes\ds-settings.xml
When the deferral is enabled, the IsManager attribute will not be updated during login and rostering processes. For
newly rostered users, it will be set to zero (false). For users that logged on before, the value of the last IsManager
lookup is used.
The server thread that performs the IsManager lookups in the background works with a FIFO queue (first-in, firstout). This means that the IsManager field of users that logged on first will be updated first.
If the deferral of IsManager lookups is enabled and an LMS administrator rosters a huge list of users at once, the
lookup thread’s queue might overrun and could produce an error. In this case, you should not defer the IsManager
lookup.
Tuning database server performance
Tuning parameters vary according to the type of database and operating system you are using. There are no specific
LMS-related performance adjustments that should be applied to the database server. Nevertheless, keep the
following general advice in mind:
•
Ensure that the database server is set up to support the maximum number of connections from the
connection pool defined in the WebSphere Application Server.
•
If you are using the same database server for the Learning Server and the Delivery Server database, you can
increase the performance by creating the databases on physically different hard disks on the database server.
There are additional resources on the Internet that cover database performance tuning for the database servers
supported by LMS. For your convenience, some of them are listed here:
•
IBM DB2 Performance Problem Determination
http://www-3.ibm.com/cgibin/db2www/data/db2/udb/winos2unix/support/tutorial_performance.d2w/toc
106 IBM Lotus LMS Release 1 Installation Guide
•
IBM DB2 tuning parameters: WebSphere Application Server
http://publib7b.boulder.ibm.com/wasinfo1/en/info/ae/ae/rprf_db2parameters.html
•
IBM Redbook SG24-6417: DB2 UDB/WebSphere Performance Tuning Guide
http://publib-b.boulder.ibm.com/Redbooks.nsf/RedbookAbstracts/SG246417.html
•
IBM Redbook SG24-6012: DB2 UDB V7.1 Performance Tuning Guide
http://publib-b.boulder.ibm.com/Redbooks.nsf/RedbookAbstracts/SG246012.html
•
IBM Redbook SG24-5511: Database Performance Tuning on AIX
http://publib-b.boulder.ibm.com/Redbooks.nsf/RedbookAbstracts/SG245511.html
•
SQL Server Database Performance Tuning Tips
http://www.sql-server-performance.com/
•
Oracle Performance and Scalability
http://www.oracle.com/appsnet/technology/performance/content.html
Tuning TCP/IP settings on LMS servers
For each operating system, different parameters can be changed to optimize overall network performance. The
following sections provide TCP/IP tuning guidelines organized by operating system. These changes are
recommended for the servers hosting the LMS application as well as the servers running the HTTP servers.
Additional TCP/IP tuning information for a variety of operating systems can be found at
http://www.psc.edu/networking/perf_tune.html
Microsoft Windows 2000 servers
In Windows 2000, all important TCP/IP parameters must be set using the registry editor (regedit.exe). Start the
editor and go to:
HKEY_LOCAL_MACHINE\SYSTEM\CurrentControlSet\Services\Tcpip\Parameters
Modify the following parameters (described below). If a parameter does not exist, you have to create it manually.
After changing the settings, you will need to reboot the machine.
Note: A detailed description of Microsoft Windows 2000 TCP/IP implementation can be found at:
http://www.microsoft.com/technet/treeview/default.asp?url=/technet/itsolutions/network/deploy/depovg
/tcpip2k.asp.
TcpTimedWaitDelay
This parameter defines the time in seconds that needs to elapse before Windows can release a closed connection and
make it available for re-use. This interval between closure and release is known as the TIME_WAIT state or 2MSL
(twice the maximum segment lifetime) state. During this time, reopening the connection to the client and server
costs less than establishing a new connection. Reducing the value of this entry allows TCP to release closed
connections faster, providing more resources for new connections.
Recommended value: 30 (decimal) = 0x0000001e (hexadecimal)
After applying this change, you should see fewer connections in TIME_WAIT. Display them with the netstat
command.
MaxUserPort
This parameter determines the highest port number TCP can assign when an application requests an available user
port from the system.
Recommended value: At least 32768 (decimal) = 0x00008000 (hexadecimal)
Appendix A: LMS Performance and Fine-tuning Information 107
TcpNumConnections
This parameter defines the maximum number of simultaneous TCP connections and should be set higher than the
expected number of simultaneous connections.
Recommended value: 150-200% of your expected number of concurrent users
Note: Instead of using the registry editor, you can create a text file with the extension .reg using Notepad. The
values have to be specified as hexadecimal values. These look like the following
REGEDIT4
[HKEY_LOCAL_MACHINE\SYSTEM\CurrentControlSet\Services\Tcpip\Parameters]
"TcpTimedWaitDelay"=dword:0000001e
"MaxUserPort"=dword:00008000
"TcpNumConnections"=dword:000007d0
After you save the file, you can copy it to all servers and add the values to the registry by simply double-clicking
it in Windows Explorer.
Linux servers
Adjust the following TCP/IP parameters to tune performance in Linux:
tcp_fin_timeout
This parameter defines how many seconds to wait for a final FIN packet (state of FIN_WAIT_2) before the socket is
forcibly closed.
Under Linux, the TCP timeout can be set in /proc/sys/net/ipv4/tcp_fin_timeout. This can be done by using the
following command:
echo 30 > /proc/sys/net/ipv4/tcp_fin_timeout
A short description of this and other TCP parameters can be viewed in Linux by using the command man tcp. More
detailed information is available in the Ipsysctl tutorial at http://ipsysctl-tutorial.frozentux.net/ipsysctltutorial.html#TCPVARIABLES.
IBM AIX servers
Adjust the following TCP/IP parameters to tune performance in IBM AIX:
tcp_timewait
The tcp_timewait option is used to configure how long connections are kept in the timewait state. It is given in 15
second intervals, and the default value is 1.
Recommended value: 2 (30 seconds)
To see the current value, use this command:
no -o tcp_timewait=2
To change the value, use this command:
no -o tcp_timewait=2
A short description of this and other TCP parameters can be viewed in AIX by using the command man no.
108 IBM Lotus LMS Release 1 Installation Guide
Sun Solaris servers
Adjust the following TCP/IP parameters to tune performance in Solaris:
tcp_time_wait_interval
This parameter tells Solaris how long in milliseconds to keep a socket that was closed before releasing it for re-use.
Recommended value: 30000 (= 30 seconds)
To see the current value, use this command:
/usr/sbin/ndd –get /dev/tcp tcp_time_wait_interval
To change the value, use this command:
/usr/sbin/ndd -set /dev/tcp tcp_time_wait_interval 30000
tcp_fin_wait_2_flush_interval
This parameter defines how many milliseconds to wait for a final FIN packet (state of FIN_WAIT_2) before the
socket is forcibly closed.
Recommended value 67500 (= 67,5 seconds)
To see the value, use this command:
/usr/bin/ndd -get /dev/tcp tcp_fin_wait_2_flush_interval
To change the value, use this command:
/usr/bin/ndd -set /dev/tcp tcp_fin_wait_2_flush_interval 67500
tcp_keepalive_interval
This parameter defines the timer interval in milliseconds prohibiting an active connection from staying established if
one of the peers never responds.
Recommended value: 300000 (= 300 seconds)
To see the value, use this command:
/usr/bin/ndd -get /dev/tcp tcp_keepalive_interval
To change the value, use this command:
/usr/bin/ndd -set /dev/tcp tcp_keepalive_interval 300000
Tuning HTTP servers
Depending on the expected number of concurrent users, you may have to change some settings in the configuration
of the HTTP servers you are utilizing within your LMS configuration. Use the following guidelines for tuning HTTP
servers.
Adjusting the reload interval for the WebSphere plug-in configuration file
Every 60 seconds, by default, the WebSphere plug-in reloads its configuration file (plug-in.xml) to check if any
changes occurred. The dynamic regeneration of this configuration information is costly in terms of performance.
Therefore, in production environments you should change the <RefreshInterval=xxxx> parameter defined in
the configuration file itself to a higher value.
Appendix A: LMS Performance and Fine-tuning Information 109
Tuning the Sun ONE Web server, Enterprise Edition - Solaris
The default configuration of the Sun ONE Web server, Enterprise Edition provides a single-process, multi-threaded
server.
Adjusting the Active Threads parameter
After the server reaches the limit set with this parameter, the server stops servicing new connections until it finishes
with old connections. If this setting is too low, the server can become throttled, resulting in degraded response
times.
To tell if the Web server is being throttled, consult its perfdump statistics. Look at the following data:
•
WaitingThreads count: If this gets close to zero, or is zero, the server is not accepting new connections.
•
BusyThreads count: If this is close to zero, or is zero, BusyThreads is probably very close to its limit.
•
ActiveThreads count: If this is close to its limit (default is 512), the server is probably limiting itself.
To view or set, use the maximum number of simultaneous requests parameter in the Enterprise Server Manager
interface to control the number of active threads within Sun ONE Web server, Enterprise Edition. This setting
corresponds to the RqThrottle parameter in the magnus.conf file.
Tuning the Microsoft Internet Information Server (IIS)
Adjusting the following IIS properties and parameters with this server will let you tune server performance.
IIS permission properties
IIS has several permission properties that dramatically affect the performance of the application server. The default
settings are usually acceptable. However, because other products can change the default settings without user
knowledge, make sure to check the IIS settings for the Home Directory permissions of the Web server.
The permissions should be set to Script and not to Execute. If the permissions are set to Execute, no error messages
are returned, but the performance of WAS is decreased.
To check or change these permissions, perform the following procedure in the Microsoft management console:
1.
Select the Web site (usually the default Web site).
2.
Right-click and select the Properties option.
3.
Click the Home Directory tab.
To set the permissions of the home directory, in the application settings, ensure that the Script checkbox is
selected in the Permissions list and that the Execute checkbox is cleared.
It might also be necessary to check the permissions of the sePlugin. To do this, expand the Web server.
Right-click the sePlugin and select Properties. Confirm that the Execute permissions are set to Execute.
Number of expected hits per day
This parameter controls the memory that IIS allocates for connections. Using the performance window, set the
parameter to more than 100000 in the Web site properties panel of the Microsoft Management Console.
ListenBackLog parameter
If you are using IIS, you are likely to encounter failed connections under heavy load conditions (typically more than
100 clients). This condition commonly results from IIS rejecting connections. You can alleviate the condition by
using the ListenBackLog parameter to increase the number of requests IIS keeps in its queue.
110 IBM Lotus LMS Release 1 Installation Guide
Use the registry editor to set the ListenBackLog parameter located at:
HKEY_LOCAL_MACHINE\SYSTEM\CurrentControlSet\Services\InetInfo\Parameters\ListenBack
Log
The recommended value is 200.
MaxPoolThreads and PoolThreadLimit parameter
The MaxPoolThreads parameter controls the number of threads per CPU in the thread pool available for IIS to run
Common Gateway Interface (CGI) processes (each process takes one thread). The PoolThreadLimit parameter
specifies the upper limit for MaxPoolThreads.
The default thread limit that IIS can create on a machine is twice the number of MB in RAM on a machine (for
example, a server with 512 MB of RAM is limited to1024 threads).
Use the registry editor and adjust the following values:
HKEY_LOCAL_MACHINE\SYSTEM\CurrentControlSet\Services\InetInfo\Parameters
\MaxPoolThreads
HKEY_LOCAL_MACHINE\SYSTEM\CurrentControlSet\Services\InetInfo\Parameters
\PoolTheadLimit
Tuning the IBM HTTP Server
The IBM HTTP Server (IHS) is a multi-process, single-threaded server. For more information about tuning IHS, see
the Hints on Running a high-performance Web server at:
http://www.software.ibm.com/webservers/httpservers/doc/v136/misc/perf.html
The configuration takes place in the IHS httpd.conf file located in the confdirectory of the Web server’s installation
directory. After setting the described parameters, you have to restart IHS.
Adjust the following IBM HTTP Server properties and parameters to tune your server performance.
MinSpareServers, MaxSpareServers, StartServers, and MaxClients
During heavy load, IHS can use a large amount of the server’s processing time to create and destroy httpd child
processes. For optimum performance, even under heavy load, specify the same value for all four parameters. This
avoids the time-costly recreation of sub-processes.
Ignore the appearing error message [error] server reached MaxClients setting. Consider raising the MaxClient when
restarting IHS.
A too-low number of child processes is as bad as a too-high number, because more processes also means more
memory usage and more processor time for managing the processes. You can use the Apache Benchmark (ab)
program located in the IHS bin directory to test the impact of different parameter settings.
To simulate 100 concurrent users performing 20 requests to LMS, for example, you can issue the following
command:
ab -n 20 -c 100 http://<hostname>/lms-lmm/studentCatalog.do
In the ab command’s summary, some fields of interest may be the following:
•
Complete requests
•
Failed requests
•
Requests per second
Appendix A: LMS Performance and Fine-tuning Information 111
•
Time per request
When testing different parameter settings for the httpd.conf, use these values to compare and find the best
configuration setting for your system.
MaxRequestsPerChild
The MaxRequestsPerChild directive sets the limit on the number of requests that an individual child server process
handles. After the number of requests reaches the value set for the MaxRequestsPerChild parameter, the child
process dies. If there are no known memory leaks with the IHS version, set this value to zero (0) to specify an
unlimited amount.
LoadModule and AddModule
The more additional modules are loaded by IHS the more memory is consumed per process. Therefore, turn off the
loading of all unnecessary modules. Consult http://httpd.apache.org/docs/mod/ for detailed descriptions on the
different modules.
Timeout
This parameter specifies the number of seconds before sends and receives time out. The recommended value is 180.
Listen
On servers configured with multiple network interface cards (NICs), use the Listen parameter to specify which IP
addresses and ports IHS should serve. For example:
Listen 127.0.0.1:80
Listen 127.0.0.1:8008
Listen 192.168.56.1:80
Listen 192.168.130.1:80
ServerTokens
This parameter controls which information about IHS is sent back to the client with the header of the HTTP
response. For security reasons, it is recommended that you set it to the following:
ServerTokens Prod
This will respond with the product name only and will not send information about the version number or the
installed modules.
Tuning the IBM HTTP Server in Windows 2000
Adjust the following IBM HTTP Server properties and parameters in Windows 2000 to tune your server
performance.
ThreadsPerChild
This parameter sets the number of concurrent threads running at any one time within the IBM HTTP Server. Set this
value to prevent bottlenecks, allowing just enough traffic through to the application server.
Use the following procedure to change this parameter:
1.
Edit the IBM HTTP Server file httpd.conf located in the directory
IBM_HTTP_Server_root_directory/conf.
112 IBM Lotus LMS Release 1 Installation Guide
2.
Change the value of the parameter by starting with 100.
3.
Save the changes and restart the IBM HTTP server.
The recommended method is to start with a size of 100, then increase as necessary. An HTTP error message of type
503 (a refused connection) is a good indicator for the need to increase the value.
There are two ways to find how many threads are being used under load. The following procedures show how this
is done.
Checking for thread usage with the Windows 2000 Performance Monitor
Use the following procedure to check thread usage with the Windows 2000 Performance Monitor:
1.
Select Start -> Programs -> Administrative Tools -> Performance Monitor.
11. In Performance Monitor, click Edit -> Add to chart. Then set the following:
•
Object: IBM HTTP Server
•
Instance: Apache
•
Counter: Waiting for connection
To calculate the number of busy threads, subtract the number waiting (Windows 2000 Performance Monitor) from
the total available (ThreadsPerChild).
Checking for thread usage using IBM HTTP Server server-status
Use the following procedure to check thread usage with IBM HTTP Server server-status:
1.
Edit the IBM HTTP Server file httpd.conf by removing the comment character "#" from the following lines:
#LoadModule status_module modules/ApacheModuleStatus.dll
#<Location /server-status>
#SetHandler server-status
#</Location>
2.
Save the changes and restart the IBM HTTP server.
In a Web browser, go to the following URL and click Reload to update status: http://yourhost/server-status.
Alternatively, if the browser supports refresh, go to http://yourhost/server-status?refresh=5 to refresh every 5
seconds. You should see 5 requests currently being processed, 45 idle servers.
MaxKeepAliveRequests
This parameter specifies the maximum number of requests to allow during a persistent connection.
Use the following procedure to change this parameter:
1.
Edit the IBM HTTP Server file httpd.conf located in the directory
IBM_HTTP_Server_root_directory/conf.
2.
Change the value of the parameter.
3.
Save the changes and restart the IBM HTTP server.
The recommended value is 0. This will allow for an unlimited amount of requests.
MaxRequestsPerChild
This parameter specifies how many requests each process will handle before it exists and another process is started.
Appendix A: LMS Performance and Fine-tuning Information 113
Use the following procedure to change this parameter:
1.
Edit the IBM HTTP Server file httpd.conf located in the directory
IBM_HTTP_Server_root_directory/conf.
2.
Change the value of the parameter.
3.
Save the changes and restart the IBM HTTP server.
The recommended value is 250000.
HTTP Logging
This parameter enables logging for the HTTP server. Logging should be turned off unless you are trying to diagnose
a problem.
Use the following procedure to change this parameter:
1.
Edit the IBM HTTP Server file httpd.conf located in the directory
IBM_HTTP_Server_root_directory/conf.
2.
Comment out the following line as indicated: #CustomLog /usr/HTTPServer/logs/access_log
common.
3.
Save the changes and restart the IBM HTTP server.
AfpaEnable
This parameter enables the Fast Response Cache Accelerator. For best performance, this accelerator needs to be
disabled.
Use the following procedure to change this parameter:
1.
Edit the IBM HTTP Server file httpd.conf located in the directory
IBM_HTTP_Server_root_directory/conf.
2.
Disable the accelerator by commenting out the following lines:
AfpaEnable
AfpaCache on
AfpaLogFile "C:\IBMHttpServer/logs/afpalog" V-ECLF
3.
Save the changes and restart the IBM HTTP server.
Tuning performance using the WebSphere Application Server Administrative
Console
LMS can be fine-tuned to obtain higher performance results by adjusting specific WebSphere Application Server
(WAS) parameters and properties.
The adjustment of the parameters in this section takes place in the WebSphere Administrative Console and is
performed on the application server hosting the Learning Server and/or Delivery Server. After you change a
parameter, you will have to re-start the application server.
This section describes how to adjust or change the following WebSphere parameters and properties.
•
JVM Heap size
•
JIT compiler
•
JVM parameter (class verification and garbage collection)
114 IBM Lotus LMS Release 1 Installation Guide
•
Web container thread pool
•
Web container MaxKeepAliveConnections
•
Web container MaxKeepAliveRequests
•
JDBC Data Source Connection Pool size
•
JDBC Data Sources properties (to correct content deployment issues)
Adjusting JVM Heap size
The JVM heap size parameter specifies how often and how long the Java Virtual Machine spends collecting garbage
(de-allocating unused Java objects). The JVM heap is a repository for live objects, dead objects, and free memory.
When the JVM runs out of memory in the heap, JVM execution stops. This occurs so that a garbage collection
algorithm can go through memory and free space that is no longer required by an application. This process affects
performance because server-side work cannot proceed during garbage collection. Adjusting this parameter helps to
increase LMS performance.
Increasing the size of the Java heap can improve the performance of the LMS system. To begin, set both Initial Java
Heap Size and Maximum Java Heap size to the same value. The size of the Java heap will depend on the available
memory on the LMS system. You should never increase the Java heap beyond the available memory on the system.
On a system running Microsoft Windows, you can do Ctrl-Alt-Del and select the Task Manager button. Click on the
performance Tab and look-up the Available Physical memory. On systems running AIX or Linux, you can use the
vmstat command.
For small LMS configurations, the Maximum Java Heap size of 256 MB that comes as the default Websphere setting
is acceptable. You should consider increasing the JVM heap size, however, if your LMS installation operates under
the following conditions:
•
The Learning Server and Delivery Server are configured to run on 2 separate machines and each machine
has at least 2 GB of RAM.- increase the maximum heap size to 768 MB.
On the other hand, if your machine has only 2 GB of RAM and you are running both the Learning Server
and Delivery Server on the same machine - leave the setting of 256 MB unchanged.
•
The Learning Server and Delivery Server are running on 2 separate machines and each machine has 4 GB of
RAM - increase the maximum heap size to 1536 MB.
•
The Learning Server and Delivery Server are running on the same machine and the machine has more than 2
GB of RAM - increase the maximum Heap size to 768 MB.
•
The Learning Server and Delivery Server are running on the same machine and the machine has more than 4
GB of RAM - increase the maximum Heap size to 1536 MB.
•
Your machine has 4 GB or more of RAM - you may consider increasing the Java heap size to 1.5 GB.
Increasing the Java heap size beyond 768 MB, however, might cause garbage collection to take longer than
normal and cause your system to be unusable while garbage collection is occurring.
If you set a large heap size, full garbage collection is slower, but it occurs less frequently. If you set your heap size in
accordance with your memory needs, full garbage collection is faster, but occurs more frequently. The goal of tuning
your heap size is to minimize the time that you spend doing garbage collection while maximizing the number of
clients that you can handle at a given time.
To view, set, or change the JVM heap size parameter in the WebSphere Administrative Console, use the following
procedure. Do this for both the Learning Server and Delivery Server applications.
1.
Select Application Servers – <server name> - Process Definition -Java Virtual Machine – Additional
Properties/General Properties
Appendix A: LMS Performance and Fine-tuning Information 115
2.
View or adjust the Maximum Heap Size and set the Initial Heap Size to the same value.
3.
Stop and re-start the application.
Enabling the JIT compiler
When a JVM JIT (Just-In-Time) compiler is present and enabled, the Java Virtual Machine performs differently. After
reading in a .class file for interpretation, the JVM hands the .class file to the JIT. The JIT takes the bytecodes and
compiles them into native code for the machine that you are running on. Using this technique it can actually be
faster performance-wise for the JIT to obtain the bytecodes, compile them “on the fly,” and run the resulting
executable rather than just interpreting it. The JIT compiler is then an important part of the Java Virtual Machine in
that it can allow Java code to run faster.
The WebSphere Administrative Console lets you either enable or disable the JIT. To do this in the WebSphere
Administrative Console, use the following procedure. Do this for both the Learning Server and Delivery Server
applications.
1.
Select Application Servers – <server name> - Process Definition - Java Virtual Machine
2.
Make sure that the JIT compiler setting is set to Enabled
3.
Stop and re-start the application.
Adjusting the JVM parameter to avoid class verification
The JVM parameter lets you skip the class verification stage during class loading, saving you overhead. When using
this value with the JIT on, gains are between 10–15 percent in startup time.
To view or change this parameter, use the following procedure:
1.
In the WebSphere Administrative Console, go to Application Servers - <server_name> - Process Definition Java Virtual Machine.
2.
Add the value “-Xverify:none” to the Generic JVM arguments field.
Adjusting the JVM parameter garbage collection threads
The JVM parameter lets you set the number of garbage collection threads to save on overhead. You can have several
garbage collection threads. If you machines have more than one processor, set the number of threads equal to the
number of processors. This is only applicable for IBM JDK 1.3.
To view or change this parameter, use the following procedure:
1.
In the WebSphere Administrative Console, go to Application Servers - <server_name> - Process Definition Java Virtual Machine.
2.
Add the value “-Xgcthreads=[number_of_processors]” to the Generic JVM arguments field.
Adjusting the Web container thread pool
A thread pool enables components of the server to reuse threads to eliminate the need to create new threads at run
time. Requests are sent to the server through any of the HTTP transports. Creating new threads expends time and
resources.
In WebSphere, there are 2 parameters that can be changed to adjust the Web Container thread pool size:
•
Minimum size – Specifies the minimum number of threads to allow in the pool. This value should be left to
its default value of 10.
116 IBM Lotus LMS Release 1 Installation Guide
•
Maximum size - Specifies the maximum number of threads to allow in the pool. This value should be set to
50% of the number of concurrent users planned for the LMS server.
Use the maximum thread size parameter to specify the maximum number of threads that can be pooled to handle
requests sent to the Web container. Requests are sent to the Web container through any of the HTTP transports. You
have two choices:
•
Adjust the Minimum Size and Maximum Size for the thread pool.
•
Turn on the Growable Thread Pool option to allow the thread pool to be increased by WAS as needed.
Although it is recommended that you select the Growable Pool Size option, if you decide to set the minimum and
maximum pool size, use these guidelines:
•
The minimum size should be left to its default value of 10.
•
The maximum size should be set to 100 and increased as necessary. You will know if the maximum pool size
needs to be increased if you observe the performance of the Learning or Delivery application servers. If you
notice that the response time is increasing while the CPU utilization of the machine is still low, this could be
a symptom of a starved system. The starvation could be caused by a bottleneck. A small thread pool size
could be one of the bottlenecks.
To view or change these parameters, use the following procedure:
•
In the WebSphere Administrative Console, go to Application Servers - <server_name> - Web Container Thread Pool.
•
View or adjust the Minimum Size, Maximum Size, and Growable thread pool to the desired size.
Adjusting the Web container MaxKeepAliveConnections
This parameter describes the maximum number of concurrent connections to the Web container that are allowed to
be kept alive, that is, to be processed in multiple requests. If this value is too small, performance is negatively
impacted.
To view or change this parameter, use the following procedure:
1.
In the WebSphere Administrative Console, go to Application Servers - <server_name> - Web Container ->
HTTP Transports - <port_number> - Custom Properties.
2.
Click New to create a new custom property and enter MaxKeepAliveConnections as Name.
3.
Set the value to about 90 percent of the Maximum Size defined for the thread pool.
Adjusting the Web container MaxKeepAliveRequests parameter
This parameter describes the maximum number of requests allowed on a single keep-alive connection. This
parameter can help prevent denial of service attacks when a client tries to hold onto a keep-alive connection.
To view or change this parameter, use the following procedure:
1.
In the WebSphere Administrative Console, go to Application Servers - <server_name> - Web Container HTTP Transports - <port_number> - Custom Properties.
2.
Click New to create a new custom property and enter MaxKeepAliveRequests asName.
3.
At the beginning, set the value to 100. If the application server requests are received from the WebSphere
plug-in only, increase this parameter's value.
Appendix A: LMS Performance and Fine-tuning Information 117
Adjusting the JDBC Data Source Connection Pool size
When accessing any database, the initial database connection is an expensive operation. Connection pooling and
connection reuse reduces the number of these operations significantly.
Only two parameters should be changed here: Min connections and Max connections. All other parameters should
be left untouched. The minimum connections should be set to 15. The maximum connections should be set to equal
the number of the Web Container Thread Pool size.
To view or change these parameters, use the following procedure (the following changes should be made to all LMS
data sources):
1.
In the WebSphere Administrative Console, go to JDBC Providers -<JDBC_provider_name> - Data Sources <database_source_name> - AdditionalProperties/Connection Pool.
2.
Adjust Min Connections and Max Connections only; let the other parameters remain unchanged.
Note: Whenever increases are made on the JDBC connection pool, equivalent changes need to be made by the
database administrator on the database server.
Adjusting WAS JDBC Data Sources properties to correct content deployment issues
In cases where LMS has trouble deploying course content after a course has been imported and registered, you can
try the following suggestions with WAS JDBC Data Sources properties to correct this problem.
•
Make sure that the Learning Server, Delivery Server, and Audit data sources have the JDBC Data Source
statement cache size set to 0 instead of 10 (the default). This should eliminate the exceptions that were
apparent in the log, and will probably allow course tracking to work if it was not working before.
•
Change the custom property select method to cursor for all the JDBC data sources. The default value for this
property is direct. For additional information about this setting, refer to
http://edocs.bea.com/wls/docs81/jdbc_drivers/mssqlserver.html.
You must restart all servers after making any of these changes.
Tuning the LMS applications
Adjusting certain features of the Learning Server and Delivery Server applications can help to increase performance
in the Learning Management System.
Adjusting LMS logging
Adjusting logging in LMS to specific levels can produce system performance benefits. To increase performance
levels, set the various log Logging levels to “Warn.” Use the following procedures to do this.
Application Log
•
Click Settings - LMM Server - System Logging - Application Log
•
Set the Logging level to warn
Database Log
•
Click Settings - LMM Server - System Logging - Database Log
•
Set the Logging level to warn
E-mail Log:
•
Click Settings - LMM Server - System Logging - E-mail Log
118 IBM Lotus LMS Release 1 Installation Guide
•
Set the Logging level to warn
Tracking Log:
•
Click Settings - LMM Server - System Logging - Tracking Log
•
Set the Logging level to warn
Archiving the LMS log files
LMS log files should be archived on regular basis. Otherwise, the files could continue to grow until no space is left
on the hard drive.
Setting the size and frequency of the Delivery Server progress record update (for LMS
systems using Oracle backend only)
Specific LMS and Oracle parameters and settings are used to determine the number of progress records that are sent
from the delivery server to the Learning Server at each update. These parameters can be changed to tune LMS
performance.
MaxRecords and Minutes parameters (LMS parameters)
Use the following procedures to change these parameters to tune LMS performance.
1.
Go to the ds-settings.xml file located in the DS WEB-INF\classes directory.
2.
Open this file for editing.
3.
The first parameter that can be changed is maxRecords. The example shows how this parameter is
represented in the ds-settings.xml file.
<!--================================================================
SendProgressTask
=============================================================== -->
<sendprogresstask component="com.ibm.workplace.elearn.module.SendProgressTask"
maxRecords="500"/>
The default maxRecords value should be set to 500 to limit the number of records handled at each update.
4.
The second parameter that can be changed is minutes. The example shows how this parameter is presented
in the ds-settings.xml file.
<!-- ==== task to send student progress data to the LMM ==== -->
<task name = "module.SendProgressTask.1"
ownerId = "module.SendProgressTask"
taskId = "1"
minutes = "5" />
The number of minutes should be changed to 2.
Appendix A: LMS Performance and Fine-tuning Information 119
Oracle PROCESSES Parameter (Oracle server only)
This parameter must be changed on the Oracle server. Increasing this parameter from the default value of 150 to 600
can improve performance. Use the following procedures to change this parameter.
1.
Find the SPFILEORACLE.ORA file on the Oracle server.
2.
Open it for editing.
3.
Find the PROCESSES parameter and change it to 600.
4.
Restart the Oracle instance for the new value to take effect.
120 IBM Lotus LMS Release 1 Installation Guide
Appendix A: LMS Performance and Fine-tuning Information 121
Index
Application Servers
deploying Learning Management System
components to separate, 87
applications
starting, 89
starting from WAS Admin console, 89
Authoring Tool, 93
Authoring Tool
installing, 93
Command Line Import Utility (CLIMP), 93
installing, 93
database creation and configuration, 38
installing, 17
Learning Management System
components, 1, 2
installation overview, 5
overview, 1
system requirements, 3
Learning Management System Installer
using for the Delivery Server, 29
using for the Learning Server, 21
Learning Server application, 75
deploying, 75
LearningSpace
migration from, 94
database schemas, 37
migration from LearningSpace, 94
Delivery Server
multiple servers, 49
adding to the Learning Management System
application, 92
Delivery Server (DS) application, 85
deploying, 85
environment entries, 63
configuring, 63
defining, 63
Network Deployment Module, 49
installing, 49
Offline Learning Client, 93
deploying, 93
performance guidelines, 103
post-installation tasks, 92
Hardware requirements, 3
Referenceable, 65
IBM Directory Server 4.1
regenerating the Web sever plug-in, 90
installing, 17
Identifying Learning Management System Hardware
Assets, 11
installation process
outline, 6
Resource Environment Provider, 63
server configuration options, 11
server responsibilities, 11
single logon, 14, 96
Installer program information, 21, 29
Software requirements, 3
installing XVFB, 94
SSO, 14, 96
JDBC data sources, 53
configuring, 53
defining, 57
JDBC Provider, 54
LDAP authentication, 71
LDAP directory, 17
identifying, 17
122 IBM Lotus LMS Release 1 Installation Guide
configuring, 14, 96
tuning performance, 103
uninstalling the Learning Management System, 101
Updater, 90
WAS Global Security, 74
web server plug-in
regenerating, 90
WebSphere, 13, 41
WebSphere Application Server security, 71
configuring, 71
WebSphere Core
installing, 13
XVBF
installing, 94
Index 123
Printed in USA