1
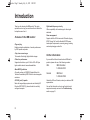
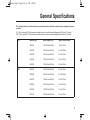
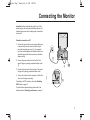
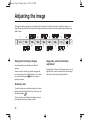
cover.doc Page 1 Wednesday, July 12, 1995 5:14 PM
IBM G41/G50
Colour Monitor
User’s
Guide
legal.doc Page i Wednesday, July 12, 1995 5:16 PM
First Edition (Sept 1995)
Notices
The following paragraph does not apply to the United Kingdom or
any country where such provisions are inconsistent with local law:
References in this publication to IBM products, programs, or services do
not imply that IBM intends to make these available in all countries in
which IBM operates. Any reference to an IBM product, program or
service is not intended to state or imply that only IBM’s product,
program, or service may be used. Any functionally equivalent product,
program, or service that does not infringe any of IBM’s intellectual
property rights or other legally protectable rights may be used instead of
the IBM product, program, or service. Evaluation and verification of
operation in conjunction with other products, programs, or services,
except those expressly designated by IBM, are the user’s responsibility.
INTERNATIONAL BUSINESS MACHINES CORPORATION
PROVIDES THIS PUBLICATION “AS IS” WITHOUT WARRANTY OF
ANY KIND, EITHER EXPRESS OR IMPLIED, INCLUDING, BUT NOT
LIMITED TO, THE IMPLIED WARRANTIES OF MERCHANTABILITY
OR FITNESS FOR A PARTICULAR PURPOSE.
Some states do not allow disclaimer of express or implied warranties in
certain transactions, therefore, this statement may not apply to you.
This publication could include technical inaccuracies or typographical
errors. Changes are periodically made to the information herein; these
changes will be incorporated in new editions of the publication. IBM may
make improvements and/or changes in the product(s) and/or the
program(s) described in this publication at any time.
It is possible that this publication may contain reference to, or
information about IBM products (machines and programs),
programming, or services that are not announced in your country. Such
references or information must not be construed to mean that IBM
intends to announce such IBM products, programming, or services in
your country.
IBM may have patents or pending patent applications covering subject
matter in this document. The furnishing of this document does not give
you any license to these patents. You can send license enquiries, in
writing, to the IBM Europe Director of Commercial Relations, IBM
Deutschland, Schoenaicherstrasse 220, D-71032 Boeblingen,
Deutschland.
Trademarks
The following terms, used in this publication, are trademarks or service
marks of the IBM Corporation in the United States or other countries:
IBM
ThinkPad
OS/2HelpCenter
Requests for technical information about IBM products should be made
to your IBM Authorised Dealer or your IBM Marketing Representative.
© Copyright International Business Machines Corporation 1995. All
rights reserved.
Note to U.S. Government Users - Documentation related to restricted
rights - Use, duplication or disclosure is subject to restrictions set forth in
GSA ADP Schedule Contract with IBM Corp.
Mexico
Importer name and address:
IBM Mexico, S.A.
Mariano Escobedo 595
Col. Polanco-Chapultepec
11560 Mexico, D.F.
Mexico.
i
legal.doc Page ii Wednesday, July 12, 1995 5:16 PM
Power Cords
DANGER
Do not remove the covers under any circumstances.
Do not connect the equipment to, or disconnect the
equipment from, a mains power outlet during an
electrical storm.
For your safety, IBM provides a power cord with a grounded attachment
plug to use with this IBM product. To avoid electrical shock, always use
the power cord and plug with a properly grounded outlet.
IBM power cords used in the United States and Canada are listed by the
Underwriters Laboratories (UL) and certified by the Canadian Standards
Association (CSA).
For units intended to be operated at 115 volts: Use a UL listed and CSA
certified cord set consisting of a minimum 18 AWG, type SVT or SJT,
three conductor cord, a maximum of 4.57 metres (15 feet) in length and
a parallel blade, grounding type attachment plug rated 15 amperes, 125
volts.
DANGER
To avoid shock hazard:
• The power cord must be connected to a properly
wired and earthed socket.
• Any equipment to which this product will be
attached must also be connected to properly wired
sockets.
For units intended to be operated at 230 volts (U.S. use): Use a UL
listed and CSA certified cord set consisting of a minimum 18 AWG, type
SVT or SJT, three conductor cord, a maximum of 4.57 metres (15 feet)
in length and a tandem blade, grounding type attachment plug rated 15
amperes 250 volts.
For units intended to be operated at 230 volts (outside the U.S.): Use a
cord set with a grounding type attachment plug rated 13 amperes
(minimum), 250 volts. The cord set should be marked <HAR> and have
the appropriate safety approvals for the country in which the equipment
will be installed.
Important: To isolate the monitor from the electrical supply you must
remove the plug from the mains power socket. The monitor should be
situated as close to the mains socket as possible, allowing easy access.
ii
como.toc Page 1 Wednesday, July 12, 1995 5:18 PM
Contents
Introduction ....................................................2
Getting started ...............................................3
Product Records ............................................4
General Specifications ..................................5
Installation ......................................................6
Connecting the Monitor.................................7
Optimising performance ...............................8
Adjusting the image.....................................10
Indicators......................................................12
Disabling DDC ..............................................14
Working with your Monitor .........................15
Troubleshooting...........................................16
Glossary........................................................19
Specifications...............................................20
Compliances.................................................21
Warranties ....................................................22
1
use.doc Page 2 Sunday, July 16, 1995 3:45 PM
Introduction
Thank you for choosing this IBM product. This guide
explains how to set up your monitor and how to obtain the
best performance from it.
Digital multi-frequency circuitry
Features of this IBM monitor:
Power management
Supports both the US Environmental Protection Agency
(EPA) “Energy Star” and the Swedish NUTEK power
consumption requirements, conserving energy, reducing
costs and prolonging monitor life.
Plug and play,
Enables automatic optimisation of monitor performance
by DDC capable computers.
Crisp, clear screen image
This monitor offers bright, high-definition images.
Flicker free performance
Supports refresh rates, up to 85 Hz for 800 x 600 plus
higher refresh rates at lower addressabilities.
Meets MPR II guidelines
All models conform to SWEDAC (Swedish Board for
Technical Accreditation) MPR-II limits for electromagnetic
emissions.
ISO 9241 (part 3) capable
Meets the image display requirements as defined by EC
Directive 90/270/EEC (2) when attached to a suitably
configured computer.
2
Offers compatibility with a wide range of video signal
standards.
Further information
If you would like further information about IBM and its
products, please call one of the following numbers:
USA
IBM information
1-800-426-3333
Canada
IBM Direct
1-800-465-7999
Outside the USA and Canada, contact your dealer or IBM
representative.
You can find information on how to get help, technical
support and warranty service in the Troubleshooting
section on page 16.
use.doc Page 3 Sunday, July 16, 1995 3:45 PM
Getting started
Unpacking
Unpacking checklist
Your monitor is heavy, so handle it with care. Whenever
you need to move or lift it, minimise the risk of injury by
keeping your back straight and by keeping the weight
near to your body. If in doubt, ask someone to assist you.
The following items are supplied with this product. If any
item is damaged or missing, notify your supplier.
Monitor
Tilt swivel stand (attached)
Lift the monitor by holding it firmly under each side and
use proper lifting techniques.
Signal cable (attached)
Power cable
Also supplied is this User’s guide and a Quick Start
information card.
3
use.doc Page 4 Sunday, July 16, 1995 3:45 PM
Product Records
Important: Be sure to retain your proof of purchase
because it might be required to receive warranty service.
You should record the following information.
IBM G41 / G50
1. Monitor name ______________________________
2. Machine type/model
3. Serial number
____________________
_________________________
4. Date of purchase ____________________________
Information is on label at the back of the monitor.
4
use.doc Page 5 Sunday, July 16, 1995 3:45 PM
General Specifications
The following table provides the machine type and model number with their respective mains voltages and typical
currents:
G41: 14 inch (nominal) CRT with maximum viewable screen size, when measured diagonally of 336mm (13.2 inches)
G50: 15 inch (nominal) FST with maximum viewable screen size, when measured diagonally of 342mm (13.4 inches)
G41
G50
Machine Type
Mains Voltage (Vac)
Typical Current (Amps)
6542/301
100-120 Vac 50/60 Hz
1.4A at 110 Vac
6542/302
200-240 Vac 50/60 Hz
0.7A at 220 Vac
6542/303
100-240 Vac 50/60 Hz
1.4A at 110 Vac
6542/304
100-240 Vac 50/60 Hz
1.4A at 110 Vac
6542/305
100-240 Vac 50/60 Hz
1.4A at 110 Vac
6543/301
100-120 Vac 50/60 Hz
1.4A at 110 Vac
6543/302
200-240 Vac 50/60 Hz
0.7A at 220 Vac
6543/303
100-240 Vac 50/60 Hz
1.4A at 110 Vac
6543/304
100-240 Vac 50/60 Hz
1.4A at 110 Vac
6543/305
100-240 Vac 50/60 Hz
1.4A at 110 Vac
6543/333
100-240 Vac 50/60 Hz
1.4A at 110 Vac
5
use.doc Page 6 Sunday, July 16, 1995 3:45 PM
Installation
Workplace preparation
Your Workstation
This section gives advice on the things that you should
consider before you set up your monitor.
Desk
Positioning the Monitor
Choose a suitable place to position the monitor. Ensure
that the furniture or equipment can support the weight of
the monitor. Allow adequate ventilation space around the
monitor.
Height
The monitor should be positioned so that the top of the
screen is slightly below your eye level when you sit at
your workstation.
When using a keyboard, your forearms should be
approximately horizontal. If your desk is of a fixed height,
adjust your chair so that your arms are in a comfortable
position. If your desk is of adjustable height, first adjust
your chair so that you are seated comfortably and then
adjust your desk.
Chair
Your chair should support your lower back and fit the
curvature of your spine. Adjust the chair so your thighs
are horizontal and your feet rest flat on the floor. Use a
footrest if necessary.
Orientation
Choose a position that gives the least reflection from
lights and windows, usually at a right angle to any
windows. The monitor should be positioned directly in
front of you so that you do not have to twist your body. Tilt
the monitor to a comfortable viewing angle.
Working Area
Organisation
Arrange your working area so that everything you need is
within easy reach. Avoid frequent twisting movements of
your back which can cause or aggravate back problems.
Documents
Use a document holder to position documents adjacent to
the monitor screen.
Lighting
For comfortable viewing of the monitor, lighting levels in
the room should not be too high. Use a lamp to illuminate
the documents you are working with, if necessary.
6
use.doc Page 7 Sunday, July 16, 1995 3:45 PM
Connecting the Monitor
Important: Before connecting the monitor, turn off the
power supply to the computer and attached devices. If a
switched mains power outlet is being used, ensure that it
is turned off.
Standard connection to a PC
1. Connect the signal cable to your computer taking care
to ensure that you do not force the cable into your
computer the wrong way round A . Your computer
may have a video adapter card installed. In this case,
attach the signal cable to the connector on the video
adapter card B .
2. Connect the power cord to the monitor first. Then
insert its plug in a properly grounded electrical outlet
C .
C
A
3. Connect the power cord to the computer. Then insert
its plug into a properly grounded electrical outlet.
4. Turn on the monitor, then the computer (or both at the
same time if using a power strip).
If attaching to a PS/2 Computer, refer to the Disabling
DDC section on page 14
B
To obtain the best possible image, please refer to the
following section, Optimising performance on page 8.
7
use.doc Page 8 Sunday, July 16, 1995 3:45 PM
Optimising performance
"Plug and Play"
Monitor implementation of the VESA DDC standard offers
the capability of automatic optimisation of monitor
performance (“Plug and Play”). In order for automatic
optimisation to be effective, the attaching computer must
also be hardware and software enabled for DDC
operation.
The monitor sends data to the computer. The computer
stores the received data, and determines the display
mode that best uses the capabilities of the monitor
through analysis of this data.
Display Modes
The computer uses software to control the way in which
the image is displayed on the screen. This software is
supplied as part of your computer operating system (e.g.
DOS, OS/2). If a video adapter card is installed, additional
software would have been supplied with it.
The way in which the image is displayed on the monitor
screen is called the Display Mode and it is governed by
two main factors, the Addressability and the Refresh
Rate.
Addressability is the number of horizontal and vertical
picture elements (pels) that form the screen image, e.g.
800 x 600.
Refresh Rate is the number of times per second that the
screen image is “repainted” by the computer or video
adapter card, e.g. 72 Hz.
8
Display Modes can be either “Interlaced” or “Noninterlaced” (see Glossary).
Your monitor can support a wide range of display modes.
For the display modes in Table 1, the screen image has
been optimised during manufacture.
Selecting display modes
The display mode that your monitor uses is controlled by
the computer. After the computer and the monitor have
been turned on, the computer will select a display mode.
You may want to use a different display mode, one that
produces the best possible screen image for your
application.
Ensuring flicker-free operation
If your computer is hardware and software enabled for
DDC operation, it will automatically select the highest
refresh rate that your monitor and computer support for
your selected display mode. If DDC is not enabled,
consult your software operating system manual to
determine what display modes it can support. Using the
necessary software utilities or graphics adapter card,
select the highest (non-interlaced) refresh rate both the
computer and the monitor can support (generally 72 Hz or
higher). Note that the monitor is capable of flicker-free
operation at addressabilities up to 1024 x 768.
use.doc Page 9 Sunday, July 16, 1995 3:45 PM
How to change display modes
Your operating system manual defines the procedure
you should follow to change the default display
mode.
Addressability
Refresh
Line Rate
Notes
720 x 400
70 Hz NI
31.5 kHz
DOS Prompt
After selecting the optimum mode you need not perform
this operation again unless you change your computer or
software configuration.
640 x 480
60 Hz NI
31.5 kHZ
VESA
Notes:
640 x 480
72 Hz NI
35.5 kHZ
VESA
1. The computer automatically changes display modes to
accommodate some applications. Generally, you will
not notice this.
640 x 480
75 Hz NI
37.5 kHZ
VESA
640 x 480
85 Hz NI
43.3 kHZ
VESA
800 x 600
72 Hz NI
48.1 kHZ
VESA
800 x 600
75 Hz NI
46.9 kHZ
VESA
800 x 600
85 Hz NI
53.7 kHZ
VESA
1024 x 768
43 Hz I
35.5 kHZ
Interlaced
1024 x 768
70 Hz NI
56.5 kHZ
VESA
1024 x 768
72 Hz NI
58.1 kHZ
2. The image size, position and shape may change when
the display mode changes. This is normal and the
image can be readjusted using the monitor controls
(see Adjusting the image on page 10).
Table 1. Factory Set Display Modes.
Legend : I = Interlaced
NI = Non-Interlaced
9
use.doc Page 10 Sunday, July 16, 1995 3:45 PM
Adjusting the image
The image is already optimised for many display modes. However, the controls can be used to adjust the image to your
liking. IBM recommends that the factory preset image size position and shape is used when operating with a display mode
listed in Table 1.
1
2
4
3
Saving and cancelling changes
Your settings will be automatically saved after five
seconds.
Should you wish to cancel any geometry changes that
you have made, press the right hand side of Key 1 where
you see the following symbol
within 5 seconds of
making the change.
Geometry reset
To reset the image size, position and shape to the factory
settings, press the left hand side of Key 1 where you see
the following symbol:
.
There may not be any settings for the display mode you
are using and so the key may have no effect.
10
6
5
8
7
9
Image size, position and shape
adjustment
By using Keys 2-7 shown in the diagram above, you can
adjust the size, position and shape of the screen image.
The pictures show how the image is affected.
use.doc Page 11 Sunday, July 16, 1995 3:45 PM
Brightness and Contrast adjustment
By pressing the right hand side or the left hand side of
keys 8 (brightness) or 9 (contrast). You can adjust the
screen image. The pictures show how the image is
affected.
8
9
IBM recommends that the contrast is adjusted so that
white text on a dark background does not appear to
“bloom”. (The edges of the characters should remain
sharp).
For ergonomic reasons it is recommended that the
contrast is not adjusted to maximum.
Disabling the controls
Some users may wish to disable the monitor controls to
prevent tampering.
To disable the controls, press and hold down the right
hand side of Key 1 where you see the following symbol:
Hold the button for 15 seconds. After 15 seconds, the
screen and LED will both flash to indicate that the keypad
has been disabled. If you wish to re-enable the controls,
repeat this process.
11
use.doc Page 12 Sunday, July 16, 1995 3:45 PM
Indicators
Power Management
To benefit from power management (electricity
conservation), the monitor must be used in conjunction
with a computer that implements the Video Electronics
Standards Association (VESA) Display Power
Management Signalling (DPMS) Standard.
The table below summarises the states shown by the
power indicator:
Power indicator
Operating state
Green - off -Amber - off
Self test
Steady green
Normal operation
Alternating green and amber
VESA Standby state
Alternating amber and green
VESA Suspend state
Steady amber
VESA Off state
Flashing green
Display mode out of range
Note that immediately after the monitor is turned on, the
LED may appear amber for 2 seconds before turning
green. This indicates that the DDC function has been
disabled. See the Disabling DDC section on page 14.
The power management feature is invoked when the
computer recognises that you have not used your mouse
or keyboard for a user-definable period of time. There are
several states, progressively lowering monitor power
consumption:
12
1. On
The monitor is fully operational for normal use. The power
indicator light is green.
2. Standby
After a defined period of inactivity, the monitor will enter
the Standby state. The monitor screen will go blank, and 5
seconds later the power indicator light will alternate
between green and amber, with the green light staying on
for longer than the amber. Pressing a key on the
Keyboard, or moving the mouse will restore normal
operation and the screen image will reappear almost
instantly.
3. Suspend
After a further period of inactivity, the monitor will be
instructed to enter the Suspend state. The screen will
remain blank and the power indicator light will continue to
alternate between green and amber, with the amber light
staying on longer than the green. When entering the
Suspend state from the On state, there is a delay of 15
seconds between the screen blanking and the Suspend
state being activated. Energy savings in this state meet
the Energy Star power consumption requirements. To
reactivate the monitor, simply press a key on the
Keyboard, or move the mouse. The screen image will
reappear almost instantly.
use.doc Page 13 Sunday, July 16, 1995 3:45 PM
4. Off
After a further period of inactivity in the Suspend state, the
monitor will be instructed to enter the Off state. The
screen will remain dark and the power indicator light will
turn amber. When entering the Off state from the On
state, there is a delay of 45 seconds between the screen
blanking and the Off state being activated. Energy
savings in this state meet the power consumption
requirements of both Energy Star and Swedish NUTEK
specification 803299. To reactivate the monitor, simply
press a key or move the mouse. There will be a short
delay before the screen image reappears.
As an Energy Star Partner, IBM has determined that this
product meets Energy Star guidelines for energy
efficiency.
Whether or not you make use of VESA DPMS power
management, IBM recommends that you switch off your
monitor at the end of each working day to save energy
and to prolong the life of your monitor.
13
use.doc Page 14 Sunday, July 16, 1995 3:45 PM
Disabling DDC
As previously mentioned, DDC offers “Plug and Play”
ease of setup to the user. To take advantage of DDC
requires suitable hardware and software inside your
computer and it is possible that you will be attaching your
monitor to a computer that does not support DDC. In most
cases, this does not cause a problem other than the fact
that the screen mode will need to be optimised manually.
However, if you are attaching to the DDC monitors PS/2
computer or one of a handful of video adapter cards, DDC
may not be compatible with the computer and results in
either a blank screen or a green screen being displayed.
In such a situation, this sequence should be followed:Press and hold the left hand side of Key 7 (see page 10)
for 15 seconds. This disables DDC. DDC can be enabled
again by pressing and holding the right hand side of Key 7
15 seconds.
In both cases it is recommended that (if possible) this is
done while something is displayed on the screen since
after the 15 second delay the screen will flash, confirming
that the change has been implemented.
In addition it is possible to find out whether or not DDC is
enabled by looking at the LED. If DDC is disabled, the
LED will go amber for two seconds at power up, before
turning green. If DDC is enabled, the LED will be
continually Green.
Each time the monitor is powered on, the LED will
indicate the DDC status.
14
DDC Reset
It is possible that even if you are attaching to a DDCcapable computer your computer will not recognise your
monitor as being DDC enabled. There are three likely
reasons for this.
1 Monitor set to ‘DDC disabled’. Refer to the above
section for details on how to enable DDC again.
2 DDC not enabled within your computer. Consult your
computers documentation.
3 DDC may have ceased to operate for some reason.
This may happen if attaching to a computer that has not
fully implemented VESA recommendations on DDC or if,
during installation, the monitor was first connected to the
computer while the monitor’s power cord was already
plugged in.
use.doc Page 15 Sunday, July 16, 1995 3:45 PM
Working with your Monitor
The following suggestions may help you work more
comfortably with your computer.
Working Practices
Rest
Take regular breaks. Vary your posture, and stand up and
stretch occasionally as prolonged use of computer
workstations can be tiring.
Back
You should sit back in the chair and use the back rest.
Hands
Use a light touch on the keyboard, keeping your hands
and fingers relaxed. Allow a space in front of the keyboard
to rest your wrists when not typing.
Eyesight
Working with monitors can be visually demanding. Have
your eyesight checked regularly. Headaches and
temporary eyestrain caused by any prolonged
concentrated visual activity can be reduced by sensible
work practices.
Screen settings
IBM recommends that the use of primary colour blue on a
dark background be avoided. It is difficult to see and may
cause eyestrain due to insufficient contrast.
Cleaning the Monitor
You should clean the screen when it becomes dusty or
marked.
Important: Important: Turn off the monitor and the mains
outlet and remove the monitor power cord and computer
power cord from the outlet.
The Screen
Gently wipe the screen with a soft, lint-free cloth. Dampen
the cloth with a non-abrasive screen cleaner. Do not
polish excessively as this may damage the coating on the
screen and cause glare. Do not use water to clean the
monitor.
The Covers
Clean the monitor covers using a damp cloth and mild
detergent if necessary. Some discoloration may occur
depending on the cleaner.
NOTE: Some discoloration may occur if a strong cleaning agent
is used.
Set the screen brightness and contrast to a comfortable
level. You may have to adjust this as the lighting changes
during the day. Many application programs let you select
colour combinations which can help you to view in
comfort.
15
use.doc Page 16 Sunday, July 16, 1995 3:45 PM
Troubleshooting
If you have a problem setting up or using the monitor, you might be able to solve it yourself. Before calling IBM you should try
the suggested actions that are appropriate to your problem.
Problem
Suggested action
Problem
Suggested action
Screen is blank and
power indicator is
off.
• Check monitor power switch
is on.
• Check wall mains outlet is
switched on.
• Check power cord is firmly
plugged into the monitor and
the mains outlet.
• If the power cord plug has a
removable fuse, replace it.
• Try another power cord.
• Try another mains outlet.
Screen is blank and
power indicator is
flashing between
green and amber.
• The monitor is in Power
Management Stand-by or
Suspend state. Press any
key on the keyboard or move
the mouse to restore
operation.
• Check the signal cable is
firmly connected to the
computer.
• Check no pins are bent in the
signal cable connector.
Screen is blank and
power indicator is
green.
• Adjust brightness and
contrast.
• Check the signal cable is
firmly connected to the
computer.
• Check no pins are bent in the
signal cable connector.
• Disable DDC and restart
your computer (See
Page 14.)
Screen is blank and
power indicator is
amber.
Screen is green.
• Disable DDC and restart
your computer (See
Page 14.)
• Check that the computer is
turned on.
• The monitor is in Power
Management Off state. Press
any key on the keyboard or
move the mouse to restore
operation.
• Check the signal cable is
firmly connected to the
computer.
• Check no pins are bent in the
signal cable connector.
16
use.doc Page 17 Sunday, July 16, 1995 3:45 PM
Problem
Power indicator is
flashing green.
Suggested action
• Display mode of the
computer is outside the
range of the monitor.
Reconfigure the computer to
use a supported display
mode. Refer to the
Specifications section on
page 20 and to Table 1 on
page 9.
Image appears to
be flickering.
• The monitor is operating in
an interlaced or low refresh
rate display mode.
Reconfigure the computer to
use a non-interlaced display
mode with a refresh rate of at
least 72 Hz.
• Move the monitor away from
any fluorescent lighting.
Image appears to
be discoloured
• Move the monitor away from
any equipment that produces
strong magnetic fields.
Problem
Suggested action
Image cannot be
centred.
• This may be caused by the
signal timings that the
computer is sending and
does not indicate that the
monitor is faulty. Reconfigure
the computer to use a
different display mode.
Controls not
working.
• Power off the monitor and
power it on again. Try the
controls.
• The controls may have been
disabled (See Page 11.)
• The monitor may be in power
management. The controls
are disabled in this state.
17
use.doc Page 18 Sunday, July 16, 1995 3:45 PM
Further help
If you are unable to correct the problem yourself, you may
seek further help as follows:
Call IBM HELPCENTER.
In the US call 1-800-772-2227
In Canada call 1-800-565-3344
In other countries contact your dealer or other IBM
authorised Servicer.
Before calling, please have available as much of the
following information as possible:
1. The information from the Product Records section
on page 4.
2. Proof of purchase.
3. Description of problem.
4. Computer type and model.
5. System configuration (hardware fitted etc.).
6. System BIOS version number.
7. Operating System and version number.
8. Display driver version number.
If possible, be at your workstation. Your technical support
representative might want to go through the problem with
you during the call.
18
use.doc Page 19 Sunday, July 16, 1995 3:45 PM
Glossary
Addressability
The number of horizontal and vertical
picture elements (pels) in the image.
The higher the addressability, the
more detailed the image that can be
displayed on the screen.
(Addressability is sometimes referred
to as resolution).
DDC
Display Data Channel. A VESA
Standard enabling ‘Plug and Play’.
Display Mode
The way in which the image generated
by the computer is displayed on the
screen. It is defined primarily by refresh
rate and addressability.
DPMS
Display Power Management Signalling.
A VESA Standard.
EPA
US Environmental Protection Agency,
responsible for the ‘Energy Star’ power
conservation program.
Horizontal
Frequency
Interlaced
ISO
The number of horizontal lines drawn
across the screen by an electron beam
in one second. Measured in kHz.
An interlaced display mode causes the
electron beam to refresh the screen
image in two passes. One pass scans
the even lines, the next pass scans the
odd lines.
Non-Interlaced
A non-interlaced display mode causes
the electron beam to refresh the screen
image in one pass.
NUTEK
Swedish National Board for Industrial
and Technical Development, involved
in producing power consumption
guidelines.
Refresh Rate
The number of times per second the
Frequency screen image is “repainted”.
Measured in Hz. The higher the (noninterlaced) vertical frequency, the less
the flicker.
Resolution
See Addressability.
SVGA
Super Video Graphics Array. Video
Modes with 800 x 600 or higher
addressability.
VESA
Video Electronics Standards
Association, responsible for defining
display mode, DPMS and DDC
standards.
VGA
Video Graphics Array. Video standard
with 640 x 480 addressability.
XGA
Extended Graphics Array. Video
standard with 1024 x 768
addressability.
International Organisation for
Standardisation, responsible for the
ISO 9241 (part 3) Standard for
Computer Systems.
19
use.doc Page 20 Sunday, July 16, 1995 3:45 PM
Specifications
G41: 14 inch (nominal) CRT with maximum viewable screen size, when measured diagonally of 336mm (13.2 inches)
G50: 15 inch (nominal) FST with maximum viewable screen size, when measured diagonally of 348mm (13.7 inches)
Dimensions
Width:
Depth:
Height:
Weight - G41:
Weight - G50:
359mm (14.1 inch)
395mm (15.5 inch)
367mm (14.4 inch)
13.5 Kg (30 lb.)
14.5 Kg (32 lb.)
Tilt Swivel
Forward tilt:
Backward tilt:
Swivel
5°
15°
± 150°
Power
Consumption (Typical/
XGA)
Normal Operation:
VESA Standby State:
VESA Suspend State:
VESA Off State:
105 W
60 W
24 W
5W
Maximum Height:
Maximum Width:
200mm (7.9 inch)
270mm (10.6 inch)
Environment
Maximum Height:
Maximum Width:
205mm (8.2 inch)
274mm (11 inch)
Operating
Temperature:
Storage
Temperature:
Shipping
Temperature:
-40 to 60° C
Input Signal:
Horiz. Addressability:
Vert. Addressability:
DDC Capability:
Clock Rate:
Analogue Direct
Drive, 75 ohm 0-0.7v
1024 pels (max.)
768 pels (max.)
DDC 1/2 B
79 Mpels/sec
Operating Humidity:
Storage Humidity:
Shipping Humidity:
10 to 80%
5 to 90%
5 to 95%
Maximum Altitude:
2134m (7,000ft)
Horiz. Frequency:
Vert. Frequency:
31 kHz - 58 kHz
50 Hz - 110 Hz
Image Size
G41
G50
Video input
Synchronisation Range
20
10 to 35° C
0 to 60° C
use.doc Page 21 Sunday, July 16, 1995 3:45 PM
Compliances
Power Management
European Union (EU) Statement (2)
Energy Star
NUTEK Specification 803299
Safety
CSA C22.2 No. 950 (1)
This product has been tested and found to comply with the limits
for Class B Information Technology Equipment according to
CISPR 22 / European Standard EN 55022. The limits for Class
B equipment were derived for typical residential environments to
provide reasonable protection against interference with licensed
communication devices.
UL 1950 (1)
SEMKO (2)
ÖVE (2)
DHHS (1)
Properly shielded and grounded cables and connectors must be
used in order to reduce the potential for causing interference to
radio and TV communications and to other electrical or
electronic equipment. Such cables and connectors are available
from IBM authorised dealers.
NOM (1)
Ergonomics
ISO 9241 Part 3 (up to 1024 x 768 addressability)
TUV/GS (1)
Note (1): This compliance applies to universal (100 - 240
Vac) and Low voltage (100 - 120 Vac) monitor.
Note (2): This compliance applies to universal (100 - 240
Vac) and High voltage (200 - 240 Vac) monitor.
Emissions/susceptibility
MPR - II
FCC Class B (1)
EN 55022 Class B (2)
VCCI Class 2 (1)
CE Mark
21
use.doc Page 22 Sunday, July 16, 1995 3:45 PM
Warranties
Europe
The warranty terms and conditions applicable in the country of purchase
in respect of an IBM product are available from the supplier. Please
retain them with your proof of purchase.
No statements contained in this documentation shall affect the statutory
rights of consumers
22