1
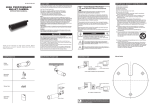
H- F2563
MP3 PLAYER
Instruction manual
1
Dear customer!
Thank you for purchasing our product. For safety, it is strongly recommended to read this manual
carefully before connecting, operating and/or adjusting the product and keep the manual for reference
in the future.
Table of contents
Table of contents............................................................................................................................................. 2
Important safeguards ......................................................................................................................................3
Characteristics of Product ..............................................................................................................................4
Names of controls & indicators .....................................................................................................................5
Accessories......................................................................................................................................................7
LCD display ....................................................................................................................................................8
Getting playback started.................................................................................................................................9
Summary of road map ..................................................................................................................................11
Basic functions..............................................................................................................................................12
How to set the PC environment by operating system ................................................................................38
How to store and connect the data...............................................................................................................41
Electronic Features .......................................................................................................................................45
FM Radio Specification ...............................................................................................................................45
Troubleshooting guide..................................................................................................................................46
Regulatory information ................................................................................................................................47
2
Important safeguards
WARNING: To prevent fire or shock hazard,
Do not expose this appliance to rain or moisture.
· Keep the unit away from direct sunlight, storing magnetic fields, excessive dust, humidity and
electronic / electrical equipment which generate electronic noise.
· Use of control, adjustments or performance of procedures other than herein may result in a fire or
hazardous radiation exposure.
· Do not drop your player or leave it under heavy objects.
· To avoid accident of electric shock, please do not attempt to detach the cover of the player.
Customer should contact a qualified technician regarding any repair job.
· Be careful not to get it contacted by chemical medication.
· Do not remove / replace battery during operation.
· Take out the battery when not using for a long time.
3
Characteristics of Product
Multi-Codec Player
- MP3, WMA, and ASF Formats are serviced as the Multi-Codec Player.
Firmware Upgrade
- Product enabling the Firmware Upgrade allows you to enjoy the music of the best quality all the time by
adding, changing and improving the functions of Player.
Multi-languages serviced Graphic LCD is installed
- Graphic LCD providing the service of multi-languages is adopted.
FM Radio Function
- Allows you to listen to the FM Radio through the functions of automatic station selection and
frequency memory, and installation of system to trace the electric wave upon moving enables the strong
frequency for FM Radio listening.
EQ
- Normal, Rock, Jazz, Classic, and PoP
Provided GUI (Graphic User Interface) MENU
Easy Navigation
- You may store or search the music or song in the structure of tree, so convenient searching is promised.
Provided MP3 Direct Encoding
FM Radio and Voice Record
- For the voice recording, AGC Function is preinstalled, so recording level is automatically adjusted.
Carrying method of necklace type is adopted, so convenient carrying is promised.
The words of song are provided.
- You can see the lyric through LCD screen with the mp3 files attached the lyric or made by lyric program
4
Names of controls & indicators
Portable MP3 Player
5
NAMES OF CONTROLS & INDICATORS
Play Mode:
NO
Name
1
Earphone Jack
2
Strap Hole
3
Line-in Jack
4
Hold S/W
5
Microphone jack
6
OLED display
7
LED lamp
8
(-) Button
9
NEXT/Fast Forward
10
(+) Button
11
PREV/Fast Rewind
12
MENU
13
PLAY/STOP/POWER
14
A-B/EG Button
15
MODE Button
16
USB Port
17
Battery Door
Description
Connect to the Earphone
Connect to the external audio source
Decrease the volume level
Skip forward to next track
Increase the volume level
Skip backward to previous track
Enter Menu to manage the player
Start Playback / Stop / Power On / Power Off
Place AAA Alkaline battery
6
Accessories
1. Installation CD
2. Stereo earphone
3. User manual
4. USB cable.
5. AAA Alkaline Battery
6. Line-in cable
7. Necklace (optional)
Remark: Accessories and items are subject to change
7
LCD display
1.
2.
3.
4.
5.
6.
7.
8.
9.
10.
Number of Music being Played
Playing Time
Repeat Mode
Battery Strength/ Hold Key
Currently Used Folder
Names of Signer and Music or Song
Type of File
Equalizer Mode
Bit RATE
3D Mode
8
Getting playback started
1. Power ON / OFF
POWER ON
Press Play / Stop / Power and hold it for 1-2 seconds to turn on the power.
POWER OFF
Press Play / Stop / Power and hold it for 1-2 seconds to turn off the power.
Caution: Don t remove the battery while the player is Power On, it will damage the firmware & the
Player.
2. Playing Start
Press Play / Stop / Power button once, it will play the track.
3. Fast Tracking
While the track is being played, press and hold
or
for fast-forward or backward the track.
4. Skip / Return Tracking
· Press
to skip forward to the next track.
· Press
to skip backward to the previous track.
5. Digital Volume Control
To adjust the volume, press
to increase the volume or press
to decrease the volume
6. Stopping Playback
· Press Play / Stop / Power button for stopping the playback.
· It will be Power Off if pressing the Play / Pause button for over 2 seconds.
7. Selecting the music
· Press and hold MODE button for 2 seconds.
9
8. Control mode
· Press and hold MENU button for 2 seconds.
9. Searching the music
· Press MENU button shortly.
10. Program list/Delete
· Press MENU button, then press A-B button -> PlayList / MODE button.
· Click the button shortly -> Delete.
10
Summary of road map
1. Menu mode
2. Control mode
General
Download
Load default
LYRIC language
Menu language
Fast format
Low format
Information
Sound
Equalizer
L/R balance
Fade-in
3D control
Treble
Bass control
Display
LCD contrast
Backlight
LCD off-time
Time mode
Tag info
Origin mode
Record
Voice record
Radio record
Music record
Play
Repeat
Play speed
Intro search
Resume
Program
Play list
Etc
Stop power off
Sleep power off
FM scan level
Battery type
Lyric control
FM band
11
Basic functions
MUSIC Mode
1. Listening to the music
· Click the MENU button and then select the folder containing the music or song you want using (+) or
(-) button.
· Transfer (Searching): You may search music or song you want using (+) or (-) button.
· Selection of Music or Song: You may listen to the selected music or song by pressing the
PLAY/POWER button after searching the music you want.
- You can control the Volume using (+} or (-) level on playing.
- Intro mode searching on playing.
1.
Setting Intro Mode "ON" of Control mode.
2.
Select Intro setting icon pushing menu button shortly.
12
2. Repeat listening to the specific part
Part repetition: used when you want to repeat listening to the selected part while playing.
· Select the first part of music or song (A position) by clicking the A-B/EQ button.
· Select the end part of music or song (B Position) by pressing the A-B/EQ button again
- You may repeat listening to the A-B Part.
- If pressing the A-B/EQ button again, the part repeating function is released.
3. Deleting the Music or Song
· Click the MODE button after selecting the music or song to delete.
· Message "FILE DELETE ARE YOU SURE?" appears on LCD screen.
· If selecting "YES" using either
or
button, the selected music or song is deleted.
13
4. PLAY LIST function
· MENU Button. You can select the folder using (+) or (-) button.
· Move (searching): You can search the song using (+) or (-) button.
· Select Music: Select the song you want to upload on play list and push the button A-B/EQ shortly then
you will see the song you selected on the play list.
(songs In Player)
(play List Song)
14
-
If you want to delete the play list song, just push the button (A-B/EQ) shortly or Play List, you use
the button of (FF
).
Caution: Do not forward this Button ( FF
) too long It may delete all play list music.
For listening play list, play mode on the control function should be "ON".
Reference with control mode for more information.
5. Key Functions in the Music Mode
Function key
POWER
EQ/A-B
Length of Pressing
shortly
long
shortly
long
MODE
+/FF
REW
MENU
shortly
long
shortly
shortly
long
shortly
long
shortly
long
Execution
Play the music
Temporal stops the music or song being played
Power off
A-B repeat mode
EQ mode selecting (Normal ->JAZZ >
Classic > Rock > POP)
Repeat mode selecting (Normal ->1>DIR >All->R.DIR->R.A I)
(On playing) Adjusts Volume
(On searching) Adjusts Volume
Move to selecting mode
Quickly searches the next part you want to listen
Move to the previous song or music
Quickl searches the previous part you want to
listen
Enters the searching mode
Moves to menu selection mode
FM RADIO Mode
Note: The earphone plays the function of antenna upon receiving FM Frequency, so you may not receive
the broadcasting it an earphone is hot inserted.
15
1. Listening to the FM broadcasting
· Adjust the frequency of broadcasting you want by pushing ether
(Before)
or
button
(After)
AUTO SCAN function
The frequency on the broadcasting is automatically searched by pushing and holding either
button after releasing the PRESET.
-
When you searching the frequency by AUTO SCAN, please set receiving sensitivity using FM
SCAN LEVEL of control mode.
Set low SCAN LEVEL when frequency is not searched by AUTO SCAN.
To stop the Auto Scan function, press the On/Off button.
2. FM Broadcasting Memory
· Adjust to the frequency you want by using ether
·
or
or
Click A-B/EQ button and Choose to Memory Mode.
16
button.
· Select the desired channel
(Frequency Settlement)
using ether
or
·
Save the selected channel
(Choosing Channel)
by pressing the A-B/EQ Button,
·
(Remember Channel)
For searching this saved channel, press the
button.
or
17
button again.
(CH1)
(CH2)
(CH3)
3. FM Broadcasting AUTO Memory
·
-
Click A-B/EQ button for 1-2 second then auto searching frequency then memorized automatically.
Maximum 20 channels can be memorized.
(CH1)
18
-
(CH2)
(CH3)
If you want to back to previous mode from Auto searching, you push and hold the PLAY/ POWER
button for 1-2 seconds.
4. FM Broadcasting record
· The broadcasting you are listening is recorded if pressing the MODE Button while listening to the
broadcasting.
(Recording)
-
(Close)
(Pause)
The recorded broadcastings will be stored in the name of (RADIO001.MP3- RADI0002.MP3) in the
RADIO Folder sequentially.
19
5. Key Functions in the Music Mode
Function key
POWER
EQ/A-B
Length of Pressing
long
shortly
long
MODE
+/FF
REW
MENU
shortly
long
shortly
long
shortly
long
Execution
Power off
Selecting memory mode
Selecting AUTO mode
* Radio Channel Auto selecting mode
Records the radio broadcasting of current
frequency
Moves to selection mode
Adjusts the volume
Selecting the frequency
(preset): Selecting the memorized channel
(memory): Selection the channel will be
memorized
Auto searching frequency
Selecting preset mode
Moves to control mode
LINE-IN ENCODE Mode
This mode allows you to store the music or song n the name of mp3 music in the Player via a connection to
the external device.
1. How to Connect to the External Device and How to Record
· Initiate recording by pressing the MODE Button after connecting to the external device to record as
follow (For the change of setting, refer to the control function).
20
(Encoding mode)
(Recording mode)
·
Push the PLAY/POWER button when you want to pause and re-record when push this button again.
·
Push the MODE button when you want to stop then it will be stored on MUSIC folder.
Move to MUSIC folder when you push (MENU) button.
Move to control mode when you push (MENU) button longer.
Move to selection mode when you push (MODE) button onger
*
*
*
*
The recorded f les will be sequentially stored in the name of (MU5IC001.MP3MUSIC002.MP3) in the MUSC Folder.
By use of MUSI RECORD setting, you can control AUTO Sync.
For more details please refer to the control function.
Caution. Recording cannot be made if the batteries are low.
Set the volume of external device at proper level, otherwise, recorded sound quality can be
poor.
VOICE RECORD Mode
The mode allows you to record the voice in the Player (for the change of setting, refer to the control
function).
21
1. Voice recording
· Initiate recording by pressing the MODE Button.
(Voice recording mode)
(Recording )
· Push PLAY/POWER button when you want to pause and push PLAY/PAUSE button to play
again.
(Pause)
· If you want to stop, push EQ/AB button and stored on VOICE folder.
Push MENU button then move stored VOICE folder.
Move to control mode when you push MENU button longer.
Move to first booting mode when you push PLAY/POWER button.
Move to select mode when you push MODE button longer.
*
The recorded voices will be sequentially stored in the name of (VOICE001.MP3 VOICE002.MP) in the Voice Folder.
*
For more information reference with control mode.
If memories are voice full, recording will be automatically stopped.
22
SETTING THE PRODUCT FUNCTIONS (CONTROL) MODE CENTRE
THE FUNCTIO NS OF PLAYER
1. Function keys in the Control Mode
Function key
POWER
EQ/A-B
MODE
+/FF
REW
MENU
Length of Pressing
shortly
long
shortly
long
Execution
Moves to selected menu
Power off
Moves to initial mode
Moves to up and down
Quickly increases (decreases) the number and
changes the selection menu
Moves to selected menu
Moves to control mode
2. General
1.
2.
3.
4.
5.
6.
7.
DOWN LOAD
LOAD DEFAULT
LYRIC LANGUAGE
MENU LANGUAGE
FAST FORMAT
LOW FORMAT
INFORMATION
· DOWNLOAD
Used when upgrading the firmware of new version You may use the product of best
performance all the time using this function. (Refer to the user guide line regarding the Firmware
Upgrade)
· LOAD DEFAULT
Used to initialize the settings of al menu functions to the default state.
23
· LYRIC Language selection
Title or information of music or song is decided according to the operating system of PC where
music or song is made. Select the language suitable for the setting
Example: Make sure to set to the KOREA if made in the Hangul Window.
Make sure to set to the CH NESE if made in Chinese Window.
LANGUAGE SET
1.
KOREAN
2.
ENGLISH
3. JAPANESE
4.
CHINESE-SIMP
5.
CHANESE-TRAD
· Menu Language selection
You can select your own language showing LCD This player now support those language (Korea.
Japan, Chinese, Germany, Spanish).
· FAST FORMAT
Used to delete all data stored in the track (only the designated data will remain).
· LOW FORMAT
Used to delete all data memorized in the memory.
Caution: Make sure to download the font after formatting.
24
· INFORMATION
Displays the name of product, Firmware version, approval number, product capacity, and
remained capacity.
INFORMATION
Model Name TMS700
F/W Ver
1.0
Serial No. 05110BF9A
Memory
114/256MB
3. Display
1.
2.
3.
4.
5.
6.
LCD CONTRAST
BACKLIGHT
LCD OFF-TIME
IME MODE
TAG INFO
ORIGN MODE
· LCD CONTRAST
Used to adjust the brightness of LCD Screen (1 ~30Level).
25
· BACKLIGHT
Allows you to set the time of backlight. Setting is available up to 0-30 sec.
· LCD OFF-TIME
Allows you to set the backlight time of LCD Screen.
· TIME MODE
Select the mode you want out of playing time (NORMAL) and remaining time (REMAIN) of music
or song being played.
· TAG INFO
YES: f playing the music or song with tag information, the subject is changed to the tag
information
NO: Displays only in the filename
* For the music or song without tag information, it s displayed in the filename regardless of
setting.
26
· ORIGIN MODE:
This function allows the user to change the direction text is d splayed on the LCD.
Normal: LCD will d splay text normally (top down).
Reverse: LCD will reverse the direct on the text is displayed by 180 degrees (bottom up).
4. Record
· VOICE RECORD
Selects the sound quality upon recording the voice
Bit RATE:8Kbps~128Kbps
VAD ON: The recording is temporarily stopped if there s no more sound source to
record upon recording the voice, and the recording is automatically restarted if there are
any sounds. Long-term recording becomes available by saving the memory capacity.
VAD OFF: Releases the voice sensing function.
VAD Level: Allows you to set the voice sensing level up to 1 -9 levels.
ALC ON: The recording level is automatically adjusted upon recording the voice, and the
sound at a distance is normally recorded.
ALC OFF: Inactivates the ALC Function
Bitrate
ALC
VAD
VAD Level
·
64KBPS
OFF
OFF
1/9
RADIO RECORD
Selects the sound quality upon recording the radio.
Bit RATE: 56Kbps~25SKbps.
27
Bitrate
128KBPS
·
MUSIC RECORD
Selects the sound quality upon recording the external sound source.
Bit RATE: 56Kbps-256Kbps
Auto SYNC ON: Is the function of creating new file through the classification by audio
track when recording the audio CD through the input into the Line-in.
Auto SYNC OFF: Releases the function of sensing the audio signal,
SYNC Level: Creates new file f there is no audio signal during the time designated for
sensing (1-10 seconds),
Volume: Sets the recording level upon recording the external sound source
(Settings up to 1-32 are available).
Bitrate
128KBPS
Auto SYNC OFF
SYNC Level 5/10
VOLUME
17/32
5. Sound
1.
2.
3.
4.
5.
6.
EQUALIZER
FADE-IN
L/R BALANCE
3D CONTROL
TREBLE MODE
BASS MODE
28
·
EQUALIZER
You may select the genre of muse or song using the EQ Selection button.
Genres: (NORMAL, JAZZ, CLASSIC, ROCK, POP)
·
FADE-IN
If setting to ON, the volume is gradually increased upon initiation of playing It prevents the sound
from being played too loudly upon playing after the stop
·
L/R BALANCE
Left and right output levels of headphone or earphone are adjustable. When adjusting the left
level, the sound of left channel is decreased or increased, and when adjusting the right level, the
sound of right channel is decreased or increased. Default setting is 0, and left and right channels
are outputted in the same level
29
·
3D CONTROL
You may set the high and low tones as per your preference.
- 3D MODE ON: Activation.
- OFF: Retraction.
- STEREO DEPTH /16: Used to adjust the weight of left and right sounds.
Example: Upon setting to 8/16,
- Left Speaker: You may hear the sound and the left 100% and the one on the right 50%.
- Right Speaker: You may hear the sound on the right 100% and the one on the left 50%.
·
TREBLE CONTROL:
Treble Control provides user with 8 levels of treble sound control.
·
BASS CONTROL
Bass Control provides user with 8 levels of bass sound control.
30
6. Play
1.
2.
3.
4.
5.
6.
REPEAT
PLAY SPEED
INTRO SEARCH
RESUME
PROGRAM
PLAY LIST
·
REPEAT
This function allows you to select the ways of selecting and repeating the music or song.
NORMAL
1
DIR
ALL
R.DIR
R.ALL
Plays the whole music or song once.
Repeats playing the selected music or song.
Repeats playing the selected folder.
Sequentially repeats playing the whole unlimitedly.
Repeats playing the folder at random.
Unlimitedly plays the whole at random.
·
PLAY SPEED
You may set the playing speed control of the recorded track up to 75%-130%.
·
INTRO SEARCH
Plays for 10 seconds from the time when music or song is initiated.
31
* If you want to intro mode search, push the («+»} lever more than 1-2 seconds.
·
RESUME
Replays at the part where music or song is played for the last time with this function set (ON) when
turning on or off the power.
·
PROGRAM
(ON) Play the music on PLAY LIST
(OFF) Not play on PLAY LIST
·
PLAYLST
Show play list music selected of user.
(FF
) Delete selected song when you forward shortly.
(FF
) Delete all play list songs when you forward longer.
32
7. Etc.
1.
2.
3.
4.
5.
6.
STOP POWER OFF
SLEEP POWER
FM SCAN LEVEL
BATTERY TYPE
LYRIC CONTROL
FM BAND
·
STOP POWER OFF
You may adjust the power off time at the idle state.
(Setting in the unit of a minute up to 1 -60 minutes s available).
·
SLEEP POWER OFF
When the designated time elapses, the power is automatically off.
(Setting in the unit of a minute up to 1-180 minutes is available).
·
FM SCAN LEVEL
This function allows you to automatically capture the frequency by measuring the sensitivity of
frequency upon listening to the FM Radio.
33
·
BATTERY TYPE
This function is used to set the BATTERY TYPE you use.
Select the using BATTERY TYPE "ALKALINE" and charger "M-CD" using the (vol+,vol-) button.
Caution: Make sure to select the BATTERY you use.
Life of battery may be reduced if using the charger after selecting the ALKALINE Mode.
Playing time may be reduced if using the ALKALINE after selecting the Charger Mode.
·
LYRIC CONTROL:
MODE: This function allows user to display song lyrics if tagged to the sound file. LINE: This
function allows user to show tagged song lyrics on either 2 or 3 lines of the LCD display.
MODE
LINES
ON
2
·
FM BAND
You can set FM frequency class tied by countries
34
UPGRADING
1. Firmware upgrade
·
Enter the control mode by licking and ho ding the MENU Button
·
Select the DOWNLOAD after entering the GENERAL Mode using the (+) or (-) Button
·
Now, the product is ready to be upgraded, and install the driver in the computer according to the
following guideline after inserting the CD provided with the product.
* Caution: Do not insert the product in the USB Port yet.
When inserting the product unless the driver s installed, the computer may not recognize the
product
2. How to Install
·
Insert the CD provided with the product in the CD-ROM.
·
Installation guide program is automatically loaded.
(When the program is not automatically executed according to system environment, execute the
program using the H-F2563.exe stored in the CD)
35
·
·
Click the Non USB Driver Install. DOS Screen appears and driver installation procedure is
completed.
Once Nan USB Driver installation is completed, click the Chkcopy of guide program after
inserting the Player in the USB Port.
Caution: For the WIN98/SE user, install the 98 driver.
You are required to reboot the computer for some cases.
(CHKCOPY program)
(CHKCOPY program)
36
·
Main File: Means all operating execution files installed in the product. Font File:
Un code font file of LCD.
a. Operates main flle (main.b.n) in upgrade folder
b. Use the font file when the font disappears, or you want to use other fonts.
* Caution: Above upgrading process is not available if the serial number of device does not appear.
* Concurrent upgrading of boot file and main fie is available. However, you need to upgrade the
font file individually.
·
Once upgrading procedure is completed, the product becomes rebooting and it is released in the
DOWNLOAD Mode.
·
For the additional uploading of functions, reconnect the product to the USB Port after
disconnecting the product from USB Port and selecting the DOWNLOAD Mode.
·
When upgrading procedure is completed, you may use the product with the improved functions.
37
Operating with computer
PC Requirements
- Windows 98/Me/2000/XP
- Hard disk space of above 20Mb
- CD-ROM Drive
- USB Port serviced PC
Setting the PC Environment
- Window 98 User
Make sure to install the WIN98 Driver. Use by connecting the player after installing the driver.
To upgrade the player, you need to install the Non USB Driver.
- Window ME/2000/XP User
Install the Non USB Driver only when you want to upgrade the player.
Installing the Additive Function Programs
1. You may install and uninstall the WIN98/SE Driver and NON USB Driver (for upgrading) using
the additive programs (for upgrading).
2. How to Install
Execute the installation driver prior to connecting the product to the USB Port.
· Insert the CD provided with the product in the CD-ROM.
· Installing guide program is automatically loading.
(When the program is not automatically executed according to system environment, execute the
program using the H-F2563.exe stored in the CD)
Win 98 Installation Driver
38
· Click the WIN98/SE Install.
DOS Screen appears and installation procedure is completed.
· When the installation is completed, connect the player to the USB Port.
· The Player is recognized and automatically installed, and it is recognized as "Mobile disk" in the
file monitoring window.
3. How to Delete
· Insert the CD provided with the product in the CD-ROM.
· Installing guide program is automatically loading. (When the program is not automatically
executed according to system environment, execute the program using the H-F2563.exe stored in the
CD).
Win 98 Deleting Driver
·
Execute the WIN98/SE Unlnstall.
39
· DOS Screen appears and driver deleting procedure is completed.
Execute the driver installation program again to get the Player recognized after the deletion.
Descriptions of Installing Guide Programs
Win 98 Installation Driver
Non USB Installation Driver
Win 98 Deleting Driver
Non USB Deleting
Driver
Manual
Firmware
Upgrading Program
HYUNDAI Homepage
Link
40
How to store and connect the data
1. Connecting to the PC
Connect the one end of cable to the USB Port of computer and another end to the USB
Terminal of Player using the USB Connection cable provided with the product.
2. Downloading/Uploading the File
If connecting this product to the PC, new mobile disk is recognized in window explorer of PC.
1) Making new folder in the Player
·
Select the mobile disk by opening the Window explorer.
41
·
Select new folder by clicking the right part of mouse.
2) Copy of file or folder of Player
·
Move the folder or f le to make a copy to the position where you want to make a copy by dragging
the corresponding folder or file.
* Note: You may make copy of numbers of files or folders concurrently
42
3) Deletion of file or folder of Player
·
Select the file or folder to delete.
·
Select the Delete Key. Popup window prompting you to delete or not appears at this time. If you want
to delete, press "Yes."
·
Deleting procedure is completed.
43
Disconnecting from the PC
When all works are completed, make sure to disconnect the product from the PC as follow When
disconnecting the product from the PC, make sure to click the green arrow (removal of hardware
safety) twice on the bottom work displaying line.
·
When following window appears, press the Stop button and then.
·
Disconnect the Player after pressing the Check button when following window appears.
(For the Windows XP, these procedures are not needed).
Caution: Normally disconnect, otherwise the data stored in the memory of this product may be damaged.
44
Electronic Features
Files Support
Digital Volume Control
Audio Frequency
Head Phone Output Power
Signal to Noise Ratio
Total Harmonic Distortion
Audio Output
Internal Memory Capacity
Battery Type
Battery Life Time
PC interface
WMA, MP3, ASF
30 Level
20-20KHz
5mW + 5mW
>80dB
<0.1%
One 3.6 mm Jack
256MB
One AAA size battery (Alkaline)
Max. 12 hours
USB Cable
FM Radio Specification
Frequency Range
S/N Ratio
Sensitivity at 30dB S/N
Stereo Separation
Audio output Distortion
87.5-108 MHz
40-60 dB
25-31 dB
30-40 dB
< 1-2 %
Our company will not be responsible for any lost or damaged data downloaded to your MP3
Player. It is recommended to backup the data before moving from one place to another
45
Troubleshooting guide
The player does not work
The buttons are not
functioning
Unable to download data
Lost data
Player is not recognized by
the PC
Player is not responding and
not functioning
Check the capacity of the battery. One 1.5V AAA size
battery is required.
Check the polarity (
and
) of the battery.
Note: You may use any 1.5V AAA size battery, but
alkaline battery tends to last longer.
You can also use a rechargeable AAA size 1.2V Ni-Cd
battery.
Check the HOLD function setting. When the HOLD
function is on. All buttons are locked.
Try reinstalling the battery to reinitialize the player.
Ensure the USB cable is properly connected to your PC and
the player.
Check that the USB driver is installed
Ensure that there is enough memory to store music or data
file(s)
Occasionally some parts of a data stream may be damaged
owing to instability of power while downloading files. In
such case, format to initialize the memory in the player by
the utility MP3 Player.
Check if the USB cable is connected properly, and if the
player is on.
Check that the USB driver is installed.
Refer to MSCN Firmware Download in Software Utilities
46
Regulatory information
Federal Communications Commission (FCC)
This device has been tested and found to comply with the limits for a Class B digital device, Pursuant
to Part 15 of the FCC Rules.
Operation is subject to the following two conditions:
1. This device may not cause harmful interference
2. This device must accept any interference received, including interference that may cause
undesired operation.
3. If your device needs repairs, you must arrange for the manufacturer to make them if you are to
keep the device's FCC registration valid.
This equipment, like other electronic equipment, generates and uses radio frequency energy. If not
installed and used according to the instructions in this manual, this equipment cause interference with
your radio and television reception.
If you think this equipment is causing interference with your radio or television reception, try
turning the equipment off and on, If the interference problems stop when the equipment is switched
Off, then equipment is probably causing the interference. You may be able to correct the problem by
doing one or more of the following:
· Adjust the position of the radio or TV antenna
· Move the device away from the radio or TV
If necessary, consult your dealer or an experiences radio or television technician.
You may find this booklet helpful: "How to Identity and Resolve Radio and TV interference
Problems"(Stock No. 004-000-00345-4), Prepared by the FCC and available from the U.S.
Government Printing office, Washington, DC 20402. See.
For the customers in Europe
The CE mark on the Audio Player is valid only for the products marketed in the European Union.
Note: All specifications and design are subject to change without further notice or obligation.
47
!
.
,
,
.
..................................................................................................................................................48
...........................................................................................................................49
3
..........................................................................................................................50
...........................................................................................................51
..............................................................................................................................................53
.............................................................................................................54
........................................................................................................................................55
..........................................................................................................................................57
.......................................................................................................................................58
...............................................................................................................................84
MP3
...........................................................................................87
....................................................................................................................91
FM ..............................................................................91
........................................................................................92
........................................................................................................................94
48
!
.
·
,
,
,
·
.
,
.
·
·
·
·
·
,
.
.
.
.
.
,
.
,
.
49
3
-
MP3, WMA ASF.
-
,
3
,
.
-
.
FM
-
FM
,
.
-
,
,
,
,
-
«
»
,
.
MP3
FM
-
AGC,
.
,
.
.
-
,
,
.
50
MP3
51
:
1
2
3
4
5
6
7
8
9
10
11
12
13
14
15
16
17
Hold S/W
LED
(-)
NEXT/Fast Forward
(+)
PREV/Fast Rewind
,
,
PLAY/STOP/POWER
A-B/EG
MODE
USB
/
AAA
52
/
/
1.
CD
2.
3.
4.
USB.
5.
6.
7.
(
:
)
.
53
1.
2.
3.
4.
5.
6.
7.
8.
9.
10.
3D (
)
54
1.
Play / Stop / Power
1-2
Play / Stop / Power
1-2
:
,
.
.
2.
Play / Stop / Power
.
3.
,
«
»
«
»
.
4.
·
·
«
«
»,
»,
.
.
5.
«+»,
,
«-»,
.
6.
·
·
Play / Stop / Power
Play / Stop / Power
.
55
,
7.
·
MODE
8.
·
MENU
9.
·
MENU
10.
·
·
/
MENU ,
«
«MODE»
->
56
» ->
/
1.
2.
FM
FM
57
1.
·
MENU
,
(+)
·
:
·
:
«PLAY/POWER»
,
(-).
(+)
.
(-).
,
-
(+)
1.
2.
,
(-)
.
58
2.
:
·
,
.
«A-B/EQ»,
·
(
«A-B/EQ»
-
,
«A-B/EQ»
3.
·
MODE
·
(
,
«
»
«
)
.
,
.
«
·
)
?»
»
(«
.
59
»)
(«
»)
4.
·
·
·
-
MENU .
(+)
:
(+)
:
«A-B/EQ».
(-)
(-)
,
«A-B/EQ»
:
«FF
»
«FF
.
»
.
.
60
.
-
«
»
5.
POWER
EQ/A-B
(Normal >JAZZ >Classic >Rock
>POP)
MODE
(Normal >1 >DIR >All >R.DIR >R.A I)
)
)
+/FF
REW
MENU
FM
:
,
.
,
.
61
1.
·
,
,
(
)
(
«
»
« «
)
«
-
»
«
,
-
,
.
-
,
2.
·
«
(
)
62
On/Off.
»
«
».
».
·
«
/EQ»
·
«
(
»
«
)
·
«
)
63
/EQ»
»
·
«
(
2)
(
1)
(
3)
3.
·
«
».
12
·
»
«
/EQ».
20
.
(
1)
64
(
2)
(
3)
-
,
1-2
«PLAY/POWER»
4.
·
MODE
(
)
(
·
)
RADIO
RADIO001.MP3, RADIO002.MP3
.
65
5.
POWER
EQ/A-B
*
MODE
+/FF
REW
):
):
MENU
3
3.
1.
·
,
«MODE»
(
).
66
,
(
)
(
·
)
PLAY/POWER
,
,
·
*
«MODE»
«MENU»
,
MUSIC
MUSIC.
«MENU»
«MODE»
MUSIC
MUSIC001.
*
*
*
,
.
3, MUSIC002.
3
.
.
:
,
67
.
,
.
3
(
)
1.
·
«MODE»
(
)
·
(
)
PLAY/POWER
,
(
·
*
,
.
)
«EQ/A-B»
«MENU»
,
VOICE.
VOICE
«MENU»
«PLAY/POWER»
«MODE»
VOICE
VOICE001.
3, VOICE 002.
3
.
68
,
*
3
,
1.
.
.
POWER
EQ/A-B
MODE
+/FF
REW
MENU
-
-
2.
1.
2.
3.
4.
5.
6.
7.
69
·
.
.
·
(
)
.
·
,
.
1.
2.
3.
4.
5.
.
KOREAN
ENGLISH
JAPANESE
CHINESE-SIMP
CHANESE-TRAD
·
,
.
·
,
(
)
70
·
.
:
·
,
,
H-F2563
1.0
05110BF9A
114/256MB
3.
1.
2.
3.
4.
5.
6.
·
(
71
1
30)
,
·
.
30
·
·
«
«
» (NORMAL)
» (REMAIN)
·
:
:
*
.
72
·
,
.
(Normal):
(Reverse):
180
.
4.
·
-
.
VAD
:8
:
128
,
.
-
.
.
VAD
ALC
:
VAD:
:
VAD.
.
,
-
.
ALC
:
64KBPS
ALC
VAD
VAD 1/9
·
.
: 56
256
73
128KBPS
·
-
.
: 56
.
256
:
),
-
.
-
:
(
.
:
.:
(1-10
),
3.
1-32).
128KBPS
5/10
5.
17/32
1.
2.
3.
4.
5.
6.
·
,
: NORMAL, JAZZ, CLASSIC, ROCK, POP
74
EQ
·
,
.
,
.
·
.
,
,
.
.
0,
.
·
-
.
:
75
,
-
:
STEREO DEPTH 0/16:
.
,
·
8/16,
: 100 %
: 100 %
,
8
·
8
76
50% , 50 % -
.
.
6.
1.
2.
3.
4.
5.
6.
·
/
1
DIR
ALL
R.DIR
R.ALL
·
(75% - 130%)
77
·
10
*
1-2
«+»
·
,
(
).
·
(ON):
(OFF):
,
,
·
,
(FF
(FF
.
):
,
):
.
78
7.
1.
2.
3.
4.
5.
6.
FM
FM
·
.
(1-60
)
·
(
1-180
·
)
FM
79
·
.
(ALKALINE (
vol+ vol-
))
Ni-CD (
))
:
.
-
,
«
»,
.
-
,
«
»
Ni-Cd
·
MP3
,
2
3
.
2
·
FM
FM
80
MP3
.
·
«Non USB driver install».
·
,
DOS.
«Chkcopy»
.
USB
:
,
WIN98/SE,
3
98.
.
(CHKCOPY program)
(CHKCOPY program)
Main File:
Font file:
.
·
·
(main.bin)
3
,
.
:
,
.
.
.
82
·
,
«
» (DOWNLOAD).
USB
3
«
·
83
» (DOWNLOAD).
.
Windows 98/ME/2000/XP
20
CD-ROM
USB
Windows 98
3
USB
.
3
«Non USB Driver»
Windows ME/2000/XP
,
«Non USB Driver»
,
,
.
3
,
.
1)
,
Windows
98/SE,
2)
·
·
:
3
CD-ROM
<None>
,
,
.
H-F2563.exe c D.
Win 98
84
·
«WIN98/SE Install»
DOS
·
·
3)
·
·
,
3
USB
.
.
CD-ROM
,
,
.
H-F2563.exe c D.
Win 98
·
.
«WIN98/SE Uninstall»
85
·
DOS
.
,
3
.
Win 98
«Non
USB driver»
Win 98
«Non USB Driver»
HYUNDAI
86
MP3
1.
USB
3
,
USB
(USB
)
2.
,
1.
·
3
Windows
87
.
·
2.
·
,
,
3
3
88
3.
·
·
,
«Delete».
,
.
·
89
3
.
.
3
2
(
,
).
«
,
».
,
3
.
90
WMA, MP3, ASF
3020
... 20
5
+5
> 80
< 0,1%
3,6
1
256
AAA (
) 1
12
USB
FM
87,5 ... 108
40 ... 60
25 ... 31
30
30
40
< 1-2 %
.
,
91
,
.
,
.
1,5 .
(
).
.
1,5 ,
.
(Ni-Cd)
1,2 .
«HOLD» (
«On» (
.),
).
.
,
.
USB
.
,
USB,
.
,
.
.
MP3 Player,
.
92
,
USB
.
,
USB.
.
93
(FCC)
,
15
FCC.
.
1.
2.
.
,
,
.
,
FCC).
,
,
.
,
,
,
.
,
,
,
,
.
,
,
.
:
;
.
,
,
.
«How to Identify and Resolve Radio
and TV interference Problems» (
),
004-000-00345-4,
U.S. Government
Printing Office, Washington, DC 20402.
94
,
.
.
.
95