1
This document is intended for informational and instructional purposes only.
MPIO reserves the right to make changes in the specifications and other information contained in this document without prior notification
MPIO disclaims any obligation to update the information contained herein.
Name of Parts
Table of Contents
ML100 Basics
Name of the Parts ...................................................................
Inserting a Battery .................................................................
Screen .......................................................................................
Components ...........................................................................
3
3
3
4
Connection
Connecting to your computer .......................................... 4
Installing USB Driver Manually .......................................... 5
Using a Removable Disk ....................................................... 6
Downloading/Uploading Files
Disconnecting the USB Cable
............................................
............................................
Usage
Playing music
7
6
FM Radio Settings .................................................................... 15
Saving Channels in Menu ................................................... 15
Setting Bandwidth ................................................................ 15
Setting FM Radio Sound ..................................................... 16
Saving Auto Preset ............................................................... 16
Setting Seek Step .................................................................. 16
Recording Settings ................................................................. 17
Setting Voice Recording Quality ....................................... 17
Setting FM Radio Recording Quality ............................... 17
Setting Voice Signal Amplification .................................. 17
Setting the VOR (Voice Operation Recording) ............. 18
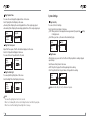
Screen Settings ........................................................................ 18
Setting Visual Effect ............................................................. 18
Setting the Language .......................................................... 19
Setting File Information ...................................................... 19
Setting Playback Time ......................................................... 20
Setting Text Flow Speed ..................................................... 20
Setting the Back Light ......................................................... 20
System Settings ....................................................................... 21
Setting Auto Play .................................................................. 21
Setting Resume ..................................................................... 21
Setting Fade In ....................................................................... 21
Setting Device Info ............................................................... 22
Setting Auto Sleep ............................................................... 22
Setting Auto Off .................................................................... 23
Initializing Settings ............................................................... 23
Adjusting Playback Speed .................................................. 23
7
7
7
8
8
8
8
8
Using the Navigation ............................................................. 9
Voice Recording ....................................................................... 9
Setting Section (A - B) Repeat ........................................... 10
Changing Modes ..................................................................... 10
Listening to FM radio ............................................................. 11
Searching the Frequency Manually ............................ 10 Customer Support
Searching the Frequency Automatically .................. 11 Upgrading Firmware
Saving Channels .................................................................... 11
Changing a Saved Frequency ............................................ 12
Listening to a Saved Frequency (Channel mode) ......... 12
Recording FM Radio ............................................................... 12
Menu Operation ...................................................................... 13
Moving in the menu ............................................................. 13
Saving the settings ................................................................ 13
Leaving the submenu ........................................................... 13
Audio Settings .......................................................................... 14
Setting EQ ................................................................................ 14
Setting User EQ ...................................................................... 14
Setting Repeat ........................................................................ 15
.............................................................................
Turn on ML100 .....................................................................
Change the volume ..............................................................
Disabling ML100 buttons ..................................................
Turn off ML100 .....................................................................
Searching for the desired section during playback ......
Searching for the desired file during playback .............
Searching for the desired file during pausing ...............
.............................................................
24
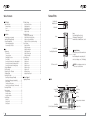
Necklace Hole
Headphones Port
Hold Switch
Lever :
Mode Switching/ Menu Setting/
File Navigation/ Changing Track/
Rewind and Fast Forward/ Volume Control
Screen
Record Button
Power/Play/Pause Button
Inserting a Battery
Push the battery cover to the arrow direction
to open it.
Insert the battery with correct polarity (+/-)
and close the battery cover.(1 AAA battery)
Note: Do not apply an excessive force USB Connector Port
to the cover. It can be broken.
Screen
EQ
Current Track
All Tracks
Folder Name
Repeat
DRM
Auto Sleep
Battery
Lock Icon
Display of music information
Visual Effects
(File Info/ Status/ StereoImage)
Playback Time
Components
ML100
Earphones
USB Cable
Utility CD
Instructions
Warranty
Battery (AAA)
Necklace
User Guide
Additional components(For example, Necklace and etc) can differ depending on the sales area.
Note: Actual player may vary slightly from images shown, and subject to change without notice.
Broken components may be purchased separately at MPIO Service Center.
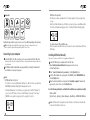
Connecting to your computer
1 Connect ML100 to the USB connection port on your computer with the USB cable.
- Removing the USB cable, while installing the USB driver or executing a command, may cause malfunction to your computer.
2 The USB Driver will be installed with a message indicating “Looking for a New Device”. The installation screen may not appear.
Note:
MTP (Media Transfer Protocol)
- This mode is for connecting Windows Media Player 10 to ML100 to listen a encoded file as WMDRM(Windows Media Digital Rights Management) music file.
- If Windows Media Player 10 is installed in your computer which the OS is Windows XP, you can use the MTP mode. (You have to install Windows Service pack 1 than higher)
- WMDRM is a encoded technology to protect the copyright of music file.
MSC (Mass Storage Class)
- ML100 can be used as a removable disk in this mode, regardless of the operating system you use.
- Install the USB driver first and connect ML100 to your conputer, if you are using Windows 98SE. To install the USB driver manually, please refer to “Installing USB Driver Manually”(page5).
To switch between MTP and MSC modes
- While the computer and ML100 are connected, press the lever to switch between MTP and MSC modes.
Installing USB Driver Manually
Please refer to the below only if ML100 is not plugged with Windows 98SE.
1 Connect ML100 with your computer with the USB cable.
2
3
4
When Add New Hardware Wizard window appears on the screen,
click the [Next] button.
Check “Search for the driver for your device”, click the [Next] button.
Insert the CD included in the package into the CD-ROM, check CD-ROM DRIVE and click the [Next] button.
When the driver installation is completed, an “Installation complete” window will appear on the screen. Then, click the [Finish] button.
Go to the following destination to confirm that the installation was completed successfully.
Windows 98SE :
[Control Panel] → [Systems] → [Device Manager] → [Hard Drive] → MPIO ML100 USB Device
Note: In Windows 98SE, the program must be installed to use ML100 as a removable disk.
Please install the USB drivers before use.
Using a Removable Disk
Downloading/Uploading Files
1 You can connect to your computer with the USB cable while ML100 is on or off.
If connected, a connection icon will appear in the LCD screen.
If connected in MTP mode, press the lever to switch to MSC mode.
2 Run Windows Explorer on your computer
A Removable Disk(ML100) icon will be created in Windows Explorer.
3 The user can store, delete data and create a folder in the same way as a hard drive.
Copy & Paste, Drag & Drop commands can be used in the same way to store data.
Copy & Paste: Select the data to store, click on right mouse button.
Select [Copy] and then [Paste] in the Removable Disk(ML100).
Drag & Drop: Select the data store, click and hold down the left mouse button to drag the files into the Removable Disk(ML100), and then release the left mouse button
:1 Place mouse cursor on “Stop a Hardware Device” icon in the system tray, and click right 2
mouse button.
Select “Stop USB Mass Storage Device”.
When the “Stop a Hardware Device” window appears, select MPIO ML100 USB Device. Then, click the [OK] button and disconnect the USB cable.
Note:
In Windows 2000, disconnect the USB cable by clicking the [OK] button after the “Safely Remove Hardware” message appears.
If you are using Windows XP, disconnect the USB Cable when the Safe To Remove
Hardware message appears.
Windows 98SE Users
There is no Safely Remove Hardware command in Windows 98SE.
The user must wait until the file/data transfer is complete, and then disconnect the USB cable.
Playing Music
Caution:
If you disconnect the USB cable while a file is being uploaded or downloaded, ML100 may malfunction.
Note:
The music file display order in Windows Explorer when you select a removable disk can be different from the actual playback order.
If you rename music files like 001***, 002***… in Windows Explorer, you can play them back by the order of number in the file name.
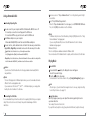
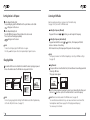
Turn on ML100
1
Press
and hold the
button, the Navigation screen will appear.
Select a file you wish to play.
2
Press
the
button to play music.
For more details of how to move folders or files, see [Using the Navigation] in page 9.
Note:
After turning on, if you don’t want the navigation screen to come up, change the setting to Auto Play in the menu. (See page 21).
Disconnecting the USB Cable
It is recommended that you follow these directions for separating ML100 from your computer
safely. If these instructions are not followed, it may result in data damage or ML100
malfunction.
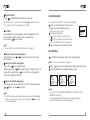
Change the volume
While it’s playing or paused, you can adjust the volume by pushing the lever in
up or down direction. You can adjust the volume from 0 to 40.
If you push the lever, it adjusts one step; if you push and hold the lever, it adjusts continuously
Disabling ML100 buttons
Push the
switch at ML100 toward the direction of the arrow.
Using the Navigation
When the hold function is set, buttons will not activated and
will appear on the screen.
To unlock, push the switch in the opposite direction of the arrow.
Turn off ML100
Press the
button to pause during playback and it will automatically turn off if
there is no further operations for 3 minutes. (In case default setting)
Press and hold the
button for 3 seconds. You can search for the desired file or folder easily using the navigation.
1 Press the lever in vertical direction, it will move to the
navigation mode, while it’s playing or paused.
The file list comes up on the screen.
2 Select a file you want to play.
: Move to subfolder, go into and select folder.
: Move to upper folder, unselect and cancel folder.
+ or - : Move folder or files within the same directory
3 If you press the
button, it plays the selected file.
Note:
You can change the time settings for Auto Off in the menu. (See page 23)
Searching for the desired section during playback
Push and hold the lever in
or
direction to find a point you want to listen,
while it’s playing.
Voice Recording
1 Press the REC button during pause, then the voice recording will begin.
Searching for the desired file during playback
Push the lever in
direction to play the next file.
When you push the lever in
direction within 10 seconds of playback, it goes to the previous file. If you push the lever in
direction after 10 seconds of playback its starts from the beginning of current file.
Searching for the desired file during pausing
While it’s paused, you can move to the previous or next file, if you push the lever in
or
direction. Press the
button to play.
Note:
MP2 or MP1 formatted files may not be played when the extension is changed to MP3 before download.
For VBR files, previous songs may not play even if the lever was pushed in
direction within
10 seconds after playback starts.
ROOT
RECORD
Sample song
Sample song 2
Note: You cannot voice record while music is playing.
2 Press the
button to pause the recording and press it again to resume the recording.
3 If you press the REC button, it will stop after saving the recording
RECORD
VOICE001. WAV
02:50:00
00:04:40
RECORD
VOICE001. WAV
02:40:00
00:04:40
SAVING
VOICE001. WAV
02:30:00
00:05:00
Note:
Files will be stored in order of VOICE001, VOICE002 & etc. And it will be stored in the RECORD folder as a WAV file.
Voice recording wills stop automatically if there aren’t sufficient memory space.
You can set the quality for the voice recording (See page 17.)
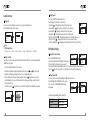
Setting Section A - B Repeat
Listening to FM Radio
1 Section Repeat Starting Point
To repeatedly play, press the REC button at the point where section starts.
will appear on the screen.
2 Section Repeat Ending Point
Press the REC button again at the point where the section ends.
The set section will now play repeatedly.
will appear on the screen.
Earphones work as an antenna, so please connect them before using.
See page 10 first, then switch to FM Radio mode
Note:
To cancel Section Repeat, press the REC button once again.
Press the
button to pause the section repeat and press it again to resume.
1 Press and hold the lever in vertical direction while the music is playing or paused.
Choose the Audio mode or the FM radio mode you wish to listen.
Audio
FM Radio
Settings
MUSIC
MUSIC001.MP3m
MUSIC002.MP3
MUSIC003.MP3
Searching the Frequency Automatically
If you push and hold the lever in
or
direction, the frequency will start to increase or decrease for searching.
After release the lever, the frequency will stop when it received a signal.
Note:
The frequency movement unit is different depending on Seek Step in FM Radio settings. (See page 16)
Changing Modes
Mode Switching
Searching the Frequency Manually
If you push the lever in
or
direction, you can change the frequency.
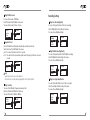
Saving Channels
1
If
you press the lever in vertical direction, the Save Channel screen will appear while listening to FM radio.
The popup menu appears.
Scan
Scan
STEREO
Scan
STEREO
STEREO
CH01 : 105.50
CH02 :
CH03 :
2 Select the channel number by pushing the lever in up or down direction, then push the lever in
direction or press it in vertical direction to save the frequency.
Note: For music to play properly after switching from FM Radio mode to Music Playback mode, set the Auto Play from the menu. (See page 21)
10
Note: Channels can also be saved in the FM Radio menu. (See page 15)
You cannot delete saved channels but you can save a new channel over a channel that has already been saved. (Please see page 12 on Changing a saved frequency.)
You can save up to 20 channels.
11
Changing a Saved Frequency
You can change the already saved channel to another frequency.
1 At a new frequency, if you press the lever in vertical direction, the save channel screen appears.
Push the lever in
direction or press it in vertical direction after selecting the saved channel number.
2 When saving a frequency, if you have the already saved frequency at a channel number, the saved frequency will be deleted and the new one will be saved.
Listening to a Saved Frequency (Channel mode)
1 Press the
button to switch to the receive mode(Scan ↔ Channel).
Select the Channel mode.
2 Every time you push lever in
or
direction, ML100
switches through preset frequencies (channels).
You can listen to any selected channel.
Channel 02/15
STEREO
CH02
Note:
If there is no saved frequency(channel), NO CHANNEL!! message will appear on the screen and the player will remain in Scan mode.
Recording FM Radio
1 Press the REC button while listening to FM Radio to start FM radio recording.
2 Press the
button to pause the recording and press it again to resume the recoring.
3 If you press the REC button, it will stop after saving the recording.
RECORD
FM001. WAV
02:50:00
12
RECORD
00:04:40
FM001. WAV
02:40:00
SAVING
00:04:40
FM001. WAV
02:30:00
00:05:00
Note:
The files will be stored in order of FM001, FM002 & etc. And it will be stored in the RECORD folder as a WAV file.
FM radio recording wills stop automatically if there have no sufficient memory space.
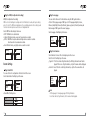
Menu Operation
Moving in the menu
Press and hold the lever in vertical direction to move to Mode Switching.
Select and enter to the Setting mode to move to Main Menu.
Use the lever to explore the menu, then push the lever in
direction or press it in vertical direction to go into the selected menu.
Mode Switching
Audio
FM Radio
Settings
Main Menu
Audio
FM Radio
Recording
Saving the settings
Push the lever in up or down direction to change the settings, then push the lever in
direction or press it in vertical direction to save the settings.
After saving the settings, move to the previous menu.
If you push the lever in
direction while you setup the settings, it will not save the settings, and will only exit from the screen.
Leaving the submenu
Push the lever in
direction to go to upper menu, and you will leave the submenu eventually.
Main Menu
Display
System
Display
Visualization
Language
File Info
Note:
If there is no operation in the menu mode, it will be canceled after 10 seconds.
13
Audio Settings
Setting EQ
You can enjoy by setting the volume to your personal preference.
Select EQ from Audio in the menu.
Audio
EQ
User EQ
Repeat
EQ
Normal
Pop
Rock
Note:
EQ Change Order
Normal → Pop → Rock → Jazz → Classical → Vocal → Bass Booster → User EQ.
Setting User EQ
You can enjoy your own sound effects by setting the EQ to the each frequency bandwidth that you prefer.
Select User EQ from Audio in the menu.
Move through frequency band by pushing the lever in
or
direction, and adjust the setting by pushing the lever in up or down direction.
After setting each frequency band, push the lever in
direction or press it in vertical direction to move to OK and save the setting, and then you will move to the previous menu.
Push the lever in
direction to move to EXIT, and the User EQ will be canceled.
Audio
EQ
User EQ
Repeat
14
Setting Repeat
You can set ML100 to play music files.
Select Repeat from Audio in the menu.
Repeat
Normal ( ) : Plays all music files in the player once.
Nomal
Repeat One ( ) : Repeats one music file over and over.
Repeat One
Repeat All
Repeat All ( ) : Repeats all music files in the player.
Random ( ) : Randomizes all music files in the player.
Directory Normal ( ) : Plays all music files in the current folder once.
Directory All ( ) : Repeats all music files in the current folder.
Directory Random ( ) : Randomizes all music files in the current folder.
FM Radio Settings
Saving Channels in Menu
Save Channel
FM Radio
CH 01 96.9
Save Channel
Choose the FM Radio mode.
CH 02 99.5
FM Band
Select Save Channel from FM Radio in the menu.
CH 03 98.5
FM Sound
After setting the frequency to save, select
the desired channel by pushing the lever in up or down direction, then push the lever in
direction or press it in vertical direction to save the frequency.
Setting Bandwidth
You can set the receiving broadband of FM radio to receive.
Select FM Band from FM Radio in the menu.
FM Radio
You can set to US/EU/KR/CN, Worldwide,
Save Channel
and Japan.
FM Band
FM Sound
User EQ
FM Band
US/EU/KR/CN
Worldwide
Japan
<Frequency Broadband List by Country>
EXIT
OK
US/EU/KR/CN
Worldwide
Japan
87.5MHz~108MHz
76MHz~108MHz
76MHz~92MHz
15
Setting FM Radio Sound
You can set the sound of FM Radio.
Select FM Sound from FM Radio in the menu.
You can set the sound to Mono or Stereo.
FM Radio
Save Channel
FM Band
FM Sound
FM Sound
Mono
Stereo
Auto Preset
Seek Step
Auto Preset
No
Yes
Note:
Saved channels can be seen in Save Channel.
After Auto Preset, the radio will start playing with the first channel (CH01).
Setting Seek Step
You can set the FM radio’s frequency movement unit.
Select Seek Step from FM Radio in the menu.
You can set the unit to 50kHz or 100kHz.
FM Radio
Auto Preset
Seek Step
16
Setting Voice Recording Quality
You can set the quality status of the Voice recording.
Select V/R Quality from Recording in the menu.
You can set Low, Middle and High.
Saving Auto Preset
Scan for FM Radio broadcasts and automatically save them as channels.
Select Auto Preset from FM Radio in the menu.
No : You can set the Auto Preset not to operate.
Yes : You can delete the saved channel and save the frequency that can be received in order.
FM Radio
Recording Settings
Seek Step
50kHz
100kHz
Recording
V/R Quality
FM Quality
Record Gain
V/R Quality
Low
Middle
High
Setting FM Radio Recording Quality
You can set the quality status of the FM Radio recording.
Select FM Quality from Recording in the menu.
You can set Low, Middle and High.
Recording
V/R Quality
FM Quality
Record Gain
FM Quality
Low
Middle
High
Setting Voice Signal Amplification
You can set the amplification level of the voice signal.
Select Record Gain from Recording in the menu.
You can set Low, Middle and High.
Recording
V/R Quality
FM Quality
Record Gain
Record Gain
Low
Middle
High
17
Setting the VOR (Voice Operation Recording)
VOR (Voice Operation Recording)
VOR is a function that begins recording when the ML100 detects sound, and stops recording
when It is silent. The VOR level is adjustable so the recording begins when the recording sound
from the internal microphone reaches the user’s designated level.
Select VOR from Recording in the menu.
Off : VOR function is deactivated.
Library : On Library mode, even small sound can be recorded.
Office : On Office mode, medium and high volume sound are recorded.
Small sound is not sensed and recorded.
Park : On Park mode, only high volume sound is recorded.
Recording
VOR
VOR
Off
Library
Office
Screen Settings
Setting Visual Effect
You can set the info configuration at the bottom of the screen.
Select Visualization from Display in the menu.
Display
Visualization
Language
File Info
Visualization
File Info
Status
Stereo Image
<Visual Effect Setting Icon>
File Info
Status
Stereo Image
18
Setting the Language
You can confirm the music file information using the ID3 tag information.
A total of 55 languages support ID3 tag: out of 55 languages English, Korean,
Chinese (simplified), Chinese (traditional), Japanese, Spanish, French, German, and
Russian support ID3 tag and the menu language.
Select Language from Display in the menu.
Display
Visualization
Language
File Info
Language
DANISH
DUTCH
ENGLISH
Setting File Information
Set information for music files to be displayed on the screen.
Select File Info from Display in the menu.
Tag Info : If the file contains Tag information, the ID3 Tag information will be dis
played. If there is no Tag information, only the file name will be displayed.
File Info : Even if the file contain Tag information, only the file name will be dis
played.
Display
Visualization
Language
File Info
File Info
Tag Info
File Info
Note:
All 55 languages in the Language support ID3 Tag information.
For all tracks without Tag information, the file name will be displayed.
19
Setting Playback Time
You can set how to display the playback time on the screen.
Select Playing Time from Display in the menu.
Running Time : Displays the current playback time of the song being played.
Remaining Time : Displays the remaining playback time of the song being played.
Display
Playing Time
Scroll Speed
Backlight Time
Playing Time
Running Time
Remaining Time
Display
Playing Time
Scroll Speed
Backlight Time
Scroll Speed
EXIT
02pixel
OK
Setting the Back Light
You can adjust the lighting time of the screen.
Select Backlight Time from Display in the menu.
Display
Playing Time
Scroll Speed
Backlight Time
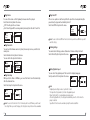
Setting Auto Play
You can set a file to AutoPlay.
Select Auto Play from System in the menu.
Off : When you turn on the navigation screen appears and if you press the
it will play music.
On : When you turn on, the music will automatically play.
System
Setting Text Flow Speed
Adjust the flow speed of the file information displayed on the sreen.
Select Scroll Speed from Display in the menu.
You can set the scroll speed from 2 to 16 pixels.
System Settings
Backlight Time
EXIT
05sec
Auto Play
Resume
Fade In
button,
Auto Play
Off
On
Setting Resume
After turning on, you can set it so that the last file played before ending is played
upon startup.
Select Resume from System in the menu.
Off : Plays the file played from the beginning before ending.
On : Plays the file from the point where it stopped before ending.
System
Auto Play
Resume
Fade In
Resume
Off
On
Note: when Auto Play is set on, the Resume will operate.
OK
Note:
You can set the lighting time from 5 to 20 seconds. When it sets to Always On, it will use lots of battery therefore it will affect the play time. When there is insufficient battery, the backlight will not come up.
20
21
Setting Fade In
You can set the volume so that it gradually increases when file is played.
Select Fade In from System in the menu.
Off : File will play in the set volume.
On : File will play with the volume gradually increasing from the start of each file.
System
Auto Play
Resume
Fade In
Fade In
Off
On
Information
Auto Sleep
Auto Off
Information
FIRMWARE: v. 1.00.
MEMORY: 0059/0120MB
Setting Auto Sleep
While you listen to Music or FM Radio, you can set the time to turn off automatically
after the scheduled time.
Select Auto Sleep from System in the menu.
System
Information
Auto Sleep
Auto Off
Auto Sleep
EXIT
120 min
OK
Note: You can set the time from 15 to 120 minutes, and choose Off when you don’t want the setting. When you restart the player, the Setting Auto Sleep function will be unavailable.
22
Information
Auto Sleep
Auto Off
EXIT
30 min
OK
Note: You can set the Auto Off time from 3 to 30 minutes, and choose Off when you don’t want the setting.
Setting Device Info
You can check the firmware version of system, the memory size in use, and the total
memory size.
Select Information from System in the menu.
You can confirm the system’s information.
System
Setting Auto Off
If there is no operation or button input after the preset time has elapsed during the
pause status, the player will automatically turn off.
Select Auto Off from System in the menu.
Auto Off
System
Initializing Settings
You can delete all settings you have setted and set all menu settings to default.
Select Initial Setting from System in the menu.
System
Initial Setting
Speed Control
Initial Setting
No
Yes
Adjusting Playback Speed
You can control the playback speed. This is useful for studying languages.
Select Speed Control from System in the menu.
Speed Control
System
Initial Setting
Speed Control
EXIT
100%
OK
Note:
Playback Speed settings can be set up from 50 to 200%
The larger the setting number is, the faster the playback speed.
Default setting 100% is recommended when playing music.
After setting Speed Control, the setting will automatically convert to 100% when the player is restarted.
Speed Control function can be worked only mp3 files and recorded files.
23
Upgrading Firmware
1
2
3
4
5
6
7
8
Download the firmware from MPIO website to your computer. (www.mpio.com)
Turn on ML100 and connect it to your computer by using a USB cable.
Please check that the player is in the MSC mode.
You can switch to the MSC mode to press the lever in vertical direction.
Firmware upgrade is only available in the MSC [Mass Storage Class] mode.
When the Firmware Upgrade screen appears, click the [NEXT] button according to the following image.
To cancel, click the [CANCEL] button.
After firmware upgrade is completed, click the [FINISH] button.
Disconnect the USB cable from the player.
Click
Click
Click
Click
Click
Note:
To cancel firmware upgrade, click the [CANCEL] button.
Please take note that external impact and low battery while performing a firmware up grade may cause device failure or other malfunctions.
For Macintosh Users
When performing a firmware upgrade on a Macintosh, please follow the instructions on our website.
24