1
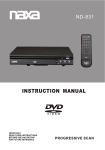
Digital Cable Set-Top Box
NDSVideoGuard embedded
ND-1200C
UserManual
HUM-ND1200C.100GB
Notice
Copyright (Copyright © 2007 HUMAX Corporation)
Not to be copied, used or translated in part or whole without HUMAX’s prior consent in
writing except approval of ownership of copyright and copyright law.
Trademarks
NDS is a trademark of News Corporation Group.
Hathway is trademark of Hathway Cable & Datacom Pvt. Ltd.
Thank you for procuring a HUMAX Digital Cable Set-Top Box.
Please read this User Manual carefully to be able to safely install, use and maintain the
Set-Top Box at maximum performance. We suggest that you keep this user manual
next to your Set-Top Box for future reference.
Warranty Exclusions
Warranty is not applicable in cases other than those involving defects in materials or
workmanship and in particular, does not cover:
• Defects caused by unauthorized repair, maintenance, modification or improper use,
use of non-HUMAX / non-Hathway parts and components not supplied by HUMAX /
Hathway.
• Defects caused by lightning, water, fire, acts of war, public disturbance or any other
cause beyond Hathway’s control.
• Products where the label bearing the serial number has been tampered, defiled,
removed or is illegible.
• Defects or dameges caused due to improper handling or physical abuse.
• Defects caused by use of illegal software.
NB: The information in this document is subject to change without notice.
1
SPECIAL NOTICE
DO NOT SWITCH OFF THE SET-TOP BOX (STANDBY MODE)
• IT IS ADVISABLE THAT THE SET-TOP BOX SHOULD ALWAYS BE KEPT IN THE
STANDBY MODE WHILE NOT WATCHING TV AND SHOULD NOT BE POWERED
OFF FROM THE 230 V MAINS SWITCH OUTLET EVEN OVERNIGHT.
• IF THE SET-TOP BOX IS SWITCHED OFF FROM THE MAINS, IT WILL NOT RECEIVE
IMPORTANT UPDATES AND INFORMATION TRANSMITTED FROM THE HEADEND
OVER THE CABLE.
• ALSO THE SET-TOP BOX WILL TAKE SOME TIME TO SWITCH ON IF THE MAINS
POWER WAS SWITCHED OFF.
SMART CARD
• THE SMART CARD SHOULD BE INSERTED GENTLY INTO THE SMART CARD SLOT
TILL IT STOPS. ABOUT 1 CM OF THE CARD WILL REMAIN OUTSIDE.
VIEWING ANALOG FREE-TO-AIR CHANNELS
• THIS SET-TOP-BOX PROCESSES ONLY DIGITAL SIGNALS AND THE ANALOG
FREE-TO-AIR SIGNALS ARE SIMPLY LOOPED-THROUGH THE SET-TOP BOX.
HENCE THE SET-TOP BOX HAS TO BE IN STANDBY MODE TO VIEW THE ANALOG
FTA CHANNELS. IF THE MAINS POWER TO THE SET-TOP BOX IS SWITCHED OFF,
YOU CANNOT VIEW THE ANALOG FTA CHANNELS.
2
Notice
Read this manual carefully and make sure you understand the instructions provided.
For your safety, check what the result of each action will be.
Warnings, Cautions, and Notes
Throughout the whole manual, pay special attention to the following marks that indicate
hazardous situations.
• Warning
Indicates a hazardous situation which, if not avoided, could result in (serious) injury.
• Caution
Indicates a situation which, if not avoided, could damage the equipment or other
apparatus.
• Note
Indicates additional information to the user to make the user aware of possible problems
and information of any importance to help the user to understand, to use and maintain
the installation.
RISK OF ELECTRIC SHOCK
DO NOT OPEN
To reduce the risk of electrical shock, do not remove cover (or back).
No user-serviceable parts inside. Refer servicing to qualified service
personnel.
This symbol indicates dangerous voltage inside the product that
presents a risk of electrical shock or personal injury.
This symbol indicates important instructions accompanying the product.
This product should not be disposed with other household wastes at the
end of its working life. Please separate this from other types of wastes
and recycle it responsibly to promote the sustainable reuse of material
resources. This will prevent possible harm to the environment or human
health from uncontrolled waste disposal.
Domestic users: Please contact either the retailer where you purchased
this product or their local government office for details of where and how
they can take this item for environmentally safe recycling. Business
users: Contact your supplier and check the terms and conditions of the
purchase contract. This product should not be mixed with other
commercial wastes for disposal.
3
Safety and Warning
This digital cable Set-Top Box has been manufactured to comply with international safety
standards. Please read the following safety precautions carefully.
Safety Instructions and Precautions
1. MAINS SUPPLY
90 - 250V AC 50Hz
Operate your product only from the type of power source indicated on the marking label.
Disconnect the Set-Top Box from the mains before you start any maintenance or
installation procedures.
2. OVERLOADING
Do not overload a wall outlet, extension cord or adapter as this may result in
fire or shock.
3. LIQUIDS
The Set-Top Box should not be exposed to any liquids dripping or splashing onto it.
In addition, no objects filled with water, such as vases, should be placed on the
Set-Top Box.
4. CLEANING
Disconnect the Set-Top Box from the wall outlet before cleaning.
Use a light damp cloth (no solvents) to dust the Set-Top Box.
5. VENTILATION
The slots on the Set-Top Box must be left uncovered to allow proper airflow to the unit.
Do not stand the Set-Top Box on soft furnishings or carpets.
Do not stack any electronic equipment on top of the Set-Top Box.
6. ATTACHMENTS
Do not use any unsupported attachments, as these may be hazardous or cause damage
to the Set-Top Box.
7. CONNECTION TO THE CABLE TV SIGNAL AND TV
Connect all components before plugging any power cords into the wall outlet.
Always turn off the Set-Top Box, TV and other components before you connect or
disconnect any cables.
8. LOCATION
Place the Set-Top Box indoors to avoid exposing it to lightning, rain or sun.
Do not place it near a radiator or heater.
Make sure it has more than 10 cm clearance from any appliances susceptible to
electromagnetic influences, such as a TV or a VCR. Do not block these openings with
any object, and do not place the product on a bed, sofa, rug, or other similar surface.
If you place the product on a rack or bookcase, ensure that there is adequate ventilation
and that you have followed the manufacturer’s instructions for mounting.
Do not place the product on an unstable cart, stand, tripod, bracket or table from where
it can fall. A falling product can cause serious injury to a child or adult, and serious
damage to the appliance
4
9. LIGHTNING, STORM, or NOT IN USE
Unplug the product from the wall outlet and disconnect the Cable input during a
thunderstorm or when left unattended and unused for long periods of time.
This will prevent damage to the unit due to lightning and power-surges.
10. EXTRANEOUS OBJECTS
Do not insert anything through the openings in the unit, where they can touch dangerous
voltage points or damage parts.
11. REPLACEMENT of PARTS
When replacement parts are required, be sure the service technician uses replacement
parts specified by the manufacturer, or those that have the same characteristics as the
original part. Unauthorized substitution may result in additional damage to the unit.
Warning
1. The mains plug, as a disconnection device, shall remain readily accessible by the user.
2. Follow these directions in order not to damage the power cord or plug.
Do not modify or process the power cord or plug arbitrarily.
Do not bend or twist the power cord too much.
Make sure to disconnect the power cord with the plug held.
Keep heating appliances as far as possible from the power cord in order to prevent the
cover vinyl from melting.
3. Follow these directions. Failure to follow one of them may cause electrical shock.
Do not open the main body.
Do not insert metals or inflammable objects inside the product.
Do not touch the power plug with wet hands.
Disconnect the power cord in case of lightning.
4. Do not use the product when it is out of order. If you continue to use the product when
defective, a serious damage can be caused to it. Make sure to contact your local product
distributor if the product is out of order.
5. Please do not insert metal or extraneous objects into the slots for smart cards.
This can cause damage to the Set-Top Box and reduce its life span.
5
Security Instructions
For your security and to prevent damage, please read the following safety instructions
carefully.
6
Safety
7
Contents
1. Before using the Set-Top Box
10
1.1 Package contents
10
1.2 Front Panel
11
1.3 Rear Panel
11
1.4 Remote Control
12
2. Setup
14
2.1 Connecting the Set-Top Box
14
2.2 Powering On
15
2.3 Configuration of the Set-Top Box
15
3. Watching a Cable Channel
16
3.1 Turning the TV on for the first time after configuring Set-top Box 16
3.2 To Select a Channel
16
3.3 To Adjust the Volume
17
3.4 To Mute Sound
17
4. Using the EPG (Electronic Programme Guide)
4.1 EPG (Electronic Programme Guide) Screen Overview
18
1. Programme Schedul screen
18
2. Main Menu screen
19
3. Menu Map
21
4. Programme Banner
22
5. Functions Guide
8
18
23
OVERVIEW OF FREQUENTLY USED FUNCTIONS
23
5.1 Using the Programme Guide
23
1. Accessing the Programme Guide
23
2. Searching for Programme of Interest
23
3. Viewing the programme of interest
24
4. Reserve / Cancel Programme
24
5. Quick search
25
5.2 Using Favourite Channel
26
5.3 Searching by Programme Types
28
5.4 Using Parental Lock Function
30
5.5 Other Function of EPG
1. Channels (
)
2. Programmes (
34
)
35
Programme Guide
35
Favourite Channels
35
Programme Filter
35
Reserved Programmes
36
Radio Channels
36
3. Help (
4. B-Mail (
)
36
)
37
5. Personal Settings (
)
38
Selecting Audio 1
38
Selecting Audio 2
38
Select Subtitle Language
38
Account Status
38
Pay-Per-View Account
38
Pay-Per-View Password
38
Select Key code
39
Set Pay-Per-View Limit
39
Banner Duration
39
Retune Reserved programme
)
39
40
Select your Signal
43
Diagonistics
41
Urgent Message Alert
41
Set Up A New Card
41
Advanced Set-up.
42
7. Games (
Specifications
38
Parental Lock
6. System Settings (
Precautions
32
)
43
45
46
9
1. Before using the Set-Top Box
This chapter describes detailed instructins on the product and its accessories.
1.1 Package Contents
Please check all package contents before using your Set-Top Box.
Set-Top Box
RCA Cable
10
Safety
1.2 Front Panel
2
1
1. STANDBY LED
Red light is emitted when the product is in STANDBY mode.
While watching the analog Fee-To-Air Channels, the Set-Top Box should be in the
STANDBY mode.
2. SMART CARD SLOT
Slot for a smart card.
The Smart Card is to be placed in the slot with the red arrow “Insert card this way up”
facing upwards (i.e. Chip-side downwards).
NOTE: THE CARD IS TO BE INSERTED GENTLY TILL IT STOPS AND REMAINS
APPROX. 1 CM OUTSIDE.
1.3 Rear Panel
1
2
3
4
1. CABLE IN
Connect the incoming Cable-TV signal to the CABLE IN jack on the Set-Top Box.
2. CABLE OUT
Connect the outgoing cable from CABLE OUT to the TV set.
3. AUDIO R/L
Connect the AUDIO R to the TV AUDIO IN and AUDIO L to the TV AUDIO IN using
RCA-RCA cord.
4. VIDEO
Connect the VIDEO to your VIDEO IN of TV / VCR using RCA-RCA cord.
11
1. Before using the Set-Top Box
1.4 Remote Control
1
11
2
12
3
4
13
5
14
6
7
8
9
10
12
15
1. TV
Switches between TV and Radio modes.
2. MENU
Displays the Main Menu.
3. NUMERIC(0-9) buttons
Enters a TV/Radio channel number.
4. INFO (+)
Press this button to view additional
information about a TV programme,
while in EPG mode.
Pressing the button while viewing a
Programme allows one to select
alternate audio language and subtitling,
If available.
5. BACK (
)
Exits whichever screen you are on
and goes one screen back.
11. POWER
Switches between operation and standby
modes.
12. HELP (?)
Press to display the Help box on the
screen. If pressed while watching a
programme, displays the programme
banner.
13. EPG
Displays the Programme Guide.
14. FAV (Favourite)
Press to display the Favourite channels
(CH 900 ~ 919).
15. V-/V+
Adjusts the audio volume.
6. Arrow buttons
Changes the channel or moves the cursor
up, down, left, or right.
7. OK
Selects a menu or confirms the selected
operation. If pressed while watching a
TV Programme, displays the main menu.
8. Red/Green/Yellow/Blue
Select the corresponding color option
shown on-screen (for use with help
services).
9. CH-/CH+
Changes the channel.
10. MUTE
Mutes the audio. Press again to resume
audio.
13
2. Setup
This chapter describes how to set up the Set-Top Box. Select the most appropriate
procedure depending on your requirements.
Note: If you encounter any problem when setting up the Set-Top Box, please contact
your local Cable Operator or Area office.
2.1 Connecting the Set-Top Box
Connecting TV / Hi-Fi system
14
INPUT
• Connect your CATV line to the CABLE IN socket on the Set-Top Box for receiving cable
services.
OUTPUT
• RF Output
Connect a cable from the CABLE OUT connector of the Cable Set-Top Box to the RF (Tuner) input
of the Television using a F to TV cord.
• Base-band Output
For best picture quality, it is recommended to use the A/V outputs of the Cable Set-Top Box.
• RCA A/V Cable are connected as in the figure above. Please note the polarity for Left & Right
audio channel is correctly connected.
2.2 Powering On
1. Connect the power cord of the Set-Top Box to a wall outlet.
2. Power on by pressing POWER (
)button on the Remote Control.
2.3 Configuration of the Set-Top Box
Since the process of configuring the Set-Top Box involves certain Network parameters,
you are requested to get the same carried out by your Cable Operator / nearest Area Office
personnel.
15
3. Watching a Cable Channel
3.1 Turning the TV on for the first time after configuring Set-Top Box
The following figure illustrates the screen that appears when you turned on the TV for the first
time. When you switch on and change the channel for the first time, the Programme banner
caption appears briefly and disappears as shown below. (You can configure the duration of
the banner vide option ‘Banner Duration’ under ‘Personal Settings’)
• Right top of the screen: 3 digit Channel number and Channel name are displayed.
• Bottom of the screen: Channel number, Channel name, Programme duration and various
current programme are displayed.
Channel Number and
Channel Name
Channel
Select
Current Time
Programme Time Select
duration
Programme Programme
rating
Information
3.2 To Select a Channel
Subscribers can select and watch their desired channel by performing any one of the
following procedures.
1. Press the CH-/CH+ (
)button to select your desired channel.
2. If you know the 3 digit channel number of the desired channel, input channel number
directly by using the NUMERIC(0-9) buttons to view the channel.
3. Press the EPG (
)button on Remote Control to enter Programme Guide screen,
use the
button and OK (
)button to select your desired channel.
16
4. You can go to Main Menu and select the Programme (
)icon and select “Programme
Filter” and select by genre. For more information refer to Using the EPG section.
5. You can go to Main Menu and select the Channel (
)icon and using the
button, select the desired channel.
6. While viewing the “Program Banner”, you can scroll through the names of the available
channels and select the desired channel.
7. By using the FAV (
)button on the Remote Control and using CH-/CH+ (
)
button thereafter.
3.3 To Adjust the Volume
You can adjust the volume using the V-/V+ (
)button on the Remote Control.
The volume level is displayed as a vertical bar on the left hand side of the TV Screen.
NOTE: YOU MAY ADJUST THE STB VOLUME SO THAT WHILE CHANGING BETWEEN
DIGITAL CHANNELS AND THE ANALOG FTA CHANNELS, THE CHANGE IN
VOLUME ON THE TV IS MINIMUM.
3.4 To Mute Sound
The Mute function is convenient to use when telephone or the doorbell rings.
Press the MUTE (
)button to mute sound. Press the button once again to disable the mute
function.
17
4. Using the EPG (Electronic Programme Guide)
4.1 EPG (Electronic Programme Guide) Screen Overview
This section describes the various components and screens of the EPG.
1. Programme Guide screen
Pressing the EPG (
)button displays the following Programme Guide grid.
In this screen, you can view the Programme details of each channel. You can select the
desired Programme or event by selecting the programme and pressing the OK (
)button
on the Remote Control.
18
2. Main Menu screen
Pressing the MENU (
)button while watching TV displays the following Main Menu screen.
(The TV programme is displayed in the window in 1/4 size.)
This is the Main page which lets you access all the features of the Set-Top Box through
the 7 icons at the top. Each icon has a sub-menu.
19
4. Using the EPG (Electronic Programme Guide)
This is the Main page which lets you access all the features of the Set-Top Box through the
7 icons at the top. Each icon has a sub-menu.
The function of each icon on the EPG menu are as follows.
1.
Channels
2.
Programmes
3.
Help
4.
B-Mail
5.
Personal Settings
6.
System Settings
7.
Games
Note: If a menu is selected, the icon changes to a golden color.
1. Press the
button to select an icon on the top of the screen.
2. The submenu of each selected icon is displayed on the left of the screen.
Press the
button to select this submenu. See detailed map on next page.
3. Press the OK (
)button after selecting the menu that you want.
4. If you want to cancel the selected menu and select another, press the BACK (
)button.
5. Press the HELP (
)button to view brief help information about each function.
6. Press the INFO (
)button to see the Programme information of the current programme
on the small TV screen.
20
3. Menu Map
Channels
Programme Guide
Favourite Channels
Programmes
Parental Lock
Programme
Filter
Reserved Programmes
Radio Channels
Parental Lock Help
Guide to Movie Ratings
Help
Audio and Subtitle Help
Favourite Channel Help
Contact Information Help
B-Mail
Parental Lock
Select Audio 1
Select Audio 2
Select Subtitle Language
Account Status
Personal Settings
Pay-Per-View Account
Pay-Per-View Password
Select Key Code
Set Pay-Per-View Limit
Banner Duration
Retune Reserved Program
Select your Signal
Diagonistics
System Settings
Urgent Message Alert
Set Up A New Card
Advanced Setup
Games
180 ITV games
181 ITV games
21
4. Using the EPG (Electronic Programme Guide)
4. Programme Banner
Whenever the TV is switched on or the channel changed, a banner automatically indicating
the current Programme title, time etc.
To view additional Programme information in this status, press the INFO (
)button.
You can search for Programmes on other channels or at different times in the grid using
the
buttons.
Program Banner disappears automatically in a few seconds. To display Program Banner
again while watching TV, press the HELP (
)button.
Channel Number and
Channel Name
Channel
Select
Current Time
Programme Time Select
duration
Programme Programme
rating
Information
Note:
• The Programme Banner information appears for a while every time the channel is
changed. You can configure the display time of the banner in ‘Banner Duration’ by
accessing the “Personal Settings” icon.
22
5. Functions Guide
OVERVIEW OF FREQUENTLY USED FUNCTIONS
In this section, you can learn about how to use several frequently-used functions of EPG.
• Programme Guide
• Favourite Channel
• Programme Category Search
• Parental Control
5.1 Using the Programme Guide
1. Accessing the Programme Guide
You can select the Programme Guide in two ways.
• Either press the EPG (
)button on the Remote Control.
• Alternatively, press the MENU (
)button to enter the Main Menu screen.
Press the
button and select the Programme (
)icon on the top of the Main Menu
screen.
Using the
button move to Programme Guide from the options displayed.
Press the OK (
)button, then the Programme Guide will be displayed.
2. Searching for programme of interest
In the programme guide, you can search Programmes by channel and time with the
buttons of the Remote Control, and search Programme information for days
other than current day.
When a Programme is selected, press the INFO (
)button to view additional information
about the selected Programme.
23
5. Functions Guide
3. Viewing the programme of interest
Select
buttons on the Remote Control, and press the OK (
)button.
If your desired Programme is a Programme to be broadcast later, the Programme
reservation screen appears.
4. Reserve / Cancel Programme
• To reserve a Programme, select your desired Programme using the
and the OK (
buttons,
)button.
• The Programme reservation screen as well as Programme information will be displayed.
Press the OK (
)button to reserve a Programme. (If your desired Programme is on air,
you watch the Programme by pressing the OK (
)button.)
The
24
shows that the program has been reserved.
• To cancel a reservation, go to the Programme (
) in the Main Menu, move to
“Reserved Programmes” and press the OK (
)button.
Then the “Reserved Programmes” list will be displayed.
Select the Programme to cancel its reservation from the list, and press the OK (
button to cancel the reservation.
The
mark disappears showing that the reservation has been cancelled.
)
5. Quick Search
Press the Fast. Fwd / Rewind button in the Programme Guide screen to display the
banner with Day and Time options. This option allows the user to skip to the Programme list
of some other day or time without having to scroll sequentially e.g to jump from Monday to
Thursday without having to scroll through Tuesday’s & Wednesday’s programmes.
You can move to your desired scheduled day using the
button and desired time using
the
button.
25
5. Functions Guide
5.2 Using Favourite Channel
The Favourite channel function enables subscribers to select and watch Favourite channels
easily by using a single button on the Remote Control, once programmed.
Favourite channel configuration procedures are described below.
1. Select the Programmes (
)icon from the icons on top of the Main Menu screen by
using the
button from the Main Menu. Then select ‘Favourite channels’ from the
detailed items displayed on the screen by using the
button.
2. Select an number *none* from 900 *none* to 919 *none* in the MY FAVOURITES list in
the Favourite Channel configuration screen by using the
button. Move to the
CHOICES list by using the
button.
3. Select your desired channel beside the *none* item using CH-/CH+ (
)button
within CHOICES and press the OK (
)button.
Then the channel is specified as a Favourite channel and is moved to the Favourite
channel list.
26
4. When you have configured a Favourite Channel, you can watch the channel by pressing
the FAV (
)button on the Remote Control or by entering the number channel nember
900 - 919 on the Remote Control.
5. The favourite channels will also appear in the EPG grid, once programmed.
6. While in the favourite channel mode, pressing CH-/CH+ (
user to scroll within the programmed favourite channels.
)button will allow the
Note: To delete a channel from the Favourite channel list, move the (Empty) item that is
at the side of the channel to delete from the channel list using the
button.
Press the OK (
)button. Then the Favourite channel is deleted.
27
5. Functions Guide
5.3 Searching by Programme Types
This function enables subscribers to easily find the channel that displays the desired type of
current Programme by the programme type e.g Movies, Education etc..
1. While turning on the TV, press the MENU (
)button to enter the Main Menu
2. Select the Programmes (
)icon from the icons on the top of the Main Menu.
Select ‘Programme Filter’ from the options displayed on the screen.
3. Move to your desired item from the Programme types displayed using the
buttons and press the OK (
)button.
Then all Programmes of that particular type that are scheduled for the day are
displayed with the channel number and time.
28
4. Select your desired Programme and press the OK (
)button.
The Set-Top Box automatically tunes your TV to the selected programme.
Note: The following types of Programme categories are available.
1. Movies
2. News/Current Affairs
3. Serials/Game Shows
4. Sports
5. Children’s/Youth
6. Music/Ballet/Dance
7. Arts/Culture
8. Social/Political/Economics
9. Education/Science
10. Leisure/Hobbies
11. Special Characteristics
29
5. Functions Guide
5.4 Using Parental Lock Function
This function enables subscribers to control viewing of content for the protection of
children and teenagers based on the rating of the broadcaster content.
Note: This function does not limit individual programmes but limits channels such as
Movies, based on the Programme rating in the original broadcast.
To run the parental lock function, complete the following procedures.
1. While turning on the TV, press the MENU (
)button to enter Main Menu.
2. Select ‘Parental Lock’ from the “Personal Settings” (
Main Menu. The following screen will appear.
30
)icons on the top of the
Press OK and the following screen will appear.
3. Input PIN code and then specify desired rating from the options displayed using the
button, and press OK (
)button.
In the illustration above, all content of the rating U and UA will be locked.
The
symbol indicates that the rating has been selected.
Caution:
• Once the Parental Lock function is configured, all the Channels higher than the
specified grade will be blocked by an interruption screen while watching TV.
If you enter the PIN code at this time, then the interruption screen disappears,
and you can watch the Channel.
Programmes of ratings lower than the specified grade are not affected.
Note:
• Default PIN code is ‘0000’.
You can configure the PIN code by using the ‘Select Key Code’ function in the
‘Personal Settings’ menu.
31
5. Functions Guide
5.5 Other function of EPG
Until now, this manual described frequently used functions in the EPG.
Now this section describes other functions provided by the EPG.
Note:
This is the Main page which lets you access all the features of the Set-Top Box through
the 7 icons at the top. Each icon has a sub-menu.
The function of each icon on the EPG menu are as follows.
1.
Channels
2.
Programmes
3.
Help
4.
B-Mail
5.
Personal Settings
6.
System Settings
7.
Games
Note: If a menu is selected, the icon changes to a golden color.
32
1. Press the
button to select an icon on the top of the screen.
2. The submenu of each selected icon is displayed on the left of the screen.
Press the
button to select this submenu. See detailed map on next page.
3. Press the OK (
)button after selecting the menu that you want.
4. If you want to cancel the selected menu and select another, press the BACK (
)button.
5. Press the HELP (
)button to view brief help information about each function.
6. Press the INFO (
)button to see the Programme information of the current programme
on the small TV screen.
33
5. Functions Guide
1. Channels
Select the channels icon to display the complete channel list.
Select the desired channel by using the
buttons and press OK (
)button.
Then the current Programme of the selected channel is displayed in the small screen.
Press the INFO (
)button to view the Programme information.
To view selected channel in full screen, press OK (
)button once again.
Note: Programme information or Synopsis will be displayed only if it is provided by the
broadcaster.
34
2.
2.Programmes
Programmes
The Programme menu has 5 sub-menus as displayed on the screen below:
• Programme Guide
In this screen you can view the Programme Guide grid for future.
For more information on using this function, refer to the Overview of
Frequently-Used Functions in the previous section.
• Favourite Channels
This function allows you to configure desired Favourite channels.
For more information on using this function, refer to the Overview of
Frequently-Used Functions in the previous section.
• Programme Filter
This function enables subscribers to easily find the channel that displays the desired type
of current Programme by the programme type e.g Movies, Education etc.
For more information on using this function, refer to the Overview of Frequently-Used
Functions in the previous section.
35
5. Functions Guide
• Reserved Programmes
You can reserve a program that is to be broadcast in future using this function.
At that particular day and time, the TV set if ON, will automatically switch to the selected
programme.
For more information on using this function, refer to the Overview of
Frequently-Used Functions in the previous section.
• Radio Channels
If you select a Radio channel, the list of available Radio channels is displayed.
Select your desired channel from the list to listen to quality audio.
3. Help
This icon represents help services.
• Parental Lock Help
• Guide to Movie Ratings
• Audio and Subtitle Help
• Favourite Channel Help
• Contact Information Help
36
4. B-Mail
This function receives various messages and official announcements sent by your service
provider.
When you receive an urgent B-mail, the Envelope (
you are watching as shown below.
)icon will appear on the screen that
Press the MENU (
)button to go to Main Menu.
Using the
button, select the
icon.
Press the OK (
)button.
The message will be displayed on the screen.
Up-to 8 B-mail messages can be stored in the Set-Top Box and when the 9th message
is received, it overwrites the first message.
If no messages have been received, when you access the B-mail icon, the screen
will display “NO MESSAGES’.
The urgent B-mail icon is only displayed if the viewer is viewing full screen video
(Provided ‘Urgent Message Alert’ option is enabled).
37
5. Functions Guide
5. Personal Settings
This function enables the subscriber to configure various EPG functions to one’s personal
requirement. This menu has following sub-menus:
• Parental Lock
This menu allows the subscriber to limit watching of broadcast material classified to
protect children and teenagers.
For more information on using this function, refer to the Overview of
Frequently-Used Functions in the previous section.
• Select Audio 1
• Select Audio 2
These 2 options allow the subscriber to select the audio language of their choice, if the
source programme is available in more than 1 language.
• Select Subtitle Language
You can configure the subtitle language to be displayed on the screen if the source
programme is supporting subtitling. Default configuration is English.
• Account Status
This function will be provided later.
• Pay-Per-View Account
This function will be provided later.
• Pay-Per-View Password
• Select Key Code
This function allows configuration of the PIN code used in the overall EPG.
The default code is ‘0000’.
To configure a new PIN code, you have to input the existing PIN code
Thereafter you will be prompted to enter the new 4 digit numerical pin code
Confirm the new pin code by entering it once again.
The new pin code will now be operational.
Note: In case you forget your pin code, kindly contact your Cable Operator or closest
Area Office.
38
• Set Pay-Per-View Limit
This function will be provided later.
• Banner Duration
This option allows the user to set the duration of display for the 2 banners.
The first screen titled “PROGRAMME BANNER DURATION” sets the display time for the
programme banner from 1 - 60 seconds. Set the time to 0 second if the banner is not to
be displayed. The second screen titled “RESERVED PROGRAMME ALERT TIME”
allows the user to select as to how much in advance the alert for Reserved Programmes
should be displayed. The range is from 1 - 30 minutes.
• Retune Reserved Programme
This option allows automatic switching to reserved Programme when the
Programme is broadcast.
If the ‘Yes’ option is selected and the Set-Top Box is in operation, it will automatically
tune to the reserved programme whenever the programme starts.
If the ‘No’ option is selected, the Set-Top Box will not tune to the reserved programme
and will continue to display current programme.
39
5. Functions Guide
6. System Settings
Caution: This function is for installation personnel only.
Please do not use this function, if you are not familiar with the procedures for
configuration of Set-Top Box environment.
The selected screen consists of the following 5 menus.
Each menu provides the following function.
• Select Your Signal
To check the signal reception status, complete the following procedures.
1. Press the OK (
)button in the System Settings menu.
2. The Channel select screen appears.
Select the appropriate Channel, and press the OK (
)button.
Displays current signal status of the selected Channel by displaying signal
strength, signal quality and BER (Bit Error Rate). If the Set-Top Box is not properly
installed or there is a problem, the values displayed are very low.
40
• Diagonistics
Set-Top Box hardware/software information display.
To view information on the operational environment of the Set-Top Box, complete the
following procedures.
1. Select ‘Diagonistics’ in ‘System Settings’ screen and then press the OK (
)button.
2. A new window appears displaying all information on current status including
Set-Top Box hardware, and software release notes, version, tuning status, etc.
• Urgent Message Alert
This function allows the subscribers to determine whether to display urgent messages
on the screen immediately or not. You can enable or disable this function as follows:
1. Press “Urgent Message Alert” in the “Systems Settings” menu.
Press the OK (
)button.
2. A new window appears allowing you to select ‘Enable’ or ‘Disable’.
If ‘Enable’ is selected, the emergency message is displayed on the screen immediately
on arrival.
If ‘Disable’ is selected, the message icon is not displayed on the screen.
Note: In such a case, the user would not know if a new message has arrived.
To check for messages, the user has to access the B-mail icon.
• Set Up A New Card
This function enables copying the viewing information of the existing card to a new one
when you are replacing Set-Top Box card with a new card.
1. Select ‘Set Up A New Card ‘ option in the ‘Systems Setting’ menu and then press the
OK (
)button.
2. A screen appears asking you to confirm new card installation once again.
Select ‘Yes’ to proceed to the next step, or select ‘No’ to return to System Settings
menu screen.
3. Follow the instructions on the screen.
41
5. Functions Guide
• Advanced Set-up
TV Aspect Ratio Setup
This function allows configuration of the picture ratio for the subscribers TV between 4:3
and 16:9.
1. Move to ‘Advanced Setup’ in the ‘System Settings’ screen and press the OK (
button.
)
2. Select ‘TV Aspect Ratio Setup’ in the ‘Advanced Setup’ screen and then press the
OK (
)button.
3. Configure the TV picture ratio appropriate to the user’s TV either 4:3 or 16:9 by using
the
button and then press the OK (
)button.
Set-Top box RF Output
This function allows selection of the RF output channel of the Set-Top Box.
The default setting is CH E36 (591.25 MHz)
1. Move to ‘Advanced Setup’ in the ‘System Settings’ screen and press the OK (
)
button.
2. Select ‘Set-Top box Output’ in the ‘Advanced Setup’ screen and then press the
OK (
)button.
3. Select the desired UHF Channel from the list displayed and press OK(
)button.
4. The Set-Top Box will now provide its RF output on the chosen UHF Channel.
42
7. Games
Provides various games for user’s entertainment.
Select the game icon to display the game channels.
Select the channel you want using the
button and press the OK (
to start various games.
)button
43
5. Functions Guide
Select a game you want using the
start various games.
44
button and press the OK (
)button to
Precautions
• Copyright(c) 2007 HUMAX Corporation.
• Not to be copied, used or translated in part or whole without HUMAX’s prior consent in
writing except approval of ownership of copyright and copyright law.
• The information in this document is subject to change without notice for enhancement of
the product function.
• This product is designed for home use (indoor installation).
Copyright(c) HUMAX All rights Reserved
is a registered trademark of HUMAX Corporation.
ND-1200C is a registered trademark of HUMAX Corporation.
Hathway is a registered trademark of Hathway Cable & Datacom Pvt. Ltd.
All other product or company names mentioned herein are registered trademarks of their
respective companies.
45
Specifications
HARDWARE SPECIFICATIONS
Power Supply
Input Voltage
Type
Power Consumption
AC 90~250, 50Hz
Switching Mode Power Supply(SMPS)
Max. 8 W
Stand-by: Max. 7 W
Demodulator
Symbol Rate
Constellation
1.5 - 7 Ms/s
16, 32, 64, 128, 256QAM
Tuner
1 Input Connector
1 RF Output Connector (loop through out)
Frequency Range
Input Signal Level
F-Type Female
F-Type Female
47 MHz to 862 MHz
47 to 75 dBuV
Video Decoder
Transport stream
Profile Level
Input Rate
Video Formats
MPEG-2 ISO/IEC 13818
MPEG-2 Main Profile @ Main Level
Max. 15 Mbit/s
4:3, 16:9 Letter box(Default)
Audio Decoder
Audio Decoding
Audio Mode
MPEG/MusiCam Layer I & II
Single / Dual mono / Stereo / Joint stereo
RF-Modulator
RF/Loop-through Output Connector
Output level
Frequency
Output Channel
TV standard
Preset Channel
F -Type Female
72 dBuV
470 MHz to 862 MHz
UHF, CH 21-CH 69
PAL G
Software changeable by Menu (Default is CH 36)
Conditional Access Interface
Smart Card Reader
1 Slot, ISO7816 Compatible
Memory
46
Flash Memory
8 Mbyte
Graphics (MPEG) & System Memory
16 Mbyte
EEPROM
32 Kbytes
Front panel
Slot
Indicators
1 Smart Card
1 LED (2 Colors) : Power On / Standby
Rear panel
Main Power Cable
Cable In
RCA
Cable Out
Fixed type on the body
1 Input, with loop-through
1 Video Output / 2 Audio Output (Left, Right)
1 within Tuner internally
Physical Specification
Size (W x H x D)
Weight(Net)
Operating Temperature
Storage Temperature
Accessories
Remote Control Unit
215 x 41 x 158 mm
0.85 kg
Remote Control, User Manual, 2 Batteries(AAA)
RCA Cable
32 keys
- NUMERIC button(0-9)
- EPG, MUTE, TV, BACK, OK
- POWER, MENU, HELP, FAV
- Up, down, left, right, CH+, CH-, V+, V- Red/Opt+, Green/soundtrack,
- Yellow/subtitle, Blue/Freeze,
SOFTWARE SPECIFICATIONS
Main Features
Condition Access System
Middleware
Basic System
EPG
Subtitle
Audio Language
Parental Control
Software Upgradeable
NDS
NDS core
MPEG-II Digital & fully DVB Compliant.
NDS
Supports EBU and DVB subtitle
Auto language selection of program
with user setting in menu
Yes
Yes
On Screen Display
OSD Languages
Information Banner
Finger printing
English
Yes
Yes
NB: The above specifications are subject to change without prior notice.
47
Memo