1
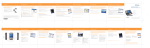
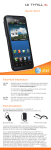
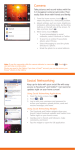
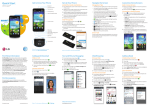
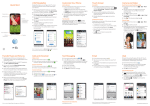
Quickstart
Welcome to AT&T
Please use this Quickstart to get a brief overview of the major features and
services available with your new smartphone.
OR
Use our interactive web tutorial available at:
att.com/Tutorials
for the most complete and up-to-date information available to set up your
device and services. The online tutorials include step-by-step instructions
and screen shots to assist your learning as well as providing an easy search
function.
You can also visit http://www.htc.com/support to view and download the
User Guide for your device.
Your device controls are
shown on this foldout.
Setting up your HTC Aria™
Removing the back cover
Inserting the SIM card
Make sure that your device is turned off before
you remove the back cover or battery.
The SIM card contains your phone number,
service details, and phonebook memory.
1.Hold the device securely.
2.Pull the device’s front panel from the gap
on the top panel.
1.Insert the SIM card with its gold contacts
facing down and its cut-off corner facing
out from the slot.
2. Slide the SIM card completely into the slot.
3.Carefully remove the back cover.
Note: T o reinstall the back cover, insert the
tabs inside the back cover into the holes
on the bottom panel of the phone, and
then press the phone against the back
cover until it clicks into place.
Cut-off corner
Note: To
�����������������������������������
remove the SIM card, remove the
back cover and the battery (if these are
installed), and then push the SIM card
out of the slot using your finger.
You must install the back cover properly
for the phone to function.
Setting up your HTC Aria™ (continued)
Replacing the microSD card
Inserting the battery
Follow these steps if you need to replace the
pre-installed microSD card.
Your device comes with a rechargeable
lithium-ion battery and is designed to use only
manufacturer-specified original batteries and
accessories.
1.Remove the back cover.
2.Press the microSD card to eject it from the
slot.
3.Insert the replacement microSD card into
the slot with its gold contacts facing down.
1.Align the battery’s exposed copper
contacts with the battery connectors inside
the battery compartment.
2.Insert the contact’s side of the battery
first and then gently push the battery into
place.
Contacts
4.Push the microSD card until it clicks into
place.
Note: T o remove the battery, lift it up from
the groove at the top of the battery
compartment.
After you have installed the SIM card and
battery, you can now charge the battery and
use your device.
Charging the battery
Turning on your HTC Aria
Charge the battery before you start using your
device.
Press the power button on the top panel to
turn your device on.
1.Connect the device to the AC adapter
using the USB sync cable.
Power button
2.Plug in the AC adapter to an electrical
outlet to start charging.
Note: U
se only the provided AC adapter and
USB sync cable to charge the device.
When the battery is charging, the Notification
LED lights up in solid amber (when off), and
this icon (
) displays in the status bar of the
Home screen (when on).
When the battery is fully charged, the
Notification LED lights up in solid green (when
off), and the full battery icon (
) displays in
the status bar of the Home screen (when on).
Warning! D
o not remove the battery from the
device while charging.
As a safety precaution, the battery
stops charging before it overheats.
Setting up your HTC Aria™ (continued)
First things first
Unlocking the screen
The first time you turn on your HTC Aria,
you will be directed to select the language,
connect to Wi-Fi (if available), set up your
email and social network accounts, and more.
Press and hold the bar on the lock screen
and then slide your finger down to unlock the
screen.
Follow screen instructions until you see the
Home screen.
When you have an incoming call and the
screen is locked, press and hold the bar and
then slide your finger down to answer the call.
About the Home screen
The Home screen is highly customizable and extends beyond the screen width, giving you lots of
room to add the information that matters most to you with tools or applications that make your
life easier. Apart from the main Home screen, there are six additional screens that extend to the
left and right sides of the display.
What you will find on the Home screen
Notifications
Device status
Weather & Desk Clock
• Tap the time to open the
Desk Clock tab of the
Clock application.
• Tap the weather
information to open the
Weather application.
Tap to open the
application or
perform the related
widget function.
Tap to open the Phone
dialer and make phone
calls.
Tap to add Widgets,
Programs, Shortcuts and
Folders to the Home
screen.
Tap to open the
All programs screen.
Check out the foldout for the
functions of these device controls.
About the Home screen (continued)
Navigating the Home screens
On any Home screen, slide your finger
horizontally across the screen to go to the left
or right home screen.
You can also swipe your finger left or right
over the optical trackball to move to the next
or previous screen.
For quicker access to a Home screen, press
Home����������������������������������
while on the main Home screen to
display a snapshot of all the Home screens, and
then tap a screen snapshot to go directly to
that screen.
Tip: O
n any Home screen, you can “pinch”
the screen with two fingers to display a
snapshot of all the Home screens.
Customizing the Home screen
You can add widgets, shortcuts, and folders to the Home screen. You can also use Scenes to
automatically populate your Home screens with related widgets that give you information as
you go. If you want to further personalize your device, change the Home screen wallpaper with
artwork or a picture that suits your style.
Adding widgets, shortcuts, and folders
Changing the Home screen wallpaper
1.From the Home screen, tap
.
2.Tap a category, and then tap the item that
you want to add to the Home screen.
1.From the Home screen, press Menu, and
then tap Wallpaper.
2.Choose whether to change the Home or
Lock screen wallpaper.
3.Tap Wallpapers (Android or HTC) or
Photos.
4.Tap the wallpaper you want to use, and then
tap Save (if you selected Photos), or
Set wallpaper (if you selected Wallpaper).
If the current screen is full, slide your finger to
place the item on another Home screen.
Tip: Some widgets come in several designs
and layouts that you can choose from.
Did you know?
To remove a Home screen item, press and hold
it and then drag it to the Remove button at
the bottom of the screen.
About the Home screen (continued)
Using Scenes
Your phone becomes multiple phones in one when you use Scenes. Scenes are personalized
Home screen layouts that you can quickly apply to your phone. By switching between Scenes,
you instantly turn your phone into your perfect weekend phone, travel phone, work phone, or
pure play phone.
Choosing a Scene
1.From the Home screen, press Menu, and tap Scenes.
2.Tap a scene, and then tap Done.
Your Home screen may look like this after you have applied a Scene.
Did you know? Y
ou can save your own Scene. After adding items to the Home screen and
changing the wallpaper, press Home > Menu, and then tap Scenes.
Tap Current (unsaved) > Save, and then enter a name for your own Scene.
10
Checking the device status
Before you make a call, check the status bar to see if your device is receiving a wireless signal.
The status bar displays important icons that tell you the current status of your wireless signal,
connection type and signal strength, remaining battery power, as well as any notifications.
Status bar indicators
Notifications panel
Press and hold the status bar and then slide
your finger down the screen to open the
Notifications panel.
GPRS available.
Signal strength.
EDGE available.
No signal.
3G available.
Roaming.
Connected to the
3G network.
No SIM card.
The Notifications panel tells you of new email
or text messages, upcoming appointments,
USB connection status, and more.
Always check to make sure that your device’s
phone function is turned on and that your
device is receiving a signal before placing a
call or using any data service.
Check out the Important icons and indicators
section on the foldout. You can also refer to
the Basics chapter of the User Guide for a list
of status indicators that you may see in the
status bar.
Tap a notification to open the related
application.
To close the Notifications panel, press Back.
11
Making calls and checking your voicemail
Making a phone call
1.On the Home screen, tap Phone to open
the Phone screen.
2.On the Phone screen, tap the desired
phone number using the dial pad.
Tip: If you have contacts on your device,
matching contacts will appear as you
enter phone numbers. You can tap a
matched contact’s photo or name.
3.Tap Call to make the call.
4.To open the in-call options, press Menu
while on a call. To adjust the in-call volume,
press the Volume Control buttons at the
left panel of the device.
5.To end the call, tap End Call.
Did you know? A
T&T 3G allows you to maintain
your data connection when
connected to a voice call.
12
Checking your voicemail
messages
From your device
1.Press and hold the number 1 key.
2.Follow the voice prompts.
From other phones
1.Dial your 10-digit wireless number.
2.Tap the * key when you hear your personal
greeting.
3.Enter your personal password.
4.Follow the voice prompts.
Managing contacts
In People, you can easily manage your communications with contacts via phone, messaging, and
email. You can also view updates on their Facebook, Twitter, and Flickr accounts.
Adding a new contact
1.From the Home screen, tap
> People.
2.Tap Add contact.
3.Select a Contact type to determine which
account the contact will sync with.
4. Do one of the following:
• For Google, Exchange or Phone contact
type, tap the Name field, enter the
contact name, and choose the order in
which to display the names. Tap OK.
• For SIM contact type, tap the Name field,
and then enter the name.
5.Enter the contact
details.
6.Scroll down the
screen, and tap
Save.
Scroll up or down your
contacts list by sliding
your finger on the
screen or swiping your
finger up or down over
the optical trackball.
Adding a new contact from
Call history
1.From the Home screen, tap
> People.
2.Tap
, press and hold the unknown call
entry, and tap Save to contacts.
3.Enter the contact details.
Note Y
ou can also import contacts from your
Exchange ActiveSync account or from
your computer. To learn how, see the
“Accounts and sync” and “Using HTC
Sync” chapters of the User Guide.
13
Linking your social networks
Use Facebook for HTC Sense, Peep, and Friend Stream to rev up your social networks and do all
the things you need to connect with your friends anytime, anywhere.
Logging into Facebook
Linking Facebook contacts
If you’ve chosen not to set up your Facebook
account the first time you turn on the device,
follow these steps to log in and instantly share
your update status with your online friends.
Link your contacts with their Facebook
accounts so you are notified whenever they
update their status, change profiles, and more.
1.From the Home screen, press Menu and
tap Settings > Accounts & sync > Add
account > Facebook for HTC Sense.
2.Enter your log in credentials, and then tap
Sign in.
3.Press Home and tap
> People.
4.Tap your name (or My contact card) >
Facebook.
5.Enter your status on the text box and tap
Share.
1. From the Home screen, tap
> People.
2.Tap the name of the contact (not the icon
or photo) you want to link with his or her
Facebook account.
3.At the upper right corner of the screen, tap
or
(if there are suggested links.)
4.Tap
next to the Facebook account
to link the contact to his or her Facebook
account.
5. Tap Done.
14
Changing your ringtone
Selecting the ringtone
Setting a song as ringtone
1.From the Home screen, press Menu, and
tap Settings.
2.Tap Sound & display > Phone ringtone.
3.Select the ringtone you want to use, and
tap OK.
You can set a song that you saved in the
storage card as the phone ringtone.
1.From the Home screen, tap
> Music.
2.Tap
, slide to the All songs tab and then
tap the song you want to set as ringtone.
3.When the song plays, press Menu, and then
tap Set as ringtone > Phone ringtone.
Tip: Y
ou can use *.wav, *.mid, or *.mp3 that you
downloaded from the Internet or copied
from your computer as ringtones.
15
Sending text messages
Compose and send text (SMS) messages to your contacts. You can view all your exchanged text or
multimedia messages with a contact using the Messages tab of the contact details screen.
Sending a text message
Keeping tab of messages
1.From the Home screen, tap
>
Messages > New message.
2. Specify the message recipients by:
• Entering phone numbers directly in
the To field. When sending to multiple
recipients, separate the phone numbers
with a comma.
As you enter information, any matching
phone numbers from your contacts list
are displayed. Tap a match to enter that
number or address directly.
• Tapping
and selecting the phone
numbers of the contacts to whom you
want to send the message. When you
have selected all the message recipients,
tap Done.
Tip: Y
ou can also select contact groups
as recipients.
3.Tap the “Tap to compose” text box, and
enter your message.
Note: T o quickly enter numbers and special
characters, tap on the onscreen
keyboard.
4.Tap Send.
You can find all text and multimedia messages
you exchanged with a contact in the Messages
tab of the Contact details screen.
1.From the Home screen, tap
> People.
2.Tap a contact, and then tap the Messages
(
) tab.
All messages you exchanged with the
contact is grouped in conversations.
Tap a conversation to view all your
exchanged messages.
3.To reply to the last received message,
tap the “Tap to compose” text box, enter
your reply, and then tap Send.
Please don’t text and drive.
16
Capturing and sharing photos
Use Camera to capture a photo and then share it with your family and friends using multimedia
messaging (MMS) or email, or upload it to your favorite online album.
Capturing a photo
Sharing a photo
1.From the Home screen, tap
>
Camera.
2.Frame your subject on the screen, and then
press the optical trackball to activate auto
focus and capture the photo.
1.From the Home screen, tap
>
Photos > Camera shots.
2.Scroll your finger left or right on the screen
until the photo appears on the center of
the display, and then tap .
3.Tap how you want to send or share the
photo.
All photos you captured are saved on the
storage card. Use Photos to view, send, or
upload your photos.
4.Follow screen instructions to proceed.
17
Enjoying videos
Use Camcorder to record a video, then send it via MMS or email, or upload it to YouTube™ for all
your friends to watch.
Recording a video
Watching a video
1.From the Home screen, tap
>
Camcorder.
2.Frame your subject on the screen, and
then press the optical trackball to start
recording video.
You can play back these video file formats in
Photos: .3gp, .3g2, .mp4, and .wmv (Windows
Media Video 9)
1.From the Home screen, tap
>
Photos > All videos.
2.Tap a video to start playing it on the screen.
3.Tap the onscreen buttons to control the
video playback.
4.Press the Volume Control buttons to adjust
the playback volume.
Sharing a video
3.Press the optical trackball again to stop
recording.
All videos you recorded are saved on the
storage card. Use Photos to play back, send, or
upload your videos.
18
1.From the Home screen, tap
>
Photos > All videos.
2.Scroll your finger left or right on the screen
until the video appears on the center of
the display, and then tap .
3.Tap how you want to send or share the
video.
4.Follow screen instructions to proceed.
Browsing the Web
Access the Web on your device using AT&T as your default home page. The browser is fully
optimized and comes with advanced features that let you enjoy Internet browsing on your device. Opening a Web page
Navigating Web pages
1.���������������������������
From the Home screen, tap
> Internet.
2.Scroll and tap the content you want to
browse.
Use finger gestures to pan on the Web page.
Note: T o add or update the data plan
associated with your device, go to
wireless.att.com/support, call 611 from
your device or call 1-800-331-0500.
3.To visit another website, press Menu and
tap the address bar.
4.Enter the website address (URL) in the
address bar and then tap .
Tap the screen twice to zoom in or out.
You can also “pinch” the screen using two
fingers to zoom in or out.
5.To bookmark the opened Web page,
press Menu, and then tap Add bookmark.
6.Change the name and location (URL) of the
bookmark, if desired, and then tap Done.
19
Sending email
About Mail
Setting up an email account
Use the Mail application to set up these email
accounts on your Android powered device:
1.From the Home screen, tap
> Mail.
2. Do one of the following:
• If this is your first time to add an email
account in Mail, tap Other (POP3/IMAP)
on the Choose a mail provider screen.
• If you have already added an email
account in Mail, tap
on the upper-left
corner, and then tap New account.
3.Enter the Email address and Password for
the email account, and then tap Next.
If the account type you want to set up is
not in the device database, you will be
asked to enter more details.
4.Enter the Account name and Your name
and then tap Finish setup.
5.Your email account Inbox appears.
To refresh you Inbox, press Menu and then
tap Refresh.
•Internet-based (POP3/IMAP) email
accounts Personal email syncs email
directly with your internet service provider
(ISP) like Yahoo!, AOL or Hotmail to your
device. Mail delivers automated setup for
common internet-based email providers.
•Corporate Email Accounts Corporate
email accounts from Microsoft® Exchange
ActiveSync Server are typically managed
by an IT organization. Use Mail to set up
wireless corporate email synchronization on
your HTC Aria so you can send and receive
email using the same email account that
you use at work.
About Gmail
Gmail is Google’s web-based email service.
Gmail is automatically configured when you
have set up your Google Account the first time
you turn on your device. Depending on your
synchronization settings, Gmail on your device
is automatically synchronized with one or
more Gmail accounts on the web.
For more information about setting up and
synchronizing your Gmail account, see the
“Email” and “Accounts and sync” chapters in
the User Guide.
20
Note: C
ontact your IT administrator for
assistance with setting up your Microsoft
Exchange account.
Sending email
1.���������������������������
From the Home screen, tap
> Mail.
2.��������������������
Press Menu and tap Compose.
3.��������
In the To field:
• Enter email addresses directly. If you’re
sending the email to multiple recipients,
separate the email addresses with a
comma. As you enter email addresses,
any matching addresses from your
contacts list are displayed. Tap a match
to enter that address directly.
• Tap the
icon, and then select the
contacts to whom you want to send the
message. You can also select contact
groups as recipients, or add contacts
from the company directory (Exchange
ActiveSync account only). When you
have selected all the message recipients,
tap Done.
Tip: Press Menu and tap Show Cc/Bcc if you
want to send a carbon copy (Cc) or a blind
carbon copy (Bcc) of the email.
4.�������������������������������������������
Enter the email subject, and then compose
your message.
Tip: When composing a long email message,
turn the phone sideways to the left to
display a bigger keyboard for a more
comfortable and accurate text entry.
5.������������������������������������������
To add an attachment, press Menu and tap
Add attachment.
6.�����
Tap Send to send the message immediately
or tap Save as draft if you want to send it
later.
21
Connecting using Bluetooth and Wi-Fi
Bluetooth is a short-range wireless communications technology that allows devices to exchange
information over a distance of about eight meters without requiring a physical connection.
Wi-Fi provides wireless Internet access over distances of up to 100 meters. To use Wi-Fi on your
device, you need access to a wireless access point or “hotspot.”
Connecting a Bluetooth headset
Connecting to a Wi-Fi network
You can listen to music over a Bluetooth stereo
headset or have hands-free conversations using
a compatible Bluetooth hands-free headset.
1.From the Home screen, tap Menu, and tap
Settings > Wireless & networks.
2.Select the Wi-Fi check box.
3.Tap Wi-Fi settings.
4.Tap a Wi-Fi network to connect to. If you
selected an open network, you will be
automatically connected to the network.
1.��������������������������������������������
Turn on the Bluetooth stereo or hands-free
headset that you want to connect with.
Refer to the headset documentation.
2.����������������������������������������
On your device, press Home > Menu, and
then tap Settings > Wireless & networks.
3.������������
Select the Bluetooth check box.
4.�����
Tap Bluetooth settings > Scan for devices.
5.������������������������������������������
Tap the name of the stereo or hands-free
headset in the Bluetooth devices section.
Your device then automatically attempts to
pair with the headset.
6.���������������������������������������
If automatic pairing fails, enter the
passcode supplied with your headset.
When the Bluetooth headset is connected to
your device, the Bluetooth connected icon
displays in the status bar. You can now start
using the headset to listen to music and/or
make and receive phone calls.
22
If you selected a network that is secured
with WEP, enter the key and then tap
Connect.
When your phone is connected to a wireless
network, the Wi-Fi icon
appears in the
status bar and tells you the approximate signal
strength (number of bands that light up).
If Network notification in Wi-Fi settings is
enabled, this icon
appears in the status
bar whenever the phone detects an available
wireless network within range.
Playing music
Copy your music tracks from your computer to your device’s storage card and start playing your
favorite tracks in Music.
Playing music tracks
You can play back these audio file formats in Music: .aac, .amr, .ogg, .m4a, .mid, .mp3, .wav, and
.wma (Windows Media Audio 9)
1.On the Home screen, tap
> Music.
The Now playing screen opens.
2.Swipe your finger right or left to go to the
next or previous music album or track.
3.When the album or track centers on the
screen, tap
to start playback. Use the
onscreen buttons to control playback.
4.Press the Volume Control buttons to adjust
the playback volume.
Note: W
hile playing music, you can return to
the Home screen by pressing the Home
button, and then launching another
application.
To go back to the Music screen, open
the Notifications panel, and then tap the
track that is currently playing.
23
Getting apps from Android Market
Android Market™ is the place to go to find new apps for your device. Choose from a wide variety
of free and paid apps ranging from productivity apps, entertainment, to games. When you find an
app you want, you can easily download and install it on your device.
Finding apps
Installing apps
1.From the Home screen, tap
> Market.
2.When the Terms of Service window
appears, tap Accept to continue.
1.From the Home screen, tap
> Market.
2.Search and then tap the app that you want
to install. Refer to the previous section on
how to find apps in Android Market.
3.In the app details screen, tap Install.
4.The subsequent screen notifies you
whether the app will require access to your
personal information or access to certain
functions or settings of your phone. If you
agree to the conditions, tap OK to begin
downloading and installing the app.
Warning: R
ead it carefully! Be especially
cautious with applications that
have access to many functions or
a significant amount of data. Once
you tap OK on this screen, you are
responsible for the results of using
this item on your phone.
5.After installing an app, tap
on the
upper-left side of the screen to return to
Android Market home. You can also
press Menu, and then tap Home.
3.Do any of the following to find an app:
• Browse through featured apps. Scroll
through the list of featured apps when
you open Android Market.
• Browse apps by categories. First, tap
Apps or Games, and then tap a category.
Under a category, you can filter the apps
by Top free or Just in.
• Tap
on the Android Market screen,
enter the name or type of app you’re
looking for, and then tap
.
24
Frequently used applications
These are some of the applications that you’ll find on your device.
Icon
Description
Calculator: Perform basic and advanced scientific calculations on your device.
Calendar: Create, send, and sync events on your device and on the Web.
Camcorder: Immediately record videos on your device and then share them.
Camera: Capture photos, and then share them via email, messaging, or social networks.
Clock: Keep track of time using the Desk Clock, World Clock, Alarms and more.
Gmail: Send and receive email and sync information with your account on the Web.
IM: Chat with friends using your favorite instant messaging provider.
Internet: Browse the Web for information.
Mail: Send and receive email using your POP3/IMAP or Exchange ActiveSync account.
Maps: Find places, get directions, and check your friends’ locations using Latitude.
Market: Find and install applications and games on your device.
Messages: Send text and multimedia messages to another mobile phone.
People: Add, import and manage all your contacts.
Photos: Browse through and share your photo and video collection.
25
AT&T, the AT&T logo and all other AT&T marks contained herein are trademarks of AT&T
Intellectual Property and/or AT&T affiliated companies. All other marks contained herein are the
property of their respective owners. © 2010 AT&T Intellectual Property. All rights reserved.
HTC Aria June 2010 Quickstart
26
Find more information
On the Web
• Interactive Web tutorials, tips & tricks and FAQs are available at
att.com/Tutorials. Select Manufacturer: HTC and Model: Aria from the drop down
menus.
• Detailed support information including device specifications, user guide,
troubleshooting, user forums and knowledgebase articles are available at
att.com/DeviceSupport.
• For information about your wireless account, service plan or network, visit
att.com/Wireless.
• To view the User Guide for your device, visit http://www.htc.com/support
On the device
Call AT&T Customer Care at 1-800-331-0500 or dial 611 from any AT&T mobile phone
for assistance with your service or device.
Find Accessories
Accessories for your smartphone are available at att.com/WirelessAccessories or visit
your local AT&T store.
91H00795-40M Rev.A
Important icons and indicators
Notification LED
Tells you when the battery is fully charged, low
in power, is being charged, or when you have a
pending notification, such as a missed call.
GPRS available.
3G available
New Gmail message
Connected to AT&T 3G
New Exchange ActiveSync
or POP3/IMAP email
Signal strength
New SMS/MMS
New voicemail
Upcoming event
Song is playing
New tweet
FM Radio in use
Call in progress
Missed call
Call on hold
Call forwarding on
Uploading data
Downloading data
Android Market application
downloaded and installed
No signal
Roaming
Connected via Wi-Fi
Connected via Bluetooth
Airplane mode
Alarm is set
Speakerphone on
Data synchronizing
Vibrate mode
Phone speaker is mute
Battery is very low
Battery is full
Battery is charging
HTC Aria key functions
AUDIO JACK
Connect a 3.5mm
stereo headset here.
POWER
EARPIECE
VOLUME UP
Press to increase
the ringer or media
volume.
VOLUME DOWN
Press to lower the
ringer or media
volume.
MENU
Press to open options
for the current screen.
HOME
Press to return to the
Home screen.
MICROPHONE
TOUCH SCREEN
BACK
Press to return to
the previous screen.
SEARCH
Press to search
information on
the Web or on the
current application.
OPTICAL
TRACKBALL
Swipe your finger
over to navigate on
the screen.
USB CONNECTOR
Connect the USB sync
cable to transfer files or
charge the battery.