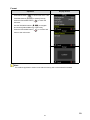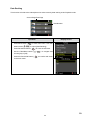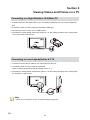
1
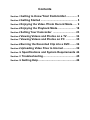
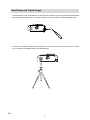
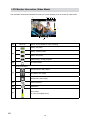
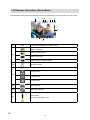
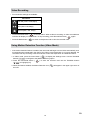
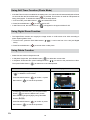
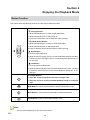
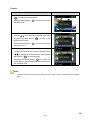
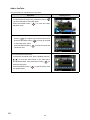
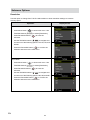
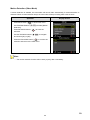
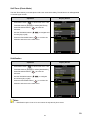
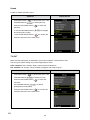
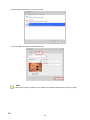
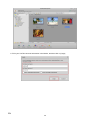
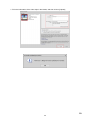
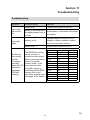
V5020u
Digital Camcorder
User Manual
Contents
Section 1 Getting
to Know Your Camcorder.............. 3
Section 2 Getting
Started................................................. 5
Section 3 Enjoying
the Video /Photo Record Mode....... 9
Section 4 Enjoying
the Playback Mode......................... 18
Section 5 Setting
Your Camcorder ............................... 23
Section 6 Viewing
Videos and Photos on a TV............ 34
Section 7 Viewing
Videos and Photos on PC .................. 35
Section 8 Burning
the Recorded Clip into a DVD........36
Section 9 Uploading
Section 10
Video Files to Internet................39
Specifications and System Requirements.44
Section 11 Troubleshooting............................................ 45
Section 12 Getting
Help..............................................46
Section 1
Getting to Know Your Camcorder
Overview
About this Manual: This manual is designed to assit you in using your new digital camcorder. All
information presented is as accurate as possible but is subject to change without notice.
This camcorder has a 5 megapixel CMOS sensor and can record Full High Definition (HD, 1920 X
1080p) video using H.264 compression. ”H.264 video compression technology helps extend the length
of video that can be recorded. In addition to to recording HD video, this camcorder can also take high
quality photos with up to 8 megapixel resolution. The 2 inch color display is great for composing and
reviewing videos and photos.
Enjoy easy connection and playback or rerecorded videos and photos on many HDMI compatible HDTVs.
Moreover, the camcorder has an advanced uploading feature. With the exclusive bulit-in YouTube Direct
application, you can upload the videos captured by the camcorder to YouTube more effortlessly. ISO can
either be adjusted automatically or allowed to be changed manually. A 10x digital zoom increases you
control over the videos and photos you take.
To fully enjoy the capabilities of this camcorder, it is strongly recommended to use a class 4 or
greater SD/SDHC memory card greater than 2 GB. These memory cards are readily available in
many retails stores.
Note
Some of the built-in memory is used for Firmware code.
Standard Accessories
Unpack the package and make sure all standard accessories listed are included:
•• HP V5020u Digital Camcorder
•• Power Adapter
•• USB Cable
•• AV Cable
•• HDMI Cable
•• Lithium-ion Rechargeable Battery
•• Quick Start Guide
•• CD-ROM (Software and User's Manual)
•• Warranty document
•• Declaration of Conformity
•• Pouch
•• Hand strap
•• Cleaning cloth
3
EN
Front & Rear View
Status LED
Speaker
Lens
Display
Microphone
Tele/Up Button
/Zoom In
Mode Button
Menu Button
Battery Cover
Record/ OK Button
Right Button
Left Button
Delete Button
Wide/Down Button
/Zoom Out
Side View
AV out Port
SD Card Cover
HDMI Port
Strap Hook
Top View and Bottom View
Power Button
Tripod Mount
EN
4
Battery Cover Latch
Section 2
Getting Started
Loading the Battery
Before using the camcorder, you must load the Lithium-ion
rechargeable battery.
1.Slide the latch at the bottom to remove cover.
2.Insert the battery following to the correct polarity marks
( + or -).
3.Replace the battery cover.
Note
• When the battery is absent, the date and time will
be reset.
Charging the Battery
For optimal flexibility, this camcorder can be recharged using the USB port of most PCs/laptops or with
the AC adapter provided in the packaging.
Recharging from a PC/Laptop USB port
1.Be sure the PC or Laptop is powered up before beginning. Connect the camcorder to the PC/Laptop
USB port using the provided USB cable as illustrated below.
2.This should display the [PC Mode] and [Charge Mode]menu on the camcorder LCD. Use the Tele/
Wide buttons (
/
) to highlight [Charge Mode].
3.Press the Record/OK button (
) to select the option. Shortly after, the camcorder will display a
charging battery icon on the LCD. The LCD will turn off after 3 seconds.
4.Please allow 5 to 9 hours for a full charge. After charging, disconnect the camcorder from the USB
cable for normal use.
Press OK Key
5
EN
Recharging from the AC Adapter
1.Connect the provided USB cable to the AC adapter and camcorder as illustrated below.
2.Plug the AC adapter into an appropriate AC power source such as a wall outlet or AC power strip.
3.When powered on camcorder with power adaptor charging, the battery is in normal charging mode,
the charging time is about 5 hours.
4.When powered off camcorder with power adapter charging, the battery is in express charging mode,
the charging time is about 3 hours.
EN
6
Safely Remove from Computer (PC)
Note
• To avoid potential loss of recorded video, please follow the procedure below before disconnecting
the camcorder from the PC or Laptop.
The following procedure documents how to safely disconnect USB devices such as this camcorder
from a Windows XP environment. For other versions of Windows, icons screen graphics, and procedure
details will vary.
1.With the camcorder already connected, double-click the “Safely Remove Hardware icon (
on the lower right of the screen in the task bar
) located
.
2.From the “Safely Remove Hardware” window (shown as below, select “USB Mass Storage Device”
and click the “Stop” button. The “Stop a Hardware Device” window will pop up. Click “OK”. When the
“Safe to Remove Hardware” window is displayed, you may remove the unit from the USB cable or
remove the USB cable from the computer.
Note
• If the “Safely Remove Hardware” icon is not displayed on the tasktray, please double click on
[My Computer]. Right click on [HP V5020u] and left click on [Eject]. Then it is safe to remove
the unit from the computer.
Turning the Camcorder On/Off and Getting Started
• To turn on the camcorder: Press Power button (
) to turn it on.
• To turn off the camcorder: Press and hold the Power button (
) for one second.
• To record video: In Vidoe mode, press Record/OK button (
) to begin recording videos. Press
Record/ OK button (
) again to stop.
• To record photo: Press Mode button (
(
) to switch to Photo mode, press Record/OK button
) to take photos.
• To view stored videos/photos: Press Mode button (
) to switch to Playback mode. Press Left/Right
buttons ( / ) to switch selection of videos and photos. Press Record/OK button (
) to enlarge
view of the selected video or photo
Note
• To conserve battery power, the camcorder will automatically turn off when idle for three minutes.
Adjustments to this feature can be made in the Settings menu.
7
EN
Hand Strap and Tripod Usage
• To help reduce the risk of damaging the camcorder due to dropping, it is highly recommended that the
strap is attached before initial use. Simply attach the strap to the strap hook as illustrated below.
• To reduce the effects of shaking and image blur, the use of a tripod may be a great solution. Attach
the camcorder to a standard tripod as illustrated below:
EN
8
Section 3
Enjoying the Video /Photo Record Mode
Button Function
Power Button: Press to turn on the camcorder. Press and hold for one
second to turn off the camcorder.
Direction Button
(
) Tele (Up) Buttons: Digital Zoom In.
(
) Wide (Down) Button: Digital Zoom Out.
(
) Right Button: Go to the next scene options.
(
) Left Button: Go to the previous scene options.
Record/ OK Button: Press to start/stop video recording.
Mode Button:
In Preview mode, press to switch to Video, Photo,and Playback mode.
Menu Button: Press to set up Resolution, Motion Detection/ISO, Audio
Volume/Self-Timer, Stabilization, Sound, TV Out, LCD Brightness,
Language, Date &Time, Default settings , Format, Auto Power Off and Date
Ranking.
Note
• There is LED backlighting for all control panel buttons for the exception of the delete button.
9
EN
LCD Monitor Information (Video Mode)
The indicators shown below illustrate the OSD (On Screen Display) icons on screen in Video mode.
65 4 3
1
2
7
8
(1)
00:30:15
Remain time available for video recording
Battery: full power
Battery: medium power
(2)
Battery: low power
Battery Empty: Charge required
(3)
SD card inserted
Video Resolution
Full HD (1920 x 1080, 30fps)
(4)
HD (1280 x 720, 60fps)
WVGA (848 x 480, 30fps)
(5)
Motion Detection
(6)
Stabilization
(7)
EN
Zoom meter:
1X~10X (10X Digital zoom)
10
Current Scene
Auto
B/W
Classic
(8)
Negative
Skin
Night
Backlight
11
EN
LCD Monitor Information (Photo Mode)
The indicators shown below illustrate the OSD (On Screen Display) icons on screen in Photo mode.
1
6 5
4 3
2
7
8
(1)
1030
Remain shots available for photo capture
Battery: full power
Battery: medium power
(2)
Battery: low power
Battery Empty: Charge required
(3)
SD card inserted
Photo Resolution
8 mega pixels
(4)
5 mega pixels
3 mega pixels
(5)
ISO sensitivity
(6)
Self-Timer indicator
(7)
EN
Zoom meter:
1X~10X (10X Digital zoom)
12
Current Scene
Auto
B/W
Classic
(8)
Negative
Skin
Night
Backlight
13
EN
Status LED behavior
1.When recharging the battery, the LED with flash until fully charged.
2.When the battery is out of power, the LED will flash 3 times per second until the camcorder powers
down.
3.During video recording, the LED will be illuminated until the recording is stopped.
4.When using the self-timer feature, the LED with flash before the photo begins taking.
Status LED
Photo Recording
• Three resolution settings are available:
Resolution
8 mega pixels
5 mega pixels
3 mega pixels
• Press Record/OK button (
• Press Mode button (
EN
) to take photos.
) to switch to Playback mode to view the recorded photo.
14
Video Recording
• Four resolution settings are available:
Resolution
Full HD (1920 x 1080,30fps)
HD (1280 x 720,60fps)
WVGA (848 x 480, 30fps)
) to record videos. When a video is recording, an video recorded time
• Press Record/OK button (
indicator will display on LCD monitor. To stop recording, press Record/OK button (
) again.
• Press the Mode button (
) to switch to Playback mode to view the recorded video.
Using Motion Detection Function (Video Mode)
• If the motion detection feature is enabled, the camcorder will begin to record video automatically once
movement/motion is detected in the field of view. When movement/motion is no longer detected, the
camcorder will stop recording a few seconds later. Follow the steps below to enable this feature.
1.In Video mode, press the menu button (
buttons (
/
) to display the Settings menu. Use the Tele/Wide
) to navigate to the [Motion Detection] option.
2.Press the Record/OK button (
(
/
) to enter the submenu and use the Tele/Wide buttons
) to highlight [On].
3.When this feature enabled, the Motion Detection icon (
the LCD.
15
) will appear in the upper right corner of
EN
Using Self-Timer Function (Photo Mode)
• If the Self-Timer function is enabled in the setting menu, the camcorder will automatically take a Photo
10 seconds after the Record/OK button (
) is pressed. This function is useful for self-portraits of
family photographs. To enable this feature, follow the steps below:
1.In Photo mode, press Menu button (
2.Press Record/OK button (
) and select Self-Timer.
) to choose ON or OFF.
• In Self-Timer mode, the Self-Timer icon (
) will appear in the upper middle of LCD.
Using Digital Zoom Function
• The Digital Zoom function can magnify the image shown on LCD screen to be video recording or
photo capturing field of view.
1.To zoom in/out, press the Tele/ Wide buttons (
zoom).
2.Press Record/OK button (
/
). It can be set from 1X to 10X (10X Digital
) to record video or take photo.
Using Delete Function
• Delete function works in Playback mode.
• In Playback Single view, press Delete button (
) to delete the current video.
• In Playback Thumbnail view, press Left/Right buttons (
Then press Delete button (
Display Screen
1.In Playback Single view, you can press Delete button
) to delete the current video.
2.Press Record/OK button (
Menu button (
) to confirm, or press
) to cancel the operation.
1.In Playback Thumbnail view, you can press Delete
button (
) to enter the Delete menu screen.
2.Move between [One] and [All] by using Tele/Wide
buttons ( /
).
3.Press Record/OK button (
Menu button (
EN
) to switch to the previous/next video.
) to delete one or all videos/photos.
Operation
(
/
) to confirm or press
) to cancel the operation.
16
Scence Options
From Live Preview mode, use the Left/Right buttons (
mode.
/
) to navigate and select the desired scene
• Auto: Record with digital camcorder default settings.
• Skin: Use to record with an effect to soften skin tone and texture.
• Night: Use for night scenes or low light conditions.
• Backlight: Take shots or record video when bright light is behind the subject.
• B/W: Video is recorded in black-and-white.
• Classic: Video is recorded in a sepia color palette to give the look of a classic film.
• Negative: Video is recorded with a “Film Negative” effect.
17
EN
Section 4
Enjoying the Playback Mode
Button Function
The buttons have the following functions in Video /Photo Playback modes.
Direction Buttons
(
) Tele (Up) Button:
1.While Date Ranking on, to switch to later date folder.
2.While Date Ranking off, to select page up.
3.Press to increase audio volume while the video is playing.
(
) Wide (Down) Button:
1.While Date Ranking on, to switch to earlier date folder.
2.While Date Ranking off, to select page down.
3.Press to decrease audio volume while the video is playing.
(
) Right Button:
1.Go to the next video/photo.
2.While the video is playing, press to increase playback speed of the video.
Continue to press the Right button to increase playback speeds (2x, 4x,
8x, and 16x).
(
) Left Button:
1.Go to the previous video/photo.
2.While the video is playing, press to reverse playback of the video. Continue
to press the Left button to increase reverse playback speeds (2x, 4x, 8x,
and 16x).
Record/OK Button:
1.Video file: Press to play/pause the video in Single view.
2.Photo file: Press to view the selected thumbnail image in Thumbnail
view.
Mode Button: Press to switch between Video/Photo/Playback mode.
Menu Button: Press to select Protect/Add to Youtube video/photo.
Delete Button: Press to enter Delete options menu.
Note
• There is LED backlighting for all control panel buttons.
EN
18
LCD Monitor Information
The indicators shown below illustrate the OSD (On Screen Display) icons on screen in Playback
Mode.
4 3
1
2
5
6
8
(1)
00:01:28
Current video time
00:03:10
Total video time
7
Fully charged
Partially charge
(2)
Low power
Battery Empty: Charge required
(3)
SD Card inserted
Video Resolution
Full HD (1920 x 1080, 30fps)
HD (1280 x 720, 60fps)
WVGA (848 x 480, 30fps)
(4)
Photo Resolution
8 mega pixels
5 mega pixels
3 mega pixels
(5)
(6)
Audio volume adjustment
/
Fast forwarrd play /Fast rewind play
(7)
Play / Pause
(8)
Stop
19
EN
Operations for Playback Mode
• Press Mode button (
) to switch to Playback mode.
• Press Tele/Wide buttons ( /
View while date ranking off.
) to page up / page down in Thumbnail view, to zoom in/out in Single
• While in Thumbnail view, press Left/Right buttons (
• Press Record/ OK button (
• Press Delete button (
• Press Menu button (
/
) to view the previous/next video/photo.
) to enlarge the selected thumbnail video / photo to be single view
) to delete the current video/photo in Playback Single view.
) to select Protect/Add to YouTube video/photo.
Video Play
• In Playback Single view of video, to press Record/OK button (
• Press Mode button (
) to play/pause video playing.
) to stop video playing.
• When a video is playing, press the Left button ( ) to reverse playback. Press the Right button ( )
to increase playback speed. Playback speeds are 2x, 4x, 8x,16x, and increase by each press of the
Left or Right buttons.
• Use Tele/Wide buttons (
/
) to adjust volume.
Photo Play
• When in Playback Thumbnail view, press Left/Right buttons ( / ) to select the desired photo, and
press Record/OK button (
) to enlarge the photo that you want to view.
• Press Menu button (
• Press Delete button (
• Press Mode button (
EN
) to select [Protect] option.
) to delete the current photo.
) to switch between Video / Photo mode.
20
Protect
Operation
Display Screen
1. In Video Playback Single view, press Menu button (
) to select the [Protect] option.
2. Press Record/OK button (
) to mark and return the
Playback mode.
1. In Playback Thumbnail view, press the Left/Right
buttons (
/
) to navigate to the desired video frame
and press the Menu button (
) to bring up the
[Protect] menu option.
2. Press Record/OK button (
) to mark and return the
Thumbnail view.
To unlock a protected file
1. In Playback Thumbnail view, use the Left/Right buttons
(
/
) to navigate to the desired frame, then press the
Menu button (
) to select [Unlock].
2. Press the Record/OK button (
) to confirm the
unlock status of the selected video/photo and return to
the Thumbnail view.
Note
• The Menu button can be pressed to enter the option menu in both Thumbnail view and Single
view.
21
EN
Add to YouTube
Only video files can uploaded to the YouTube.
Operation
Display Screen
1.In Video Playback Single view, press Menu button (
) to select the [Add to YouTube] option.
2.Press Record/OK button (
) to mark and return
Playback mode.
1. In Playback Thumbnail view, press the Left/Right
buttons (
/
) to navigate to the desired video frame
and press the Menu button (
) to bring up the [Add
to YouTube] menu option.
2. Press Record/OK button (
) to mark and return the
Thumbnail view.
To not upload the marked video
1.In Playback Thumbnail view, press Left/Right buttons (
/
) to move the select frame on the video set to
be uploaded before, then press Menu button (
) to
select [Undo] option.
2.Press Record/OK button (
) to set the select video
not upload status.
EN
22
Section 5
Setting Your Camcorder
Options in Menu
Operation
Display Screen
1.In Video/Photo mode, press the Menu button (
up the Settings menu.
2.Press Menu button (
) to bring
) to back to Video/Photo mode.
3.Use the Tele/Wide buttons (
menu options.
/
4.Press Record/OK button (
) to navigate through the
) to enter submenu options.
5.Press Tele/Wide buttons (
/
) to select the setting
) to validate.
options, then press Record/OK button (
6.From the Menu screen, you can press Menu button (
) to
return Video/Photo mode at any time.
Options (Video / Photo Mode)
Settings Menu
Default Settings
• Resolution
• Full HD/8M
• Motion Detection/ISO
• Off/Auto
• Audio Volume/Self-Timer
• 03/Off
• Stabilization
• On
• Sound
• Off
• TV Out
• NTSC
• LCD Brightness
• 03
• Default Setting
• ---
• Format
• ---
• Language
• English
• Time & Date
• ----
• Auto Power Off
• On
• Date Ranking
• On
23
EN
Submenu Options
Resolution
Use this option to change from Full HD / 8M resolution to lower resolution settings to conserve
memory space.
Operation
Display Screen
Video Mode:
1. Press Menu button (
Tele/Wide buttons (
) to enter main menu. Use
/
) to select [Resolution].
2. Press Record/OK button (
) to enter the
submenu.
3. Use the Tele/Wide buttons (
/
) to navigate and
choose one of the following options: Full HD, HD, and
WVGA.
4. Press the Record/OK button (
) to confirm the
selection and return to the main menu.
Photo Mode:
) to enter main menu. Use
1. Press Menu button (
Tele/Wide buttons (
/
) to select [Resolution].
2. Press Record/OK button (
) to enter the
submenu.
3. Use the Tele/Wide buttons (
/
) to navigate and
choose one of the following options: 8M, 5M, and 3M.
4. Press the Record/OK button (
) to confirm the
selection and return to the main menu.
EN
24
Motion Detection (Video Mode)
If motion detection is enabled, this camcorder will record video automatically if movement/motion is
detected. When movement/motion stops, the camcorder will stop recording after a few seconds.
Operation
1. Press Menu button (
Use Tele/Wide Buttons (
Detection].
Display Screen
) to enter main menu.
/
) to select [Motion
2. Press Record/OK button (
) to enter the
submenu.
3. Use the Tele/Wide buttons (
/
) to navigate
and choose [On] or [Off].
4. Press the Record/OK button (
) to confirm the
selection and return to the main menu.
Note
• The motion detection function will not work properly with a low battery.
25
EN
ISO (Photo Mode)
The camcorder allows the user to adjust ISO sensitivity when in Photo mode, there are 3 options in
submenu:
• Auto: The camera automaticeally adjust ISO sensitivity
• ISO 800
• ISO 1600
Operation
1. Press Menu button (
Tele/Wide buttons (
Display Screen
) to enter main menu. Use
/
) to select [ISO].
2. Press Record/OK button (
) to enter the
submenu.
3. Use the Tele/Wide buttons (
/
) to navigate
and choose one of the following options: 8M, 5M,
and 3M.
4. Press the Record/OK button (
) to confirm the
selection and return to the main menu.
Audio Volume (Video Mode)
Operation
1. Press Menu button (
Use Tele/Wide buttons (
Volume].
Display Screen
) to enter main menu.
/
2. Press Record/OK button (
) to select [Audio
) to enter the
submenu.
3. Adjust the volume of audio by using Left/Right
Buttons ( / ).
4. Press the Record/OK button (
) to confirm the
change and return to the main menu.
EN
26
Self-Timer (Photo Mode)
The Self-Timer allows you to take photos with a ten-second time delay. The self-timer icon will appeatred
on the left-upper screen.
Operation
1. Press Menu button (
Tele/Wide buttons (
Display Screen
) to enter main menu. Use
/
) to select [Self-Timer].
2. Press Record/OK button (
) to enter the
submenu.
3. Use the Tele/Wide buttons (
/
) to navigate and
choose [On] or [Off].
4. Press the Record/OK button (
) to confirm the
selection and return to the main menu.
Stabilization
Operation
1. Press Menu button (
Tele/Wide buttons (
Display Screen
) to enter main menu. Use
/
) to select [Stabilization].
2. Press Record/OK button (
) to enter the
submenu.
3. Use the Tele/Wide buttons (
/
) to navigate
and choose [On] or [Off].
4. Press the Record/OK button (
) to confirm the
selection and return to the main menu.
Note
• Stabilization option is set to On and cannot be adjusted in photo mode.
27
EN
Sound
Enable or disable operation sound.
Operation
1. Press Menu button (
Tele/Wide buttons (
Display Screen
) to enter main menu. Use
/
) to select [Sound].
2. Press the Record/OK button (
) to enter the
submenu.
3. 3. Use the Tele/Wide buttons (
/
) to navigate
and choose [On] or [Off].
4. Press the Record/OK button (
) to confirm the
selection and return to the main menu.
TV OUT
Make sure the appropriate TV standard of your area is selected – either NTSC or PAL.
The wrong TV system setting may cause image/video to flicker.
NTSC standard: USA, Canada, Japan, South Korea and Taiwan etc.
PAL standard: UK, Europe, China, Australia, Singapore and Hong Kong etc.
Operation
1. Press Menu button (
Tele/Wide buttons (
Display Screen
) to enter main menu. Use
/
) to select [TV Out].
2. Press the Record/OK button (
) to enter the
submenu.
3. Use Tele/Wide buttons (
/
NTSC(60Hz) or PAL(50Hz).
) to choose
4. Press the Record/OK button (
) to confirm the
selection and return to the main menu.
EN
28
LCD Brightness
Operation
1. Press Menu button (
Display Screen
) to enter main menu.
Use Tele/Wide Buttons (
Brightness].
/
) to select [LCD
2. Press the Record/OK button (
) to enter the
submenu.
3. Adjust the LCD Brightness by using Left/Right
buttons ( / ).
4. Press the Record/OK button (
) to confirm the
changes and return to the main menu.
Language
Use this option to select the prefered of user interface language
Operation
1. Press Menu button (
Tele/Wide buttons (
Display Screen
) to enter main menu. Use
/
) to select [Language].
2. Press Record/OK button (
) to enter the
submenu.
3. Use Tele/Wide buttons (
/
) to choose the
language options.
4. Press the Record/OK button (
) to confirm the
selection and return to the main menu.
29
EN
Date & Time
Operation
1. Press Menu button (
Tele/Wide buttons (
Display Screen
) to enter main menu. Use
/
) to select [Date & Time].
2. Press the Record/OK button (
) to enter the
submenu.
3. Move between date or time items by using Left/Right
buttons ( / ). Adjust the date or time by using
Tele/Wide buttons (
/
).
4. 4. Press the Record/OK button (
) to confirm the
changes and return to the main menu.
Note
Please note the AM/PM setting to ensure accurate time setting.
Default Setting
This option will return the camcorder to the original factory settings.
Operation
1. Press Menu button (
Use Tele/Wide buttons (
Setting].
Display Screen
) to enter main menu.
/
2. Press Record/OK button (
) to select [Default
) to choose default
settings.
3. Press the Record/OK button (
) to confirm and
return to the main menu.
EN
30
Format
Operation
1. Press Menu button (
Tele/Wide buttons (
Display Screen
) to enter main menu. Use
/
) to select [Format].
2. Press the Record/OK button (
) to enter the
submenu.
3. Use the Tele/Wide buttons (
/
) to navigate
and choose [Internal Memory] or [SD card].
4. Press the Record/OK button (
) to confirm and
return to the main menu.
Note
The software application saved on the internal memory will not be erased if formatted.
31
EN
Auto Power Off
By default, the Auto Power feature is enabled (On). This will allow the camcorder to automatically
power down after 3 minutes or inactivity to preserve battery power.
Operation
1. Press Menu button (
Wide buttons (
/
Display Screen
) to enter main menu. Use Tele/
) to select [Auto Power Off].
2. Press Record/OK button (
3. Use the Tele/Wide buttons (
) to enter the submenu.
/
) to navigate and
choose [On] or [Off].
4. Press the Record/OK button (
) to confirm and return
to the main menu.
EN
32
Date Ranking
This function will collect the videos/photos into a document by date ranking under Playback mode.
Current Page/Total Page
Total Number
Operation
1. Press Menu button (
Wide buttons (
/
Display Screen
) to enter main menu. Use Tele/
) to select [Date Ranking].
2. Press Record/OK button (
3. Use the Tele/Wide buttons (
) to enter the submenu.
/
) to navigate and
choose [On] or [Off].
4. Press the Record/OK button (
) to confirm and return
to the main menu.
33
EN
Section 6
Viewing Videos and Photos on a TV
Connecting to a High-Definition 16:9(Wide) TV
111Connect one end of the HDMI cable to your camcorder’s HDMI Out port or the dock’s HDMI Out
port.
222Connect the other end of the cable to a television’s HDMI port.
333Set video input source of the TV to “ HDMI” option.
444The steps for viewing stored photos and videos on a TV are exactly the same as for viewing them
on the camcorder’s LCD monitor.
(16:9)
Connecting to a non-high-definition 4:3 TV
111Connect one end of the AV cable to your camcorder’s AV Out port.
222Connect the other end of the cable to a television.
Video In (Yellow) and Audio In (White) marked “mono” or “L”.
333The steps for viewing stored pictures and video on a TV are exactly the same as for viewing them
on camcorder’s LCD monitor.
(4:3)
Note
•• Make sure to select the correct TV system setting as page 28.
EN
34
Section 7
Viewing Videos and Photos on PC
Video and Photo Editing Software
TM
ArcSoft MediaImpression editing software is bundled in the supplied CD. To transfer images to the
computer, the software must be installed upon first use when connecting this camcorder to your PC
through USB port.
TM
•• ArcSoft MediaImpression is a user-friendly application that helps you manage your media, burn
TM
your video to CD/DVD, and upload your videos easily to YouTube .
Note
•• More detailed Instructions and Help menu for the editing software can be found within the
program once installation is complete. Click on the “Extra” button on the title bar and select
TM
“Help” to open the ArcSoft instruction manual.
TM
•• For more information about the ArcSoft
MediaImpression2 software. Please visit the web
site http://mediaimpression.arcsoft.com for more information. All other trademarks are the
property of their respective owners.
To install the bundled software:
111Connect this camcorder to your PC through USB port.
222Click “Install Application Software”. Follow the on-screen instructions to complete the installation.
35
EN
Section 8
Burning the Recorded Clip into a DVD
The bundled software, ArcSoft MediaImpression, can be used to burn movie clips onto a DVD. You
can share this DVD movie with your family or friends by using a regular DVD player.
To create a DVD:
111Install ArcSoft MediaImpression (Refer to Section 7).
222Click on Windows [ Start ] g[ (All) Programs ] g[ ArcSoft MediaImpression 2 ].
333The ArcSoft MediaImpression main screen will appear on your desktop.
444Click on [ Videos ] . (Or you can click on [Make Movie] to skip step 5.)
EN
36
555The operation screen will appear:
•• Select the folder that contains the video files you want to burn.
•• Select the files in the display area.
•• Click on [Make Movie] at the bottom menu.
666Click on [Add Media] (
) to add the files into slide.
777Click on [Save/Share].
37
EN
888Select [ Burn ] and click on [ Next ] to proceed.
999Click on [ Start ] to start the VCD/DVD burning.
Note
Please insert a blank, writable VCD or DVD into the CD/DVD Writer before clicking on [Start].
EN
38
Section 9
Uploading Video Files to Internet
The built-in Internet Direct application offers you an easy way to upload your video clips to Internet
instantly. It helps you share them with your family and friends on the website. Also, the bundled
software, ArcSoft MediaImpression, can be used to upload your video clips to Internet.
9.1 Internet Direct
To upload video files marked with
to Internet:
111 Select the video clips in Playback Mode.
222 Connect the camcorder and computer with the supplied USB cable.
333After making a USB connection, the AutoPlay window will appear. (It may be different based on
OS recognition. If the AutoPlay window does not appear. Please click [My Computer]-->[DVAP]->[DVAP.exe] to execute the application.)
Note
If ArcSoft MediaImperssion is not installed, you may be asked to install the H.264 Codec (ffdshow)
for viewing the videos on the Internet Direct correctly .
444The main screen appears automatically on the desktop.
555 Upload video clips:
111 Press [Upload DV-selected files] Button
.
222 The videos clips marked with
will be uploaded to the website automatically. (You may be
asked to fill in your account information before uploading or you can fill in the information firstly
by click on
)
333 Click on [ CANCEL] to stop uploading.
39
EN
To upload video files selected manually to Internet:
111 Follow the step 2 and 3 on previous page.
222 On the thumbnail screen, click on the up/down icon to change the pages. Click on the video clips
you want to upload.
333 Click on [ UPLOAD] to start uploading.
To playback the video file:
111 Double click on the video clip on the thumbnail screen.
222 Click on the Play/Pause icon
thumbnail preview screen.
EN
to play/pause. Click on the Return icon
40
to return to the
To setup your account information for the website:
1. Click on
to go to the setup screen.
2. Fill in your account information in the blanks. Then click on “Save”.
9.2 ArcSoft MediaImpression
To upload video files to YouTube:
111Install ArcSoft MediaImpression (Refer to Section 7).
222Click on Windows [ Start ] g[ (All) Programs ] g[ ArcSoft MediaImpression 2 ].
333The ArcSoft MediaImpression main screen will appear on your desktop.
444Click on [ Videos ] .
555The operation screen will appear:
•• Select the folder that contains the video files you want to upload.
•• Select the files in the display area.
•• Click on [Upload to YouTube] at the bottom menu.
41
EN
666Fill in your YouTube account information in the blanks, and then click on [Login]
EN
42
777Fill in the information of the video clips in the blanks, and then click on [Upload]
43
EN
Section 10
Specifications and System Requirements
Specification
Image sensor
CMOS sensor
Lens
Focus range
Zoom
LCD monitor
Storage media
Fixed Lens (f=4.76mm; F2.8 )
1m~ infinite
1X~10X (10X Digital)
2.0”LCD (measured diagonally)
Built-in128MB memory (96MB of memory is used for system firmware
code)
8M pixels: 3264 x 2448 (interpolated)
Image resolution
5M pixels : 2560 x 1920
Video resolution
3M pixels : 2048 x 1536
FULL HD(1080p) 1920X1080(30fps)
HD (720p) 1280 X 720 (60fps)
Power Source
Battery Recording Time
File format
Speaker
PC interface
HDMI
TV out
Battery
Dimension
Weight
WVGA 848X480(30fps)
Power Source USB/Adapter Power
About 2 hours
Video: .AVI (H.264)
Mono
USB 2.0 mini port
HDMI 1.2
NTSC/PAL selectable, HDMI
Lithium-ion rechargeable battery (BL 5C)
100x51.5x17.5mm
93g (with battery)
System requirements
•
•
•
•
•
•
•
Microsoft Windows XP/Vista/7
Intel Pentium 4 2.4 GHz or above
512 MB RAM
CD-ROM Drive
1 GB free HDD space
Available USB port
16-bit Color Display
Note
The LCD monitor is manufactured using extremely high-precision technology, so over 99.99% of
the pixels are operational for effective use. However, some tiny black and/or bright dots (white,
red, blue or green) may appear on the LCD screen. These dots are a normal result of the
manufacturing process, and do not affect the recording.
EN
44
Section 11
Troubleshooting
Troubleshooting
Symptom
Camcorder
will not turn
on.
Can’t take
video
Possible Cause
Solution
Power is off.
Press Power Button to turn on.
Battery is not installed or
the battery power level is
too low.
Load battery in camcorder and charge
the battery.
Memory is full.
Upload Videos or Photos to a PC/
Laptop, or delete unwanted content
from the camcorder memory.
Power is off.
Press Power Button to turn on.
The SD/SDHC memory
The files on
card is too slow or
the memory
contains invalid content.
card do
Please use performance
not display
Class 4 or greater
smoothly
memory cards. If the
when the LCD issue continues due
shows the “
to invalid content, try
Unsupport
formatting the CD/SDHC
SD Card”
memory card in the
marking.
camcorder settings menu
(see page 30 for details).
45
Rating
Speed (MB/s)
SD Class
6x
0.9
n/a
10x
1.5
n/a
13x
2.0
2
26x
4.0
4
32x
4.8
4
40x
6.0
6
66x
10.0
6
100x
15.0
6
133x
20.0
6
150x
22.5
6
200x
30.0
6
266x
40.0
6
300x
45.0
6
EN
Section 12
Getting Help
Should your HP Branded Product require service within the warranty period, please contact
the original point of purchase or an authorized HP reseller in your country. If service is not
available at those locations, please contact an HP Branded Product warranty agent from the
support contact list provided on this document. Supported languages are: English, French,
German, Italian, Portuguese and Spanish. A warranty agent will work with you to troubleshoot
your issue and if necessary, issue a Return Material Authorization (RMA) number in order
to replace your HP Branded Product. For warranty claims, you will be required to provide a
copy of your original dated sales receipt as proof of purchase and the issued RMA number.
End User customer shall be responsible for shipping charges when shipping the product to
the service center. The service agent will provide you with an address and you will also be
responsible for any shipping charges to the warranty service center. Once your product is
received by this service center, a replacement unit will be shipped back to you typically in 5
business days.
Contact/phone Support:
Language
Contact/phone Support:
[email protected]
繁體中文
[email protected]
EN
Deutsch
[email protected]
Nederlands
[email protected]
English
[email protected]
Español
[email protected]
Français
[email protected]
Italiano
[email protected]
日本語
[email protected]
한국어
[email protected]
Português
[email protected]
Svenska
[email protected]
46
Contact/Phone Support:
Country
Language
Number
Europe Region (EMEA)
België
Nederlandsk/ Deutsch
+ 32 2700 1724
Deutschland
Deutsch
+ 49 6950073896
España
Español
+ 34 914533458
France
Français
+ 33 171230454
Ireland
English
+ 353 1850882016
Italia
Italiano
+ 39 269682189
Nederland
Nederlandsk
+ 31 202015093
Schweiz
German/ Français/ Italiano
+ 41 18009686
UK
English
+ 44 2073652400
United States
English
+ 1-866-694-7633
Canada
English & Français
+ 1-866-694-7633
Country
Language
City
Number
Mexico City
52.55.1204.8185
Guadalajara
52.33.1031.3872
Monterrey
52.81.1107.2639
North America
México
Español
Venezuela
Español
Caracas
58.212.335.4574
Colombia
Español
Bogota
57.1.508.2325
Perú
Español
Lima
51.1.705.6232
Chile
Español
Santiago
56.2.581.4977
Brasil
Português
Sao Paolo
55.11.5504.6633
Argentina
Español
Buenos Aires
54.11.6091.2399
47
EN
P/N: 7525C00214A