1
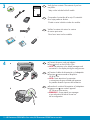
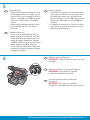
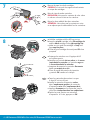
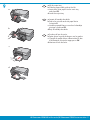
EN
Start Here
ES
Comience aquí
FR
Commencez ici
1
EN
ES
WARNING: To ensure that the software is installed
correctly, do not connect the USB cable until prompted.
ATENCIÓN: Para asegurarse de que el software se
ha instalado correctamente, no conecte el cable USB
hasta que se le indique.
AVERTISSEMENT : Pour garantir une installation correcte
du logiciel, ne connectez pas le câble USB avant que
cela ne vous le soit demandé.
Lea este documento primero antes de instalar el producto, para información referente a las especificaciones
eléctricas y advertencias de seguridad refiérase a los instructivos de uso.
FR
2
a
EN
ES
FR
b
a. Remove all tape, tabs, and protective film from
the lid and from the front and back of the device.
Remove the protective film from the display.
b. Adjust the angle of the display to a position
suitable for viewing.
a. Retire las cintas, las lengüetas y la película
protectora que se encuentran en la tapa y
en la parte anterior y posterior del dispositivo.
Retire la película protectora de la pantalla.
b. Ajuste el ángulo de la pantalla en una posición
adecuada para la visualización.
a. Retirez le ruban adhésif, les languettes et le film
de protection du couvercle, ainsi que de l’avant
et de l’arrière du périphérique. Retirez le film
de protection de l’écran.
b. Positionnez l’écran de manière à bien voir ce qui
y est affiché.
HP Photosmart C5500 All-in-One series/HP Photosmart C5500 Tout-en-un série
3
HP Photosmart C5500 All-in-One series
EN
ES
Verify the box contents. The contents of your box
may differ.
*May not be included with all models
Compruebe el contenido de la caja. El contenido
de su caja puede ser distinto.
*Puede no estar incluido en todos los modelos
*
FR
Vérifiez le contenu du carton. Le contenu
du carton peut varier.
*Non fourni avec tous les modèles
*
4
a
*
*
EN
ES
b
FR
a. Connect the power cord and adapter.
b. Press to turn on the HP All-in-One.
c. NOTE: Pay attention to the helpful messages and
animations in the display during the setup process.
a. Conecte el cable de alimentación y el adaptador.
b. Presione para encender el dispositivo
HP All-in-One.
c. NOTA: Preste atención a los mensajes
y animaciones de gran utilidad que aparecen
en pantalla durante el proceso de instalación.
a. Branchez le cordon d’alimentation et l’adaptateur.
b. Appuyez sur pour mettre l’appareil
HP Tout-en-un sous tension.
c. REMARQUE : Soyez attentif aux messages
et aux animations d’aide à l’écran lors
de la configuration.
2 • HP Photosmart C5500 All-in-One series/HP Photosmart C5500 Tout-en-un série
5
EN
FR
6
Do the following:
• When a prompt appears asking you to set
the language and country/region, use the
arrows to select your language from the list
of up to 4 languages, press OK to confirm.
Select your country/region, press OK to
confirm.
• When a prompt appears asking to install
print cartridges, go to the next step in
this guide.
ES
Haga lo siguiente:
• Si aparece un mensaje por el cual se le solicita
que configure el idioma y el país/región, utilice
las flechas para seleccionar un idioma de la
lista de 4 idiomas y presione OK para confirmar.
Seleccione el país/región y presione OK para
confirmar.
• Si aparece un mensaje por el cual se le solicita
que instale los cartuchos de impresión, vaya al
siguiente paso de esta guía.
Procédez comme suit :
• Si une invite vous demande de définir la
langue et le pays/la région de votre choix,
utilisez les flèches pour sélectionner votre
langue (4 langues disponibles), appuyez
sur OK et confirmez. Choisissez votre pays/
région, appuyez sur OK et confirmez.
• Si une invite vous demande d’installer des
cartouches d’impression, passez à l’étape
suivante de ce guide.
EN
ES
FR
Open the print cartridge door.
IMPORTANT: The device must be turned on to insert
cartridges.
Abra la puerta de los cartuchos de impresión.
IMPORTANTE: Para insertar los cartuchos,
el dispositivo debe estar encendido.
Ouvrez la porte d’accès aux cartouches
d’impression.
IMPORTANT : Pour insérer les cartouches
d’impression, le périphérique doit être sous tension.
HP Photosmart C5500 All-in-One series/HP Photosmart C5500 Tout-en-un série • 3
7
EN
ES
FR
8
EN
b
ES
c
FR
Remove the tape from both cartridges.
CAUTION: Do not touch the copper-colored contacts
or re-tape the cartridges.
Retire la cinta de ambos cartuchos.
PRECAUCIÓN: No toque los contactos de color cobre
ni vuelva a colocar la cinta en los cartuchos.
Retirez le ruban adhésif des deux cartouches.
ATTENTION : Ne touchez pas les contacts en cuivre
et ne replacez pas le ruban adhésif sur les cartouches.
a. Hold the cartridges with the HP logo on top.
b. Insert the tri-color cartridge in the left cartridge slot
and the black cartridge in the right cartridge slot.
c. Make sure you push the cartridges in firmly until
they snap into place.
d. Close the print cartridge door and press OK when
prompted.
a. Sostenga los cartuchos con el logotipo de HP
en la parte superior.
b. Introduzca el cartucho de tres colores en la ranura
izquierda de los cartuchos y el cartucho negro en
la ranura derecha de los cartuchos.
c. Asegúrese de empujar los cartuchos firmemente
hasta que encajen en su sitio.
d. Cierre la puerta del cartucho de impresión
y presione OK cuando se le indique.
a. Tenez les cartouches de manière à ce que
le logo HP soit vers le haut.
b. Insérez la cartouche d’impression couleur
dans l’emplacement gauche et la cartouche
d’impression noire dans l’emplacement droit.
c. Appuyez fermement sur les cartouches jusqu’à
ce qu’elles s’enclenchent dans leur emplacement.
d. Fermez la porte d’accès aux cartouches
d’impression. A l’invite, appuyez sur OK.
4 • HP Photosmart C5500 All-in-One series/HP Photosmart C5500 Tout-en-un série
9
EN
a
ES
b
FR
a. Lift the output tray.
b. Slide the paper-width guide to the left.
c. Insert plain white paper into the main tray
and press OK.
d. Lower the output tray.
a. Levante la bandeja de salida.
b. Deslice la guía de ancho de papel hacia
la izquierda.
c. Introduzca papel blanco normal en la bandeja
principal y presione OK.
d. Baje la bandeja de salida.
a. Soulevez le bac de sortie.
b. Faites glisser le guide de largeur vers la gauche.
c. Chargez du papier blanc ordinaire dans le bac
d’alimentation principal et appuyez sur OK.
d. Abaissez le bac de sortie.
c
d
HP Photosmart C5500 All-in-One series/HP Photosmart C5500 Tout-en-un série • 5
10
EN
FR
a
b
If you have photo paper, load it now. If you
do not have photo paper, go to step 12.
a. Lift the photo tray lid.
b. Load photo paper with the glossy side
down in the photo tray. Slide the paper
guides against the photo paper.
c. Lower the photo tray lid.
d. Pull out the tray extender and lift up the
paper catch.
ES
Si dispone de papel fotográfico, cárguelo ahora.
Si no dispone de papel fotográfico, vaya al paso 12.
a. Levante la tapa de la bandeja de fotografías.
b. Cargue el papel fotográfico con la cara
satinada orientada hacia abajo en la bandeja
de fotografías. Deslice las guías de papel hacia
el papel fotográfico.
c. Baje la tapa de la bandeja de fotografías.
d. Extraiga el extensor de la bandeja y levante
el tope del papel.
Si vous avez du papier photo, chargez-le
maintenant. Si vous n’avez pas de papier
photo, passez à l’étape 12.
a. Soulevez le capot du bac photo.
b. Chargez du papier photo côté brillant
vers le bas dans le bac photo. Placez les
guides du papier contre le papier photo.
c. Abaissez le capot du bac photo.
d. Tirez l’extension du bac et soulevez le bac
de récupération de papier.
11
ES
d
EN
a. Presione el botón OK después de cargar
el papel en la bandeja y espere a que
se imprima la página de alineación.
b. Una vez impresa esta página, presione
el botón OK.
Cuando la página está impresa, el proceso
de alineación ha finalizado.
FR
a. Press the OK button after you have loaded
paper in the tray, then wait while the
alignment page is printed.
b. Press the OK button after the alignment
page is printed.
When the page is printed, alignment
is complete.
a. Une fois le papier chargé dans le bac,
appuyez sur OK et attendez que la
page d’alignement s’imprime.
b. Appuyez sur OK une fois la page
d’alignement imprimée.
L’alignement est alors terminé.
6 • HP Photosmart C5500 All-in-One series/HP Photosmart C5500 Tout-en-un série
12 - Windows
A
EN
ES
FR
B
NOTE: Do not connect the USB cable until
prompted.
a. Turn on your computer, log in if necessary,
and then wait for the desktop to appear.
Insert the CD and follow the onscreen
instructions.
IMPORTANT: If the startup screen does
not appear, double-click My Computer,
double-click the CD-ROM icon with the
HP logo, and then double-click setup.exe.
NOTA: No conecte el cable USB hasta que
se le indique.
a. Encienda el equipo, inicie sesión si es
necesario, y espere a que aparezca el
escritorio. Introduzca el CD y siga las
instrucciones que aparecen en pantalla.
IMPORTANTE: Si no aparece la pantalla
de inicio, haga doble clic en Mi PC,
haga doble clic en el icono CD-ROM
con el logotipo de HP y, a continuación,
haga doble clic en setup.exe.
REMARQUE : Ne connectez pas le câble USB
tant que vous n’y êtes pas invité.
a. Allumez l’ordinateur, connectez-vous
si nécessaire et attendez que le bureau
s’affiche. Insérez le CD-ROM et suivez
les instructions à l’écran.
IMPORTANT : Si l’écran de démarrage
ne s’affiche pas, double-cliquez sur l’icône
Poste de travail, puis sur l’icône du CD-ROM
avec le logo HP, puis sur le fichier setup.exe.
EN
ES
FR
IMPORTANT: Purchase a USB cable separately
if it is not included.
a. Once the USB prompt appears, connect the
USB cable to the port on the back of the
HP All-in-One, and then to any USB port
on the computer.
b. Follow the onscreen instructions to complete
the software installation. Go to page 9 to
explore the features of your HP All-in-One.
IMPORTANTE: Adquiera un cable USB por
separado si no está incluido.
a. Cuando se le indique que conecte el USB,
conecte el cable USB al puerto por la parte
posterior del dispositivo HP All-in-One y,
a continuación, a cualquier puerto USB
del equipo.
b. Siga las instrucciones que aparecen en
pantalla para finalizar la instalación del
software. Vaya a la página 9 para explorar
las funciones del dispositivo HP All-in-One.
IMPORTANT : Achetez séparément un câble
USB, si celui-ci n’est pas fourni.
a. Lorsque l’invite USB apparaît, branchez
le câble USB sur le port situé à l’arrière de
l’appareil HP Tout-en-un, puis sur n’importe
quel port USB de l’ordinateur.
b. Suivez les instructions affichées à l’écran pour
installer le logiciel. Allez à la page 9 pour
découvrir les fonctionnalités de votre appareil
HP Tout-en-un.
HP Photosmart C5500 All-in-One series/HP Photosmart C5500 Tout-en-un série • 7
12 - Mac
A
EN
ES
FR
IMPORTANT: Purchase a USB cable
separately if it is not included.
a. Connect the USB cable to the port on the
back of the HP All-in-One, and then to any
USB port on the computer.
IMPORTANTE: Adquiera un cable USB por
separado si no está incluido.
a. Conecte el cable USB al puerto por la parte
posterior del dispositivo HP All-in-One y,
a continuación, a cualquier puerto USB
del equipo.
IMPORTANT : Achetez séparément un
câble USB, si celui-ci n’est pas fourni.
a. Branchez le câble USB sur le port situé
à l’arrière de l’appareil HP Tout-en-un,
puis sur n’importe quel port USB de
l’ordinateur.
B
EN
ES
FR
a. Insert the CD.
b. Double-click the HP Photosmart CD icon on
the desktop.
c. Double-click the HP Installer icon. Follow the
onscreen instructions.
d. Complete the Setup Assistant screen. Go to
page 9 to explore your HP All-in-One.
a. Introduzca el CD.
b. Haga doble clic en el icono del CD
de HP Photosmart del escritorio.
c. Haga doble clic en el icono del instalador
de HP. Siga las instrucciones que
aparecen en pantalla.
d. Complete la pantalla Asistente de
configuración. Vaya a la página 9 para
explorar el dispositivo HP All-in-One.
a. Insérez le CD-ROM.
b. Double-cliquez sur l’icône du CD
HP Photosmart du bureau.
c. Double-cliquez sur l’icône du programme
d’installation HP. Suivez les instructions
affichées à l’écran.
d. Renseignez l’écran de l’assistant de
configuration. Allez à la page 9 pour
découvrir les fonctionnalités de votre
appareil HP Tout-en-un.
8 • HP Photosmart C5500 All-in-One series/HP Photosmart C5500 Tout-en-un série
EN
ES
EN
ES
EN
ES
Explore the features
Explore las funciones
FR
Now that the HP Photosmart software is
installed on your computer, you can try out
one of the features on the HP All-in-One.
FR
Découverte des fonctionnalités
Une fois le logiciel HP Photosmart installé
sur votre ordinateur, vous pouvez tester une
fonctionnalité du périphérique HP Tout-en-un.
Una vez instalado el software
HP Photosmart en su equipo,
pruebe algunas de las funciones
del dispositivo HP All-in-One.
Print a 4 x 6 inch photo
Imprima una foto
de 4 x 6 pulgadas
EN
a
ES
FR
FR
Impression d’une photo
au format 10 X 15 cm
a. If you have not already done so, load photo paper in the
photo tray.
b. Insert the memory card from your camera into the appropriate
memory card slot.
a. Cargue papel fotográfico en la bandeja de fotografías,
en caso de que no lo haya hecho todavía.
b. Introduzca la tarjeta de memoria de su cámara en la ranura
adecuada de la tarjeta de memoria.
a. Si vous ne l’avez pas encore fait, chargez le papier photo
dans le bac photo.
b. Insérez la carte mémoire de l’appareil photo dans
l’emplacement approprié.
b
HP Photosmart C5500 All-in-One series/HP Photosmart C5500 Tout-en-un série • 9
a
EN
Photo Menu
Create
Save
View & Print
ES
b
Print
Options
a. When the Photo menu appears in the color
graphics display, press OK to select View & Print.
b. Press the arrow buttons to view the desired photo,
then press OK to display the selected photo.
c. Press the up arrow button to increase the number
of photos.
d. Press OK to preview the selected photo.
e. Press PRINT PHOTOS to print the photo.
OK
View
a. Cuando aparece el menú Foto en la pantalla de
gráficos en color, presione OK para seleccionar
Ver e imprimir.
b. Presione los botones de flecha para visualizar la
foto que desee; a continuación, presione OK para
mostrar la foto seleccionada.
c. Presione el botón de flecha arriba para aumentar
el número de fotos.
d. Presione OK para previsualizar la foto
seleccionada.
e. Presione IMPRIMIR FOTOS para imprimir
la fotografía.
c
FR
0
Print
d
Edit
OK
Done
a. Lorsque le menu Photo apparaît à l’écran
graphique couleur, appuyez sur OK pour
sélectionner Afficher & Imprimer.
b. Appuyez sur les flèches pour visualiser la photo
voulue, puis sur OK pour l’afficher.
c. Appuyez sur la touche vers le haut pour voir plus
de photos.
d. Appuyez sur OK pour afficher l’aperçu de la
photo sélectionnée.
e. Appuyez sur IMPRIMER LES PHOTOS pour
imprimer la photo.
Print Preview: Page 1/2
8.5 x 11 paper
Next
Settings
Print
10 • HP Photosmart C5500 All-in-One series/HP Photosmart C5500 Tout-en-un série
EN
ES
About CD Printing
Acerca de la impresión en CD
EN
ES
FR
EN
ES
FR
A propos de l’impression sur CD
Your HP All-in-One has a CD/DVD holder and CD/DVD tray,
which you can use for CD printing. If you would like to print directly
onto a printable CD, refer to the Basics Guide for more information.
El dispositivo HP All-in-One tiene un soporte y una bandeja para
CD/DVD que pueden servir para imprimir en CD. Si desea imprimir
directamente en un CD apto para ello, consulte la guía básica para
obtener más información.
L’appareil HP Tout-en-un est équipé d’un lecteur et d’un plateau
de CD/DVD qui vous permettent de graver des CD. Pour graver
directement un CD réinscriptible, reportez-vous au Guide d’utilisation.
Troubleshooting
Solución de problemas
FR
Dépannage
www.hp.com/support
EN
ES
FR
Problem: (Windows) The Microsoft Add Hardware screen appears.
Action: Cancel all screens. Unplug the USB cable, and then insert
the HP All-in-One CD. Refer to Step 12.
Problema: (Windows) Aparece la pantalla Agregar hardware
de Microsoft.
Acción: Cierre todas las pantallas. Desconecte el cable USB y,
a continuación, inserte el CD del dispositivo HP All-in-One.
Consulte el paso 12.
Problème : (Windows) L’écran Microsoft Ajout de matériel s’affiche.
Action : Cliquez sur Annuler sur tous les écrans affichés. Débranchez
le câble USB, puis insérez le CD-ROM HP Tout-en-un. Reportez-vous
à l’étape 12.
HP Photosmart C5500 All-in-One series/HP Photosmart C5500 Tout-en-un série • 11
www.hp.com/support
EN
ES
FR
EN
ES
FR
Problem: (Windows only) You did not see the screen prompting
you to connect the USB cable.
Action: Cancel all screens. Remove, and then re-insert the
HP All-in-One CD. Refer to Step 12.
Problema: (Sólo en Windows) No ha visto la pantalla que indica
que debe conectar el cable USB.
Acción: Cierre todas las pantallas. Extraiga el CD del dispositivo
HP All-in-One y, a continuación, vuelva a insertarlo. Consulte el paso 12.
Problème : (Windows uniquement) L’écran vous invitant à connecter
le câble USB ne s’affiche pas.
Action : Cliquez sur Annuler sur tous les écrans affichés. Retirez le
CD-ROM HP Tout-en-un, puis introduisez-le de nouveau. Reportez-vous
à l’étape 12.
Problem: (Windows only) The Device Setup Has Failed To Complete
screen appears.
Action: Unplug the device and plug it in again. Check all connections.
Make sure the USB cable is plugged into the computer. Do not plug the
USB cable into a keyboard or a non-powered USB hub. Refer to step 12.
Problema: (Sólo en Windows) Aparece la pantalla Se ha producido
un error en la instalación del dispositivo.
Acción: Desconecte el dispositivo y vuelva a conectarlo. Compruebe
todas las conexiones. Asegúrese de que el cable USB está conectado
al equipo. No conecte el cable USB a un teclado ni a un concentrador
USB sin alimentación. Consulte el paso 12.
Problème : (Windows uniquement) L’écran La configuration
du périphérique ne s’est pas achevée s’affiche.
Action : Débranchez le périphérique puis rebranchez-le. Vérifiez
toutes les connexions. Assurez-vous que le câble USB est branché
à l’ordinateur. Ne branchez pas le câble USB sur un clavier ni sur un
concentrateur USB non doté de sa propre alimentation. Reportez-vous
à l’étape 12.
2007 Hewlett-Packard Development Company, L.P.
Printed in ()
Printed in ()
Printed in ()
*Q8340-90016*
*Q8340-90016*
HP *Q8340-90016*
Photosmart C5200 All-in-One series •12