1
(continued)
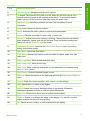
Name and Description
2
Directional pad: Navigates through menu options.
3
On button: Turns the HP All-in-One on or off. When the HP All-in-One is off, a
minimal amount of power is still supplied to the device. To completely remove
power, turn the HP All-in-One off, and then unplug the power cord.
4
Attention light: Indicates a problem occurred. See the display for more
information.
5
Back button: Returns to previous screen.
6
Setup: Accesses the menu system for reports and maintenance.
7
Preview: Displays a preview of a scan, copy, or photo job.
8
Photo Fix: Adjusts a photo for viewing or printing. Features include color effects,
photo brightness, frames, and red-eye removal. Press this button to switch this
feature on and off. Photo Fix is on by default.
9
Photosmart Express: Launches the Photosmart Express menu for printing,
editing, and sharing photos.
10
Scan Menu: Opens the Scan Menu.
11
Copy Menu: Selects copy options, such as number of copies, paper size, and
paper type.
12
Start Copy Black: Starts a black-and-white copy.
13
Start Copy Color: Starts a color copy.
14
Start Scan: Starts a scan job and sends it to the destination you selected using
the Scan Menu button.
15
Print Photos: Prints all selected images in color.
16
Reprints: Scans the original on the glass and launches the Photosmart Express
menu.
17
Cancel: Stops the current operation, exits a menu, or exits settings.
18
Help: Opens the Help menu on the display.
19
Rotate: Rotates the currently displayed photo on the display 90 degrees.
Subsequent presses continue to rotate the photo 90 degrees.
20
Zoom Out: Zooms out to show more of a photo on the display.
21
Zoom In: Zooms in to enlarge the image on the display. You can also use this
button to adjust the crop box when printing.
22
OK: Selects a menu, setting, or value displayed on the display.
Basics Guide
HP All-in-One overview
Label
5