1
hp pavilion vf52
lcd monitor
(15-inch/38.1-centimeter viewable image)
user’s guide
The information in this document is subject to change without notice.
Hewlett-Packard® Company makes no warranty of any kind with regard to this material, including,
but not limited to, the implied warranties of merchantability and fitness for a particular purpose.
HP shall not be liable for errors contained herein or for incidental or consequential damages in
connection with the furnishing, performance, or use of this material.
THE WARRANTY TERMS CONTAINED IN THIS STATEMENT, EXCEPT TO THE EXTENT
LAWFULLY PERMITTED, DO NOT EXCLUDE, RESTRICT OR MODIFY AND ARE IN ADDITION
TO ANY MANDATORY STATUTORY RIGHTS APPLICABLE TO THE SALE OF THIS PRODUCT
OR SERVICE TO YOU.
HP assumes no responsibility for the use or reliability of its software on equipment that is not
furnished by HP.
This document contains proprietary information that is protected by copyright. All right are
reserved. No part of this document may be photocopied, reproduced, or translated to another
language without the prior written consent of HP.
Hewlett-Packard Company
P.O. Box 4010
Cupertino, CA 95015-4010
USA
© 2003 Hewlett-Packard Development Company, L.P.
All rights reserved.
Hewlett-Packard is a registered trademark of Hewlett-Packard Company in the United States of
America and other countries/regions.
Other brand or product names are trademarks of their respective holders.
Table of Contents
Introduction.................................................................................... 1
Features...................................................................................................1
For Your Safety .........................................................................................1
Installation ..................................................................................... 2
Unpacking the Monitor..............................................................................2
Locations and Functions of Controls ............................................................3
Making the Connections ............................................................................4
Using Your Monitor ........................................................................ 5
Installing the Drivers ..................................................................................5
Turning the Display On and Off..................................................................6
Tilting the Display .....................................................................................7
Setting the Video Mode .............................................................................7
Setting the Refresh Rate .............................................................................7
Minimizing Power Consumption .................................................................7
Caring for and Cleaning the Display...........................................................8
Adjusting Your Display ................................................................... 8
Summary of Control Buttons .......................................................................8
Displaying the OSD “Main Menu”..............................................................9
Selecting Items in the OSD Menu................................................................9
Changing Settings by using the OSD Menu .................................................9
Using the Direct Keys ..............................................................................15
Troubleshooting ........................................................................... 17
LCD Monitor Quality and Pixel Policy ........................................... 18
Technical Information ................................................................... 18
Display Information .................................................................................18
Video Modes .........................................................................................19
Unknown Video Modes ...........................................................................19
Recycling your Product ............................................................................19
Regulatory Information ................................................................ 20
Federal Communications Commission Notice .............................................20
Canadian Notice....................................................................................20
EPA Energy Star Compliance ...................................................................21
Power Cord Set Requirements ..................................................................21
user’s guide
iii
iv
user’s guide
Introduction
For Your Safety
This LCD monitor has a 15-inch / 38.1-centimeter
active matrix TFT (thin film transistor) liquid crystal
display module. It is designed for use with any
Windows®-based PC. The monitor’s compact-sized
design provides great space savings on your
computer desk.
WARNING: To completely disconnect
power from your display, you must
remove the power cord from the wall
outlet and then remove the power cable
from the display.
Features
For your safety and the protection of your monitor,
follow these precautions:
Important features include:
• Use only the factory-supplied power cord* that
• Automatic configuration to the PC video settings
with maximum XGA resolution.
•
• Three control buttons plus OSD (on-screen
display) for monitor settings provide adjustment
and configuration with ease and instant feedback.
• Integrated audio speakers provide stereo sound.
• Support of analog video input allows for direct
and immediate replacement of CRT displays.
• A tilt feature to optimize viewing position.
• An anti-glare coating on the panel to reduce the
reflection of ambient light.
• Flicker-free performance across all recommended
video modes.
• Support for high refresh rates up to 76 Hz.
• VESA DDC2B Plug-and-Display compliant.
• A Power-saving feature that is compatible with
Microsoft® Windows.
• Compliance with Swedish MPR II guidelines for
reduced electromagnetic emissions.
shipped with your monitor.
To prevent electrical shock, do not disassemble
the display. The cover should be removed only
by qualified service personnel.
• Do not cover the air vents.
• To avoid the risk of damage to the display and
electrical shock to yourself, do not expose the
display to rain or moisture.
If any of the following conditions occur, unplug the
display and contact qualified service personnel:
•
•
•
•
The power cord or plug is frayed or damaged.
You have spilled liquid into the display.
The display has been exposed to rain or water.
The display does not operate correctly when the
operating instructions are followed.
• The display has been dropped or the cabinet has
been damaged.
*The power cable is for use with the supplied power
adapter only. In case of loss or damage, contact the
retailer for replacement.
user’s guide
1
Working in Comfort
To optimize your comfort and productivity, it’s
important that you set up your work area correctly
and use your HP monitor properly. With that in
mind, we have developed some setup and use
recommendations based on established ergonomic
principles for you to follow.
These recommendations can be found in the
onscreen version of the Safety & Comfort Guide,
which is preloaded on the hard disk drive of your HP
computer.
To view the Safety & Comfort Guide online:
Type
http://www.hp.com/ergo/
into your Web browser address box, and then press
Enter on the keyboard.
NOTE: This monitor is not intended for use in an
office workspace.
WARNING: To reduce the risk of serious
injury, read the Safety & Comfort Guide. It
describes proper workstation setup,
posture, and health and work habits for
computer users. It also provides important
electrical and mechanical safety
information.
2
user’s guide
Installation
Please follow the instructions in this chapter to install
your LCD monitor.
NOTE: Before connecting your display, first read
through the instructions in this chapter and the
safety precautions in the previous chapter.
Unpacking the Monitor
When you are unpacking the display, make sure that
you have the following items:
• The LCD monitor
• AC power adapter with attached DC power cable
and separate power cord
• Analog video signal cable
• Audio cable
• The CD with software drivers and this User’s
Guide
• The Warranty
NOTE: Place the monitor on a flat, sturdy surface.
Choose an area free from excessive heat, moisture,
and sunlight.
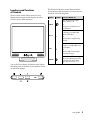
Locations and Functions
of Controls
There are three control buttons and one Power
button on the front panel of the display, as well as
a LED for power status indication.
The functions of the three control buttons and the
Power button on the front panel of your monitor are
described in the following table.
Button
Symbol
Press the Button to:
Select
Show the OSD menu (“Main
Menu”) while it is off.
Or
Execute the selected function in
the OSD menu.
Minus
—
Move a selected item downward
or decrease a user-adjustable
value in OSD Menu.
Or
Start the Auto Setup (Direct-key
function).
+
Move a selected item upward or
increase a user-adjustable value
in OSD Menu.
Or
Start the Audio Function Menu
(Direct-key function).
Plus
Power
Turn on or turn off the monitor.
The power indicator (green LED)
on the left of the Power button
lights while the monitor is on.
You use the Power button, the button on the right in
the button panel on the front of your monitor, to turn
on and off the monitor.
user’s guide
3
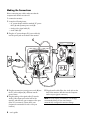
Making the Connections
Before connecting any cables, make sure that the
computer and monitor are turn off.
To connect the monitor:
1 Locate the following items:
• AC power adapter with the attached DC power
cable (A) and separate power cord (B).
• Analog video signal cable (C).
• Audio cable (D).
2 Plug the AC power adapter DC power cable (A)
into the power jack on the back of the monitor.
C
B
A
3 Plug the separate (two-prong) power cord (B) into
the AC power adapter (A), and then into the
power source.
4 Plug the analog video signal cable (C) into the
Analog Video Input port on the back of the
monitor, and then into your computer video port
(blue VGA connector). (Please check your
computer documentation for the video port
location.)
4
user’s guide
D
5 Plug the audio cable (D) to the Audio jack on the
back of the monitor, and then into the computer
audio out port (green connector).
NOTE: For best display performance, it is strongly
recommended that you use Auto Setup to
automatically configure the monitor settings.
Using Your Monitor
This chapter contains information about using your
LCD Monitor.
Installing the Drivers
The monitor comes with driver software allowing
you to take advantage of the Plug and Play feature of
the Microsoft® Windows® Me, Windows 2000, or
Windows XP operating system. This software
enables the computer to communicate with the
monitor and use all the monitor features. Without
this software, the monitor settings and display
images will not be correct.
NOTE: HP computers may come with the Plug and
Play drivers preinstalled. If you have an older
computer, these drivers may not be preinstalled
and you may need to install the drivers from the
CD-ROM disc that came with the monitor.
You can also download the latest version of a driver
from the HP Monitors Support Web site. Go to
http://www.hp.com and click the Support link.
If the monitor driver installation procedure differs
from the steps provided here, or if you need more
detailed installation information, please refer to the
Microsoft Windows information that came with the
computer.
Windows 2000 Users
7 Click Update Driver and click Next.
8 Select the recommended option and then
click Next.
9 Select the Specify a Location box and then
click Next.
10 Find and open the hp_vf52.inf file on the
CD-ROM disc in the Drivers directory, and
then click OK.
11 Click Next to install the selected monitor.
Windows Me Users
NOTE: The procedure for installing the driver for
your operating system may vary from this.
To install the driver for the monitor:
1 Click Start, select Settings, and then click Control
Panel.
2 Double-click Display.
3 Click the Settings tab.
4 Click the Advanced, button.
5 Select the Monitor tab.
6 Click the Change button.
7 Select the Specify the Location of the driver box
and then click Next.
8 Click Next.
9 Find and open the hp_vf52.inf file on the
CD-ROM disc in the Drivers directory, and
then click OK.
10 Click Next to install the selected monitor.
NOTE: The procedure for installing the driver for
your operating system may vary from this.
Windows XP Users
To install the driver for the monitor:
NOTE: The procedure for installing the driver for
1 Click Start, select Settings, and then click Control
Panel.
your operating system may vary from this.
2 Double-click Display.
3 Click the Settings tab.
To install the driver for the monitor:
4 Click Advanced Properties or Advanced, and
select the Monitor tab.
5 Click Properties.
2 Click Control Panel.
6 Click Appearance and Themes.
6 Click the Driver tab.
1 Click Start.
3 Click Display.
4 Select the Settings tab.
user’s guide
5
5 Click the Advanced button.
6 Select the Monitor tab.
7 Click Properties.
8 Select the Driver tab.
9 Click Update Driver.
10 Select the Install from a list or specific location
box and then click Next.
11 Select the Don’t search box and then click Next.
12 Click Have Disk.
13 Click Browse.
14 Find and open the hp_vf52.inf file on the
CD-ROM disc in the Drivers directory, and then
click OK.
15 Click Next to install the selected monitor.
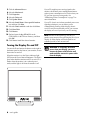
Turning the Display On and Off
You use the Power button, the button on the right in
the button panel on the front of your monitor, to turn
the monitor on and off.
When the monitor is on, the Power indicator light
(LED) near the Power button illuminates. The light is
green when both the monitor and PC are active, it is
amber when the monitor is in a reduced power
mode, and the light is off when the monitor is off.
6
user’s guide
If your PC supplies power saving signals to the
monitor, the monitor power management features
reduce power consumption to low levels when your
PC goes into its power-saving mode. See
“Minimizing Power Consumption“ on page 7 for
more information.
If your PC doesn’t use industry standard power-save
signaling techniques, you can reduce power
consumption by turning off the display when it
won’t be used for an extended period. You can turn
the display off even if you leave your PC running.
NOTE: Because of the technology used in LCD
panels, screen savers will not prolong the life of your
display. So if the display will not be used for an
extended period, be sure to turn it off.
WARNING: To completely disconnect
power from your display, you must
remove the power cord from the wall
outlet and then remove the power cable
from the display.
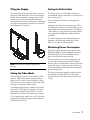
Tilting the Display
Setting the Refresh Rate
The monitor has a tilt feature that allows you to tilt
the display back and forth as well as left and right to
find the most comfortable viewing position. To tilt
the display, grasp the sides and push the display
back or pull it toward you, or turn it left or right until
it is in the desired position. The display can be tilted
20º backward and 5º forward.
The image refresh rate is the number of times per
second that the image is refreshed; it is also known as
the vertical frequency.
Your LCD Monitor is flick-free at all supported
refresh rates.
Although your LCD monitor supports up to 75 Hz
for analog video input, we recommend that you use
60 Hz refresh rate for best performance. The table in
“Video Modes” on page 19 shows the image refresh
rates supported by the display at different screen
resolution.
To set the refresh rate with a standard Windows
installation, follow the steps mentioned in your
Windows or video card documentation.
Minimizing Power Consumption
Many PCs support industry standard power-save
signaling techniques. Power management features
reduce the display’s power consumption after a
period of keyboard or mouse inactivity.
NOTE: Do not tilt the display by grasping the
top edge.
Setting the Video Mode
Since the display resolution of this monitor is 1024
pixels by 768 lines, the display will perform best
when your PC is set to a screen resolution of 1024 x
768. If you use a lower resolution (such as 640 x 480),
the image is expanded to fill the screen.
When the monitor is in a power-saving mode, the
screen is blank and the power indicator is amber.
Pressing a key on the keyboard or moving the mouse
restores the image in several seconds. Consult your
PC documentation for information about setting the
power-saving modes.
The display accepts the signals for standard powersaving mode, and when the PC goes into power
saving mode then the display also goes into power
saving.
Your display supports many common video modes,
as shown in “Video Modes” on page 19. Check the
documentation supplied with your PC and video
adapter card to find out which modes they support.
To see what the video mode is on your PC, check the
settings for the Display Properties in the Windows
Control Panel of your PC.
user’s guide
7
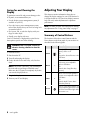
Caring for and Cleaning the
Display
To maximize screen life and prevent damage to the
LCD panel, we recommend that you:
• Use the display power management system (if
available on your PC).
• If you don’t use a power management system,
turn off the display when you won’t be using it for
an extended period.
Adjusting Your Display
This chapter contains information about how to
change the display settings for your LCD Monitor. It
is designed with an OSD (on-screen display) menu to
help you easily make adjustments for optimum
performance.
NOTE: You must perform Auto Setup before making
any adjustment. See “Using Auto Setup“ on page 9.
• Don’t press, rub, or poke the display with your
finger or other object.
• Handle your display with care.
Summary of Control Buttons
Your LCD module is a high-quality optical device
that requires special care when cleaning.
The functions of the three control buttons and the
Power button on the front panel of your monitor are
described in the following table.
WARNING: Don’t use liquid, aerosol, or
abrasive cleaning solutions to clean the
screen.
To clean the screen:
Button
Symbol
Select
Show the OSD menu (“Main
Menu”) while it is off.
Or
Execute the selected function in the
OSD menu.
Minus
—
Move a selected item downward
or decrease a user-adjustable
value in OSD Menu.
Or
Start the Auto Setup (Direct-key
function).
+
Move a selected item upward or
increase a user-adjustable value in
OSD Menu.
Or
Start the Audio Function Menu
(Direct-key function).
1 Shut down the PC.
2 Turn off and unplug the display.
3 Gently dust the screen with a dry, soft, line-free
cloth.
NOTE: If the screen is still dirty, you can dampen
the cloth with several drops of distilled water.
Make sure the LCD panel is completely dry before
you turn the display back on.
4 Plug in the display.
5 Turn on your PC and display.
Plus
Power
8
user’s guide
Press the Button to:
Turn on or turn off the monitor. The
power indicator (green LED) on the
left of the Power button lights while
the monitor is on.
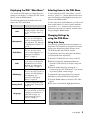
Displaying the OSD “Main Menu”
Selecting Items in the OSD Menu
You can use the OSD features to change the screen
settings of your display. To display the OSD “Main
Menu”, press the ‘Select’ button.
To select items in the OSD “Main Menu”, you will
use the ‘+’ (plus) or ‘—’ (minus) buttons on the front
panel of the monitor to highlight the item, then you
will press the ‘Select’ button.
The following table briefly describes each of the
items in the OSD “Main Menu”.
Item
Description
Auto
Automatically adjust the display
settings by using this “Auto Setup”
icon. See “Using Auto Setup“ on
page 9.
Management
Open the “Management” submenu
where you can select Brightness,
Contrast or the image position for
further adjustment. See “Adjusting
the “Management” Submenu“ on
page 10.
Clock/Phase
Open the “Clock/Phase” submenu
where you can select Clock or
Phase for further adjustment. See “
Adjusting the “Clock/Phase”
Submenu“ on page 12.
Color
Open the “Color” submenu where
you can select Color Temperature,
RGB and Black Level for further
adjustment. See “Adjusting the
“Color” Submenu“ on page 12.
OSD Display
Open the “OSD Display” submenu
where you can select H. position or
V. position of the OSD display for
further adjustment. See “
Adjusting the “OSD Display”
Submenu“ on page 14.
Factory Recall
Recall factory-setting values back.
See “Adjusting the Factory Recall“
on page 14.
Languages
Open the “Languages” submenu
where you can select one of the five
languages for your preference in
display OSD messages. See
“Selecting Language for Your
Preference” on page 15.
Exit
Close and exit the OSD main menu.
To select items in the OSD submenus, you will use all
three control buttons. To select a specific submenu,
you use the ‘+’ or ‘—’ buttons to move forward or
backward to the item to be adjusted, and then select
it by pressing the ‘Select’ button.
Changing Settings by
using the OSD Menu
Using Auto Setup
You can easily optimize the screen performance for
the monitor VGA interface by using the Auto button
and the auto-adjustment pattern software on the
CD-ROM disc that came with the monitor.
To perform the Auto Setup using the Auto button,
you should follow the steps below:
1 Insert the CD-ROM disc into a drive on the PC.
2 Run the software file Adjustment Pattern.exe
(from the CD-ROM drive) to display a setup test
pattern.
3 Press the ‘Auto’ button (by pressing the ‘—’
button when the OSD “Main Menu” is not shown)
to produce a stable, centered image.
To perform the Auto Setup function by using the
Main Menu, you should follow the steps below:
1 Press the ‘Select’ button to show the OSD “Main
Menu”.
2 The ‘Auto’ icon should be highlighted already.
user’s guide
9
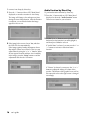
3 Press the ‘Select’ button to select and execute the
Auto Setup function. After the execution of the
Auto Setup function, it will show the follow
message:
Adjusting the “Management”
Submenu
To perform the adjustment in the “Management”
submenu you should follow the steps below:
1 Press the ‘Select’ button to show the OSD “Main
Menu”.
2 Use the ‘+’ or ‘—’ button to move (forward
or backward) to the management icon and
highlight it.
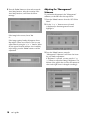
If the image looks correct, choose Yes.
Or
If the image requires further adjustment, choose
No, and the ‘Phase’ bar will show. Then you can
adjust Phase by using the ‘+’ or ‘—’ buttons. When
all text appears focused and there is no instability
in the image, press the ‘Select’ button to end the
adjustment.
3 Press the ‘Select’ button to enter the
“Management” Submenu. It will show four items
for your further adjustment.
If ‘Brightness’ is selected, you may use the ‘+’ or
‘—’ buttons to adjust the setting of brightness. The
fullness of the graphic bar as well as the numerical
value at the right corner is changed accordingly.
10
user’s guide
If ‘Contrast’ is selected, you may use the ‘+’ or ‘—’
buttons to adjust the setting of contrast. The
fullness of the graphic bar as well as the numerical
value at the right corner is changed accordingly.
NOTE: We recommend you do Auto Setup before
adjusting the contrast setting.
If ‘V. position’ is selected, you may use the ‘+’ or
‘—’ buttons to adjust the setting of the vertical
position of the image. The fullness of the graphic
bar as well as the numerical value at the right
corner is changed accordingly.
If ‘Exit’ is selected, it will exit the “Management”
submenu and go back to the “Main Menu”.
If ‘H. position’ is selected, you may use the ‘+’ or
‘—’ buttons to adjust the setting of the horizontal
position of the image. The fullness of the graphic
bar as well as the numerical value at the right
corner is changed accordingly.
user’s guide
11
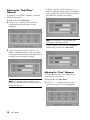
Adjusting the “Clock/Phase”
Submenu
To adjust the “Clock/Phase” submenu you should
follow the steps below:
If ‘Phase’ is selected, you may use the ‘+’ or ‘—’
buttons to adjust the setting of phase. The fullness
of the graphic bar as well as the numerical value at
the right corner is changed accordingly.
1 Bring-up the OSD “Main Menu”.
2 Use the ‘+’ or ‘—’ button to move (forward
or backward) to the clock/phase icon and
highlight it.
NOTE: We recommend you perform the Auto
Adjust before adjusting the phase.
If ‘Exit’ is selected, it will exit the “Clock/Phase”
submenu and go back to the “Main Menu”.
3 If ‘Clock’ is selected, you may use the ‘+’ or ‘—’
buttons to adjust the setting of clock. The fullness
of the graphic bar as well as the numerical value at
the right corner is changed accordingly.
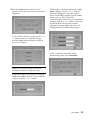
Adjusting the “Color” Submenu
To do adjustment in the “Color” submenu you
should follow the steps below:
NOTE: We recommend you perform the Auto
Setup first. And adjust the clock setting only if the
image looks incorrect.
12
user’s guide
1 Bring-up the OSD “Main Menu”.
2 Use the ‘+’ or ‘—’ button to move (forward or
backward) to the Color icon and highlight it.
3 Press the ‘Select’ button to enter the “Color”
submenu. It will show three items for your further
adjustment.
If ‘RGB Adjust’ is selected, it will show the “RGB
Adjust” submenu. Use the ‘+’ or ‘—’ buttons to
choose and highlight one of the three options
(Red, Green and Blue), and then press the ‘Select’
button to select it. This will show the
corresponding bar on menu, and you can adjust its
setting by using the ‘+’ or ‘—’ buttons. This control
may be helpful in achieving a more natural
appearance in graphic images and closer color
matching between the printer and the display.
If ‘Color Temp’ is selected, you may use the ‘+’ or
‘—’ buttons to select one of the three settings.
Press the ‘Select’ button will return you back to
the “Color” submenu.
If ‘Exit’ is selected, it will exit the “Color”
submenu and go back to the “Main Menu”.
Note:
As you choose an item, your screen
immediately updates to reflect this setting.
If ‘Black Level Adjust’ is selected, it will bring-up
“Back Level Adjust” submenu. You can adjust its
setting by using the ‘+’ or ‘—’ buttons.
user’s guide
13
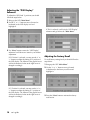
Adjusting the “OSD Display”
Submenu
To adjust the OSD H and V, positions you should
follow the steps below:
1 Bring-up the OSD “Main Menu”.
2 Use the ‘+’ or ‘—’ button to move (forward or
backward) to the OSD display icon and
highlight it.
If ‘Exit’ is selected, it will exit the “OSD Display”
submenu and go back to the “Main Menu”.
3 Use ‘Select’ button to enter the “OSD Display”
submenu. It will show two items for your further
adjustment.
If ‘H. Position’ is selected, you may use the ‘+’ or
‘—’ buttons to adjust the setting of H. position of
the OSD display. The fullness of the graphic bar as
well as the numerical value at the right corner is
changed accordingly.
If ‘V. Position’ is selected, you may use the ‘+’ or
‘—’ buttons to adjust the setting of V. position of
the OSD display. The fullness of the graphic bar as
well as the numerical value at the right corner is
changed accordingly.
14
user’s guide
Adjusting the Factory Recall
To recall factory settings back you should follow the
steps below:
1 Bring-up the OSD “Main Menu”.
2 Use the ‘+’ or ‘—’ button to move (forward
or backward) to the factory recall icon and
highlight it.
3 Press the ‘Select’ button to activate the factory
recall action.
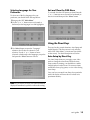
Selecting Language for Your
Preference
To select one of the five languages for your
preference you should follow the steps below:
Exit and Close the OSD Menu
To exit and close the OSD menu you should use the
‘+’ or ‘—’ button to move (forward or backward) to
the exit icon and then press the ‘Select’ button.
1 Bring-up the OSD “Main Menu”.
2 Use the ‘+’ or ‘—’ button to move (forward or
backward) to the languages icon and highlight it.
Using the Direct Keys
3 Use ‘Select’ button to enter the “Language”
submenu. It will show five items for your
selection. Use the ‘+’ or ‘—’ button to move
(forward or backward) to the languages you prefer
and press the ‘Select’ button to select it.
There are hot key control functions: Auto Setup, and
Audio Function. The direct access is only effective
while OSD “Main Menu” is inactivated (not visible
on the screen). For detail descriptions see below.
Auto Setup by Direct Key
Use Auto Setup whenever you apply a new video
mode or change the refresh rate. While the Auto
Setup routine is running, you should have a stable
image displayed on the screen. Do not move items
around the screen, play games, or view video during
Auto Setup.
Once you have executed Auto Setup for a particular
mode, the display will store the new values in its
permanent memory.
NOTE: As you choose an item, your OSD information
displayed immediately updates to reflect this setting.
user’s guide
15
To execute Auto Setup by direct key:
Audio Function by Direct Key
1 Press the ‘—’ button with no OSD “Main Menu”
displayed, to start the execution of Auto Setup.
To perform the audio function by direct key:
The image will change color and appear to jitter
during the Auto Setup function. After the function
is complete, you are asked whether the image
appears correct or not.
2 If the image looks correct, choose Yes, and then
the OSD will close automatically.
If the image requires further adjustment, choose
No, and the ‘Phase’ bar will show. Then you can
adjust Phase by using the ‘+’ or ‘—’ buttons. When
all text appears focused and there is no instability
in the image, press the ‘Select’ button to end the
adjustment and close the OSD menu.
1 Press the ‘+’ button with no OSD “Main Menu”
displayed to show the “Audio function” menu.
There are two items for your selection.
2 Use the ‘+’ or ‘—’ button to move (forward or
backward) to the function icon and highlight it,
and then press ‘Select’ to select it.
If ‘Audio Mute’ is selected, you may use the ‘+’ or
‘—’ buttons to activate or deactivate mute
function.
If ‘Volume’ is selected, you may use the ‘+’ or ‘—’
buttons to adjust the setting of volume of the
speaker. The fullness of the graphic bar as well as
the numerical value at the right corner is changed
accordingly.
16
user’s guide
Troubleshooting
The message “No Sync.” appears on
my display.
This chapter contains information about how to
troubleshoot your LCD Monitor. If you have tried all
of the items listed below, check your warranty and
contact Support. Go to http://www.hp.com and
click the Support link.
This message appears when there is no video signal
from the computer with cable already connected.
My display doesn’t work, even
though the computer appears
to work.
The message “Signal Out of Range”
appears on my display.
1 Make sure the power cable is securely plugged
into the display.
2 Make sure the display is turned on.
3 Try turning the display off and then turning it on
again.
4 Make sure the display’s power cord is plugged
into a power outlet and into the AC power
adapter. Check to see whether the outlet works by
plugging another device (such as a lamp) into the
outlet. (If the light on the front of the display is
lighted, it is getting power. Try the next item on
this procedure.)
5 Check the cable connection between the display
and the computer. The cable connectors must be
pushed in all the way.
The message “Check Cable” appears
on my display.
This message appears when the video cable is not
properly connected to the computer.
1 Make sure that the computer’s power is turn on.
2 Make sure that your graphic card has its output.
This message appears when the input signal is
beyond the display’s capability.
Set your PC to a supported video mode, preferably
1024 x 768 at 60 Hz. See “Setting the Video Mode“ on
page 7.
The image is very unstable.
1 Set your PC to a supported video mode,
preferably 1024 x 768 at 60 Hz. See “Setting the
Video Mode” on page 7.
2 Restore the original factory settings by choosing
Factory Recall in the OSD “Factory Recall”
submenu.
3 Perform the Auto Setup function. See “Auto
Setup by Direct Key“ on page 15.
NOTE: Even if your PC’s setting is out of the range
of video modes that are supported by your LCD
monitor, it may still be displayed with reduced
quality. This provides you with an opportunity to
change your PC’s setting to a correct one.
1 Make sure the analog video cable is plugged into
the Analog Video Input port on the back of the
display.
2 Make sure the other end of analog video cable is
plugged into the PC’s video port.
user’s guide
17
LCD Monitor Quality and
Pixel Policy
The HP vf52 TFT monitor uses high-precision
technology, manufactured according to HP
standards, to guarantee trouble-free performance.
Nevertheless, the monitor may have cosmetic
imperfections that appear as small bright or dark
spots. This is common to all LCD monitors used in
products supplied by all vendors and is not specific
to the HP vf52 monitors. These imperfections are
caused by one or more defective pixels or sub-pixels.
• A pixel consists of one red, one green, and one
blue sub-pixel.
• A defective whole pixel is always turned on (a
bright spot on a dark background), or it is always
off (a dark spot on a bright background). The first
is the more visible of the two.
• A defective sub-pixel (dot defect) is less visible
LCD Module
15-in (38.1-cm), active matrix TFT,
anti-glare coating, 0.297 mm pixel
pitch
Display Size
304 mm x 228 mm
Viewing Angle
Left/Right
Up/Down
–60° / 60° (Typical)
–55° / 45° (Typical)
Luminance
250 cd/m2 (Typical)
Contrast Ratio
350:1 (Typical)
Display Colors
262144 (6 bits/colour)
Audio Output
2 W +2 W (rms)
AC Adapter
Input
Output
100 — 120 V Full Range, 1.2 A
(1,2 A) — 0.6 A (0,6 A)
12 V , 3.3 A (3,3 A)
Power consumption
Operating mode: 30 W maximum
Off mode: 2 W maximum
Signal Input
Video Signal
Sync signals
RGB positive 0.7 VPP, 75 ohm
Separate & Composite, TTL Level
Zero defective full pixels.
Line (horizontal)
frequency
30 kHz ~ 63 kHz
3 bright sub-pixels (red, green or blue; always on).
5 dark sub-pixels (red, green or blue; always off).
Raster (vertical)
frequency
56 Hz ~ 76 Hz
No more than two adjacent (less than 2.5 mm
edge-to-edge) defective pixels.
Pixel dot clock
80 MHz (maximum)
Recommended
video mode
1024 x 768 @ 60 Hz
Pedestal tilt
20° forward, -5° backward
Dimensions
(W x H x D)
341mm x 323 mm x 42 mm
Weight
3.0 kg
Operating
Conditions
Temperature
Humidity
Altitude
5° ~ 40° C at altitude 0 ~ 2000 m
5° ~ 30° C at altitude 2000 ~ 3000 m
20% ~ 85% RH, non-condensing
3000 m Maximum
than a defective whole pixel and is small and only
visible on a specific background.
The HP vf52 monitor does not have more than:
•
•
•
•
•
Display Information
5 total dot defects.
• No more than two pairs of two adjacent defective
pixels.
To locate defective pixels, the monitor should be
viewed under normal operating conditions, in
normal operating mode at a supported resolution
and refresh rate, from a distance of approximately
50 cm (16 in.).
HP expects that, over time, the industry will continue
to improve its ability to produce LCD monitors with
fewer cosmetic imperfections and HP will adjust
guidelines as improvements are made.
Technical Information
This chapter contains technical information about
your LCD Monitor.
18
user’s guide
Storage Conditions
Temperature
Humidity
Altitude
–20° ~ 60° C
5% ~ 95% RH
10000 m Maximum
Video Modes
Unknown Video Modes
Your LCD monitor supports the following industrystandard combinations of screen resolution and
refresh rates. Other combinations are possible, but
may require adjustments to the image.
Like all other monitors, the your LCD monitor is
designed to work with standard video modes.
However, not all video/graphic cards use only
standard display modes.
For optimum performance, set your PC to a screen
resolution of 1024 x 768 at a 60 Hz refresh rate.
Your LCD monitor uses state-of-the-art technology,
which is designed to automatically synchronize to
any display video mode listed in the above table. We
recommend that you choose one of the supported
video modes listed above. If you choose an unknown
video mode, you will need to manually adjust the
clock, phase, and image position; the resulting
display may still be bad.
Supported Resolution
(dots x lines)
Vertical
Frequency
(Refresh Rate)
640
640
640
640
640
x
x
x
x
x
480
480
480
480
350
60
70
72
75
70
Hz
Hz
Hz
Hz
Hz
SVGA
800
800
800
800
800
x
x
x
x
x
600
600
600
600
600
56
60
70
72
75
Hz
Hz
Hz
Hz
Hz
XGA
1024
1024
1024
1024
x
x
x
x
60
70
72
75
Hz
Hz
Hz
Hz
VGA
768
768
768
768
If you must use an unknown mode that is not in the
listed display video modes, you should run Auto
Setup first. If Auto Setup doesn’t provide adequate
image adjustment, then you must manually adjust
the clock, phase, horizontal position, and vertical
position. If this does not work, please chose a
recommended video mode.
Recycling your Product
US TEXT
720 x 400
70 Hz
HP has a strong commitment toward the
environment. Your monitor has been designed to
respect the environment as much as possible.
Power
MAC
640 x 480
832 x 624
67 Hz
75 Hz
HP can also take back your old monitor for recycling
when it reaches the end of its useful life.
NOTE: The display is capable of going beyond these
recommended modes.
HP has a product take-back program in several
countries. The collected equipment is sent to one of
HP’s recycling facilities in Europe or the USA. As
many parts as possible are reused. The remainder is
recycled. Special care is taken for batteries and other
potentially toxic substances, which are reduced to
non-harmful components through a special chemical
process. If you require more details about HP’s
product take-back program, contact your dealer or
your nearest HP Sales Office.
This product contains the following materials may
require special handling at the end-of-life:
• Mercury in the liquid display.
user’s guide
19
Regulatory Information
Cables
Federal Communications
Commission Notice
Connections to this device must be made with
shielded cables with metallic RFI/EMI connector
hoods to maintain compliance with FCC Rules and
Regulations.
This equipment has been tested and found to comply
with the limits for a Class B digital device, pursuant
to Part 15 of the FCC Rules. These limits are designed
to provide reasonable protection against harmful
interference in a residential installation. This
equipment generates, uses, and can radiate radio
frequency energy and, if not installed and used in
accordance with the instructions, may cause harmful
interference to radio communications. However,
there is no guarantee that interference will not occur
in a particular installation. If this equipment does
cause harmful interference to radio or television
reception, which can be determined by turning the
equipment off and on, the user is encouraged to try
to correct the interference by one or more of the
following measures:
• Reorient or relocate the receiving antenna.
• Increase the separation between the equipment
and the receiver.
• Connect the equipment into an outlet on a circuit
different from that to which the receiver is
connected.
• Consult the dealer or an experienced radio or
television technician for help.
Modifications
The FCC requires the user to be notified that any
changes or modifications made to this device that are
not expressly approved by Hewlett-Packard
Company may void the user’s authority to operate
the equipment.
Declaration of Conformity for Products Marked with
FCC Logo, United States Only
This device complies with Part 15 of the FCC Rules.
Operation is subject to the following two conditions:
(1) this device may not cause harmful interference,
and (2) this device must accept any interference
received, including interference that may cause
undesired operation.
For questions regarding your product, contact:
Hewlett-Packard Company
P. O. Box 692000, Mail Stop 530113
Houston, TX 77269-2000
Or, call
1-800- 652-6672
For questions regarding this FCC declaration,
contact:
Hewlett-Packard Company
P. O. Box 692000, Mail Stop 510101
Houston, TX 77269-2000
Or, call
(281) 514-3333
To identify this product, refer to the Part, Series, or
Model number found on the product.
Canadian Notice
This Class B digital apparatus meets all requirements
of the Canadian Interference-Causing Equipment
Regulations.
Avis Canadien
Cet appareil numérique de la classe B respecte toutes
les exigences du Règlement sur le matériel brouilleur
du Canada.
20
user’s guide
EPA Energy Star Compliance
Monitors that are marked with the
Energy Star® Logo meet the
requirements of the EPA Energy
Star program. As an Energy Star
Partner, Hewlett-Packard
Company has determined that this product meets the
Energy Star guidelines for energy efficiency. Specific
details on using the Energy Saving features can be
found in the energy saver or power management
section of the computer manual.
Power Cord Set Requirements
The monitor power supply is provided with
Automatic Line Switching (ALS). This feature allows
the monitor to operate on input voltages between
100-120V~ or 200-240V~.
The power cord set (flexible cord or wall plug)
received with the monitor meets the requirements for
use in the country where you purchased the
equipment.
If you need to obtain a power cord for a different
country, you should purchase a power cord that is
approved for use in that country.
The power cord must be rated for the product and
for the voltage and current marked on the product’s
electrical ratings label. The voltage and current rating
of the cord should be greater than the voltage and
current rating marked on the product. In addition,
the cross-sectional area of the wire must be a
minimum of 0.75 mm² or 18AWG, and the length of
the cord must be between 6 feet (1.8 m) and 12 feet
(3.6 m). If you have questions about the type of
power cord to use, contact your HP authorized
service provider.
A power cord should be routed so that it is not likely
to be walked on or pinched by items placed upon it
or against it. Particular attention should be paid to
the plug, electrical outlet, and the point where the
cord exits from the product.
user’s guide
21
22
user’s guide