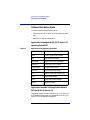
1
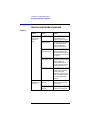
HP-UX 11i Version 1.5 Installation and Configuration Guide release id B.11.20 for rx9610 and rx4610 hp servers and i2000 hp workstations Manufacturing Part Number: B9106-90001 June 2001 © Copyright 2001 Hewlett-Packard Company. Legal Notices The information in this document is subject to change without notice. Hewlett-Packard makes no warranty of any kind with regard to this manual, including, but not limited to, the implied warranties of merchantability and fitness for a particular purpose. Hewlett-Packard shall not be held liable for errors contained herein or direct, indirect, special, incidental or consequential damages in connection with the furnishing, performance, or use of this material. Warranty. A copy of the specific warranty terms applicable to your Hewlett-Packard product and replacement parts can be obtained from your local Sales and Service Office. Restricted Rights Legend. Use, duplication or disclosure by the U.S. Government is subject to restrictions as set forth in subparagraph (c) (1) (ii) of the Rights in Technical Data and Computer Software clause at DFARS 252.227-7013 for DOD agencies, and subparagraphs (c) (1) and (c) (2) of the Commercial Computer Software Restricted Rights clause at FAR 52.227-19 for other agencies. HEWLETT-PACKARD COMPANY 3000 Hanover Street Palo Alto, California 94304 U.S.A. Use of this manual and disk(s) or tape cartridge(s) supplied for this pack is restricted to this product only. Additional copies of the programs may be made for security and back-up purposes only. Resale of the programs in their present form or with alterations, is expressly prohibited. Copyright Notices. Copyright © 1983-2001 Hewlett-Packard Company, all rights reserved. Reproduction, adaptation, or translation of this document without prior written permission is prohibited, except as allowed under the copyright laws. ©Copyright 1979, 1980, 1983, 1985-93 Regents of the University of California This software is based in part on the Fourth Berkeley Software Distribution under license from the Regents of the University of California. 2 Copyright © 1980, 1984, 1986 Novell, Inc. Copyright © 1986-1992 Sun Microsystems, Inc. Copyright © 1985, 1986, 1988 Massachusetts Institute of Technology. Copyright © 1989-1993 The Open Software Foundation, Inc. Copyright © 1986 Digital Equipment Corporation. Copyright © 1990 Motorola, Inc. Copyright © 1990-1995 Cornell University Copyright © 1989-1991 The University of Maryland Copyright © 1988 Carnegie Mellon University Copyright © 1991-1999 Mentat, Inc. Copyright © 1996 Morning Star Technologies, Inc. Copyright © 1996 Progressive Systems, Inc. Copyright © 1997-1999 Isogon Corporation, All Rights Reserved Trademark Notices. UNIX is a registered trademark in the United States and other countries, licensed exclusively through The Open Group. X Window System is a trademark of the Massachusetts Institute of Technology. MS-DOS and Microsoft are U.S. registered trademarks of Microsoft Corporation. OSF/Motif is a trademark of the Open Software Foundation, Inc. in the U.S. and other countries. Itanium is a trademark of Intel Corporation. Revision History: June 2001, Edition 1. This edition describes installing HP-UX 11i Version 1.5 (release B.11.20). This guide’s printing date and part number indicate its current edition. The printing date changes when a new edition is printed. (Minor corrections and updates which are incorporated at reprint do not cause the date to change.) The part number changes when extensive technical changes are incorporated. New editions of this manual will incorporate all material updated since the previous edition. For the latest version, see the HP-UX 11.x Release Documentation section on the Web: docs.hp.com 3 Typographic Conventions This manual uses the following typographic conventions: Boldface Words defined for the first time appear in boldface. Computer Computer font indicates literal items displayed by the computer. For example: file not found User input Bold, computer text indicates literal items that you type. For example, to change to your account’s home directory, enter: cd Italics Manual titles, variables in commands, and emphasized words appear in italics. For example, you would substitute an actual directory name for directory_name in this command: cd directory_name [ ] and | Brackets [] enclose optional items in command syntax. The vertical bar | separates syntax items in a list of choices. For example, you can enter any one of these three items in this syntax: ls [-a | -i | -x] Enter 4 Text in this bold, sans serif font denotes keyboard keys and on-screen menus. A notation like Ctrl-Q indicates that you should hold the Ctrl key down, then press Q. Contents 1. Introduction and Related Information Introduction . . . . . . . . . . . . . . . . . . . . . . . . . . . . . . . . . . . . . . . . . . . . . . . . . . . . . . . . . . . . 8 Welcome to HP-UX . . . . . . . . . . . . . . . . . . . . . . . . . . . . . . . . . . . . . . . . . . . . . . . . . . . . . 8 Install Guide Overview. . . . . . . . . . . . . . . . . . . . . . . . . . . . . . . . . . . . . . . . . . . . . . . . . . 8 How to use this Install Guide. . . . . . . . . . . . . . . . . . . . . . . . . . . . . . . . . . . . . . . . . . . . . 9 How this Install Guide is Organized. . . . . . . . . . . . . . . . . . . . . . . . . . . . . . . . . . . . . . . . 10 Media Kit Contents . . . . . . . . . . . . . . . . . . . . . . . . . . . . . . . . . . . . . . . . . . . . . . . . . . . . . 12 New Features in HP-UX 11i Version 1.5 . . . . . . . . . . . . . . . . . . . . . . . . . . . . . . . . . . . . 13 The HP-UX Operating Environment (OE) . . . . . . . . . . . . . . . . . . . . . . . . . . . . . . . . . 13 Features Unavailable in HP-UX 11i Version 1.5 . . . . . . . . . . . . . . . . . . . . . . . . . . . . . . 14 HP-UX Installation Restrictions . . . . . . . . . . . . . . . . . . . . . . . . . . . . . . . . . . . . . . . . . . . 15 Software Distribution Media . . . . . . . . . . . . . . . . . . . . . . . . . . . . . . . . . . . . . . . . . . . . . . 16 Applications included on the HP-UX 11i Version 1.5 Operating System DVD . . . . . 16 Applications available on the Application Release DVD for HP-UX 11i Version 1.5 16 System Configurations. . . . . . . . . . . . . . . . . . . . . . . . . . . . . . . . . . . . . . . . . . . . . . . . . . . 19 Hardware Configurations . . . . . . . . . . . . . . . . . . . . . . . . . . . . . . . . . . . . . . . . . . . . . . . . 20 rx9610 Server . . . . . . . . . . . . . . . . . . . . . . . . . . . . . . . . . . . . . . . . . . . . . . . . . . . . . . . . 20 rx4610 Server . . . . . . . . . . . . . . . . . . . . . . . . . . . . . . . . . . . . . . . . . . . . . . . . . . . . . . . . 20 i2000 Workstation. . . . . . . . . . . . . . . . . . . . . . . . . . . . . . . . . . . . . . . . . . . . . . . . . . . . . 21 Mass Storage Drivers. . . . . . . . . . . . . . . . . . . . . . . . . . . . . . . . . . . . . . . . . . . . . . . . . . . . 23 New SCSI Drivers. . . . . . . . . . . . . . . . . . . . . . . . . . . . . . . . . . . . . . . . . . . . . . . . . . . . . 23 Tachlite Driver . . . . . . . . . . . . . . . . . . . . . . . . . . . . . . . . . . . . . . . . . . . . . . . . . . . . . . . 23 SCSI Devices . . . . . . . . . . . . . . . . . . . . . . . . . . . . . . . . . . . . . . . . . . . . . . . . . . . . . . . . . . 24 LSI LVD UltraII SCSI Controller . . . . . . . . . . . . . . . . . . . . . . . . . . . . . . . . . . . . . . . . 24 QLogic SCSI Adapter Rates . . . . . . . . . . . . . . . . . . . . . . . . . . . . . . . . . . . . . . . . . . . . . 24 2. Installing HP-UX 11i Version 1.5 Planning your HP-UX 11i Version 1.5 Cold Install . . . . . . . . . . . . . . . . . . . . . . . . . . . . . . . . . . . . . . . . . . . . . . . . . . . . . . . . . . . . Cold Install Requirements . . . . . . . . . . . . . . . . . . . . . . . . . . . . . . . . . . . . . . . . . . . . . . Ignite-UX Support . . . . . . . . . . . . . . . . . . . . . . . . . . . . . . . . . . . . . . . . . . . . . . . . . . . . Configuring Disk Space . . . . . . . . . . . . . . . . . . . . . . . . . . . . . . . . . . . . . . . . . . . . . . . . Root Disk . . . . . . . . . . . . . . . . . . . . . . . . . . . . . . . . . . . . . . . . . . . . . . . . . . . . . . . . . . . . Pre-Install Data Tables . . . . . . . . . . . . . . . . . . . . . . . . . . . . . . . . . . . . . . . . . . . . . . . . How to Install HP-UX 11i Version 1.5 . . . . . . . . . . . . . . . . . . . . . . . . . . . . . . . . . . . . . 28 28 29 29 30 30 31 A. Post-Install Information How to Create a System Backup. . . . . . . . . . . . . . . . . . . . . . . . . . . . . . . . . . . . . . . . . . . 38 5 Contents How to Install Optional Software Products . . . . . . . . . . . . . . . . . . . . . . . . . . . . . . . . . . How to Identify your Model, OS and Software. . . . . . . . . . . . . . . . . . . . . . . . . . . . . . . . Identify Model . . . . . . . . . . . . . . . . . . . . . . . . . . . . . . . . . . . . . . . . . . . . . . . . . . . . . . . . Identify OS . . . . . . . . . . . . . . . . . . . . . . . . . . . . . . . . . . . . . . . . . . . . . . . . . . . . . . . . . . Identify Software . . . . . . . . . . . . . . . . . . . . . . . . . . . . . . . . . . . . . . . . . . . . . . . . . . . . . How to Find HP on the Web . . . . . . . . . . . . . . . . . . . . . . . . . . . . . . . . . . . . . . . . . . . . . . 39 41 41 42 42 43 B. In Case of Trouble Error Messages. . . . . . . . . . . . . . . . . . . . . . . . . . . . . . . . . . . . . . . . . . . . . . . . . . . . . . . . . 46 Known Error Messages. . . . . . . . . . . . . . . . . . . . . . . . . . . . . . . . . . . . . . . . . . . . . . . . . 46 C. Data Collection Tables 6 Introduction and Related Information 1 Introduction and Related Information Chapter 1 7 Introduction and Related Information Introduction Introduction Welcome to HP-UX HP-UX 11i Version 1.5 is the release for all Itanium processor family (IPF) based HP-UX systems. The release ID for HP-UX 11i Version 1.5 is B.11.20, and the term HP-UX 11i Version 1.5 (B.11.20) will be used throughout this install guide. The HP-UX 11i Version 1.5 (B.11.20) Operating Environment (OE) is an integrated and tested software solution containing the operating system and selected applications. PA-RISC based systems should continue to run HP-UX 11i (release ID B.11.11) or earlier releases. HP-UX 11i Version 1.5 (B.11.20) will not run on PA-RISC based systems. This release is not intended for Mission Critical environments, and HA products such as ServiceGuard are not supported on this release. It includes the following major features and enhancements: • Base VERITAS Volume Manager 3.1 for HP-UX (VxVM), is integrated in HP-UX and is now the default volume manager and root disk • Support for running most PA-RISC applications on IPF without recompiling • Enhancements to some commands, including date and strftime Functionality provided in this release will be included in future releases of HP-UX. Install Guide Overview Depending on how your system is configured, your use for this guide will vary. For example, • If you ordered one of the server configurations with HP-UX 11i Version 1.5 pre-installed, this guide can still provide you with valuable information about configuring your system, as well as peripherals, software, optional OS components and more. • If you ordered a server or workstation without the OS pre-installed, then you will need to follow the instructions in Chapter 2. 8 Chapter 1 Introduction and Related Information Introduction WARNING i2000 workstations ship with Windows 2000 pre-installed. By following the install instructions in Chapter 2 of this guide, you will overwrite the Windows 2000 operating system. How to use this Install Guide To help ensure a successful installation of HP-UX 11i Version 1.5, we recommend that you review this entire guide before proceeding to install the OS on your system as described in Chapter 2 of this guide . Note that HP-UX 11i Version 1.5 is the only HP-UX release for all HP-UX Itanium-based systems; therefore this guide only describes installing HP-UX 11i Version 1.5 on Itanium-based systems. This Installation Guide provides detailed information regarding both the hardware and the software that together make up your new system. If you will be cold-installing HP-UX 11i Version 1.5 on your new system, the following steps for using this guide are recommended: 1. Read the following section, How this Install Guide is Organized. 2. Complete the pre-install data collection tables in Appendix C. 3. Complete the install procedure in Chapter 2 TIP Any last minute install issues are provided in a Readme Before Installing booklet (MPN: B9106-90005) provided with the HP-UX 11i Version 1.5 media. Be sure to review this booklet before continuing. Chapter 1 9 Introduction and Related Information How this Install Guide is Organized How this Install Guide is Organized Table 1-1 Chapter Section Content Chapter 1 Installation and Configuration Notes Introduction This section introduces you to the Install Guide and provides suggestions for how to use it best. Media Kit Contents This section describes the media kit that is shipped with new HP servers, including software, applications, release notes, etc. New Features (and Unsupported Features) This sections describes new features of the operating system that shipped with your system, and also describes any features that are not supported. Software Distribution Media: Content Listings This section consists of three separate listings which describe the software included on the Application Release DVD, the Operating System DVD, and other software supported by this OS. System Configurations This section provides summary and detailed listings of the three HP Itanium -based system configurations, including processor speeds, cache memory, supported PCI interfaces cards, and other peripherals. How to Plan Your HP-UX Installation This section provides a brief list of information required to begin the install procedure. How to Install HP-UX 11i Version 1.5 This section provides step-by-step procedures for installing the OS. Chapter 2 Installing HP-UX 11i Version 1.5 10 Chapter 1 Introduction and Related Information How this Install Guide is Organized Table 1-1 Chapter Section Content Appendix A Post-Install Information How to Create a System Backup This section provides a brief description of creating a system backup. How to Install Optional Software Products This section provides an example of how to install one of the optional software products that ships on the application release DVD. How to Identify your Model, OS and Software This section shows you the commands for finding information about your system. How to Find HP on the Web This section provides several useful URL’s that you can use to find various HP reference material on the web, such as user manuals, manpages, HP-UX patches, support documents, safety information and more. Appendix B In Case of Trouble Errors and Warnings This section describes what to do if you encounter certain errors. Appendix C Data Collection Tables Data Collection Tables This section contains the data collection tables (each on a separate page so that you can make photocopies if necessary) that you will use to record pre-install data. Chapter 1 11 Introduction and Related Information Media Kit Contents Media Kit Contents This guide accompanies the HP-UX 11i Version 1.5 (B.11.20) media kit, which also includes: • HP-UX 11i Version 1.5 DVD — Contains the HP-UX OS (operating system), required networking software, and on-line diagnostics. • Application DVD — Contains HP-UX application software. • Instant Information CD — Contains current HP-UX manuals, release notes and white papers. • Readme Before Installing HP-UX 11i Version 1.5 — This booklet contains last minute information for HP-UX 11i Version 1.5. Read this booklet before installing. • HP-UX 11i Version 1.5 Release Notes — A file describing new features and functionality changes for HP-UX 11i Version 1.5. This file will be on the system after you install HP-UX 11i Version 1.5 in: /usr/share/doc/RelNotes/ Release Notes are also available on the Instant Information CD and on the Web at: http://docs.hp.com/ Select the HP-UX 11i Version 1.5 Release Documentation link. 12 Chapter 1 Introduction and Related Information New Features in HP-UX 11i Version 1.5 New Features in HP-UX 11i Version 1.5 HP-UX 11i Version 1.5 (B.11.20) adds software functionality and support for Itanium-based systems to HP-UX. HP-UX 11i Version 1.5 (B.11.20) is intended for all Itanium processor family (IPF) based HP-UX systems. PA-RISC based systems should continue to run the HP-UX 11i or HP-UX 11.x releases. This release will not run on PA-RISC based systems. HP-UX 11i Version 1.5 (B.11.20) includes the following major features and enhancements: • Base VERITAS Volume Manager 3.1 for HP-UX (VxVM), is integrated in HP-UX and is now the default volume manager and root disk • Support for running most PA-RISC applications on IPF without recompiling • Enhancements to some commands, including date and strftime Functionality provided in this release will be included in future releases of HP-UX. See the HP-UX 11i Version 1.5 Release Notes for more about these new OS features. NOTE HP is continually adding support for additional hardware and software. Contact your HP Service Representative for information about additional support or refer to the latest edition of this document on http://docs.hp.com/. The HP-UX Operating Environment (OE) Beginning with HP-UX 11i, the operating system is delivered as part of the HP-UX Operating Environment (OE). An Operating Environment is an integrated and tested software solution containing the operating system and selected applications. In HP-UX 11i Version 1.5 (B.11.20), the operating system and selected applications are provided on two DVDs, to install the full OE, you must install from both DVDs. Chapter 1 13 Introduction and Related Information Features Unavailable in HP-UX 11i Version 1.5 Features Unavailable in HP-UX 11i Version 1.5 In comparison with HP-UX 11i, HP-UX 11i Version 1.5 (B.11.20) does not provide support for: • • • • • • • • • • • PA-RISC systems updates, HP-UX 11i Version 1.5 (B.11.20) must be cold installed HFS or LVM root disk, use VxVM or whole disk VxFS instead boot from LVM disks root, swap or dump on LVM disks early dump Shared LVM Business Copy/BCV/snapshot features on high-end disk arrays Fabric connectivity with Fibre Channel Mass Storage High Availability (HA) features PCI OLA/R HP-UX 11i Version 1.5 (B.11.20) does not support • • • • PA cross development on IPF HP supplied PA mode archive system libraries. HP supplied IPF archived system libraries mix & match between IPF and PA binaries and/or 32-bit and 64 bit objects • network boot • framebuffer graphics support • boot from floppy disk In addition, administrators and developers should make note of the following important changes and limitations: • the id number returned by uname may no longer be unique • manual editing of /stand/system file is now obsolete Additional information about the above changes and limitations, and other differences between HP-UX 11i and HP-UX 11i Version 1.5 (B.11.20), are described further in the HP-UX 11i Version 1.5 Release Notes (MPN: B9106-90003) . 14 Chapter 1 Introduction and Related Information HP-UX Installation Restrictions HP-UX Installation Restrictions Installing HP-UX 11i Version 1.5 (B.11.20) requires a 4 GB minimum root disk. The following installation restrictions apply: • Installing HP-UX 11i Version 1.5 (B.11.20) requires using the DVD media. • HP-UX 11i Version 1.5 (B.11.20) only supports cold installation of the HP-UX operating system. • Updating to HP-UX 11i Version 1.5 (B.11.20) from previous releases is not supported. • The HP-UX 11i Version 1.5 (B.11.20) release does not support using Ignite-UX to create and distribute a Golden System or Golden Disk for network installation of HP-UX. NOTE This manual deals only with the software steps required to install your operating system. For hardware upgrades, either see the documentation included with your hardware or consult your HP Support Engineer. Chapter 1 15 Introduction and Related Information Software Distribution Media Software Distribution Media The following tables list the applications that are: • included on the HP-UX 11i Version 1.5 (B.11.20) Operating System DVD, • available on the Application Release DVD Applications included on the HP-UX 11i Version 1.5 Operating System DVD Table 1-2 Applications on the Operating System DVD Product Name Description Aries PA-RISC Dynamic Code Translator ASE Asian System Environment Base VxVM Base HP VERITAS Volume Manager Base VxFS Base HP VERITAS File System CDE/Xt/ Motif Windows interface for Unix DCE RPC Client Remote Procedure Calls IUX Ignite UX - Cold install from DVD only LVM Logical Volume Manager SAM System Administration Manager SD-UX Software Distributor Applications available on the Application Release DVD for HP-UX 11i Version 1.5 The products listed here are not included on the HP-UX 11i Version 1.5 (B.11.20) Operating System DVD; they are available on the HP-UX 11i Version 1.5 (B.11.20) Application Release DVD. 16 Chapter 1 Introduction and Related Information Software Distribution Media Some of these applications are offered for free and may also be available for download from the HP website. Please check the HP ordering database or the configuration guides for details on the individual products. Table 1-3 Applications on the Application Release DVD Product Number Product Name Description B9415AA Apache Apache Web Server B3899BA* C/ANSI C Dev HP C/ANSI C Developer Bundle Fortran Fortran compiler GigEther-00 Gigabit Ethernet PCI Gigabit Ethernet LAN driver B3691AA* Glance Plus GlancePlus HP9000 Server Glance Plus - Jpn Japanese GlancePlus HP9000 Server B6060BA MPI HP Message Passing Interface B5118CA* Online JFS Online Backup for JFS B9116AA VxVM – Full Veritas Volume Manager – Full B3911DB* ANSI C++ HP ANSI C++ compiler B3394BA Dev Kit HP-UX Developer's Toolkit. Tools for user interface development. B6061AA MLIB HP Parallel Math Library B4580AA STK HP-UX 11i Version 1.5 Software Transition Kit B3901BA B3907DB* B3909DB B3693AA B3691AJ* B3693AJ B3929CA B3913DB Chapter 1 17 Introduction and Related Information Software Distribution Media Table 1-3 Applications on the Application Release DVD Product Number Product Name Description B9789AA Java 2 RTE 1.3 B9788AA Java 2 SDK 1.3 Java 2 RTE/SDK 1.3 Run Time Environment and Software Development Kit B4965AA* MWA Svr Measureware Server –Tool for viewing system data MWA Svr - Jpn Japanese Measureware Server MirrorDisk/UX Disk Mirroring for HP-UX B8342AA Netscape Netscape Communicator B2432EB* Object Cobol RTS HP Micro Focus Object Cobol Runtime System B6960AA OmniBack OmniBack Backup Software B6836AA OpenGL Open Graphics Language FibrChanl-00 Fibre Channel PCI Fibre Channel LAN Driver B4967AA B4965AJ* B4967AJ B5403BA* B2491BA B2435EB Note: Product Numbers with asterisks (*) are for i2000 workstations To see the most recently updated list of applications that are certified on HP-UX 11i Version 1.5 (B.11.20): 1. Go to: http://software.hp.com/HPUX-RDMP/ 2. Select the latest HP-UX Application Release desired, then select New/Updated Software Product List. 3. Review the list of supported applications. 18 Chapter 1 Introduction and Related Information System Configurations System Configurations HP-UX 11i Version 1.5 (B.11.20) supports only a 64-bit version of the HP-UX kernel. The tables below outline the fully supported HP-UX 11i Version 1.5 (B.11.20) configurations for rx9610 and rx4610 hp servers, and i2000 hp workstations. NOTE The information in the following tables is subject to change. For the most up-to-date information, refer to the following web site: http://www.hp.com/products1/itanium/ Table 1-4 Server Configuration Summary Platform Processor Cache Min/Max Memory # Slots PCI I/O rx9610 733Mhz 2MB 800Mhz 4MB 256MB to 128GB 64 to 128 PCI Ultra-2 SCSI, FWD SCSI-2, Gigabit Ethernet, 10/100B-TX, Fibre Channel 733Mhz 2MB 733Mhz 4MB 1GB to 64GB 10 PCI 800Mhz 4MB Ultra-2 SCSI, FWD SCSI-2, 1000B-SX, 10/100B-TX, Fibre Channel rx4610 Table 1-5 Workstation Configuration Summary Platform Processor Cache Min/Max Memory # Slots PCI I/O i2000 733Mhz 2MB 1GB to 4GB 7 PCI 800Mhz 2MB 2GB to 4GB 10/100B-TX, USB, external SCSI Chapter 1 19 Introduction and Related Information Hardware Configurations Hardware Configurations rx9610 Server The rx9610 server can contain up to 4 cells. Each cell includes, among other things, a memory card (16 dimm slots), four Itanium processors, and a connector for an additional memory card (16 additional dimm slots). The configurations for the rx9610 are: Server rx9610 - 16-way IPF-based server Processor 733MHz/2MB 800MHz/4MB Memory 128GB max memory using 16 SDRAM DIMM sockets per memory expander board per cell Drives DVD drive (IDE) Floppy drive LS-120 (IDE) slim line Hard Disk Drives (HDD) 2 hot swap 1" 18GB each, total 36GB PCI I/O up to 64 66MHz slots or 128 33MHz slots Supported Add-On Peripherals A5272A - Sure Store E Disk System S10 A5236A(z) - Sure Store E Disk System FC10 A5277A - Sure Store E Disk Array FC60 A3311A - High Availability Storage System A5599A - DLT8000 Tape Drive Supported Add-On Cards A5150A -Dual Port Ultra2 SCSI A5159A -Dual Port FWD SCSI-2 A4926A - PCI 1000BaseSX Gigabit Ethernet Fiber, single port A4929A - PCI 1000BaseT A6792A - PCI 100BaseT A5158A - Single Port Fibre Channel (Tachlite) rx4610 Server The Itanium processor server configurations for the rx4610 are: 20 Chapter 1 Introduction and Related Information Hardware Configurations Server rx4610 - a 2-4 way IPF-based server Processors 733MHz/2MB 733MHz/4MB 800MHz/4MB Memory 64GB max memory using 32 SDRAM DIMM sockets per memory expander board Drives DVD drive (IDE) Floppy drive LS-120 (IDE) slim line 2 hot swap 1" Hard Disk Drives 18GB each, total 36GB PCI I/O 10 PCI slots - 8 66MHz slots, 2 33MHz slots Supported Add-On Peripherals A5272A - Sure Store E Disk System SC10 A5236A(z) - Sure Store E Disk System FC10 A5950A - Sure Store E Disk Array XP512 A5700A - Sure Store E Disk Array XP256 A5920A - Sure Store E Disk Array XP48 A5277A - Sure Store E Disk Array FC60 A5616A - Sure Store E Disk System HVD 10 C4318B - Smart Storage Enclosure (DDS4) C6369A/71A - DDS4 Tape Drive A5617A - 10/180 Tape Library A5598A - 9840 Tape Drive A5599A - DLT8000 Tape Drive A5583A(HVD) - 2/20 Tape Library Supported Add-On Cards A5150A -Dual Port Ultra2 SCSI A5159A -Dual Port FWD SCSI-2 A4926A - PCI 1000BaseSX Gigabit Ethernet Fiber, single port A4929A - PCI 1000BaseT Copper Gigabit Ethernet A6792A - PCI 100BaseT A5158A - Single Port Fibre Channel (Tachlite) i2000 Workstation The Itanium-based workstations are available in two configurations, the i2000 733MHZ is a single processor system with 2MB Cache, and 1, 2, or 4GB memory, and the i2000 800MHZ is a dual processor system with 2MB Cache, and 2 or 4GB memory. Chapter 1 21 Introduction and Related Information Hardware Configurations Workstation i2000 - a 1-2 way IPF-based workstation with 2M L2 Cache Processor 1 733MHz/2MB 2 800 MHz/2MB Memory UP - 1GB (add on to 2 or 4GB) MP - 2GB (add on 4 GB) Drives DVD drive (IDE) Floppy drive LS-120 or LS-240 (IDE) slim line Hard Disk Drives (HDD) 18GB Core Built-in I/O 7 PCI slots 10/100BT LAN (10-200B-TX?) USB (4) internal SCSI (Ultra3 Qlogic 12160) PS-2 Keyboard Graphics Console NVIDIA Quadro2Pro 22 Chapter 1 Introduction and Related Information Mass Storage Drivers Mass Storage Drivers External mass storage is not supported on the i2000 hp workstations. New SCSI Drivers For the rx9610 and rx4610 servers, two new SCSI HBA drivers, qlisp and c8xx, are released in HP-UX 11i Version 1.5 (B.11.20). The c8xx driver runs on all IPF systems and replaces the c720 HBA driver on PA systems. The qlisp HBA driver is a new driver to support the 12160 Qlogic SCSI controller. The c8xx HBA driver supports both the A5150A, Dual Channel Ultra2 SCSI, and the A5159A, Dual Channel FWD SCSI-2, add-in PCI cards. The qlisp HBA driver supports the core Qlogic SCSI controller. There is no early dump support in HP-UX 11i Version 1.5 (B.11.20). Unlike PA systems, on IPF based systems, it is not possible to get a crash dump before the system is booted. For more information, see System Crash Dump Changes in Chapter 3 of the HP-UX 11i Version 1.5 Release Notes, “HP-UX Features.” Tachlite Driver For the rx9610 and rx4610 servers, this release includes td, the Fibre Channel PCI Tachyon TL driver. This version of the driver supports Fibre Channel Arbitrated Loop (FC-AL) only. Fabric is not supported in this release. The IPF platforms supported by this driver are: • hp server rx9610 • hp server rx4610 For a complete list of supported platforms and devices as well as other up-to-date information, see the Fibre Channel web site at http://techsolutions.hp.com. Chapter 1 23 Introduction and Related Information SCSI Devices SCSI Devices External mass storage is not supported on the i2000 hp workstations. LSI LVD UltraII SCSI Controller On Itanium-based servers, unlike PA-based systems, the LSI LVD UltraII SCSI controller, part number A5149A, can not boot from targets with SCSI ID greater than 7. These controllers have the Sub System ID Bits (SSID) set such that the card is forced into narrow mode. Specifying Bootable Devices in the LSI BIOS The LSI BIOS is used to determine which SCSI HBAs are searched for bootable devices. The LSI BIOS limits this selection to a maximum of four possible choices, determined by the PCI bus slot order. Any boot target must reside on one of those default controllers. NOTE HP-UX will let you install to any device on the system but if the device is not on one of the default controllers you can not boot from it. QLogic SCSI Adapter Rates For the rx9610 and rx4610 servers, some JBOD (Just a Bunch Of Disk) enclosures contain internal cabling for a slower SCSI rate than newer disk devices may accept. If an Ultra160 disk accepts the higher rate in an Ultra2 enclosure, a hang will occur in data transfers. To force the autonegotiation to use a slower rate, you must configure the SCSI adapter. Setting external QLogic SCSI connector for JBODs: Step 1. Enter Alt-Q when prompted on machine book Step 2. Choose Configuration Settings->Host Adapter Settings Adapter Configuration: Manual 24 Chapter 1 Introduction and Related Information SCSI Devices Changing to Manual mode allows access to all the fields in the device settings screen. Step 3. Choose Configuration Settings->SCSI Device Settings->Bus 1 Press TAB to move to the left column (affects all devices in this model) Jamaica BOX JBOD (Fast settings): Sync Offset: 8 Sync Period: 25 SC10 Megatron (Ultra2 settings): Sync Offset: 14 Sync Period: 10 Step 4. Configuration Settings->Host Adapter Settings Adapter Configuration: AUTO Changing back to AUTO mode allows autonegotiation to occur but based on the new device settings. Leaving this at Manual may cause the card to complain with warnings as the settings are forced on the SCSI devices without negotiation. Step 5. Save changes and reboot Chapter 1 25 Introduction and Related Information SCSI Devices 26 Chapter 1 Installing HP-UX 11i Version 1.5 2 Installing HP-UX 11i Version 1.5 This chapter describes installing HP-UX 11i Version 1.5. After reading the preparation notes on the next few pages and completing the pre-install data collection tables in Appendix C, follow the cold install procedures described in this chapter. Chapter 2 27 Installing HP-UX 11i Version 1.5 Planning your HP-UX 11i Version 1.5 Cold Install Planning your HP-UX 11i Version 1.5 Cold Install This section describes cold installing from the HP-UX 11i Version 1.5 (B.11.20) DVD. See the following documents supplied with the HP-UX 11i Version 1.5 (B.11.20) media for additional information: • HP-UX 11i Version 1.5 Release Notes — Describes changes included in this release. On your system, look in: /usr/share/docs/ These documents are also on the Instant Information CD supplied with HP-UX 11i Version 1.5 (B.11.20) media and at HP’s user documentation Web site: http://docs.hp.com/ For the latest information on downloading and using Ignite-UX, go to the Ignite-UX Web site: http://software.hp.com/software/HPsoftware/IUX/ WARNING Cold-installing HP-UX overwrites everything on the target disk, including other disk partitions. On i-class systems, cold-installing HP-UX will overwrite the factory installed Windows 2000 operating system. HP-UX 11i Version 1.5 does not support sharing the root disk with any other operating system. Cold Install Requirements To cold-install HP-UX 11i Version 1.5, you must have the following: • A supported Itanium-based server or workstation. Supported systems are listed in the section “System Configurations” of Chapter 1, “Introduction and Related Information.” • The HP-UX 11i Version 1.5 (11.20.B) media 28 Chapter 2 Installing HP-UX 11i Version 1.5 Planning your HP-UX 11i Version 1.5 Cold Install Ignite-UX Support The Ignite-UX product is not available for configuring an Ignite-UX server at the time of the initial release of HP-UX 11i Version 1.5. When it is released, it will be available for download from HP’s Software Depot web site: http://software.hp.com/software/HPsoftware/IUX/ To be notified of new releases of Ignite-UX by email, please register at the Software Depot web site listed above. Configuring Disk Space • Develop a clear configuration plan, including the following: — File system sizes. — Swap space size. — Dump device. — Disk and file-system parameters. The defaults for these settings match a broad set of needs, but if necessary they can be modified early in the install process. • If you plan to install application programs other than those supplied with HP-UX 11i Version 1.5, consider vendor size recommendations. For planning disk space, refer to these other books: — Managing Systems and Workgroups — available on the HP Instant Information CD and at: http://docs.hp.com/ — HP JFS 3.3 and HP OnLineJFS 3.3 VERITAS File System 3.3 System Administrator's Guide — available at http://docs.hp.com/ — VERITAS Volume Manager 3.1 Administrator’s Guide — available at http://docs.hp.com/ Chapter 2 29 Installing HP-UX 11i Version 1.5 Planning your HP-UX 11i Version 1.5 Cold Install CAUTION If your system needs to be reinstalled at any point, the root disk will be overwritten and all data on it will be lost. For that reason, we recommend that you do not put user data on the root disk. Root Disk HP-UX 11i Version 1.5 provides several file system choices for the root disk. • By default, the system installs VxVM on the root disk with VxFS file systems. Unless the system firmware supports the edd30 command, VxVM should only be installed onto a disk located at target 0. Once installed, you should not physically move the VxVM root disk. — Striping volumes can be configured during the install. — Mirrored volumes can not be configured during the install. Configure mirroring after the installation is complete. • Whole-disk VxFS • HFS file systems are not supported. • Logical Volume Manager (LVM) is not supported as root disk, use VxVM instead. Pre-Install Data Tables The pre-install data tables are located in Appendix C. IMPORTANT All of the data in these tables is required to install HP-UX 11i Version 1.5 (with the exception of the networking information if you are installing a stand-alone system). By completing the following tables prior to beginning the install of HP-UX 11i Version 1.5, you will have all the data you need, in one place, to successfully complete the install once you have started. 30 Chapter 2 Installing HP-UX 11i Version 1.5 Planning your HP-UX 11i Version 1.5 Cold Install How to Install HP-UX 11i Version 1.5 To cold install the operating system, which overwrites everything on the target disk: Step 1. Make sure any external devices connected to the target system are turned ON and operational. Step 2. Insert the HP-UX 11i Version 1.5 DVD into the drive. Step 3. Turn the system ON, reboot, or cycle power. The system should boot automatically from the DVD; if it does, go directly to step 4. IMPORTANT: If the system does not boot automatically, you will be taken to the boot menu, which is a timed menu -- press any key to stop the timer. Then, you can run install manually from the EFI shell, as follows: 1. Select EFI Shell (Built In) from the boot menu. 2. Display the list of devices by typing: map -b (The -b command line option scrolls the screen one page at a time in the event that the device list is longer than one page.) 3. Look at the list of devices (displayed as fs0, fs1, etc.) and identify the DVD-ROM device. An example of a DVD-ROM device entry from the map command: fs0 : Acpi (PNP0A03),0)/Pci(3|1)/Ata(Secondary,Master) /CDROM(Entry1) 4. The edd30 [on | off ] command toggles the BIOS option to display device path according to the EDD 3.0 specification. If the BIOS option is off, the root disk must be located at target 0. If the root disk is not located at target 0, type : edd30 on to enable EDD 3.0. 5. Then enter the command device_name:\install. For example, if the DVD-ROM device is fs0, you would enter fs0:\install Chapter 2 31 Installing HP-UX 11i Version 1.5 Planning your HP-UX 11i Version 1.5 Cold Install Step 4. Verify the system booted from the DVD. The bootloader will display a message indicating you have 20 seconds to interrupt the boot process. The AUTO file should contain the string boot :IINSTALL -c0 If the AUTO file string is different from the above, you may have booted from the wrong device. In that case, interrupt the boot process, enter the EFI shell. From the EFI shell, select the correct device, as explained in step 3. Step 5. Once the kernel has booted, it will scan the system for IO devices. Step 6. The system now displays the Ignite-UX welcome screen for the HP-UX installation process. If you have used Ignite-UX on PA systems, the remaining procedures will be familiar to you. Take a moment to read how to navigate and select choices on this terminal interface: • Use the Tab key to navigate between fields and the arrow keys to navigate within fields. • Use the Return/Enter key to select an item. Pressing Return/Enter or the space-bar opens a menu list. • For Help, use Cntl-K for navigation key help and Cntl-F (or F1) for context-sensitive help. • You can enter the underlined letter of an item (such as I for install HP-UX) to navigate more quickly. Step 7. Select Install HP-UX to begin interacting with the Ignite-UX (cold-install) program. Step 8. From the User Interface and Media Options screen, choose the degree of customizing needed to configure the installation. The default setting under Source Location Options (Media only installation) is correct for installing from a DVD. Three choices are shown in User Interface Options: • Guided Installation provides tutorial information and limited choices for inexperienced Ignite-UX users. • Advanced Installation enables you to customize your system on tabbed screens. Use this mode to change VxVM settings. You may also find it convenient to set system parameters, network services, file-system characteristics, and other configuration details. 32 Chapter 2 Installing HP-UX 11i Version 1.5 Planning your HP-UX 11i Version 1.5 Cold Install • No User Interface Use all the defaults and GO. Ignite-UX permits you to exit from Guided Installation and restart the configuration using Advanced Installation later by either selecting the Cancel button or pressing C. Mark your choices and select OK. NOTE The remaining steps take you through the Guided Installation. For help, consult the Help screens. For more help on using Advanced Installation, see the Ignite-UX Administration Guide. Step 9. You are now at the first step of the Install HP-UX Wizard: Select an overall system configuration. Accept the default option: HP-UX 11i Version 1.5 (B.11.20). Step 10. Select a system environment. In this step you will choose the type of desktop, or windowing system that will be installed on your system. If you are unsure of which environment to choose, the CDE (Common Desktop Environment) HP-UX Environment is recommended. Make your selection before continuing. Step 11. Select a root disk. In this step you will choose the disk that will house your root filesystem. If you are unsure of what to choose, keep the default selection which has been calculated by the install program. Step 12. Specify the amount of root swap space. Some initial calculations have been performed by the install program, and a recommended value has been set for you. You can either accept this value or change it before continuing. Step 13. Select filesystem type. The default value chosen by the install program is recommended. On the File System tab, choose between Whole-disk with VxFS and VxVM (HP VERITAS Volume Manager with VxFS). The following restrictions and limitations apply to VxVM: • The VxVM install option may be used only when installing onto a disk located at target 0 unless the firmware supports the edd30 command. If you did not enable EDD 3.0 and you need to, you can break out of the HP-UX Install Wizard, reboot the machine, and start again (see step 3). If the edd30 command succeeds you may install VxVM to any target. If the command fails, you may only install VxVM Chapter 2 33 Installing HP-UX 11i Version 1.5 Planning your HP-UX 11i Version 1.5 Cold Install to target 0. • Once installed, the VxVM root disk can not be moved to another SCSI bus or address that results in a change in the hardware path to the device. If it is moved, you may not be able to boot sanely from it. This is similar to the limitation present in LVM. Step 14. Specify root disk volume group disks. In this step you will specify how many disks you want placed into the root disk volume group and whether or not you would like the disks to be striped. (The HP-UX Install Wizard describes these features in depth.) Step 15. Select language(s). Browse the available languages, marking the desired selections. Step 16. Select the user license. In this step you will select the type of user license you wish to install on your system. This information does not have to be exact, but should represent what you believe to be the primary usage of your system. A minimal two-user license is denoted here. To load licenses for more than two users, you must use the Application DVD. Step 17. Select additional software. In this step you may select any additional software which you would like loaded onto your system. Browse the list, marking your selections, then continue to the next step. Step 18. Pre-Install check information, Step 1. There are two steps involved in the pre-install checks. The first is to identify which disks will be overwritten during the install process. If you see disk in the list that you do not want included, back up to the root disk selection and choose another disk. Otherwise continue on to the next step. Step 19. Pre-Install check information, Step 2. The second step in the pre-install check is to review any errors or warnings. Warnings are simply informational. If there are any errors, they will need to be resolved before the installation can continue. Step 20. System summary. At this point you have successfully defined your system. Use the show summary button to view a summary of how your system will be configured. If you see any problems, or wish to change any of your selections, feel free to back up to the appropriate step, and make the needed changes. Otherwise, select Finish (at the bottom of the tabs). You have the chance to Cancel at this time. If you cancel, you return to the previous configuration screen. Step 21. Next, the installation will begin with filesets being copied from the 34 Chapter 2 Installing HP-UX 11i Version 1.5 Planning your HP-UX 11i Version 1.5 Cold Install media to the hard disk. The system will automatically reboot during the installation process. Step 22. After the system has rebooted, the Welcome to HP-UX screen is displayed. At this point, you will need to answer a few questions before you can use the system. The first is whether or not you plan to use the system on a network. If you have completed the pre-install data collection tables in Appendix C, you have all of the information you need to complete the networking section of the install, so answer Y for yes. Step 23. On the following screens, enter the basic network configuration information that you collected in Appendix C. Depending on how you set up your parameters, the system either will have configured them automatically or will call the set_parms command to allow you to set the root password, date and time, time zone, IP address, and additional network parameters. Step 24. Confirm your choices. Congratulations! You are now finished with the install procedure and will be given the opportunity to log in to the system as root. Step 25. Log in to the system. Step 26. After the cold install, store the HP-UX OS DVDs in a safe place. You may need them to install drivers or other software later. Chapter 2 35 Installing HP-UX 11i Version 1.5 Planning your HP-UX 11i Version 1.5 Cold Install 36 Chapter 2 Post-Install Information A Post-Install Information This appendix describes: • How to Create a System Backup • How to Install Optional Software Products • How to Identify your Model, OS and Software • How to Find HP on the Web Appendix A 37 Post-Install Information How to Create a System Backup How to Create a System Backup You do not need to create a back up immediately after a cold install. The Ignite-UX product is not available for making a system recovery backup at the time of the initial release of HP-UX 11i Version 1.5. When it is released, it will be available for download from HP’s Software Depot: http://software.hp.com/software/HPsoftware/IUX/ Before Ignite-UX is available, once you have begun putting additional files on your system we recommend using the fbackup command to create a backup archive and frecover to restore the system if necessary. By backing up your system, you will have a reliable system image to return to if subsequent system changes or failures corrupt your system. 38 Appendix A Post-Install Information How to Install Optional Software Products How to Install Optional Software Products The Applications DVD that is distributed with HP-UX 11i Version 1.5 contains optional development tools and system management software. HP-UX 11i Version 1.5 must be booted in order to install optional software products. The following is the procedure for installing products from the Applications DVD. Step 1. Insert the Applications DVD in the DVD-ROM drive. Step 2. Mount the Applications DVD. To install software from the Applications DVD, you must mount the DVD as a filesystem that HP-UX 11i Version 1.5 can access. a. Determine the DVD-ROM device name. Use the ioscan -funC disk command to list disk devices, including the DVD-ROM. The following sample output shows a DVD-ROM on cabinet 0 whose device name is /dev/dsk/c1t0d0. disk 4 4/2/0.0.0 sdisk CLAIMED /dev/dsk/c1t0d0 DEVICE TOSHIBA CD-ROM XM /dev/rdsk/c1t0d0 b. Create a mount point for the Applications DVD, if one does not yet exist. The mount point is a directory that HP-UX will use as an access point for the DVD. Often a /CDROM directory is used. If this directory does not exist, create it using the mkdir /CDROM command. c. Use the mount command to mount the DVD. Using the mount command, specify the DVD-ROM device name and mount point. For example, the following command mounts the /dev/dsk/c1t0d0 device as the /CDROM directory. mount /dev/dsk/c1t0d0 /CDROM See the mount (1M) manpage for details. Step 3. Use swinstall to install software from the Application DVD. Appendix A 39 Post-Install Information How to Install Optional Software Products The following example command runs swinstall to install software from the source mounted at /CDROM. swinstall -i -s /CDROM See the swinstall (1M) manpage for details. Step 4. Select and install software from the Applications DVD. The swinstall program presents an interface for selecting and installing software from the DVD. Step 5. Unmount and eject the Applications DVD. You must unmount the DVD before you can eject it from the DVD-ROM drive. The DVD is automatically unmounted whenever the server reboots. Use the umount command to unmount the DVD. For example, umount /CDROM will unmount the /CDROM filesystem. See the umount (1M) manpage for details. 40 Appendix A Post-Install Information How to Identify your Model, OS and Software How to Identify your Model, OS and Software Identify Model To determine the model number of your system, check your invoice. Once the system is up and running, you can check your model number as well as a number of other informational items about your system by entering: machinfo Following is a sample output: # machinfo CPU info: Number of CPUs = 1 Clock speed = 800 MHz CPUID registers vendor information = processor serial number = processor version info = architecture revision: processor family: processor model: processor revision: largest CPUID reg: processor capabilities = implements long branch: Cache L1 L1 L2 L3 info: Instruction: Data: Unified: Unified: size size size size = 16 = 16 = 96 = 4096 "GenuineIntel" 0x0000000000000000 0x0000000007000604 0 7 Intel(R) Itanium(TM) Family Processors 0 Intel(R) Itanium(TM) Processor 6 stepping C0 4 0x0000000000000000 0 KB, KB, KB, KB, associativity associativity associativity associativity = = = = 4 4 6 4 Memory = 2043 MB (1.995117 GB) Firmware Revision = S460AC4A.86B.0073.B.0101291049 Platform info: model string = "ia64 Intel MP Server" machine id number = 2e405c47-a41c-d511-bfcb-0060b00619e4 machine serial number = ......... OS info: sysname = HP-UX nodename = puppy release = B.11.20 version = A (two-user license) machine = ia64 idnumber = 0775969863 /stand/vmunix _release_version: @(#) $Revision: vmunix: vw: njl selectors: CUPI80_BL2001_0429 danax_vxvm_dump 'CUPI80_BL2001_0403' 'njl_danax_vxvm_dump' FLAVOR=debug DFILE=dfile.em_64 Mon Apr 30 21:34:48 EDT 2001 # Appendix A 41 Post-Install Information How to Identify your Model, OS and Software Identify OS After installing HP-UX 11i Version 1.5, you will notice that uname -r identifies HP-UX 11i Version 1.5 as: B.11.20. This is the release ID. Identify Software To identify the software products on a system or a media, use swlist. For example, to show revision and descriptive title of all software installed on a system, enter: /usr/sbin/swlist To show revision and descriptive title of all software on a CD-ROM mounted at /cdrom, enter: /usr/sbin/swlist -s /cdrom swlist has many options to expand or narrow the listing to specific software and software attributes. For more about swlist, see Managing HP-UX Software With SD-UX. 42 Appendix A Post-Install Information How to Find HP on the Web How to Find HP on the Web You can obtain software and documentation for installing HP-UX and related products on the Web: • The latest HP-UX manuals: http://docs.hp.com/ • If you have installed the Apache Web Server, additional information and links can be found at: http://your_system_name • Ignite-UX information and download: http://software.hp.com/software/HPsoftware/IUX/ • HP-UX 11.0 Software Transition Kit: http://software.hp.com/STK/ • Downloading HP-UX patches and patch information from your nearest HP IT Resource Center: Americas and Asia Pacific: http://us-support.external.hp.com/ Europe, Middle East and Africa: http://europe-support.external.hp.com/ To receive HP Security Bulletins, select “Support Information Digests” from the Maintenance and Support page). • Euro currency symbol information: http://www.hp.com/euro/ • Safety and ergonomic information: http://www.hp.com/ergo/ • LicensePower/iFOR from the core HP-UX: http://www.isogon.com/LPowerifor/suppdown.htm Appendix A 43 Post-Install Information How to Find HP on the Web 44 Appendix A In Case of Trouble B In Case of Trouble This appendix describes: • Error Messages • Warnings Appendix B 45 In Case of Trouble Error Messages Error Messages As an install progresses, you will see messages relating to the progress being entered into the log file. These messages usually refer to normal behavior. ERROR and WARNING messages, however, have the following significance: ERROR Indicates a serious problem, usually requiring action from the user in order to proceed with an installation. WARNING Indicates something out of the ordinary, but not fatal. The warning may require action. NOTE Indicates something out of the ordinary, but not fatal. The note does not require action. Known Error Messages The following message is placed in the swagent.log and install.log files after installing HP-UX 11i Version 1.5 (B.11.20): * Installing fileset "HPvxvm.VXVM-KRN,r=B.11.20.%30" (12 of 274). NOTE: The VxVM drivers have been added to the /stand/system file. You must build the kernel and reboot. You need to build the kernel and reboot only if the installation process does not automatically do it for you. Use " /usr/sbin/mk_kernel -s /stand/system " to build the new kernel. This message is produced because the is_kernel and is_reboot flags in the fileset are not set properly. It is strictly informational and does not affect the actual installation. A kernel build occurs automatically at the end of the installation. 46 Appendix B Data Collection Tables C Data Collection Tables You will need to supply the information in the following tables when installing HP-UX 11i Version 1.5 (B.11.20). If you chose the guided install, you will be prompted for the information in these tables at various stages throughout the install, by the HP-UX Install Wizard. If you chose the Advanced Install, you will be given the opportunity to enter all of this information at the beginning of the install using a tabbed file-folder character-based interface. NOTE If you choose to network-enable your system, you must designate a unique host name, host IP address, and other network information for your server or workstation. Refer to your site network administrator for those details to include in these tables. If there is an HP-UX command that you can use after the install to confirm specific information entered by a command, it is provided with that command in the data collection table. Table C-1 Type of Information Network Information Your Specific Information How to confirm information after system is up Host Name uname -n Host IP Address nslookup name Subnet Mask grep SUBNET_MASK /etc/rc.config.d/netconf Default Gateway IP Address netstat -r Domain Name cat /etc/resolv.conf DNS IP Address cat /etc/resolv.conf DNS Domain Name grep NIS_DOMAIN /etc/rc.config.d/namesvrs Appendix C 47 Data Collection Tables NOTE Some of the items in the following table, Miscellaneous Information, may not be familiar to you, but they are all questions that will be asked of you during the install. All options are described in detail during the install, so you can defer making decisions about those unfamiliar to you until you reach that point in the install. Table C-2 Miscellaneous Information Type of Information Your Specific Information Type of Desktop (ie. CDE / 64-bit minimal) Root DiskPath Root Swap Space Filesystem Type VxVM w/VxFS or Whole disk with VxFS Root Disk Volume Group Disks (How many disks you want placed into the root disk volume group and whether or not you want the disks to be striped). Type of user license (number of users) Select additional software (All, HP-UX Additions, Uncategorized) Pre-Installed Disk Information (which will be overwritten during the install disk -- see Root Disk Path) This is a “review” confirmation step. 48 Appendix C Index A applications on Application Release DVD, 16 on OS DVD, 16 website for updated list, 18 C c8xx, 23 cold-install procedure, 31 configuration server, 19 workstation, 19 configurations hardware, 20 system, 19 website for latest, 19 conventions typographic, 4 D documentation Disk and File Management Tasks, 28, 29 for planning disk space, 29 Managing Systems and Workgroups, 29 driver fibre channel, 23 drivers c8xx, 23 qlisp, 23 SCSI HBA, 23 td, 23 E error messages, 46 M media kit contents, 12 O overview install guide, 8 Q qlisp, 23 R restrictions installation, 15 rx4610, 20 S SCSI card, 24 drivers, 23 LSI LVD UltraII SCSI Controller, 24 QLogic, 24 sx9610, 20 T Tachlite driver, 23 W web access applications, 16 Ignite-UX, 29, 43 latest system configuration info, 19 Managing Systems and Workgroups, 29 www.docs.hp.com, 12 www.software.hp.com, 18 H HP-UX 11i v1.5 new features, 13 installation restrictions, 15 Operating Environment, 13 overwriting Windows 2000, 8 release B.11.20 introduction, 8 version 1.5 introduction, 8 I i2000, 21 ignite-UX, 28 49