1
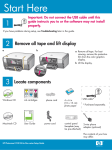
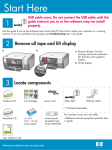
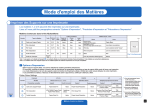
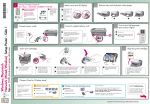
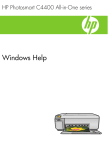
setup
guide
1
hp photosmart
140 series
2
unpack your printer
plug in the power cord
Place the printer at least 10 inches (250 mm)
away from any obstruction to allow space for the
paper to move through the printer during printing.
1. Connect the power cord to the back of your
printer.
2. Plug the power cord into a working electrical
outlet.
Important: Make sure the power cord does not
block the rear paper path.
Rear paper path
HP #57
3
load an index card
Note: The index card will be used to print a
calibration page in step 6.
1. Open the paper tray door.
2. Place an index card from the sample pack on
the paper tray and slide the card underneath
the output guide.
Paper width guide
Paper tray
3. Move the paper width guide to fit close to the
left edge of the index card without bending
the card.
Output guide
*Q3025-90153*
Q3025-90153
4
remove the tape
5
install the print cartridge
1. Open the print cartridge package.
1. Open the print cartridge door.
2. Pull the pink pull-tab to remove the clear
tape from the print cartridge.
2. Insert the HP #57 tri-color print cartridge into the print
cartridge cradle with the copper contacts facing
toward the inside of the printer and the ink nozzles
facing down.
1
2
3
3. Push the print cartridge into the cradle until you feel it
snap into place.
4. Close the print cartridge door.
Do not touch or remove
the ink nozzles or the
copper contacts!
6
turn on your printer
Print cartridge door
7
print your first photo
1. Press the ON button on the top of the
printer.
1. Place a few sheets of photo paper in the paper tray with the glossy side up and the tab closest to
the inside of the printer. Slide the paper underneath the output guide.
2. Press the OK button. A calibration page
prints on the previously loaded index card.
2. Move the paper width guide to fit close to the left edge of the paper without bending the paper.
On button
3. Insert a memory card that contains digital photos into the correct memory card slot.
Note: Push the memory card into the printer until it stops—it does not insert all the way into the
printer. The memory card light flashes while the printer reads the memory card.
4. Press the CANCEL button to cancel printing a photo index page.
5. When Select:#1 appears on the printer’s LCD screen, press the PRINT button to print your first
photo.
OK button
Memory card slots
Print button
Memory card light
Cancel button
OK button
need more help?
?
www.hp.com/support
Printed in USA 05/03 v1.1.0 • Printed on recycled paper
© 2003 Hewlett-Packard Company