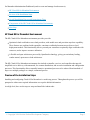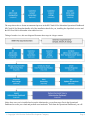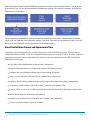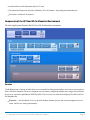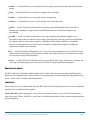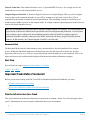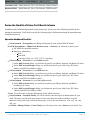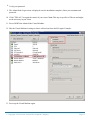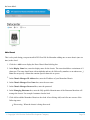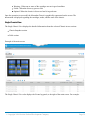
1
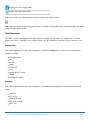
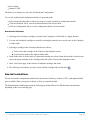
page-hp-logo-wrapper
page-hp-logo
page-title
HP Cloud OS for Moonshot Install & Configure Your
Cloud
page-version
Version 1
‹ PREV | ^ UP | NEXT ›
Install & Configure Your Cloud
Welcome! The following topics explain how to install & configure your cloud with HP Cloud OS for Moonshot.
It's important to read the topics and perform the described steps in order. While some steps are optional, the
sequence that you'll follow in the Operational Dashboard is significant, to ensure a proper deployment of your
cloud.
Install and set up the Admin node:
Installation Overview
Important Tasks Before You Install
Install and Set Up the Admin Node
Set Admin Node Prerequisites
View Connection Settings
Customize Networks
Complete Admin Node Installation
After you install and set up the Admin node, you can perform additional steps:
Manage Nodes and Create a Cloud
Create Compute Regions
Enter or Update your License Key
Customize User Settings
View Updates and Extensions
Launch Administration Dashboard for Post-Deployment Tasks
Note: Also see the Operational Dashboard and Administration Dashboard Help topics:
HP Cloud OS for Moonshot Operational Dashboard Help
HP Cloud OS for Moonshot Administration Dashboard Help
‹ PREV | ^ UP | NEXT ›
Installation Overview
Welcome! This topic presents an overview of the installation steps.
An HP Cloud OS for Moonshot infrastructure requires advance planning and preparation by IT network
administrators. The HP Cloud OS for Moonshot installation deploys the HP Cloud OS for Moonshot
Operational Dashboard (used to set up, configure, and install an HP cloud infrastructure) and the HP Cloud OS
page-footer-left
© Copyright 2014 Hewlett-Packard Development Company
page-footer-right
Page 2
for Moonshot Administration Dashboard (used to create and manage cloud resources).
HP Cloud OS for Moonshot Environment
Preview of the Installation Steps
Overall Installation Process and Approximate Time
Components of the HP Cloud OS for Moonshot Environment
Next Step
HP Cloud OS for Moonshot Environment
The HP Cloud OS for Moonshot environment provides you with:
Optimized cloud workloads across cloud providers, with model-once and provision-anywhere capability.
These features are combined with repeatable, consistent workload placement across diverse cloud
deployment models. This functionality allows you and your customers to optimally align workloads with
resources, and to improve resource utilization.
A flexible and open architecture powered by OpenStack technology, giving you an industry leading,
vendor neutral, open source cloud architecture.
The HP Cloud OS for Moonshot environment also include an installer, services, and controllers that provide
simplified service delivery with automated, live content distribution, and an easier installation and configuration
processes. This functionality allows manually intensive operational processes to be reduced from hundreds of
steps over multiple packages to a simple, automated process.
Preview of the Installation Steps
Installing and configuring Cloud OS for Moonshot is a multi-step process. Throughout the process you will be
prompted to either enter required information or accept the default information.
At a high level, here are the steps to setup and install the Admin node:
page-footer-left
© Copyright 2014 Hewlett-Packard Development Company
page-footer-right
Page 3
The steps shown above feature an automated process in the HP Cloud OS for Moonshot Operational Dashboard.
HP Cloud OS for Moonshot handles all of the installation details for you, installing the OpenStack services and
the HP Cloud OS for Moonshot value-added services.
Taking a broader view, this next diagram illustrates those steps in a larger context:
Notice how once you've installed and set up the Admin node, you perform steps first in the Operational
Dashboard to create your cloud and perform associated tasks. Then from the Operational Dashboard, you will
page-footer-left
© Copyright 2014 Hewlett-Packard Development Company
page-footer-right
Page 4
launch the separate Administration Dashboard to perform a number of post-installation tasks. And from that
point forward, you will use the Administration Dashboard to manage your cloud environment, including the
Moonshot server cartridges.
The documented post-installation tasks are designed to familiarize you with the Administration Dashboard,
which you'll use from that point forward to manage your cloud. The tasks are also designed to help you verify
that your recently deployed cloud environment is functioning properly.
Overall Installation Process and Approximate Time
Assuming a typical configuration, the overall setup process involves the following steps. The total time to
complete the setup once HW is installed, configured and the hypervisor is ready is four to six hours. In this list,
approximate execution times are shown here for reference, once the installation from the HP Cloud OS for
Moonshot ISO has begun.
Collect the required information for the network configuration
Setup the Moonshot chassis, cartridges and configure the internal switches
Configure the server hardware and the physical networking as required
Setup a server with either VMware ESXi or Linux KVM as a hypervisor
Configure the networking within the hypervisor to support the required networking configuration
Create three virtual machines to host the Admin, Controller and Compute VMs
Create a VM to use as an access node for installation of the HP Cloud OS for Moonshot software ISO
Install and configure the Admin node (60 minutes)
Add (discover and allocate) the Controller and Compute VMs (30 minutes)
Create a cloud and compute region (60 minutes)
page-footer-left
© Copyright 2014 Hewlett-Packard Development Company
page-footer-right
Page 5
Add and discover the Moonshot chassis (15 min)
Download and import the desired workload(s) (30 to 60 minutes - depending on download time)
Provision a workload (30 minutes)
Components of the HP Cloud OS for Moonshot Environment
The following diagram illustrates the HP Cloud OS for Moonshot environment.
Services
Cloud Infrastructure consists of individual services installed and integrated together across one or more nodes to
form a cloud environment. These are composite services that are integrated together into a single cloud solution.
Services are exposed or published as RESTful APIs. The list of services that can be deployed for HP Cloud OS
for Moonshot are:
Keystone — An OpenStack service to provide identity (domain, project and users) management, access
token, and service catalog functionality.
page-footer-left
© Copyright 2014 Hewlett-Packard Development Company
page-footer-right
Page 6
Glance — An OpenStack service to provide for discovering, registering, and retrieving virtual machine
images.
Nova — An OpenStack service to provide a compute fabric controller.
Cinder — An OpenStack service to provide volume management.
Neutron — An OpenStack service to create and provision virtual networks.
Apollo — An HP Cloud OS for Moonshot service that provides HP Moonshot Chassis and Server
Management. In addition, it helps to discover HP Moonshot Servers and allocates them for the
provisioning.
Graffiti — An HP Cloud OS for Moonshot resource pool registry and capability tagging service.
Designed to support diverse functions: discovering, registering, and retrieving resource pool definitions
for compute, network, and volume resources; a dictionary of the cloud's capabilities; a searchable
directory to find cloud resources based on their capabilities; and dynamic binding, describing the
requirements instead of static binding.
Eve — An HP Cloud OS for Moonshot service to provide for provisioning lifecycle of a TOSCA-based
infrastructure topology design of the compute, network, and volume resources in a defined resource pool.
Also provides security and management.
Focus — An HP Cloud OS for Moonshot service to provide for discovering, registering, versioning, and
retrieving of document types necessary to describe TOSCA-based infrastructure topologies.
Administration Node
The HP Cloud OS for Moonshot Administration Node (Admin Node) hosts the Operational Dashboard that
deploys private and hybrid-only cloud infrastructure environments by network booting the managed Baremetal
servers, which are the Controller and Baremetal host.
Controllers
While each service can be individually deployed, HP Cloud OS for Moonshot groups these services into distinct
groups for ease of architectural description.
Cloud Controller: This contains those services that are considered single services for a cloud environment,
such as Keystone, Glance, Graffiti, Eve, and Focus, and define the boundaries of the cloud environment from an
identity standpoint.
page-footer-left
© Copyright 2014 Hewlett-Packard Development Company
page-footer-right
Page 7
Network Controller: This contains Neutron's server, l3 agent and DHCP services. It is a single service in a
cloud and can co-exist with cloud controller services.
Compute Region Controller: A Resource Region is known as a Compute Region. This is a pool of compute
resources that can be consumed through a service API by consumers of the cloud, such as Nova. This is
responsible for the launch of instances across baremetal hosts. The scheduling is based on varied flavors of
instances and available resources on the compute nodes. In a single compute region deployment model, this can
coexist with cloud controller services.
Note: HP recommends that you define and use multiple compute regions. For example, you could separate the
regions based on different workloads and requirements between development and production. A development
team's compute region could provide non-redundant machines with less RAM; the compute region for
production could have machines with much more RAM, backed up with heavy compute and fault-tolerant
resources. In this scenario, the Compute Region Controller is its own node.
Baremetal Host
The Baremetal Host hosts the cloud instances using a baremetal driver for the OpenStack Nova compute
service. Within the OpenStack framework, the baremetal driver has the same role as the drivers for other
hypervisors (libvirt, xen, etc.), and yet it is presently unique in that the hardware is not virtualized - there is no
hypervisor between the workloads and the physical hardware that includes Moonshot cartridges.
Next Step
Proceed to the next topic, Important Tasks Before You Install.
‹ PREV | ^ UP | NEXT ›
Important Tasks Before You Install
Before you can start working in the HP Cloud OS for Moonshot Operational Dashboard, you must:
Plan the Infrastructure for a Cloud
Review the Checklist of Values You'll Need in Advance
Plan the Infrastructure for a Cloud
This section defines the minimum infrastructure requirements to standup a cloud. You will need support from
your IT administrator to correctly capture information about your environment.
page-footer-left
© Copyright 2014 Hewlett-Packard Development Company
page-footer-right
Page 8
Deployment Architecture
Server Infrastructure
Network Infrastructure
Deployment Architecture
A simple cloud environment would include:
A Cloud Administration Node (Admin Node)
A Controller Node
A Baremetal Host
The following diagram depicts a simplified deployment scenario.
page-footer-left
© Copyright 2014 Hewlett-Packard Development Company
page-footer-right
Page 9
Note: You can add multiple Baremetal Hosts with the same type of network connectivity shown in the diagram.
Server Infrastructure
Refer to the Support Matrix for details about the following:
Server infrastructure for HP Cloud OS for Moonshot
Hypervisor recommendations for HP Cloud OS for Moonshot
Node requirements for HP Cloud OS for Moonshot
Moonshot chassis firmware version
Operating systems supported
Supported deployment scenario
Included software
Network Infrastructure
page-footer-left
© Copyright 2014 Hewlett-Packard Development Company
page-footer-right
Page 10
The following networks are utilized in the HP Cloud OS for Moonshot infrastructure:
Admin Network: Provides connectivity between the Admin node, the Controller node and the Baremetal
host. The Admin node provides DHCP and PXE services on this network.
Nova_Flat network: Utilized for connectivity between the Controller and Baremetal hosts and the
Moonshot cartridges. The Controller node provides DHCP and PXE services for this network. Workloads
are provisioned to the Moonshot cartridges using this network.
IPMI Network: Utilized for communication between the Baremetal host and the Moonshot Chassis
Manager. This includes chassis and cartridge discovery, power control of cartridges and nodes, and
monitoring of the health of the Moonshot systems.
Public Network: Provides public access to the HP Cloud OS for Moonshot Administration Dashboard
and external access to the Internet for the Admin node and Controller node.
Notes:
The Admin node and the Controller node utilize Internet access to obtain updates and workload content
from HP. If Internet access is not feasible from your datacenter, then it is possible for updates and
workloads to be downloaded locally and then uploaded to your cloud environment.
The Controller node will require a static IP address on the Public network. Please consult with your
network administrator to obtain the required static IP address.
Network Configuration
As shown in the deployment scenario diagram, HP Cloud OS for Moonshot will have the following network
configuration:
Admin Node: 2 NICs - Admin Network and Public Network
Controller Node: 3 NICs - Admin Network, Nova_Flat Network, and Public Network
Baremetal Host: 3 NICs - Admin Network , Nova_Flat Network, and IPMI Network
The NICs per node/host NIC are as follows:
page-footer-left
© Copyright 2014 Hewlett-Packard Development Company
page-footer-right
Page 11
Admin Node
Admineth0
Network Public Network
eth1
eth2
Controller Node Admin Network Nova_Flat Network Public Network
Baremetal Host Admin Network Nova_Flat Network IPMI Network
review-checklist
Review the Checklist of Values You'll Need in Advance
In addition to the information presented already in this topic, please review the following checklist before
starting the installation. You'll need to specify the following types of information during the installation and
configuration process.
Operation Dashboard Checklist
In Environment > Prerequisites, the dialogs will prompt for your external DNS IP details.
In Edit Prerequisites > Admin Node Internet Access > Network, you will need to specify your:
NIC details for the public interface
Http Proxy information:
Host
Port-8080
Non-Proxy Hosts: 10.\*|192.\*|127.0.\*|localhost
In Environment > Networks, for your Public network:
On the Edit Network dialog, you will need to specify your Subnet, Netmask, and Router IP values.
On the Edit Network Ranges dialog, you will need to specify your Node Type, IPV4 Start
Address, and IPV4 End Address values.
In Environment > Networks, for your IPMI network:
On the Edit Network dialog, you will need to specify your Subnet, Netmask, and Router IP values.
On the Edit Network Ranges dialog, you will need to specify your Node Type, IPV4 Start
Address, and IPV4 End Address values.
In Environment > Networks, for your Nova_Flat network:
On the Edit Network dialog, you will need to specify your Subnet, Netmask, and Router
(mandatory) IP values.
On the Edit Network Ranges dialog, you will need to specify your Node Type, IPV4 Start
Address, and IPV4 End Address values.
Note: You will be able to skip the Edit options for the Admin Network.
In Environment > Complete Install, you will be asked to enter the top-level domain name for your
cloud. The name you'll provide must consist of lowercase characters with no numbers or special
characters. It may end in any valid web domain type, such as (but not limited to) .com, .org, .net, .edu,
.mil, .gov.
In Cloud > Manage Clouds > Create Cloud, you will only need to enter a Name for your cloud. You
page-footer-left
© Copyright 2014 Hewlett-Packard Development Company
page-footer-right
Page 12
can use default values for other options; however, plan ahead to specify new, non-default passwords for
the Admin user, Arch user, and Trash user.
In Cloud > Manage Clouds > Create Compute Region dialog, you will need to enter a Name for your
region. Recommended: create multiple regions. On each Create Compute Region dialog, on the Controller
& Compute Nodes tab, you will need to enter the number of nodes that participate in the region.
Administration Dashboard Checklist
In Project > Access and Security > Create Keypair, you will just need to enter the Keypair name.
Note: You will not need to define flavors to complete the post-install steps. As explained later in
Launch Administration Dashboard for Post-Deployment Tasks, a flavor will be generated automatically
for you based on your Moonshot server cartridge type: hp_moonshot_server (for an HP ProLiant
Moonshot Server Cartridge) and hp_moonshot_m300 (for an HP ProLiant m300 Server Cartridge).
In Project > Infrastructure > Images, you will need to create images, and the associated Kernel and
RAM disk images. You will not need to specify the Description, Minimum Disk, and Minimum RAM
values.
In Project > Moonshot Management, you will need to specify the chassis display name, Chassis
Manager IP, Chassis Manager password, and Managing Host Name.
In Project > Infrastructure > Images > Launch > Launch Instance dialog, you will need to specify the
image, instance name, networking, and (pre-defined) flavor.
Next Step
Proceed to the next topic, Install and Set Up the Admin Node.
‹ PREV | ^ UP | NEXT ›
Install and Set Up the Admin Node
This topic explains how to install the Admin Node, which launches the Operational Dashboard and helps in
setting up the environment to create a cloud.
Set Up the Admin Node
Boot the Admin Node Using the Cloud OS ISO
Launch the Operational Dashboard
Set Up the Admin Node
page-footer-left
© Copyright 2014 Hewlett-Packard Development Company
page-footer-right
Page 13
You can install the Admin Node only on a virtual machine. Use the following steps to create a virtual machine
in an existing or a new hypervisor infrastructure:
1. Configure the hypervisor host's networking as shown in the Deployment Architecture. The host must
provide connectivity to the Admin Node (virtual machine) on an isolated private network and also to all
the nodes' port eth0. The Admin Node must also have connectivity to a routable network for Internet
access.
2. Create a virtual machine (Admin Node) with the hardware configuration suggested in Cloud
Infrastructure section. The following configuration must be reviewed during this step:
Ensure the Admin Node's primary NIC is bridged or connected to the admin network and the
second NIC is bridged or connected to a routable network for Internet access.
On a KVM based VM, for the disk configuration, ensure you set it to the IDE/SCSI type as this is
the supported type.
3. Download the HP Cloud OS for Moonshot ISO to the host's local file system or data store.
4. Configure the Virtual Machine (VM) Admin Node to point to the HP Cloud OS for Moonshot ISO as a
CD/DVD drive or install media ISO image.
Boot the Admin Node Using the HP Cloud OS for Moonshot ISO
The Admin Node is booted using HP Cloud OS for Moonshot *.iso. Follow these steps:
1. Ensure that ISO image is located in the host's local file system or data store.
2. Edit the settings of the Admin Node (Virtual Machine) so that the CD ROM points to the Cloud OS ISO
image.
3. Switch on the power for the Admin Node. The machine begins to boot.
4. To view the boot process, select the Console Tab of the Virtual Machine.
5. In the Full Name of the new user box, enter the name. This is the name that will be used while sending
emails or will be used at any other place where the full user name is displayed.
6. In the Username for your account box, enter a user name. This is the name with which you can log into
your Admin Node. Note: The user name should start with a lowercase alphabet and can include numbers
also.
7. In the Password box, enter the password. Note: The password should be a mix of letters, numbers and
special characters and should be changed at regular intervals.
page-footer-left
© Copyright 2014 Hewlett-Packard Development Company
page-footer-right
Page 14
8. Verify your password.
9. The Admin Node Login screen is displayed once the installation completes. Enter your username and
password.
10. Click CTRL+ALT to regain the control of your cursor. Note: This step is specific to VMware and might
not be necessary in your client.
11. Power DOWN the Admin Node Virtual Machine.
12. Edit the Virtual Machine's settings so that it will not boot from the ISO again. Example:
13. Power up the Virtual Machine again.
page-footer-left
© Copyright 2014 Hewlett-Packard Development Company
page-footer-right
Page 15
At this point, HP Cloud OS for Moonshot is installed on the Admin Node.
Launch the Operational Dashboard
To launch the Operational Dashboard:
1. From a Windows or Linux client that has access to the Admin Node, open a Mozilla Firefox or Google
Chrome browser.
2. Make sure the browser has the following IP addresses set as proxy exceptions:
192.*;10.*;localhost;127.0.*
3. In the browser, enter https://192.168.124.10:9000 to launch the Operational Dashboard user interface,
which is running on the Admin node.
4. On the Environment tab, review the types of prerequisites, servers, connections, and networks in your
environment.
Next Step
Proceed to the next topic, Set the Admin Node Prerequisites, to begin the process of setting up and installing the
Admin node.
‹ PREV | ^ UP | NEXT ›
Set Admin Node Prerequisites
Your first step in the HP Cloud OS for Moonshot Operational Dashboard is to configure the Admin Node
prerequisites. See the sections in this topic:
Enable Admin Node Internet Access — Set up Internet access on the Admin Node. You will need Internet
access for downloading updated and extensions. For details, see View Updates and Extensions.
Set the External DNS Server — Add the IP address of the external DNS server that your Cloud OS
environment is using to access named websites within your cloud.
Set the Time for the Admin Node — Configure the date/time settings accurately because the Admin Node
acts as the NTP Server to all the managed nodes.
Set the Email Notification — Configure your cloud to send email notifications when the Cloud and
Compute Region operation completes since this takes some time. By enabling and setting this
page-footer-left
© Copyright 2014 Hewlett-Packard Development Company
page-footer-right
Page 16
prerequisite, you can be alerted by e-mail when each operation completes.
Note: In the current release, after you complete the Admin Node installation, you may continue to use the
Operational Dashboard to modify the following prerequisite values:
Cloud Admin Node Time settings
Email Notification settings
However, after you complete the Admin Node installation, you cannot subsequently change:
Admin Node Internet Access settings
External DNS Server settings
Enable Admin Node Internet Access
To enable the Admin Node Internet Access:
1. On the Operational Dashboard, select the Environment tab > Prerequisites.
2. For the Cloud Administration Node Internet Access, click Edit Prerequisite.
3. Set the Network Interface to the network interface on the Admin Node that has been configured for
Internet access, for example, eth1.
4. Leave the default Network Configuration checked as DHCP. If you have a static IP address allocated for
the node, uncheck DHCP and fill in the appropriate information.
5. Set the HTTP Proxy Information applicable for your environment. If you are on a network that has a
proxy, you must fill in this Proxy information.
Caution: Specifying incorrect proxy host settings might cause some features to not work correctly later,
after the installation, when you use the HP Cloud OS for Moonshot Administration Dashboard.
a. Specify the Host's IP address - get this value from your system administrator or from the settings in
your web browser.
b. Specify the Port - get this value from your system administrator or from the settings in your web
browser.
c. Specify the Non-Proxy Hosts' IP addresses - that is, specify addresses that should not use proxy
servers, for the Controller/Baremetal Host and admin networks. Each network needs to be separated by a
pipe bar "|". For example: 10.*|192.*|127.0.*|localhost.
page-footer-left
© Copyright 2014 Hewlett-Packard Development Company
page-footer-right
Page 17
d. If necessary, specify the optional Username and Password.
6. After completing the steps above, click Update Prerequisite.
7. Now click Complete Prerequisite to complete this setup for the Cloud Administration Node Internet
Access entry.
When this prerequisite completes, a timestamp will be displayed in the Last Updated column.
Set the External DNS Server
To set the external DNS server:
1. On the Operational Dashboard, select the Environment tab > Prerequisites.
2. For the External DNS Server, click Edit Prerequisite.
3. Type the appropriate IP address for the external DNS server used by your Cloud OS environment to be
able to access named websites within your cloud.
4. Click Update Prerequisite.
When this prerequisite completes, a timestamp will be displayed in the Last Updated column.
Set the Time for the Admin Node
To set the time for the Admin Node:
1. On the Operational Dashboard, select the Environment tab > Prerequisites.
2. For the Cloud Administration Node Time Settings, click Edit Prerequisite.
3. Set the appropriate Timezone for your area (UTC is the default).
4. Set the Date and Time applicable for your environment if different from the default.
5. Click Update Prerequisite.
6. Click Complete Prerequisite to complete this setup for the Set the Time for the Admin Node entry.
When this prerequisite completes, a timestamp will be displayed in the Last Updated column.
page-footer-left
© Copyright 2014 Hewlett-Packard Development Company
page-footer-right
Page 18
Set the Email Notification
To set the email notification:
1. On the Operational Dashboard, select the Environment tab > Prerequisites.
2. For the email notification settings, click Edit Prerequisites.
3. Click the Enable Notification checkbox.
4. Set the SMTP Server to an SMTP server that is valid for your network.
5. Set From Address to an applicable email address for your environment. Most likely, you would add your
email address as the person responsible for managing the cloud infrastructure.
6. Set To Address to an applicable email address or comma-separated addresses for your environment. This
address could be to the person who started the cloud build, or anyone who is interested in following the
cloud build process.
7. Click Update Prerequisite.
When the Cloud and Compute Region operation completes, the email goes to the listed recipients, showing the
start and completion times.
When this prerequisite completes, a timestamp will be displayed in the Last Updated column.
Prerequisite Troubleshooting
If any of the prerequisite steps fail to complete, an error message displays. If this happens, see the
Troubleshooting topic.
Next Step
Proceed to the next topic, View Connection Settings.
‹ PREV | ^ UP | NEXT ›
View Connection Settings
The Environment > Connections panel is informational only. The values are read only. With HP Cloud OS for
Moonshot environments, the values are already defined for you:
page-footer-left
© Copyright 2014 Hewlett-Packard Development Company
page-footer-right
Page 19
Network mode: dual. Dual mode means that all the connections have their own interfaces, where VLAN
and bridge are off.
Logical Interface values:
intf0 (admin)
intf1 (nova_flat)
intf2 (ipmi, public)
Physical Interface values:
1Gb (preferred) on 1st port
1Gb (preferred) on 2nd port
1Gb (preferred) on 3rd port
In this case, 1Gb (preferred) on 2nd port means a one gigabit network for port 2, as enumerated by default
from the server's BIOS or as overridden in the Server Types panel. The "preferred" tag suggests that if the
NIC/port does not support 1Gb, HP Cloud OS for Moonshot falls back to the next maximum speed supported by
the NIC or port.
Next Step
Proceed to the Customize Networks topic.
‹ PREV | ^ UP | NEXT ›
Customize Networks
This topic describes the steps to customize the network settings. These steps are required.
Caution: You must customize the network settings before performing the steps in Complete the Admin Node
Installation. After that, the network settings in the Operational Dashboard are read only. Once the install
process is triggered, no changes can be made. If you want to make changes, you need to start over by reinstalling the Admin Node.
Introduction
Customize the Public Network
Customize the Nova_Flat Network
Customize the IPMI Network
Next Step
page-footer-left
© Copyright 2014 Hewlett-Packard Development Company
page-footer-right
Page 20
Note: You do not have to customize the Admin Network.
Introduction
Based on the network infrastructure suggested in the "Plan the Infrastructure for a Cloud" section of Important
Tasks Before You Install, you must customize the network settings. Here are some of the criteria to be
considered while making changes to the default settings:
For a production deployment, and to reduce the complexities of configuring the switches, it is strongly
recommended that you provide separate wired networks for public and admin. This requires you to
specify your own range of IP addresses and other settings.
Get the details of your public network range from your Network Administrator. You must use a dedicated
assigned IP address range when configuring the cloud's public network.
Some networks and address ranges for those networks are provided by default. You can modify or delete
the IP address ranges as well as add new ones. You must use valid ranges that fall within the subnet as
defined by the subnet address and mask specified in the network details.
Note: Validation of the address ranges only occurs when you open the Edit Address Ranges dialog for each
network and click Update Address Ranges. Otherwise,you will not know if you have any errors. However, the
Complete Install step will run a validation check and cannot be completed until the errors (if any) are fixed. If
there is an address range error, the validation check will show the network type and possibly the address value.
If not, open the Edit Address Ranges dialog for the specified network and click Update Address Ranges to
identify the incorrect address.
Customize the Public Network
To provide external access, make sure you specify a contiguous IP address range in the <External/Public IP
Address Range>. On successful deployment of a Cloud, only the Controller Node gets the external IP address.
Therefore, a small range of this IP pool is sufficient. Get the range from your IT administrator.
Edit the Public Network
To edit the public network:
1. On the Operational Dashboard, select the Environment tab > Networks.
2. Click Edit Network for the public Network Type.
3. Click each tab: Network, VLAN, and Router, one by one, to perform the following actions:
On the Network tab, specify the Subnet and Netmask of your dedicated public IP address range.
Do not change:
page-footer-left
© Copyright 2014 Hewlett-Packard Development Company
page-footer-right
Page 21
Bridge Enabled = False
On the VLAN tab, do not change:
VLAN Enabled = False
VLANID = 300
On the Router tab, in the Router box, enter the Gateway IP address of your Public IP address
range. The Router Preference default value is 5 and is sufficient.
Note: The Router Preference value indicates the number of hops to reach the destination; the lesser
the value, the higher the priority of the network.
Edit the Public Address Ranges
To edit the public address ranges:
1. In the public Edit Network drop-down list, select Edit Address Ranges to open the Edit Address Ranges
dialog.
2. The Network Type and Subnet values are pre-populated by default, with the correct settings.
3. Click Add Address Range to modify the set of address range options. Each time you click, you modify
another set of address range options, based upon your public network. Get the range from your IT
administrator:
a. Set Node Type to host.
b. Set IPV4 Start Addr to the start of the <External/Public IP Address Range> described above.
c. Set IPV4 End Addr to the end of the <External/Public IP Address Range>. Note: Provide the IP address
range corresponding to the network address.
4. Click Update Address Ranges to save your changes to validate that the IP address is correct.
Note: If you enter invalid address ranges, you will get a validation error, which identifies the incorrect address
(start or end) for the corresponding network type. You must fix all errors in the Edit Address Ranges dialog
and click Update Address Ranges to validate the addresses are correct.
Customize the Nova_Flat Network
The Nova_Flat network is used for connectivity between the Controller and Baremetal hosts and the Moonshot
cartridges. The Controller node provides DHCP and PXE services for this network. Workloads are provisioned
to the Moonshot cartridges using this network.
page-footer-left
© Copyright 2014 Hewlett-Packard Development Company
page-footer-right
Page 22
Edit the Nova_Flat Network
To edit the Nova_Flat network:
1. On the Operational Dashboard, select the Environment tab > Networks.
2. Click Edit Network for the public Network Type.
3. Click each tab: Network, VLAN, and Router, one by one, to perform the following actions:
On the Network tab, specify the Subnet and Netmask of your dedicated public IP address range.
Do not change:
Bridge Enabled = False
On the VLAN tab, do not change:
VLAN Enabled = False
VLANID = 172
On the Router tab, in the Router box, enter the Gateway IP address of your Public IP address
range. The Router Preference default value is 10 and is sufficient.
4. Click Update Network to save your changes.
Edit the Nova_Flat Address Ranges
To edit the Nova_Flat address ranges:
1. In the Nova_Flat Edit Network drop-down list, select Edit Address Ranges to open the Address Ranges
dialog.
2. The following fields are pre-populated:
Network Type
Subnet values
Node Type - It is set for three types: Host, Router, DHCP.
IPV4 Start Addr displays the start of the IP address range for all three node types.
IPV4 End Addr displays the end of the IP address range for all three node types.
3. Make the required changes as per your environment.
4. (Optional) Click Add Address Range to add a set of address range options to the bottom of the Edit
Address Ranges dialog box. Each time you click Add Address Range, you add another set of address
range options to be filled in. Note: Provide the IP address range corresponding to the network address.
5. Click Update Address Ranges to save your changes.
page-footer-left
© Copyright 2014 Hewlett-Packard Development Company
page-footer-right
Page 23
Note: If you enter invalid address ranges, you will get a validation error, which identifies the incorrect address
(start or end) for the corresponding network type. You must fix all errors in the Edit Address Ranges dialog and
click Update Address Ranges to validate the addresses are correct.
Customize the IPMI Network
The IPMI network is used for communication between the Baremetal host and the Moonshot Chassis Manager.
This includes chassis and cartridge discovery, power control of cartridges and nodes, and monitoring of the
health of the Moonshot systems.
Edit the IPMI Network
To edit the IPMI network:
1. On the Operational Dashboard, select the Environment tab > Networks.
2. Click Edit Network for the public Network Type.
3. Click each tab: Network, VLAN, and Router, one by one, to perform the following actions:
On the Network tab, specify the Subnet and Netmask of your dedicated public IP address range.
Do not change:
Bridge Enabled = False
On the VLAN tab, do not change:
VLAN Enabled = False
VLANID = 172
On the Router tab, you do not need to specify the Gateway IP address in the Router box, and the
Router Preference default value is sufficient.
4. Click Update Network to save your changes.
Edit the IPMI Address Ranges
To edit the IPMI address ranges:
1. In the IPMI Edit Network drop-down list, select Edit Address Ranges to open the Address Ranges
dialog.
2. The following fields are pre-populated:
Network Type
Subnet values
Node Type - It is set for three types: Host, Router, DHCP.
IPV4 Start Addr displays the start of the IP address range for all three node types.
IPV4 End Addr displays the end of the IP address range for all three node types.
3. Make the required changes as per your environment.
page-footer-left
© Copyright 2014 Hewlett-Packard Development Company
page-footer-right
Page 24
4. (Optional) Click Add Address Range to add a set of address range options to the bottom of the Edit
Address Ranges dialog box. Each time you click Add Address Range, you add another set of address
range options to be filled in. Note: Provide the IP address range corresponding to the network address.
5. Click Update Address Ranges to save your changes.
Note: If you enter invalid address ranges, you will get a validation error, which identifies the incorrect address
(start or end) for the corresponding network type. You must fix all errors in the Edit Address Ranges dialog and
click Update Address Ranges to validate the addresses are correct.
Next Step
Proceed to the next topic, Complete Admin Node Installation.
‹ PREV | ^ UP | NEXT ›
Complete Admin Node Installation
This topic describes the steps to complete the Admin Node installation. These steps are required.
Caution: Be sure the values for the Prerequisites, Connections, and Networks are what you need, before you
follow the steps in this topic. Once you click Complete Install, the dialogs are read only. If you want to make
changes, you need to start over by re-installing the Admin Node.
To complete the Admin Node installation:
1. On the Operational Dashboard, select the Environment tab > Complete Install.
2. On the confirmation page, specify the following information.
a. Domain Name: Enter the top-level domain name for your cloud. By default, it is set to cloudos.local.
The name you provide must consist of lowercase characters with no numbers or special characters. It may
end in any valid web domain type, such as (but not limited to) .com, .org, .net, .edu, .mil, .gov.
b. Network Mode: The Network Mode is Dual by default. Dual network mode needs two Ethernet cards
and allows you to completely separate traffic to/from the admin network and to/from public network.
3. Click Complete Install. This action installs underlying components, such as TFTP Boot, DHCP, DNS,
NTP servers, and monitoring tools, on the Admin Node. This may take several minutes. A working status
message displays in the Setup Complete column.
4. The Operational Dashboard displays a working status message in the Install Complete column. Note: Any
page-footer-left
© Copyright 2014 Hewlett-Packard Development Company
page-footer-right
Page 25
failure during this part of the process requires rebuilding the Admin Node through the bootable ISO.
5. (Optional) Click Show Install Log to view the install activity in the /var/log/install.log, which appears on
the bottom of the window.
6. (Optional) Click Refresh to monitor the install progress.
7. After the Admin Node is installed, the screen will display the timestamp in the Install Complete column.
The Complete Install button is replaced by the Continue... button.
8. Click Continue... to add the Cloud tab to the Operational Dashboard, which allows you use additional
Operational Dashboard dialogs to create your cloud and compute regions.
Next Step
Now that you have installed the Admin node, you can Manage Nodes and Create a Cloud.
‹ PREV | ^ UP | NEXT ›
Manage Nodes and Create a Cloud
Now that the Admin Node is installed, it's time to manage the nodes, and then create a cloud.
Manage Cloud Controller and Baremetal Host
Create a Cloud
Manage Cloud Controller and Baremetal Host
Before you starting managing the Cloud Controller and Baremetal Host, ensure that the boot order on all nodes
(virtual machines) is configured to boot from the network first.
Note: When creating virtual machines on a hypervisor, you have to set the first boot option to PXE
boot since there is no operating system installed on the VMs. After the OS is installed these VMs
will not search for a PXE boot even if they fail to boot from hard disk.
1. Power ON the Controller and Baremetal Host.
2. In the Operational Dashboard, select the Cloud tab > Manage Nodes.
3.
page-footer-left
© Copyright 2014 Hewlett-Packard Development Company
page-footer-right
Page 26
Once the Cloud Controller and the Baremetal Host finish booting up, the nodes display in the table with
their alias names set to their MAC address (address of the NIC associated with the Admin network). Each
node will be in a Not Allocated state.
4. Select Edit Node for each node to rename the MAC address in the Alias column to a more meaningful
name such as cloudcontroller, compute1, compute2. Note: The node name can only be letters
(capitalization is allowed) and numbers with no spaces. The node table then displays with the new alias
names.
5. Click More against each node to display a drop-down list.
6. Select Allocate Node. This installs the OS and completes the setup and configuration of nodes so that
services can be deployed. The nodes go through different states like Not Allocated, Hardware, Installing,
Installed, Readying and Finalizing, before displaying the Allocated state. **Note: It may take around 12+
minutes for each node to get allocated.
7. (Optional) Click Alias to view the details of the nodes.
To search for a particular node:
In the Nodes page, in the Filter textbox, enter the search criteria.
The search results are displayed in the table.
Create a Cloud
To create a cloud:
1. In the Operational Dashboard, select the Cloud tab > Manage Clouds.
2. Click Create Cloud to open the Create Cloud dialog.
3. Specify a Cloud Name. This will be the name that is used to initialize Keystone and will be displayed in
the Administration Dashboard. Note: A cloud name must contain only letters and numbers. It cannot
contain spaces or special characters.
4. Select the Controllers tab and specify which node will have the Cloud Controller, Network Controller,
and Storage Controller respective services. You install all these core controller services on different nodes
or on the same Cloud Controller.
5.
page-footer-left
© Copyright 2014 Hewlett-Packard Development Company
page-footer-right
Page 27
Select the Attributes tab to specify property values required to create a Cloud. The following attributes are
displayed. Retain the default values.
Cloud Type — By default Physical is displayed. Note: Physical implies that Baremetal
provisioning is supported.
Keystone Signing — Set the Keystone Signing method based upon the authentication scheme:
UUID or PKI. PKI (the default setting) is a large token that contains token information such as the
user ID and user roles. UUID is the alternative 32-character token choice.
DHCP — By default it is True. If you do not want to use DHCP, change the DHCP Boolean to
False.
Networking mode — Only Flat is supported.
Provider Network Name — Specify a network name; by default flat_network1 is displayed.
NIC Connected to provider network — Set it to the NIC of your nova_flat network. For example:
eth1.
Local Volume File Name — This is the name of the file to be created on the target node's file
system and used with losetup when creating the logical volume group. No need to change the
default value.
Maximum Volume File Size (GB) — Specify the maximum size of the file created on the target
node's file system to represent the size of the cinder volume. If the file size is too big for the file
system, the size of the file will be capped at 90% of the free space in that file system (at the time of
creation). Best practice is to adjust the size to a value appropriate for the file-system associated with
the Local Volume File. No need to change the default value.
Admin User Password — Admin user's password for a granted administrator role on an Admin
project in the Administration Dashboard.
Arch User Password — Architect user's password for a granted architect role on an Admin project
in the Administration Dashboard.
Trash User Password — Trash user's password for a granted user's role on a trash project in the
Administration Dashboard.
Remember the passwords — You will use them to log into the HP Cloud OS for Moonshot Administration
Dashboard.
When you're ready, click Create Cloud. The cloud will go through a series of steps to create an active cloud,
showing the percent (%) completed. When creating a cloud or a compute region, all of the nodes involved are
first checked to ensure they can be resolved on the network. This verification process can take (up to)
approximately five minutes. During this time, the progress percentage will remain at 1%. If any of the nodes fail
to resolve during the verification process, the cloud or region creation will fail.
The overall process from the time you click Create Cloud takes around twenty minutes to complete.
Next Step
page-footer-left
© Copyright 2014 Hewlett-Packard Development Company
page-footer-right
Page 28
Proceed to the next topic, Create Compute Regions.
‹ PREV | ^ UP | NEXT ›
Create Compute Regions
Once the Cloud setup is complete, the Cloud displays in an active state. You can now create one or more
regions in the cloud.
There are multiple use cases where you would prefer to have separate compute regions, such as:
To accommodate a heterogeneous set of hardware configured for different workloads.
To distribute the workload across regions to get better response times. Each region can contain dedicated
endpoints with a full Nova installation including its own message queue and database.
To create a compute region:
1. In the Operational Dashboard, select the Cloud tab > Manage Clouds.
2. For the cloud just created, click Create Compute Region to open the Create Compute Region dialog.
3. Specify a Region Name. This will be the name that is used to initialize Keystone and will be displayed on
the Administration Dashboard. A region name must contain only letters and numbers. It cannot contain
spaces or special characters.
4. From the Compute Controller drop down list, select the node that will have the Compute Controller
services. The Compute Controller service can reside on a different node (recommended) or on the same
Cloud Controller.
5. In the Controllers and Compute Nodes Tab, do the following:
From the Compute Controller drop-down list, select the node that will have controller services.
From the Number of Nodes drop-down list, select the nodes.
Or click to select the checkbox against each node.
Note: The Cloud Controller and the Compute Controller can be in the same machine.
6. In the Attributes tab, specify the property values required to create a cloud region. From the Compute
Host Type drop-down list, select Moonshot Server.
7. Click Create Compute Region.
The compute region will go through series of steps to create and will display the completion percentage. Once
the Compute Region is created, the state will display as Active.
page-footer-left
© Copyright 2014 Hewlett-Packard Development Company
page-footer-right
Page 29
Note: This process takes apoproximately 10 minutes to complete.
Next Step
Proceed to the next topic, Enter or Update your License Key.
‹ PREV | ^ UP | NEXT ›
Enter or Update your License Key
The HP Cloud OS for Moonshot dashboards require a common, date-based HP Cloud OS for Moonshot license.
When you purchase HP Cloud OS for Moonshot, there are two SKUs, for a one-year or three-year license.
If you have not already done so, you can order these in the same way you order other HP Server products
(hardware or software) directly through HP or through an HP channel partner. After ordering, you will receive
via email or printed letter a certificate that you will redeem at HP.com. When you go to HP.com, you will
register for support and receive a license key. You will be directed to the HP Software Depot website, where
you can download the software.
After completing the installation, follow the instructions in this topic to enter your license key in the HP Cloud
OS for Moonshot Operational Dashboard.
When your license expires, you will receive an informational message to purchase a new license key.
Manage Your License
After you have completed the Admin node installation in the Operational Dashboard:
1. Click Settings in the top banner.
2. Click License.
3. In the licensing information, note the number of days remaining on the current license.
Get a New License
When your license expires, follow your usual HP ordering process to purchase a new license. In the Operational
Dashboard:
1. Click Settings in the top banner.
2. Click License.
page-footer-left
© Copyright 2014 Hewlett-Packard Development Company
page-footer-right
Page 30
3. In the licensing information, note the Instance ID value for your cloud. The HP Support representative
will need this value when your new license is generated.
4. Now enter the license key (alphanumeric characters) given to you by the HP Support representative.
Next Step
Proceed to the next topic, which includes options steps to Customize User Settings.
‹ PREV | ^ UP | NEXT ›
Customize User Settings
You can optionally customize the following user settings to suit your requirements.
1. In the Operational Dashboard, click the Settings link. It's near the upper right corner of the top banner.
2. The Operational Dashboard displays the Settings page is displayed, with options in the left panel.
3. From the left panel, click User Settings.
4. From the Language drop-down list, select the appropriate language. For example: English.
5. From the Timezone drop-down list, select the timezone. For example: UTC (Coordinated Universal
Time).
6. In the Table Page Size box, enter a number. For example, 20, meaning a maximum of 20 line items will
be displayed at a given time.
7. From the Log Level drop-down list, select an option. For example: Info. The Log Level gives you options
to either capture more detailed log files when you need to troubleshoot, or save disk space with less
detailed log files while your system is running routinely.
8. Click Save to save the details.
Next Step
Read the next topic, View Updates and Extensions.
‹ PREV | ^ UP | NEXT ›
View Updates and Extensions
page-footer-left
© Copyright 2014 Hewlett-Packard Development Company
page-footer-right
Page 31
This topic explains how to obtain patches and other relevant functionality from the HP Cloud OS Distribution
Network (CODN).
Note: The same Updates and Extensions functionality is available in the Administration Dashboard, which is
the new dashboard that you will use. For introductory information, you can read this topic. It is presented in
the Operational Dashboard context. However you can perform the steps later, if you want, in the
Administration Dashboard. In most cases, you will not need to take any action (at this point) on this Updates
and Extensions page of the Operational Dashboard.
Configure and Download Steps
Next Step
Configure and Download Steps
1. From the Cloud tab in the Operational Dashboard, click the Updates and Extensions panel. If you are
accessing this page for the first time, there is no data to display in the table. Note: The Operational
Dashboard displays a warning message indicating that your credentials are not configured or there is no
active session with the CODN. A session may timeout after 20 minutes.
2. Click the Configure button.
3. On the Configure dialog, if you are using it for the first time, sign up for the CODN.
4. After registering or logging in, you are returned to the Updates and Extensions panel. The Operational
Dashboard presents the available downloads that are relevant to your HP Cloud OS for Moonshot
environment.
5. Click the Download button that is located next to an item you want to acquire.
6. Before installing an install module's hot fix, such as one labeled (for example) "Keystone Token
Expiration Hotfix", verify that the install module you're about to update does exist for your cloud. To do
this, access the HP Cloud OS for Moonshot Installation Dashboard. In Mozilla Firefox or Google
Chrome, open https://192.168.124.10:3000.
7. In the Installation Dashboard, open the proposal for the hot fix by clicking the Edit button next to the
listed item.
8. Return to the Operational Dashboard and its Updates and Extensions panel. Click Install next to the hot
fix. The installation process starts.
9. To check on the progress of the installation, click More > View Progress.
10.
page-footer-left
© Copyright 2014 Hewlett-Packard Development Company
page-footer-right
Page 32
Verify the patch installation. Once the job is in its completed state, reopen the patched proposal in the
Installation Dashboard.
Click Edit. For example, you should see the name of the hot fix, such as "Token-Expiration Hotfix
Enabled." To apply the hot fix in your cloud, set its attribute Boolean value to true, click Apply and then
Save.
New patches may be available periodically. When you use the Administration Dashboard, be sure to revisit the
Updates and Extensions panel on a regular basis.
Next Step
Having completed the installation steps, created your cloud, licensed the dashboards, and at least viewed
Updated and Extensions and the CODN, you should now launch the Administration Dashboard to perform a set
of post-deployment tasks. The steps that we'll describe are designed to familiarize you with the Administration
Dashboard, and also verify that your deployed cloud is operating properly. See Launch Administration
Dashboard for Post-Deployment Tasks.
‹ PREV | ^ UP | NEXT ›
Launch Administration Dashboard for Post-Deployment Tasks
After a cloud environment has been created in the Operational Dashboard, you manage the cloud through the
Administration Dashboard, which provides a simplified means of creating and managing Cloud resources and
topology design documents.
The Administration Dashboard enables you to provision a composite topology described by topology design
documents. Importantly for HP Moonshot environments, the Administration Dashboard also lets you manage
the Moonshot chassis that are assigned to run specific workloads in your cloud.
This topic describes a set of baseline post-deployment tasks that you should perform on your cloud. Here we are
highlighting just the minimal steps you should follow to get started with the Administration Dashboard, and
verify that your deployed cloud is operating properly.
How to Access the Administration Dashboard
Create a Keypair
Upload Cloud Images
Manage your Moonshot Chassis
page-footer-left
© Copyright 2014 Hewlett-Packard Development Company
page-footer-right
Page 33
View the Provided Flavor
Launch an Instance from an Image
Next Steps
How to Access the Administration Dashboard
You can access the Administration Dashboard in one of two ways:
Open a Google Chrome or Firefox browser. Enter the URL of your Cloud Controller node's public IP
address. Login with the Admin account's username and password that you specified previously in the
Operational Dashboard on the Create Cloud > Attributes dialog.
Or, from within the Operational Dashboard, click Manage Clouds > More > Launch Dashboard for the
cloud you created.
Create a Keypair
Keypairs serve as a means of accessing the instance. One immediate advantage that this method has over
traditional password authentication is you can be authenticated by the server without ever having to send your
password over the network. Users need to create keypair(s) for their individual projects.
To create a keypair, do the following:
1. In the Administration Dashboard, select the Project tab. The tab displays with options in the left panel.
2. Select the Access and Security option from the left panel to display more options.
3. Click Access and Security to display a page with three tabs: Keypairs, API Access and Authentication
Token. By default, Keypairs is the active tab.
4. Click Create Keypair to display the Create Keypair dialog box.
5. In the Keypair Name box, enter a Keypair name. For example, testonlykeypair, or any custom
name, with no spaces.
6. Click Create Keypair. The keypair is downloaded to the browser session. If it does not download
automatically, a message is displayed to download the keypair from a link.
The key is downloaded in the form of a PEM file.
The key can only be downloaded once.
It is very important to store the key in a safe location.
page-footer-left
© Copyright 2014 Hewlett-Packard Development Company
page-footer-right
Page 34
7. From the left panel, select the Access and Security option again. The keypair is displayed on the page.
Upload Cloud Images
An image is required to install an Operating System in an instance. To upload cloud images in the
Administration Dashboard:
1. Click any of the tabs: Cloud, Region, or Project. The selected tab displays options in the left panel.
2. If you selected the Project tab, select Infrastructure > Images. If you started on the Cloud or Region
tab, click Images.
Note: You must create image types such as QCOW2 and AMI with the associated Amazon Kernel Image
(AKI) and Amazon RAMdisk Image (ARI). Recommendation: create the images in the following
sequence: Amazon Kernel Image (AKI), Amazon RAMdisk Image (ARI) and QCOW2. The
Administration Dashboard displays the Kernel Image drop-down list and RAM Disk Image drop-down
list when the selected format is QCOW2 or AMI.
Next, perform the steps in the following AKI, ARI, and QCOW2-QEMU sections.
To create an Amazon Kernel Image (AKI)
1.
2.
3.
4.
5.
6.
7.
8.
9.
10.
11.
Click Create Image to open the Create An Image dialog box.
In the Name box, enter a name for the image.
(Optional) In the Description box, enter a description for the image.
From the Format drop-down list, select AKI.
From the Image Source drop-down list, do one of the following:
Select Image Location from the drop-down list. The Image Location box is displayed.
In the Image Location box, enter the HTTP URL from which to load the AKI image.
Or:
Select Image File from the drop-down-list.
Click Choose File to browse to the AKI image.
Select the AKI Image to upload.
The CPU Architecture drop-down list displays x86_64 by default. The HP Moonshot hardware supports
the above specification.
In the Minimum Disk box, specify a minimum size required to boot the image. If no input is entered, the
minimum value defaults to 0.
In the Minimum Ram box, specify a minimum size required to boot the image. If no input is entered, the
minimum value defaults to 0.
Click the checkbox next to Public. This will make the image visible to all users.
Click the checkbox next to Protected. This makes the image read-only.
Click Create Image. A message is displayed on successful creation.
page-footer-left
© Copyright 2014 Hewlett-Packard Development Company
page-footer-right
Page 35
To create an Amazon RAMdisk Image (ARI)
1.
2.
3.
4.
5.
6.
7.
8.
9.
10.
11.
Click Create Image to open the Create An Image dialog box.
In the Name box, enter a name for the image.
(Optional) In the Description box, enter a description for the image.
From the Format drop-down list, select ARI.
From the Image Source drop-down list, do one of the following:
Select Image Location from the drop-down list.
In the Image Location box, enter the HTTP URL from which to load the ARI image.
Or:
Select Image File from the drop-down-list.
Click Choose File to browse to the ARI image.
Select the ARI Image to upload.
The CPU Architecture drop-down list displays x86_64 by default. The HP Moonshot hardware supports
the above specification.
In the Minimum Disk box, specify a minimum size required to boot the image. If no input is entered, the
minimum value defaults to 0.
In the Minimum Ram box, specify a minimum size required to boot the image. If no input is entered, the
minimum value defaults to 0.
Click the checkbox next to Public. This will make the image visible to all users.
Click the checkbox next to Protected. This makes the image read-only.
Click Create Image. A message is displayed on successful creation.
To create a QCOW2-QEMU Image
1.
2.
3.
4.
5.
Click Create Image to open the Create An Image dialog box.
In the Name box, enter a name for the image.
(Optional) In the Description box, enter a description for the image.
From the Format drop-down list, select QCOW2-QEMU Emulator.
From the Image Source drop-down list, do one of the following:
Select Image Location from the drop-down list.
In the Image Location box, enter the HTTP URL from which to load the QCOW2-QEMU image.
Or:
Select Image File from the drop-down-list.
Click Choose File to browse to the QCOW2-QEMU image.
Select the QCOW2-QEMU Image to upload.
6. From the Kernel Image drop-down list, select the corresponding kernel image.
7. From the RAM Disk Image drop-down list, select the corresponding RAM disk image.
8. The CPU Architecture drop-down list displays x86_64 by default. The HP Moonshot hardware supports
page-footer-left
© Copyright 2014 Hewlett-Packard Development Company
page-footer-right
Page 36
9.
10.
11.
12.
13.
the above specification.
In the Minimum Disk box, specify a minimum size required to boot the image. If no input is entered, the
minimum value defaults to 0.
In the Minimum Ram box, specify a minimum size required to boot the image. If no input is entered, the
minimum value defaults to 0.
Click the checkbox next to Public. This will make the image visible to all users.
Click the checkbox next to Protected. This makes the image read-only.
Click Create Image. A message is displayed on successful creation. The image displays in the Images
page of the Cloud Tab.
Manage your Moonshot Chassis
This section defines the process to add HP Moonshot servers to your cloud.
Note: This function can be performed by the Cloud Administrator or any member who is part of the Cloud
group.
1. In the Administration Dashboard, select the Cloud tab. The tab displays options in the left panel.
2. From the left panel, select Moonshot Management to display the Datacenter View. This option enables
two views:
Datacenter View
Single Chassis View.
By default, Datacenter View is the active view.
Datacenter View
Before we discuss adding a Moonshot chassis to the cloud, let's take a quick look at the Datacenter user
interface.
The Datacenter View displays the Add, Edit, and Delete options at the top, and the Events Log panel on the
right. The Datacenter View also displays a search option to allow you to search for a specific cartridge.
During your first visit to this screen, there might not be any chassis to display. After you add a chassis
(explained in the next section), you can then toggle between two views in the Datacenter:
Grid view:
Table view:
Later, to display the Single Chassis View, you can double click a Chassis graphic. For example, after a chassis
page-footer-left
© Copyright 2014 Hewlett-Packard Development Company
page-footer-right
Page 37
has been added:
Add a Chassis
This is a key task during your post-install of HP Cloud OS for Moonshot: adding one or more chassis (one at a
time) to the cloud.
1. Click the + Add icon to display the Enter Chassis Details dialog box.
2. In the Display Name box, enter the display name for the chassis. The name should have a minimum of 4
characters. The name should start with an alphabet and may be followed by numbers or an underscore (_).
Note: Do not specify a Name that contains special characters or spaces.
3. In the Chassis Manager IP Address box, enter the IP address of your Moonshot Chassis.
4. In the Chassis Manager User Name box, enter the user name.
5. In the Chassis Manager Password box, enter the password.
6. In the Managing Hostname box, enter the fully-qualified domain name of the Baremetal host that will
manage the chassis. For example: hostname.cloudos.local
7. Click Add to add the Moonshot Chassis to the cloud. After clicking Add, watch for one or more of the
following states:
Discovering - When the chassis is being discovered
page-footer-left
© Copyright 2014 Hewlett-Packard Development Company
page-footer-right
Page 38
Warning - When one or more of the cartridges are not in good condition
Failed - When the discovery process fails
Optimal- When the chassis is discovered and is in good state
Once the operation is successful, the Moonshot Chassis is graphically represented on the screen. The
information is displayed regarding the cartridges, nodes, and the state of the chassis.
Single Chassis View
The Single Chassis View displays the detailed information about the selected Chassis in two sections:
Chassis Snapshot section
Table section
Example of the main screen:
The Single Chassis View also displays the Events log panel, to the right of the main screen. For example:
page-footer-left
© Copyright 2014 Hewlett-Packard Development Company
page-footer-right
Page 39
Chassis Snapshot section
The Chassis Snapshot visually represents the chassis with all the cartridges and nodes along with power states of
the cartridges.
Note: A chassis has one or more cartridges, and each cartridge can include one or more nodes.
The following table displays a list of icons and their description. These icons are displayed next to the chassis
on the right panel. It also displays the complete state of the chassis.
Icon
Description
Displays the chassis UUID.
Displays the chassis name.
Displays the Chassis Manager IP address.
Displays the firmware version.
Displays the number of cartridges discovered.
Displays the number of available nodes for provisioning.
Displays overall health of the chassis.
Displays the Last Sync-Up Time.
Displays the maintenance mode state.
Displays the fan status.
page-footer-left
© Copyright 2014 Hewlett-Packard Development Company
page-footer-right
Page 40
Displays the power supply status.
Displays the temperature status.
Also, you can click the following icon to force a refresh of the Chassis status.
Note: The Force Refresh option will take a minute to complete. During this time you cannot perform any action
on the cartridge and the nodes.
Table Views section
The Table views section displays the details of all the cartridges and the nodes in a tabular form. The table
displays two views - Cartridges View and the Nodes View. By default, the Cartridges View is the active view.
Cartridges View
In the table displayed below the Chassis Snapshot, click the Cartridges tab to display the following details
about the cartridge:
Cartridge Name
ID
Serial #
Nodes
Product ID
Type
System ROM Version
Health
Maintenance Mode
Nodes View
In the table displayed below the Chassis Snapshot, click Nodes tab to display the following details about the
nodes:
Node ID
CPU Cores
Memory(in MB)
Min Disk (in MB)
MAC List
page-footer-left
© Copyright 2014 Hewlett-Packard Development Company
page-footer-right
Page 41
Power Status
Instance UUID
The Node View displays two new tabs: Workload and Configuration.
To view the workload and configuration details of a particular node:
Select a node from the table for which you want to view the workload or configuration details.
Click the Workload Tab to view the workload details of the selected node.
Click the Configuration Tab to view the configuration details of selected node.
Notes about the Table Views
1. Selecting or de-selecting a cartridge or a node in the Cartridges or Nodes table is a toggle function.
2. You can select multiple cartridges or nodes by selecting the particular rows one-by-one, in the Cartridges
or Nodes table.
3. Selecting a cartridge in the Cartridges table has two effects:
It also selects that cartridge on the Chassis in the Snapshot section.
It selects all its nodes in the adjacent Nodes table.
4. In the Nodes table, if all the nodes of a particular cartridge are selected, then the last node's selection also
selects the parent cartridge in the Cartridges table and on the Chassis in the Snapshot section.
5. Items 3 and 4 also apply to the selection of multiple cartridges and nodes.
6. The following icon indicates you have selected all the cartridge/nodes in the table.
View the Provided Flavor
Flavors are machine configurations that describe the amount of memory, number of CPUs, and ephemeral disk
space available. When you register a chassis, a flavor is created by default.
The Administration Dashboard presents the following pre-defined flavors for HP Moonshot environments,
depending on the server cartridge type.
page-footer-left
© Copyright 2014 Hewlett-Packard Development Company
page-footer-right
Page 42
Flavor name
Server Cartridge Type
CPUs: Configuration
2.
CPU Architecture: x86_64.
hp_moonshot_server HP ProLiant Moonshot Server Cartridge
RAM MBs: 8192.
Root Disk GBs: 450.
hp_moonshot_m300 HP ProLiant m300 Server Cartridge
CPUs: 8.
CPU Architecture: x86_64.
RAM MBs: 32768.
Root Disk GBs: 450.
As part of your initial post-deployment steps, you do not need to create new flavors to verify that your cloud is
operating properly.
If you're curious, to see how the flavors are defined already:
1. On the Region tab, select a Current Compute Region.
2. Click Flavors to open the Flavors window.
3. Find the flavor you want to view (in this case, hp_moonshot_server or hp_moonshot_m300, depending on
your cartridge server type), and click Edit Flavor to open the Edit Flavor dialog box.
4. Recommendation: For now, keep the pre-defined values.
5. Click Cancel.
Later, when you want to create new flavors, or edit existing ones, see the Administration Dashboard Help PDF
and its section covering How to Access Flavors and Flavor Extra Specs.
Launch an Instance from an Image
The next post-install step is to launch an instance from an image. This task is important to verify that network
connectivity is present and working, and that your cloud is operational.
Here are the steps:
1. In the Administration Dashboard, select the Project tab.
2. The tab displays options in the left panel. From the left panel, click Infrastructure and then select Images
. The Images page is displayed.
3.
page-footer-left
© Copyright 2014 Hewlett-Packard Development Company
page-footer-right
Page 43
Click Launch next to the image listed in the table.
4. A Launch Instance dialog box displays with four tabs: Details, Access & Security, Networking, and
Post-Creation. By default, Details is the active tab.
5. On the Details tab:
From the Image drop-down list, select the image.
In the Instance Name box, enter a name for the instance.
From the Flavor drop-down list, select the flavor. In this case, it should be hp_moonshot_server or
hp_moonshot_m300, depending on your cartridge server type.
In the Instance Count box, enter 1, or more than 1 if you intend to launch multiple instances.
Recommendation: for this initial post-install process, enter 1.
6. On the Access & Security tab, from the Keypair drop-down list, select a value from the list.
7. On the Networking tab, no networks will be listed in the Selected Networks section. You should select
the private network from the Available networks section.
8. Click Launch.
The view changes to Project > Infrastructure > Instances.
Next Steps
At this point, you're done with the installation & configuration steps (including post-install). You can now
proceed to the Manage section of this documentation site. It includes information about utilities,
troubleshooting, Disk Image Builder, and the backup process. Also included from the Manage page is the
HP Cloud OS for Moonshot Administration Dashboard Help, where you can get more information about the
dashboard's features, roles, and tasks.
page-footer
page-footer-left
© Copyright 2014 Hewlett-Packard Development Company
page-footer-right
Page 44