1
HP Insight Foundation Suite for Integrity with
Linux User's Guide
HP Smart Setup
HP Support Pack
HP Part Number: 5992-3193
Published: September 2009
Edition: 2.6
© Copyright 2007–2009 Hewlett-Packard Development Company, L.P.
Confidential computer software. Valid license from HP required for possession, use or copying. Consistent with FAR 12.211 and 12.212, Commercial
Computer Software, Computer Software Documentation, and Technical Data for Commercial Items are licensed to the U.S. Government under
vendor's standard commercial license.
The information contained herein is subject to change without notice. The only warranties for HP products and services are set forth in the express
warranty statements accompanying such products and services. Nothing herein should be construed as constituting an additional warranty. HP
shall not be liable for technical or editorial errors or omissions contained herein.
Acknowledgments
Intel® and Itanium® are trademarks or registered trademarks of Intel Corporation or its subsidiaries in the United States and other countries.
RED HAT READY® Logo and RED HAT CERTIFIED PARTNER® Logo are trademarks of Red Hat, Inc.
Table of Contents
About This Document.........................................................................................................7
Additional Documentation.....................................................................................................................7
Intended Audience.................................................................................................................................7
Typographic Conventions......................................................................................................................7
Publishing History..................................................................................................................................8
Related Information................................................................................................................................9
HP Encourages Your Comments..........................................................................................................10
1 Planning the Installation..............................................................................................11
Overview...............................................................................................................................................11
Support Information.............................................................................................................................11
Supported Linux OS Distributions..................................................................................................11
Supported Hardware.......................................................................................................................11
Support Exceptions..........................................................................................................................12
Ensure Support for Linux on HP Integrity Servers.........................................................................12
Choosing an Installation Scenario........................................................................................................13
Choosing an Installation Environment.................................................................................................13
Using a Serial Console.....................................................................................................................14
Using a VGA Console......................................................................................................................14
Using the HP Smart Setup EBSU Utility.........................................................................................15
Installation Process...............................................................................................................................15
2 Preparing for Installation.............................................................................................17
Obtaining the Latest HP Insight Foundation Suite for Integrity with Linux.......................................17
Ensuring Platform Compatibility.........................................................................................................17
Verifying Hardware Compatibility.................................................................................................17
Backing Up Existing Data................................................................................................................18
Setting Up a Console.............................................................................................................................18
Setting Up a Serial Console.............................................................................................................18
Setting Up a VGA Console..............................................................................................................19
Preparing the Server Hardware............................................................................................................19
Setting Up the Boot Drive................................................................................................................19
Accessing the Removable Media Devices Using EFI......................................................................20
Enabling a CD/DVD Device.......................................................................................................20
Enabling a USB Device...............................................................................................................21
3 Installing the OS and Updating the Server...............................................................23
Using HP Smart Setup to Install the OS...............................................................................................23
Using the Linux Media to Install the OS...............................................................................................30
Updating the Server..............................................................................................................................31
Installing Updates from the Web.....................................................................................................31
Registering for HP Support Notifications.......................................................................................31
Installing the Fibre Channel HBA Drivers for Linux...........................................................................32
Installing the MPT Fusion HBA Drivers for Linux...............................................................................33
4 EFI and HP Smart Setup Media Utilities....................................................................35
Using the Option ROM Configuration for Arrays Utility....................................................................35
Using EFI...............................................................................................................................................35
Table of Contents
3
EFI Boot Manager............................................................................................................................35
EFI Shell...........................................................................................................................................36
HP Smart Setup Utilities.......................................................................................................................36
Accessing HP Smart Setup Utilities.................................................................................................36
5 Installing and Using the HP Support Pack.................................................................39
Software Provided in the HP Support Pack..........................................................................................39
HP Management Base for Integrity Servers....................................................................................39
HP Insight Management Agents.....................................................................................................39
HP System Management Homepage ..............................................................................................40
HP Server Manageability eXtensions..............................................................................................40
HP WBEM Providers for Linux.......................................................................................................40
HP Partition Manager .....................................................................................................................40
HP nPartition Commands...............................................................................................................40
HP Array Configuration Utility – Command Line Interface..........................................................41
OpenPegasus ..................................................................................................................................41
Small Footprint CIM Broker............................................................................................................41
HP Utilization Provider Including WBEM......................................................................................41
HP SmartSetup Scripting Toolkit....................................................................................................42
HP SAS Integrated Raid (IR) Configuration Utility........................................................................42
HP Integrity Virtual Machines WBEM Provider.............................................................................42
Product Installation Dependencies.......................................................................................................42
Removing OpenWBEM...................................................................................................................43
Installing the Java Development Kit Product..................................................................................43
Installing Sun JDK 6 for the Linux IA64 Platform.....................................................................43
Installing BEA JRockit 5.0 JDK for the Linux IA64 Platform.....................................................43
Installing Software from the HP Support Pack.....................................................................................44
Before Running the Installer ...........................................................................................................44
Running the Installer ......................................................................................................................45
A Configuring and Using a Serial Console..................................................................49
Configuring a Serial Console................................................................................................................49
Using a Serial Console..........................................................................................................................49
B HP Support Pack Dependencies.................................................................................51
RHEL4...................................................................................................................................................51
RHEL5...................................................................................................................................................52
SLES10...................................................................................................................................................52
SLES11...................................................................................................................................................53
C Known Issues................................................................................................................55
HP Insight Management WBEM Providers on Pegasus cimserver Supports Multi-Process Mode
Only.......................................................................................................................................................55
Unaligned Access Messages ................................................................................................................55
Superfluous PAM Authentication Message..........................................................................................55
HP Insight Management WBEM Providers Information Reporting....................................................56
Changing IP Address of Network Interface ........................................................................................56
Configuring Storage Adapters..............................................................................................................56
Partitioning Fibre Channel HBA Adapters...........................................................................................56
Installing the MPT Fusion HBA Driver on RHEL 5U2 and RHEL 5U3 using a Xen Kernel Hangs
the Server..............................................................................................................................................56
HP System Management Homepage Session Time-out Error..............................................................58
4
Table of Contents
HP SAS Integrated Raid (IR) Configuration Utility May Cause Kernel Panics on RHEL4U7.............58
Flashing HP PCIe 2-port 1000Base-T adapter (AD337A) Adapters.....................................................58
D Supported Products Matrix.........................................................................................59
Table of Contents
5
6
About This Document
This document describes how to use the HP Insight Foundation Suite for Integrity with Linux
(HIFIL) V2.6 product.
•
•
The HP Smart Setup software prepares your system for installation of the Linux operating
system (OS). The HP Smart Setup EFI-based setup utility (EBSU) utility assists with tasks
such as configuring storage adapters, upgrading firmware, preparing a system hardware
inventory, and installing diagnostics tools.
The HP Support Pack installs additional utilities and tools (such as HP system management
software) after the Linux OS is installed. It includes the HP Integrity Linux Management
Tools, which provides HP Systems Insight Manager for additional functionality.
The document printing date and part number indicate the document’s current edition. The
printing date changes when a new edition is printed. Minor changes may be made at reprint
without changing the printing date. The document part number changes when extensive changes
are made.
Document updates may be issued between editions to correct errors or document product changes.
To ensure that you receive the updated or new editions, you should subscribe to the appropriate
product support service. See your HP sales representative for details.
See the latest version of this document at the HP Technical Documentation website:
http://docs.hp.com
Additional Documentation
The HP Smart Setup and Support Pack software packages each contain a set of software
documentation. The documentation is located in the /docs directory. Within the /docs directory,
you can access the index.html web page or the README.txt file, both of which list the
documentation found in the respective software packages.
Linux OS distributions provide documentation with their respective products. The documentation
for your specific Linux OS is included with your system. For additional information about your
Linux OS and its associated documentation, read the support notes document that HP provides
with your OS distribution.
Intended Audience
This document is intended for system administrators responsible for installing, configuring, and
managing Linux. Administrators must have knowledge of OS concepts, commands, and
configuration. It is also helpful to have knowledge of Extensible Firmware Interface (EFI) concepts.
Typographic Conventions
This document uses the following typographical conventions.
Command
A command name or qualified command phrase.
ComputerOut
Text displayed by the computer.
Ctrl-x
A key sequence. A sequence such as Ctrl-x indicates that you must hold down the key labeled
Ctrl while you press another key or button.
ENVIRONVAR
The name of an environment variable, for example, PATH.
Additional Documentation
7
[ERRORNAME]
The name of an error, usually returned in the errno variable.
Key
The name of a keyboard key. Return and Enter both refer to the same key.
Term
The defined use of an important word or phrase.
UserInput
Commands and other text that you type.
Variable
The name of a placeholder in a command, function, or other syntax display that you replace
with an actual value.
[]
The contents are optional in formats and command descriptions. If the contents are a list
separated by |, you must choose one of the items.
{}
The contents are required in formats and command descriptions. If the contents are a list
separated by |, you must choose one of the items.
...
The preceding element can be repeated an arbitrary number of times.
|
Separates items in a list of choices.
Publishing History
The document publishing date and part number indicate the current edition of the document.
The publishing date changes when a new edition is released. Minor changes might be made at
reprint without changing the publishing date. The document part number changes when extensive
changes are made. Document updates might be issued between editions to correct errors or
document product changes. To ensure that you receive the updated or new editions, subscribe
to the appropriate product support service. See your HP sales representative for details. For the
latest version of this document online, see HP Insight Foundation Suite for Integrity with Linux
User's Guide:
http://h20000.www2.hp.com/bc/docs/support/SupportManual/c01861377/c01861377.pdf
8
Manufacturing Part
Number
Supported OS
Supported Versions
Edition
Number
5992–3193
RHEL
SLES
RHEL4U4 and later, RHEL5,
2.6
RHEL5U1, RHEL5U2, and
RHEL5U3
SLES10, SLES10SP1, SLES10SP2,
and SLES11
September 2009
5992–3193
RHEL
SLES
RHEL4U4 and later, RHEL5,
2.5
RHEL5U1, RHEL5U2, and
RHEL5U3
SLES10, SLES10SP1, SLES10SP2,
and SLES11
May 2009
5992–3193
RHEL
SLES
RHEL4U4 and later, RHEL5,
RHEL5U1, and RHEL5U2
SLES9SP3, SLES9SP4, SLES10,
SLES10SP1, and SLES10SP2
September 2008
2.4
Publication Date
Manufacturing Part
Number
Supported OS
Supported Versions
Edition
Number
Publication Date
5992–3193
RHEL
SLES
RHEL4U4 and later, and RHEL5 2.3
and RHEL5U1
SLES9SP3, and SLES10 and
SLES10SP1
April 2008
5992–3193
RHEL
SLES
RHEL4U4 and later, and RHEL5 2.2
and RHEL5U1
SLES9SP3, and SLES10 and
SLES10SP1
December 2007
5991-7635
RHEL
SLES
RHEL4U4 and later, and RHEL5 2.1
SLES8 (HP Smart Setup only),
SLES9SP3 and SLES10
August 2007
5991-7635
RHEL
SLES
RHEL3U8, RHEL4U4 and later, 2.0
and RHEL5
SLES8 (HP Smart Setup only),
SLES9SP3 and SLES10
March 2007
5991-6413
RHEL
SLES
RHEL3U8 and RHEL4U4 and
later
SLES8 (HP Smart Setup only),
SLES9SP3 and SLES10
1.2
November 2006
5991-6413
RHEL
SLES
RHEL3U8 and RHEL4U4 and
later
SLES8 (HP Smart Setup only)
and SLES9SP3
1.1
September 2006
5991-5295
RHEL
RHEL4U3
1.01
July 2006
5991-5295
RHEL
SLES
RHEL3U7 and RHEL4U3
SLES8 (HP Smart Setup only)
and SLES9SP3
1
April 2006
Related Information
—
The HP Insight Foundation Suite for Integrity with Linux website:
http://www.hp.com/go/integritylinuxessentials
—
The Intel EFI website:
http://developer.intel.com/technology/efi/
—
The HP WBEM Providers for Linux product website:
http://www.hp.com/go/wbemlinux
—
The HP Systems Insight Manager website:
http://www.hp.com/go/hpsim
—
The Distributed Management Task Force (DMTF) website that contains details on the WBEM
protocol:
http://www.dmtf.org/standards/wbem
—
The Open Group's OpenPegasus website:
http://www.openpegasus.org
—
The HP Business Support Center website that contains HP Integrity server technical support
information:
http://www.hp.com/support/itaniumservers/
Related Information
9
—
For additional information on HP products and services, see the HP website:
http://www.hp.com
—
For the location of the nearest sales office, call:
In the United States: +1 800 637 7740
In Canada: +1 905 206 4725
In Japan: +81 3 3331 6111
In Latin America: +1 305 267 4220
In Australia/New Zealand: +61 3 9272 2895
In Asia Pacific: +8522 599 7777
In Europe/Africa/Middle East: +41 22 780 81 11
For product information, contact any of the HP worldwide sales offices or HP Channel
Partners (in the United States, call 1 800 637 7740).
HP Encourages Your Comments
HP encourages your comments concerning this document. We are committed to providing
documentation that meets your needs. Send any errors found, suggestions for improvement, or
compliments to:
[email protected]
Include the document title, manufacturing part number, and any comment, error found, or
suggestion for improvement you have concerning this document.
10
1 Planning the Installation
Installing the Linux operating system (OS) on an HP Integrity server involves preparing the
hardware for the OS installation, installing the OS, and updating the system with the latest OS
patches. This chapter helps you plan the installation based on the server model, the OS edition,
the source of the OS media, and your network environment. Subsequent chapters guide you
through the installation process.
Overview
The HP Integrity server family, based on the Intel Itanium processor, supports Linux on a full
range of server models. This range includes entry-level servers, such as the 2-processor rx1620;
mid-range servers, such as the rx7640 and rx8640; and the high-end 128-processor Superdome.
Some servers, such as the HP Superdome, rx8640, and rx7640 servers, are based on the HP
Super-Scalable Processor chipset (sx1000 or sx2000). They are composed of basic building blocks
known as cells. These cell-based servers can be set up as a single system or divided into multiple
partitions, where each partition is assigned memory, processors, and I/O resources for its exclusive
use. Each partition can execute its own OS image.
Support Information
To prepare for the installation of the HP Insight Foundation Suite for Integrity with Linux, verify
that the server satisfies the software and hardware requirements described in this section.
Supported Linux OS Distributions
The Linux OS distributions supported by the HP Insight Foundation Suite for Integrity with
Linux are as follows:
•
Red Hat Enterprise Linux (RHEL)
— RHEL4U4 and later updates
— RHEL5 and later updates
•
SUSE Linux Enterprise Server (SLES)
— SLES10 and later service packs
— SLES11
Supported Hardware
HP provides support for Linux on HP Integrity servers using only the latest HP Support Pack
version that is provided with the HP Insight Foundation Suite for Integrity with Linux. This is
the latest HP Support Pack for a given Linux distributor without exception. HP supports the
minimum OS distributions as listed in Table 1-1 including later updates and service packs unless
otherwise specified in “Support Exceptions” (page 12). Each HP Support Pack version contains
only the currently supported OS distributions and includes any problem resolutions that have
been implemented to improve the product.
HP recommends that you frequently update your copy of the HP Insight Foundation Suite for
Integrity with Linux to ensure that your servers are being managed with the most current support
tools and that you have the supported version of HP Support Pack. You can obtain the latest
version of the product as described in “Obtaining the Latest HP Insight Foundation Suite for
Integrity with Linux” (page 17).
HP recommends that you review Appendix D (page 59) to ensure that the adapters in your
server are supported by the HP Insight Foundation Suite for Integrity with Linux. In addition,
HP recommends that you keep the server up-to-date as described in “Updating the Server”
(page 31).
Overview
11
The following table provides the minimum RHEL and SLES OS distributions that are supported
using the latest HP Insight Foundation Suite for Integrity with Linux:
Table 1-1 Supported Minimum OS Distributions by HP Integrity Server
Server
RHEL Distributions
SUSE Distributions
BL860c
RHEL4U6, RHEL5U1
SLES10, SLES11
BL870c
RHEL4U6, RHEL5U1
SLES10SPI, SLES11
cx2620
RHEL4U4
None
rx1600
RHEL
None
rx1620
RHEL4, RHEL5
SLES10
rx2600
RHEL4
None
rx2620
RHEL4, RHEL5
SLES10
rx2660
RHEL4U4, RHEL5
SLES10SP1, SLES11
rx3600
RHEL4U4, RHEL5
SLES10, SLES11
rx4640
RHEL, RHEL5
SLES10
rx5670
None
None
rx6600
RHEL4U4, RHEL5
SLES10, SLES11
rx7620
RHEL4U1, RHEL5U1
SLES10
rx7640
RHEL4U4, RHEL5U1
SLES10, SLES11
rx8620
RHEL4U1, RHEL5U1
SLES10
rx8640
RHEL4U4, RHEL5U1
SLES10, SLES11
Superdome sx1000
RHEL4U1, RHEL5U1
SLES10
Superdome sx2000
RHEL4U4, RHEL5U1
SLES10SP1, SLES11
Support Exceptions
The following support exceptions should be reviewed to ensure that you are using the correct
versions of the product:
HP Smart Setup EBSU utility and the rx2600 HP Integrity server:
The HP rx2600 server is not supported by the HP Smart Setup EBSU utility after the version
4.2 so you must retain a copy of this version for use in managing this server.
MPT Fusion HBA driver requirements on the rx2660, BL860c and BL870c HP Integrity servers:
The use of the MPT Fusion HBA driver on the rx2660, BL860c, and BL870c HP Integrity
servers requires an update of this driver when your server is running RHEL5 or SLES10 and
is described in “Installing the MPT Fusion HBA Drivers for Linux” (page 33).
Ensure Support for Linux on HP Integrity Servers
HP recommends that you review the Linux certification and support matrix for your HP Integrity
servers prior to downloading Linux from the Red Hat or Novell SUSE websites. You should
ensure that the distribution of Linux that you want to install is both certified and supported on
your server.
Use the following steps to review information about the supported and certified distributions
of the RHEL and the SUSE Linux distributions for HP Integrity servers:
1.
Go to the Open Source and Linux from HP website at:
http://www.hp.com/go/integritylinux
12
Planning the Installation
2.
3.
Click Linux certification and support matrices.
Select the appropriate Linux distribution tab, locate the server name of interest, and then
click the link.
Detailed product information, downloads, documentation, and specific certification
information is provided in a categorized listing.
Choosing an Installation Scenario
When you purchase an HP Integrity server, you can order additional hardware, support options,
and an OS Enablement Kit, such as the HP Insight Foundation Suite for Integrity with Linux.
You can also order a factory-installation of the OS. Depending on your order and subsequent
use, one of the following scenarios will apply to your system:
•
Factory-Installed Linux
To get the system up and running, verify that the OS is installed correctly. Perform an update
of the latest Linux patches and fixes from the website of the installed Linux distribution.
Install additional tools and utilities using the HP Support Pack.
•
No OS Installed
Use HP Smart Setup to prepare the server hardware for installation and use the Linux
Installer media to load the OS files on the server or you can execute a cold installation. After
installation, verify that the OS is installed correctly. Perform an update of the latest Linux
patches and fixes from the website of the installed Linux distribution. Install additional tools
and utilities using the HP Support Pack.
•
Factory-Installed OS Other than Linux
If you run an alternate factory-installed OS, you can perform the migration on an entry-level
server or engage an HP Customer Engineer (CE) to perform the migration on a mid-range
or high-end server. Contact HP Support or sales to engage an HP CE.
When migrating to Linux from another OS, pay attention to the differences in supported
hardware between the two operating systems. You must replace incompatible components
with those supported on Linux. If you want to keep the data residing on the server hard
disk, you must back up the data and verify that you can restore it elsewhere.
Use HP Smart Setup to prepare the server hardware for installation and update the system
with the latest firmware and drivers. Use the Linux Installer media to load the OS files on
the server. Perform an update of the latest Linux patches and fixes from the website of the
installed Linux distribution. Install additional tools and utilities using the HP Support Pack.
•
Installed Linux Incorrect or Inoperable
Use HP Smart Setup to set up and update the system with the latest firmware and available
drivers. After reinstallation of Linux, verify that the OS is installed correctly. Perform an
update of the latest Linux patches and fixes from the website of the installed Linux
distribution. Install additional tools and utilities using the HP Support Pack.
Choosing an Installation Environment
The installation environment consists of the server model, the Linux OS distribution and version,
a VGA or serial console, and the software you need to perform the installation. The software
required for installation includes the HP Smart Setup software package and the Linux installer
media.
A list of the supported HP Integrity servers is provided in the “Support Information” (page 11)
section; a list of the supported adapters is provided in Appendix D (page 59).
Choosing an Installation Scenario
13
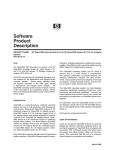
Using a Serial Console
A serial console is a PC running terminal emulation software, such as a Secure SHell (SSH) client
like PuTTY (available from the web or on your Linux system). Using the minicom or cu command,
connect to the server through the Management Processor (MP) serial port or LAN port.
Figure 1-1 shows serial consoles connected to an HP Integrity rx4640 server.
Figure 1-1 Serial Console Configuration
When using a headless console to install Linux, you can view detailed installation information
for each file by monitoring the setup log channels.
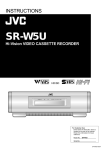
Using a VGA Console
A VGA console is a VGA monitor, a USB HP keyboard, and a USB mouse connected to the
server. (You can use a USB-to-PS2 converter to connect to a console switch.)
Figure 1-2 shows a VGA console connected to an HP Integrity rx4640 server.
Figure 1-2 VGA Console Configuration
A VGA console provides complete access to all the installation and administration tasks that can
be performed on the server. You can use the VGA console to prepare the server for installation,
install the OS, and check server status after installation.
14
Planning the Installation
Using the HP Smart Setup EBSU Utility
You can use HP Smart Setup both before and after the OS is installed.
HP recommends that you obtain the latest version of the HP Insight Foundation Suite for Integrity
with Linux. For more information about downloading HP Smart Setup, see “Obtaining the Latest
HP Insight Foundation Suite for Integrity with Linux” (page 17).
•
Before Installing the OS
Use any bootable, removable media containing HP Smart Setup to boot the server. With the
media in the CD/DVD drive or USB HDD, the server boots to the HP Smart Setup EBSU
utility, which provides an interface for offline setup and assists with configuration tasks,
such as creating hard disk partitions and upgrading the firmware. Additionally, the HP
Smart Setup EBSU utility provides a wizard called Smart Setup. The Smart Setup wizard
guides you through preparing the system for and installing the OS. The HP Smart Setup
EBSU utility works in conjunction with the Linux Installer media, which contains the OS
image. It is strongly recommended that you use the HP Smart Setup to install the OS.
•
After Installing the OS
Use the HP Smart Setup EBSU utility to install the EFI driver and utilities and to upgrade
firmware, which ensures the stability and performance of the system.
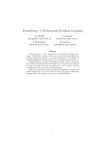
Installation Process
The OS installation process involves preparing the server, installing the OS on the server, and
updating it with the latest firmware, drivers, utilities, security fixes, and OS fixes. Figure 1-3
shows the main tasks involved in each stage.
Installation Process
15
Figure 1-3 Installation Overview
There are minor differences in the sequence of tasks or the interface you use to perform them
based on your choice of console and installation media. Use the detailed instructions in the
following chapters, and note any warnings or cautions that might apply.
16
Planning the Installation
2 Preparing for Installation
Preparing your server for an OS installation involves setting up a console (VGA, serial, or both)
and preparing the hardware for installation. If you are migrating from another OS, you must
also ensure that the server platform and its peripheral devices are compatible with Linux before
proceeding. This chapter provides detailed instructions for each task.
Obtaining the Latest HP Insight Foundation Suite for Integrity with Linux
HP recommends that you frequently update your copy of the HP Insight Foundation Suite for
Integrity with Linux to ensure that your servers are being managed with the most current support
tools.
You can obtain the latest version of the HP Insight Foundation Suite for Integrity with Linux by
component format using the following procedure:
1.
2.
3.
Ensure that your system has an application that can burn a bootable CD or DVD installed
(for example, Nero or Roxio).
Go to the HP Insight Foundation Suite for Integrity with Linux Smart Setup download page
at http://h20293.www2.hp.com/portal/swdepot/
displayProductInfo.do?productNumber=T2387AA.
Select the HP Smart Setup ISO file from the Software Specification list, complete the online
form, and then click Next to complete the download.
The HP Smart Setup ISO file contains the entire HP Insight Foundation Suite for Integrity
with Linux product including the HP Support Pack.
NOTE: The HP Insight Foundation Suite for Integrity with Linux media delivered by HP
may not contain the latest version of the product.
4.
Create a bootable disc by writing the HP Smart Setup ISO file and the HP Support Pack files
to a CD or DVD using the media burning application.
TIP: You can download tar files of the HP Support Pack, HP SmartSetup Scripting Toolkit, and
HP Management Base products.
Ensuring Platform Compatibility
If you are migrating from another OS to Linux, ensure that the hardware is compatible and any
data on the server disk is backed up.
Verifying Hardware Compatibility
To verify that your existing hardware is compatible with Linux, use the following steps:
1.
2.
3.
4.
Review the Linux certification and support matrix as described in “Ensure Support for Linux
on HP Integrity Servers” (page 12).
In the Linux certification and support matrix list, select the appropriate Linux distribution
tab, and then click the link for the server whose compatibility you want to verify.
Click the Product overview and how to buy link.
Click the options & accessories tab to review supported hardware configurations. For
example, the options & accessories page for the rx8640 server:
http://h71028.www7.hp.com/enterprise/cache/423649-0-0-0-121.html
This web page lists the processors, memory, adapters, and controllers that are available for
the rx8640 server.
Obtaining the Latest HP Insight Foundation Suite for Integrity with Linux
17
5.
Verify existing device compatibility at the HP Integrity server connectivity website:
http://www.hp.com/go/serverconnectivity
6.
Verify storage compatibility by reviewing the HP Integrity Server-Storage Support Matrices
located at:
http://www.hp.com/products1/serverconnectivity/support_matrices.html
NOTE: This list is not exhaustive because storage vendors may support more configurations
than those indicated at this site. As a general rule, check with your storage vendor and an
HP Sales Representative for a definitive statement on server-storage compatibility.
Backing Up Existing Data
To restore the data from the hard disk on your server after migrating to Linux, you must first
back up the data and verify that it can be restored. Use the following guidelines:
1.
2.
3.
Perform a server-wide backup using your existing backup utilities.
Verify the integrity of the backup by restoring samples of data to another server.
Store the backup in a safe place.
Setting Up a Console
You can install the OS and administer the server from either a VGA console, a serial console, or
both.
On HP Integrity rx1600, rx1620, rx2600, and rx2620 servers, the Management Processor (MP) is
optional. In cases where the MP was not ordered, the only console is the serial interface on the
bulkhead connector. This connector is a serial port (UART) and must be configured for use. For
configuration information, see “Configuring and Using a Serial Console” (page 49).
Setting Up a Serial Console
From the serial console, you can access the EFI shell and the MP. Use these utilities while installing
and administering Linux on HP Integrity servers.
You can configure a serial console in two ways:
•
•
Connect a PC to the MP serial port using a null modem cable.
Connect a PC to the MP LAN port using a cat5 LAN cable.
On a system running Linux, the SSH client is the native terminal emulator application.
On a system running Windows, use a terminal emulator application, such as PuTTY or
HyperTerminal. PuTTY is a free implementation of Telnet and SSH for 32-bit Linux and UNIX,
and it provides an xterm terminal emulator. HP recommends that you use PuTTY version 0.57
or later, which is available the HP Insight Foundation Suite for Integrity with Linux or from the
PuTTY Download Page website:
http://www.chiark.greenend.org.uk/~sgtatham/putty/download.html
To set up a serial console, perform the following steps:
1.
2.
18
Use a null modem cable to connect a PC to the MP serial port or to the serial console port
(for systems without MP), or use a cat5 cable to connect a PC to the MP LAN port.
If necessary, install a terminal emulator and specify the following port settings:
— Bits per second: 9600
— Data bits: 8
— Parity: none
— Stop bits: 1
— Flow Control: Xon/Xoff
Preparing for Installation
3.
4.
5.
Use the Keyboard Configuration Panel to map the Backspace character to Ctrl-H.
Boot the server.
Run the terminal emulator and press Enter.
The MP> prompt is displayed if you are using the Management Processor; otherwise, the
server's output is shown.
NOTE: Before the Linux OS is booted, all console interaction occurs through EFI. To modify
the default local graphics display to a serial console path, you must configure a single serial port
(UART) for both Console-In/Out in the EFI boot manager. For detailed instructions, see
“Configuring and Using a Serial Console” (page 49).
Setting Up a VGA Console
On servers configured with an internal graphics adapter, you can connect a monitor, keyboard,
and mouse directly to the appropriate ports. On HP Integrity rx5670 servers, you must first install
an HP Graphics and USB Combo adapter (A6869A), and then connect the console to the
appropriate ports. From an existing serial console, you can then modify the system configuration
to redirect the output to the VGA console.
Table 2-1 Graphics Support on Server Models
Server Model
Graphics Adapter
rx1600, rx2600, rx4640, rx1620, rx2620
Internal graphics adapter (available on an MP adapter, which is optional
on some servers)
rx5670
Optional HP Graphics and USB Combo adapter (A6869A)
To install the HP Graphics and USB Combo adapter:
1.
2.
3.
4.
5.
6.
Insert the HP Graphics and USB Combo adapter in an open PCI slot of the server.
Connect a VGA monitor, USB HP keyboard, and USB mouse to the appropriate ports.
Boot the server to the EFI Boot Manager menu.
From the EFI Boot Manager at the serial console, select Boot Option Maintenance Menu.
Select the option Select Active Console Output Devices.
Select the line with the appropriate graphics adapter PCI device.
If there is no asterisk at the beginning of the line, the device is disabled. Press Enter to toggle
the state of the adapter from disabled to enabled.
7.
Select Save Settings to NVRAM and then Exit. The video display is now directed to the
VGA console.
Preparing the Server Hardware
This section describes how to set up the server hardware for OS installation, set up the boot
drive, and set up the CD or DVD drive.
Setting Up the Boot Drive
The OS installs through the boot controller that is detected as adapter zero and then to the drive
detected as drive zero.
CAUTION: HP recommends that only the target OS drive be connected during installation.
This ensures that the OS is installed on the correct drive.
To set up the boot drive, performing the following steps:
1.
Power down the server.
Preparing the Server Hardware
19
2.
3.
4.
Make a list of all device connections so you can reconnect them after the installation is
completed.
Disconnect all mass storage devices from all controllers except the boot controller.
Configure the boot controller and boot drive.
NOTE: If you are using an HP SmartArray controller, see the Controller's User Guide. You
can interrupt the boot process to invoke the EFI-based SmartArray configuration utility,
ORCA. To invoke this utility press F8 on the VGA console or Esc–8 on the serial console.
Accessing the Removable Media Devices Using EFI
When hardware (for example, a hard disk drive, a USB Hard Disk Drive (HDD) device, or a CD
or DVD drive) is added to a system after the system has booted to EFI, the EFI shell environment
does not automatically detect the new device. You must reconnect the device driver for the EFI
shell to recognize the device.
Additionally, the EFI shell environment creates default mappings for all the device handles that
support a recognized file system. After you change the system configuration or add a new device,
you must regenerate these mappings.
Enabling a CD/DVD Device
To access a CD/DVD, you must enable the EFI shell to detect it, and then access it using the
following steps:
1.
From the EFI shell, enter the following:
Shell> reconnect -r
The reconnect command reconnects one or more drivers from a device, disconnecting all
the drivers from all the devices and then reconnecting them. If a device handle is not specified,
the reconnect operation is performed on all the handles in the system. If a device handle is
specified, only the device handle and the devices below it are reconnected.
2.
Regenerate all mappings:
Shell> map -r
The -r option regenerates all the mappings in a system. The EFI shell displays a device
mapping table similar to the following example:
fs0 : Acpi(PNP0A03,0)/Pci(2|0)/Ata(Primary,Master)/CDROM(Entry1)blk0
: Acpi(PNP0A03,1)/Pci(1|0)/Scsi(Pun0,Lun0)blk1 :
Acpi(PNP0A03,0)/Pci(2|0)/Ata(Primary,Master)blk2 :
Acpi(PNP0A03,0)/Pci(2|0)/Ata(Primary,Master)/CDROM(Entry1
TIP: The map command displays or defines a mapping between a user-defined name and
a device handle. The most common use of this command is to assign drive letters to device
handles that support a file system protocol. After these mappings are created, the drive
letters can be used with all the file manipulation commands. It can also be used to create
new mappings and delete existing mappings using the -d option. If the map command is
used without any options, all the current mappings are listed. If the -v option is used, the
mappings are shown with additional information on each mapped handle.
3.
4.
Record the device name of the CD/DVD device, fs0, in this example. Use this device name
to explore the contents of the removable media.
Go to the CD/DVD file system:
# fsnumber:
20
Preparing for Installation
5.
Change directories to \EFI\boot, and then enter the following:
# bootia64.efi
The Smart Setup EBSU entry is created in the EFI Boot Manager as a selection for booting
to launch the HP Smart Setup EBSU utility.
Enabling a USB Device
To access a USB HDD device, you must enable the EFI shell to detect and then access it using
the following steps:
IMPORTANT:
1.
2.
3.
4.
The USB HDD device must be formatted with a FAT32 file system.
From any Linux system, go to the http://www.hp.com/go/integritylinuxessentials website,
and click on the Download for HP Insight Foundation Suite for Integrity with Linux link.
Click the link for the HP Smart Setup tar file to download the file to a local folder.
Connect the USB HDD device, and then mount it if the OS does not do so automatically.
Extract the contents of the HP Smart Setup tar file to the USB HDD device, making sure that
the EFI folder structure is in the root directory.
# tar zxvf ebsu-version.tgz –C /mnt/usb
5.
Unmount the USB device:
# umount /mnt/usb
CAUTION:
6.
7.
Failure to unmount the USB device will result in data loss.
Connect the USB device to the intended server.
From the EFI shell, enter the following:
Shell> reconnect -r
The reconnect command reconnects one or more drivers from a device, disconnecting all
the drivers from all the devices and then reconnecting them. If a device handle is not specified,
the reconnect operation is performed on all the handles in the system. If a device handle is
specified, only the device handle and the devices below it are reconnected.
8.
Regenerate all mappings:
Shell> map -r
The -r option regenerates all the mappings in a system. The EFI shell displays a device
mapping table.
TIP: The map command displays or defines a mapping between a user-defined name and
a device handle. The most common use of this command is to assign drive letters to device
handles that support a file system protocol. After these mappings are created, the drive
letters can be used with all the file manipulation commands. It can also be used to create
new mappings and delete existing mappings using the -d option. If the map command is
used without any options, all the current mappings are listed. If the -v option is used, the
mappings are shown with additional information on each mapped handle.
9.
Record the device name of the USB HDD device, fs0, for example. Use this device name to
explore the contents of the removable media.
10. Go to the USB file system:
# fsnumber:
Preparing the Server Hardware
21
11. Change directories to \EFI\boot, and then enter the following:
# bootia64.efi
The Smart Setup EBSU entry is created in the EFI Boot Manager as a selection for booting
to launch the HP Smart Setup EBSU utility.
NOTE: This entry may fail if you change the USB connection. You must execute the
preceding steps again to reconnect the USB HDD device.
22
Preparing for Installation
3 Installing the OS and Updating the Server
This chapter provides instructions for installing Linux using the HP Smart Setup EBSU utility
or a cold installation. You can install the HP Support Pack after installing the OS.
Using HP Smart Setup to Install the OS
The HP Smart Setup EBSU utility provides an easy-to-use interface for installing the OS and for
performing other tasks, such as configuring storage adapters, upgrading firmware, partitioning
the hard disk, and installing diagnostic tools.
Installation requires a serial or VGA console and involves the following steps:
•
•
•
•
•
booting from a bootable, removable media containing HP Smart Setup,
running the HP Smart Setup EBSU utility,
launching the Linux installer,
loading OS files to the boot disk,
and booting the server from the boot disk.
You must be connected either to the serial or VGA console of the MP on the target server using
a terminal emulation application, such as SSH client, PuTTY, minicom, or the cu command. If
the MP is not available on the network, you must be physically connected using a serial or VGA
cable.
IMPORTANT: When using QLogic Fibre Channel adapters while using the configuring partitions,
creating partitions, or HP Smart Setup EBSU utilities, if an older version of the EFI aux driver
is installed it is possible that storage devices attached to this adapter may not be detected. If this
situation occurs, a prompt is displayed and you must update the firmware of the QLogic Fibre
Channel adapters before reattempting the utility.
To install Linux, perform the following steps:
1.
2.
Ensure that the removable media is accessible and contains the HP Smart Setup EBSU utility.
For details, see “Accessing the Removable Media Devices Using EFI” (page 20).
From the EFI Boot Menu, select Smart Setup EBSU as appropriate, and then press Enter.
Figure 3-1 shows the EFI Boot Manager menu that is displayed.
Figure 3-1 EFI Boot Manager Menu
Using HP Smart Setup to Install the OS
23
NOTE: The entry Smart Setup EBSU (if configured) are not displayed in all EFI Boot
Managers. If this entry does not appear, perform the steps detailed in “Accessing the
Removable Media Devices Using EFI” (page 20).
3.
The HP Smart Setup EBSU utility starts and displays the introduction screen. Press Enter
to accept the default selection and continue.
The Main Menu is displayed, as shown in Figure 3-2.
Figure 3-2 HP Smart Setup EBSU Main Menu
NOTE: If there are I/O adapters installed on your system that Linux does not support, the
list of unsupported adapters is displayed. In addition, you are warned that you can continue
with the use of the HP Smart Setup EBSU utility, however, it could invalidate your HP
service contract. For more HP Integrity server information, see the HP Business Support
Center website:
http://www.hp.com/support/itaniumservers
4.
If your HP Integrity server is cell-based (for example, a Superdome sx2000 server) or contains
the zx2 chipset, execute this step; otherwise, continue to step 6.
The additional System Settings option appears on the Main Menu, as shown in Figure 3-3.
Figure 3-3 HP Smart Setup EBSU Main Menu with System Setting Option
24
Installing the OS and Updating the Server
Based on the type of server, the option to configure either the Advanced Configuration and
Power Interface (ACPI) or maximum payload size (MPS) setting appears. Use the following
steps to configure your system's ACPI or MPS settings properly:
Select System Settings and press Enter.
Choose one of the following processes as appropriate for your system, either ACPI or MPS:
ACPI Setting
a. The following screen is displayed:
Figure 3-4 Configure the ACPI Setting
b.
c.
d.
Select the proper setting for your server using the information provided.
Select Next, and then press Enter to continue.
Press Enter to accept the default selection (OK). The system is rebooted.
You are returned to the HP Smart Setup EBSU utility introduction screen to continue
with your Linux installation using the new ACPI configuration.
Or
MPS Setting
The following screen is displayed:
Figure 3-5 Configure the MPS Setting
The current MPS setting is determined from the system. If it is set to "ON" no further action
is required and a confirmation is displayed. Otherwise, you are prompted to set the MPS
variable to "ON" and reboot the system. If this variable cannot be detected, set, or is
unsupported on the system, an error is displayed.
Using HP Smart Setup to Install the OS
25
NOTE: This setting cannot be changed for the rx2660, rx3600, and rx6600 PCI-X servers,
therefore, this menu option is not available.
5.
Select Configure Storage Adapters and press Enter. A submenu displays the list of adapters
on the system, as shown in Figure 3-6.
Figure 3-6 Configure Storage Adapters Option
NOTE: Prior to launching the Smart Setup wizard, you must use the Configure Storage
Adapters option to ensure that Linux is installed with the desired storage configuration.
Only storage that is going to be used as a boot device must be configured at this time. Other
(non-boot) storage can be configured using the HP Smart Setup EBSU utility or after OS
installation.
6.
7.
Select the appropriate storage adapter and press Enter.
A list is provided with device IDs that are applicable to your adapter as generated by the
EFI command drvcfg, as shown in Figure 3-7. Each device represents an adapter or a
channel on an adapter. Select the appropriate adapter from the list and select Configure.
Figure 3-7 Configuring Storage Adapters
8.
9.
26
Review the storage adapter documentation and provide any additional information. For
more information regarding the use of the storage configuration utility, see the documentation
specific to the storage adapter.
After the desired storage adapters are configured, press ESC to return to the Main Menu.
Installing the OS and Updating the Server
NOTE: If you have just configured a RAID volume, then you must reboot the system so
that it is detected. Additionally, on rx7620 and rx8620 servers, you must run the search
all command from the EFI shell before attempting to use this volume.
10. To launch the Smart Setup wizard, from the Main Menu select Smart Setup and press Enter,
as shown in Figure 3-8.
Figure 3-8 Select Smart Setup
11. Smart Setup provides an introduction to the wizard.
NOTE: To install Linux on a RAID volume or a Fibre Channel LUN, you must first ensure
that this storage is configured as described in the previous steps.
Select Next and press Enter to continue and display the next screen.
Smart Setup Page 1 (Figure 3-9) is the firmware update screen, which lists each system
device, its installed firmware version, and the firmware version that is in the HP Insight
Foundation Suite for Integrity with Linux you are using.
Figure 3-9 Page 1: Update Firmware
If the server is cell-based, the firmware update screen is slightly different as shown in
Figure 3-10
Using HP Smart Setup to Install the OS
27
Figure 3-10 Page 1: Update Firmware, Cell-Based Servers
For either server type, all hardware devices present are listed and automatically selected if
updating is necessary. If multiples of one type of PCI adapter exist, only those adapters that
are in need of updating are actually upgraded, provided that the adapter flasher enables
the selection of adapters to flash.
12. Select the devices with firmware that you want to update. To continue, select Next and press
Enter to display the next screen as in Figure 3-11.
NOTE: You may not be able to use the Smart Setup function to upgrade the firmware of
some devices. This function does not allow you to upgrade the firmware if the installed
version is the same or higher than the version of the HP Smart Setup utility. However, you
can make a firmware downgrade by selecting the Maintain Firmware function from the
Main Menu. When using this function, you are prompted for confirmation of the downgrade.
ADD EBSU QLOGIC PROMPT CHANGES HERE AND IN CH5.
The Smart Setup wizard upgrades the firmware for all supported servers except the following:
rx1660
rx1620
rx2600
rx2620
cx2620
rx4640
rx5670
rx7620
rx8620
Superdome sx1000
For these servers, you must contact HP Support for assistance in upgrading the firmware.
Figure 3-11 Page 2: Disk Partitioning
28
Installing the OS and Updating the Server
13. Make the appropriate selections for the options on Smart Setup Page 2 as follows:
a. For question 2, specify the logical volume on which you want to create partitions.
NOTE: The EFI System Partition (ESP) and the HP Service Partition (HPSP) will be
created on the chosen logical volume to simplify the maintenance of your server.
b.
For question 3, specify the option to install the Drive Explorer utility, which enables
you to browse a drive in EFI.
Select Next and press Enter to display the next screen similar to Figure 3-12.
Figure 3-12 Page 3: Installation Considerations
14. Make the appropriate selections for the options on Smart Setup Page 3 as follows:
a. For question 4, specify the option to install offline diagnostic tools from the HP Itanium
Processor Family (IPF) Offline Diagnostics and Utilities media.
b. Question 5 is only enabled if the system is cell-based; otherwise it appears in red and
is disabled. If the system is cell-based, specify the ACPI configuration mode.
For the Superdome, rx8640, rx8620, rx7640, and rx7620 servers, use of the default selection
is suggested; all others should use the Default ACPI Configuration Mode selection.
c.
For question 6, specify the option to launch the Linux installer.
Select Setup and press Enter to display the partition deletion confirmation window
15. Select Continue and press Enter.
A prompt is displayed with the following message:
(i)INFORMATION! All tasks you selected will now be performed.
A progress bar is displayed along with the status text. The screen might flash periodically
as your tasks are automatically performed.
16. Press Enter to continue.
You are prompted to insert the diagnostics media.
17. Insert the HP Itanium Processor Family (IPF) Offline Diagnostics and Utilities media and
press Enter.
Using HP Smart Setup to Install the OS
29
18. A prompt is displayed with a message directing you to insert the Linux installer media in
the CD or DVD drive, as shown in Figure 3-13.
IMPORTANT: If you are using a serial console, prior to starting the Linux OS Installation,
see “Configuring and Using a Serial Console” (page 49) and follow the instructions.
Figure 3-13 Inserting the Linux Installer Media
Insert the Linux Installer media and press Enter.
The Linux OS installation completes. Immediately after the initial installation of the OS is
successfully installed, HP recommends that you run the HP Support Pack installer as described
in Chapter 5 (page 39).
Using the Linux Media to Install the OS
You can install Linux on your server using the distribution media for one of the supported OSs.
This activity is considered a “cold installation”. The installation process is very similar to the
standard cold installation with these three configuration exceptions:
• Firewall configuration
• Security Enhanced Linux (SELinux)
• Package group selection
The instructions for the supported OSs are detailed in the following documents:
•
For RHEL4— See Red Hat Enterprise Linux 4 Installation Guide for x86, Itanium, AMD64, and
Intel Extended Memory 64 Technology (Intel EM64T):
http://www.redhat.com/docs/manuals/enterprise/RHEL-4-Manual/x8664-multi-install-guide/
•
For RHEL5— See Red Hat Enterprise Linux 5 Installation Guide):
http://www.redhat.com/docs/manuals/enterprise/RHEL-5-manual/Installation_Guide-en-US/
•
For SLES10— See Installing SUSE LINUX Enterprise Server 10 on HP Integrity Servers:
http://docs.hp.com/en/5991-6394/
•
For SLES11— See Installing SUSE LINUX Enterprise Server 11 on HP Integrity Servers:
http://docs.hp.com/
30
Installing the OS and Updating the Server
To install the OS, follow these steps:
1.
2.
Begin the OS installation as described in the installation guide for the OS you are installing.
Select the defaults (or configure as needed) until the Firewall Configuration screen appears.
Modify the selections offered as follows:
a.
b.
Click the No firewall radio button to disable the firewall.
For RHEL4 or RHEL5, set Enable SELinux to Enable to use a security policy.
HP Insight Foundation Suite for Integrity with Linux supports the use of SELinux with
RHEL4 and RHEL5 only.
3.
Continue the installation using the defaults provided (or configure as needed) until the
Package Group Selection screen appears.
Modify the selection by clicking Everything to install all packages included with RHEL.
4.
Continue the installation using the defaults provided (or configure as needed).
The Linux OS installation completes. HP recommends that you run the HP Support Pack installer
immediately after the installation of the OS is complete as described in Chapter 5 (page 39).
Updating the Server
To update your system after installing the OS, you must install the latest patches and fixes from
the appropriate Linux OS distribution website.
NOTE: Firmware upgrades for Superdome sx1000, rx8640, rx8620, rx7640, and rx7620 servers
must be performed by HP CEs in compliance with the support agreement.
Installing Updates from the Web
The latest software updates for your HP Integrity server are available from the HP Business
Support Center as follows:
1.
2.
3.
4.
5.
Go to the http://www.hp.com/support/itaniumservers/ website.
Click on the appropriate product link for your server.
Click the Download drivers and software link.
Select a software/driver language from the list.
Click on the appropriate Linux distribution link.
All of the available driver and software updates are provided in a categorized listing for
your selection.
6.
Click Download for each driver or software product you want to update, and then follow
the installation instructions provided.
Additional information specific to the selected server is also available at this website and includes
troubleshooting, how to perform regular maintenance, how to upgrade or migrate the server,
and associated documentation.
Registering for HP Support Notifications
HP recommends that you register for alerts and notifications to stay informed of updates to the
drivers, patches, and other components specific to your server.
To register, go to the Subscriber's Choice website and follow the instructions provided:
http://www.hp.com/united-states/subscribe/gateway/
Updating the Server
31
Installing the Fibre Channel HBA Drivers for Linux
If your system contains Fibre Channel Host Bus Adapters (HBAs), you should ensure that the
most current drivers supported by HP are installed; this is applicable to all releases of Linux
distributions. Fibre Channel HBAs include the following:
A6826A
PCI-X 2-port 2Gbps Fibre Channel
A7538A
PCI-X 1-port 2Gbps Fibre Channel
AB379A
2-port 4Gbps Fibre Channel
AB429A
1-port 4Gbps Fibre Channel
AD167A
1-port 4Gbps Fibre Channel
AD168A
2-port 4Gbps Fibre Channel
AE311A
1-port 4Gbps Fibre Channel
AD300A
2-port 4Gbps Fibre Channel
A8002A
1-port 4Gbps Fibre Channel
A8003A
2-port 4Gbps Fibre Channel
403619-B21
2-port 4Gbps Fibre Channel
List all PCI devices to determine whether your system contains one of these adapters:
# lspci | grep Fibre
80:02.0 Fibre Channel: Emulex Corporation Helios-X LightPulse Fibre Channel Host Adapter (rev 01)
a0:02.0 Fibre Channel: QLogic Corp. QLA2312 Fibre Channel Adapter (rev 03)
a0:02.1 Fibre Channel: QLogic Corp. QLA2312 Fibre Channel Adapter (rev 03)
NOTE: The number of PCI functions displayed for each adapter by lspci is determined by
the number of ports the adapter has. In other words, 2-port adapters have two entries with the
same PCI bus/slot that differ only in function number, as in the previous example.
Adapter Part No.
32
Output of lspci Command
A6826A
Fibre Channel Fibre Channel: QLogic Corp. QLA2312 Fibre Channel
Adapter (rev 03)
A7538A
Fibre Channel Fibre Channel: QLogic Corp. QLA2312 Fibre Channel
Adapter (rev 03)
AB379A
Fibre Channel: QLogic Corp. QLA2422 Fibre Channel Adapter (rev 02)
AB429A
Fibre Channel: QLogic Corp. QLA2422 Fibre Channel Adapter (rev 02)
AD167A
Fibre Channel: Emulex Corporation Helios LightPulse Fibre Channel
Host Adapter (rev 01)
Installing the OS and Updating the Server
Adapter Part No.
Output of lspci Command
AD168A
Fibre Channel: Emulex Corporation Helios-X LightPulse Fibre Channel
Host Adapter (rev 01)
AE311A
Fibre Channel: QLogic Corp. QLA2432 Fibre Channel Adapter (rev 02)
AD300A
Fibre Channel: QLogic Corp. QLA2432 Fibre Channel Adapter (rev 02)
A8002A
Fibre Channel: Emulex Corporation Zephyr LightPulse Fibre Channel Host Adapter (rev
01)
A8003A
Fibre Channel: Emulex Corporation Zephyr-X LightPulse Fibre Channel Host Adapter
(rev 02)
403619-B21
Fibre Channel: QLogic Corp. QLA2432 Fibre Channel Adapter (rev 02)
If any entries are shown that match the model numbers listed, update the driver using the
following steps:
1.
2.
3.
4.
5.
6.
7.
Go to http://www.hp.com/.
Click Software & Drivers.
Click Download drivers and software (and firmware).
In the For Product field, enter the model number of your Fibre Channel adapter (for example,
A6826A).
Press Go.
Select the appropriate OS from the Product search results list.
Click the Download button for the latest Linux Driver Kit for Qlogic HBAs and Qlogic-based
mezzanine HBAs driver to obtain a tar archive of all necessary files
NOTE: All drivers for a given brand of adapter are contained in one driver kit. In this case,
all drivers for Qlogic adapters are contained in this driver kit.
8.
Unpack the driver files in the kit. For example, the following command could be used:
# tar zxvf hp_qla2x00-date.tar.gz
9. Change to the directory that was created in the previous step.
10. Install the driver:
# ./INSTALL
For additional information, see the documentation that is included with the Linux Driver Kit for
Qlogic HBAs and Qlogic-based mezzanine HBAs.
Installing the MPT Fusion HBA Drivers for Linux
Support for the HP Insight Management Agent for the Core 8 port Serial Attached SCSI (SAS)
HBA on the rx2660 server, or BL860c, and BL870c server blades is not included with the MPT
Fusion driver that is shipped with the Red Hat and Novell Linux distributions. However, HP
Insight Management Agent support is included with the MPT Fusion driver that is shipped with
RHEL4.6 and RHEL4.7.
If you are running HP Insight Management Agents for these HBAs on one of the listed servers,
you must update the driver using the following steps:
1.
2.
3.
4.
Go to the http://www.hp.com/support/itaniumservers/ website.
Click on the appropriate product link for your server.
Click the Download drivers and software link.
Select a software/driver language from the list.
Installing the MPT Fusion HBA Drivers for Linux
33
5.
Click on the appropriate Linux distribution link.
All of the available driver and software updates are provided in a categorized listing for
your selection.
6.
7.
Click the Download button for the latest MPTLinux Driver Update for Integrity Servers
driver to download the tar file.
Install the driver on your system:
# rpm -ivh <downloaded driver name>
8.
Reboot your system.
NOTE: To avoid any potential issues, review the known issue “Installing the MPT Fusion HBA
Driver on RHEL 5U2 and RHEL 5U3 using a Xen Kernel Hangs the Server” (page 56).
For additional information, see the documentation that is included with the MPT Fusion driver
update.
34
Installing the OS and Updating the Server
4 EFI and HP Smart Setup Media Utilities
This chapter describes functions available through the HP Smart Setup EBSU utility and provides
an easy-to-use interface to upgrade the firmware, partition the hard disk, install diagnostic tools,
configure storage controllers, and run other EFI utilities.
Using the Option ROM Configuration for Arrays Utility
Option ROM Configuration for Arrays (ORCA) is an EFI utility that enables you to configure a
RAID array without booting Linux. Using ORCA you can create, view, or delete a logical drive.
For detailed instructions on using ORCA, see any of the following documents: HP SmartArray
5300 Controller User's Guide, HP SmartArray 6402 Controller User's Guide, HP SmartArray P600
Controller User's Guide, and HP SmartArray P800 Controller User's Guide.
To access ORCA:
1.
2.
3.
4.
Log on to the MP (management processor) using telnet or Hyperterminal.
Enter the console command, CO, to access the SAC> prompt.
At the SAC> prompt, enter restart to reboot the system.
During the system reboot after the SmartArray adapter is detected, you are prompted to
press F8 at the MP prompt (or Esc–8 if you are using a serial console), to enter the ORCA
utility.
The Main menu is displayed.
5.
Choose one of the options presented: Create, View, or Delete a Logical Drive.
Using EFI
The Intel Extensible Firmware Interface (EFI) specification defines a model for the interface
between the OS, the firmware, and the hardware. EFI serves the same purpose on Itanium-based
computers as the BIOS on x86-based computers. EFI provides a standard environment for running
pre-boot applications and for booting the OS.
HP Integrity servers use EFI to initialize the platform firmware and load the OS. After the system
is initialized, EFI provides two interfaces with which you can interact, as described in the following
sections.
EFI Boot Manager
First displayed when you power on the server, the EFI Boot Manager provides a menu-based
interface (Figure 4-1 is an example) with options for booting the OS, loading EFI applications,
configuring the server, and performing other pre-boot operations.
Using the Option ROM Configuration for Arrays Utility
35
Figure 4-1 EFI Boot Manager
EFI Shell
Available as a selection from the EFI Boot Manager, the EFI Shell provides a command-line
interface from which you can get information about the system, install an operating system, boot
the operating system, execute batch scripts, launch EFI applications, load EFI drivers, and manage
files and system variables.
For Additional Information
Use the following resources to obtain additional EFI information.
•
The Intel™ EFI website:
http://developer.intel.com/technology/efi/
•
EFI Shell command help:
From the EFI Shell, enter help or ? for a list of EFI shell commands.
HP Smart Setup Utilities
Some of the options available from the HP Smart Setup EBSU utility main menu are not part of
the steps required to prepare your system for Linux installation, but such options can be used
to customize, diagnose problems, or fine-tune firmware settings.
Accessing HP Smart Setup Utilities
To access the HP Smart Setup utilities:
1.
2.
3.
Power on the server. The server boots to the EFI utility.
Ensure that the removable media, containing the HP Smart Setup EBSU utility, you want
to use is accessible. For details, see “Accessing the Removable Media Devices Using EFI”
(page 20).
From the EFI Boot Menu, select Smart Setup EBSU or Smart Setup from EBSU as
appropriate, and then press Enter.
NOTE: The entry Smart Setup EBSU or Smart Setup from EBSU are not displayed in
all EFI Boot Managers. If this entry does not appear, perform the steps detailed in “Accessing
the Removable Media Devices Using EFI” (page 20).
4.
36
The HP Smart Setup EBSU utility executes and the introduction screen is displayed. Click
OK and press Enter to continue.
EFI and HP Smart Setup Media Utilities
The HP Smart Setup EBSU utility provides the following capabilities:
•
•
•
Configure Storage Adapters—Configures bootable I/O adapters. A submenu provides a
list of storage adapters from which to choose.
Smart Setup—Provides a wizard that guides you through the following set of preselected
Linux installation setup tasks:
— Updating firmware
— Creating disk partitions
— Installing offline diagnostic tools
— Installing Linux
Maintain Firmware—Upgrades the firmware for all the selected devices that can be
upgraded. You can upgrade all the devices at once or select one or more individually.
NOTE: You may not be able to use the Smart Setup function to upgrade the firmware of
some devices. This function does not allow you to upgrade the firmware if the installed
version is the same or higher than the version of the HP Smart Setup utility. However, you
can make a firmware downgrade by selecting the Maintain Firmware function from the
Main Menu. When using this function, you are prompted for confirmation of the downgrade.
The Smart Setup wizard upgrades the firmware for all supported servers except the following:
rx1660
rx1620
rx2600
rx2620
cx2620
rx4640
rx5670
rx7620
rx8620
Superdome sx1000
For these servers, you must contact HP Support for assistance in upgrading the firmware.
•
Create Partitions and Install Diagnostics—Creates partitions, such as the EFI System
Partition (ESP) or the HP Service Partition (HPSP).
— ESP - A partition that is required to boot the OS. Only the EFI drivers and the OS files
should be stored here. This partition is labeled EFIPART.
— HPSP - An optional partition. The files from the HP Itanium Processor Family (IPF)
Offline Diagnostics and Utilities media are stored here. This partition is labeled HPPART.
•
•
Install Linux—Launches the Linux Installer.
System Inventory—Retrieves system information and displays a complete, categorized
report of the system inventory information including the UUID (Logical) and Serial Number
(Logical) when possible, installed memory, and the firmware version for all I/O adapters.
Install Diagnostics—Installs a copy of the diagnostics programs from the HP Itanium
Processor Family (IPF) Offline Diagnostics and Utilities media to the HPSP partition.
Install and Update Support Tools—Copies support tools to the HPSP partition. These tools
are for use only by HP Support.
Drive Explorer—Offers these options:
— Execute - Launches Drive Explorer, which displays the directories present on the disks
in the EFI partition or executes EFI programs.
— Install - Installs Drive Explorer.
•
•
•
IMPORTANT: When using QLogic Fibre Channel adapters while using the configuring partitions,
creating partitions, or HP Smart Setup EBSU utilities, if an older version of the EFI aux driver
is installed it is possible that storage devices attached to this adapter may not be detected. If this
situation occurs, a prompt is displayed and you must update the firmware of the QLogic Fibre
Channel adapters before reattempting the utility.
HP Smart Setup Utilities
37
38
5 Installing and Using the HP Support Pack
This chapter provides instructions for installing and using the HP Support Pack. This contents
of this software package must be installed after installation of the OS only.
Software Provided in the HP Support Pack
The HP Insight Foundation Suite for Integrity with Linux provides the following additional
functionality and utilities for your Linux system in the HP Support Pack:
•
•
•
•
•
•
•
•
•
•
•
•
•
“HP Management Base for Integrity Servers” (page 39)
“HP Insight Management Agents” (page 39)
“HP System Management Homepage ” (page 40)
“HP Server Manageability eXtensions” (page 40)
“HP WBEM Providers for Linux” (page 40)
“HP Partition Manager ” (page 40)
“HP nPartition Commands” (page 40)
“HP Array Configuration Utility – Command Line Interface” (page 41)
“OpenPegasus ” (page 41)
“HP Utilization Provider Including WBEM” (page 41)
“HP SmartSetup Scripting Toolkit” (page 42)
“HP SAS Integrated Raid (IR) Configuration Utility” (page 42)
“HP Integrity Virtual Machines WBEM Provider” (page 42)
HP Management Base for Integrity Servers
HP Management Base for HP Integrity servers installs an Open IPMI driver appropriate for the
target system and several utilities for Baseboard Management Controller (BMC) management.
These items are needed by other management products, such as HP Insight Management Agents
and HP WBEM Providers.
For information about HP Management Base, see hpbmc(8), hpuid(8), hpseld(8,), openipmi(4) and
the HP Management Base Installation and User's Guide:
http://www.docs.hp.com/en/5991-7630
HP Insight Management Agents
Based on the Simple Network Management Protocol (SNMP), HP Insight Management Agents
(HPIMA) allow you to remotely monitor configuration information and system status on your
HP Integrity server from any SNMP browser. A central management server that uses HP Insight
Manager ( or HP Systems Insight Manager) gathers and organizes the raw agent information
from the browser for display in reports, allowing you to monitor system use and troubleshoot
problems.
HP Insight Management Agents provide a broad spectrum of SNMP agents for the collection of
server management data. This product includes SNMP extensions, data collection agents, and
MIBs ported from the legacy "Compaq Insight Manager" product, such as Health, Host, Network
Interface Card (NIC), Standard Equipment, Standard Information, Storage (including IDA, IDE,
SCSI, and FC), and Threshold. The agents are handled by the HP Systems Insight Manager though
they should work with any other management console applications that use SNMPv1.
You can obtain the latest version of HP Insight Management Agents by installing the downloaded
HP Support Pack as described in “Obtaining the Latest HP Insight Foundation Suite for Integrity
with Linux” (page 17).
Software Provided in the HP Support Pack
39
For more information, see HP Insight Management Agents for Linux on HP Integrity Servers:
Installation Guide and Release Notes:
http://www.docs.hp.com/en/5991-2731/
HP System Management Homepage
The HP System Management Homepage (SMH) is a web server that can be used by HP
web-enabled system management software. The System Management Homepage provides an
interface between the HP Insight Management Agents and the HP manageability tools. The HP
System Management Homepage software organizes data from HP Insight Management Agents
installed on a server into easy-to-read tables that are displayed in a web interface.
For more information, see the HP System Management Homepage website:
http://www.hp.com/servers/manage/smh
HP Server Manageability eXtensions
The HP Server Manageability eXtensions (SMX) is a manageability framework for HP Proliant
and HP Integrity servers using Web Based Enterprise Management (WBEM) and the Common
Information Model (CIM). SMX is designed to run on HP servers and provide complete
manageability as defined by the Distributed Management Task Force (DMTF), Storage Networking
Industry Association (SNIA) and the HP WBEM Technical Committee (TC).
HP WBEM Providers for Linux
WBEM is a Distributed Management Task Force (DMTF) standard that uses Internet technologies,
such as XML, HTTP, and SSL, to manage systems. HP WBEM Providers for Linux allows
management applications such as HP Systems Insight Management to retrieve, monitor, and
configure system information. HP WBEM Providers are the instruments that provide system
data for the management application.
For more information, see the HP WBEM Solutions for Linux website:
http://www.hp.com/go/wbemlinux
HP Partition Manager
HP Partition Manager provides you with a convenient GUI to configure and manage nPartitions
on HP servers. Using HP Partition Manager, you can perform complex configuration tasks
without having to remember commands and parameters. You select nPartitions, cells, I/O chassis,
or other components from the graphical display, and then select an action from a menu. HP
Partition Manager is installed on your HP Integrity system by default when HP nPartitions
commands are installed; HP Partition Manager is not installed as a standalone application.
You can use HP Partition Manager to perform the following tasks: create, modify, and delete
nPartitions, examine the nPartition configuration of a complex (all of hardware within a
server—including all cells, I/O chassis, cables, cabinet hardware, and power and utilities
components), check the complex for potential configuration and hardware problems, and manage
hardware resources on the complex.
IMPORTANT: Before installing HP Partition Manager, you must download and install the Sun
JDK 6 or BEA JRockit 5.0. For the JDK installation details, see “Product Installation Dependencies”
(page 42).
HP nPartition Commands
HP nPartition Commands enable you to create, modify, and delete nPartitions on HP nPartition
servers, including HP Integrity servers such as the Superdome, rx8640, rx8620, rx7640, and rx7620
servers. The manpages for these commands are also installed.
40
Installing and Using the HP Support Pack
HP Array Configuration Utility – Command Line Interface
HP Array Configuration Utility – Command Line Interface (ACU-CLI) for Linux on Itanium-based
systems is an online tool that can be used to manage and configure Smart Array-based storage
controllers. The HP ACU-CLI is an interactive command console that provides immediate
feedback to the user, and is functionally equivalent to the ACU GUI.
OpenPegasus
OpenPegasus implements the WBEM standard to enable management solutions that deliver
increased control of enterprise resources. OpenPegasus is installed on your HP Integrity system
by default when WBEM providers or HP nPartitions commands are installed; OpenPegasus is
not installed as a standalone application.
OpenPegasus SDK is the software developers kit for the OpenPegasus product. It provides the
tools needed to develop Common Information Model (CIM) client applications and provides
modules for OpenPegasus.
NOTE: The OpenPegasus SDK is included with your Linux RHEL5 and SLES 10 OS distribution.
For your convenience, the OpenPegasus SDK for RHEL and SLES 10 are found in the HP Support
Pack software package in the following locations respectively:
distros/rhel5/tog-pegasus-devel-2.7.1-17hp.rhel5.ia64.rpm
distros/sles10/tog-pegasus-devel-2.7.1-17hp.sles10.ia64.rpm
You can download all current versions of OpenPegasus SDK from the Open Group website:
http://www.openpegasus.org/pr/
For more information, see the HP WBEM Providers for Linux Installation Guide and Release Notes:
http://docs.hp.com/en/5991-6518/
Small Footprint CIM Broker
The Small Footprint CIM Broker (sfcb) is a CIM server conforming to the CIM Operations over
HTTP protocol. It supports the HP SMX WBEM providers that were developed in conjunction
with the Common Manageability Programming Interface (CMPI). The Small Footprint CIM
Broker provides access to the HP SMX WBEM providers and is installed on your HP Integrity
system by default when WBEM providers are installed on SLES 11. It is not installed as a
standalone application.
NOTE: The sblim-sfcb RPM is not included in the support pack, however it is delivered
with the SLES11 distribution.
For more information, see the HP SMX WBEM Providers for Linux Installation Guide and Release
Notes:
http://docs.hp.com/en/####-####
For more information about the Small Footprint CIM Broker, see the Novell website:
http://www.novell.com
HP Utilization Provider Including WBEM
HP Utilization Provider provides a light-weight daemon, utild, that records system-utilization
data on a five-minute interval. System-utilization data includes CPU utilization, memory
utilization, disk utilization, and network utilization. The HP Utilization Provider includes the
WBEM provider, which provides access to the utilization data. The Virtual Server Environment
(VSE) Management Software relies on the HP Utilization Provider. Removing HP Utilization
Provider prevents the VSE Management Software from functioning properly.
Software Provided in the HP Support Pack
41
When HP Utilization Provider is installed, it launches the utild daemon, which consumes
minimal CPU, memory, and disk resources. Only 30 days of utilization data are kept in data files
in /var/adm/util. The total disk space used by these files should not exceed 20MB in the
default installation. The utild process wakes up every five minutes and discovers and records
four metrics (CPU, memory, disk, and network utilization); this discovery process has minimal
impact on system performance.
The WBEM schema files for the HP Utilization Provider are installed at /opt/util/mof. For
more information, see utild(1M).
HP SmartSetup Scripting Toolkit
The SmartSetup Scripting Toolkit (SSTK) enables you to deploy a large number of HP Integrity
servers rapidly and efficiently. Using SSTK, you can develop custom scripts that simplify server
deployments by automating various hardware configuration and software installation operations.
SSTK can set specific Extensible Firmware Interface (EFI) boot variables, create disk partitions,
and tie into the standard unattended installation process to install the OS and selected applications.
SSTK is delivered as a tar file that is used to install and configure the product. For more
information, see the “Configuring the Repository” section of the SmartSetup Scripting Toolkit
Deployment Guide:
http://www.docs.hp.com/en/5991-6250/
HP SAS Integrated Raid (IR) Configuration Utility
The Integrated Raid (IR) Configuration Utility, cfggen, is a Linux command line utility that
configures the IR functionality of the HP Serial Attached SCSI (SAS) controllers that are used in
LSI-1068-based HP SAS controllers. This utility is a minimally interactive program that can be
executed from the Linux prompt. The result from invoking this utility is communicated to the
environment through the program status value returned when the program exits.
For more information about cfggen, see cfggen(8), the “Utilities Reference” chapter of the
SmartSetup Scripting Toolkit Deployment Guide, or the HP 8 Internal Port SAS Host Bus Adapter (SAS
Controller) Users Guide:
http://docs.hp.com/en/J6369-90071/
HP Integrity Virtual Machines WBEM Provider
HP Integrity Virtual Machines (Integrity VM), is a soft partitioning and virtualization technology
within the HP Virtual Server Environment, that enables you to create multiple virtual servers or
machines within a single HP Integrity server or nPartition. Each virtual machine hosts its own:
"guest" operating system instance, applications and users. The HP Integrity VM WBEM provider
facilitates the enabling of manageability and support of guests
Product Installation Dependencies
Some software products have dependencies or prerequisites that might not be available on your
system. When installing software, the Management media installer attempts to handle any
dependencies that are required. Also, most required software is provided with your Linux OS
distribution media and should be installed by default.
If there is required software that is not delivered with the Management media installer or with
the Linux OS installation, an error message displays information about the missing software
packages or files and the installation process is aborted. You must then obtain and install the
required packages or files before running the installer again. See your Linux OS for information
about obtaining and installing the missing software. A list of software dependencies for all
supported Linux distributions is provided in “HP Support Pack Dependencies” (page 51).
42
Installing and Using the HP Support Pack
NOTE: The Management media installer automatically checks your system for the hpmgmtbase
software. This software is installed or updated by default.
Removing OpenWBEM
OpenPegasus is required to install nPartition Commands, Partition Manager, and HP WBEM
Providers. Removing OpenWBEM requires the removal of several other SLES utilities. You
should verify that you do not need these utilities before you remove them. The HPIMA, ACU-CLI,
and HP SMH utilities do not require OpenPegasus.
The installer prompts you to remove OpenWBEM if you choose to install any of the above
packages that require OpenPegasus. You are first prompted to view more information about the
package before removal, and then you are prompted to remove the OpenWBEM package from
your system. At this point, you must decide whether to reply with confirm (to remove
OpenWBEM and continue with the installation), or with n (to discontinue).
Installing the Java Development Kit Product
Installing Sun JDK 6 for the Linux IA64 Platform
Use this procedure to install the Sun Java Development Kit (JDK) 6.
1.
Download Sun JDK 6 binary file for the Linux Intel Itanium platform from the Sun Developer
Network website:
http://java.sun.com/javase/downloads/index.jsp
2.
Set execute permissions on the downloaded file:
# chmod jdk-6u12-linux-ia64.bin
3.
Run the self-extracting binary to extract the RPM file:
# ./ jdk-6u12-linux-ia64.bin
NOTE: The initial "./" is required if you do not have "." (a period) in your PATH
environment variable.
A binary license agreement is displayed.
4.
You must agree to the Sun JDK 6 license agreement to proceed with the installation.
NOTE: The default installation path is /usr/java/, which can be modified during the
installation process. A good location to install the Sun JDK is /usr/local/. Use this
information when setting the JAVA_HOME environment variable in the next step.
5.
Set the JAVA_HOME environment variable:
# export JAVA_HOME="javaDir"
where javaDiris the directory in which the Sun JDK 6 files were installed. For example,
/usr/java/jdk1.6.0_12.
NOTE: The JAVA_HOME environment variable must be exported in this fashion prior to,
and in the same shell session as, the use of the HP Support Pack installer.
Installing BEA JRockit 5.0 JDK for the Linux IA64 Platform
Use this procedure to install the BEA JRockit 5.0 Java Development Kit (JDK).
Product Installation Dependencies
43
1.
If your system is running RHEL5U1, you must disable SELinux before installing the BEA
JRockit 5.0 JDK. Otherwise, bypass this step.
# echo 0 >/selinux/enforce
2.
Download the JRockit 5.0 R27.5 JDK Linux (Intel Itanium - 64-bit) file to the directory
on the Linux system where HP Partition Manager, nPartition Commands, and nPartition
Provider are to be installed from the BEA JRockit website:
http://download2.bea.com/pub/jrockit/50/jrockit-R27.5.0-jdk1.5.0_14-linux-ipf.bin
3.
Set execute permissions on the downloaded file:
# chmod a+x jrockit-R27.5.0-jdk1.5.0_14-linux-ipf.bin
4.
Run the self-extracting binary to extract the RPM file:
# ./jrockit-R27.5.0-jdk1.5.0_14-linux-ipf.bin
NOTE: The initial "./" is required if you do not have "." (a period) in your PATH
environment variable.
A binary license agreement is displayed.
5.
You must agree to the BEA JRockit 5.0 JDK license agreement to proceed with the installation.
NOTE: The default installation path is /root/jrockit-R27.5.0-jdk1.5.0_14, which
can be modified during the installation process. A good location to install the JRockit 5.0
JDK is /usr/local/. Use this information when setting the JAVA_HOME environment
variable in the next step.
6.
Set the JAVA_HOME environment variable:
# export JAVA_HOME="javaDir"
where javaDir is the directory in which the BEA JRockit 5.0 JDK files were installed. For
example, /root/jrockit-R27.5.0-jdk1.5.0_14.
NOTE: The JAVA_HOME environment variable must be exported in this fashion prior to,
and in the same shell session as, the use of the HP Support Pack installer.
7.
If your system is running RHEL5U1, you must re-enable SELinux. Otherwise, bypass this
step.
# echo 1 >/selinux/enforce
Installing Software from the HP Support Pack
The software included in the HP Support Pack is installed by running the interactive installer
install.sh. This installer provides options for installing one or more of the products described
in “Software Provided in the HP Support Pack” (page 39).
Before Running the Installer
Before running the installer, perform the following steps:
1.
2.
3.
4.
44
Review the “Product Installation Dependencies” (page 42) section and ensure that you
prepare your system accordingly.
Ensure that you have the latest version of the product as described in “Obtaining the Latest
HP Insight Foundation Suite for Integrity with Linux” (page 17).
Log in to the system as root.
Mount the media containing the HP Support Pack or identify the directory into which the
tar file was unpacked.
Installing and Using the HP Support Pack
Running the Installer
You can run the installer anytime after the OS has been installed; however, HP recommends that
you run the installer immediately after the initial installation of the OS.
To install software from the HP Support Pack , perform the following steps:
1.
Start the installer:
# ./install.sh [-s]
NOTE:
The optional command option, -s , can be used to execute the installation silently.
The following message is displayed:
Welcome to the HP Intergrity Essentials Foundations Pack for Linux version #.##.#
Check ftp://ftp.hp.com/pub/linux for software updates [Y/N]?
2.
Select one of the following options:
a. If you want the installer to determine if a newer version of the HP Support Pack is
available, enter Y.
The installer connects to the HP FTP site and performs a comparison between your
version and the latest version of the HP Support Pack.
•
•
b.
If a newer version is not available, the installation of the current version of the HP
Support Pack software proceeds.
If a newer version is available, a message is shown notifying you that a new version
is available. A list of options is displayed. Select the appropriate option.
If you do not want the installer to determine if a newer version of the HP Support Pack
is available, enter N .
You have selected not to update your Management CD software at this time.
If you would like to update this software in the future, you can obtain the
latest version from HP’s support website as follows:
For the latest information and downloads go to
http://www.hp.com/go/integritylinuxessentials
Press <enter> to continue the installation of the current version of the HP Support Pack.
Press Enter to proceed with the installation of the current version of the HP Support
Pack.
3.
You are prompted to make additional selections based on the software update option you
selected in the previous step.
The installer analyzes your system and prepares it for installation of the products provided
with the HP Support Pack.
NOTE: If the installer detects missing RPMs that are necessary to the installation, messages
are displayed indicating which RPMs you must install before proceeding. For example,
messages similar to the following may appear:
hpima will not be available because the following required RPMs are missing:
net-snmp sensors
hpsmh will not be available because the following required RPMs are missing:
net-snmp sensors
In this case, you would need to install the required RPMs for HP-IMA and HP SMH before
these products can be installed.
A menu of available products and options that can be installed is displayed. The contents
of this menu depend upon the version of the HP Support Pack that you are installing or the
Linux distribution installed on your system. A menu similar to one of the following is
displayed:
Installing Software from the HP Support Pack
45
Menu for RHEL4:
1. Install HP Insight Manager Agents for HP Integrity servers
2. Install HP System Management Homepage
3. Install HP Insight Management Agents Webapp via HP SMH.
4. Install nPartition Commands
5. Install The nPartition Management GUI for HP Integrity servers.
6. Install HP WBEM Providers for Linux
7. Install HP Command Line Array Configuration Utility
8. Install HP Utilization WBEM Provider
9. Install HPVM Guest Kit for Linux
10. Install The Open64 Compiler Suite v4.2.1
11. Install or update everything
12. Uninstall HIFIL and return to this menu
13. Exit
Menu for SLES11:
1.
2.
3.
4.
5.
6.
7.
8.
9.
Install HP System Management Homepage
Install HP's Server Manageability eXtensions (SMX)
Install Server Manageability eXtensions Webapp via HP SMH
Install HP Command Line Array Configuration Utility
Install MPT Fusion SAS Integrated RAID configuration utility
Install The Open64 Compiler Suite v4.2.1
SMX with everything else available: remove IMA, WBEM if found
Uninstall HIFIL and return to this menu
Exit
Menu for all other Linux Distributions:
1. Install HP Insight Manager Agents for HP Integrity servers
2. Install HP System Management Homepage
3. Install HP Insight Management Agents Webapp via HP SMH.
4. Install nPartition Commands
5. Install The nPartition Management GUI for HP Integrity servers.
6. Install HP Server Manageability eXtensions (SMX)
7. Install Server Manageability eXtensions Webapp via HP SMH
8. Install HP Command Line Array Configuration Utility
9. Install HP Utilization WBEM Provider
10. Install MPT Fusion SAS Integrated RAID configuration utility
11. Install HPVM Guest Kit for Linux
12. Install The Open64 Compiler Suite v4.2.1
13. WBEM providers with everything else: remove SNMP agents if found
14. Install SNMP agents and everything else: remove WBEM providers if found
15. Uninstall HIFIL and return to this menu
16. Exit
The installation options are categorized as follows:
Install individual products
Individual products can be installed one at a time and the process is repeated for each
product you want to install.
Install everything (RHEL4), SMX and everything, or IMA and everything
With all Linux distributions, it is possible to install all of the products in the HP Support
Pack at one time. However, with all distributions except RHEL4 there is a choice of which
WBEM provider to install with the HP Support Pack products, HP SMX or HP WBEM.
If you choose to install the HP SMX web-based providers, HP-IMA is removed first to
avoid conflicts. Conversely, if HP WBEM SNMP-based providers are chosen for
installation, then HP SMX is removed first to avoid conflicts.
Update all products
To update all the software products in the HP Support Pack that can coexist, in a single
step, enter the appropriate option number and press Enter. The installer automatically
exits after all products are updated or installed.
46
Installing and Using the HP Support Pack
Uninstall HIFIL
This option is displayed only when HP Management Base is installed on the system.
To remove the HIFIL product, including HP Management Base, enter the appropriate
option number and press Enter. The installer returns to the menu after the entire HIFIL
product is removed.
4.
Enter an option from the menu and press Enter.
NOTE: If HP Management Base is installed and you select it for installation, the installer
will ask if you want to upgrade or uninstall it. Choosing to upgrade the product may reveal
dependency conflicts, which will require you to intervene. Instructions for solving these
conflicts or how to properly configure HP Management Base are provided by the installer.
NOTE: There is a known compatibility issue with HP ACU-CLI and RHEL5U1 on HP
Integrity servers with a SmartArray controller configured with more than one logical drive.
To avoid creating this adverse condition, the installer will not install the HP ACU-CLI
(hpacucli) product on these servers and this option is not displayed in the product
installation menu. Further, if hpacucli is detected on the system, it is uninstalled by the
installer.
5.
After the installation is complete, you must start the appropriate framework to access any
providers, execute one of the following:
WBEM Providers (OpenPegasus) on RHEL or SLES 10:
# /etc/init.d/tog-pegasus start
SMX WBEM Providers (SFCB) on SLES 11:
# /etc/init.d/sfcb start
NOTE: The installation log for the HP Support Pack is located in
/var/log/hp/managementCD-version_number-install.log. This directory is applicable
if the media you are using is CD/DVD or the USB HDD.
Installing Software from the HP Support Pack
47
48
A Configuring and Using a Serial Console
Before the Linux operating system (OS) is booted, all console interaction occurs through EFI. To
modify the default local graphics display to be a serial console path, you must configure a single
serial port (UART) for both Console-In/Out in the EFI boot manager. This configuration allows
the Linux kernel to interpret the UART as ttyS0 on system boot sending output to the selected
display screen.
Configuring a Serial Console
To configure a serial console, perform the following steps:
NOTE: The steps and actual computer output may vary slightly from the following process.
These differences are based on the version of EFI and version of Management Processor.
1.
2.
When the system boots, select Boot Option Maintenance Menu from the EFI Boot Manager
screen and press Enter.
From the Boot Option Maintenance Menu, select Select Active Console Output Devices
and press Enter. The resulting screen displays a list of UARTs and PCI devices available for
console I/O.
NOTE:
• UART identifiers of PNP0501 describe modes available for "Serial A" or "Serial 1" built-in
UART.
• UART identifiers of HWP0002 describe modes available for the "Console" UART on the
management processor (MP).
3.
4.
Select a UART from the list and press Enter.
From the same screen, select Save Settings to NVRAM and press Enter.
The system prompts you to save NVRAM if you omit this step.
5.
6.
Select Exit and press Enter to return to the main menu.
Select the option Select Active Console Input Devices from the main menu and press
Enter.
7. From the list provided, select the same UART that you chose as your output device and
press Enter.
8. Select Save Settings to NVRAM and press Enter.
9. Select Exit and press Enter.
10. To apply the changes you have selected, select Cold Reset from the Boot Option
Maintenance menu and press Enter.
11. When prompted, enter Y and press Enter.
The firmware and serial console are configured after system reset.
Using a Serial Console
Although you might have set up a serial console in the EFI boot manager, Linux defaults to a
VGA console. If no VGA device is present, console output is directed to a stub device (for example,
not visible.) To specify a serial console, you must pass the console= parameter to the kernel.
This can either be done as an extra parameter to the kernel or by means of the parameter
append=line in elilo.conf. For example:
Manual Boot Option
-----------------ELILO boot: linux console=ttyS0
fs0:\> elilo linux "console=ttyS0"
Automatic via elilo.conf
-----------------------append="console=ttyS0"
Configuring a Serial Console
49
IMPORTANT: Exactly one UART must be selected in the EFI Console-In/Out tables for a serial
console to work. The UART selected in this table is ttyS0.
The format of the console parameter is as follows:
console=ttySn[,spb]
n = Serial line
where:
s
= Speed
Example: 9600, 19200, 38400, 57600, 115200 (9600 is the default if no speed is specified. 115200
is the maximum for HP UART.)
p
= Parity
Example: n (no parity, typical case)
b
= Bit Encoding.
Example: 7, 8 (8 is the typical case).
For a 115200 baud console, the following syntax is used:
console=ttyS0,115200n8
NOTE: If you are using a Linux distribution that uses kernel revision 2.6.10 or later (Post
RHEL4), this method of specifying a console will not work. For more information on serial ports
with these kernels, see the Linux Cross Reference website:
http://lxr.linux.no/source/Documentation/ia64/serial.txt
50
Configuring and Using a Serial Console
B HP Support Pack Dependencies
Some software products contained in the HP Support Pack have dependencies or prerequisites
that may or may not, already be available on your system. If there are dependencies that are not
delivered with the installer or with the Linux OS installation, an error message displays with
information on the missing software packages or files and the installation process is aborted.
You must then obtain and install the required packages or files from the Linux distribution media
before running the installer again.
The following sections provide information about dependencies for the HP Support Pack for
RHEL4, RHEL5, SLES10, and SLES11.
RHEL4
The following list provides information about software contained in RHEL4 and the related
dependencies.
hpacucli-8.28-xxx.ia64.rpm need below packages:
glibc prctl libunwind
hpima-3.12-xxx.rhel4.ia64.rpm need below packages:
bzip2-libs compat-libstdc++-296 e2fsprogs elfutils-libelf systemtap glibc openssl popt redhat-release rpm-libs
tcp_wrappers zlib
hpima-webapp-4.5-xxx.rhel4.ia64.rpm need below packages:
net-snmp
hpmgmtbase-2.11-xxx.rhel4.ia64.rpm need below packages:
binutils glibc redhat-release
hpsmh-3.0.0-xxx.ia64.rpm need below packages:
None
hpsmh-tomcat-1.3-xxx.linux.ia64.rpm need below packages:
None
hpvm-4.1.0-xxx-rhel.ia64.rpm need below packages:
glibc
hpvmprovider-4.1.0-xxx-rhel.ia64.rpm need below packages:
glibc libgcc libstdc++ tog-pegasus
hpwbem-3.3.8-xxx.rhel4.ia64.rpm need below packages:
glibc libgcc libstdc++ popt tog-pegasus
hpwbem-base-server-3.3.8-xxx.rhel4.ia64.rpm need below packages:
glibc libgcc libstdc++ popt tog-pegasus
hpwbem-firmwarelogs-3.3.8-xxx.rhel4.ia64.rpm need below packages:
glibc libgcc libstdc++ tog-pegasus
hpwbem-legacy-3.3.8-xxx.rhel4.ia64.rpm need below packages:
ethtool glibc libgcc libstdc++ rpm-libs sysfsutils tog-pegasus
hp.com-npartition-providers-1.07.01-xxx.rhel4.ia64.rpm need below packages:
glibc libgcc libstdc++ tog-pegasus
hp.com-npartition-cmds-1.03.00-xxx.rhel4.ia64.rpm need below packages:
glibc libgcc libstdc++ tog-pegasus
hp.com-parmgr-2.02.04-xxx.rhel4.ia64.rpm need below packages:
tog-pegasus
hp-utilprovider-01.07-xxx.rhel4.ia64.rpm need below packages:
glibc libgcc libstdc++ tog-pegasus
mptsas_cfggen-2.0.30-xxx.ia64.rpm need below packages:
None
net-snmp-5.1.2-xxx.EL4.7hp.ia64.rpm need below packages:
beecrypt bzip2-libs chkconfig elfutils-libelf systemtap glibc libselinux openssl popt rpm-libs tcp_wrappers
zlib
net-snmp-perl-5.1.2-xxx.EL4.7hp.ia64.rpm need below packages:
bzip2-libs elfutils-libelf systemtap glibc openssl perl popt rpm-libs tcp_wrappers zlib
net-snmp-utils-5.1.2-xxx.EL4.7hp.ia64.rpm need below packages:
elfutils-libelf systemtap glibc openssl perl
net-snmp-devel-5.1.2-xxx.EL4.7hp.ia64.rpm need below packages:
beecrypt-devel elfutils-devel rpm-libs rpm-devel
net-snmp-libs-5.1.2-xxx.EL4.7hp.ia64.rpm need below packages:
RHEL4
51
glibc openssl
open64-4.2.1-xxx.ia64.rpm need below packages:
gcc glibc info perl
RHEL5
The following list provides information about software contained in RHEL5 and the related
dependencies.
hpacucli-8.28-xxx.ia64.rpm need below packages:
glibc prctl libunwind
hpima-3.12-xxx.rhel5.ia64.rpm need below packages:
compat-libstdc++-296 e2fsprogs-libs glibc net-snmp net-snmp-libs openssl perl redhat-release tcp_wrappers zlib
hpima-webapp-4.5-xxx.rhel5.ia64.rpm need below packages:
net-snmp
hpmgmtbase-2.11-xxx.rhel5.ia64.rpm need below packages:
binutils glibc OpenIPMI redhat-release
hpsmh-3.0.0-xxx.ia64.rpm need below packages:
None
hpsmh-tomcat-1.3-xxx.linux.ia64.rpm need below packages:
None
hpsmx-webapp-0.2-xxx.noarch.rpm need below packages:
libxml2-python python python-devel
hp.com-npartition-providers-1.07.01-xxx.rhel5.ia64.rpm need below packages:
glibc libgcc libstdc++
hp.com-npartition-cmds-1.03.00-xxx.rhel5.ia64.rpm need below packages:
glibc libgcc libstdc++
hp.com-parmgr-2.02.04-xxx.rhel5.ia64.rpm need below packages:
None
hp-smx-02.05-xxx.rhel5.ia64.rpm need below packages:
glibc libgcc libstdc++
hp-utilprovider-01.07-xxx.rhel5.ia64.rpm need below packages:
glibc libgcc libstdc++
mptsas_cfggen-2.0.30-xxx.ia64.rpm need below packages:
None
open64-4.2.1-xxx.ia64.rpm need below packages:
gcc glibc info perl
tog-pegasus-2.7.1-xxxhp.rhel5.ia64.rpm need below packages:
bash bind-utils chkconfig coreutils e2fsprogs glibc grep libgcc libstdc++ net-snmp net-tools openssl pam procps
redhat-lsb sed SysVinit
SLES10
The following list provides information about software contained in SLES10 and the related
dependencies.
hpacucli-8.28-xxx.ia64.rpm need below packages:
glibc prctl libunwind
hpima-3.12-xxx.sles10.ia64.rpm need below packages:
compat e2fsprogs glibc openssl libgcc libstdc++ net-snmp popt rpm sensors sles-release tcpd
hpima-webapp-4.5-xxx.sles10.ia64.rpm need below packages:
net-snmp
hpmgmtbase-2.11-xxx.sles10.ia64.rpm need below packages:
binutils glibc sles-release
hpsmh-3.0.0-xxx.ia64.rpm need below packages:
None
hpsmh-tomcat-1.3-xxx.linux.ia64.rpm need below packages:
None
hpsmx-webapp-0.2-xxx.noarch.rpm need below packages:
libxml2-python python python-devel python-xml
hpvm-4.1.0-xxx-sles10.ia64.rpm need below packages:
glibc
hpvmprovider-4.1.0-xxx-sles10.ia64.rpm need below packages:
glibc libgcc libstdc++ libunwind
hp.com-npartition-providers-1.07.01-xxx.sles10.ia64.rpm need below packages:
52
HP Support Pack Dependencies
glibc libstdc++ libunwind
hp.com-npartition-cmds-1.03.00-xxx.sles10.ia64.rpm need below packages:
glibc libgcc libstdc++ libunwind
hp.com-parmgr-2.02.04-xxx.sles10.ia64.rpm need below packages:
None
hp-smx-02.05-xxx.sles10.ia64.rpm need below packages:
glibc libgcc libstdc++ libunwind
hp-utilprovider-01.07-xxx.sles10.ia64.rpm need below packages:
glibc libgcc libstdc++ libunwind
mptsas_cfggen-2.0.30-xxx.ia64.rpm need below packages:
None
open64-4.2.1-xxx.ia64.rpm need below packages:
gcc glibc info perl
tog-pegasus-2.7.1-xxxhp.sles10.ia64.rpm need below packages:
bash bind-utils coreutils e2fsprogs glibc grep openssl libgcc libstdc++ libunwind net-snmp net-tools openssl
pam procps sed
SLES11
The following list provides information about software contained in SLES11 and the related
dependencies.
hpacucli-8.28-xxx.ia64.rpm need below packages:
glibc prctl libunwind
hpmgmtbase-2.11-xxx.sles11.ia64.rpm need below packages:
binutils glibc sles-release
hpsmh-3.0.0-xxx.ia64.rpm need below packages:
None
hpsmx-webapp-0.2-7.noarch.rpm need below packages:
libxml2-python python python-xml
hp-smx-02.05-xxx.sles11.ia64.rpm need below packages:
glibc libtdb1 libgcc43 libstdc++43 libunwind sblim-sfcb
mptsas_cfggen-2.0.30-xxx.ia64.rpm need below packages:
None
open64-4.2.1-xxx.ia64.rpm need below packages:
gcc glibc info perl
SLES11
53
54
C Known Issues
This appendix contains known issues with the HP Insight Foundation Suite for Integrity with
Linux product, which undergoes rigorous testing before each release. From HP test activities to
date, the following items have been uncovered that you should keep in mind.
HP Insight Management WBEM Providers on Pegasus cimserver Supports
Multi-Process Mode Only
HP Insight Management WBEM providers running on Pegasus cimserver (RHEL5, SLES10) only
support running in multi-process mode. HP Insight Management WBEM Providers will not
currently support running in a single process on the Pegasus cimserver.
To ensure your providers are running in a Pegasus multi-process configuration, perform the
following steps as the root user:
1. Verify that the cimserver is running to retrieve configuration values by entering:
# /etc/init.d/tog-pegasus start
2.
Verify that forceProviderProcess is set to true by entering:
# cimconfig -g forceProviderProcesses
This command should return Current value: true.
3.
Based on the value returned in Step 2, perform one of the following steps.
• If the command returns Current value: false, reset the value by entering:
# cimconfig -p -s forceProviderProcesses=true
•
If the command returns Current value: true, reset the Pegasus cimserver to allow
the new setting to take affect by entering:
# /etc/init.d/tog-pegasus restart
Unaligned Access Messages
Due to the current alignment boundaries of certain data structures on Integrity servers, customers
may see infrequent messages in the system event log with the format sfcbd unaligned
access. This should only occur during WBEM Provider initialization and does not represent
any loss of data integrity or functionality.
Superfluous PAM Authentication Message
The release currently shipping for SuSE Linux Enterprise Server 11 (SLES11) has a verbose sfcb
default configuration setting for all PAM authenticated actions. This setting results in a superfluous
message of the following form:
pam_succeed_if(sfcb:auth): requirement "user ingroup sfcb" was met by
the root user.
This message appears in /var/log/messages reporting for each successful PAM authentication
during WBEM requests. An enhancement request has been filed with SuSE as well as SFCB
maintainers and will be resolved by the next distribution release.
If the messages become an issue, use the workaround that follows until this is resolved.
The PAM logging setting for sfcb can be changed by using the following steps:
1. Shutdown SFCB by running the following as root user:
# /etc/init.d/sfcb stop
2.
Edit the /etc/pam.d.sfcb config file by making the following edit:
Replace the line
auth
required
pam_succeed_if.so user ingroup sfcb
HP Insight Management WBEM Providers on Pegasus cimserver Supports Multi-Process Mode Only
55
with the following line:
auth
3.
required
pam_succeed_if.so quiet_success user ingroup sfcb
Restart SFCB by entering the following:
# /etc/init.d/sfcb start
HP Insight Management WBEM Providers Information Reporting
HP Insight Management WBEM Providers do not currently report all information about bonded
network interfaces. If bonded interfaces are configured on a given server, CIM_IPProtocolEndpoint
WBEM instances will not be displayed on these servers. This information will be available on
servers when the HP Insight Management WBEM Providers add Ethernet teaming support the
next release.
Changing IP Address of Network Interface
While HP Insight Management WBEM Providers are running, if the IP address of a network
interface is changed the providers do not pickup the new IP address of the network interface.
This issue will be resolved in the next release.
Until this issue is resolved, use the following workaround:
Restart the cimserver using one of the following commands as the root user:
• If running Pegasus on RedHat Enterprise Linux 5 (RHEL5) or SuSE Linux Enterprise Server
10 (SLES10) enter the following:
# /etc/init.d/tog-pegasus restart
•
If running SFCB on SuSE Linux Enterprise Server (SLES11), enter the following:
# /etc/init.d/sfcb restart
Configuring Storage Adapters
The Configure Storage Adapters function in the HP Smart Setup EBSU utility requires that the
EFI driver for the storage adapter be installed prior to configuring storage adapters. You must
first select the Maintain Firmware function from the HP Smart Setup EBSU main menu to upgrade
the adapters, thus installing the EFI driver. You can then proceed to use the Configure Storage
function to set up your storage adapter.
Partitioning Fibre Channel HBA Adapters
Creating a partition using EBSU, or other partitioning tools, can result in the duplication of the
created partition in multiple LUNs. Typically, this happens when there are redundant paths to
the same storage device. For example, when you have two paths (A and B) to a storage device
then two blocks bound to the original LUN are created. If you create a partition in the original
LUN, it will be mirrored in the duplicated blocks.
For more details regarding configuring LUNs, see the HP StorageWorks: Booting Windows Server
2003 for Itanium-based systems from a storage area network application notes:
http://h20000.www2.hp.com/bc/docs/support/SupportManual/c00193929/c00193929.pdf.
To configure the boot LUN, see the “Configuring the HBAs“ section in conjunction with the
“Cabling options for single-channel HBAs” section to create a zone/boot environment with only
one LUN mapped to the boot HBA.
Installing the MPT Fusion HBA Driver on RHEL 5U2 and RHEL 5U3 using
a Xen Kernel Hangs the Server
After the MPT Fusion HBA driver is installed on a system running RHEL 5U2 using a Xen kernel,
the server hangs during rebooting and the following messages are displayed:
56
Known Issues
ELILO boot: Uncompressing Linux... done
Loading file HP-initrd-2.6.18-92.el5xen.img...done
This is the result of the MPT Fusion driver rebuilding the initrd file and modifying elilo.conf
when the it is installed. The following is a comparison of the elilo.conf file contents before
and after the driver installation:
Before
After
prompt
timeout=20
default=linux
relocatable
prompt
timeout=20
default=HP
#Corresponds to kernel 2.6.18-92.el5xen
# (previously, default=linux)
relocatable
image=vmlinuz-2.6.18-92.el5xen
vmm=xen.gz-2.6.18-92.el5
label=linux
initrd=initrd-2.6.18-92.el5xen.img
read-only
root=/dev/VolGroup00/LogVol00
append="-- rhgb quiet"
image=vmlinuz-2.6.18-92.el5xen
vmm=xen.gz-2.6.18-92.el5
label=linux
initrd=initrd-2.6.18-92.el5xen.img
read-only
root=/dev/VolGroup00/LogVol00
append="-- rhgb quiet"
# The following entry was added by Proliant
HBA install script
# in package mptlinux-4.00.13.01-3.rhel5
image=vmlinuz-2.6.18-92.el5xen
label=HP
#Corresponds to kernel 2.6.18-92.el5xen
initrd=HP-initrd-2.6.18-92.el5xen.img
read-only
root=/dev/VolGroup00/LogVol00
append="-- rhgb quiet"
The default variable is changed to HP that corresponds to the Xen kernel and a new image
stanza is inserted into the file. This new stanza is missing a line, which causes the server hang
during reboot.
To avoid the system hangs during reboot, you must modify the file /etc/elilo.conf manually
after the MPT Fusion driver is installed and before rebooting the server using the following steps:
1. Edit /etc/elilo.conf.
2. Add the following line immediately after the line, image=vmlinuz-2.6.18-92.el5xen
in the label=HP stanza:
vmm=xen.gz-2.6.18-92.el5
The file should now look like:
prompt
timeout=20
default=HP
#Corresponds to kernel 2.6.18-92.el5xen
# (previously, default=linux)
relocatable
image=vmlinuz-2.6.18-92.el5xen
vmm=xen.gz-2.6.18-92.el5
label=linux
initrd=initrd-2.6.18-92.el5xen.img
read-only
root=/dev/VolGroup00/LogVol00
append="-- rhgb quiet"
# The following entry was added by Proliant HBA install script
# in package mptlinux-4.00.13.01-3.rhel5
Installing the MPT Fusion HBA Driver on RHEL 5U2 and RHEL 5U3 using a Xen Kernel Hangs the Server
57
image=vmlinuz-2.6.18-92.el5xen
vmm=xen.gz-2.6.18-92.el5
label=HP
#Corresponds to kernel 2.6.18-92.el5xen
initrd=HP-initrd-2.6.18-92.el5xen.img
read-only
root=/dev/VolGroup00/LogVol00
append="-- rhgb quiet"
3.
Reboot the server.
HP System Management Homepage Session Time-out Error
The default value of the ui-timeout option in the HP SMH is 20 seconds. For servers with
numerous devices, 80 CPUs for example, the home or device pages may take more than 20
seconds to load and you may encounter a timeout message in your browser. You can avoid this
by setting the value of ui-timeout to the maximum of 80 seconds, using one of the following
methods:
NOTE:
The maximum value for ui-timeout is 3600 seconds.
From the command line:
1. Set ui-timeout to 80 seconds:
# /opt/hp/hpsmh/sbin/smhconfig --ui-timeout=80
2.
Restart HP SMH:
# /etc/init.d/hpsmhd restart
From HP SMH :
1. Sign in to HP SMH.
2. Select Settings→SMH→Security→Timeouts.
3. Modify the UI timeout (seconds) value, and then click Apply.
4. Sign out of HP SMH.
5. Restart HP SMH:
# /etc/init.d/hpsmhd restart
HP SAS Integrated Raid (IR) Configuration Utility May Cause Kernel Panics
on RHEL4U7
The Integrated Raid (IR) Configuration Utility, cfggen, is a Linux command line utility that
configures the IR functionality of the HP Serial Attached SCSI (SAS) controllers that are used in
LSI-1068-based HP SAS controllers. The cfggen utility causes kernel panics when creating
volumes with RHEL4U7.
Until this issue is resolved in the MPT driver, HP recommends that you use the EFI executable,
cfggen.efi, utility to create volumes.
If cfggen is installed on a system running RHEL4U7, the HP Support Pack installer will remove
it.
For information about using the cfggen.efi utility, see the SmartSetup Scripting Toolkit
Deployment Guide:
http://www.docs.hp.com/en/5991-6250/
Flashing HP PCIe 2-port 1000Base-T adapter (AD337A) Adapters
The HP PCIe 2-port 1000Base-T adapter (AD337A) with the 3.0.48 firmware version cannot be
flashed using HP Smart Setup.
58
Known Issues
D Supported Products Matrix
This appendix lists the adapters that are supported by the HP Insight Foundation Suite for
Integrity with Linux in each of the supported OS distribution release. Table D-1 lists the I/O
adapter part number by category, a brief description of the part, and the initial, supported Linux
distribution(s) including later updates or service packs.
Table D-1 Supported Products Matrix
Part
Number
Description
RHEL Support
4
4U1
SLES Support
4U3
4U4
4U6
5
5U1
10
10 SP1
10 SP2 11
Fibre Channel
403619B21
HP BLc QLogic
QMH2462 FC HBA
Opt Kit
X
A6826A
PCI-X Dual
X
Channel 2Gb Fibre
Channel HBA
X
X
A7538A
HP StorageWorks X
Linux Q2300 64-bit
HBA
X
X
A8002A
HP FC2142SR 4GB
PCI-e HBA
X
X
X
X
A8003A
HP FC2242SR
PCI-e DC HBA
X
X
X
X
AB379A
HP PCI-X 2.0 2Port
4Gb Fibre Channel
HBA Qlogic
X
X
X
AB379B
HP PCI-X 2.0 2Port
4Gb Fibre Channel
HBA Qlogic
X
X
X
X
AB429A
1-port 4Gb FC
Qlogic
X
X
X
X
AD167A
1-port 4Gb FC
Emulex
X
X
X
X
AD168A
2-port 4Gb FC
Emulex
X
X
X
X
AD300A
2-port 4Gb FC
Qlogic PCI-e
X
X
X
X
AE311A
1-port 4Gb FC
Qlogic PCI-e
X
X
X
X
X
X
X
X
IDE
rx1600/
rx2600
Embedded I/O for X
rx1600/ rx2600
rx1620/
rx2620/
cx2620
Embedded I/O for X
rx1620/
rx2620/cx2620
X
X
rx4640
Embedded I/O for X
rx4640
X
X
59
Table D-1 Supported Products Matrix (continued)
Part
Number
Description
RHEL Support
4
4U1
SLES Support
4U3
4U4
4U6
5
5U1
10
10 SP1
10 SP2 11
LAN
60
447883B21
4-port GbE Mezz
A5506B
PCI 4 Port
100Base-TX LAN
Adapter
A6794A
SCSI & LAN Core
I/O (Procurium)
X
X
A6865A
PCI core I/O for
SuperDome
X
X
A7061A
Win/Linux
X
1000Base-T Gigabit
Eth Adpt
X
X
A7073A
Win/Linux
1000Base-SX
Gigabit Eth Adpt
X
X
X
A9899A
Win/Linux 2 port
1000Base-SX Giga
Adptr
X
X
X
X
A9900A
Win/Linux 2 port
1000Base-T Giga
Adptr
X
X
X
X
AB290A
HP PCI-X 2p
1000BT, 2p U320
SCSI Adptr
X
X
AB306A
Core IO for the
rx86/rp8420 server
AB314A
HP Integrity
rx8640 Core I/O
adapter
2p GigE
NIC
PCI-X 2-port
1000BT w/WOL
(Core I/O)
AD144A
Win/Linux
133MHz 10GbE SR
Fiber Adapter
AD145A
Win/Linux 4-port
1000Base-T Gigabit
Adapter
AD337A
HP PCIe 2-port
1000Base-T
Adapter
X
X
X
X
AD338A
HP PCIe 2-port
1000Base-SX
Adapter
X
X
X
X
AD385A
HP PCI-X 266MHz
10GigE SR Adapter
X
X
X
X
Supported Products Matrix
X
X
X
X
X
X
X
X
X
X
X
X
X
X
X
X
X
X
X
X
X
X
X
X
X
Table D-1 Supported Products Matrix (continued)
Part
Number
Description
RHEL Support
4
BL860c
Embedded I/O for
BL860c
BL870c
Embedded I/O for
BL870c
rx1600/
rx2600
Embedded I/O for X
rx1600/rx2600
rx1620/
rx2620/
cx2620
Embedded I/O for X
rx1620/
rx2620/cx2620
rx2660
Embedded I/O for
rx2660
4U1
SLES Support
4U3
4U4
4U6
5
X
X
5U1
10
X
X
X
X
X
X
X
X
10 SP1
10 SP2 11
X
X
X
X
MP
A6695 69101
SCSI and MP Core
I/O
A6875A
HP Management X
Processor Adapter
for ZX6000
A9918A
Core I/O for the
rx76xx/rp7420
server
X
X
AB306A
Core IO for the
rx86/rp8420 server
X
X
AB314A
HP Integrity
rx8640 Core I/O
Adapter
X
X
X
X
AB315 60201
Core I/O for
Mittlehorn server
X
X
X
X
RUSA
UCIO
Ruby/Sapphire
Unified Core I/O
board
X
X
X
X
rx4640
Embedded I/O for X
rx4640
X
X
X
X
X
RAID
337972B21
HP Smart Array
P600 Controller
X
A9825A
Smart Array 5302 X
with 128MB cache
X
A9826A
Smart Array 5304 X
with 256MB cache
X
A9890A
HP Smart Array
6402/128MB
Controller
AD335A
HP Smart Array
P800 Controller
X
X
X
X
X
X
X
X
X
61
Table D-1 Supported Products Matrix (continued)
Part
Number
Description
RHEL Support
4
4U1
SLES Support
4U3
4U4
4U6
5
X
5U1
10
X
10 SP1
X
10 SP2 11
AH226A
HP PCIe Smart
Array E500 SAS
Controller
X
SA P400
(core 1)
PCIe 8-port int SAS
Smart Array P400
(Core I/O rx2660)
X
X
X
X
SA P400
(core 2)
PCIe 8-port SAS
Smart Array P400
(Core I/O rx3600,
rx6600)
X
X
X
X
SA P600
PCI-X 8-port
int/4-port ext SAS
Smart Array P600
(Core I/O rx3600,
rx6600)
X
X
X
X
SA P800
PCIe 8-port
int/8-port ext SAS
Smart Array P800
(Core I/O rx3600,
rx6600)
X
X
X
X
431643B21
HP BLc PCIe Mezz
pass-thru
X
X
X
X
BL860c
Embedded I/O for
BL860c
X
X
X
BL870c
Embedded I/O for
BL870c
rx2660
Embedded I/O for
rx2660
SAS
X
X
X
X
X
X
SCSI
62
A6695 69101
SCSI and MP Core
I/O
A6794A
SCSI & LAN Core
I/O (Procurium)
A7059A
Windows and
Linux Ultra160
SCSI Adapter
X
X
X
A7060A
Windows, Linux 2 X
port Ultra160 SCSI
HBA
X
X
A7173A
HP Dual Channel
Ultra320 SCSI
Adapter
X
X
A9918A
Core I/O for the
rx76xx/rp7420
server
Supported Products Matrix
X
X
X
X
X
X
Table D-1 Supported Products Matrix (continued)
Part
Number
Description
RHEL Support
4
4U1
SLES Support
4U3
4U4
4U6
5
5U1
10
X
X
10 SP1
10 SP2 11
AB290A
HP PCI-X 2p
1000BT, 2p U320
SCSI Adpter
X
X
AB306A
Core IO for the
rx86/rp8420 server
X
AB314A
HP Integrity
rx8640 Core I/O
Adapter
X
X
X
X
AB31560201
Core I/O for
Mittlehorn server
X
X
X
X
rx1600/
rx2600
Embedded I/O for X
rx1600/ rx2600
rx1620/
rx2620/
cx2620
Embedded I/O for X
rx1620/
rx2620/cx2620
X
X
X
USB
A6869A
Graphics USB
Adapter for HP
servers
X
A6869B
HP Servers
Graphics USB PCI
Adapter
X
X
X
X
BL860c
Embedded I/O for
BL860c
X
X
X
X
BL870c
Embedded I/O for
BL870c
RUSA
UCIO
Ruby/Sapphire
Unified Core I/O
board
rx1600/
rx2600
Embedded I/O for X
rx1600/ rx2600
rx1620/
rx2620/
cx2620
Embedded I/O for X
rx1620/
rx2620/cx2620
rx2660
Embedded I/O for
rx2660
rx4640
Embedded I/O for X
rx4640
X
X
X
X
X
X
X
X
X
X
X
X
X
X
X
X
Video
A6869A
Graphics USB
adapter for HP
servers
A6875A
HP Management
Processor adapter
for zx6000
X
X
63
Table D-1 Supported Products Matrix (continued)
Part
Number
Description
RHEL Support
4
64
4U1
SLES Support
4U3
4U4
4U6
5
BL860c
Embedded I/O for
BL860c
BL870c
Embedded I/O for
BL870c
RUSA
UCIO
Ruby/Sapphire
Unified Core I/O
board
X
X
rx2660
Embedded I/O for
rx2660
X
X
rx4640
Embedded I/O for X
rx4640
Supported Products Matrix
X
X
5U1
10
X
X
X
X
10 SP1
X
X
X
X
X
X
X
10 SP2 11
X
65
*5992-3193*
Printed in the US