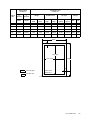
1
DocuPrint 240A/340A HP-GL, HP-GL/2 Emulation Settings Guide HP, HP-GL, and HP-GL/2 are registered trademarks of Hewlett-Packard Corporation. NetWare is a registered trademark of Novell, Inc., in the United States and other countries. All product/brand names are trademarks or registered trademarks of the respective holders. Important c This manual is copyrighted with all rights reserved. Under the copyright laws, this manual may not be copied or modified in whole or part, without the written consent of the publisher. d Parts of this manual are subject to change without prior notice. e We welcome any comments on ambiguities, errors, omissions, or missing pages. Xerox, The Document Company and the stylized X are registered trademarks of Xerox Corporation. All Xerox and Fuji Xerox product names are either registered trademarks or trademarks of Xerox Corporation and Fuji Xerox Co., Ltd. Preface Thank you for choosing this printer. This manual explains how to set up the printer to perform HP-GL/2 emulation. Be sure to read this manual first to ensure proper use of this product. Note that this manual is written for users who have basic knowledge of the operating environment and operation method as well as the method of using the printer. Keep this manual handy for a quick reference to ensure full and efficient use of this product. Preface 3 Types of Manuals Manuals Bundled With the Machine & Their Contents Setup and Quick Reference Guide Explains how to install this printer, load paper, and troubleshoot of this printer. The Online Help for the CentreWare Internet Services Explains how to set the items and features of CentreWare Internet Services. The Online Help for the printer driver Explains how to set the items and features of the printer driver. User Guide (PDF) Explains printer settings, and describes control panel menu items and daily care in detail. This PDF file is included in the CD-ROM bundled with this printer. Network Print Environment User Guide (PDF) Explains how to set the printer for the network environment to use this printer as a network printer. This PDF file is included in the CD-ROM bundled with this printer. HP-GL, HP-GL/2 Emulation Settings Guide (PDF) Explains how to set the emulation mode for HP-GL and HP-GL/2. This PDF file is included in the CD-ROM bundled with this printer. Manuals Bundled With Optional Accessories User Guide (PostScript® Software Kit) (PDF) Explains how to set the printer as a PostScript printer and the items that can be set in the printer driver. This PDF file is included in the CD-ROM bundled with the PostScript software kit. Installation Guide Explains how to install each optional accessory. Note • Adobe® Acrobat® Reader needs to be installed to display PDF files. 4 Types of Manuals Contents Preface.............................................................................................................. Types of Manuals.............................................................................................. Contents............................................................................................................ Using This Guide .............................................................................................. 1 Using Emulation ......................................................................................... 7 1.1 1.2 1.3 1.4 2 About Emulation ...................................................................................................... 7 Emulation Mode .......................................................................................................7 Host Interfaces and Emulation ................................................................................ 7 Switching Between Print Languages .......................................................................8 Mode Menu Screen .................................................................................................8 Default Settings ....................................................................................................... 9 Limits During Auto Layout Mapping ........................................................................9 Paper Margin .........................................................................................................10 About Fonts ........................................................................................................... 10 Usable Fonts .........................................................................................................10 Font Cache ............................................................................................................10 Eject Function........................................................................................................ 11 To Forcibly Eject Remaining Data .........................................................................11 To Eject All Jobs in the Printer .............................................................................. 12 HP-GL Mode Settings .............................................................................. 13 2.1 2.2 2.3 3 3 4 5 6 About Mode Menu ................................................................................................. 13 This Printer’s Menus .............................................................................................. 13 About Mode Menu .................................................................................................14 HP-GL Mode Menu Settings.................................................................................. 15 List of HP-GL/2 Setting Items ................................................................................15 Setting the HP-GL Mode Menu .............................................................................22 About the HP-GL Mode List................................................................................... 23 HP-GL/2 Mode List ................................................................................................23 Print Method ..........................................................................................................24 Materials Related to HP-GL Mode ........................................................... 25 3.1 3.2 3.3 Hard Clip Area ....................................................................................................... 25 Printable Area........................................................................................................ 26 Auto Layout ........................................................................................................... 28 What Is Auto Layout? ............................................................................................28 Making the Auto Layout Function Effective ...........................................................28 Details on Setting Items .........................................................................................28 Determining the Document Size ............................................................................30 Determining the Output Size .................................................................................31 Determining the Scaling Factor .............................................................................33 Limits During Auto Layout Mapping .......................................................................34 Examples of Combinations of Functions ...............................................................35 Index ............................................................................................................... 37 List of Mode Menu (HP-GL) Contents 5 Using This Guide Prerequisite Knowledge Read this guide in detail before using this printer. If you are not familiar with the machine to which the printer is to be connected or the basic operations or concepts of the software, read the relevant manuals first. Machines and software to which the printer is to be connected refer to personal computers, workstations, networks, and the respective operating systems and applications on which these machines run. Organization The following is a summary of each chapter. 1. Using Emulation This chapter explains the available interfaces and fonts, emulated printers, and doing operations with the default settings. 2. HP-GL Mode Settings This chapter explains the printer settings needed to use HP-GL emulation. 3. Materials Related to HP-GL Mode This chapter explains the hard clip area, number of printable digits for various paper sizes, and auto layout among other functions. Conventions 1. In this guide, “computer” refers to both the personal computer and workstation. 2. The following icons are used in this guide: 3. 6 Important Indicates important information which you should read. Note Indicates additional information on operations or features. Refer to Indicates reference sources. The following conventions are used in this guide: Refer to “xxx” : The cross-reference is within this guide. Refer to xxx : The cross-reference is not within this guide. [ ] : Indicates items displayed on the computer and the printer control panel. Also indicates the title of printed report/lists from the printer. < > : Indicates items such as hard buttons and indicators on the keyboard and printer. Using This Guide 1 Using Emulation 1.1 About Emulation This chapter explains HP-GL, HP-GL/2 emulation of the print language available on this printer. Print data follows certain rules (grammar). These rules (grammar) are called a print language. This printer supports a page description language used to create images on a page basis and an emulation feature used to obtain the print result similar to that obtained by another printer. The ability to obtain the print result similar to that obtained by other printers is called emulation. Emulation Mode When printing data written in a language other than the page description language supported by this machine, place this printer in the emulation mode. This printer has more than one emulation mode. The following table summarizes the relationship between the HP-GL, HP-GL/2 emulation mode and the printer type to be emulated. Emulation mode HP-GL emulation mode (HP-GL mode) Emulated printer 7586B or DJ750C Plus HP-GL/2 emulation mode (HP-GL/2 mode) DJ760C Plus In the HP-GL mode, the modes switch between the HP-GL mode, HP-GL/2 mode, and HP-RTL. For the HP-GL/2 mode, the mode is fixed as HP-GL/2 and HP-RTL. Host Interfaces and Emulation Different host interfaces support different print languages. Host interfaces that support print languages are as follows: • Parallel port • Serial port • LPD port • NetWare port • SMB port • IPP port • USB port • Port9100 port 1.1 About Emulation 7 Switching Between Print Languages This printer supports multi-emulation, allowing you to switch between print languages. There are three methods of switching between print languages. Switching by Commands Commands for switching between print languages are provided. Upon receipt of a command, this printer selects the relevant print language. Automatic Switching This printer analyzes the data received by the host interface to identify the print language to be used. It then switches to the identified print language automatically. Interface-dependent Set a print language for each host interface using the control panel. Switch to the print language corresponding to the host interface that received data. Mode Menu Screen This screen is used to set items specific to HP-GL emulation mode. Press the <Menu> button to display the HP-GL mode menu screen and then select [HPGL] in [Print Language]. Refer to • Information on HP-GL mode menu items: “2 HP-GL Mode Settings” (P. 13) 8 1 Using Emulation 1.2 Default Settings You can print in the following ways with the HP-GL and HP-GL/2 emulation modes set to the default settings. The document data is enlarged or reduced (auto layout) to match the size of the paper being used. Document Size: Auto, Coord. Rotation: 0, Zoom Mode: Output Size, Zoom: On Printable area Document size Output size Note • If necessary, you may change the default settings. See “2 HP-GL Mode Settings” (P. 13) for information on changing settings. Limits During Auto Layout Mapping When the Hard Disk (Optional) Is Installed in the Printer Print data is stored to the hard disk when Auto Layout is executed. When the Hard Disk (Optional) Is not Installed in the Printer Print data is stored to the Auto Layout memory when [auto layout function] is executed. The initial capacity of the Auto Layout memory is 64 KB. Therefore, this printer cannot correctly output auto layout if the print data received by the auto layout memory exceeds 64 KB. In this case, change the size of the Auto Layout memory from the printer control panel. The upper limit of the Auto Layout memory is 5,120 KB. The auto layout memory cannot accept data larger than 5,120 KB. We recommend installing the hard disk (optional) to this printer if you are going to use the auto layout function. 1.2 Default Settings 9 Paper Margin The default output size is set to [A Size]. If the print data exceeds the effective coordinate area at all, it will be printed on the next larger size (for example, the next paper larger than A5 is A4). When paper margin is set, the area set for the paper margin rather than the area recognized by [Area Determine] sets the effective coordinate area. Do these settings if printing is done on a paper size larger than the size you want. Setting range is from 0 to 99 mm. The default value is 0 mm. Refer to • “2 HP-GL Mode Settings” (P. 13) 1.3 About Fonts This section explains about the fonts that can be used in the HP-GL emulation mode. Usable Fonts The following fonts can be used in HP-GL emulation. • Stroke font Font Cache To ensure high-speed printing, outline fonts are cached if they are not too large. Outline fonts are converted to bit map data temporarily and then printed. To minimize this processing time, the processed bit map data is saved in the memory. This process is called font cashing. The saved bit map data is erased at power-off or system reset. 10 1 Using Emulation 1.4 Eject Function This section explains the eject function. There are two types of eject functions as shown here. • The remaining data is forcibly ejected. • All the jobs in the printer are eliminated. To Forcibly Eject Remaining Data For HP-GL and HP-GL/2 emulation modes, data is not ejected until a full page of data has accumulated. When using a parallel interface, if operations stop while the data for the last page is being transferred, the printer waits for the next data until the time set [Auto Eject Time] has passed, and the “Waiting for data” appears in the display. In this kind of situation, forced eject does not wait for automatic eject and just forces all of the data in the printer to print out. The procedure is shown below. Note • When “Waiting for data” appears in the display, the next job sent to the printer may not be printed correctly. Send the next job after forced eject or after the automatic eject time has been exceeded. Refer to • Auto Eject Time: User Guide 4.2 Description of Menu Items 1. Press the <Eject/Set> button when the display shown to the right appears. <Eject/Set> button Printing will start. When printing is finished, “Ready to print” appears in the display. Important • When the common menu item [Print Mode] is set to [Auto], “Waiting for data” does not appear, so forced eject does not occur. 1.4 Eject Function 11 To Eject All Jobs in the Printer Print all the jobs that the printer has received. Through this procedure, you can interrupt the receiving of data and empty the buffer. The procedure is explained below. 1. Press the <Online> button when the display shown to the right appears. Note • Press the <Online> button to make the printer automatically stop receiving data. 2. Press the <Eject/Set> button. Printing will start. <Online> button <Eject/Set> button All the jobs are printed and “Off-line” appears in the display. Note • When a parallel interface or USB interface is being used, depending on when the <Online> button is pressed in step 1, data reception may occur in the middle of a job. In this situation, data after that is recognized as a new job, after the <Eject/Set> button is pressed, and processed like a new job after releasing offline in step 3. 3. Press the <Online> button. “Ready to print” appears in the display. Note • After “Ready to print” appears, data that is being processed as a new job may not be printed correctly if [Print Mode] is set to [Auto] in the common menu. 12 1 Using Emulation <Online> button 2 HP-GL Mode Settings 2.1 About Mode Menu This section explains the types of menus and the levels of the emulation mode menu. This Printer’s Menus In the menus, there are Mode menu for emulation settings and Common menu for the printer and other settings. You can set the following items in the common menu when using HP-GL, HP-GL/2, and HP-RTL emulation. • Port Status (Parallel/Serial/LPD/NetWare/SMB/IPP/USB/Port9100) Set the port that uses HP-GL, HP-GL/2, and HP-RTL emulation to [Enable]. • Print Mode (Parallel/Serial/LPD/NetWare/SMB/IPP/USB/Port9100) (Default: [Auto]) Set port print mode so that you can use HP-GL emulation. Select [HPGL/2] or [Auto] as the print mode. • HP-GL Auto Layout Refer to • User Guide 4.2 Description of Menu Items 2.1 About Mode Menu 13 About Mode Menu This HP-GL mode menu is used to set items specific to HP-GL and HP-GL/2 emulation. You can change the mode menu settings while the printer is printing. When this is done, the changed settings take effect from the next job. The mode menu is configured from the following levels. • Mode menu > Menu item > Item > Candidate value Note • Some menu items do not have items. Sometimes the items are divided into item 1, item 2, and item 3. (Called item hereafter.) HPGL Features Menu Stored Jobs Menu Mode menu Menu item Paper Tray Auto Tray 1 Tray 2 Output Size A Size A4 A5 Document Size Auto Output Size A0 At startup Factory No. 01 - 10 Retrieve Factory No. 01 - 10 Item Candidate value The diagram shown above represents a portion of the levels in the HP-GL mode menu. Refer to • Operations and items that can be set: “2.2 HP-GL Mode Menu Settings” (P. 15) 14 2 HP-GL Mode Settings 2.2 HP-GL Mode Menu Settings This section explains the items that can be set using HP-GL mode menu and the setting procedures. List of HP-GL/2 Setting Items This section explains the items that can be set using HP-GL mode menu. Features Menu Paper Tray Sets the paper tray that supplies paper. Candidate values are shown below. [Auto] (default) The printer searches for the paper tray that has the paper size set in [Output Size] and paper is fed from that tray. [Tray 1] [Tray 2] [Tray 3] [Tray 4] Important • When [Tray 1] to [Tray 4] are selected, the [Output Size] item cannot be set because the paper loaded in these trays become the output sizes. Note • When [Auto] is selected and the same size and type of paper is loaded in the same orientation in multiple trays, the paper tray will be selected according to the tray priority settings and paper priority settings in the common menu. • When the same size of paper is loaded in different orientations in multiple trays, the paper loaded in landscape is given priority. • When the optional trays are installed, [Tray 3] and [Tray 4] appear in the display. Output Size Sets the size of the paper to print on. Candidate values are shown below. When the [Paper Tray] is set to [Auto]. [A size] [A4] [A5] [B5] [Auto] When the [Paper Tray] is set to [Tray 1] to [Tray 4]. The paper size loaded in the tray that is set appears in the display. [Output Size] cannot be set. Note • If the paper size loaded in the tray is unknown, then [**] appears in the display. 2.2 HP-GL Mode Menu Settings 15 Document Size Sets the Client-Created document size. Candidate values are shown below. [Auto] (default) [Output Size] The size is the same as that set in [Output Size]. [A0] [A1] [A2] [A3] [A4] [A5] [B0] [B1] [B2] [B3] [B4] [B5] Note • If [Auto] is not selected, the [Auto Layout] setting switches to [Off]. • If [Auto] is not selected, the [Zoom Mode] setting switches to [Output Size]. Coord. Rotation Sets the paper orientation for printing. Candidate values are shown below. [0] (default) Paper orientation is set as landscape. [90] Paper orientation is set as portrait. Gradation Mode Sets the gradation for printing. Candidate values are shown below. [Grayscale] (default) [Black Pen] Auto Layout Turns on or off the auto layout function. Candidate values are shown below. [On] (default) [Off] Note • [On] only appears in the display when [Auto] is selected in [Document Size]. • When [Off] is selected, the [Zoom Mode] setting changes to [Output Size]. Palette Setup Specifies the palette to be used. Candidate values are shown below. [Command] (default) [Stored Jobs] Quantity Enter Quantity Sets the number of copies to be printed. You can set the number in a range from 1 to 250. The default value is 1. Important • The number of copies specified by the client is used when printing. After printing, that value can also be changed on the printer control panel. But, if the number of copies was specified from a NetWare, or LPD port, then the value set on the printer control panel cannot be changed after printing is finished. 16 2 HP-GL Mode Settings Quantity Setup Sets the method to specify the number of copies to print. Candidate values are shown below. [Protocol] (default) [Stored Jobs] [Command] 2 Sided Print Sets 2 sided printing. [Off] 2 sided printing is not done. [Long Edge Flip] Printing is done from left to right. [Short Edge Flip] Printing is done from top to bottom. Note • Can be set when the duplex unit (optional) is installed. Output Tray Specifies the tray to which the printed paper is ejected. [Center Tray] (default) [Rear Tray] [OffsetCatchTray] Note • You can set [Rear Tray] when the optional rear tray is installed. • You can set [OffsetCatchTray] if the optional offset catch tray is installed. Adjust Position Moves the hard clip area vertically or horizontally. This setting can be made in 1 mm increments within the range between -250 and +250. [Up & Down] You can set this item in 1 mm increments from -250 to 250mm. (-9.8 to 9.8 inches in 0.1 inch increments) The default value is [0 mm]. [Left & Right] You can set this item in 1 mm increments from -250 to 250mm. (-9.8 to 9.8 inches in 0.1 inch increments) The default value is [0 mm]. Note • Data outside the print area will not be printed even if the position is adjusted. • Data that has gone out of the print area as the result of positional adjustment will not be printed. • When changing the candidate values by the < > or < > button, you can change the display continuously by holding the button down. Also, pressing the < > and < > buttons simultaneously displays the default value. 2.2 HP-GL Mode Menu Settings 17 Print Control HP-GL Mode Switches between graphics languages. This setting affects HP-GL commands (IW, OW, and UC commands). Candidate values are shown below. [HP-GL] (default) You can use HP-GL, HP-GL/2, or HP-RTL. The languages switch according to the print data that is sent to the printer. [HP-GL/2] HP-GL/2, or HP-RTL can be used. Hard Clip Sets the size of hard clip area. In the HP-GL mode, the drawing area is limited depending on the paper size. This area is called a hard clip area. It determines the maximum range of pen movement. Accordingly, images cannot be drawn exceeding the bounds of the hard clip area. Candidate values are shown below. [Output Size] (default) Set the hard clip area to the same size as the paper. However, the actual area that can be printed is whatever is the area on which the printer can print. [Normal] The hard clip area for A4, A3, letter, and ledger are the same as for Hewlett-Packard’s HP7550A. The hard clip area for other paper sizes is the same as the printable area for this printer. Eject Command Set commands (SP, SP0, NR, FR, PG, AF, and AH) that indicate completion of drawing. At receipt of one of these commands, drawing is terminated and paper is ejected. All commands except for SP0 are set to [Disable] as the default. Note • When two or more commands are specified, drawing stops and paper is ejected at receipt of any one command. Zoom Determines whether to enlarge/reduce (scaling) the document size so that the document size fits the output size. [On] (default) Scaling [Off] Scaling is not done. Print data is printed at actual (100%) size. Because of this, the print data may not fit on the paper. 18 2 HP-GL Mode Settings Zoom Mode Determines whether to use A-sizes (A0, A1, A2, A3, A4, and A5) or the effective coordinate area obtained by the method selected in the area determining mode for auto scaling. Candidate values are shown below. [Output Size] (default) Paper sizes are automatically selected from the six sizes in the A series of paper sizes (A0, A1, A2, A3, A4, and A5). [Coordinate Area] Document sizes are determined by the effective coordinate area after the paper margins have been calculated according to the method selected in [Area Determine]. Note • If anything except [Auto] is selected in [Document Size], then the [Coordinate Area] cannot be selected. • [Coordinate Area] setting can only be done if [Auto Layout] is [On]. If it is set to [Off], [Output Size] takes effect. Area Determine Specifies the method of obtaining the effective coordinate area for auto scaling. Candidate values are shown below. [Auto] (default) Select a method to determine the printable area from either IW, IP, Adapted, or PS. The order of priority is PS > IW > IP > Adapted. [IW] The effective coordinate area is set to the area specified by the last IW command in the data. If there are no IW commands in the data, Adapted determines the effective coordinate area. [IP] The effective coordinate area is set to the area including what is specified by IP commands in the data. If there are no IP commands in the data, Adapted determines the effective coordinate area. [Adapted] The effective coordinate area is determined by the following conditions. • The maximum and minimum positions mapped by the commands. • The largest font size on that page. • The widest line. [PS] The effective coordinate area is set to the area specified by the first PS command in the data. If there are no PS commands in the data, [Adapted] determines the effective coordinate area. Paper Margin Sets the paper margin for auto scaling. You can set this item in 1 mm increments from 0 to 99 mm (0.0 to 3.9 inches in 0.1 inch increments). The default value is [0 mm]. Note • When changing the candidate values by the < > or < > button, you can change the display continuously by holding the button down. Also, pressing the < > and < > buttons simultaneously displays the default value. 2.2 HP-GL Mode Menu Settings 19 Image Enhance Enables or disables image enhancement. Image enhancement raises the resolution and smooths sharp edges. Candidate values are shown below. [On] (default) [Off] Important • The [Zoom Mode], [Area Determine], and [Paper Margin] settings are effective only when [Document Size] is set to [Auto]. Pen Attributes Sets attributes of 16 pens (No. 00 to 15). The thickness and color of the drawing line can be specified. Pen Width Sets the width of the pen (thickness of the line). The pen width can be specified in steps of 0.1 mm within the range between 0.0 and 25.5 (0.00 to 1.00 inch in 0.01 inch increments). The default is [0.3 mm]. Note • When changing the candidate values by the < > or < > button, you can change the display continuously by holding the button down. Also, pressing the < > and < > buttons simultaneously displays the default value. • When an image is reduced by combining the [Document Size] setting and [Output Size] setting, the pen width is also reduced (minimum pen width = 0.1 mm (0.01")). • The line width is increased starting in the center of the line. • When 0.0 is specified, nothing is drawn. Line End Sets the line end shape. [Cut] (default) z : Coordinate specification position z : Coordinate specification position z : Coordinate specification position [Round] [Rectangle] Line Intersect Sets the intersection shape. [None] (default): [Cut]: [Round]: [Join]: Note • [None] requires the shortest processing time and therefore is suitable for check. • When a symbol is specified with a symbol mode command, live concatenation is not performed. “Symbol mode command” refers to an HP-GL command used to specify a symbol. 20 2 HP-GL Mode Settings Density Sets pen color density. The setting range is 0 to 100% in 5% increments. The default for pen No. 00 is 0%, and the defaults for pens No. 02 through No. 15 are 100%. Note • When changing the candidate values by the < > or < > button, you can change the display continuously by holding the button down. Also, pressing the < > and < > buttons simultaneously displays the default value. Stored Jobs Menu Settings can be registered to NV memory (No. 01 to 10) and called up as required. At startup [At startup] refers to the reading of non-volatile memories (No. 01 to 05) pre-registered by [Store] when the power is switched on or the system is reset. Sets the No. of the NV memory to call up. The default is [Factory], which means that the default settings are called up when the printer is started up. Retrieve This feature calls up pre-registered settings. Sets the No. of the memory to call up. The default is [Factory], which means that the default settings are called up. Store There are two types of memory, ROM for storing defaults, and NV memory (No. 01 to 10) for holding user settings. By registering to memory, the various preset mode menu settings are registered as a group to NV memory (No. 01 to 10). Registering these settings in advance makes it easier to call up mode menu settings, and you are no longer required to repeat the same settings each time after the printer is switched on. Registered settings are held until you initialize NV memory or clear memory. Delete Clears the settings registered to NV memory. Sets the No. of the memory to clear. Note • [No.01] to [No.10] are not displayed if no settings have been registered to memory. • We recommend pressing the <Online> button to set the offline mode when registering as the setting values sometimes differ if a command from a client arrives while you are registering to memory. 2.2 HP-GL Mode Menu Settings 21 Setting the HP-GL Mode Menu This section uses a document size of [A4] set in the HP-GL mode to explain the mode menu setting procedure. Ready to print 1. Press the <Menu> button. Menu Print Language 2. Press the < > button. Print Language HPGL 3. Press the < > button. HPGL Features Menu 4. Press the < > button. HPGL Paper Tray 5. Press the < > or < > button several times. HPGL Document Size 6. Press the < > button. Documet Size Auto # 7. Press the < > or < > button several times. Documet Size A4 8. Press the <Eject/Set> button. Documet Size A4 # 9. Press the <Menu> button. Ready to print 22 2 HP-GL Mode Settings 2.3 About the HP-GL Mode List This section explains the HP-GL mode list. Refer to • For information about reports and lists: User Guide 6.2 Printing Reports/Lists HP-GL/2 Mode List • HP-GL/2 Settings List You can confirm the HP-GL mode setting values. 2.3 About the HP-GL Mode List 23 • HP-GL/2 Logical Printers/Stored Jobs List You can confirm the setting values that are in the NV memory. Print Method On the control panel, select [Report/List] > [Print Language] > [HP-GL/2 Settings] or [HP-GL/2 Logical]. 24 2 HP-GL Mode Settings 3 Materials Related to HP-GL Mode 3.1 Hard Clip Area In the HP-GL mode, the plottable area is determined (separately from the printable area) depending on the paper size. This area is called a hard clip area. It determines the maximum range of pen movement. Accordingly, images cannot be drawn exceeding the bounds of the hard clip area. This printer allows you to select a hard clip area from the following: • Normal Defines the printable area of this machine as the hard clip area. • Output Size Defines the output size equivalent as the hard clip area. Actually, images can be printed only within the printable area. The hard clip area can be specified by making the HP-GL emulation mode setting or using the hard clip specification command [&I]. The following coordinate values are set when the origin is set at the lower left of the A3-size paper (Auto Layout is specified for HP-GL/2). (16798, 11876) +Y (16442, 11520) Normal hard clip area Output size hard clip area Output size (0, 0) Normal origin (0, 0) Output size origin +X 3.1 Hard Clip Area 25 3.2 Printable Area Printable areas in the HP-GL mode are as follows: Note • Some output sizes may not be used depending on the printer type. Output Sizes and Printable Areas Paper length (1/7200 in.) Output size Coordinate value (1/7200 in.) Xdirection Ydirection Width Height Bottom left X Bottom left Y Long edge Short edge Top right X Top right Y XR YU A3 119052 84168 1260 1260 116532 81648 117792 82908 1260 1260 A4 84168 59508 1260 1260 81648 56988 82908 58248 1260 1260 A5 59508 41940 1260 1260 56988 39420 58248 40680 1260 1260 B4 103176 72828 1260 1260 100656 70308 101916 71568 1260 1260 B5 72828 51588 1260 1260 70308 49068 71568 50328 1260 1260 Margin Printable area Top right Margin Width (Top right X, Top right Y) YU Short edge Long edge XR Physical paper (Bottom left X, Bottom left Y) Printable area (0, 0) 26 3 Materials Related to HP-GL Mode Height Paper length (1/7200 in.) Output size Coordinate value (1/7200 in.) Xdirection Ydirection Width Height Bottom left X Bottom left Y Long edge Short edge Top right X Top right Y XR YU A3 84168 119052 1260 1260 81648 116532 82908 117792 1260 1260 A4 59508 84168 1260 1260 56988 81648 58248 82908 1260 1260 A5 41940 59508 1260 1260 39420 56988 40680 58248 1260 1260 B4 72828 103176 1260 1260 70308 100656 71568 101916 1260 1260 B5 51588 72828 1260 1260 49068 70308 50328 71568 1260 1260 Margin Printable area Top right Margin Width YU (Top right X, Top right Y) Long edge Short edge Height XR (Bottom left X, Bottom left Y) Physical paper Printable area (0, 0) 3.2 Printable Area 27 3.3 Auto Layout This section explains auto layout. What Is Auto Layout? Auto layout is the function that judges the document size according to the HP-GL data input from the host system, enlarges/reduces the document so that it fits the paper size, and lays out the document at the center of the paper. Using the auto scale and auto layout functions allows you to print a document in HP-GL mode without regard for the document size and origin position. All auto layout settings must be made on the operation panel of the printer. They cannot be made using advanced setting commands. Making the Auto Layout Function Effective To make the auto layout function effective, make the following settings on the control panel of the printer: • Set [Document Size] to [Auto]. The default is [Auto]. • To set the origin position, set [Auto Layout] to [On]. • Set [Zoom] to [On]. The default is [On]. • Select the method of obtaining the effective coordinate area in [Area Determine]. The default is [Auto]. • Specify the paper margin by setting [Paper Margin]. The default is [0 mm] ([0.0"]). • Set [Zoom Mode]. The default is [Output Size]. Details on Setting Items Details on individual items are as follows. Document Size Setting [Document Size] to [Auto] allows you to set [Auto Layout] to [On]. Auto Layout Setting set [Auto Layout] to [On] makes the [Zoom], [Area Determine], [Paper Margin], and [Zoom Mode] settings effective. Zoom The purpose of this setting is to determine whether to enlarge/reduce (scaling) the document size so that the document size fits the output size. 28 3 Materials Related to HP-GL Mode Area Determine Methods for obtaining the effective coordinate area based on the HP-GL data are as follows: [Auto] An effective coordinate area determining method is automatically selected among PS, IW, IP, Adapted. PS, IW, IP, Adapted are given priority in this order. [IW] The area specified by the last IW command in data is determined as the effective coordinate area. If data contains no IW command, Adapted is used to determine the effective coordinate area. [IP] The area containing the area specified by all IP commands in data is determined as the effective coordinate area. If data contains no IW command, Adapted is used to determine the effective coordinate area. [Adapted] The effective coordinate area is determined by the following conditions: • Maximum and minimum position coordinates of the points plotted by drawing commands • Maximum character size in the page • Maximum pen width [PS] The area containing the area specified by the first PS command in data is determined as the effective coordinate area. If data contains no PS command, Adapted is used to determine the effective coordinate area. Paper Margin Specify the paper margin within the range between 0 mm (0.0") and 99 mm (3.9"). The default is [0 mm] ([0.0"]). The area obtained by removing the area specified by making the [Paper Margin] setting from the effective coordinate area obtained in [Area Determine] is determined as the effective coordinate area. Paper margin The image exceeding the bounds of the hard clip area is not plotted. Area obtained in [Area Determine] Area obtained by removing the area specified by making the [Paper Margin] setting from the effective coordinate area obtained in [Area Determine] 3.3 Auto Layout 29 Zoom Mode Select the mode that determines the document size according to the obtained effective coordinate area. Also determine whether the paper is set in landscape or portrait according to the effective coordinate area. When set to [Coordinate Area]: The area obtained by removing the area specified by making the [Paper Margin] setting from the effective coordinate area obtained in [Area Determine] is determined as the effective coordinate area. When set to [Output Size]: The document size is determined by the obtained effective coordinate area and origin position setting. The document size is selected from A sizes (A0, A1, A2, A3, A4, and A5). Determining the Document Size The document size is determined by comparing it with the hard clip areas of different sizes of paper based on the effective coordinate area obtained according to [Zoom Mode], [Paper Margin], and [Area Determine] settings. When [Zoom Mode] Is Set to [Output Size] 1. The effective effective coordinate area is obtained from the input HP-GL data in the specified [Area Determine]. 2. The size of the character specified in the page (or the default character size) or the value that is one half the specified pen width, whichever is larger, is added to the effective coordinate area obtained in 1 as a margin. 3. The area specified as a paper margin is removed from the effective coordinate area obtained in 2. 4. The size of the minimum area that contains the effective coordinate area obtained in 3 is determined as the document size. When [Zoom Mode] Is Set to [Coordinate Area] 30 1. The effective coordinate area is obtained from the input HP-GL data in the specified [Area Determine]. 2. The size of the character specified in the page (or the default character size) or the value that is one half the specified pen width, whichever is larger, is added to the effective coordinate area obtained in 1 as a margin. 3. The area specified as a paper margin is removed from the effective coordinate area obtained in 2. 4. The effective coordinate area obtained by performing the above steps 1 to 3 is determined as the document size. 3 Materials Related to HP-GL Mode Example: Assume that the following data is input when Zoom Mode = Output Size, Origin Position = Auto, Paper Margin = 10 mm, Area Determine = IP. All pen widths are set to 0.1 mm. The following data does not contain a character size specification command and the physical size of the area specified by IP/IW is A3. IN; IP -8399, -5938, 8399, 5938; IW -8399, -5938, 8399, 5938; PU; SP1; : : SP0; 1. [Area Determine] is set to [IP], so the area (-8399, -5938, 8399, 5938) specified by the IP command is determined as the effective coordinate area. 2. The data in the above example contains no character size specification command and all pen widths are 0.1 mm, so the size that is one half the default height of the character on A3 paper (75 plotter unit) is added to the size of the effective coordinate area obtained in 1. Effective coordinate area obtained in 2: -8474, -6013, 8474, 6013 3. The area specified by [Paper Margin] (10 mm = 400 plotter unit) is removed from the effective coordinate area obtained in 2. Effective coordinate area obtained in 3: -8074, -5613, 8074, 5613 4. The effective coordinate area obtained in 3 is of the A3 size (greater than the A4 size), so the document size is judged as being A3. The effective coordinate area obtained when [Paper Margin] is set to [0 mm] is (-8474, -6013, 8474, 6013), so its size is greater than A3 up to A2 inclusive. The document size is judged as being A2. Determining the Output Size When the following settings are made on the control panel, the paper size is determined as described below. • Document Size: Auto • Paper Tray: Auto The method of determining the paper size varies depending on the [Output Size] setting and [Zoom Mode] setting on the control panel. When [Output Size] Is Set to [A size] The size (A4 or A5) of the paper set in the tray actually becomes the candidate value. If A-size (A4 or A5) paper is not set in the tray, all A-sizes (A4 and A5) become the candidate values and an error message prompting you to load A-size paper in the tray appears on the control panel. 3.3 Auto Layout 31 When [Output Size] Is Set to [Auto] The size (A4, B5, or A5) of the paper set in the tray actually becomes the candidate value. If A4, B5, or A5 size paper is not set in the tray, all A-sizes (A4 or A5) become the candidate values and an error message prompting you to load paper in the tray appears on the control panel. When [Zoom Mode] Is Set to [Output Size] If the output size which is the same as the document size is supported, select the paper of the size which is the same as the document size. If the document size is greater than any candidate paper size, select the paper of the largest size. If the document size is smaller than any candidate paper size, select the paper of the closest size. When [Zoom Mode] Is Set to [Coordinate Area] Select the smallest paper that contains the effective coordinate area. If the size of the effective coordinate area is larger than any candidate paper size, select the paper of the largest size. If the size of the effective coordinate area is smaller than any candidate paper size, select the paper of the closest size. Note • When [Document Size] is set to a value other than [Auto], the output size set on the control panel is assumed to be specified. • When [Paper Tray] is set to [Auto], the size of the paper set in the tray is assumed to be specified. If the size of the paper set in the tray is not supported, an error message appears to prompt you to set paper of the supported size. 32 3 Materials Related to HP-GL Mode Determining the Scaling Factor During execution of auto scaling, the scaling factor is determined by the document size and output size. Note that the scaling factor depends on the [Zoom Mode] setting. Note • To enable the scaling function, set [Zoom] to [On] on the control panel. If [Zoom] is set at [Off], images will be drawn at a scale of 100%. When [Document Size] Is Set to [Auto] and [Zoom Mode] Is Set to [Output Size] The [Hard Clip] setting becomes ineffective. The output size hard clip area is always used. • When the document size is the same as the output size, the image is drawn at a scale of 100%. • When the document size is larger than the output size, the image is drawn with it reduced. • When the document size is smaller than the output size, the image is drawn at a scale of 100%. Output size Document A3 A4 A5 B4 B5 A0 35 25 100 31 100 A1 50 35 25 43 31 A2 71 50 35 61 43 A3 100 71 50 87 61 A4 100 100 71 100 87 A5 100 141 100 173 100 Note • When origin position is set to layout, the image is drawn with the document laid out at the center. When origin position is set to bottom left or center, the image is drawn with the origins of the document and paper aligned. • Some output sizes may not be used depending on the printer type. 3.3 Auto Layout 33 When [Document Size] Is Set to [Auto] and [Zoom Mode] Is Set to [Coordinate Area] The [Hard Clip] setting becomes ineffective. The extended hard clip area is always used. The scaling factor is determined by the effective coordinate area and output size. The following table summarizes effective coordinate areas by paper size. Note • Some output sizes may not be used depending on the printer type. Unit: Plotter unit 0 degree Output size Minimum value 90 degrees Maximum value Minimum value Maximum value P2x-P1x P2y-P1y P2x-P1x P2y-P1y P2x-P1x P2y-P1y P2x-P1x P2y-P1y A3 7829 5485 73075 51200 5485 7829 51200 73075 A4 5485 3828 51200 35733 3828 5485 35733 51200 A5 3828 2648 35733 24720 2648 3828 44088 35733 B4 6762 4723 63120 44088 4723 6762 44088 63120 B5 4723 3297 44088 30773 3297 4723 30773 44088 The maximum scaling factor is equivalent to 210% of the size of the extended hard clip area of each paper and the minimum scaling factor is equivalent to 22.5%. Limits During Auto Layout Mapping When the Hard Disk (Optional) Is Installed in the Printer Print data is stored to the hard disk when Auto Layout is executed. When the Hard Disk (Optional) Is Not Installed in the Printer Print data is stored to the Auto Layout memory when Auto Layout is executed. The initial capacity of the Auto Layout memory is 64 KB. Therefore, this printer cannot correctly output auto layout if the print data received by the auto layout memory exceeds 64 KB. In this case, change the size of the Auto Layout memory from the printer control panel. The upper limit of the Auto Layout memory is 5,120 KB. The auto layout memory cannot accept data larger than 5,120 KB. We recommend installing the hard disk to this printer if you are going to use the auto layout function. 34 3 Materials Related to HP-GL Mode Examples of Combinations of Functions This section explains examples of print results obtained by combining the supported functions. Document Size: Auto, Coord. Rotation: 0, Zoom Mode: Output Size, Zoom: On Printable area Document size Output size Document Size: Auto, Coord. Rotation: 0, Zoom Mode: Output Size, Zoom: Off Printable area Document size Output size 3.3 Auto Layout 35 Document Size: Auto, Coord. Rotation: 0, Zoom Mode: Coordinate Area, Zoom: On Printable area Effective coordinate area determined by input data Output size Document Size: Auto, Coord. Rotation: 0, Zoom Mode: Coordinate Area, Zoom: Off Printable area Effective coordinate area determined by input data 36 3 Materials Related to HP-GL Mode Output size Index A Auto Layout . . . . . . . . . . . . . . . . . . . . . . . . . . 28 E eject function . . . . . . . . . . . . . . . . . . . . . . . . . 11 emulation mode . . . . . . . . . . . . . . . . . . . . . . . . 7 F font cache . . . . . . . . . . . . . . . . . . . . . . . . . . . 10 H hard clip area . . . . . . . . . . . . . . . . . . . . . . . . . 25 host interface . . . . . . . . . . . . . . . . . . . . . . . . . . 8 HP-GL/2 Logical Printers/Stored Jobs List . . . . . . . . . . . . . . . . . . . . . . . . . . . . . . . . . 24 HP-GL/2 Settings List . . . . . . . . . . . . . . . . . . 23 L Limits during auto layout mapping . . . . . . . . . . 9 M mode menu . . . . . . . . . . . . . . . . . . . . . . . . . . 13 P paper margin . . . . . . . . . . . . . . . . . . . . . . . . . 10 printable area . . . . . . . . . . . . . . . . . . . . . . . . . 26 S setting the HP-GL Mode Menu . . . . . . . . . . . 22 Index 37 Customer Response Sheet DocuPrint 240A/340A HP-GL, HP-GL/2 Emulation Settings Guide (ME3216E2-1) To improve our publications, we would appreciate your feedback regarding this guide. Please take a few moments to complete and return this form to us. z About Yourself 1. How often do you use this guide? [ ] Daily [ ] Weekly [ ] Monthly [ ] Infrequently 2. When do you usually refer to the guide? [ ] Doing a usual operation [ ] Using unfamiliar features [ ] Solving a problem 3. Which part of the guide do you read frequently? Chapter/Section/Page: 4. Where do you keep this guide? 5. (Optional) Your Name: Company or organization: Address: Occupation: z About the Guide Strongly agree 1. It is handy. 1 2. It is easy to read. 1 3. Titles of chapters and sections make sense. 1 4. Information is logically placed. 1 5. Referencing is easy. 1 6. Content is easy to understand. 1 7. The step-by-step instructions are easy to follow. 1 8. All necessary information is included. 1 9. Illustrations aid in the understanding of content. 1 10. The use of color is effective. 1 Neutral 2 2 2 2 2 2 2 2 2 2 3 3 3 3 3 3 3 3 3 3 4 4 4 4 4 4 4 4 4 4 Strongly disagree 5 5 5 5 5 5 5 5 5 5 Other comments: After completing this form, detach and send it to the address below. (Please use your own envelope and postage stamp.) Thank you for your cooperation. Fuji Xerox Co., Ltd. KSP R&D 2D7 3-2-1, Sakado, Takatsu-ku Kawasaki-shi, Kanagawa-ken JAPAN 213-0012. DocuPrint 240A/340A HP-GL, HP-GL/2 Emulation Settings Guide Human Interface Design Development Document Products & Supply Company Fuji Xerox Co., Ltd. ME3216E2-1 (Edition 1) Copyright 2003 by Fuji Xerox Co., Ltd. © List of Mode Menu (HP-GL)