1
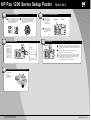
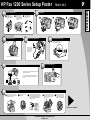
HP Fax 1200 Series Setup Poster
a
Remove the print
cartridges and cords
from the sides of the
HP Fax.
b
Rest the box on its
side and pull out your
HP Fax. Remove any
packaging or tape from
the HP Fax.
c
Load paper
Verify that you have
these additional key
components.
power adapter
a
c
b
power cord
phone cord
print cartridges
trays
3
4
Connect
the cable
Attach
paper
trays
Slide the top
tray into
place.
Connect the power cord
3
1
2
Snap the bottom tray into place, and then lower.
6
Connect the phone cord
Use the phone cord to connect your
HP a
Fax to a telephone wall jack.
Connect the power
adapter to the power
cord, and then plug
the power cord into
the power outlet.
.
5
.
7
Connect additional office equipment (optional)
.
Turn on your HP Fax
This diagram shows a possible configuration for connecting
additional office equipment.
For each piece of office equipment you are connecting to
the HP Fax, remove a plastic tab from the phone/fax
connector.
8
Insert black print cartridge
a
Raise the top cover up and back. The
print-cartridge carriage moves to the
middle of the access area.
b
Raise both latches on the
print carriage.
c
c
Remove the black print cartridge (thinner
one) from its packaging and, being careful to
touch only the black plastic, gently remove
both the green pull tab and the blue tape
covering the nozzles.
d
Push the black print cartridge firmly
down into the slot on the right. As you
insert the cartridge, make sure the
label is facing you.
CAUTION:
Do not touch
or remove
the goldcolored
contacts.
For the latest product information, go to:
www.hp.com
e
Lower the right print-cartridge
latch down onto the top of the
cartridge, and push down until
the latch locks firmly into place.
Turn over to continue.
C8461-90111
2
Unpack your HP Fax
*C8461-90111*
*C8461-90111*
1
Side 1 of 2
HP Fax 1200 Series Setup Poster
9
10
.
Insert color print cartridge
a
Remove the color print cartridge (wider
one) from its packaging and, being careful
to touch only the black plastic, gently
remove both the green pull tab and the
blue tape covering the nozzles.
b
Push the color print cartridge firmly down into
the slot on the left. Lower the left print-cartridge
latch down onto the top of the cartridge, and
push down until the latch locks firmly into place.
Close the top cover.
CAUTION:
Do not touch
or remove
the goldcolored
contacts.
11
.
Make sure paper is
loaded in your HP Fax.
The message “Press
ENTER to Align
Cartridges” appears in
the display. Press the
ENTER key to enable
the HP Fax to perform
the alignment. After a
page prints, the
alignment is complete.
a
If prompted on the
display, enter the code
for your country on the
keypad, and then
confirm your selection.
b
If prompted, enter the code
for your language on the
keypad, and then confirm
your selection.
Keypad
Display
Set up faxing
Keypad
ENTER
In the U.S., you must enter your name and fax number.
Menu
a
.
To enter the date, press Menu, then 5, and then 1. Use the keypad to enter the
date. When the correct number appears, press the right arrow key to move to the
next position. For the year, enter the last two digits. After you are finished, press
ENTER.
b
To enter your name and fax number, press Menu, then 5, and then 2.
Use the keypad to enter your fax header information.
ABC
2
Recycle or discard the alignment
page.
13
Select your country and language
12
Print an alignment page
Side 2 of 2
Each number corresponds to both upper and lower case letters. For example, if
your name is Brian, press the 2 key three times for an uppercase B. When the
correct letter appears, press the right arrow key. After you are finished, press
ENTER. Enter the fax number, and then press ENTER.
Refer to the Basic Guide for information on other fax settings.
.
You can now copy and fax with your new HP Fax
Look in the Basic
Guide for
information on how
to get started using
your HP Fax.
Copyright Hewlett-Packard Company 2000.
Printed in the USA, Germany, or Singapore.
For troubleshooting, refer to the HP Fax 1200 Series: Your Basic Guide. Save this
poster for future reference.