1
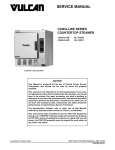
V1401 MIXER
M802CE & V1401CE MIXERS
MODELS
M802CE
ML-134275
V1401CE
ML-134279, 134283
HOBART INTERNATIONAL, INC.
701 S. RIDGE AVENUE
TROY, OHIO 45374-0001
FORM 34914 (Mar. 2004)
Net Weight 512 kg
Shipping Weight 548 kg
M802CE
Net Weight 714 kg
Shipping Weight 754 kg
V1401CE
Standard Mixers
INSTALLATION
OPERATION
–2–
MAINTENANCE
CONTENTS.
SAFETY INFORMATION . . . . . . . . . . . . . . . . . . . . . . . . . . . . . . . . . . . . . . . . . . . . . . . . . . . . . 4
WARNING SYMBOLS . . . . . . . . . . . . . . . . . . . . . . . . . . . . . . . . . . . . . . . . . . . . . . . . . . . . . . . 4
LIABILITY . . . . . . . . . . . . . . . . . . . . . . . . . . . . . . . . . . . . . . . . . . . . . . . . . . . . . . . . . . . . . . . . . 4
HYGIENE . . . . . . . . . . . . . . . . . . . . . . . . . . . . . . . . . . . . . . . . . . . . . . . . . . . . . . . . . . . . . . . . . 5
FOREWORD . . . . . . . . . . . . . . . . . . . . . . . . . . . . . . . . . . . . . . . . . . . . . . . . . . . . . . . . . . . . . . 5
GENERAL INFORMATION . . . . . . . . . . . . . . . . . . . . . . . . . . . . . . . . . . . . . . . . . . . . . . . . . . . 5
INSTALLATION . . . . . . . . . . . . . . . . . . . . . . . . . . . . . . . . . . . . . . . . . . . . . . . . . . . . . . . . . . . . 6
Unpacking . . . . . . . . . . . . . . . . . . . . . . . . . . . . . . . . . . . . . . . . . . . . . . . . . . . . . . . . . . . 6
Location . . . . . . . . . . . . . . . . . . . . . . . . . . . . . . . . . . . . . . . . . . . . . . . . . . . . . . . . . . . . 6
Before First Use . . . . . . . . . . . . . . . . . . . . . . . . . . . . . . . . . . . . . . . . . . . . . . . . . . . . . . 7
Electrical Supply and Connection . . . . . . . . . . . . . . . . . . . . . . . . . . . . . . . . . . . . . . . . 7
Check Rotation (Three-Phase Machines Only) . . . . . . . . . . . . . . . . . . . . . . . . . . . . . 7
OPERATION . . . . . . . . . . . . . . . . . . . . . . . . . . . . . . . . . . . . . . . . . . . . . . . . . . . . . . . . . . . . . . . 8
Electro-Mechanical Timer Controls . . . . . . . . . . . . . . . . . . . . . . . . . . . . . . . . . . . . . . . 8
Changing Speeds . . . . . . . . . . . . . . . . . . . . . . . . . . . . . . . . . . . . . . . . . . . . . . . . . . . . . 9
Power Bowl Lift . . . . . . . . . . . . . . . . . . . . . . . . . . . . . . . . . . . . . . . . . . . . . . . . . . . . . . . 9
Mixing . . . . . . . . . . . . . . . . . . . . . . . . . . . . . . . . . . . . . . . . . . . . . . . . . . . . . . . . . . . . . 10
Cleaning . . . . . . . . . . . . . . . . . . . . . . . . . . . . . . . . . . . . . . . . . . . . . . . . . . . . . . . . . . . 15
MAINTENANCE . . . . . . . . . . . . . . . . . . . . . . . . . . . . . . . . . . . . . . . . . . . . . . . . . . . . . . . . . . . 16
Lubrication . . . . . . . . . . . . . . . . . . . . . . . . . . . . . . . . . . . . . . . . . . . . . . . . . . . . . . . . . 16
Adjustments . . . . . . . . . . . . . . . . . . . . . . . . . . . . . . . . . . . . . . . . . . . . . . . . . . . . . . . . 17
FAULT FINDING . . . . . . . . . . . . . . . . . . . . . . . . . . . . . . . . . . . . . . . . . . . . . . . . . . . . . . . . . . . 19
SERVICE INFORMATION AND ADDRESSES . . . . . . . . . . . . . . . . . . . . . . . . . . . . . . . . . . . 20
–3–
SAFETY INFORMATION.
The information in this manual has been prepared to assist the operator to understand,
maintain and operate the M802CE and V1401CE Mixers. Before installation or operating
for the first time, this manual must be studied to obtain a clear understanding of the mixer
and its capabilities.
To prevent accidents, read, understand and follow all the precautions and warnings
contained in this manual before operating or carrying out any of the cleaning/maintenance
operations. For warning information see the section below and the sections on
INSTALLATION, OPERATION, and MAINTENANCE. The procedures and precautions
contained in this manual are understood to apply to the machinery only when it is used
in the authorized manner. If the machinery is used other than in the authorized manner,
the operator will be responsible for his/her own safety and for the safety of the other
persons who may be involved.
• Ensure this manual is kept in an easily accessible place near the mixer for future
reference .
• All operators must be trained in the safe operation of the mixer.
• Do not remove any covers or loosen any fittings while the mixer is operating.
• Ensure the electrical supply has been isolated before attempting to service or move
the mixer.
• Rotating machinery and electricity are potentially hazardous and may cause injury
if sufficient precautions are not taken prior to operating or servicing the machine.
• Always have your mixer regularly serviced at least twice a year, depending on the
frequency of use.
• Do not hose or pressure clean this appliance. Follow the cleaning instructions
detailed in this manual.
WARNING SYMBOLS.
To identify the safety messages in this manual, the following symbols have been used:
The “Warning” symbol is found primarily where the corresponding
information is important for the safe use of the machinery.
The electrical hazard symbol is used when there are risks of an electrical
nature. Prior to cleaning or servicing the machinery, always disconnect
the power cable from the main supply.
LIABILITY.
Installations and repairs which are not carried out by authorized technicians or the
use of non-original spare parts, or any technical alterations to the machine, may
affect the warranty set out in the standard conditions of sale. This does not affect your
statutory rights. Continued product improvement is a Hobart policy; therefore,
specifications may change without notice.
–4–
HYGIENE.
It is the responsibility of the mixer operator to maintain the machine in a clean
condition to the highest standards of hygiene to prevent the formation of harmful
bacteria. Regular attention and cleaning will achieve this result.
A good standard of personal hygiene is important for mixer operators. Hair and
clothing must be neat and clean. Hands and fingernails must be thoroughly washed
before work commences. Jewelry should not be worn.
FOREWORD.
Hobart reserves the right to alter the design of its products without prior notice. While
every effort is made to ensure this publication reflects the latest design, the
Company cannot guarantee full compliance.
Take pride in your mixer keep it clean and in good mechanical and electrical
condition.
The information and instructions contained in this manual may not cover all details
or variations in the equipment, nor provide for every eventuality that may arise with
installation, operation or maintenance. If additional information is required, please
contact your local Hobart sales office.
GENERAL INFORMATION.
The M802CE model mixer (400 Volt / 50 Hertz / 3 Phase) is a heavy-duty 80-quart
(75.7 L) mixer with a 3 horsepower (2.2 kW) motor and an electro-mechanical timer
as standard equipment. Other standard features include a clutch and a power bowl
lift. With the use of bowl adapters and special agitators, 30-, 40-, or 60-quart (28.4,
37.9, or 56.8 L) bowls may be used on the M802CE. This mixer is also available with
a 14" (35.6 cm) higher than standard pedestal.
The V1401CE model mixer is a heavy duty 140-quart (132.5 L) mixer with a
5 horsepower (3.7 kW) motor and an electro-mechanical timer as standard equipment.
Other standard features include a clutch and a power bowl lift. With the use of bowl
adapters and special agitators, 30-, 40-, 60-, or 80-quart (28.4, 37.9, 56.8, or 75.7 L)
bowls may be used on the V1401CE. This mixer is also available with a 17" (43 cm)
higher than standard pedestal.
The Bowl Guard is standard equipment on all M802CE and V1401CE models.
These mixers can be ordered with deluxe finish, which includes a chrome-plated
transmission case and planetary, and an unpainted top cover.
A variety of accessories are available for all mixers. These are described in a
separate Use and Applications Handbook which is furnished with each mixer.
–5–
INSTALLATION.
Prior to installation, verify that the electrical service agrees with the specifications on the
machine data plate.
UNPACKING.
Immediately after unpacking the mixer, check for possible shipping damage. If this
machine is found to be damaged, save the packaging material and contact your nearest
Hobart sales office.
LOCATION.
Place the mixer in its operating location. There should be adequate space around the
mixer for the user to operate the controls and install and remove bowls. The area above
the mixer should allow the top cover to be removed for routine maintenance and
servicing.
Holes are provided in the base for permanent bolting to the floor in normal installation.
Once located, the mixer must be leveled.
• Remove the top cover screws and the top cover.
• Place a level on the machined surface of the transmission case (Fig. 1) and slide
shims under the legs (base) of the mixer as required to level it front-to-back and sideto-side.
• Do not replace the top cover until installation is completed.
Fig. 1
–6–
BEFORE FIRST USE.
Lubrication
This mixer is shipped with oil in the transmission and planetary. Check oil levels before
starting mixer. Refer to LUBRICATION, pages 16 and 17, for applicable lubrication
procedures.
Cleaning
New mixer bowls and agitators (beaters, whips, and dough arms) should be thoroughly
washed with hot water and a mild soap solution, rinsed with either a mild soda or vinegar
solution, and thoroughly rinsed with clear water BEFORE being used. This cleaning
procedure should also be followed for bowls and agitators before whipping egg whites
or whole eggs.
ELECTRICAL SUPPLY AND CONNECTION.
The electrical installation of the mixer must be in accordance with the
current edition of the IEE regulations for electrical equipment in buildings,
Electricity at Work Act 1989 and must conform to the requirements of the
Local Electricity Board.
Disconnect main electrical power supply to the machine before working
on the machine. Place a tag at the main disconnect switch to indicate
that you are working on the circuit.
A threaded hole for 3/4" (19 mm) trade size conduit is located at the top of the pedestal.
Make electrical connections according to the wiring diagram located on the inside of the
Top Cover.
CHECK ROTATION (Three-Phase Machines Only).
Three-phase machines must be connected so the planetary rotates in the direction of
the arrow on the Drip Cup. To check rotation:
•
Set the gear shift lever on 1.
• Apply power to the mixer. Set the Electro-Mechanical Timer on HOLD. Place the
Bowl Support all the way up. Set the speed on 1. Position the clutch on RUN.
Momentarily run the machine by pushing the START button and then the STOP
button.
• If rotation is incorrect, disconnect main electrical power supply and
interchange any two of the incoming power supply leads.
–7–
OPERATION.
MOVING BEATER IN BOWL, KEEP HANDS, CLOTHING, AND
UTENSILS OUT WHILE IN OPERATION. DO NOT USE WITHOUT
INTERLOCKED GUARD.
Every M802CE and V1401CE mixer is equipped with an Electro-Mechanical Timer
Control (described below). Also, become familiar with the other operating parts (Fig. 2)
and their functions, which are referenced throughout the OPERATION section of this
manual.
The Bowl Guard must be in position or the mixer will not operate. Refer to page 11.
If the Bowl Support is not all the way up, the mixer will not operate unless the START
button is held in.
Fig. 2
ELECTRO-MECHANICAL TIMER CONTROLS.
The START button is used to start the mixer.
The STOP button is used to stop the mixer.
–8–
The TIMER is used in conjunction with the START button for timed mixing operations
and will stop the mixer when a preset time has elapsed.
For timed mixing — Place the clutch lever on STOP and set the gear shift lever at the
desired speed. Set the timer at the desired time and press the START button to start
the motor. Move the clutch lever to RUN to start mixing. (Clutch Lever and Gear Shift
Lever are described below under CHANGING SPEEDS.)
For non-timed mixing — Place the clutch on STOP and set the gear shift lever at the
desired speed. Set the timer on HOLD. Press the START button to start the motor and
move the clutch lever to RUN to start mixing. To stop the mixer, move the clutch lever
to STOP and press the STOP button.
CHANGING SPEEDS.
The Clutch Lever is used when changing speeds. Moving the Clutch Lever to STOP
disengages the clutch and activates a brake which stops the planetary. The motor will
continue to run with the Clutch Lever on STOP unless the STOP button is pressed.
The Gear Shift Lever is used to change speeds. To change speeds, disengage the
clutch by moving the Clutch Lever to STOP. The brake is automatically actuated. When
the agitator shaft has stopped, move the Gear Shift Lever to the desired speed. Make
sure the Gear Shift Lever lines up with the number on the shifter plate — never position
the handle between numbers. Place the Clutch Lever on RUN to continue operation.
POWER BOWL LIFT.
Before lowering the bowl onto a bowl truck, always unlock both bowl
clamps.
The Power Bowl Lift Lever is used to raise or lower the bowl while the motor is running.
The Wire Cage Assembly must be in the front-center position. If the Clutch Lever is in
the RUN position, the Planetary and Agitator will be mixing at the speed indicated by the
position of the Gear Shift Lever (this may be required by recipe). If the Clutch Lever is
on STOP, the Planetary and Agitator will not be mixing. The Electro-Mechanical Timer
will allow the mixer to operate if it is on HOLD or if time is set on the timer. Press and
hold the START button and move the Power Bowl Lift Lever clockwise to raise the bowl
or counterclockwise to lower it. An overload slip clutch will ratchet at the top and bottom
stop positions to signal end of travel and protect the operating mechanism.
On new machines, the power bowl lift lever may need to be manually returned to the
center neutral position until parts are broken-in.
–9–
MIXING.
This section explains operation of the mixer and how to install bowls and agitators. A
separate Use and Applications Handbook, provided with the mixer, contains information
on mixing procedures and outlines specific uses for agitators and accessories.
Bowl
The bowl must be installed before the agitator. To install the bowl, fully lower the bowl
support. Position the bowl so the alignment bracket on the back of the bowl is under the
retainer on the bowl support and the alignment pins on the front of the bowl support fit
in the holes in the bowl. Lock the bowl in place by rotating the bowl clamps over the ears
of the bowl.
If a bowl adapter is required, install it on the bowl support as you would the bowl, and
then install the bowl on the adapter.
Agitator
To install an agitator, the bowl must be installed and fully lowered. Place the agitator
in the bowl, push it up on the agitator shaft, and turn it clockwise to seat the shaft pin
in the slot of the agitator shank.
Bowl Guard (Built Before July, 2004) (Fig. 3)
The Wire Cage Assembly on the Bowl Guard can be rotated out of the way to add
ingredients or access the bowl and agitator. Some ingredients, such as liquids or
powders, may be added through the wire cage assembly while the mixer is in operation.
An ingredient chute accessory is available to assist in adding ingredients. Contact your
local Hobart Sales representative for more information.
Fig. 3
– 10 –
To Rotate the Wire Cage Assembly to the Rear . . .
Push the Latch in to release the Centering Pin from the Centering Ramp. Note how the
grooves on the nylon Retainers allow the Wire Cage to ride around the circular Ridge
on the planetary Drip Cup. The Wire Cage can rotate 360° to the left or right. When the
Wire Cage returns to the front-center position, the Centering Pin is captured and held
by the Centering Ramp, restricting rotation of the Wire Cage until the Latch is pressed
again.
The Wire Cage must be in the front-center position for the mixer to operate.
To Remove the Wire Cage Assembly for Cleaning . . .
Lower the Bowl. Rotate the Wire Cage to the rear. Remove both Agitator and Bowl.
Return the Wire Cage to the front.
While holding the Wire Cage securely with both hands, use your thumb to push down
on the Black Release Knob. Lower and remove the Wire Cage. Wash it in a sink, rinse
with clear water and dry with a clean cloth.
The stainless steel Splash Guard can be wiped off or washed easily with a cloth or
sponge and warm soapy water. Rinse with clear water. Dry with a clean cloth.
To Reinstall the Wire Cage Assembly . . .
Hold the Wire Cage so its top ring is positioned around the planetary Drip Cup with the
grooves in both nylon Rear Retainers straddling the Ridge on the Drip Cup. Push in the
Front-Center Retainer until it stays in and so that it’s grooves also straddle the Ridge
on the Drip Cup. The Wire Cage is properly assembled when all three Retainers
straddle the Ridge on the Drip Cup in the three opposed locations.
Rotate the Wire Cage out of the way to install or remove the Agitator and Bowl or to add
ingredients.
Return the Wire Cage to its front-center position to operate the mixer.
– 11 –
WIRE CAGE ASSEMBLY (Built After July, 2004) (Fig. 4)
The Wire Cage assembly can be rotated out of the way to add ingredients or to access
the bowl and agitator. Some ingredients, such as liquids or powders, may be added
through the Wire Cage assembly while the mixer is in operation. An ingredient chute
accessory is available to assist in adding ingredients. Contact your local Hobart Sales
representative for more information.
Note how the grooves on the nylon retainer shoes allow the Wire Cage to ride around
the Circular Ridge of the Planetary Drip Cup.
•
To open the Wire Cage assembly, rotate it to your left.
•
To close the Wire Cage assembly, rotate it to your right until it stops in the FrontCenter Position.
NOTE: The Wire Cage assembly must be returned to the Front-Center Position for the
mixer to operate.
Fig. 4
– 12 –
To Remove Wire Cage Assembly (Fig. 5)
1. Lower the bowl. Remove the accessory and bowl.
2. While holding the wire cage securely with both hands, rotate it to your left until the
front-center retainer shoe reaches the gap in the circular ridge on the planetary
drip cup.
3. Lower the front of the wire cage and move the wire cage assembly slightly to the
rear so the rear retainer shoes clear the ridge of the drip cup. The Wire Cage
assembly can now be removed.
Fig. 5
4. Wash the Wire Cage assembly in a sink, rinse with clear water and dry with a clean
cloth.
5. The stainless steel Splash Guard can be wiped off and/or washed with a cloth or
sponge using warm, soapy water. Rinse with clear water and dry with a clean cloth.
To Reinstall Wire Cage Assembly
1. Position the ring of the Wire Cage assembly so the Front-Center Retainer Shoe
is lined up with the gap in the Circular Ridge on the Planetary Drip Cup.
2. Position the grooves so the rear retainer shoes straddle the Circular Ridge on the
Planetary Drip Cup.
3. Lift the front of the Wire Cage assembly so the Front-Center Retainer Shoe passes
up through the gap in the Circular Ridge on the Planetary Drip Cup.
4. Rotate the Wire Cage assembly to your right until all three retainer shoes straddle
the ridge on the Drip Cup in the three opposed locations.
5. Continue rotating the Wire Cage assembly so the opening is to the front of the
mixer (to install the accessory) or until it stops at the Front-Center Position (Fig 6).
– 13 –
M802CE/V1401CE MIXER CAPACITY CHART.
Recommended Maximum Capacities — dough capacities based on 21°C and 12% flour moisture.
AGITATORS SUITABLE
FOR OPERATION
PRODUCT
M802CE
V1401CE
76 L
132 L
CAPACITY OF BOWL (LITERS LIQUID)
KITCHEN CAPACITIES —SINGLE BATCHES
Egg Whites
Mashed Potatoes
D
2L
4L
B&C
27 kg
45 kg
Mayonnaise (Qty. of Oil)
B or C or D
28 L
47 L
Meringue (Qty. of Water)
D
3L
5L
Waffle or Hot Cake Batter
B
30 L
—
D or C
15 L
28 L
Whipped Cream
BAKERY CAPACITIES —SINGLE BATCHES
Cake, Angel Food (0.2 to 0.3 kg cake)
C or I
60
120
Cake, Box or Slab
B or C
45 kg
84 kg
Cake, Cup
B or C
41 kg
75 kg
Cake, Layer
B or C
41 kg
75 kg
B
45 kg
84 kg
Cake, Short (Sponge)
Cake, Pound
C or I
36 kg
68 kg
Cake, Sponge
C or I
29 kg
64 kg
Cookies, Sugar
B
27 kg
45 kg
ED
77 kg *
95 kg *
ED
64 kg *
79 kg *
B&P
34 kg
57 kg
ED
39 kg =
61 kg =
Dough, Bread or Roll (Lt.-Med.)
60% AR
§
Dough, Heavy Bread 55% AR
§
Dough, Pie
Dough, Thin Pizza 40% AR
(max. mix time 5 min.)
§‡
Dough, Med. Pizza 50% AR
§‡
ED
70 kg =
86 kg =
Dough, Thick Pizza 60% AR
§‡
ED
70 kg *
86 kg *
Dough, Raised Donut 65% AR
ED
27 kg †
45 kg †
Dough, Whole Wheat 70% AR
ED
68 kg *
84 kg
Eggs & Sugar for Sponge Cake
B & C or I
18 kg
34 kg
B
29 kg
45 kg
Icing, Fondant
Icing, Marshmallow
Shortening & Sugar, Creamed
Pasta, Basic Egg Noodle
(max. mix time 5 min.)
=
*
†
§
‡
•
C or I
5 kg
9 kg
B
29 kg
54 kg
ED
29 kg = •
45 kg •
1st SPEED
2nd SPEED
3rd SPEED
If high gluten flour is used, reduce above dough batch size by 10%.
The M802CE and V1401CE require a 50% reduction in batch size to mix in speed 2 with 50% or less AR doughs.
This application may require an extended column.
NOTE: % AR (% Absorption Ratio) = water weight divided by flour weight. Capacity depends on moisture content of dough. Above
capacities based on 12% flour moisture at 21°C water temperature. Colder water temperatures require reduction in loads. Use
of ice requires a reduction in batch size.
ABBREVIATIONS - AGITATORS SUITABLE FOR OPERATION
B
Flat Beater
C
Wing Whip (4-Wing: 11 thru 28 L., 6-Wing: 38 thru 132 L.)
D
Wire Whip
ED Dough Arm (19 thru 132 L.)
I
Heavy-Duty Wire Whip (28 thru 132 L.)
P
Pastry Knife
– 14 –
Mixer Speeds
Speed 1 (Low) — This speed is for heavy mixtures such as pizza dough, heavy batters,
and potatoes.
Speed 2 (Medium-low) — This speed is for mixing cake batters, mashing potatoes, and
developing bread dough.
Speed 3 (Medium-high) — This speed is for incorporating air into light batches, as well
as finishing whipped items.
Speed 4 (High) — This speed is for maximum and accelerated air incorporation into light
batches.
CLEANING.
Before any cleaning procedure, disconnect main electrical power supply
to the machine. Place a tag at the main disconnect switch to indicate
that you are working on the machine.
A flat scraper is furnished to aid in cleaning bowls and agitators.
The mixer should be throughly cleaned daily. DO NOT use a hose to clean the mixer
— it should be washed with a clean damp cloth. The base allows ample room for
cleaning under the mixer. The apron may be removed by loosening the thumb screws.
The Drip Cup-Splash Guard (which is secured by three screws) should be removed
periodically and wiped clean.
For cleaning the Bowl Guard (including both Wire Cage Assembly and Splash Guard),
refer to applicable pages 10 through 13.
– 15 –
MAINTENANCE.
Before performing any maintenance on the mixer, disconnect main electrical
power supply to the machine. Place a tag at the main disconnect switch
to indicate that you are working on the machine.
LUBRICATION.
Planetary
The planetary oil should be checked periodically. To check, DISCONNECT
MAIN ELECTRICAL POWER SUPPLY and remove the Drip Cup-Splash
Guard, which is secured by three screws. Remove the Planetary Fill Plug
(Fig. 6). Oil should be even with the bottom of the fill plug hole. If it is not,
slowly add the recommended planetary lubricant until it is. Replace the fill
plug and the Drip Cup-Splash Guard.
Fig. 6
A Planetary Drain Plug (Fig. 6) is located on the bottom of the planetary. Should
draining become necessary, remove the Drip Cup-Splash Guard and place a suitable
catch pan under the drain plug. Remove the drain plug, allow the oil to completely drain,
and replace the drain plug. Remove the fill plug and pour in 6 fluid ounces (177 mL) of
the recommended planetary lubricant. Replace the Panetary Fill Plug and the Drip CupSplash Guard. Contact your local Hobart Service Centre for the recommended
planetary lubricant.
Planetary Seal
Occasionally, the Planetary Seal (Fig. 6) may become dry and begin to squeak. To
correct this, work a little lubrication under the lip of the seal.
– 16 –
Transmission
The transmission oil should be even with the line on the Oil Level Gauge
when the motor is NOT running. If the oil falls below this line, DISCONNECT
MAIN ELECTRICAL POWER SUPPLY and remove the Top Cover, which
is secured by two screws. Remove the Transmission Fill Plug (Fig. 7) and
add a small amount of the recommended transmission oil until it returns
to the proper level. DO NOT overfill the transmission, as leakage may
result. Contact your local Hobart Service Centre for the recommended
transmission oil.
Bowl Lift
The bowl clamp area of the bowl support, the slideways, and lift screw should be
lubricated two or three times per year, depending on use. To reach these areas, loosen
the thumb screws securing the apron and remove the apron. Remove the inner apron
by removing its screws.
Slideway Oilers (Fig. 6) are provided for lubricating the bowl lift slideways — use
Lubriplate FMO-200-AW oil (supplied).
The Lift Screw (Fig. 6) is lubricated with the bowl lift fully lowered by applying a thin
coat of Lubriplate 630AA (supplied).
Replace both aprons.
Fig. 7
ADJUSTMENTS.
Bowl Clamps
The height of the bowl clamp is controlled by a spring washer and locknut, which are
located on the bottom of the bowl support. Turning the locknut clockwise will loosen the
clamp, counterclockwise will tighten it. If repeated adjustments are necessary,
additional service is indicated. Contact your local Hobart Service Centre.
– 17 –
ADJUSTMENTS. Continued
Agitator Clearance
The agitator clearance should be checked with each bowl change. The agitator must
not touch the bowl and the maximum clearance between the bottom of the bowl and the
B Flat Beater is 1/8" (3.2 mm); the maximum clearance between the bottom of the
bowl and the E or ED Dough Arm is 5/16" (7.9 mm).
Install a Bowl and Agitator. If the Bowl and Beater come into contact before the Bowl
Support reaches its stop, adjust the Stop Screw upwards following the procedure below.
To Measure the Clearance . . .
Pour enough flour in the bowl to cover the bottom of the bowl where the beater travels.
With the bowl fully raised, briefly run the mixer in speed 1.
Turn off the mixer, DISCONNECT MAIN ELECTRICAL POWER SUPPLY,
and measure the depth of flour where the beater has traced a path. This
measurement should be taken at several points around the bowl to
ensure accuracy.
To Adjust Bowl / Agitator Clearance . . .
• Remove the Apron (which is secured by four thumbscrews).
• Loosen the Locking Nut on the Stop Screw (Fig. 8). Turn the Stop Screw
counterclockwise to increase the clearance or clockwise to decrease the clearance.
• Tighten the Locking Nut while holding the Stop Screw.
• After adjustments are made, replace the Apron.
• Reconnect the main electrical power supply.
• Carefully operate the bowl lift several times to check the adjustment.
Fig. 8
– 18 –
FAULT FINDING.
Fault
Machine fails to start.
Motor starts but shaft
fails to turn.
Agitator touches bowl.
Possible Cause
Remedy
Blown fuse or circuit breaker
open.
Check and replace faulty fuse.
Bowl support is not in the
correct operating position.
Place bowl in up position.
Bowl guard is not in the correct
operating position.
Place guard in front and
center position.
Speed selection lever is not in
correct operating position.
Set to required speed
position.
Check gear lever position. If
not correctly engaged, mixer
will not start.
Move gear lever to desired
speed.
Check that electrical supply is
switched on.
Plug in and switch on.
Mixer is overloaded.
Decrease amount of load.
Machine still fails to operate.
Call local service centre.
Gear selection lever is
incorrectly positioned.
Move to the correct speed.
Planetary shaft still fails to turn.
Call local service centre.
Bowl clamp(s) are not closed.
Close bowl clamp(s).
Improper agitator clearance.
See MAINTENANCE for
adjustment procedure.
Bowl clamp(s) are improperly
adjusted.
See MAINTENANCE for
adjustment procedure.
Planetary seal squeaks. Seal requires occasional
lubrication.
– 19 –
See MAINTENANCE.
SERVICE INFORMATION AND ADDRESSES.
SERVICING SHOULD BE CARRIED OUT BY A COMPETENT
HOBART TRAINED PERSON.
For further details, contact your local regional office.
France
Germany
UK
Sales
0164-116090
0781-202-0
07002-101-101
Service
0164-116076 0180-3456-258
07002-202-202
Spares
0164-116133
07002-303-303
FORM 34914 (Mar. 2004)
0781-202-0
– 20 –
Other