1
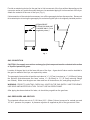
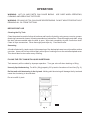
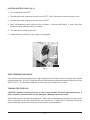
MODEL EFO40
GAS FRYER
ML-52051
ML-52074
701 S. RIDGE AVENUE
TROY, OHIO 45374-0001
FORM 16903, Rev. E (3-98)
IMPORTANT FOR YOUR SAFETY
THIS MANUAL HAS BEEN PREPARED FOR PERSONNEL QUALIFIED TO INSTALL GAS
EQUIPMENT, WHO SHOULD PERFORM THE INITIAL FIELD START-UP AND
ADJUSTMENTS OF THE EQUIPMENT COVERED BY THIS MANUAL.
POST IN A PROMINENT LOCATION THE INSTRUCTIONS TO BE FOLLOWED IN THE
EVENT THE SMELL OF GAS IS DETECTED. THIS INFORMATION CAN BE OBTAINED
FROM THE LOCAL GAS SUPPLIER.
IMPORTANT
IN THE EVENT A GAS ODOR IS DETECTED, SHUT
DOWN UNITS AT MAIN SHUTOFF VALVE AND
CONTACT THE LOCAL GAS COMPANY OR GAS
SUPPLIER FOR SERVICE.
FOR YOUR SAFETY
DO NOT STORE OR USE GASOLINE OR OTHER
FLAMMABLE VAPORS OR LIQUIDS IN THE
VICINITY OF THIS OR ANY OTHER APPLIANCE.
WARNING
IMPROPER INSTALLATION, ADJUSTMENT,
ALTERATION, SERVICE OR MAINTENANCE CAN
CAUSE PROPERTY DAMAGE, INJURY OR DEATH.
READ THE INSTALLATION, OPERATING AND
MAINTENANCE INSTRUCTIONS THOROUGHLY
BEFORE INSTALLING OR SERVICING THIS
EQUIPMENT.
IN THE EVENT OF A POWER FAILURE, DO NOT
ATTEMPT TO OPERATE THIS DEVICE.
© HOBART CORPORATION, 1994
–2–
TABLE OF CONTENTS
GENERAL. . . . . . . . . . . . . . . . . . . . . . . . . . . . . . . . . . . . . . . . . . . . . . . . . . . . . . . . . . . . . . . . . . . . . . 4
INSTALLATION . . . . . . . . . . . . . . . . . . . . . . . . . . . . . . . . . . . . . . . . . . . . . . . . . . . . . . . . . . . . . . . . . 4
Unpacking . . . . . . . . . . . . . . . . . . . . . . . . . . . . . . . . . . . . . . . . . . . . . . . . . . . . . . . . . . . . . . . . 4
Location . . . . . . . . . . . . . . . . . . . . . . . . . . . . . . . . . . . . . . . . . . . . . . . . . . . . . . . . . . . . . . . . . 4
Installation Codes and Standards . . . . . . . . . . . . . . . . . . . . . . . . . . . . . . . . . . . . . . . . . . . . . 5
Assembly . . . . . . . . . . . . . . . . . . . . . . . . . . . . . . . . . . . . . . . . . . . . . . . . . . . . . . . . . . . . . . . . 5
Gas Connection . . . . . . . . . . . . . . . . . . . . . . . . . . . . . . . . . . . . . . . . . . . . . . . . . . . . . . . . . . . 6
Gas Pressures and Orifices. . . . . . . . . . . . . . . . . . . . . . . . . . . . . . . . . . . . . . . . . . . . . . . . . . 6
Leveling . . . . . . . . . . . . . . . . . . . . . . . . . . . . . . . . . . . . . . . . . . . . . . . . . . . . . . . . . . . . . . . . . 7
Flue and Hood Requirements . . . . . . . . . . . . . . . . . . . . . . . . . . . . . . . . . . . . . . . . . . . . . . . . 7
OPERATION . . . . . . . . . . . . . . . . . . . . . . . . . . . . . . . . . . . . . . . . . . . . . . . . . . . . . . . . . . . . . . . . . . . 8
Before First Use . . . . . . . . . . . . . . . . . . . . . . . . . . . . . . . . . . . . . . . . . . . . . . . . . . . . . . . . . . . 8
Filling the Fry Tank with Liquid Shortening . . . . . . . . . . . . . . . . . . . . . . . . . . . . . . . . . . . . . 8
Lighting Insructions . . . . . . . . . . . . . . . . . . . . . . . . . . . . . . . . . . . . . . . . . . . . . . . . . . . . . . . . 9
Over Temperature Device . . . . . . . . . . . . . . . . . . . . . . . . . . . . . . . . . . . . . . . . . . . . . . . . . . . 9
Turning the Fryer On . . . . . . . . . . . . . . . . . . . . . . . . . . . . . . . . . . . . . . . . . . . . . . . . . . . . . . . 9
Turning the Fryer Off . . . . . . . . . . . . . . . . . . . . . . . . . . . . . . . . . . . . . . . . . . . . . . . . . . . . . . 10
Extended Shutdown . . . . . . . . . . . . . . . . . . . . . . . . . . . . . . . . . . . . . . . . . . . . . . . . . . . . . . . 10
Cooking with the Fryer . . . . . . . . . . . . . . . . . . . . . . . . . . . . . . . . . . . . . . . . . . . . . . . . . . . . . 10
Shortening Hints . . . . . . . . . . . . . . . . . . . . . . . . . . . . . . . . . . . . . . . . . . . . . . . . . . . . . . . . . . 11
Filter Shortening Daily . . . . . . . . . . . . . . . . . . . . . . . . . . . . . . . . . . . . . . . . . . . . . . . . . . . . . 11
Cleaning . . . . . . . . . . . . . . . . . . . . . . . . . . . . . . . . . . . . . . . . . . . . . . . . . . . . . . . . . . . . . . . . 12
MAINTENANCE . . . . . . . . . . . . . . . . . . . . . . . . . . . . . . . . . . . . . . . . . . . . . . . . . . . . . . . . . . . . . . . . 12
–3–
Installation, Operation and Care of
MODEL EFO40 GAS FRYER
SAVE THESE INSTRUCTIONS FOR FUTURE USE
GENERAL
The Model EFO40 Gas Fryer features an accurate thermostat for frying consistency and enhanced oil
life. The efficient gas burner provides prompt quiet ignition. The fry tank has an easy-to-clean interior.
The fryer is furnished with a set of four 6" (152.4mm) adjustable legs, two twin fry baskets, a crumb
screen, clean-out rod, drain pipe, and two filter bags. A set of four casters (two brake and two standard)
and a quick-disconnect device are available as optional accessories.
INSTALLATION
UNPACKING
Immediately after unpacking the fryer, check it for possible shipping damage. If the fryer is found to
be damaged, save the packaging material and contact the carrier within 15 days of delivery.
Prior to installation, verify that the type of gas (natural or propane) agrees with the specifications on
the data plate located on the inside of the door. Also be sure the fryer is built for the installation
elevation.
Do not use the door or its handle to lift or move the fryer.
LOCATION
The equipment area must be free and clear of combustibles. The fryer, when installed, must have
clearance from combustible and non-combustible construction of 6" from the sides and 6" from the back
of the fryer. It must be installed at least 16" (406.4mm) away from any open top flame units. The
installation location must allow adequate clearances for servicing and proper operation.
The fryer may be installed on combustible floors.
The fryer must be installed so that the flow of combustion and ventilation air will not be obstructed.
Adequate clearance for air openings into the combustion chamber must be provided. An adequate
supply of air must be available to allow for that required for combustion of the gas at the fryer burners.
–4–
INSTALLATION CODES AND STANDARDS
Hobart fryers should be installed in accordance with:
In the United States
1. State and local codes.
2. National Fuel Gas Code, ANSI-Z223.1 (latest edition), available from American Gas Association,
Inc. 1515 Wilson Blvd., Arlington, VA 22209.
3. NFPA Standard #96 (latest edition), available from National Fire Protection Association, Batterymarch
Park, Quincy, MA 02269.
In Canada
1. Local codes.
2. CAN/CGA-B149.1 Installation for Natural Gas Burning Appliances and Equipment (latest edition).
3. CAN/CGA-B149.2 Installation for Propane Burning Appliances and Equipment (latest edition), available
from the Canadian Gas Association, 178 Rexdale Blvd., Etobicoke, Ontario, Canada M9W 1R3.
ASSEMBLY
The fryer must be restrained with adequate ties to prevent tipping when installed in order to avoid the
splashing of hot liquid.
Legs
Tilt fryer on its side, being careful to avoid scratching the finish. Thread legs into holes provided on
bottom of fryer. Carefully raise fryer to its normal position and place it in the installing location.
Casters
If casters are assembled to the fryer, the installation must be made using a connector (not supplied by
Hobart) that complies with the Standard for Connectors for Movable Gas Appliances, ANSI-Z21.69
(latest edition), and a quick-disconnect device that complies with the Standard for Quick-Disconnect
Devices for Use With Gas Fuel, ANSI-Z21.41 (latest edition).
Separate instructions for installing casters to the fryer are included with the casters.
–5–
Provide a restraining device for the gas line to limit movement of the fryer without depending on the
connector and/or any quick-disconnect device or its associated piping to limit movement of the fryer.
Attach the restraint at the rear of the fryer (Fig. 1).
If disconnection of the restraint is necessary, turn off the gas supply before disconnection. Reconnect
this restraint prior to turning the gas supply on and returning the fryer to its originally installed position.
STRAIN RELIEF
FITTING FOR GAS LINE
THIS SIDE ONLY. (To be
supplied by others.)
PL-51194
Fig. 1
GAS CONNECTION
CAUTION: Gas supply connections and any pipe joint compound must be resistant to the action
of liquified petroleum gases.
Location of the gas inlet is at the lower left rear of the fryer. A gas shutoff valve must be installed in
the gas line ahead of the fryer, as required by codes.
The gas supply line must be at least the equivalent of 1/2" (12.7mm) iron pipe (or 3/4" (19.05mm) if using
the optional quick-disconnect flex hose, unless 3/4" (19.05mm) to 1/2" (12.7mm) reducing fittings
are utilized). Make sure the pipes are clean and free of obstructions, dirt, and piping compound.
WARNING: PRIOR TO LIGHTING, CHECK ALL JOINTS IN THE GAS SUPPLY LINE FOR LEAKS.
USE SOAP AND WATER SOLUTION. DO NOT USE AN OPEN FLAME.
After piping has been checked for leaks, air should be purged from the gas lines.
GAS PRESSURES AND ORIFICES
The standard orifices are set at 4" (101.6mm) W.C. (Water Column) pressure for natural gas and
10" W.C. pressure for propane. A pressure regulator is supplied as part of the gas control valve.
–6–
LEVELING
After gas connections have been made, place a spirit level on top of the fryer and adjust the legs to
level the fryer front-to-back and side-to-side in the final installed position.
FLUE AND HOOD REQUIREMENTS
Ventilation requirements will vary with each installation and must comply with applicable portions of
NFPA Standard #96, Vapor Removal From Cooking Equipment, and with local codes. Considerations
to be kept in mind include:
Flue connections must not be made directly to the fryer.
Fryer must be located under a hood with an adequate connection to an exhaust duct and with a 6"
extension beyond fryer sides.
Clearance above fryer should be adequate for products of combustion to be removed efficiently.
An 18" minimum clearance should be maintained between the flue vent and the filters of the hood
venting system.
Conditions resulting in cross currents within the kitchen, such as wall fans, open windows next to
the fryer, or fans blowing directly on the fryer, should not be allowed to exist.
To prevent fryer function from being affected by a reduced atmospheric pressure, adequate makeup air should be provided in the kitchen to replace air taken out by the ventilating system.
–7–
OPERATION
WARNING: HOT OIL AND PARTS CAN CAUSE BURNS.
CLEANING AND SERVICING THE FRYER.
USE CARE WHEN OPERATING,
WARNING: SPILLING HOT OIL CAN CAUSE SEVERE BURNS. DO NOT MOVE FRYER WITHOUT
DRAINING ALL OIL FROM THE TANK.
BEFORE FIRST USE
Cleaning the Fry Tank
Clean the protective metal oils from all surfaces and from the fry tank by using a non-corrosive, greasedissolving commercial cleaner, following manufacturer's directions. Rinse thoroughly and drain, using
the drain valve accessible when the door is open. Wipe tank completely dry with a soft clean cloth.
Clean all fryer accessories. Rinse thoroughly and wipe dry. Close drain valve.
Seasoning
All cold-rolled steel fry tanks require light seasoning of the backsplash area to avoid possible surface
corrosion. Use a soft lint-free cloth to apply a thin layer of cooking oil over the entire backsplash area.
This should also be done after every cleaning.
FILLING THE FRY TANK WITH LIQUID SHORTENING
Tank warranty will be voided by improper operation. Turn gas valve off when draining or filling.
Use only liquid shortening. For 40-lb (18kg) capacity, fill fry tank to line above oil level line (Fig. 2).
Do Not melt solid shortening in the fry tank. Melting solid shortening will damage the fry tank and
cause the shortening to be scorched.
Do not overfill fry tank.
FILL TO THIS LINE
COLD ZONE
PL-40675-1
Fig. 2
–8–
LIGHTING INSTRUCTIONS (Fig. 3)
1. Turn thermostat knob OFF.
2. Depress gas valve extension arm and turn to OFF. Wait 5 minutes for unburned gas to vent.
3. Depress gas valve extension arm and turn to PILOT.
4. While still depressing arm, light pilot with a lit taper. Continue with Steps 2, 3, and 4 until pilot
remains lit when extension arm is released.
5. Turn gas valve extension arm ON.
6. Repeat above procedures if gas supply is interrupted.
Thermostat
Knob
Gas Valve
Extension Arm
PL-40676-1
Fig. 3
OVER TEMPERATURE DEVICE
If the shortening becomes overheated, a high temperature shutoff device will turn the gas valve off and
extinguish the pilot. DO NOT relight the pilot until the shortening temperature has lowered to at least
300°F (149°C). If the situation persists, contact your local Hobart service office.
TURNING THE FRYER ON
CAUTION: Before turning the burners on, the fry tank must be filled with liquid shortening. If
this is not done, the tank walls can be damaged. Warpage can cause leaks.
Set the thermostat to the desired temperature. When the set temperature is reached, the gas control
shuts off gas flow to the burners while the pilot remains lit. If cold food is introduced and the oil
temperature falls, the burners will come on to maintain the temperature.
–9–
TURNING THE FRYER OFF
1. Turn thermostat OFF.
2. Turn gas valve extension arm to PILOT. In this position, the pilot continues to burn.
3. To shut off all gas to the system, including the pilot, turn gas valve extension arm to OFF.
Extended Shutdown
1. Turn manual gas shutoff valve OFF.
2. Turn thermostat OFF.
3. Turn gas valve extension arm to OFF.
COOKING WITH THE FRYER
Preparation
•
Bring fryer up to temperature.
•
Prepare raw, wet foods by draining and wiping dry to minimize spatter.
•
For uniform doneness, keep all food for a basket the same size.
•
When using baskets, keep food at maximum of 11/2 (680g) pounds of product per basket.
•
Lower basket carefully into oil to prevent spattering.
Special Processing
•
Turn doughnuts and fritters only once during frying.
•
When frying potatoes and onion rings, shake basket several times in a manner that prevents grease
spattering.
•
Carefully drop batter-covered foods individually into fry tank or basket.
•
If basket is used, cover basket with shortening before loading.
•
Food such as corn-on-the-cob must be submerged during frying. Stack a second empty basket on
top to keep corn submerged.
After Frying
•
Remove baskets immediately after frying.
•
Hang baskets to drain on rear basket hangers.
•
Remove food.
•
Season food as necessary after removing it from the fryer.
•
Avoid salt mixing with the shortening since it will hasten chemical breakdown of the oil.
– 10 –
•
Add shortening as necessary for proper level.
•
Revitalize with approximately 15% new oil daily.
CAUTION: Keep level of shortening at line above oil level line in fry tank.
SHORTENING HINTS
•
Use good quality liquid shortening.
•
Maintain a good turnover ratio.
•
Keep equipment and surroundings clean.
•
Filter shortening daily as a minimum.
•
Set thermostats correctly.
•
Replace shortening if it becomes poorly flavored.
•
Do not salt over a fryer.
•
Remove excess moisture and particles from food products before placing in fryer.
FILTER SHORTENING DAILY
WARNING: HOT OIL AND PARTS CAN CAUSE BURNS.
CLEANING AND SERVICING FRYER.
USE CARE WHEN OPERATING,
Turn gas valve off when draining or filling.
Filter shortening at least once a day, as conditions warrant. A commercially available power filter (by
other manufacturers) may be used. Follow the manufacturer's operating instructions for draining,
straining, and replacing shortening in the fry tank.
Manual Filtering
To drain the shortening from the drain pipe through a filter bag or some other filtering material, follow
this procedure:
Turn fryer off. Remove baskets carefully to avoid splashing. Open fryer door and attach drain pipe
extension to drain valve. Be sure to use a container of sufficient capacity for the shortening. Place
container below the drain pipe. If using a filter bag, tie securely to the drain pipe. If using some other
filter medium, place filter above the container.
Carefully open the drain valve so the shortening flows through the filter. Flush out scraps and sediment
from fry tank with a small quantity of warm shortening. Drain tank thoroughly and wipe clean. If it is
necessary to clean tank more thoroughly, see CLEANING — WEEKLY OR AS NEEDED.
Close drain valve. Return strained shortening to fry tank. Add shortening to mark above oil level line.
– 11 –
CLEANING
Weekly or as Needed
After shortening has been drained, flush out scraps and sediment with a small quantity of warm
shortening and allow tank to drain thoroughly.
Close drain valve and fill tank with a non-corrosive, grease-dissolving commercial cleaner, following
the manufacturer's instructions. Set thermostat at 300°F (149°C) or less and boil solution for 15 or 20
minutes.
Drain solution from tank. Close drain valve, refill tank with water. Add 1/2 (118ml) cup of vinegar to
neutralize alkaline left by cleaner. Bring solution to a boil and allow to stand for a few minutes. Drain
tank and rinse with clear, hot water. Drain tank. Dry tank thoroughly.
Close drain valve. Add shortening to the line above the oil level line.
Daily
Clean fryer regularly with a damp cloth and polish with a soft dry cloth.
To remove discolorations which may have formed when regular cleaning was neglected, use any
detergent or soap and water.
For particularly stubborn discolorations, a self-soaping scouring pad may be used. Always rub with
the grain in a horizontal direction.
Keep the fryer free of accumulated grease. Wash exterior surfaces at least once daily. Use a cloth
with warm water and a mild soap or detrgent. Rinse with clear water; then dry.
MAINTENANCE
WARNING: HOT OIL AND PARTS CAN CAUSE BURNS.
CLEANING AND SERVICING THE FRYER.
USE CARE WHEN OPERATING,
WARNING: SPILLING HOT OIL CAN CAUSE SEVERE BURNS. DO NOT MOVE FRYER WITHOUT
DRAINING ALL OIL FROM THE TANK.
Annually, when the fryer is cool, check the flue to be sure it is free of obstructions.
Contact personnel qualified to install and repair gas equipment for all other maintenance problems.
FORM 16903, Rev. E (3-98)
– 12 –
PRINTED IN U.S.A.