1
USERS MANAUL
8.4”/10” Digital Photo Frame
with NXT Stereo Speaker
Model Name
HDF-8040/HDF-8040E
HDF-1002/HDF-1002E
This is the diagram of the model HDF-8040
READ THE INSTRUCTIONS INSIDE CAREFULLY.
KEEP THIS USER'S MANUAL FOR FUTURE REFERENCE
82-257-00250
Safety Warnings
Some DOs and DON’Ts on the safe use of equipment
This equipment has been designed and manufactured to meet international safety
standards but, like any electrical equipment, care must be taken if you are to obtain
the best results and safety is to be assured.
DO read the operating instructions before you attempt to use the equipment.
DO ensure that all electrical connections (including the mains plug, extension leads
and interconnections between the pieces of equipment) are properly made and in
accordance with the manufacturer’s instructions. Switch off and withdraw the mains
plug before making or changing connections.
DO consult your dealer if you are ever in doubt about the installation, operation or
safety of your equipment.
DO be careful with glass panels or doors on equipment.
DO route the mains lead so that it is not likely to be walked on, crushed, chafed, or
subjected to excessive wear and tear or heat.
DON’T UHPRYHDQ\¿[HGFRYHUDVWKLVPD\H[SRVHGDQJHURXVYROWDJHV
DON’T obstruct the ventilation openings of the equipment with items such as
newspapers, tablecloths, curtains, etc. Overheating will cause damage and shorten
the life of the equipment.
DON’T allow electrical equipment to be exposed to dripping or splashing, or objects
¿OOHGZLWKOLTXLGVVXFKDVYDVHVWREHSODFHGRQWKHHTXLSPHQW
DON’T place hot objects or naked ame sources such as lighted candles or
nightlights on, or close to equipment. High temperatures can melt plastic and lead
WR¿UHV
DON’T use makeshift stands and NEVER ¿[OHJVZLWKZRRGVFUHZVWRHQVXUH
FRPSOHWHVDIHW\DOZD\V¿WWKHPDQXIDFWXUHU¶VDSSURYHGVWDQGRUOHJVZLWKWKH
¿[LQJVSURYLGHGDFFRUGLQJWRWKHLQVWUXFWLRQV
DON’T use equipment such as personal stereos or radios so that you are distracted
IURPWKHUHTXLUHPHQWVRIWUDI¿FVDIHW\,WLVLOOHJDOWRZDWFKWHOHYLVLRQZKLOVWGULYLQJ
DON’T listen to headphones at high volume, as such use can permanently damage
your hearing.
DON’T OHDYHHTXLSPHQWVZLWFKHGRQZKHQLWLVXQDWWHQGHGXQOHVVLWLVVSHFL¿FDOO\
stated that it is designed for unattended operation or has a stand-by mode. Switch
off using the switch on the equipment and make sure that your family know how
WRGRWKLV6SHFLDODUUDQJHPHQWVPD\QHHGWREHPDGHIRULQ¿UPRUKDQGLFDSSHG
people.
DON’T continue to operate the equipment if you are in any doubt about it working
normally, or if it is damaged in any way - switch off, withdraw the mains plug and
consult your dealer.
ABOVE ALL
--- NEVER let anyone especially children push anything into holes, slots or
any other opening in the case - this could result in a fatal electrical shock;
--- NEVER guess or take chances with electrical equipment of any kind
--- it is better to be safe than sorry!
2
Thank you for purchasing this Hitachi product. With this photo frame, you can
SOD\IDYRXULWHLPDJHVYLGHRDQGPXVLF¿OHVE\XVLQJlight-emitting touchpad
on the front panel of the photo frame. 7KHLQYLVLEOH1;7ÀDWSDQHOVWHUHR
VSHDNHUVSURGXFHDKLJKTXDOLW\VRXQGE\WKHVFUHHQYLEUDWLRQVPlease read
the following instructions for more details.
Supported playable format:
Photo: JPEG
Music: MP3(up to 320kbps)
Video: MPEG-1, MPEG-2, MPEG-4*.avi, Motion-JPEG
Important Safety Precautions
.HHSDZD\IURPZDWHURUPRLVWX
Ambient Temperature 0~40°C. Never store in hot and very cold areas.
%HFDUHIXOO\WRNHHSLWZLW
'RQRWWU\WRRSHQWKHF
Connect the AC adapter to the DC IN jack and to power outlet.
2QO\XVHDWWDFKPHQWVDFFHVVRULHVVSHFL¿HGE\WKHPDQXIDFWXUHU
When left unused for a long period of time, the unit should be unplugged
from the household AC outlet.
Warning7RUHGXFHWKHULVNRI¿UHRUHOHFWULFVKRFNGRQRWH[SRVHWRUDLQ
moisture, dripping or splashing.
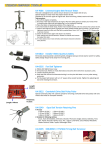
Package Content
Digital photo frame
Remote control
IUM %A
T
Power adaptor
HDF-1002/HDF-1002E
(10 inch;16:9 ratio)
Stand
H
IT
HDF-8040/HDF-8040E
(8.4 inch; 4:3 ratio)
L
TE
CR2025
3V
RY
(Including 3V Lithium
%DWWHU\W\SH&5
Note: Remove the insulating mylar
strip from battery if the battery is
EHLQJXVHGIRUWKH¿UVWWLPH
Mini USB
cable
Instruction Manual
and
Quick Start Guide
USERS MANAUL
MANUAL DEL USUARIO
8.4”/10” Digital Photo Frame
with NXT Stereo Speaker
Model Name
HDF-8040/HDF-8040E
HDF-1002/HDF-1002E
Note: 2-pin adapter for
EU market; 3-pin adapter
for UK market.
This is the diagram of the model HDF-8040
READ THE INSTRUCTIONS INSIDE CAREFULLY.
KEEP THIS USER'S MANUAL FOR FUTURE REFERENCE
82-257-00250
3
Table of Contents
Safety Warnings .................................................................. 2
Supported playable format .......................................................... 3
Important Safety Precautions ...................................................... 3
Package Content .......................................................................... 3
Table of Contents ......................................................................... 4
Product Overview ............................................................. 5~6
Remote Control .............................................................. 7~9
- Remote the insulation strip of the remote control ........................................ 9
- Remote Control Operation Range ................................................................ 9
%DWWHU\,QVWDOODWLRQIRUWKH5HPRWH&RQWURO
Preparation ...........................................................................10~14
- Attaching the stand ..................................................................................... 10
- Connecting to the power ............................................................................. 11
&RQQHFWLQJWRD3&YLDPLQL86%
7UDQVIHUULQJ¿OHVWRWKHLQWHUQDOPHPRU\.................................................... 13
- Removing this unit from computer .............................................................. 13
,QVHUWLQJDPHPRU\FDUGRU86%
drive ............................................... 14
Operations ............................................................................. 15~28
- Selecting the storage media ....................................................................... 15
- Playing photos ...................................................................................... 16~23
- Photos with music playback ........................................................................ 24
3OD\LQJYLGHR¿OHVa
- Playing MP3 music ................................................................................ 27~28
Editing .................................................................................... 29~34
Copying files from and to a PC ................................................... 35
Multi-screen ........................................................................... 36~37
- Multi screen for slideshow .................................................................... 36~37
Time and calendar setting ................................................... 38~39
- Display ..................................................................................................... 38
- Set Time ..................................................................................................... 39
- Set Date ..................................................................................................... 39
OSD settings .......................................................................... 40~43
Troubleshooting ....................................................................44
6SHFL¿FDWLRQVa
4
Product Overview
Name
Description
1 LCD Screen Display area
Front Panel
2 Remote
control
sensor
1
3
2
3
4
/
/
(Up/Down/
Left/Right)
pads
5
6
Note: When the pad( /
/ / / / ) has been
WRXFKHGLWZLOOÀDVKLQ
few seconds.
/
4 NXT
panel
stereo
speaker
5
(Mode/
Stop) pad
6
Receive the signals from
supplied remote control.
0RYHVXSGRZQOHIW
right in the menus.
Press to rotate when
viewing a photo by full
screen in Photo (
)
mode. For more details,
refer to page 19.
%XLOWLQ1;7ÀDWSDQHO
stereo speaker. Note: The
FXUY\DQGZDY\UHÀHFWLRQ
during playing audio is
natural factor resulted by
the vibration of the NXT
speaker.
Mode: Tab to return
to the main menu.
It includes Photo,
Favorite, Edit, Clock,
Calendar, Setup, Movie,
Photo+Music and Music
modes.
Stop: Tab to stop the
playback.
Tap to playback/pause
(Play/
Pause) pad WKHPHGLD¿OHVRUFRQ¿UP
the selection.
5
Product Overview
Rear Panel
Name
7 SD/MMS/
MS/XD
card slot
8 CF Type I
8
9
OFF/ON
7
10
slot
11
9 Earphone
12
jack
13
10 Mini USB
14
connector
Description
Accommodates SD,
MMC, MS or xD cards.
Accommodates CF
Type I cards.
Connect an earphone to
the unit.
Connect to a PC using
DPLQL86%FDEOH
11 USB A-type &RQQHFWWRRWKHU86%
connector ÀDVKGULYHUV
Note: This unit does
not support any external
hard disk and MP3
player connection via
86%
For attaching the
12 Stand
receptacle supplied stand.
Turns the unit’s power
13 Power
on or off.
ON/OFF
switch
14 DC-IN jack Connect to supplied
power supply.
6
Remote Control
Name
1
1
2
3
4
5
6
Description
(Up) button Moves up in the menus.
2 Setup button Press to enter the
3
(Left)
button
4
(Play/
Pause/SEL./
OK) button
5
(Previous) Return to the previous
picture or song.
button
3UHss to return
previous page.
6
(F.BWD
button)
7
(Rotate)
button
7
8
Setup menu.
Moves left in the
menus.
3UHVVWRSOD\EDFN
SDXVHWKHPHGLD¿OHV
3UHVVWRFRQ¿UPWKH
setting or function.
Fast backwards through
a music/movie clip at
2x, 4x, 8x, 16x, 32x
times the speed of
normal play.
Rotate the photo by 90°
clockwise.
(Refer to Page19, the
Rotation section).
Off,
Track,
Folder
and
all when playing
music, movie, or picture.
Refer to Page 26, 28 for
more details.
8 Repeat 1/ALL Press to toggle
button
7
Remote Control
Name
9
10
11
12
13
14
15
16
17
8
Description
Mode: Press to
9
(Mode/
(Photo),
Stop) button toggle
(Edit),
(Time),
(Setup),
(Movie),
(Photo+Music) and
(Music) modes.
Stop: Press to stop the
playback.
Moves right in the
10 (Right)
menus.
button
Moves down in the
(Down)
11
menus.
button
Go to the next picture
(Next)
12
or song.
button
3UHss to go to next
page.
Fast forwards through a
13 (F.FWD)
music/movie clip at 2x,
button
4x, 8x, 16x, 32x times
the speed of normal
play.
Press to zoom-in/out
14 (Zoom)
the photo. (Each press
button
to zoom the photo by
150%, 200%, 25% and
50%. Refer to page 23
for more details.
Press to adjust the value
(Bright15
ness) button of brightness. Refer
to Page 28 for more
details.
Press
to decrease
/
(Vol16
ume) button the volume.
to increase the
Press
volume.
Press to change the
17 EQ button
sound effect during
music playback. Refer to
page 28 for more details
Remote Control
Remove the insulating strip of remote control
Remove the insulating mylar
strip from the battery if the
battery is being used for the
¿UVWWLPH,WLVORFDWHGDWWKH
bottom back side of the remote
control.
Remote Control Operation Range
3RLQWWKHUHPRWHFRQWUROXQLW
no more than 5 meters from
the remote control sensor and
within 60° of the front of the
unit. The operating distance
may vary according to the
brightness of the room.
5m
30 30
0
0
Battery installation for the remote control
CR2025
2
1
Caution: %HFDUHIXOZKHQ
you press the slot of the
battery compartment with your
¿QJHUQDLOVRQO\DVWKLVPLJKW
break them.
,IWKHUHPRWHFRQWUROXQLW
fails to work even when it
is operated near the unit,
replace the battery.
1. Press and hold the battery
release tab in the direction of
arrow 1 .
2. Pull out the battery holder
completely in the direction of
arrow 2 as shown in the left.
3. Remove the old battery, and
place a new battery in the
holder.
4. Push the holder back into the
remote control.
Note: Use a 3V lithium battery
(No. CR2025 or equivalent)
9
Preparation
Attaching the stand
1. Insert the head of the stand in the receptacle.
2. Rotate clockwise or counterclockwise until the stand locks in
place.
Landscape Viewing
Portrait Viewing
OFF/ON
or
OFF/ON
7KLVXQLWFDQEHSODFHGYHUWLFDOO\RUKRUL]RQWDOO\IRUHLWKHU
landscape or portrait display.
10
Preparation
Connecting to the power
DC-IN 12V
1. Connect one end of the supplied AC power adapter (12Vdc, 1.66A)
to the Photo Frame, and the other end to the wall outlet.
2. Press power switch to turn on/off the power. The screen will be
turned on in a second.
Warning: Do not connect the Digital Photo Frame to the mains
supply until you have completed all the external device
connections.
11
Preparation
OFF/ON
Connecting to a PC via mini USB
0LQL86%FDEOH
(included)
DC-IN 12V
7KLVXQLWGRHVQRWVXSSRUW86%EXVSRZHUWKHUHIRUHPDNHVXUH
the power has been connected via power socket, and turned on
before connecting to PC.
3OHDVHUHPRYHWKHPLQL86%FDEOHZKHQ\RXXVHWKHXQLWVROHO\
7KLVXQLWFRPHVZLWK0%LQWHUQDO)ODVK0HPRU\7KURXJK
connecting to a computer with WKHVXSSOLHGPLQL86%FDEOH, the unit
becomes a storage device that allows to store, access, and delete
data likewise your local hard disk.
Cautions:
'RQRWDWWHPSWWRFRQQHFW86%KRVWDQGPLQL86%SRUWDW
the same time, or it will cause the main unit work improperly. If it
happens, please restart the power of the unit.
2. This digital photo frame does not support operation system
Windows® Me or earlier.
3. Though the Digital Photo Frame can be treated as a data storage
device, please also back up your data in case of data loss due
to electric outage, malfunction, or all kinds of damages to the
product.
4. Do not connect to a PC with USB A-type connector.
5. 8VHWKHVXSSOLHGPLQL86%FDEOHRQO\8VLQJRWKHUFDEOHFDQ
cause connection failure.
12
Preparation
7UDQVIHUULQJ¿OHVWRWKHLQWHUQDOPHPRU\
The steps below is demonstrated by Windows Vista™. For other
operation systems, please refer to its manual for more details.
OFF/ON
0LQL86%FDEOH
(included)
1. Turn the Power switch to ON.
2. Connect this unit to a computer via
PLQL86%FDEOH$QDXWRSOD\ZLQGRZ
will pop up on the screen when the unit
is detected by Windows Vista.
3. Click on 2SHQIROGHUWRYLHZ¿OHV
to access the folders in the internal
memory of the unit
8VHGUDJDQGGURSPHWKRGWRFRS\¿OHV
from computer to this unit’s internal
memory.
Removing this unit from computer
1. Double click the Safely Remove
Hardware icon on the task bar on
Windows Vista.
2. Click the USB Mass Storage Device,
then click OK to disconnect this unit
with PC.
13
Preparation
Inserting a memory card or USB
SD
MS
OFF/ON
MMC
drive
,QVHUW\RXUPHPRU\FDUGRU86%WRWKHDSSURSULDWHVORWDFFRUGLQJ
to the orientation marked on this unit.
To remove MMC/SD/MS/CF Type I/xD card, pull the card straight
out.
This unit can only playback one storage drive at a time. If more
than one source is connected, please refer to Selecting the
storage media on page 15 to select your desired drive.
This unit can only play image (JPEG), audio (MP3) and video
(MPEG-1, MPEG-2, MPEG-4*.avi, Motion-JPEG) formats. For
other formats, please convert to readable format on your computer
before playing on this device. Some free conversion softwares are
available online. For example, you may download “MediaCoder”
from Internet.
This unit does not support any external hard disk and MP3 player
FRQQHFWLRQYLD86%H[FHSWWKH03SOD\HU\RXLQVHUWHGFDQEH
used as a mass storage device.
14
Operations
Selecting the storage media
1. Press or tap <Mode> to display the main menu.
2. Press or tap < / >/< / > to select SD/SDHC/MMC/MS/MS
Pro/xD Card reader( ), CF Type I Card reader( ) ,USB
(
), or Internal Memory ( ) source, then press < > or tap
< >.
SD/SDHC/MMC/MS/MS Pro
/xD card reader
CF Type I card reader
86%
Internal memory
3. Press or tap <
or tap < >.
/
>/<
/
> to select a mode, then press <
>
Photo
Music
Photo with music
background
Movie
Edit
Setup
Time and
Calendar
Current selected
mode
15
Operations
Playing photos
This unit supports only JPEG picture format playback. To play
RWKHUIRUPDWSLFWXUHVSOHDVHFRQYHUWWKHVH¿OHVWRWKHIRUPDWRQ
your computer.
3KRWRVZLWKKLJKUHVROXWLRQZLOOWDNHORQJHUWLPHIRUORDGLQJ
For more the slide show effects, please refer to Setup>Photo
Setting>Transition Effect on page 40. for mode details.
7KH VFUHHQ VDYHU ZLOO EH DFWLYDWHG LI QR RSHUDWLRQ DW WKH PDLQ
menu in a while. Press or tap any buttons to return to the main
menu.
16
Operations
Thumbnail browse mode
1024x768
2008/5/30
Rotate
Slide Show
%DVLFRSHUDWLRQ
1. Press or tap <
/ >/< / > to select Photo ( ) from main
menu, then press < > or tap < !%\GHIDXOWWKHXQLWEHJLQVWR
play slide shows automatically.
2. Press < > or tap < > to enter thumbnail page while playing
photos by slideshow.
3. Press or tap < / >/< / >/< /< >/< / > to select the
photo you wish to display, then press < > or tap < > to display
the photo by full screen. To return to thumbnail mode, press <
or tap < > again.
>
4. Press or tap < / > to go all the way down and then press or tap
< / > to go all the way right to jump to the next page, and vice
versa for jumping to previous page.
Note : Select your browse mode to Thumbnail in Setup menu
under “Browse” setting if you are in the File manager mode
(refer to page 42 for more details).
17
Operations
0DQXDO5RWDWLRQ
1. Press or tap < / > to highlight
the Rotate, then press < > or tap
< > to enter rotate mode.
Thumbnail Mode
1024x683 2008/9/1
2. Press or tap < / >/< / >/
< / >/< / > to select the photo
you wish to rotate.
Slideshow
Reset
Return
Reset
Return
Rotate Mode
Rotate it
18
Rotate
Rotate Mode
Rotate it
4. Press or tap < / > and < / > to
highlight Return to return thumbnail
mode.
Slideshow
Rotate Mode
1024x683 2008/9/1
3. Press < > or tap < > to rotate the
photo. Each press or tap will rotate
the photo 90 degree clockwise.
Rotate
Operations
5. Press or tap < / >/< / >/<
/ >/< / > to highlight the rotated
Thumbnail Mode
photo, then press < > or tap
< > to view the rotated photo by
full screen.
1024x683 2008/9/1
Rotate
Slideshow
6. Press or tap < / > to rotate the
photo by 90 degree clockwise, press
or tap < / > to rotate the photo
by 90 degree anti-clockwise. Press
or tap < / !WRÀLSWKHSKRWRE\
horizontal, press or tap < / >
WRÀLSWKHSKRWRE\YHUWLFDOZKHQ
displaying a photo by full screen.
7. In addition, each press < > button
from remote control can also rotate
the photo by 90 degree clockwise in
full screen display.
8. Press < > or tap <
thumbnail page.
> to return
19
Operations
To reset the rotation
1. Press or tap < / >/< / >/
< / >/< / > under thumbnail
mode to highlight the rotated photo.
Thumbnail Mode
1024x683 2008/9/1
2. Press or tap < / > to highlight
the Rotate, then press < > or tap
< > to enter rotate mode again.
Slideshow
Rotate
Slideshow
Thumbnail Mode
1024x683 2008/9/1
3. Press or tap < / > and < / > to
highlight Reset, then press < > or
tap < >. The rotated photo will reset
to original angle.
Rotate
Rotate Mode
Rotate it
Reset
Return
Note 1: The rotation will be cancelled when the unit is turned off.
Note 2: If the photo is not rotated with the procedures above, please
setup the Slide Mode to Normal from Setup menu. For
more detailed settings, refer to page 42.
20
Operations
Auto Rotation
Vertical display
Horizontal display
7KHKRUL]RQWDORUYHUWLFDORULHQWDWLRQRIWKHSKRWRVZLOOEH
DXWRPDWLFDOO\DGMXVWHGWR¿WLQWKHIUDPHZLWKKRZWKHIUDPHLV
placed. If the horizontally placed photo frame is rotated left by
90 degrees, the current displayed photo will automatically rotate
clockwise by 90 degrees. If the vertically placed photo frame
is rotated right by 90 degrees, the current displayed photo will
automatically rotate anti-clockwise by 90 degrees.
Note: Auto Rotation only works by turning left 90 degree. Rotating
from right will not have any responses.
21
Operations
File manager browse mode
File Number: 1/6
/dev/usb
%LUWKGD\3DUW\
%LUWKGD\3DUW\
%LUWKGD\3DUW\
%LUWKGD\3DUW\
%LUWKGD\3DUW\
%LUWKGD\3DUW\
1.
File
Setup
manager
your browse
in Setup
mode
menu
to under
“Browse” setting on page 42.
2. Press or tap <
/ >/< / > to select Photo ( ) from main
menu, then press < > or tap < >.
3. Press or tap < / !WRHQWHU¿OHPDQDJHUSDJHZKLOHSOD\LQJ
photos by slideshow.
5. Press or tap <
/
> to go to left window if more folders are
available, then press or tap <
you wish to view.
6. Press or tap <
/
/ >/<
/ > to select the folder
> to go to right window. Press or tap
< / >/< / > to select a photo, then press <
display the photo by full screen.
> or tap < > to
7. Press < > to go to next page or press < > to return previous
page if more pages available,
Note:7KHSKRWRVZLOOEHVRUWHGE\¿OHQDPHIURPQXPEHUDQG$WR
Z automatically.
22
Operations
Zoom-in/out
25%
50%
100%
150%
200%
1. Press < > repeatedly to zoom-in or zoom-out when displaying
the photo by a ratio as shown above.
2. Press or tap < / >/< / >/< / >/< / > to move the
position when you zoom-in the photo to 150% or 200%.
Note 1: The zoom-in/out function works only when the photo is
displayed by full screen in Photo ( ) mode.
Note 2: If nothing response after pressing < >, please setup
the Slide Mode to Normal from Setup. For more setting
details, refer to page 42.
Brightness
3UHVV > repeatedly to adjust your preference brightness when
you browse photos. The brightness level is from -3 to +3.
23
Operations
Photos with music playback
3UHVVRUWDS<
/ >/< / > to select Photo with Music ( )
from main menu, then press < > or tap < >. The photos will be
displayed on the screen with music background.
Note: The Photo with Music function works only the photo and
PXVLF ZKLFK VWRUHG LQ H[WHUQDO PHPRU\ FDUG RU 86%
GULYH1RPXVLFEDFNJURXQGSOD\EDFNLIQRDXGLR¿OHVVWRUHG
LQWKHVDPHPHPRU\FDUGRU86%
drive.
24
Operations
3OD\LQJYLGHR¿OHV
Note: This unit can only play MPEG-1, MPEG-2, MPEG-4*.avi and
Motion-JPEG formats. For other formats, please convert to
readable format on your computer before playing.
1. Press or tap <
/
>/<
/
> to
File Number: 1/1
/dev/usb
select Movie( ) on the menu page,
then press < > or tap < >.
2. The movie will be played
automatically if the Auto Play>
Movie has been setup to On in
Setup menu(refer to page 42). To
Summer holiday
Clip 001
1
Clip 002
2
Clip 003
3
Clip 004
4
Clip 005
5
stop the playback, press < > or tap
< !DQGWKHQEULQJXSWKH¿OHPDQDJHU
3. Press or tap < / > and < / >/< / > to select the folder
from left side window if more folders are available, then press or
tap < / > to enter movie list on the right side window.
4. Press < > to go to next page or press < > to return previous
page if more pages available.
5. Press or tap < / >/<
< > or tap < >.
/ > to highlight the movie, then press
25
Operations
6. The speed of advance (x2, x4, x8, x16 and x32) or reverse (x2,
x4, x8, x16 and x32) changes for each press of <
during playback.
> or <
>
Volume
Press or tap < / >/< / > or press volume buttons / to
adjust volume when playing music. Volume level ranges from 0
to 16, of which 0 is the lowest volume level and 16 is the highest
volume level.
Brightness
3UHVV > repeatedly to adjust your preference brightness when
you watching videos. %ULJKWQHVVOHYHOUDQJHVIURPWRRI
which -3 is the dimmest display and +3 is the brightest display.
Repeat
(GLWPress <
> to toggle the available repeat options on below:
Off
Off the repeat function
Track
5HSHDWWKHFXUUHQW¿OH
Folder 5HSHDWDOO¿OHVLQFXUUHQWIROGHU
All
26
5HSHDWDOO¿OHVLQFXUUHQWVWRUDJH
device
Operations
Playing MP3 music
1. Press or tap <
/
>/<
/
> to
select Music( ) on the main menu,
then press < > or tap < >.
2. The music will be played
automatically if the Auto Play>
Music has been setup to On in
Setup menu(refer to page 42). To
stop the playback, press <
< >.
/dev/usb
Alternative
Alternative
Sound 001
1
Sound 002
2
Sound 003
3
Sound 004
4
Sound 005
5
Sound 006
6
Sound 007
7
Sound 008
8
Rock
> or tap
3. Press or tap < / > and < / >/< / > in order to select the
folder from left side window if more folder available, then press or
tap <
/
> to enter music list on the right side window.
3. Press < > to go to next page or press <
page if more pages available.
> to return previous
4. Press or tap < / >/< / > to highlight the music, then press
< > or tap < > to playback.
5. Press < > or < > during playback. The speed of advance
(x2, x4, x8, x16 and x32) or reverse (x2, x4, x8, x16 and x32)
changes for each press of <
> or <
>.
27
Operations
Note:
1. The curvy & wavy reflection during playing is a nature factor
resulted by the vibration of the NXT speakers.
2. This unit can only play MP3 audio format. For other audio formats,
please convert to MP3 on your computer before playing.
3. This unit supports MP3 format up to 320kbps compressional bit rate.
4. 0S¿OHQDPHGLVSOD\LVVXSSRUWHGXSWRFKDUDFWHUVIRUWKLV
unit.
Volume
Press or tap < / >/< / > or press volume buttons
adjust volume when playing music.
/
to
Repeat
(GLWPress <
> to toggle the available repeat options on below:
Off
Off the repeat function
Track
5HSHDWWKHFXUUHQW¿OH
Folder 5HSHDWDOO¿OHVLQFXUUHQWIROGHU
All
5HSHDWDOO¿OHVLQFXUUHQWVWRUDJH
device
EQ
Press <
> on the remote to toggle below available sound effects.
Normal
Full Treble
Jazz
Rock
Classical
Pop
%DVV%RVWHU
28
No effect
For light music
For jazz music
For rock music
For classic music
For pop music
For lower vocal
Editing
(GLWPRGHDOORZV\RXWRFRS\GHOHWHFUHDWHDQGIRUPDWIROGHUV
DQG¿OHVEHWZHHQGLIIHUHQWVWRUDJHGHYLFHV
1. Press or tap < / >/< / > to select
Edit( ) on the main menu, then
press < > or tap < >.
2. A selection window appears on the
screen, select the option you wish
to edit and then press <
< >.
Photo
Music
Photo/Audio
Movie
All
> or tap
3. Press or tap < / > to enter the
left side window, then press or tap
< / >/< / > to select a source if
more input sources are available.
Note:%\GHIDXOWWKHIROGHURILQWHUQDO
memory is named nand.
/dev/nand
/dev/usb
Alternative
Sound 001
1
Sound 002
2
Sound 003
3
Sound 004
4
Sound 005
5
29
Editing
Copy
1. Press or tap < / > to return to
right side window, then press or tap
/dev/nand
/dev/usb
< / >/< / !WRVHOHFWWKH¿OH\RX
wish to copy.
2. Press < > or tap < > to highlight
WKH¿OH
3. Repeatedly the step 1 and 2 to
KLJKOLJKWPRUH¿OHVWKHQSUHVVRUWDS
<
/
/dev/nand
/dev/usb
> to highlight Edit button.
4. Press < > or tap < >, then an
Edit dialogue window appears on the
screen.
/dev/nand
/dev/usb
Alternative
Sound 001
1
Sound 002
2
Sound 003
3
Sound 004
4
Sound 005
5
Alternative
Sound 001
1
Sound 002
2
Sound 003
3
Sound 004
4
Sound 005
5
Alternative
Sound 001
1
Sound 002
2
Sound 003
3
Sound 004
4
Sound 005
5
5. Press or tap < / >/< / > to select
Copy, then press < > or tap < >.
6. Press or tap < / > to enter to
left side window, then press or tap
/dev/nand
/dev/usb
< / >/< / > to select an input
source or a folder to be saved.
7. Press or tap <
/
> to return right
side window, press or tap <
again to highlight Edit.
30
/
>
/dev/nand
/dev/usb
Alternative
Sound 001
1
Sound 002
2
Sound 003
3
Sound 004
4
Sound 005
5
Alternative
Sound 001
1
Sound 002
2
Sound 003
3
Sound 004
4
Sound 005
5
Editing
8. Press < > or tap < >, then an
Edit dialogue window appears on the
/dev/nand
/dev/usb
screen.
9. Press or tap < / >/< / > to select
the Paste , then press < > or tap
< >.
/dev/nand
/dev/usb
Note: A progress bar will be indicating the
copy status. Wait until it’s complete.
Alternative
Sound 001
1
Sound 002
2
Sound 003
3
Sound 004
4
Sound 005
5
Rock
Sound 001
1
Sound 002
2
Sound 003
3
Sound 004
4
Sound 005
5
Delete
1. Press or tap < / > to return to
right side window, then press or tap
/dev/nand
/dev/usb
< / >/< / !WRVHOHFWWKH¿OH\RX
wish to delete.
2. Press < > or tap < > to highlight the
¿OH
3. Repeatedly the step 1 and 2 to
KLJKOLJKWPRUH¿OHVWKHQSUHVVRUWDS
<
/
/dev/nand
/dev/usb
> to highlight Edit button.
4. Press < > or tap < >, then an
Edit dialogue window appears on the
screen.
/dev/nand
/dev/usb
Alternative
Sound 001
1
Sound 002
2
Sound 003
3
Sound 004
4
Sound 005
5
Alternative
Sound 001
1
Sound 002
2
Sound 003
3
Sound 004
4
Sound 005
5
Alternative
Sound 001
1
Sound 002
2
Sound 003
3
Sound 004
4
Sound 005
5
5. Press or tap < / >/< / > to select
Delete, then press < > or tap < >.
31
Editing
6. A delete window will pop-up on
/dev/nand
/dev/usb
the screen. Press or tap < / >/
< / > to highlight Yes, then press
Alternative
Sound 001
1
Sound 002
2
Sound 003
3
Sound 004
4
Sound 005
5
< > or tap < > to delete the selected
¿OHV
Note: Selecting ‘No” if you want to cancel
this delete action and leave this
window.
Create a new folder
1. Press or tap < / > to enter the
left side window, then press or tap
/dev/nand
/dev/usb
< / >/< / > to select the source
you wish to create a new folder.
Alternative
Sound 001
1
Sound 002
2
Sound 003
3
Sound 004
4
Sound 005
5
2. Press < > or tap < !WRFRQ¿UPWKH
selected source and go to right side
window automatically.
3. Press or tap <
then press <
/
> to highlight Edit,
/dev/nand
/dev/usb
> or tap < >.
Alternative
Sound 001
1
Sound 002
2
Sound 003
3
Sound 004
4
Sound 005
5
4. An Edit dialogue window appears
on the screen. Press or tap < / >/
< / > to highlight New Folder, then
press < > or tap < >.
32
/dev/nand
/dev/usb
Alternative
Sound 001
1
Sound 002
2
Sound 003
3
Sound 004
4
Sound 005
5
Editing
5. A virtual keyboard appears on
the screen, press or tap <
/dev/nand
/dev/usb
/ >
/< / >/< / >/< / > to text the
folder name and then press Enter to
Alternative
Sound 001
1
Sound 002
2
Sound 003
3
Sound 004
4
Sound 005
5
FRQ¿UP
Virtual keyboard overview:
Captial Mode
Text bar
Numeric key
Capital/Lowercase
language/Symbol
input keys
Space key
Back key: move the cursor one
position backwards and delete the
letter if any.
Arrow keys: Select to move the
Captial/Lowercase/
Symbol switch key:
press < > to toggle an
option.
Lowercase Mode
a b c d e f g h i
j k l m n o p q r
s t u v w x y z
cursor backwards or forwards
Enter key: Press < !WRFRQ¿UP
the password you entered in the
Text bar.
Cancel key: press cancel and exit
the virtual keyboard.
Symbol Mode
* + - \ : / < + >
? [ ] ^ { I } ~ !
# $ %& “ ( ) @
33
Editing
Format
Note: This function only can format
internal memory.
1. Press or tap < / > to highlight Edit,
then press < > or tap < >.
2. An Edit dialogue window appears
on the screen. Press or tap <
/ >/
< / > to highlight Format Photo
Frame, then press < > or tap < >.
3. The system will start to format.
WARNING: Operating this procedure will
erase all data which stored
in the internal memory of this
photo frame.
34
/dev/nand
/dev/usb
/dev/nand
/dev/usb
Alternative
Sound 001
1
Sound 002
2
Sound 003
3
Sound 004
4
Sound 005
5
Alternative
Sound 001
1
Sound 002
2
Sound 003
3
Sound 004
4
Sound 005
5
&RS\LQJÀOHVIURPDQGWRD3&
&RQQHFWLQJZLWKDPLQL86%FDEOHDOORZV\RXWRXVHWKLVXQLWDV
DFDUGUHDGHUWKDW\RXFDQFRS\¿OHVWRDQGIURPDFRPSXWHU)RU
more connecting details, please refer to Connecting to a PC via
mini USB on page 12. The “Removeable Disk” icons will appear
on the Windows Explorer as shown below after connection.
7KURXJKFRQQHFWLQJWRDFRPSXWHUWKHXQLWFDQEHXVHGDVD
storage device that allows to store, access, and delete data similar
to your local hard disk.
Note:
'RQRWFRQQHFWDQ\86%GHYLFHWRWKH86%A-type connector
after the unit has been connected to PC.
2. Though the Digital Photo Frame can be treated as a data storage
device, please also back up your data in case of data loss due
to electric outage, malfunction, or all kinds of damages to the
product.
35
Multi-screen
Multi-screen for slideshow
This function allows you to display the calendar, clock, and
slideshow in one screen
1. Press or tap < / >/< / > to select
Setup ( ) from main menu, then
press < > or tap < >.
2. Press or tap < / >/< / > to select
Photo Setting( ), then press or tap
<
/
>.
3. Press or tap < / >/< / > to
select Slide Mode, then press or tap
<
/
>
4. Press or tap < / >/< / > to select
Date & Time, then press or tap < >
or tap < !WRFRQ¿UPDQGWKHRSWLRQLV
ticked.
5. Double press or tap <
the upper menu.
/
> to return
Setup Menu
Photo Setting
Interval Time
Transition Effect
Panel Setting
Slide Mode
%URZVH
Setup Menu
Interval Time
Transition Effect
Panel Setting
Slide Mode
%URZVH
Setup Menu
Interval Time
Transition Effect
Panel Setting
Slide Mode
%URZVH
Setup Menu
Custom Setting
Normal
Date & Time
Motion
Custom Setting
Normal
Date & Time
Motion
Exit
6. Press or tap < / >/< / > to
select Exit( ) to exit setting menu.
Alternatively, press or tap <
to exit directly.
36
/MODE >
: Select
&RQ¿UP
Multi-screen
6. Press or tap < / >/< / > to
select the source you wish to play
the slideshow, then press <
< !WRFRQ¿UP
7. Press or tap <
Photo (
< >.
/
>/<
/
), then press <
> or tap
> to select
> or tap
8. The photo slideshow will display along
with clock and calendar.
9. To exit Date & Time mode, please
double press< > or tap < >.
Note: To return to full screen display,
please setup the Slide Mode to
Normal or Motion (refer to page
42), otherwise the screen will
37
Time and calendar setting
Time and calendar
3UHVVRUtap < / >/< / > to select Time (
menu, then press < > or tap < >.
) from main
Display
Clock
Clock&Calendar
1. Press or tap < / > and < / >/< / > to select Clock or
Clock&Calendar you wish to display on the screen.
2. Press or tap < / >/< / > to change year, press or tap
< / >/< / > to change month.
3. Press or tap <
38
/
> to return the main menu.
Time and calendar setting
Set Time
1. Press or tap < / >/< / > to select
Set Time, then press < > or tap
< >.
2. Press or tap < / >/< / > to set
Hour, then press or tap < / >/<
/ >/< / >/< / > to set Minute,
and Second in that order.
3. Press or tap <
/ >/< / > to select
OK, then press or tap < > or tap
< !WRFRQ¿UP
Note: Press <
exit.
/
> to select Cancel to
Set Date
1. Press or tap < / >/< / > to select
Set Date, then press < > or tap < >.
2. Press or tap < / >/< / > to set
Year, then press or tap < / >/<
/ >/< / >/< / > to set Month,
and Day in that order.
3. Press or tap <
/ >/< / > to select
OK, then press or tap < > or tap
< !WRFRQ¿UP
Note: Press <
exit.
/
> to select Cancel to
39
OSD settings
1. Turn the POWER switch to ON.
2.
Press
tap
< or/ >/< / > to select Setup ( ) from main
menu, then press < > or tap < >.
3. Press or tap < / >/<
you wish to setup.
4. Press <
> or tap <
5. Press <
/
/ >/<
/
>/<
/
> to select the item
!WRFRQ¿UPWKHVHOHFWHGLWHP.
> to return the upper menu.
6. Press or tap < / >/< / > to select Exit( ) to exit setting
menu. Alternatively, press or tap < / > to exit directly.
OSD
menus
Photo
Setting
40
Sub-menus
Menu settings Description of operations
Interval Time
5Sec., 10Sec.,
15Sec., 30Sec.,
1Min., 3Min.,
Off
Select the interval time for
photo slide show.
Note: Interval time does
not work if the Slide Mode
(page 42) is setup to Motion.
Transition
Effect
No Effect,
%OLQG9HUWLFDO
%OLQG+RULzontal, Colour
Ration Ver,
Colour Ration
+RU%ORFN
Fade In Fade
Out, Random
Select the style of transition.
OSD settings
OSD
menus
Photo
Setting
Sub-menus
Menu settings Description of operations
Panel setting
Original
Landscape position
%ODFNKRUL]RQWDOEDQGVDSSHDU
along the top and bottom of
the screen when displaying
16:9 aspect ratio photos.
'LVSOD\ODQGVFDSHDVSHFW
ratio photo by full screen without change the shape. Note:
The photo will be enlarged
WR¿WWKHVFUHHQLIWKHSKRWR
aspect ratio is close to 4:3.
Portrait position
%ODFNEDQGVPLJKWDSSHDURQ
the top and bottom side of the
photo when displaying 16:9
aspect ratio photos.
%ODFNKRUL]RQWDOEDQGVDSSHDU
along the top and bottom of
the screen when displaying 4:
3 aspect ratio.
Full screen
Landscape position
%ODFNKRUL]RQWDOEDQGVDSSHDU
along the top and bottom of
the screen when displaying
16:9 aspect ratio photos.
Note: The full screen display
works only when the photo
aspect ratio is 4:3.
'LVSOD\ODQGVFDSHSKRWR
aspect ratio by full screen
without change the shape.
Note: The photo will be
HQODUJHGWR¿WWKHVFUHHQLI
the photo aspect ratio is close
to 4:3.
41
OSD settings
OSD
menus
Photo
Setting
Sub-menus
Menu settings Description of operations
Panel setting
Full screen
(QODUJHWKHODQGVFDSH
9 aspect ratio photo. The left
and right side of the photo will
EHFXWHG%ODFNEDQGVDSSHDU
on the top and bottom side of
the photo.
(QODUJHWKHODQGVFDSH
aspect ratio photo. The left
and right side of the photo will
EHFXWHG%ODFNEDQGVDSSHDU
on the top and bottom side of
the photo.
Slide Mode
Normal
Date&Time
Motion
AutoPlay
Display
setup
Custom
Setup
42
Portrait position
%URZVH
Thumbnail
File Manager
Photo
Music
Movie
%ULJKWQHVV
On/Off
On/Off
On/Off
-3 to +3
Contrast
OSD Language
-3 to +3
English,
French, German, Italian,
Spanish, Portuguese, Dutch,
Polish
No effect while playing
photos by slide show.
Display photos with date
and time on the screen. Refer to page 36-37 for more
detailed operation.
Zoom out the photos from
enlarged to original size
automatically.
Select a browse mode to
view photos by thumbnails
RUE\¿OHQDPHV
Select On/Off for automatic
playback for Photo, Music
or Movie mode .
Adjust the panel’s brightness.
Adjust the panel’s contrast.
Select the preference
language to show on the
screen.
OSD settings
Custom
Setup
Default
Restore
Exit
Exit Setup page.
Restore the factory default
settings. WARNING!
Select this function will
erase all previously stored
settings
43
Troubleshooting
Troubleshooting
%HIRUHUHTXHVWLQJVHUYLFHIRUWKLVGHYLFHFKHFNWKHFKDUWEHORZIRUDSRVVLEOH
cause of the problem you are experiencing. Some simple checkups or a
minor adjustment on your part may eliminate the problem and restore proper
operation.
SYMPTOM (COMMON)
REMEDY
&KHFNWRPDNHVXUHWKHSRZHUSOXJLVSOXJJHGLQWR
the power outlet.
0DNHVXUHWKHUHLVSRZHUWRWKHRXWOHW
Unable to view photos 1RWDOO-3(*¿OHVDUHFRPSDWLEOH3OHDVHRSHQWKH
¿OHVLQWKHFRPSXWHUDQGUHVDYHWKHPDV-3(*
on the Digital Photo
¿OHVDQGWU\WRSOD\EDFNLQWKHGHYLFH
Frame
&KHFNLIXVLQJFRPSDWLEOHPHPRU\FDUGV
1RWDOOYLGHR¿OHVDUHFRPSDWLEOH3OHDVHRSHQWKH
8QDEOHWRYLHZ¿OPV
¿OHVLQWKHFRPSXWHUDQGFRQYHUWLQWRUHDGDEOH
formats.
,I\RXZDQWWRLQVHUW06'XR06'XR3UR06
Memory card
M2 card or MS PRO-HG into this device, use only
with Memory Stick Duo Replacement Adapter or
Memory Stick Micro Adapter (not supplied).
7KLVGHYLFHGRHVQRWVXSSRUW&)7\SH,,FDUG
If picture display seems 8VHORZHUUHVROXWLRQSLFWXUH
slow
&KHFNWKHEDWWHU\LIWKHUHPRWHFRQWUROGRHVQRW
Remote control does
work.
not respond
&KHFNWKHEDWWHU\LVLQVWDOOHGZLWKWKHFRUUHFW
polarities (+and-).
<RXFDQQRWFRQQHFWWKHPDLQXQLWWRWKH86%
Unable to detect
the main unit while
KRVWDQGPLQL86%SRUWDWWKHVDPHWLPHRULWZLOO
FRQQHFWLQJWRPLQL86%
cause the unit work improperly. If happened, please
restart the power on the unit.
No power
44
Specification
HDF-8040/HDF-8040E
6SHFL¿FDWLRQ
Item
Panel
Video
Audio
User interface
Screen
Resolution
Display area
%ULJKWQHVV
Contrast
Display colours
Photo
Video decompression
Aspect ratio
Value adjustment
NXT speaker
Screen Saver
Connector
Function button
OSD Language
Built-in memory
Power
General
System
requirement
0%
Consumption
Power source
Input
Dimension
17W
AC 100-240V 60Hz
DC 12V/1.66A
Approx. 259x217x206mm (with
stand)
Approx. 760g (with stand)
Weight
®
Operation system Microsoft Windows XP Home Edition
Hardware
Accessories
8.4” 4:3 digital type
:[+5*%
170(H)x127(V)mm
250 cd/m2 (typ.)
500:1 (typ.)
6-bit, 262,144 colours
JPEG
MPEG-1, MPEG-2, MPEG-4*.avi
and Motion-JPEG
Full Screen/Original
%ULJKWQHVV&RQWUDVW
3W*2
Yes
Card reader x1 (SD/SDHC/MMC/
MS/MS Pro/xD/CF Type I)
86%W\SH$DQGPLQL86%
6 keys touch pads
English/German/French/Italian/
Spanish/Portuguese/Polish/Dutch
Service Pack 2 (SP2), Windows XP
Professional SP2, Windows XP Tablet
PC Edition SP2 or Windows Vista
Intel Pentium IV/AMD 1.5 GHz (or higher)
0%5$0RUKLJKHU
0%)UHH+DUG'LVNVSDFHDWOHDVW
6XSHU9*$*UDSKLF&DUGRUKLJKHU
6RXQG&DUGELWRUKLJKHU
&'520'9'520'ULYH
Power adaptor, Stand, Quick Start Guide, User’s
PDQXDO0LQL86%FDEOH
45
Specification
HDF-1002/HDF-1002E
6SHFL¿FDWLRQ
Item
Panel
Video
Audio
User interface
Screen
Resolution
Display area
%ULJKWQHVV
Contrast
Display colours
Photo
Video decompression
Aspect ratio
Value adjustment
NXT speaker
Screen Saver
Connector
Function button
OSD Language
Built-in memory
Power
General
System
requirement
0%
Consumption
Power source
Input
Dimension
46
17W
AC 100-240V 60Hz
DC 12V/1.66A
Approx. 279x224x37mm (without
stand)
Approx. 841g (without stand)
Weight
®
Operation system Microsoft Windows XP Home Edition
Hardware
Accessories
10” 16:9 digital type
:[+5*%
220(H)x132(V)mm
220 cd/m2 (typ.)
400:1 (typ.)
6-bit, 262,144 colours
JPEG
MPEG-1, MPEG-2, MPEG-4*.avi
and Motion-JPEG
Full Screen/Original
%ULJKWQHVV&RQWUDVW
3W*2
Yes
Card reader x1 (SD/SDHC/MMC/
MS/MS Pro/xD/CF Type I)
86%W\SH$DQGPLQL86%
6 keys touch pads
English/German/French/Italian/
Spanish/Portuguese/Polish/Dutch
Service Pack 2 (SP2), Windows XP
Professional SP2, Windows XP Tablet
PC Edition SP2 or Windows Vista
Intel Pentium IV/AMD 1.5 GHz (or higher)
0%5$0RUKLJKHU
0%)UHH+DUG'LVNVSDFHDWOHDVW
6XSHU9*$*UDSKLF&DUGRUKLJKHU
6RXQG&DUGELWRUKLJKHU
&'520'9'520'ULYH
Power adaptor, Stand, Quick Start Guide, User’s
PDQXDO0LQL86%FDEOH
Visit Partmaster.co.uk today for the easiest way to buy electrical spares and
accessories. With over 1 million spares and accessories available we can
deliver direct to your door the very next day.
Visit www.partmaster.co.uk
or call
0870 6001 338
(UK customers only)
Calls charged at National Rate.
Note: If you require a replacement for any of the items listed
below, please quote their corresponding part numbers:
Replacement Part
Part Number
Remote Control
92-257-02020
Power adaptor
43-111-00290
0LQL86%FDEOH
54-400-00800
HDF-8040/HDF-8040E Stand
60-257-C0901
HDF-1002/HDF-1002E Stand
60-257-C1401
User’s manual
82-257-00250
Quick Start Guide
82-257-01160
The mark is in compliance with the Waste Electrical and Electronic Equipment
Directive 2002/96/EC (WEEE). The mark indicates the requirement NOT to
dispose the equipment including any spent or discarded batteries as unsorted
municipal waste, but use the return and collection systems available.
If the batteries or accumulators included with this equipment, display the
chemical symbol Hg, Cd, or Pb, then it means that the battery has a heavy
metal content of more than 0.0005% Mercury, or more than 0.002% Cadmium
or more than, 0.004% Lead.
Notes for battery disposal
Your product contains batteries covered by the European Directive 2006/66/
EC, which cannot be disposed of with normal household waste. Please inform
yourself about the local rules on separate collection of batteries. The correct
disposal of batteries helps prevent potentially negative consequences on the
environment and human health.
Windows® is a registered trademark of Microsoft Corporation in the
United States and other countries.
Microsoft®, Windows®, and Windows Vista™ are either registered trademarks
or trademarks of Microsoft Corporation in the United States and/or other
countries. All trademarks and registered trademarks are the properties of
their respective owners. All rights reserved.
8VLQJUHPRWHFRQWUROIRUWKH¿UVWWLPH
Remove the insulating strip of remote control
Remove the insulating mylar strip from the battery if the battery is being
XVHGIRUWKH¿UVWWLPH,WLVORFDWHGDWWKHERWWRPEDFNVLGHRIWKHUHPRWH
FRQWURO
8.4”/10” Digital Photo Frame
with NXT Stereo Speaker
HDF-8040/HDF-8040E
HDF-1002/HDF-1002E
Remote Control Operation Range
3RLQWWKHUHPRWHFRQWUROXQLWQRPRUHWKDQPHWHUVIURPWKHUHPRWH
FRQWUROVHQVRUDQGZLWKLQRIWKHIURQWRIWKHXQLW7KHRSHUDWLQJ
GLVWDQFHPD\YDU\DFFRUGLQJWRWKHEULJKWQHVVRIWKHURRP
GB
P
0
30 30
0
3. Attaching the stand
,QVHUWWKHKHDGRIWKHVWDQGLQWKHUHFHSWDFOH
5RWDWHFORFNZLVHRUFRXQWHUFORFNZLVHXQWLOWKHVWDQGORFNVLQSODFH
4XLFN6WDUW*XLGH
Thank youIRUSXUFKDVLQJWKLV+LWDFKLSURGXFW:LWKWKLVSKRWRIUDPH\RXFDQ
SOD\IDYRXULWHLPDJHVYLGHRDQGPXVLF¿OHVE\XVLQJlight-emitting touchpad
on the front panel of the photo frame. 7KH LQYLVLEOH 1;7 ÀDW SDQHO VWHUHR
VSHDNHUVSURGXFHDKLJKTXDOLW\VRXQGE\WKHVFUHHQYLEUDWLRQVPlease read
the following 4XLFN*XLGHWRKHOSZLWKWKHEDVLFRSHUDWLRQV)RUPRUHGHWDLOV
RQWKHYDULRXVIXQFWLRQVDQGRSHUDWLRQVSOHDVHUHIHUWRWKH8VHU*XLGH
4. Connecting to the power
1. Package content
Digital photo frame
Remote control
,8M %$
T
Power adaptor
HDF-1002/HDF-1002E
LQFKUDWLR
Instruction Manual
and
Quick Start Guide
H
,T
TE
&5
/
HDF-8040/HDF-8040E
LQFKUDWLR
&RQQHFWRQHHQGRIWKHVXSSOLHG$&SRZHUDGDSWHU9GF$WRWKH
3KRWR)UDPHDQGWKHRWKHUHQGWRWKHZDOORXWOHW
39
RY
,QFOXGLQJ9/LWKLXP
%DWWHU\W\SH&5
Note: Remove the insulating
mylar strip from battery if the
battery is being used for the
¿UVWWLPH
Stand
Mini USB
cable
'&,19
,QVWUXFWLRQPDQXDO
5. Switching the power to on
HDF-8040/HDF-8040E
HDF-1002/HDF-1002E
8.4”/10” Digital Photo Frame
with NXT Stereo Speaker
GB
6ZLWFKLQJWKHSRZHUWRWKHON marking position to turn on the unit after
LQVHUWLQJDPHPRU\FDUGRU86%GULYH
0LFURVRIW®:LQGRZV®DQG:LQGRZV9LVWDDUHHLWKHUUHJLVWHUHGWUDGHPDUNVRU
WUDGHPDUNVRI0LFURVRIW&RUSRUDWLRQLQWKH8QLWHG6WDWHVDQGRURWKHUFRXQWULHV$OO
WUDGHPDUNVDQGUHJLVWHUHGWUDGHPDUNVDUHWKHSURSHUWLHVRIWKHLUUHVSHFWLYHRZQHUV$OO
rights reserved.
OFF/ON
Windows® is a registered trademark of Microsoft Corporation in the United States
and other countries.
OFF/ON
Note: 2-pin adapter
IRU(8PDUNHWSLQ
DGDSWHUIRU8.PDUNHW.
6. Inserting a memory card or USB drive
,QVHUW\RXUPHPRU\FDUGRU86%'ULYHUWRWKHDSSURSULDWHVORWDFFRUGLQJ
to the orientation marked on this unit.
1. Turn the PowerVZLWFKWRON.
&RQQHFWWKLVXQLWWRDFRPSXWHUYLDPLQL86%FDEOH7KHWindows
VistaZLOOVKRZWKHXQLWKDVEHHQFRQQHFWHGRQWKHVFUHHQDIWHUFRQQHFWLQJ
SD
MS
OFF/ON
MMC
7. Basic playback
8VHGUDJDQGGURSPHWKRGWRFRS\¿OHVIURPFRPSXWHUWRWKLVXQLW
7KLVXQLWGRHVQRWVXSSRUW86%EXVSRZHUPDNHVXUHWKHSRZHUKDVEHHQ
FRQQHFWHGDQGWXUQHGRQEHIRUHFRQQHFWLQJWR3&
Photo
Edit
Setup
SD/SDHC/MMC/MS/
063UR['FDUGUHDGHU
&)7\SH,FDUGUHDGHU
86%
,QWHUQDOPHPRU\
0XVLF
3KRWRZLWKPXVLF
EDFNJURXQG
Movie
&XUUHQWO\VHOHFWHG
mode
Time and
Calendar
Warning:
1. 'RQRWDWWHPSWWRFRQQHFW86%KRVWDQGPLQL86%SRUWDWWKHVDPHWLPH
RULWZLOOFDXVHWKHPDLQXQLWZRUNLPSURSHUO\,ILWKDSSHQVSOHDVHUHVWDUWWKH
power of the unit.
®
2. This digital photo frame does not support operation system Windows Me or
earlier.
3. 'RQRWFRQQHFWWRD3&ZLWKUSB A-type FRQQHFWRU
:KHQWKHPHQXDSSHDUVRQWKHVFUHHQ
/
> to
/
>/<
press or tap <
VHOHFWSD/SDHC/MMC/MS/MS Pro/xD
Card reader CF Type I Card
reader USB .
Memory 7KLVXQLWFRPHVZLWK0%LQWHUQDO)ODVK0HPRU\7KURXJKFRQQHFWLQJWRD
FRPSXWHUZLWKDPLQL86%FDEOHVXSSOLHGWKHXQLWEHFRPHVDVWRUDJHGHYLFH
WKDWDOORZVWRVWRUHDFFHVVDQGGHOHWHGDWDOLNHZLVH\RXUORFDOKDUGGLVN
Removing this unit from computer
RUInternal
The steps below is demonstrated by Windows Vista. For other operation
V\VWHPVSOHDVHUHIHUWRLWVPDQXDOIRUPRUHGHWDLOV
'RXEOHFOLFNWKHSafely Remove Hardware LFRQRQWKHWDVNEDULQ
Windows.
6HOHFWWKHUSB Mass Storage DeviceWKHQFOLFNStopWRGLVFRQQHFW
this unit from PC.
/ >WRVHOHFW
/ >/<
Press or tap <
Photo Music DQGVideo
> or tap < >
then press <
WRSOD\EDFN)RURWKHUVHOHFWLRQVDQG
RSHUDWLRQVSOHDVHUHIHUWRWKHLQVWUXFWLRQ
manual.
8. File transfer to PC
7UDQVIHUULQJ¿OHVWRWKHLQWHUQDOPHPRU\
The steps below is demonstrated by Windows Vista™. For other operaWLRQV\VWHPVSOHDVHUHIHUWRLWVPDQXDOIRUPRUHGHWDLOV
OFF/ON
9LVLW3DUWPDVWHUFRXNWRGD\IRUWKHHDVLHVWZD\WREX\HOHFWULFDOVSDUHVDQGDFFHVVRULHV:LWKRYHU
PLOOLRQVSDUHVDQGDFFHVVRULHVDYDLODEOHZHFDQGHOLYHUGLUHFWWR\RXUGRRUWKHYHU\QH[WGD\
9LVLWZZZSDUWPDVWHUFRXN
RUFDOO
0870 6001 338
(UK customers only)
&DOOVFKDUJHGDW1DWLRQDO5DWH
or
'&,19
7KH PDUN LV LQ FRPSOLDQFH ZLWK WKH :DVWH (OHFWULFDO DQG (OHFWURQLF (TXLSPHQW
'LUHFWLYH(&:(((7KHPDUNLQGLFDWHVWKHUHTXLUHPHQW127WRGLVSRVHWKH
HTXLSPHQWLQFOXGLQJDQ\VSHQWRUGLVFDUGHGEDWWHULHVDVXQVRUWHGPXQLFLSDOZDVWHEXW
XVHWKHUHWXUQDQGFROOHFWLRQV\VWHPVDYDLODEOH
,I WKH EDWWHULHV RU DFFXPXODWRUV LQFOXGHG ZLWK WKLV HTXLSPHQW GLVSOD\ WKH FKHPLFDO
V\PERO+J&GRU3EWKHQLWPHDQVWKDWWKHEDWWHU\KDVDKHDY\PHWDOFRQWHQWRIPRUH
WKDQ0HUFXU\RUPRUHWKDQ&DGPLXPRUPRUHWKDQ/HDG
Notes for battery disposal
<RXU SURGXFW FRQWDLQV EDWWHULHV FRYHUHG E\ WKH (XURSHDQ 'LUHFWLYH (& ZKLFK FDQQRW
EH GLVSRVHG RI ZLWK QRUPDO KRXVHKROG ZDVWH 3OHDVH LQIRUP \RXUVHOI DERXW WKH ORFDO UXOHV RQ
VHSDUDWH FROOHFWLRQ RI EDWWHULHV 7KH FRUUHFW GLVSRVDO RI EDWWHULHV KHOSV SUHYHQW SRWHQWLDOO\ QHJDWLYH
FRQVHTXHQFHVRQWKHHQYLURQPHQWDQGKXPDQKHDOWK