1
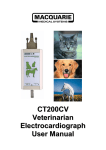
Kentucky Fried Chicken
Computerized Control
Installation, Operation, and Programming Instructions
OPERATOR MANUAL
LIMITED WARRANTY FOR HENNY PENNY EQUIPMENT
Subject to the following conditions, Henny Penny Corporation makes the following limited warranties to the original
purchaser only for Henny Penny appliances and replacement parts:
NEW EQUIPMENT: Any part of a new appliance, except baskets, lamps, and fuses, which proves to be defective in
material or workmanship within two (2) years from date of original installation, will be repaired or replaced without
charge F.O.B. factory, Eaton, Ohio, or F.O.B. authorized distributor. Baskets will be repaired or replaced for ninety (90)
days from date of original installation. Lamps and fuses are not covered under this Limited Warranty. To validate this
warranty, the registration card for the appliance must be mailed to Henny Penny within ten (10) days after installation.
FILTER SYSTEM: Failure of any parts within a fryer filter system caused by the use of the non-OEM filters or
other unapproved filters is not covered under this Limited Warranty.
REPLACEMENT PARTS: Any appliance replacement part, except lamps and fuses, which proves to be defective in
material or workmanship within ninety (90) days from date of original installation will be repaired or replaced without
charge F.O.B. factory, Eaton, Ohio, or F.O.B. authorized distributor.
The warranty for new equipment covers the repair or replacement of the defective part and includes labor charges and
maximum mileage charges of 200 miles round trip for a period of one (1) year from the date of original installation.
The warranty for replacement parts covers only the repair or replacement of the defective part and does not include any
labor charges for the removal and installation of any parts, travel, or other expenses incidental to the repair or replacement of
a part.
EXTENDED FRYPOT WARRANTY: Henny Penny will replace any frypot that fails due to manufacturing or workmanship
issues for a period of up to seven (7) years from date of manufacture. This warranty shall not cover any frypot that fails due to
any misuse or abuse, such as heating of the frypot without shortening.
0 TO 3 YEARS:
During this time, any frypot that fails due to manufacturing or workmanship issues will
be replaced at no charge for parts, labor, or freight. Henny Penny will either install a new frypot at no cost or
provide a new or reconditioned replacement fryer at no cost.
3 TO 7 YEARS:
During this time, any frypot that fails due to manufacturing or workmanship issues will
be replaced at no charge for the frypot only. Any freight charges and labor costs to install the new frypot as
well as the cost of any other parts replaced, such as insulation, thermal sensors, high limits, fittings, and
hardware, will be the responsibility of the owner.
Any claim must be presented to either Henny Penny or the distributor from whom the appliance was purchased. No
allowance will be granted for repairs made by anyone else without Henny Penny’s written consent. If damage occurs during
shipping, notify the sender at once so that a claim may be filed.
THE ABOVE LIMITED WARRANTY SETS FORTH THE SOLE REMEDY AGAINST HENNY PENNY FOR ANY BREACH
OF WARRANTY OR OTHER TERM. BUYER AGREES THAT NO OTHER REMEDY (INCLUDING CLAIMS FOR ANY INCIDENTAL OR CONSEQUENTIAL DAMAGES) SHALL BE AVAILABLE.
The above limited warranty does not apply (a) to damage resulting from accident, alteration, misuse, or abuse; (b) if the
equipment’s serial number is removed or defaced; or (c) for lamps and fuses. THE ABOVE LIMITED WARRANTY IS EXPRESSLY IN LIEU OF ALL OTHER WARRANTIES, EXPRESS OR IMPLIED, INCLUDING MERCHANTABILITY AND FITNESS, AND ALL OTHER WARRANTIES ARE EXCLUDED. HENNY PENNY NEITHER ASSUMES NOR AUTHORIZES ANY
PERSON TO ASSUME FOR IT ANY OTHER OBLIGATION OR LIABILITY.
Revised 01/01/07
FM07-020-F
Revised 08-31-07
Table of Contents
SECTION 1.
INTRODUCTION ....................................................................................................
1-1. SAFETY .........................................................................................................
1-2. ASSISTANCE ................................................................................................
1-3. INTRODUCTION ..........................................................................................
1-4. CONTROL PANEL WIRE REMOVAL .........................................................
1-5. NINE-PIN CONNECTOR WIRING ..............................................................
1-6. TEMPERATURE PROBE INSTALLATION .................................................
1-7. SLOT COVER ................................................................................................
1-8. CONTROL PANEL INSTALLATION ...........................................................
1-1
1-1
1-1
1-2
1-2
1-3
1-3
1-4
1-4
SECTION 2.
OPERATION ............................................................................................................
2-1. INTRODUCTION ..........................................................................................
2-2. SWITCHES AND INDICATORS ..................................................................
2-3. FRYER POWER UP MODE ..........................................................................
2-4. MODE SELECTION FROM FILTER MODE ...............................................
2-5. COOKING OPERATION ...............................................................................
2-6. FILTERING THE SHORTENING .................................................................
2-1
2-1
2-1
2-2
2-2
2-3
2-4
SECTION 3.
PROGRAMMING ....................................................................................................
3-1. BASIC PROGRAMMING SEQUENCE .......................................................
3-2. COOK CYCLE PROGRAMMING ...............................................................
3-3. ERROR CODES .............................................................................................
3-4. SPECIAL PROGRAMMING MODES ..........................................................
3-5. ONE STEP KFC PARAMETERSUSAGE REVIEW OPERATION .............
3-6. TEST PROCEDURE ......................................................................................
3-7. SPECIAL FUNCTIONS .................................................................................
3-1
3-1
3-1
3-2
3-2
3-3
3-3
3-4
Henny Penny Distributor List (Domestic and International)
i
304
SECTION 1. INTRODUCTION
1-1. SAFETY
The Henny Penny pressure fryer has may safety features incorporated.
However, the only way to ensure a safe operation is to fully understand the proper installation, operation, and maintenance procedures.
The instructions in this manual have been prepared to aid you in
learning the proper procedures. Where information is of particular
importance or is safety related, the words NOTICE, CAUTION,
WARNING, and DANGER are used. Their usage is described below.
SAFETY ALERT SYMBOL is used with DANGER,
WARNING, or CAUTION which indicates a personal injury type
hazard.
NOTICE is used to highlight especially important information.
CAUTION used without the safety alert symbol indicates a
potentially hazardous situation which, if not avoided, may
result in property damage.
CAUTION indicates a potentially hazardous situation
which, if not avoided, may result in minor or moderate
injury.
WARNING indicates a potentially hazardous situation
which, if not avoided, could result in death or serious injury.
DANGER INDICATES AN IMMINENTLY HAZARDOUS SITUATION WHICH, IF NOT AVOIDED, WILL
RESULT IN DEATH OR SERIOUS INJURY.
1-2. ASSISTANCE
103
Should you require outside assistance, just call your local Henny
Penny distributor in your area, or call Henny Penny Corp.
1-800-417-8405 toll free or 1-937-456-8405.
1-1
1-3. INTRODUCTION
Installation of the KFC Computerized Control Panel on existing
Henny Penny gas pressure fryers.
Disconnect the fryer from the electrical supply source
before beginning panel conversion.
Failure to disconnect the fryer from the supply source
could result in electrical shock.
The fryer internal wiring is numbered to correspond to the
numbers on the wiring diagram, Figure 1.
1-4. CONTROL PANEL WIRE
REMOVAL
A. Remove the four screws holding the existing control panel in
place.
B. Position the control panel for servicing by placing the lower
edge of the control panel on top of fryer frame and door.
C. Identify the locations of the following wires. Reference wire
diagram Figure 1.
Wire
Neutral
Motor
Motor
L1
Fan
Solenoid
Solenoid
Hi Limit & Fan
Gas Valve
1-2
Wire Number
2
34
33
1
10
31
32
8
12
Pin Number
9 Pin Conenctor
1
9
7
3
4
6
8
2
5
Location
Main Power Switch
Main Power Switch
Main Power Switch
Main Power Switch
Main Power Switch
Main Timer
Soft/Crisp Switch
Wiring Harness
Gas Valve
304
1-5. NINE-PIN CONNECTOR
WIRING
A. Remove the above wires from their existing position. These
wires will be connected to the nine-pin connector provided.
B. Locate wires number 12, 8, and 11 at the fan motor. Remove
the connector securing these wires. Wire number 11 can be
discarded at this time. Wire number 12 will be connected to the
nine-pin connector as noted on the wiring diagram. Wire
number 8 from the fan motor will be joined with wire number 15
before it is connected to the nine-pin connector. Join these two
wires using the twist-on wire connector provided.
C. Note the position of the wires on the nine-pin connector.
Reference wiring diagram Figure 2. The wires on the connector
will have corresponding numbers to those within the control
panel.
D. Using the twist-on wire connectors provided, splice the
corresponding wires together.
E. Wiring of the nine-pin connector is completed.
“Do not install the control panel at this time.”
1-6. TEMPERATURE PROBE
INSTALLATION
A. Drain the shortening from the cook pot to a level below
the position of the thermostat pot fitting.
B. Remove the thermostat capillary tube from the cook pot
as per section 5-11 of standard Henny Penny Service Manual.
C. Install the reducer fitting, Henny Penny part number
FP01-024 into the pot wall fitting. Use pipe sealant to seal
the pipe threads.
D. Install the compression fitting, part number 30094, Figure
3 into the reducer. Use pipe sealant to seal the pipe threads.
E. Install the new probe by inserting the probe into the compression
fitting until the probe extends one-half (1/2) inch into the cook pot.
Tighten the nut on the compression fitting a half a turn past the
point where the fitting first becomes tight onto the probe.
Excess force will damage the probe.
F. Installation of the temperature probe is complete.
304
1-3
1-7. SLOT COVER
When installing the computerized panel retrofit kit, it is necessary
to cover the existing slot in the heat shroud. This slot allows the
capillary tube of the old control panel to extend through the heat
shroud when mounting the old control.
A. Open door and push slot cover through shroud from bottom
of the shroud.
B. Bend the 4 tabs of slot cover over the top of the heat shroud.
1-8. CONTROL PANEL
INSTALLATION
A. The new computerized panel is positioned and installed exactly
like the existing electromechanical control panel.
B. Place the computerized control panel on top of fryer frame
and door.
C. Mate the nine-pin connectors together. Refer to KFC gas
wiring diagram.
D. Connect the temperature probe to the control panel board.
E. Install the control panel and two screws. When installed
properly there will be approximately a 7/16 inch of a gap
between the bottom of the control panel and fryer rail.
F. This completes the electrical and mechanical installation of
the computerized control panel.
1-4
304
FIGURE 1
304
1-5
FIGURE 2
1-6
304
304
1-7
1-8
304
SECTION 2. OPERATION
2.1 INTRODUCTION
The KFC Programmable Controller has two fundamental modes
of operation: cook and program. In the cook mode the melt,
stand-by, heat, and timer functions are active. In program, these
modes are set by the operator.
2.2 SWITCHES AND
INDICATORS
Melt Indicator - The display will read “LO” when the control is in
the automatic melt mode. If the temperature of the shortening is
below 185º the control will enter the melt mode. When the
temperature of the shortening reaches 185º hte control will go
into the stand-by mode or to the first setpoint of the current cycle.
Stand-by Mode - The display will read “COOL” when the
control is in the stand-by mode. After filtering or programming,
the shortening temperature is reset to 250º which extends
shortening life and is also an energy savings. The “EXIT COOL”
switch must be depressed to exit the stand-by mode.
Although the display will read “COOL” in the stand-by
mode, the shortening is hot and could cause burns.
Cycle Selection - Cycle selection is accomplished by depressing the
switch nex to the desired cook cycle. The LED light next to the
switch will start flashing and the timing cycle will begin. When the
cycle is completed the buzzer will sound and the display will read
“DONE.”
Time/Temperature Display - This is a four digit LED type display
which shows the remaining cook time during cook cycles and also
the shortening temperature on demand from operator.
Heat Indicator - The heat light will illuminate whenever the control
calls for heat. When shortening temperature has been reached the
heat light will extinguish.
HI Temperature Indicator - The display will read “HI” if the
shortening temperature is 40º above the setpoint.
304
2-1
2-2. SWITCHES AND
INDICATORS
(Continued)
DROP Indicator -The display will read “DROP” when the
shortening has reached the setpoint temperature. (+ 4° to -2°)
Temperature Switch -This switch allows the operator to read the
temperature of the shortening while in a cook cycle. The display range
is from 255° to 390° F.
2-3. FRYER POWER UP
MODE
In power up, the mode is selected depending on the temperature of
the oil. Power Switch in the “POWER” position.
1. If pot temperature is below the melt temperature of 185°
the fryer will enter the melt mode. Display will read’ “LO”.
2. If the pot temperature is 185° F or higher the control will
enter the stand-by mode and regulate to 250° F. Display
will read “COOL”.
3. When the operator presses the EXIT COOL switch the
control will return to the last cycle selected and regulate to
that cycle’s programmed temperature.
2-4. MODE SELECTION
FROM FILTER MODE
To avoid electrical shock, this appliance msut be equipped
with an external circuit breaker which will disconnect all
ungrounded (unearthed) conductors. The main power
switch on this appliance does not disconnect all line
conductors.
When the display reads “FILR” after a cooking cycle, it is time to filter.
Move the power switch to the OFF position and filter as usual. When
the display reads “FILL” move the power switch to the pump position
and pump the shortening back into the frypot. The control will remain
“locked out” until the shortening has been filtered and the operator
depresses the EXIT FILL switch. The control will then enter the
stand-by mode.
To avoid personal injuries or property damage be sure
shortening has been pumped back into the frypot before
depressing the EXIT FILL switch. Unit will enter the heat
mode.
2-2
304
2-5. COOKING OPERATION
1. Move the power switch to the POWER position.
2. If the display reads “LO” wait for it to change to “COOL” or
display a temperature.
3. If the display reads “COOL” depress the EXIT COOL switch.
4. Depress the switch next to the cycle you wish to use. The
indicator light next to that cycle will illuminate.
5. When the display reads “DROP” meaning the temperature of
the oil has reached operating temperature, carefully lower the
loaded basket with product into the oil.
6. Tighten spindle in clockwise rotation aligning red ball on the
spindle to read ball on the lid latch.
LID MUST BE LATCHED PROPERLY OR PRESSURIZED SHORTENING AND STEAM MAY ESCAPE
FRYPOT. SEVERE BURNS WILL RESULT.
7. Depress the switch next to the cycle you have chosen. Indicator
light will begin flashing and display will begin the timer countdown.
8. When the cooking cycle is finished, the buzzer will beep and
the display will read “DONE.”
9. Depress the switch next to the cycle you are using. Be sure
all pressure is released from the frypot, open lid, and remove
product.
DO NOT FORCE LID LATCH OPEN BEFORE PRESSURE GAUGE READS “0” PSI. ESCAPING STEAM
AND SHORTENING WILL RESULT IN SEVERE
BURNS.
304
2-3
2-6. FILTERING THE
SHORTENING
Frying breaded products requires frequent filering. After each
frying cycle the display will read FILR, indicating to filter. It should be
noted that further operation of the control is not allowed until filtering
is complete. Clean and filter the frypot as follows.
1. Turn the main power switch to the OFF position.
2. Clean any build-up from the sides of the frypot.
Use care when using a scraper or brush to clean the frypot,
to prevent damaging the temperature probe.
3. Open the drain valve very slowly until all shortening has
been drained from the frypot. As the shortening drains
clean the inside of the frypot with a brush.
The filter drain pan must be as far back under fryer as
it will go, and the cover in place. Be sure the hole in the
cover lines up with the drain before opening the drain.
Failure to follow these instructions causes splashing of
shortening and could result in personal injury.
Surfaces of fryer and basket will be hot. Use care when
filtering to avoid getting burned.
4. When the frypot is clean and all shortening has been drained,
close the drain valve and open the filter valve.
5. Digital display will read FILL.
6. Move the power switch to the PUMP position.
FAILURE TO HOLD THE LID CLOSED SO THAT
THE FIRST SURGE OF THE RETURNING SHORTENING WILL NOT SPLASH OUT OF THE FRYPOT,
WILL RESULT IN SEVERE BURNS.
2-4
304
2-6. FILTERING THE
SHORTENING
(Continued)
7. When the pump is pumping air only, close the filter valve
first and then move the main power switch to the OFF
position.
8. Being sure there is sufficient shortening in the frypot,
depress the EXIT FILL switch.
9. The unit will go into the stand-by mode and digital display
will read COOL.
10. Temperature of shortening will then stabilize to 250ºF.
11. The control will stay in the stand-by mode until the EXIT
COOL switch is depressed. This will return the control
to the last cycle selected and regulate to that cycle’s
programmed temperature.
304
2-5
SECTION 3. PROGRAMMING
3-1. BASIC PROGRAMMING
SEQUENCE
To enter the program mode a password keystroke sequence is
required. Note that when performing this sequence the switches
must be depressed within one second of each other. If not,
the control will not enter the program mode.
1. Depress the “SELECT TIME” switch.
2. Depress the “EXIT COOL” switch.
3. Depress the “SELECT FUNCTION” switch.
4. Depress the “EXIT FILL” switch.
You are now in the program mode of the control.
3-2. COOK CYCLE
PROGRAMMING
To program a cook cycle the following steps should be followed.
1. Follow the keystroke sequence and enter the program
mode.
2. Select the product you desire to program by depressing
the cycle switch next to the product.
3. TIME will be flashing in the function display.
4. Use the four change switches beneath the display to
change the displayed values. Program the starting time
first.
5. Depress the SELECT TIME switch which allows you to
enter the second interval for time.
6. Program your second interval time. Repeat until all six
interval times have been programmed.
7. Depress the SELECT FUNCTION switch. TEMP will be
flashing in the function display.
8. Repeat steps 4, 5, and 6 until all six interval temperatures
have been programmed.
9. Depress the SELECT FUNCTION switch until PRESSURE
is flashing in the function display. Digital display will read
OFF or ON.
304
3-1
3-2. COOK CYCLE
PROGRAMMING
(Continued)
10. Follow steps 4, 5, and 6 until all six intervals have been
programmed for pressure.
The above steps may be followed for interval alarms
except you cannot program an interval alarm in the
first interval.
Refer to Special Programming Modes on factory
presets for load compensation, proportional control,
and filter cycle counts.
3-3. ERROR CODES
The following defines the error code number. If an error code
occurs, the buzzer will sound until you depress a cycle switch.
The control will continue to display the error code and fryer
will be inoperative until error is corrected.
• E 5 - Pot temperature too high. (Software high limit)
• PROB - Temperature probe has failed.
• E 41 - Control Problem - Must be initialized and
reprogrammed.
3-4. SPECIAL
PROGRAMMING MODES
The special programming modes are entered by way of a
special sequence of keys and are intended to be infrequently
used for service or factory preset functions. The modes are
numbered according to the cycle that is selected to enter them.
• KFC Parameters (Factory Preset) (Cycle 6)
• Test Procedures (Cycle 7)
To enter special programming mode, the following steps must
be followed exactly.
1. Enter the password keystroke sequence for programming
mode. Refer to “The Basic Programming Sequence”.
2. Depress the EXIT COOL switch. Display will read “SP”.
3-2
304
3-4. SPECIAL
PROGRAMMING MODES
(Continued)
3. Select the desired special function by depressing either
cycle switch 6 or 7.
4. Perform the desired operation.
5. Depress the EXIT FILL switch to exit the special program
mode. Unit will return to stand-by cook mode.
The preceding steps must be followed exactly to enter
the special program mode.
3-5. ONE STEP KFC
PARAMETERS
1. Enter the special program mode.
2. Depress the cycle 6 switch. Display will read as follows.
Digit
4
3
2
1
Digit 1: Blank - When depressed it will erase all memory from
controller. Display will read INIT for one second then erase
all memory.
Digit 2: Blank - When depressed it will enter all KFC cooking
parameters. Display will read INIT for two seconds, then DEF
for two seconds.
Digit 3: Display will read either F for Fahrenheit degrees or
C for Celsius degrees.
Digit 4: Display will read either E for Electric or 0 for other
(includes gas).
3-6. TEST PROCEDURE
1. Enter the special program mode.
2. Depress the cycle 7 switch. Display will be blank.
3. Depressing a certain switch on the front panel turns an
output on, while depressing the same switch again turns
that output off. This will test all circuits on the controller.
304
3-3
3-6. TEST PROCEDURE
(Continued)
The table below shows the corresponding switch with the
output.
Switch
Product One
Select Time
Select Function
Change Switch Under Display 4
Change Switch Under Display 3
Change Switch Under Display 2
Change Switch Under Display 1
Device Activated
Pressure Solenoid and Heat Control
Product Indicators
Function Indicators
Change Switch Indicator Display
Change Switch Indicator Display
Change Switch Indicator Display
Change Switch Indicator Display
The SELECT FUNCTION or SELECT TIME switch
must be depressed before the PRODUCT ONE switch
to properly perform the solenoid and heat control
output test.
To avoid personal injuries or property damage when
performing the solenoid and heat control test, be sure
there is shortening in the frypot. Unit will run
unregulated. For test purposes only.
3-7. SPECIAL FUNCTIONS
When programming one step KFC parameters, load compensation, proportional control, and filter cycle are automatically
programmed into the control. The following defines these three
functions.
Load Compensation - Load compensation adjusts cooking
times to compensate for differences in the cooking process such
as load size. The control is continuously comparing the pot
temperature to the setpoint, the control will shorten the cook time.
If the pot temperature is below the setpoint, the control will
lengthen the cook time. Load compensation for KFC
parameters is set at 0.
Proportional Control - Proportional control regulates pot tempera
ture by pulsing the heat off and on until it reaches setpoint tempera
ture. This allows better temperature accuracy when dropping
product. Proportional control for KFC parameters is set at
10 degrees.
3-4
Filter Cycle - Filter indication is given after the programmed
number of cycles are cooked. KFC parameters are set at 1,
and further operation of the control is not allowed until filtering
is complete.
304
805
3-5
3-6
805
805
3-7
3-8
805
805
3-9
3-10
807
805
3-11
3-12
807
807
3-13
3-14
807
807
3-15
3-16
807
807
3-17
3-18
807
SN: AN0703021 & ABOVE
807
3-19
SN: AN0703021 & ABOVE
3-20
807
SPARE PARTS LIST - GAS
Part No.
Description
To ensure the correct control replacement kit is shipped for gas
fryers built before 8-16-06, the model and serial number must
be provided.
√
√
√
√
√
√
√
√
√
√
√
√
√
73888RB
73889RB
30978
14332
14428
29887
30018
30094
36097
29898
17635
54085
29901
ME90-009
71933
56528
36210
51426
14354
Assy - Control - 600SMS Int (8-18-06 & after)
Assy - Control - 600SMS Dom (8-18-06 & after)
Transformer - 120VP-12VS-20VA
Temperature Probe (non-SMS)
Assy - 6 inch Probe - 600 SMS
Menu Cards
Ferrule (for Temperature Probe)
Compression Fitting
Pot Fitting with Protector
Power Switch
Indicator Lights
Indicator Lights - Green - CE
Capacitor/Resistor Assembly
Relay - 240V (CE)
Relay - 24V (CE)
Membrane Switch
Replaceable Beeper
EMC Filter - CE
Kit - Conversion 600 to SMS (SN: KA021JJ to GA085JB)
√recommended parts
807
3-21
Part No.
SPARE PARTS LIST - ELECTRIC
Description
To ensure the correct control replacement kit is shipped for
electric fryers built before 8-16-06, the model and serial number
must be provided.
√
√
√
√
√
√
√
√
√
√
73896RB
73897RB
29382
36210
28979
16624
54085
30560
29901
29898
29887
30018
30094
√ 43649
√ 73799
√ 30971
14781
14459
14360
Assy - Control - 500SMS Int (8-18-06 & after)
Assy - Control - 500SMS Dom (8-18-06 & after)
Membrane Switch
Replaceable Beeper
Transformer
Indicator Lights
Indicator Lights - Green - CE
Capacitor/Resistor Assembly
Capacitor/Resistor Assembly
Power Switch
Menu Cards
Ferrule (for Temperature Probe)
Compression Fitting
Probe Assembly (non-SMS)
Assy - 3 inch Probe - 500 SMS
MOV Assembly
Kit - Dom.-FAST to HP Ctl. HB014JB & above (w/setpoints)
Kit - Int’l.-FAST to HP Ctl. HB014JB & above (no setpoints)
Kit - FAST to HP Ctl.-400V-CE (SN: KB021JJ to HB013JB)
√recommended parts
3-22
807