1
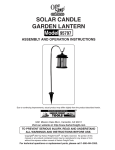
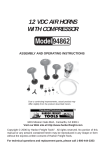
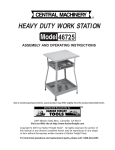
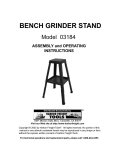
Solar Insect killer
with light
Model 95500
Assembly & operating Instructions
Due to continuing improvements, actual product may differ slightly from the product described herein.
®
3491 Mission Oaks Blvd., Camarillo, CA 93011
Visit our website at: http://www.harborfreight.com
To prevent serious injury, read and understand
all warnings and instructions before use.
Copyright© 2006 by Harbor Freight Tools®. All rights reserved. No portion of this
manual or any artwork contained herein may be reproduced in any shape or form
without the express written consent of Harbor Freight Tools.
For technical questions or replacement parts, please call 1-800-444-3353.
Specifications
Overall Dimensions
5-7/8” L x 5-7/8” W x 6-1/8” H
Solar Panel Dimension
2.62” L x 2.62” W
Polycrystalline Solar Panel
60 mA - 0.24 W
Batteries
600 mA AA NiCd Batteries - Qty. 2 - (included)
LED Lights-2 Modes
Single LED Light (1 White LED)
Pest Attracting Light (2 Ultraviolet LED)
Running Time
8 Hours on Fully Charged Batteries
Net Weight
0.8 lb.
Save This Manual
You will need this manual for the safety warnings and precautions, assembly, operating, inspection, maintenance and cleaning procedures, parts list and assembly diagram.
Keep your invoice with this manual. Write the invoice number on the inside of the front
cover. Write the product’s serial number in the back of the manual near the assembly diagram, or write month and year of purchase if product has no number. Keep this manual
and invoice in a safe and dry place for future reference.
GENERAL SAFETY RULES
Work Area
1.
Keep work area clean. Cluttered areas invite injuries.
2.
Check for damaged parts. Before using any product, any part that appears
damaged should be carefully checked to determine that it will perform its intended
function. Check for any broken or damaged parts and any other conditions that may
affect its operation. Replace or repair damaged or worn parts immediately.
3.
Always check hardware and assembled parts after assembling. All connections should be tight and hardware tightened.
4.
Keep children away. Children must never be allowed in the work area. Children
should not be allowed to play or touch this product because of high voltage. Also
keep pets away front the Solar Insect Killer with Light.
5.
Use eye protection. Always wear ANSI-approved impact safety goggles when
setting up this product.
6.
Maintain products with care. Keep the Solar Insect Killer with Light clean for better
and safer performance. Follow instructions for set up. Be sure the Solar Insect Killer
is in the OFF position before cleaning off bugs. Clean with a dry brush. Be careful
not to damage the electric grid. Keep the Solar Panel clear of dirt and dust with a
damp cloth. Inspect periodically.
SKU 95500
For technical questions, please call 1-800-444-3353.
Page 7.
People with pacemakers should consult their physician (s) before using this
product. Electromagnetic fields in close proximity to a heart pacemaker could cause
interference to or failure of the pacemaker.
Unpacking
When unpacking, check to make sure that the item is intact and undamaged. If any
parts are missing or broken, please call Harbor Freight Tools at the number shown on the
cover of this manual as soon as possible.
Assembly Instructions
Note: For additional information regarding the parts listed in the following pages, refer to
the Assembly Diagram near the end of this manual on page 8.
Installation Operation
Note: The Solar Insect Killer with Light can be configured in two designs. One design is as
a Light that resembles a Lantern. The other design is a Solar Garden Light with a
stake that goes into the ground.
1.
As a Solar Garden Light, insert the assembled Stake (17, 18, 19, & 20) into a
flat and level surface. Choose an area where the sunlight falls directly onto the
Solar Panel (2). Insert the sharp end of the Stake into the ground, deep enough to
hold firmly. Be sure you have avoided any underground wiring or plumbing. Attach
the Light firmly on the top of the Stake. See the cover photo. Make sure the area
is not accessible to children or pets and that the area has no plant debris nearby
that can fall on the unit.
2.
As a Lantern design, remove the Stake. You need to place the lantern in a area
where the Solar Panel (2) can be charged with direct sunlight while hanging. Lift the
Hook (1) and connect it to a chain or hook from a beam or door jam. Avoid hanging
it too low where bodily injury could happen. See Figure 3.
SKU 95500
For technical questions, please call 1-800-444-3353.
Page Solar Panel (2)
Figure 1
3.
You need to flip the Switch to OFF (8) and charge the Solar Insect Killer with
Light when using it for the first time. Charge time for the Solar Panel (2) is at
least 2-3 days. After this, it will last eight hours without sunlight. Turn off the light
during daylight.
Note: The Solar Insect Killer with Light can also be charged with an AC/DC adapter,
4.5V/250mA (not included).
Note: There are three positions on the Switch (8). ON, OFF & Ultraviolet Light (that attracts
insects to kill them). The Insect Killer position of the switch will operate 6 hours at
a time after a full days charge. See Figure 2.
On/Off and Ultraviolet Switch (8)
Figure 2
4.
The power Switch (8) is located on the underside of the top cover. See Figure 2.
SKU 95500
For technical questions, please call 1-800-444-3353.
Page Hook (1)
Lantern Style
Ground Stake
(17, 18, 19, 20)
Figure 3
5.
Place the lantern assembly on the top of the Ground Stake (17,18,19, 20). Be sure
it is connected firmly. Turn the Switch (8) on.
Replacing the batteries
Note: If the light stops working after being used for a period of time, it may mean the battery is beyond its lifespan.
1.
Remove the Light from the Stake. From the underside of the Light, remove the cage
to access the batteries. Twist the cage counterclockwise and lift off to expose the
Screws (10). Set aside. (Caution: The cage is fragile. Handle carefully). See Figures
4 & 5.
Underside of
top cover
On/off Switch (8)
Figure 4
2.
With a screwdriver (not provided) remove the Screws (10) to expose the batteries.
Tilt the Transparent Inner Hood assembly (12), containing the bulbs, carefully aside
but still connected. Remove the batteries, being careful not to damage the wiring.
See Figures 4 (above) and 5 on page 6.
SKU 95500
For technical questions, please call 1-800-444-3353.
Page Transparent
Inner Hood
Assembly (12)
Batteries (11)
Battery Case (9)
Figure 5
3.
Replace the dead batteries with identical AA NiCd Rechargeable Batteries (11). Be
sure to follow the polarity signs inside of the Battery Case (9).
4.
Reverse these steps and reassembly the Solar Insect Killer with Light. Tighten the
screws and replace the cage, turning clockwise. Connect assembly to the Stake.
Turn the Switch to ON. If it does not light, check to polarity of the batteries again or
place the Solar Light in sunlight and charge.
5.
Dispose of the used batteries properly by contacting your local community waste
disposal facility.
INSPECTION, MAINTENANCE, AND CLEANING
1.
To remove dust, be sure the Switch is in the OFF position. Use a damp cloth. Dry
with a cloth.
2.
This product is weather resistant but avoid standing water.
3.
Brush off the dried bugs with the Light in the OFF position.
SKU 95500
For technical questions, please call 1-800-444-3353.
Page PARTS LIST
Part
Description
Q’ty
Part
Description
Q’ty
1
Hook
1
11
Battery
2
2
Solar Panel
1
12
Electric Grid
1
3
Top Cover
1
13
Screw
2
4
Circuit Board
1
14
Reflect Ring
1
5
LED
1 White
2 Ultraviolet
15
Reflect Board
1
16
Outer Hood
1
6
Control Circuit Board
1
17
Upper Shaft
1
7
Recharge Socket
1
18
Connector
1
8
Switch
1
19
Lower Shaft
1
9
Battery Case
1
20
Ground Stake
1
10
Screw
4
PLEASE READ THE FOLLOWING CAREFULLY
The manufacturer and/or distributor has provided the parts list and assembly diagram in this manual as a reference tool only. Neither the manufacturer
or distributor makes any representation or warranty of any kind to the buyer
that he or she is qualified to make any repairs to the product, or that he or
she is qualified to replace any parts of the product. In fact, the manufacturer
and/or distributor expressly states that all repairs and parts replacements
should be undertaken by certified and licensed technicians, and not by the
buyer. The buyer assumes all risk and liability arising out of his or her repairs
to the original product or replacement parts thereto, or arising out of his
or her installation of replacement parts thereto.
SKU 95500
For technical questions, please call 1-800-444-3353.
Page ASSEMBLY DIAGRAM
Solar Panel (2)
Main Body
Ultraviolet LED
White Led
Electric Grid
Stake (17, 18, 19, 20)
1
6
7
2
8
5 4
9
3
11
13
10
12
14
15
17
18
16
19
20
Record Product’s Serial Number Here:
Note: If product has no serial number, record month and year of purchase instead.
Note: Some parts are listed and shown for illustration purposes only, and are not available
individually as replacement parts.
SKU 95500
For technical questions, please call 1-800-444-3353.
Page