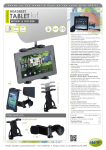
1
BD-66A
CHEST FREEZER
USER MANUAL
W
MO
NT H
AR
Y
T
R AN
12
Y
AR
NT H
S
W
MO
S
12
BD-66A
R AN
T
IMPORTANT
Please read this Owner’s Manual carefully before using
your freezer. Keep in a safe place for future reference.
Thank you for choosing
Table of Contents
Outline Drawing
Page 1
Important Safeguards
Page
2-3
Electric Control panel
Page
4
Freezer Installation
Page
5
Energy Saving Tips
Page
6
Operating the Freezer
Page 6-7
Care and Cleaning
Page
8
Defrosting
Page
9
Useful Hints
Page
10
Troubleshooting
Page
10-11
Guide to Home Freezing
Accessories List
Technical Data and Wiring Diagram
Warranty
ATTACHMENT
Page 12
Page
13
Page 14
Page
page
15
16
DANGER
AVOID THE RISK OF CHILD ENTRAPMENT.
BEFORE THROWING AWAY AN OLD REFRIGERATOR OR FREEZER, TAKE
OFF THE DOORS/LIDS AND REMOVE THE SHELVES SO THAT CHILDREN
CANNOT GET TRAPPED INSIDE.
Important Safeguards
Read all instructions before using this appliance.
When using this appliance, always exercise basic safety precautions, including
the following:
1) Use this appliance only for its intended purpose as described in this guide.
2) Remove all packaging before commencing freezer operation.
3) This freezer must be installed properly in accordance with the installation
instructions before it is plugged in and used. See grounding instructions in
the installation section.
4) This freezer is designed for freestanding installation only and it should not be
recessed or built in.
5) At least 7.5cm air space on top, sides and back of the freezer should be
given. This allows air to circulate freely and helps to prevent condensation
on the cabinet.
6) It is recommended that the freezer is cleaned before use as per the ‘Care
and Cleaning Instructions’ in this manual.
7) Never unplug your freezer by pulling on the power cord. Always grip the plug
firmly and pull it straight from the outlet.
8) Replace or repair immediately all electric service cords which may have
become frayed or otherwise damaged. Do not use cord that shows cracks or
abrasion damage along its length or at either the plug or connector end.
9) If your old freezer is still around the house but not in use, be sure to remove
the doors to reduce the possibility of danger to children.
10)Unplug your freezer before cleaning or before making any repairs. NOTE:
We strongly recommend that any servicing or repairs be undertaken by a
suitably qualified technician.
11) Do not refreeze any foods which have been thawed.
2
15
12)Do not use any electrical devices or sharp instruments to defrost the freezer.
13)Food should only be placed inside the freezer 8 hours after the freezer has
been turned on to avoid wasting power and over working the compressor.
14)Ensure that hot food is allowed to cool completely before freezing.
15)Do not overfill the freezer. Where possible, large blocks of meat should be
cut and wrapped in smaller pieces. Space should be left between packages
of food to enable air to circulate at all times.
6
66
0.65
30
455x650x875
16)Never place combustible, explosive or volatile liquid, gas or other materials in
the freezer.
17)Do not install the freezer in the same vicinity of any combustible, explosive or
volatile liquids/gases.
18)Do not leave beverages such as beer, soft drinks or other liquids packaged
in glass containers in the freezer. Such liquids will expand upon freezing and
can cause the glass to break.
SAT
L
E
C
Over load Protector
YELLOW LAMP
BLUE
BLACK
19)Do not put water directly in to the tank of the freezer.
RELAY
GREEN LAMP
E
TERMINAL BLOCKS LEAD
1
N
WHITE
WHITE
G/Y
G/Y
BLACK
BLUE
WHITE
COMPRESSOR
BLACK
BD-66A
BLACK
SERVICE
CORD.
E
14
3
1)The control panel is numbered 1,2,3,4,5,6,7. This refers to the temperature
on the inside of the freezer.The temperature is lowered by turning the dial
in clockwise direcrtion.
ƽRefrigerate: When dial is near the "1" position, the interior average
temperature of freezer is approximately 10ć̚-2ć .
ƽFreeze: When dial is near the "2-7" postion, the interior average
temperature of freezer is approximately -2ć̚-26ć.
When you change the dial from refrigerate function to feeze function, the food
in the freezer should be taken out to aviod freezen .
2)The green lamp is used to indicate that the appliance is connected to a
power supply and is 'on' . The greenlamp will be illuminated when the freezer
is connected to an appropriate power supply .
3) The yellow lamp will be illuminated when the 'Super Freeze' switch is
in 'on' . The compressor continues cooling until the 'Super freeze' is turned
to 'OFF' again.
4)All control equipment is installed on the control panel situated on the
exterior of the freezer.
BD-66A
Power on
green power-on light
Super Freeze
OFF
ON
yellow Super Freeze switch
R
1 eferig
e
te
ra
7
2
6
3
Fr
temperature control dial switch
e
e z5
e
4
4
13
Freezer Installation
1) The freezer is designed for free-standing installation only.
2) The freezer should not be recessed or built in.
3) Install the freezer on a base strong enough to support it when fully loaded.
Ensure the freezer is on a stable surface to minimise noise and vibration.
4) Install the handle: you can find the handle in the foodbasket,and loosen
the screws of the door, install the handle on the door,then tighten the
screws, in the end , clock the handle lid in the handle.
5) When moving the freezer, never tilt at an angle more than 45o as this could
damage the compressor and freezer system. If the freezer is tilted over 45o, or
has been stored on its side, allow the freezer to stand upright for at least 24
hours prior to plugging it back in. This will allow the refrigerant to settle.
6) Install the freezer in a well-ventilated area away from any heat source or direct
sunlight. Air must be allowed to circulate freely around the freezer. Allow at
least 3inches (7.5cm) of clearance space for the top, back and sides.
7) Install the freezer in a dry place to prevent rust from forming on the compartment
body and to avoid the risk of damaging the electric insulation.
Electrical Connection and Precautions
1) IMPORTANT –
For personal safety, this appliance must be properly
earthed.
2) The voltage range for this appliance is 187v – 242v. In the event that your
regional power supplier cannot meet this requirement, please use a safe and
reliable automatic voltage regulator with a minimum output of 500W to avoid
damaging the compressor.
3) A 13 Amp, 3 pin plug and 5 Amp fuse only must be used for this freezer to avoid
serious damage. The plug should always be wired in accordance with the
following codes:
Green and Yellow
EARTH (E)
Blue or Black
Neutral (N)
Brown or Red
LIVE (L)
It is safest to consult a qualified electrician at all times
4) In the event of an electrical short circuit, grounding reduces the risk of electric
shock by providing an escape wire for the electrical current. This appliance is
12
3)There is condensation on the surface . THIS IS ESPECIALLY COMMON IN
CLIMATES WITH HIGHHUMIDITY AND IS NOT A DEDECT.
CLEAN THE CONDENSATION WITH A DRY CLOTH.
Troubles/Problems
Reasons
Solutions
Power is off.
Check your main circuit.
The plug is not inserted.
Insert plug and switch on socket.
The fuse is blown/burnt.
Change the fuse (5 amp)
The indicating lamp is out of use
Change the indicationg lamp bulb.
Circuit breaker tripped
Reset breaker.
Cable is damaged.
Call electrician to repair.
Green indicating lights is off
The temperature is not low
enough, or red light is on
'1'
'7'
'7'
Temperature setting is not low
Enough.
Turn dial to higher number setting.
The freezer is in direct sunlight
or close to a heat source.
Change freezer location.
Toomuch food has been
stored at one time
Place food in the freezer in
Batches and use fast/quick
freeze feature.
The door is being opened
too often
Keep door closed for longer.
Too much noise/vibration.
The floor is not level
Change the position of the
freezer until the noise level is
reduced
The compressor works
continuously.
The thermostate setting is too
low.
Turn the dial to increase the
temperature.
The quick freezing switch is on
and the yellow lamp is lit.
Turn the quick freeze switch to
its mormal (off) position when the
fast/quick freeze period has
finished.
'1'
Strong doours in the freezer
Reamove spoiled food form
freezer and any other food it has
been in contact with.
Splilt food.
Food no wrapped correctly.
Ensure food with strong odour
is tightly covered (freezer bags
are best).
Interior requires cleaning.
Clean per 'Care and Cleaning'
instruction.
No baking soda in place.
Place an open box of baking
soda inside the freezer. Reaplace
every 3 months.
IF PROBLEMS PERSIST, CONTACT AN APPROVED HAIER-THERMOCOOOL SERVICE TECHNICIAN .
ALWAYS USE A CERTIFIED TECHNICIAN/ELECTRICIAN.
6
11
10
7
( some model
have this part)
8
9