1
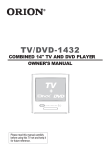
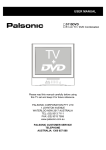
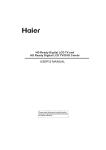
0090509448
00000309243
L19K3
0090509448
2009.02.04
A
LCD TV
USER MANUAL
Please read this manual carefully
before using this TV set and leep it
for future reference.
MODELS:
LA19T3W(STOCK#ONN19LCD)
LX19T3W(STOCK#ONN19LCDV)
LA22T3W(STOCK#ONN22LCD)
LX22T3W(STOCK#ONN22LCDV)
CAUTION: TO REDUCE THE RISK OF ELECTRIC SHOCK,
DO NOT REMOVE COVER (OR BACK).
NO USER SERVICEABLE PARTS INSIDE.
REFER SERVICING TO QUALIFIED SERVICE
PERSONNEL.
The lightning flash with arrowhead symbol, within an equilateral
triangle is intended to alert the user to the presence of
uninsulated dangerous voltage within the product s
enclosure that may be of sufficient magnitude to constitute a
risk of electric shock.
The exclamation point within an equilateral triangle is intended
to alert the user to the presence of important operating and
maintenance (servicing) instructions in the literature
accompanying the appliance.
WARNING: TO PREVENT FIRE OR SHOCK HAZARD, DO NOT
CAUTION:
EXPOSE THIS APPLIANCE TO RAIN OR MOISTURE.
TO PREVENT ELECTRIC SHOCK DO NOT USE THIS
POLARIZED PLUG WITH AN EXTENSION CORD,
RECEPTACLE OR OTHER OUTLET UNLESS THE
BLADES CAN BE FULLY INSERTED TO PREVENT
BLADE EXPOSURE.
CAUTION: These servicing instructions are for use by qualified service
personnel only. To reduce the risk of electric shock, do not perform any
servicing other than that contained in the operating instructions unless
you are qualified to do so.
CAUTION: USE OF ANY CONTROLS, ADJUSTMENTS, OR PROCEDURES
OTHER THAN THOSE SPECIFIED HEREIN MAY RESULT IN HAZARDOUS
RADIATION EXPOSURE. (This item is only for TV with DVD models.)
IMPORTANT SAFETY INSTRUCTIONS
1) Read these instructions.
2) Keep these instructions.
3) Heed all warnings.
4) Follow all instructions.
5) Do not use this apparatus near water.
6) Clean only with dry cloth.
7) Do not block any ventilation openings. Install in accordance with the
manufacturer's instructions.
8) Do not install near any heat sources such as radiators, heat registers, stoves,
or other apparatus (including amplifiers) that produce heat.
9) Protect the power cord from being walked on or pinched particularly at plugs,
convenience receptacles, and the point where they exit from the apparatus.
10) Only use attachments/accessories specified by the manufacturer.
11) Use only with the cart, stand, tripod, bracket, or table specified by the
manufacturer, or sold with the apparatus. When a cart is used, use caution when
moving the cart/apparatus combination to avoid injury from tip-over.
12) Unplug this apparatus during lightning storms or when unused for long
periods of time.
13) Refer all servicing to qualified service personnel. Servicing is required when
the apparatus has been damaged in any way, such as power-supply cord or plug
is damaged, liquid has been spilled or objects have fallen into the apparatus, the
apparatus has been exposed to rain or moisture, does not operate normally, or
has been dropped.
14)The apparatus shall not be exposed to dripping or splashing and that no
objects filled with liquids, such as vases, shall be placed on the apparatus.
15)The mains plug or appliance inlet is used as the disconnect device, remain it
readily operable during the apparatus normal use.
Front Panel Controls.................................................................................. 1
Connection Options................................................................................... 2
Remote Control Key Functions.................................................................... 3
Connection Instructions............................................................................. 5
External equipment Connections.............................................................. 5
Antenna Connection............................................................................... 5
External AV Source Setup....................................................................... 5
PC Setup............................................................................................... 6
YPbPr Input........................................................................................... 6
VCR Setup............................................................................................. 7
Cable TV Setup.......................................................................................7
Basic Operating Instructions....................................................................... 8
Turn on the LCD TV...................................................................................8
Audio Control.......................................................................................... 8
Mute....................................................................................................... 8
Select the TV Channel You Want................................................................ 8
P.MODE Mode..........................................................................................8
S.MODE Mode......................................................................................... 8
Sleep...................................................................................................... 8
H.LOCK...................................................................................................9
Menu Operations........................................................................................10
Picture Menu Options................................................................................10
Sound Menu Options.................................................................................11
Function Menu Options............................................................................. 12
Tuner Menu Options................................................................................. 13
Timer Menu Options................................................................................. 14
Adjust Menu Options................................................................................. 14
DVD Features............................................................................................ 15
Special Function Playback..........................................................................17
DVD System Setup.....................................................................................18
Playable Discs........................................................................................... 20
Disc Protection and DVD Characteristics..................................................... 21
Troubleshooting Guide............................................................................... 22
Specifications........................................................................................... 23
Control Panel Function
1. POWER Press to turn on and off the TV.
2. INPUT Selects the input signals.
3. MENU Menu display. Press to access the on-screen menu display.
4. VOL- Volume down / Left button to adjust the item in the OSD.
VOL+ Volume up / Right button to adjust the item in the OSD
/Press to enter.
5. CH- TV channel down / to select the item in the menu.
CH+ TV channel up / to select the item in the menu.
6. Power indicator
7. Remote Sensor Receivers IR signals from the remote control.
Do not put anything near the sensor ,which may
block the remote control signal.
DVD
OPEN/CLOSE
PLAY/PAUSE
STOP
PREV
NEXT
DVD slot load
Insert DVD with the label side facing towards
the back. (Silver "shiny" side facing towards you)
The above figure is for reference
only, connections may differ
depending upon the models and
terminals of some models may be
on the back bottom of the set
1. HDMI: Connect a HDMI device to receive digital audio and uncompressed
digital video.
2.VGA
Connect to the VGA 15PIN analog output connector of a PC
graphics card to use set as a PC display.
3.Component Input Connect a component video device to these jacks.
4.S-VIDEO Connect S-Video out from an S-Video device to the jacks.
5.VIDEO Out Connect video input from an external device to this jack.
6.AUDIO Out Connect audio input from an external device to these jacks.
7. Video in Connect video output from an external device to this jack.
8.Audio in Connect audio output from an external device to these jacks.
9.PC audio in Connect the audio output from the pc to the PC audio input port.
10..Headphone jack : Headphone audio output terminal.
11. ANT IN(Antenna Input)
Connect cable or antenna signals to the TV,
either directly or through your cable box.
Remote Control Key Functions
When using the remote control, aim it
towards the remote sensor on the TV
1
OPEN/CLOSE
DISPLAY
2
3
4
5
6
21
ARC
P.MODE
S.MODE SLEEP
D.AUDIO SUBTITLE
CCD
MTS/SAP
22
23
24
25
26
SCAN
7
INPUT
27
MUTE
RECALL
8
28
9
VOL
CH
29
MENU
H.LOCK
30
10
11
EXIT
12
13
31
OK
D.MENU
32
REPEAT
ZOOM
PLAY/PAUSE STOP
PREV
NEXT
SETUP
TITLE
SEARCH
10+
PROGRAM
A-B
ANGLE
D.CALL
14
15
16
17
18
REV
33
34
35
36
37
38
39
40
19
20
(For TV with DVD)
1.Press to turn on and off the TV
2.Press to display the TV status information on the top
of the TV screen
3.Press to change the aspect ratio
4.Press repeatedly to cycle through the available picture
modes
5.DVD AUDIO
6.DVD SUBTITLE
7.Show the input source
8.Switches the TV sound on or off
9.Press to adjust the volume
10.Press to open the on-screen menu
11.Thumbstick(Up/Down/Left/Right)
Allows you to navigate the on-screen menus
and adjust the system settings to your preference
12.Clears all on-screen displays and returns to TV viewing
from any menu
13.DVD ZOOM
14.DVD REPEAT
15.DVD FAST FORWARD
16.DVD FAST REVERSE
17.DVD TITLE
18.DVD SET UP
19.DVD PROGRAM
20.DVD A-B
21.DVD Open/close
22.Press to display the sleep timer option
23.Press to cycle through different sound settings
24.Select MONO, STEREO, SAP
25.Select a closed caption option
26.Press to change a channel
27.SCAN
28.Press to jump back and forth between two channels
29.Press to scan through channels. To scan quickly
between the last two channels, press and hold down
either +/- .
30.V-CHIP
31.Confirm button
32. DVD menu
33. DVD PLAY/PAUSE
34. DVD STOP
35. DVD Previous Chapter
36. DVD Next Chapter
37.DVD SEARCH
38.DVD 10+
39.DVD CALL
40.DVD ANGLE
When using the remote control, aim it towards the remote sensor on the TV.
1
SCAN
HDMI
2
14
3
1
2
3
4
5
6
7
8
9
INPUT
15
DISPLAY
0
4
16
MENU
MUTE
5
17
CH+
6
VOL-
OK
VOL+
18
CHEXIT
RECALL
7
8
9
10
11
12
13
19
P.MODE
CCD
PIP
ARC
SLEEP
S.MODE
MTS/SAP H.LOCK FREEZE
SWAP
MOVE
FAVORITE
(For TV without DVD)
20
21
22
23
24
25
1.Press to turn on and off the TV
2.SCAN
3.Not available
4. Show the input source
5.Press to open the on-screen menu
6.Volume/Channel Selection
7.Clears all on-screen displays and returns to TV viewing
from any menu
8.Press repeatedly to cycle through the available picture
modes
9.Press to change the aspect ratio
10.Select a closed caption option
11. Select MONO, STEREO, SAP
12.Not available
13.Not available
14.HDMI mode
15.Press to change a channel
16.Press to display the TV status information on the top
of the TV screen
17.Switches the TV sound on or off
18.Confirm button
19.Press to jump back and forth between two channels
20.Press to cycle through different sound settings
21.Press to display the sleep timer option
22.Not available
23.V-CHIP
24.Not available
25.Not available
VOL+/OK
Press H.LOCK to enter it and input the password correctly, the H.LOCK menu
will appear on the screen(The initial password is 0000).
Password: The password can be changed. Press VOL+/OK to enter. The screen
will display New PW ----, then enter the new password and the screen display
Confirm PW ----, if the same password is input correctly twice, the old password
will be changed.
V-Chip: Press VOL+/- to select On or Off.
TV-Rating:The Parental control will automatically block certain categories that
are more restrictive . For example, if you block TV-Y category, then all the
categories in the young adult group will be blocked (TV-Y, TV-Y7, TV-G, TV-PG,
TV-14 and TV-MA).
The sub-ratings (D, L, S, V, FV) work together similarly.
How to set the D, L, S, V and FV sub-ratings
First, press CH+/- button select one of these Ratings:
TV-Y, TV-Y7, TV-G, TV-PG,TV-14, or TV-MA , and press VOL+/- button.
A symbol ”U” will be displayed for each sub-rating.
While”U” is selected, press OK button to go to a sub rating. To select a different
Rating, press CH+/- buttons and then repeat the process.
Note
The V-chip will automatically block certain categories that are More restrictive .
For example, if you block B sub-rating in TV-PG, then the B sub-ratings in
TV-14 and TV-MA will automatically be blocked.
Movie-Rating: Blocks movies according to the movie ratings limits specified, so
children cannot view certain movies. You can set the ratings limit by blocking out
all the movies with the ratings above a specified level. Keep in mind that the
movie ratings limit only applies to movies shown on TV, not TV programs, such as
soap operas.
English-Rating: English Language Rating
Press VOL+/OK to enter the sub-menu, press CH+/- to select one of these
Ratings: Empty, C, C8+, G, PG, 14+, or 18+, and press VOL+/- to select
UNBLOCK or BLOCK.
French-Rating: French Language Rating
Press VOL+/OK to enter the sub-menu, press CH+/- to select one of these
Ratings: Empty, G, 8ans+, 13ans+, 16ans+, or 18ans+, and press VOL+/- to
select UNBLOCK or BLOCK.
In this manual, the OSD (On Screen Display) may be different from your TV s
because it is just an example to illustrate the TV operation.
Press INPUT to select the input source, and the menu for each source is different.
1. Press MENU button to display the main menu, and VOL+/-to select the main
menu.
2. Press CH+/- to scroll through the parameters, press VOL+/OK to confirm .
3. Press VOL+/- buttons to make changes to the parameters.
4. Press EXIT button to exit the menu.
Not available
Not available in PC
Reset : Reset all settings to factory mode.
Reset : Reset all settings to factory mode.
Menu Language Selection:
The menus can be shown on the screen in the selected language. First select
your language.
1. Press MENU button and VOL+/- until the following menu appears on the screen.
2. Press CH+/- button to enter the function menu and to go up and down to select
the desired option .
3. Press VOL+/- button to adjust the selected option to your preference .
Functions:
Language: This item displays the language of the OSD.
Pic. Size: To select the display mode :4:3/Full/Zoom.
Menu Time: To select 5S/10S/15S.
Halftone: To select the menu transparency.
Blue screen :Press VOL+/- to select On or Off. To set On, screen will be in blue
screen after 3 seconds if there is no signal.
DNR: Digital Noise Reduction. Reduces the appearance of digitizing errors
caused by compression. Press VOL+/- to select On or Off.
1. Press MENU and VOL+/- button until the following menu appears on the
screen.
Note: This menu is only appears in TV mode .
2. Press CH+/- button to enter the turning menu and to go up and down to
select the desired option .
3.Press VOL+/- button to adjust the selected option to your preference .
Functions:
Channel Type: Press VOL+/- to select Air or cable.
Auto Search: Auto search and save the channel .Press the VOL+ button to start
automatic search function operation. All channels now available will be
automatically preset in order .After the search has finished, the first program
number will display on the screen. This search automatically adds only the active
channels in your area to the TV's memory. It deletes any channels on which there
is no broadcast or a poor signal.
Note: The Auto Search function will scan the channels on the selected Air input.
If the TV is connected to cable, please select Cable under ' Air ' sub menu.
Fine Tune : If the image and / or sound received is not very good , you can press
CH+/- to select Fine Tune in the menu . Then , press VOL+/- button to adjust and
improve the image quality. Do not use this feature unless reception is poor.
Skip : If you want skip a channel , press VOL+/- to select On , and this channel
will be skipped next time when you press CH+/- . You can press the digit buttons
to select the channel . If you want to restore the channel , select Off.
1. Press MENU and VOL+/- button until the following menu appears on the
screen.
2. Press CH+/- button to enter the turning menu and to go up and down to
select the desired option .
3.Press VOL+/- button to adjust the selected option to your preference.
Functions:
Clock: Set the Correct time.
Time Off: Set the time that the TV goes off automatically.
Time On: Set the time that the TV comes on automatically.
Book Channel: Set the channel that the TV comes on automatically.
Remind Time: Set the time that you want to remind.
Remind Channel: Set the channel that you want to remind.
1. Press MENU and VOL+/- button until the following menu appears on the
screen.
Note: This menu is only appears in PC mode .
2. Press CH+/- button to enter the adjust menu and to go up and down to
select the desired option .
3.Press VOL+/- button to increase and decrease the level to adjust the
selected option to your preference .
Functions:
H-Position: Picture horizontal position adjust.
V-Position: Picture vertical position adjust.
Clock : Adjust the TFT-LCD to match the PC input source.
Phase : Removes any horizontal distortion and clears or sharpness the displayed
characters.
Auto Adjust : Is opted for adjustment of picture location frequency and phase
parameters.
DVD Features
Basic Playback
Preparations
Press DVD button on the remote control
to enter the DVD status.
Note: Do not insert a disc until the DVD input states
open
Basic playback
1.Place the DVD in the disc slot. The disc will be
loaded automatically after one to two seconds
then the DVD player reads the DVD and displays
the opening menu If there is no disc placed in
DVD mode, OPEN will display on the screen all
the times)
Do not place a disc that is unplayable in this
DVD player.
Some discs do not start automatically. Press
PLAY/PAUSE to start playback.
2. Some discs may start playback with a menu. Use
the cursor buttons on the remote control to select
menu options and press PLAY/PAUSE to start. You
may also press the digit buttons to select a menu
option directly. Many DVDs will not allow this during
start-up.
Pause playback
1. Press PLAY/PAUSE to pause playback (still mode).
The sound will be muted during still mode.
2. Press PLAY/PAUSE to resume normal playback.
Stop playback
1. Press STOP button to go to stop mode, the TV
screen will show the start logo. With some discs,
such as DVD or CDs, the player can resume
playback from the point where it was stopped.
2. Press PLAY/PAUSE to resume playback from the
location where the playback was stopped.
3. Press STOP twice to stop completely.
Previous and Next
During Playing, pressing the PREV button will
restart the last chapter and skip chapters
backwards with each subsequent press until the
start of the disc is reached.
Each press of NEXT button during playing will
skip the current chapter and play the next one.
Fast forward and Fast reverse
1. Press FWD to fast forward through the disc.
Each time the FWD button is pressed, the
fast forward motion speed changes.
2. Press PLAY/PAUSE to resume normal playback.
3. Press REV to fast reverse through the disc.
Each time the REV button is pressed, the
fast reverse motion speed changes.
4. Press PLAY/PAUSE to resume normal playback.
Single step playback
1. When paused, press PLAY/PAUSE continuous
to single step forward to the next frame in the
video.
2. Press PLAY/PAUSE to resume normal playback.
DVD Features(Continued)
Advanced Playback
IMPORTANT NOTE:
ALL DESCRIBED FUNCTIONS A FOR DVD DISCS. IF YOU PLAY OTHER DISC
FORMATS THE OPERATION AND ON SCREEN DISPLAY WILL BE DIFFERENT.
SUBTITLE
Press " SUBTITLE ", the screen will display "SUBTITLE 01/XX XXXXX", "01" indicates the ordinal
number of this language; "XX" indicates total number
of language; "XXXXXX" indicates the language of
country. (The number of language depends on disc.)
This function can select up to 32 languages displayed on screen.
REPEAT
Press " REPEAT " and Chapter repeat will be
displayed on screen, the second press will display
Title repeat, the third press will display All repeat,
the fourth press will cancel this function.
ANGLE
When enjoying sports, concert or theatre, press this
key to watch same actions in different angles. (Valid
for discs possessing this function. Using a disc
recorded in multi-angle you can view the scene from
different angles,for example,front, side, whole view
and exterior scene).
D.MENU
Press this key to display the root menu, select
items according to your preference. (This
function will work on a DVD with a multi-layer
menu.)
D.CALL
Pressing this key will cycle through "Title Elapsed",
"Title Remain", "Chapter Elapsed", "Chapter Remain"
and "Display off ".
PROGRAM
When playing discs, press "PROGRAM" to enter
program mode. Press the digit buttons to select the
program number that you want. When finished move
the cursor to select "START" . Press PLAY/PAUSE
to confirm. This will start the program playback.
SEARCH
Press "SEARCH" once to display the search
menu. Press the button again to select. Press
the program number buttons to input the item
you require. Press PLAY/PAUSE to confirm.
AUDIO
D.AUDIO
Press this key can change the mode of audio.
such as: Audio 1/2: AC 3 2 CH English
Audio 2/2: AC 3 5.1 CH English
Press this button to cycle between Mono Left, Mono
Right, Mix-Mono and Stereo.
Note: When press this button continuously, you must
allow a 3 second interval between selections.
Special Function Playback
JPEG DISC PLAYBACK
When a disc containing standard JPEG picture files is inserted into the player, a
navigation menu will be displayed automatically. Use the UP and DOWN cursor
buttons to select a file then press PLAY/PAUSE. The slide show will commence.
Press PREV or NEXT to move between pictures. Press pause to stop on the
current picture. Press PLAY/PAUSE to resume normal playing.
A JPEG disc contains JPEG (.jpg) format picture information that can be decoded
by a micro-computer software and displayed through the video output interface or
on the television screen.
This function has many applications. For example one can save files from a
scanner or digital camera in the JPEG format, record these on a CD-R disc and
present them to an audience through this player.
The JPEG format is a convienient method to store images in a small amount of
memory space, and is ideal for archiving information.
SCREEN SAVER FUNCTION
This unit employs a screen saver mode to help protect the tube during static video pictures. This
can be turned off on the GENERAL SETUP PAGE.
DVD System Setup
DVD System Setup
General Setup Process
1.Press the setup button, the general set up
page will be displayed press twice the
preference page will be displayed.
2.Press / to select, the item, then press
to enter the submenu.
3.Press / to select then press PLAY/PAUSE
to confirm.
4.Press SETUP repeatedly to exit the set-up
menus.
NOTE: Preference page will be displayed when
there is no DVD in the unit. To access this page,
press SETUP button twice.
..General Setup Page..
Tv Display
Angle Mark
Osd Lang
Caption
Screen Saver
LB 4 3/Ps
On 4 3/Lb
ENG 16 9
On
Off
..Preference Page..
Parental
Password
Default
1 Kid Saf
2G
3 Pg
4 Pg 13
5 Pgr
6R
7 Nc17
8 Adult
General Setup Page
ASPECT RATIO DESCRIPTION
When using the DVD with the internal TV, select
4 3/LB.
..General Setup Page..
The following information applies only when
the DVD output is connected to an external
TV.
Tv Display
Angle Mark
Osd Lang
Caption
Screen Saver
4:3/PS (PS = Pan and Scan)
You may select if you have a normal aspect ratio (4:3)
TV, although the NORMAL/LB (letter box) is a more
common choice. In PS mode, widescreen material will
fill the screen, but at the expense of chopping off extre
me left and right edges of the original film picture. For
this feature to work, the disc must be specially coded.
Such discs are uncommon.
4:3/LB (LB = Letter Box)
You may select this if you have a normal aspect ratio (4:3) TV. Widescreen
material will be shown in pure unaltered form, allowing the entire picture area
of the original film to be viewed without any side cropping. Black bars will
appear above and below the picture.
16:9
You may select this if you have a widescreen (16:9) TV. Back bars may still
appear above and below the picture even if using a widescreen TV. This is
because some film directors prefer to use ultra widescreen aspect ratios e.g.
2.35:1. This will normally be indicated on the DVD packaging.
LB 4 3/Ps
On 4 3/Lb
ENG 16 9
On
Off
DVD System Setup(Continued)
DVD System Setup
General Setup Page
ANGLE MARK: Users can select a particular camera
angle when playing a DVD which offers multiple angles.
This item allows you to set Angle Mark ON or OFF.
On Screen Display (OSD) Language: Users can
select on-screen display language.
CAPTION: This function allows you to display or hide
the caption.
SCREEN SAVER: If the screen saver is on, then there
will be an animated picture of DVD on the screen
whenever the DVD player is idle for more than 3 minutes .
Preference Page
The Preference Page is only available when there is
no disc in the player.
PARENTAL: The parental control function works in
conjunction with the different censorship classes
assigned to DVDs. These classes help to control the
types of DVDs that the family watches, There are up
to 8 censorship classes for DVDs.
..Preference Page..
1 Kid Saf
2G
3 Pg
4 Pg 13
5 Pgr
6R
7 Nc17
8 Adult
Parental
Password
Default
Note:
1.To change this setting you must enter your password.
(Initial password is 1234)
2.When set to OFF, all discs may be viewed.
PASSWORD CHANGE:
You can change your password by entering 4 digits.
You must confirm the 4 digits before the new
password can be accepted.
Note:
If you forget your password or a password is
accidentally set enter 1369 as the password.
This will enable you to regain control.
DEFAULT: Resets all settings (except password and
parental lock status) for this DVD player back to the
manufacturers original settings. Press ENTER to
perform the reset.
Note:
Some functions may not be available depending on
the type of disc.
..Preference Page..
Parental
Password
Default
Old Password
New Password
Confirm Pwd
Change
Playable Discs
The following discs can be played:
You cannot play discs other than those listed above.
You cannot play non-standardized discs, even if they may be labelled as above.
The performance of CD-R or CD-RW disc depends on the way the disc was burned. In
a few cases, their performance may not be consistant or may not even operate at all.
This DVD Player is designed and manufactured according to the Region
Management Information that is recorded on a DVD disc. If the Region number
described on the DVD disc does not correspond to the Region number of this DVD
Player, this DVD player will not play that disc.
This Region number of this DVD Player is .
1
Disc Protection and DVD Characteristics
Compare DVD disc with other discs:
DVD
Encode
method
LD
Digital/MPEG
Singleside
doublelayer
9.4G
Doubleside
doublelayer
17G
133
242
266
Playing Time minutes minutes minutes
484
minutes
Capacity
Disc diameter
Singleside
singlelayer
4.7G
Double
-side
single
-layer
8.5G
Analog
12cm
Horizontal
resolution
More than 500 line
Picture
proportion
Multiple kinds
Subtitle
Language
Sound quality
32 kinds
8 kinds
48KHz, 96KHz/
6, 20, 24bit
Single-side
60 minutes
double-side
120 minutes
30cm/20cm
SVCD
VCD
Digital
Digital/
MPEG I
650MB
650MB
45 minutes 74 minutes
12cm
12cm
CD
Digital
650MB
74 minutes
12cm
No more than No more than No more than
430 line
350 line
250 line
One kind
16 kinds
at most
One kind
One kind
4 kinds
4 kinds
at most
4 kinds
at most
2 kinds
2 kinds
44.1KHz/
16bit
44.1KHz/
16bit
44.1KHz/
16bit
44.1KHz/
16bit
19
22
NTSC M
2.5W+2.5W
External jack
COMPONENT input, PC input, S-VIDEO input,
Audio input, Video input, Antenna input HDMI input,
A/V out, PC Audio in, Headphone
~120V 50/60Hz
50W
60W
V0.1
0090509448