1
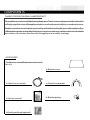
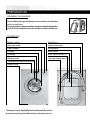
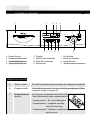
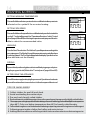
WASHER DRYER USER MANUAL HWD–C1000TXVE HWD–C1000TXVE ME HWD–C1200TXVE HWD–C1200TXVE ME 04 - 09 Table of contents 10 - 15 16 - 20 BEFORE USE Using the appliance Maintenance ¬ Components . . . . . . . . 03 ¬ Program selection. . . . 10 ¬ Cleaning & Care. . . . . . . 16 ¬ Preparation. . . . . . . . . . 04 ¬ Consumption and technical data. . . . . . . . . 11 ¬ Display codes. . . . . . . . . 18 ¬ Safety instructions. . . 05 ¬ Trouble shooting . . . . . 19 ¬ Washing & drying. . . . . 12 ¬ Installation . . . . . . . . . . 06 ¬ Electric Circuit Diagram.20 ¬ Control Panel. . . . . . . . 08 LEGEND Yes No Optional For your safety, any instructions in this manual with this "Warning" sign must be followed strictly. DISPOSAl Donotdisposeofelectricalappliancesasunsortedmunicipalwaste,useseparatecollectionfacilities.Contact yourlocalgovernmentforinformationregardingthecollectionsystemsavailable.Ifelectricalappliancesare disposedofinlandfillsordumps,hazardoussubstancescanleakintothegroundwaterandgetintothefood chain, damaging your health and well-being. Whenreplacingoldapplianceswithnewones,theretailerislegallyobligatedtotakebackyouroldappliance for disposals at least free of charge. COMPONENTS Before use 03 Thanks for purchasing a Haier product Pleasereadtheseinstructionscarefullybeforeusingthisappliance.Theinstructionscontainimportantinformationwhich willhelpyougetthebestoutoftheapplianceandensuresafeandproperinstallation,useandmaintenance. Keepthismanualinaconvenientplacesoyoucanalwaysrefertoitforthesafeandproperuseoftheappliance.Ifyou selltheappliance,giveitaway,orleaveitbehindwhenyoumovehouse,makesureyoualsopassonthismanualsothatthe new owner can become familiar with the appliance and safety warnings. Accessories Checktheaccessoriesandliteratureinaccordancewith this list: 1x Bottom cover 1x Inlet hose assembly 1x Drain hose bracket 1x Service manual 3x Blanking plugs 1xQualitycertificate(optional) 04 PREPARATION BEFORE USE PREPARING THE MACHINE Removeallthepackingmaterialstopreventunsteadiness,includingthe polystyrene base. Uponopeningthepackage,waterdropsmaybeseenontheplasticbagandthe porthole.Thisisnormalphenomenonresultingfromwatertestsinthefactory. DESCRIPTION Power switch Drain hose Program knob Water inlet valve Door handle Power cord Display Back cover Porthole Back cover screws (3) Washer door Transportation bolts (3) Detergent distribution drawer Bottom trim Thisdiagrammaybeslightlydifferentfromthelayoutofthewasher dryeryouhavejustpurchasedduetotechnicalimprovements. Before use Safety instructions 05 Before switching the appliance on for the first time DO NOT ... DO ... R...ensureyouconnecttheappliancedirectlytoadomes- ...touchorusetheappliancewhenbarefootorwithwetor damp hands or feet. R... make sure that the plug is accessible. R...keepsurroundingareasfreeformaccumulationoflint, ...useflammabledetergentordrycleaningagent. tic mains water supply. ...useanyflammablespraysinclosevicinitytotheappliance. dust and dirt. ...removeorinsertthepluginthepresenceofflammablegas. R...keepawayfromheatsourcesanddirectsunlightto ...installtheapplianceoutdoorsinadampplace,orinan areawhichmaybepronetowaterleakssuchasunder ornearasinkunit.Intheeventofawaterleakallowthe machine to dry naturally. preventplasticandrubbercomponentsfromaging. R...makesurethatthepowercordisnotcaughtunderorin theapplianceandavoiddamagetothepowercord. R...ensurethattheapplianceisnotinstalledbehinda ...placethewasherdryerdirectlyonacarpet,orclosetoa wall or furniture. lockabledoor,aslidingdoororadoorwithahingeonthe oppositesidetothatoftheappliancesothatafullopening of the appliance door is restricted. ...connecttheappliancetothepowersupplyuntilinstallation is complete. R...makesurethatchildrenorinfirmpersonsdonotplay ... use an appliance with missing parts. with the packing materials. ...dryunwashedgarmentsinthewasherdryer. During Daily use of the appliance DO ... DO NOT ... R...makesurethatitemssoiledwithcookingoil,acetone, alcohol,petrol,kerosene,spotremovers,turpentine, waxes,waxremoversorsimilarsubstanceshavebeen washedwithhotwaterandanextraamountofdetergent before being dried. ...touchthewasherdryerdoorduringthewashingordrying process - it gets hot! R ...incasethepowercordisdamaged,letitbereplacedby ...hotwashordryfoamrubberorsponge-likematerials, shower caps or waterproof textiles. themanufacturer,hisserviceagentorotheraccordingly qualified persons. R...unplugtheappliancebeforecarryingoutanymaintenance or repair. R...holdtheplugandnottheelectriccablewhenunplugging the power supply. R ...ensurethattheapplianceisnotusedbypersonswith reducedphysical,sensoryormentalcapabilities,lackof experienceandknowledgewithoutsupervisionorinstruction by a person responsible for their safety. R...makesurenottoplaceheavyobjectsorsourcesof heat or damp on top of the appliance. ...blocktheventilationopeningsatthebaseoftheappliancewithacarpetorbycoveringtheapplianceduringuse. ...openthedetergentdistributiondrawerduringthewashcycle. ...forcethewasherdryerdooropen.Thedoorisfittedwith aself-lockdeviceandwillnotopenuntil2-3minutesafter the washing machine stops. ...openthewasherdryerdoorifthewaterlevelisvisibly over the porthole. ...attempttorepairtheapplianceyourself.Contactthe manufacturerortheirapprovedserviceagent. ...stopthewasherdryerbeforetheendofthedryingcycle unlessallitemsarequicklyremovedandspreadoutsothat the heat is dissipated. 06 Installation Before use Adjusting the bottom cover Beforeremovingthetransportationbolts,pleasefixthe bottomcovertothebottomofthewasherdryer.Laydown themachine(fig.1.),screwoffthefeetandadjustthe bottomcoverwiththefourholescorrespondingthescrew holesofthefeet.Thenscrewthefeetbackonthroughthe coverandfixitthussecurelytothebottomofthemachine (fig. 2.). Itkeepsoutthedampnessandreducesthenoise. 1. 2. 1. 2. 3. 4. Dismantle the Transportation bolts Thetransportationboltsaredesignedforclampingantivibrationcomponentsinsideofthewasherdryerduringthe transportation process. 1. Remove the back cover. 2. Removethethreeboltsontherearsideandtakeout thesyntheticstabilisersfromwithinthemachine. 3. Replace the back cover. 4. Filltheholesleftbytheboltswithblankingplugs. Note: Keepthetransportationboltsandsynthetic stabilisers in a safe place for later use. Adjusting the washer dryer Thereareadjustablefeetunderthebottomofthewasherdryer.Beforeuse,they shouldbeadjustedsothatthemachineislevel.Thiswillminimisevibrationsand thusnoiseduringuse.Itwillalsoreducewearandtear.Werecommendusinga spirit level to level the appliance. Before use 07 Inlet Hose 1. Connectthenutontheinlethosetotheconnectoron the water valve. 2. Applyinlethosetoawatertabwithcold,freshwater. Note:Usethehose-setsuppliedwiththeappliance. Old hose-sets should not be reused. 1. 2. 1. Usethedrainhosebrackettokeeptheendofthe drainhoseretainedandpreventtheoutflowofwater. Don'textendthelengthofthedrainhose;ifanextendedhoseisrequired,pleaseconsultaserviceman. 2. Theheightofthedrainageoutletmustbe80-100cm. Fixthedrainhosetotheclipatthebackofthewashingmachinetopreventitfromdroppingoff. 80 - 100 cm Drain hose 1. Note:Thedrainhoseshouldnotbesubmergedin waterandshouldbesecurelyfixedandleak-free.Ifthe drainhoseisplacedonthegroundorifthepipeisat aheightoflessthan80cm,thewashingmachinewill continuouslydrainwhilebeingfilled(self-siphoning). Connecting to the power supply Before connecting to the power supply, check: ¬ ThesocketisadequateforthemaximumpoweroftheWasherDryer (Forsafety,fusesinthepowercircuitshouldberatedfornolessthan15A). ¬ The voltage should meet the requirement. ¬ ThepoweroutletshouldbecapableofacceptingtheWasherDryerplug. ¬ Connect the machine to an earthed socket outlet. 2. Before use 08 Control Panel C F Wash Rinse Spin E D L A Temp Dry Speed Delay Extra rinse Dry ECO Wash Quickwash Wool Rinse Spin Dry Synthetics Start/Pause Cotton&Linen Iron Prewash K A Power button B Programselectiondial C Detergentdistributiondrawer D Spinspeedsettingbutton J I H E Display F Wash status indicator G Start/Pause button H Eco button G Air wash B I J K L Dry button Extra rinse button Delay button Washtemperaturebutton OPERATIONAL FUNCTIONS _Pressthisbuttontoturnthemachineon.Pressitagaintoswitchitoff. _Turnthedialclockwiseoranti-clockwisetoselecttherequiredprogram.(Referto A ¬ Power switch B ¬ Program knob C program modes on page 10). _ ¬Detergentdistribution Instructions are printed on the front of the drawer. drawer Open the drawer, three compartments can be seen: Compartment 1: Pre-wash detergent Compartment 2: Standard washing extra-fast washing Compartment 3: Softener, conditioning agent, perfume, etc. 2 3 1 Before use 09 OPERATIONAL FUNCTIONS D E ¬Spinspeedbutton _ Press this button to select the desired speed. _Informationsuchasremainingwashtime,temperatureandspeedsettinganderror ¬ Display H messages are shown here. _ ¬Washstatusindicator This light shows the stage of the cycle in the selected program ¬Start/Pausebutton _AftertheWasherDryerisconnectedtothepowersocketandaprogramisselected, pressthisbuttontostartoperation.Pressthisbuttonagainduringoperationto pausetheprogram.Thedisplayscreenwillstartblinkingandthemachinewillbe paused. Press the button again and the program will continue. _Economywash.Thisfunctionautomaticallyadjustswaterconsumption,washtime ¬ Eco button I and heating time. The wash load range is: Prewash: 1kg-6kg; Cotton: 1kg-6kg; Synthetic: 1kg-3kg; Quick wash: 1kg-3kg; Wash: 1kg-6kg; Rinse: 1kg-6kg; Spin: 1kg-6kg _Pressthisbutton,thecorrespondinglightwillgoonandtheappliancewilldrythe F G ¬ Dry button laundry after the last spin cycle. J K ¬Extrarinsebutton _Pressthisbutton,theoverheadindicatorwillgoon.WhentheWasherDryerisat thelastrinsingoperation,itwillnotdrainbutstartasoakingcycle.Ifyouwantto spinthelaundry,pressthisbuttonagain,theindicatorwillgooutandoperationwill resume. _ ¬ Delay button Pressthebuttonrepeatedlybeforestartingtheprogramtoenterthetimeyou wantthemachinetobefinishedin,thestartwilldelayfrom0.5to24hoursin 30-minuteintervals.Afterthedelayisselected,presstheStart/Pausebuttonto startcountdown(thetimeisdisplayedonthescreenuntiltheprogrammeends). Note:Thedelaytimemustbelongerthantheprogrammetime,otherwisethe Washer Dryer will start the wash programme immediately. L ¬Washtemperature _Touchthisbuttonandthewashtemperaturewillbedisplayedonthescreen.Select button asuitabletemperatureaccordingtothetypeoflaundry.Thecorrespondinglightwill go on. using the APPLIANCE 10 Program selection PROGRAM MODES 2 Program Temperature Maximum Preset 1 ¬ Prewash 0 ° to 90 °C 40 °C 2 3 3 1 1 1 Detergentcompartmentforprewashmode 2 Detergent compartment 3 Compartmentforsoftenerandotheradditives Default RecommendedLaundry Spin speed R £ R Heavy soiled laundry 1000 rpm 2 ¬Cotton&Linen 0 ° to 90 °C 40 °C R £ Cotton fabrics 1000 rpm 3 ¬ Synthetics 0 ° to 60 °C 40 °C R £ Synthetic fabrics 800 rpm 4 ¬ Wool R £ Wool fabrics 600 rpm 5 ¬ Quick wash 0 ° to 40 °C 40 °C R £ Lightlysoiledcotton,linen 800 rpm and synthetic fabrics 6 ¬ Wash 0 ° to 60 °C 40 °C R £ Cotton,linenandsynthetic / fabrics 7 ¬ Rinse 0 °C 40 °C £ Cotton,linenandsynthetic 800 rpm fabrics 8 ¬ Spin 0 °C 0°C £ Cotton,linenandsynthetic 1000 rpm fabrics 9 ¬ Dry Thelaundryiscompletelydrywhenthecycle Cotton,linenandsynthetic / is complete fabrics 10 ¬ Iron Thelaundryiscompletelydrywhenthecycle Cotton,linenandsynthetic / is complete fabrics 11 ¬ Air wash Airrefreshwashforsmallitemsthatneed Cotton,linenandsynthetic / aquickrefresh(e.g.schooluniforms) fabrics Yes 0 ° to 40 °C 0 °C No Optional using the APPLIANCE 11 Consumption and technical data CONSUMPTION TABLE Thewashcycletimesareintendedasaguideonly.Theactuallyusedtimemayvaryduetodifferentwater pressure, initial water temperature, etc. Program ENERGYCONSUMPTION WATERCONSUMPTION WASHING TIME ¬ Prewash 1,15 kw/h 61 l 133 min. ¬ Cotton & Linen 1,06 kw/h 49 l 116 min. ¬ Synthetics 0,86 kw/h 49 l 72 min. ¬ Wool 1,10 kw/h 50 l 60 min. ¬ Quick wash 0,97 kw/h 48 l 12 min. ¬ Wash 0,54 kw/h 40 l 61 min. ¬ Rinse 0,60 kw/h 41 l 24 min. ¬ Spin 0,54 kw/h 34 l 11 min. ¬ Dry 0,33 kw/h 41 l 150 min. ¬ Iron 0,28 kw/h 37 l 60 min. ¬ Air wash 0,12 kw/h 0l 30 min. TECHNICAL DATA Power source Max.workingcurrent(A) Waterpressure(MPa) Washing power (W) Spinning Power (W) Spinningspeed(r/min) Max. load (kg) Washing programs Waterheatingpower(W) Dryheatingpower(W) Dimensions(HxDxWmm) Net weight (kg) Washing noise (dB A) Spinningnoise(dBA) HWD-C 1000TXVE/ME 220-240V~/50Hz 10 0.03 ≤ P ≤ 1 200 350 1000 6 11 1800 1000 850 x 590 x 595 82 54,3 71,8 HWD-C 1200TXVE/ME 220-240V~/50Hz 10 0.03 ≤ P ≤ 1 200 450 1200 6 11 1800 1000 850 x 590 x 595 82 54,3 71,8 12 using the APPLIANCE Washing & Drying Power supply Connectthewasherdryertothepowersupply(220Vto240V~/50Hz). Water connection Turn on the tap. The water must be clean and clear. Note:Beforeuse,checkforleakageinthejointsbetweenthetapandtheinlet hosebyturningonthetap.Donotusetheapplianceuntilthehosesareproperly fixed. Preparing the laundry ¬Sortoutclothesaccordingtofabric(cotton,synthetics,woolorsilk)andtohow dirty they are. ¬Separatewhiteclothesfromcolouredones.Washthemfirstbyhandtocheckif they fade or run. ¬Emptypocketsfromobjectslikelightersandmatches,keys,coins,etc.and remove the harder decorative objects (e.g. brooches). ¬Garmentswithouthems,underwear,finelywoventextilesuchasfinecurtains aretobeputintowashbag(itisbetternottowashtheminawashing machine). ¬Closezippersandhooks,makesurethebuttonsaresewnontightlyandplace small items such as socks, belts, bras, etc. in the wash bag. ¬Unfoldlargepiecesoffabricsuchasbedsheets,bedspreads,etc. ¬ Turn shirts inside out. PLEASENOTE This Washer Dryer is for domestic use only.Do not use it for purposesotherthanthatforwhichitwasdesigned.Followthe instructionsgivenonthelabelofeachgarmentandwashonly machine-washablegarments.Donotdrygarmentthathasbeen cleaned with industrial chemicals. using the APPLIANCE 13 Loading the machine Mixe d Intense Speed Speed u p Jeans Comfort 40 Spor t W ool Hand wash Synthetic Rinse Te mp Delay E xtra Rinse Highwash Rinse Hold Cotton Start/ Paus e Prewas h Powe r Spin Drain Openthewasherdoor,putinthelaundrypiecebypiece.Closethedoortightly. ¬WhenfirstusingtheWasherDryer,letitrunemptywithoutdetergentforone quickwashcycletopreventthelaundryfrombeingtaintedbyoilordirtywater from the Washer Dryer. ¬ Do not overload the Washer Dryer. Selecting detergent Thewashingefficiencyandtheperformanceisdeterminedbythequalityofdetergent used.Specialnon-foamingdetergentproducesgoodwashingresults.Usespecific detergentsforsyntheticandwoollengoods.Donotusedrycleaningagentssuchas trichloroethylene and similar products. Note:Donotaddmoredetergentthanneeded.Pleasefollowthedosagerecommendation on the detergent package. Adding detergent Slideoutthedetergentdrawerandputtherequireddetergentandsofteningagent intothecorrespondingcompartments.Pushbackthedrawergently.(Refertothe instructions on the drawer) 2 3 1 Caution: ¬Forpre-washingprogram,detergentshouldbeaddedtobothcompartments1and 2.Forotherprograms,donotadddetergenttocompartment1. ¬Ifliquiddetergentwillbeused,pleasefillintothedosagecupandplaceitdirectly into the drum together with the laundry. ¬Donotoverusesoftener;otherwise,itwilldamagetheartificialfibers. Selecting Program Togetthebestwashingresults,anappropriatewashingprogramshouldbeselectedaccording tothelaundrytype.Pleaseturntheprogramknobclockwisetoselecttherightprogram. Wash Rinse Spin Dry Delay Extra rinse Dry EcoTime Start/ Pause Power Speed Wash Quickwash Wool Synthetics Cotton&Linen Prewash Selecting functional Selecttherequiredoptions.(Refertothe"Controlpanel"pages08and09). Otherwisekeepallthebuttonsdeselected.Ifyouwishtodryyourlaundrydirectly after the wash cycle is finished, please press the "Dry"-button. Start/Stop 1 Temp Rinse Spin Dry Iron Air wash 0 using the APPLIANCE 14 Washing & Drying Setting washing temperature Wash Rinse Spin Pressandholddownthetemperaturebuttonuntilthedesiredtemperatureis selected or the symbol for no water heating. * Temp Dry Speed Delay Extra rinse Dry ECO Quickwash Wool Synthetics Start/Pause Cotton&Linen Prewash Setting spin speed Pressandholddownthespeedbuttonuntilthedesiredspeedisselectedorthe symbol"--"isselectedfornospin.See"Operationalfunctions"onthe"Control panel"pages(08and09)forselectingtemperatureandspinspeed.Itisadvisable to select the recommended value. Wash Rinse Spin Temp Dry Speed Delay Extra rinse Dry ECO Cotton&Linen Prewash Washing PresstheStart/Pausebutton.TheWasherDryerwilloperateaccordingtothe pre-setprograms.TheWasherDryerwillstopoperationautomaticallywhena washingcycleends.The"End"signwillappearonthedisplay.Openthewasher Wash the Rinse Spin Dry Temp door and take out laundry. Speed Drying Delay Extra rinse Dry EcoTime Start/ Pause Quickwash Wool Power Start/Stop 1 0 Wash Rinse Spin Synthetics Dry Cotton&Linen Iron Ifyouwishtodrywetlaundry,pleaseselectoneofthedryingprogramsbyPrewash turningtheprogramknob(Refertothe"Controlpanel"pages08and09). Quickwash Wool Synthetics Start/Pause Air wash Powe r W ash Rinse S pin D ry Te mp Speed Delay E xtra rinse Dry E coTime Start/ Paus e Start/Stop W ash Quickwash W ool Synthetics Cotton&Line Cotton&Linen Prewash Rinse Spin Dry Iron Air wash After using the appliance Turnoffthewatersupplyandunplugthepowercord.Openthewasherdoorto preventformationofmoistureandodours.Letthedooropenwhilenotused. Tips for saving energy 1. Collect clothes for one full wash load. 2. Avoid overloading the washer dryer. 3. Pre-wash only heavily soiled clothes. 4. Reducetheamountofdetergentorchoosethespeedupwashprogramsforslightlysoiledclothes. 5. Chooseaproperwashingtemperature.Moderndetergentscanwashwithverygoodresultalreadyinlowertemperature than 60°C. Only user higher temperature than 60° for heavily soiled laundry. 6. Followthedosagerecommendationonthedetergentpackagetoavoidusingtoomuchdetergent. 7. Softening agent makes clothes feel softer and easier to iron. 8.Adding fabric conditioner will also get rid of static condensation to make ironing easier. using the APPLIANCE 15 CARE CHART Resistantmaterial Bleachableincoldwater Don't dry clean Delicatefabric Do not bleach Dry flat Washableat95°C Iron at 200° C Hung to dry Washableat60°C Iron at 150° C Dry on clothes hanger Washableat40°C Iron at 100° C Tumbledry,normalheat Washableat30°C Don't iron Tumbledry,reducedheat Hand wash Drycleaning(anysolvent) Don't tumble dry Dry clean only Drycleaning(pericloride) Wool Seal Drycleaning(aviationfuel) WASH LOAD Cotton: 6 kg Synthetic: 3 kg Delicate: 2 kg Quick: 3 kg LOAD REFERENCE Bed sheet (single) Cotton Approximately 800g Blanket Wool Approximately 3000g Blended fabric clothes / Approximately 800g Jackets Cotton Approximately 800g Jeans / Approximately 800g Overalls Cotton Approximately 950g Pyjamas / Approximately 200g Shirts / Approximately 300g Socks Blended fabrics Approximately 50g T-Shirts Cotton Approximately 300g Underwear Blended fabrics Approximately 70g PLEASENOTE The final part of a drying cycle is a cooling cycle without heat to ensure that the dried items are left at a temperature that keeps them undamaged. 16 MAINTENANCE Cleaning & care After washing Turnoffthewatersupplyandpulloutelectricityplugafter eachwash.Openthewasherdryerdoortopreventformation ofmoistureandodours.Ifthewashingmachineisleftidlefor alongperiod,drainthewaterinthemachineandreplacethe drain hose. 1. 2. Cleaning the detergent drawer 2. Cleanthedetergentdistributiondrawerregularly. Swingoutthedrawer,flushitcleanwithwaterandthen replace it. 1. Cleaning the machine Unplugthemachineduringcleaningandmaintenance.Use asoftclothdampenedwithsoapliquidtocleanthemachine caseandrubbercomponents.Donotuseorganicchemicalsor corrosive solvents. Cleaning the filter Clean the filter once a month: 1.Pulloutthebottomcoverwiththinobjectsortoolscarefully. 2.Removethefilterbyturningcounterclockwise. 3.Flush the filter clean with running water. 4.Replacethefilterbyturningclockwiseandremountthe cover. 1. 2. 3. 4. Caution: Thefiltermustbeinplace,oritmayleadtoleakage. MAINTENANCE 17 Water inlet and inlet filter Topreventblockagetothewatersupplybyingressofforeign substances,cleanthewaterinletandinletfilterregularly. Moving the machine Ifthemachineistobemovedtoadistantlocation,replace thetransportationlocksremovedbeforeinstallationtoprevent damage as shown below. 1. 2. 3. 4. 1. Remove the blanking plugs. 2. Remove the back cover 3.Insertthesyntheticstabilisersandthetransportationbolts. 4.Tighten the bolts with a spanner. 5.Replace the back cover. 5. Long periods of disuse Powe r W ash Rinse S pin D ry Te mp Speed Delay E xtra rinse Dry E coTime Start/ Paus e Cotton&Line Cotton&Linen Prewash Ifthewasherdryerisleftidleforalongperiod,pulloutthe electricalplugandturnoffthewatersupply.Openthewasher dryerdoortopreventformationofmoistureandodours.Let the door open while not used. Start/Stop W ash Quickwash W ool Synthetics Rinse Spin Dry Iron Air wash 18 Display codes MAINTENANCE DISPLAY CODES AND SPECIAL FUNCTIONS CODES CAUSES Err1 ¬ Washer door is not properly shut. Err2 ¬Drainageerror.Waterisnotemptied within 4 minutes. Err3 ¬ Temperature sensor error. Err4 ¬Heatererrororlaundryoverload.Theset temperatureisnotreachedwithinspecified time.(Appearsattheendofacycle). Err5 ¬Waterlevelnotmetwithin8minutes. Err6 ¬ Dehumidification/heating error. Err7 ¬ Motor overheat error. Err8 ¬ Water overflow. Err9 ¬Errorofthedryertemperaturesensor. Er10 ¬ Error of the water level sensor. Er12 ¬Errorofthedryerwaterlevelsensor. Er13 unb EUAr 1:16 0:01 60°C --°C 0 800 L--1 L--A End SOLUTIONS _ Shut the door properly _Cleanthefilterandcheckthedrainhoseforblockage. Removefilterincaseanywaterremainsintheunit. _ Please contact the Service Center. _ Reduce load and start washing again. _ Please contact the Service Center. _ Check the tap and the water pressure. _ Please contact the Service Center. _ Please contact the Service Center. _ Please contact the Service Center. _ Please contact the Service Center. _ Please contact the Service Center. _ Checkwhetherclothesaredryornotandwhetherthereis waterstillinthedrum.Ifsoallowexcesshumidityto escapefromtheapplianceandtrythedryingcycleagain. _ Please contact the Service Center. ¬ Dryer heater error. ¬ Laundry is unevenly distributed. _ Redistribute laundry to balance the drum. _ Please contact the Service Center. ¬ Communication error. ¬ Status information: remaining program time is 1 hour and 16 minutes. ¬ Status information: remaining program time is 1 minute. ¬ Status information: Wash temperature is 60°C. ¬ No heat (cold wash). ¬ No spin. ¬ Status information: Spin speed 800 rpm. ¬ Manually selected code when laundry weight is less than 1kg. ¬ Manually selected code when drum is nearly full. ¬ Program is finished. ¬Controlpanellockfunction:Pressthe"Delay"andthe"Start/Pause"buttonssimultaneouslyfor3secondsafter startingaprogram.Itcannolongerbechangedbyoperatingbuttonsorknobs.Thewashingmachineemitsanaudible signalwhilethecontrolpanelislocked.Tounlockpressthe"Delay"and"Start/Pause"buttonsagainfor3seconds. ¬Power-offmemoryfunction:Incaseofabruptpowerfailureortheneedtocutoffthepowerduringaprogram cycle,thepresentsettingswillbesavedandthepresetoperationwillresumewhenthepowerisonagain. MAINTENANCE Troubleshooting 19 TROUBLESHOOTING Intheunlikelyeventofdifficultieswithyourappliancepleasefollowthetroubleshootingguidebelow.Iftheproblempersists, contacttheretailerifthemachineisstillwithintheguaranteeperiod.Iftheapplianceisoutofguarantee,contactanapprovedserviceagenton08450253025.Ifanerrorcodeisdisplayed,pleaserefertotheerrorcodeguidebelow. PROBLEMS POSSIBLE CAUSES POSSIBLE SOLUTIONS _ WasherDryerfailsto ¬Poorconnectiontothepowersupply. Checkconnectiontothepowersupply. _ Check the power supply. ¬ Power failure. operate. ¬Thewasherdoorisnotproperlyclosed. _Makesurethewasherdoorisclosedproperly. ¬Machinehasnotbeenswitchedon. _Makesurethemachineisswitchedon. _ Turn water tap on. WasherDryercannotbe ¬ Water tap is not turned on. filled with water. ¬Waterpressureislessthan0,03Mpa. _ Check water pressure. _ Check the inlet hose for bends. ¬ The inlet hose is kinked. _ Ensure the water supply. ¬ Water supply failure. ¬Theprogramknobisnotproperlyset. _Makesuretheprogramknobisproperlyset. ¬Thewasherdoorisnotproperlyclosed. _Makesurethewasherdoorisclosedproperly. Machineiscontinually ¬ The height of the drain hose is _ Make sure the height of the drain fillinganddraining. below 80 cm. hose is within 80 - 100 cm. _ Drainage failure. ¬ Drain hose is blocked. Unblock the drain hose. ¬Drainhoseendismorethan100cm _ Make sure the drain hose end is less above the floor level. than 100 cm above floor level. Strongvibrationwhile ¬Notalltransportationboltshavebeen _Checkifalltransportationboltshavebeen spinning. removed. removed. ¬ Washer dryer is located on an _ Make sure the washer dryer is on uneven surface or is not level. an even surface and levelled. _Reduceamountoflaundryinthedrum. ¬ Machine is overloaded. _ Check the power supply. Operationstopsbefore ¬ Water or electricity failure. completingwashcycle. Operationstopsfora ¬Washerdryergivesanerrormessage. _ Wait until cycle is complete _ See display codes on previous page. period of time. Excessivefoaminthe ¬Thedetergentisnotalow-foaming _Checkifyourdetergentisappropriate. _ Reduce amount of detergent used. drum. type or for manual wash. ¬ Excessive use of detergent. Fuse Door Lock Temperature Limiter Drying Heater Electric Circuit diagram Fuse Fuse Power Switch TP MOTOR HaierEuropeTradingS.r.l. ViaDeCristoforis12 21100 Varese - Italy Tel + 39 0332 24511 Fax +39 0332 245146 [email protected]