1
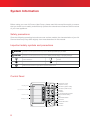
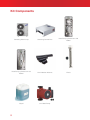
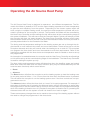
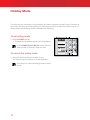
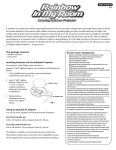
HEAT PUMP SYSTEMS
operation and maintenance home owners manual
HOME
OWNERS
MANUAL
HEAT PUMP SYSTEMS
installation manual
1
2
Table of Contents
04
05
06
07
08
09
10
12
13
14
15
Joule Heat Pump Systems
How does a Heat Pump work
System Installation
Installation Warning
Kit Components
The Control Box
Operating the Air Source Heat Pump
Holiday Mode
Troubleshooting
Cleaning and Maintenance
Maintenance Sheet
HEAT PUMP SYSTEMS
installation manual
3
Joule Heat Pump Systems
All of our Heat Pump systems are designed to be provide the homeowner with a world class
heating system, with the benefits of free energy generated by the heating system, and are
designed to provide many years of trouble free operation.
However, please take a moment to read these notes in conjunction with our commissioning
certificate and leaflets for the Heat Pump and Heat Pump controller that we provided on installation. The controller supplied will manage the day to day operation of the heating system
and it’s operation will be dependent on the system design.
These documents should be retained for future reference with a copy of our commissioning
certificate lodged inside the heat pump controller housing, providing all the details that a service engineer would require.
It is important to control your heating system correctly to minimise the heating costs for the
dwelling. Due to the efficiency of the Heat Pump, the cost of heating the dwelling will be
significantly less than that of a dwelling heated using a gas or oil boiler. You will notice that
your electricity bill will be higher than that of a house heated with a boiler. This is because the
dwelling will be heated using the heat pump which uses electricity. There will be no bills for oil
or gas and the efficiency of the heating system will give you cheaper heating bills than if you
were using a gas or oil boiler. Therefore the additional cost on the electricity bill will be far less
than the cost of running a gas or oil boiler.
4
How does a Heat Pump Work
There is a Heat Pump present in every single persons dwelling; we refer to it more commonly
as a fridge! It is a device that converts heat from one medium and transfers it to another medium. In the case of the Air Source Heat Pump, heat is taken from the air and using compression it is converted into a higher temperature heat. This heat is then circulated through your
house to heat the building and your domestic water cylinder.
Air to Water Heat Pumps Glossary
Defrosting: The process the heat pump will undertake under extreme cold weather conditions to remove ice or frost.
Refrigerant: The fluid that is used to transfer heat in a refrigeration system.
COP: Alternatively known as Coefficient of Performance. This is the ratio of heat generated
by the heat pump compared to the power consumption of the heat pump. For example, if the
COP is stated as being 4, then the Heat Pump will generate 4 times more heat from the power
it is given, ie it is 400% efficient.
Buffer Tank: A water store connected to the heat pump. It lengthens the run times for the heat
pump to allow greater efficiency. It also provides hot water for the defrost cycle.
Air to Water Heat Pump: The mechanical device which converts heat that is present in the
air to hot water which is used to heat the building and the domestic hot water.
Heat Pump Controller: The control panel by which the Heat Pump is controlled. This is located indoors and is used to operate the wokings of the Heat Pump.
Domestic Water Cylinder (DHW cylinder): The storage vessel to hold the hot water for use
in sinks and showers.
Immersion Heater: This is the heater than is fitted into the DHW cylinder to provide a way to
heat the cylinder using electricity. In systems heated using a Heat Pump it is used as a back
up heater to heat the water to a higher temperature at set intervals. This provides a pasteurisation process for the system to meet building regulations regarding the control of Legionella.
UFH: This stands for Underfloor Heating. This is the system where hot water is pumped
through pipework that is beneath the floors in a dwelling. The pipework transfers heat to the
floor which then heats the room above.
HEAT PUMP SYSTEMS
installation manual
5
System Information
Before using your new Air Source Heat Pump, please read this manual thoroughly to ensure
that you know how to safety and efficiently operate the extensive and features and functions
of your new appliance.
Safety precautions
Since the following operating instructions cover various models, the characteristics of your Air
Source Heat Pump may differ slightly from those described in this manual.
Important safety symbols and precautions
WARNING
Hazards or unsafe practices that may result in severe personal injury or death.
WARNING WARNING
WARNING
WARNING
WARNING WARNING
CAUTION
CAUTION CAUTION
Hazards or unsafe practices that may result in minor personal injury or property damage.
CAUTION
CAUTION
CAUTION CAUTION
Follow directions.
Unplug the power plug from the wall
socket.
Do NOT attempt.
Do NOT disassemble.
Make sure the machine is grounded to prevent electric shock.
Control Panel
Power(Space mode)
Display panel
Upr/Downs button
DHW hot key
Outing hot key
Power(DHW mode)
Mode button (Space mode)
Mode button (DHW mode)
Set button
View button
Daily schedule setting button
Weekly schedule setting
button
Cancel/Delete button
Silent button
Schedule Set button
Lock button
Test button
6
Installation Warning
• Plug the power cord into a wall socket with the power specifications of the product or
higher and use the socket for this appliance only. In addition, do not use an extension cord.
• Sharing a wall socket with other appliances using a power strip or extending the power
cord may result in electric shock or fire.
• Do not use an electric transformer. It may result in electric shock or fire.
• If the voltage/frequency/rated current condition is different, it may cause fire.
• The installation of this appliance must be performed by a qualified technician or service
company. Failing to do so may result in electric shock, fire, explosion, problems with the
product, or injury.
• Install a switch and circuit breaker dedicated to the air conditioner. Failing to do so may
result in electric shock or fire.
• Fix the outdoor unit firmly so that the electric part of the outdoor unit is not exposed. Failing to do so may result in electric shock or fire.
• Do not install this appliance near a heater or flammable material. Do not install this appliance in a humid, oily or dusty location, or in a location exposed to direct sunlight and water
(rain drops). Do not install this appliance in a location where gas may leak. This may result
in electric shock or fire.
• Never install the outdoor unit in a location such as on a high external wall where it could
fall. If the outdoor unit falls, it may result in injury, death or property damage.
• This appliance must be properly grounded. Do not ground the appliance to a gas pipe,
plastic water pipe, or telephone line. Failure to do so may result in electric shock, fire, an
explosion, or other problems with the product.
• Never plug the power cord into a socket that is not grounded correctly and make sure that
it is in accordance with local and national codes
HEAT PUMP SYSTEMS
installation manual
7
Kit Components
Samsung Heat Pump
Samsung Control Box
Heat Pump cylinder box with
Buffer
Heat Pump cylinder box w/o
Buffer
Anti-vibration Mounts
Flexis
Glycol
6m Head Pump
8
The Control Box
See below the pictures of Heat Pump Controller and a multi channel Time Clock. For the installer to commission the system the Heat Pump Controller will be used (left hand side of the
picture). The occupier of the dwelling will use the multi channel Time Clock to set the time and
temperature control for each heating zone.
Please note that the multi channel Time Clock may be subject to change. Operating instructions for the Time Clock is provided by the Time Clock manufacturer, please refer
to their instructions to operate.
Multi Channel
Time Clock
Heat Pump
Controller
HEAT PUMP SYSTEMS
installation manual
9
Operating the Air Source Heat Pump
The Air Source Heat Pump is designed to operate at two different temperatures. The Domestic Hot Water is heated to 50°C and the space heating operates at a lower temperature
to gain the most efficiency from the system. Depending on the chosen system which will
have a single or multiple heating zones, the zone time and temperature controls will be located in locations for the occupier to control. The Domestic Hot Water will be controlled by
the Heat Pump Controller and the settings for this will be done at the commissioning stage of
the system installation. This will ensure that the Domestic Water Cylinder will always provide
the occupier with their hot water demand. The Heat Pump Controller will also control when
the Immersion Heater turns on and off. It will turn the Immersion Heater on once per week to
provide pasteurisation for the Domestic Hot Water.
The timing and the temperature settings for the heating system are set up through the single channel or multi channel time clock and room thermostats. These are set up to suit the
occupiers demands and they will control when the heating turns on and off. The occupiers
can program the time clocks and room thermostats to suit their requirements. Refer to the
instructions supplied with the time clocks and temperature stats for details on how to set up
the programmes.
No interaction is needed between the occupier and the Heat Pump Controller as all settings
on this will be set up at the commissioning stage of the installation. The Heat Pump Controller
is used for setting the system up only.
The time clocks and temperature stats will determine when the dwelling zones are heated.
Most time clocks will also have two other functions (they may be named differently but will
have the same functions) which are as follows:
• Boost
• Advance
The Boost button will allow the occupier to set the heating system to heat the heating zone
for an extra period of either 1, 2 or 3 hours from the time when the Boost button is pressed.
This will allow the occupier to run the heating system even if the time controls are not programmed to turn on.
The Advance button will set the time clock to “move” to its next programme. For example, if
the system is timed to be off, pressing the Advance button will turn the heating on earlier than
the programme on the time clock is set up for but it will revert back to it’s programme settings
when it the heating is timed to turn off. Likewise if the system is timed to be on, presssing the
Advance button will turn the system off until it is timed to turn back on again.
These are temporary changes that can be made to the running of the heating system without
the need to change the programmes in the time clocks.
10
The Heat Pump will work most efficiently if the temperatures in the dwelling are not set too low
on the zone thermostats. This is because the Heat Pump is a low temperature device that will
take time to heat the dwelling if the heating has been turned off or if the zone temperatures
have been allowed to drop too low. The most cost efficent way for the Heat Pump to operate
is if the heating is set to run constantly at a set temperature during winter. This will prevent
long running times for the Heat Pump to reheat the dwelling if is has been allowed to cool down.
You may notice that the circulation pump may be running at times even if the Heat Pump is
not running and there is no demand for heating or hot water. This is normal for the Heat Pump
as it helps the Heat Pump to operate efficiently.
Instructions on setting up the time and temperature controls that are installed will be as per
their manufacturers instructions. Please refer to these manuals for detailed instructions on
how to programme the heating times.
After Installation
Please be aware of the following to ensure that your Heat Pump system gives you trouble free
operation.
• Do not push anything through the grill of the unit. The fan circulates at high speed and can
be damaged if any object comes into contact with it
• Ensure that the Heat Pump is not interfered with.
• Ensure that your warranty card is completed and sent back to Joule as per the instructions
in the installation manual provided with the Heat Pump. Failure to do this will result in a
limited warranty period.
• Make sure that you keep your installers details for any future maintenance requirements
• Concentrated Glycol is provided with the Heat Pump. This acts as an anti-freeze so ensure
that this is used in the system to protect it in periods of cold weather.
• Make sure that the Heat Pump has no obstacles placed beside it that will restrict the flow
or air to it. Details can be found in the Heat Pump installation manual of the area around
the Heat Pump that must be kept clear.
• Care must be taken in periods of cold weather where ice can form on the ground around
the Heat Pump
HEAT PUMP SYSTEMS
installation manual
11
Holiday Mode
The only time the occupiers of the dwelling will need to operate the Heat Pump Controller is
when they are away from the dwelling for a few days and will not want the Heat Pump to run.
When leaving
the dwelling, simply undertake the following:
OUTING
MODE
ENGLISH
ENGLISH
cancel
outingyou
mode
If you To
want
to take the
a vacation,
can use the Outing hot key. When this mode is enabled, it is
To
cancel
the
outing
mode
assured
that
the
heat
pump
maintains
your house at a lower temperature to save energy cost.
To
cancel the outing mode
1. Press Outing Hot key once again to exit.
1. Press Outing Hot key once again to exit.
The
heat
pumpHot
is turned
on a again
normaltooperation.
1. 1.
Press
OUTING
key once
exit.
Press
Outing
Hot
key.
The
heat
pump
is
turned
on
a
normal
operation.
The Heat Pump is turned on a normal operation.
The
heat
pump
at a low
temperature.
It will
return
to delivers
a normalheat
heating
mode
or DHW mode.
It
will
return
to
a
normal
heating
mode
DHW
mode.
buttonmode
hasornot
If Itthe
willPower(Spacemode)
return to a normal heating
orbeen
DHW
turned
modeon, this key does not work.
ENGLISH
OUTING MODE
If you want to take a vacation, you can use the Outing hot key. When this mode is enabled, it is
assured
thatto
the
heat
pump maintains
at a lower
temperature
saveisenergy
cost.
If you want
take
a vacation,
you canyour
usehouse
the Outing
hot key.
When thisto
mode
enabled,
it is
assured
that
the
heat
pump
maintains
your
house
at
a
lower
temperature
to
save
energy
cost.
To set outing mode
1. Press Outing Hot key.
1. Press
Outing Hot
key.
1.Press
OUTING
key. heat at a low temperature.
The heat
pumpHot
delivers
Theheat
Heatpump
Pumpdelivers
delivers
heat
a low
temperature
• The
heat
at at
a low
temperature.
If the Power(Spacemode) button has not been
on,
this key(Space
does not
work.
If Ifthe
buttonbutton
has not
been
turned
thePower(Spacemode)
POWER
Mode)
has
not
turned
on,
this
key
does
not
work.
been turned on, this key does not work
OUTING MODE
To cancel the outing mode
1. Press Outing Hot key once again to exit.
The heat pump is turned on a normal operation.
It will return to a normal heating mode or DHW mode.
12
Troubleshooting
The following are simple problems and actions that may be taken. For all other issues contact
your installation engineer.
Fault
Action
Error Code E911 shows on the controller
screen
The flow rate in the system is too low. Contact your service engineer.
Error Code E101 shows on the controller
screen
There is no communication between the Heat Pump and the Heat Pump Controller. Contact your service engineer
Not enough hot water
Check the temperature in the DHW cylinder using the Blue “View” button on
the Heat Pump Controller.
Check that hot water from the taps is the same temperature as the water in the
DHW cylinder. If not, check mixer taps to see if they are set at a low temperature.
Check the hot water temperature setpoint on the Heat Pump Controller.
Temperature in the DHW cylinder should reach 48°C. This is lower than a
conventional fossil fuel heated water cylinder.
Check the Heat Pump to ensure that it has a free area surrounding it to allow
air to pass through the fan.
The magnetic filter may be dirty and will need to be cleaned. This must only be
done by your service engineer.
There is no hot water
All hot water may have been used. It will take time for the Heat Pump to reheat
the water to the correct temperature.
Water or vapour is emmitted from the
Heat Pump
The water is condensation from the air which is turned to a liquid when the
Heat Pump is operating.
The unit may be in defrost. In defrost mode the Heat Pump will evaporate the
water on the condensor will turns to vapour. The Heat Pump is designed to
operate in this way.
The rooms are too hot
Turn down the room temperature on the zone temperature stats.
After powering down the heat Pump,
upon restart it does not operate
The Heat Pump will not start operation immediately. This is to protect the unit.
It will begin operation within a few minutes.
HEAT PUMP SYSTEMS
installation manual
13
Cleaning and Maintenance
• A full service of the Air Source Heat Pump and the heating system should be carried out
annually by a qualified engineer.
• Do not clean the appliance by spraying water directly onto it. Do not use benzene, thinner
or alcohol to clean the appliance. This may result in discolouration, deformation, damage,
electric shock or fire.
• Before cleaning or performing maintenance, unplug the Air Source Heat Pump from the
wall socket and wait until the fan stops. Failing to do so may result in electric shock or fire.
• Take care when cleaning the surface of the heat exchanger of the outdoor unit since it has
sharp edges. To avoid cutting your fingers, wear thick cotton gloves when cleaning it.
• Do not clean the inside of the Heat Pump by yourself. For cleaning inside the appliance,
contact your installer.
• As part of the annual maintenance routine the system pressure chould be tested by a qualified
installer. Test the concentration of glycol in the system. It should have a concentration of 25%.
• The maintenance of the Air Source Heat Pump should also include testing the Heat Pump
Controller and the other components connected to the Heat Pump electrically. Details of
these tests can be found in the Air Source Heat Pump Installation Manual.
• The magnetic filter should be isolated and cleaned out to ensure that debris does not build
up in the pipework over time which can have a detrimental effect on the operation of the Heat
Pump. This must be carried out by the qualified engineer at the time of the system service.
14
Maintenance Sheet
Date of Service
Service Engineer
Name
Engineer Number
Issues Noted
HEAT PUMP SYSTEMS
installation manual
15
16
JOULE IE
mail
tel
fax
eml
web
Kylemore Park West, Ballyfermot, Dublin 10
+353 (1) 623 7080
+353 (1) 626 9337
[email protected]
www.joule.ie
JOULE UK
mail
tel
fax
eml
web
Unit 17C&D Power Road, Plantation Bus. Pk.
Bromborough, Wirral, CH62 3RN
+44 (0) 1513 551 094
+44 (0) 1513 568 336
[email protected]
www.jouleuk.co.uk
JOULE PL
mail
tel
fax
eml
web
23-200 Kraśnik, ul. Towarowa 34.
+48 (0) 128811171
+48 (0) 814709046
[email protected]
www.joule-pl.pl