Transcript
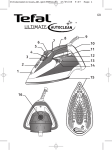
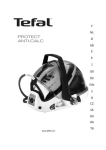
MINUTE
2
You have just purchased the first instant ironing kit ever invented.This is a new, ultracompact iron concept which can be used anywhere, thanks to its insulating ironing mat
and its compact iron stand.The "instant" iron is designed for short, everyday ironing
sessions.
047256 - 13/05
English
Please read these instructions carefully
and keep them to hand
What water to use?
Your appliance has been designed to function with untreated tap water. However, it is necessary to
operate the Self-Clean function regularly in order to eliminate hard water deposits from the steam
chamber. If your water is very hard (check with your local water authority), it is possible to mix tap
water with store-bought distilled or demineralised water in the following proportions : - 50%
untreated tap water, - 50% distilled or demineralised water.
1
3
5
• In order to avoid drips on the ironing :
• Turn off the steam by pressing the dry / steam control; use this position
for ironing wool, silks and synthetics.
• For other fabrics, leave the control (B) on the steam position.
during steam ironing, there may be some condensation on the iron
stand ; this will disappear when the iron is left to cool down on its stand.
What temperature and steam settings should be used ?
= STEAM ZONE
Types of water not to use ?
10
4
Choosing dry or steam ironing
Heat concentrates the elements contained in water during evaporation.The types of water
listed below contain organic waste or mineral elements that can cause spitting, brown staining, or premature wear of the appliance: water from clothes dryers, scented or softened
water, water from refrigerators, batteries or air conditioners, pure distilled or demineralised
water or rain water should not be used in your Tefal iron. Also do not use boiled, filtered or
bottled water.
9
FABRICS
LINEN
COTTON
WOOL
6
SILK
I. IRONING
8
SYNTHETICS
Polyester, Acetate,
Acrylic, Polyamide
Using the mat
• This ironing mat is extra-large, heat and steam resistant.
It allows you to iron on any suitable flat surface without risk
of scorching or dripping.
With its rectangular shape, the mat enables perfect ironing to
be carried out on the corner of a suitable heat-resistant table.
A
It may be creased after being stored in the box. Just
iron it before beginning your session. Creases will disappear in a flash.
• To do some ironing, place your ironing mat on a suitable flat, stable, heat-resistant
surface (A).
7
11
Installing the iron stand
POSITION OF THE THERMOSTAT
POSITION OF THE
CONTROL
DRY / STEAM CONTROL
MAX
●●●
●●
●
●
Our advice
Fabrics and ironing temperatures
• Your iron heats quickly: start with fabrics that can be ironed at low
temperatures and work up to finish with those that require a high
temperature.
• If you turn down the thermostat control, wait for the indicator light to
come on before you start ironing again.
• If you are ironing a fabric made of mixed fibres, set the ironing
temperature for the most delicate fabric.
• Position the iron stand, ideally on the corner of the mat (A).
During any pause in ironing, always put your iron on its stand, never leave it on
its soleplate on the mat.
123456789-
Dry / Steam control and anti-scale valve
Thermostat indicator panel
Ergonomic grip handle
filler cap
Thermostat control
Thermostat indicator light
Supply cord
Multi-directional soleplate
Maximum mark on the tank.
Do not exceed this limit.
10-Iron stand
11-Insulating ironing mat
Filling the tank
• Unplug your iron before filling it.
• Press on the Dry / Steam control so that it is set to
DRY (B) and will not drip during filling.
• Place the iron flat on its mat, lift the filler cap and fill it to
the "max" mark indicated (capacity, 125 cc).
or
• With the iron set on its base, open the filler cap and fill it
without exceeding the "MAX" mark indicated on the side of the
tank (C).
NOTE : Reduce the water flow towards the end of filling
in order to avoid any overflow.
• Close the filler cap.You can now plug in your iron.
Important! Remove any labels from the soleplate before
heating the iron.
• To change the setting from “Min” to
“Max”, turn the thermostat control
anti-clockwise.
• Set the thermostat control (D)
according to the table below.
• The thermostat indicator light will come
on (E). It goes out when the soleplate
has reached the required temperature.
On first use you may notice a small amount of smoke.This is normal and will
disappear.
B
• Unplug it, put it on the iron stand and wait for the soleplate to cool.
• Empty the tank and set the steam control to DRY.
A little water may remain in the tank.
• Wind the cord around the handle of the iron.
• Fold the mat, place on it the stand with the iron
and put them away. It takes up very little space (F).
F
C
Adjusting the temperature
Important!
Before using your iron for the first time on the steam setting, we recommend
that you let it operate for a few seconds holding it horizontal and away from
your ironing.
2- STORING YOUR IRON
D
E
3- CARE OF YOUR IRON
FOR YOUR SAFETY
IMPORTANT! Unplug your iron and leave it to cool before cleaning it.
• CLEANING THE ANTI-SCALE VALVE
(once a month) :
- Unplug the iron and empty the tank.
- To take out the anti-scale valve, switch to DRY.
The valve can then be lifted out.
Use the grips on the side (G) to pull it out.
G
NEVER TOUCH THE TIP OF THE VALVE.
• SELF-CLEANING PROCEDURE
To extend the working life of your iron, carry out the self-cleaning procedure
once a month.
- Leave the iron with the water, tank full, on its stand (thermostat set at maximum).
- When the indicator light goes out, unplug the iron and hold it over a sink.
- Remove the anti-scale valve.
- Shake the iron gently, holding it horizontally, over the sink, until most of the water,
(with the impurities) has run out through the soleplate.
- Re-insert the anti-scale insert.
- Place the iron on its stand and plug in for 2 minutes to dry the soleplate.
- Unplug the iron and, when the soleplate has cooled, wipe it with a soft cloth.
Our advice : The self-cleaning procedure delays any scaling up of your iron.
- Leave the valve to soak for 4 hours in a glass of white
vinegar or natural lemon juice (H).
- Rinse the valve under the tap.
Re-insert the anti-scale valve, using slight pressure.
H
THE IRON WILL NOT WORK WITHOUT THE ANTI-SCALE VALVE.
• CLEANING THE SOLEPLATE
- While the soleplate is still slightly warm, clean it by wiping over it with a damp,
non-metallic cloth.
• SOFT IRONING MAT
- The mat can be cleaned by wiping over it with a damp sponge.
- Note: the mat cannot be cleaned in a washing machine. Machine washing will damage
it, making it unsuitable for ironing.
- Do not dry clean.
4- IF THERE IS A PROBLEM
Problem
Possible causes
Solutions
• Water is running out of the steam holes in
the soleplate.
• The selected temperature is too low for steam.
• You are using steam when the iron is not hot enough.
• You have stored your iron flat, without setting the control to
dry.
• Set the thermostat in the coloured area (from ●●● to MAX).
• Wait for the indicator lamp to go out.
• See the chapter "Storing your iron".
• Brown deposits are coming out of the
soleplate and staining the ironing.
• You are using chemical de-scalers.
• You are using unsuitable water.
• Textile fibres have accumulated in the steam holes and are
burning.
•
•
•
•
•
•
• Your linen has not been rinsed sufficiently or you have
ironed a new garment before washing it.
•
•
• Your ironing was not properly rinsed or you are using starch. •
•
• The soleplate is brown or dirty and can stain
the ironing.
• You are using too high a temperature.
• Your iron produces little or no steam.
•
•
•
•
Do not add any de-scaling product to the water in the tank.
See the chapter "What water should be avoided"
Carry out the self-cleaning procedure.
Clean the soleplate with a non-metallic sponge.
From time to time, vacuum the steam holes.
Ensure linen is rinsed thoroughly to remove any soap deposits
or chemicals on new garments which may be sucked up by
the iron.
Clean the soleplate, as indicated above.
See the chapter on temperatures for the thermostat setting.
Clean the soleplate, as indicated above.
Always spray starch onto reverse side of the fabric to be
ironed.
• Your iron has been used too long on the dry setting.
Press the Dry / Steam control to activate the steam.
Fill it.
Clean the anti-scale valve .
Clean the anti-scale valve and carry out the self-cleaning
procedure.
• Carry out the self-cleaning procedure.
• The soleplate is scratched or worn.
• You have put your iron down on a metal stand.
• Always put your iron down on its stand.
• Water flows out of the tank hatch.
• You have not closed the tank stopper properly.
• Check that the tank hatch is properly closed and press it
home beyond the point of resistance.
• Do not exceed the maximum level indicated on the tank.
• Read the instructions carefully before using your appliance for the first
time:TEFAL cannot be held responsible for any use contrary to the instructions.
• This product has been designed for domestic use only. Any commercial
use, inappropriate use or failure to comply with the instructions, the
manufacturer accepts no responsibility and the guarantie will not apply.
• Important! The voltage of your electrical supply must match the rating
of the iron (220-240V). Any connection error can cause irreparable
damage to the iron which is not covered by the guarantee.
• This iron must be plugged in to an earthed socket. If you use an extension lead, ensure that it has a current rating of at least 10 Amperes and
a correctly wired earth conductor.
• If the power cord is damaged, it must be replaced immediately by an
Approved Service Centre in order to avoid any danger.
• Never immerse the iron in water!
• The appliance must be unplugged before filling or emptying the tank.
• If it is dropped or falls to the floor, the iron should not be used.
• If the iron is dropped, have it professionally checked before using it
again: invisible damage may be dangerous.
• The soleplate of the iron can be very hot:
- never touch it,
- never leave the iron on its mat if the soleplate is still hot or warm,
- always allow your iron to cool before putting it away,
- never leave the iron unattended when plugged in or while the
soleplate is still hot,
- never leave your iron within the reach of children.
• The iron, iron stand and mat must be placed on a flat and stable surface.
• The iron must be used only with the iron stand supplied
• NEVER DISMANTLE YOUR IRON.
ALWAYS CONTACT AN APPROVED SERVICE CENTRE.
•
•
•
•
The iron is set to DRY
.
The tank is empty.
The anti-scale valve is dirty.
Your iron is scaled up.
• You have over-filled the tank.
• The iron steams at the end of tank filling.
• The steam control button is not set to DRY
.
• At the end of ironing, there is an accumulation of water in the bottom of the iron
stand.
• You have been ironing for a long time or the ambient
temperature is low.
• The steam control button is not in the DRY position.
ENVIRONMENT PROTECTION FIRST !
• After the iron has cooled on its stand, wipe up the surplus
water in the iron stand before putting the system away.
If you have any problem or queries, please contact our Customer Relations team first for expert help and advice.
Your appliance contains valuable materials which can be recovered
or recycled.
Take it to a local civic waste collection point.