1
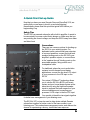
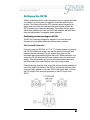
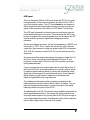
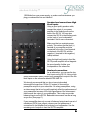
~ÄëçäìíÉ=Ñ áÇÉäáíó™
Owners Manual and Set-up Guide:
Genesis Surround ServoSub™ 2/12t
Contents
A QUICK START SET-UP GUIDE
SAFETY TIPS
CONNECTIONS
PLACEMENT OF THE SUBWOOFER
ADJUSTING THE CONTROLS
SETTING-UP THE S2/12T
POSITIONING AND CONNECTING THE S2/12T
LFE GAIN
LFE OUTPUT
POWER
SPEAKER-LEVEL CONNECTIONS: HIGH LEVEL INPUTS
LINE-LEVEL CONNECTIONS
PHASE SWITCH
MAKING YOUR SYSTEM SOUND RIGHT
THE MAIN CONTROLS
TUNING THE SYSTEM IN
LOW BASS
TUNING FOR LOW FREQUENCY EFFECTS (LFE)
THE TECHNOLOGY
THE SERVO ADVANTAGE
500W CLASS-D SWITCHING AMPLIFIER
THE TRANSDUCERS
SPECIFICATIONS
3
3
3
4
4
5
5
8
8
8
9
9
10
11
12
12
13
14
15
15
15
16
17
1
~ÄëçäìíÉ=Ñ áÇÉäáíó™
A Message from Genesis
Congratulations! You are now the owner of one of the finest subwoofers available for music and home theater systems.
The Genesis Surround ServoSub™ 2/12t is a unique subwoofer with
two 12” woofers that is designed for applications requiring corner or
sidewall placement, and is universally installation friendly. The unique
shape of the S2/12t makes it an ideal partner to surround or rear
loudspeakers in a multi-channel music or home theater system. The
S2/12t is ideal in multiple subwoofer installations where the distributed
bass of the system produces low bass that is more even, without
resonance peaks (nodes) and valleys (anti-nodes) of a single source.
The S2/12t delivers bass frequencies as intended by the musical
performer, or as intended by the movie director. This is what we call
absolute fidelity™. In this case, we mean that the bass response of
the speaker is completely faithful to the input signal. This is achieved
by servo control of the woofer cone.
The S2/12t plays as loudly and deeply as much larger sub-woofers
that cost much more, and outperforms them in terms of transient
fidelity and freedom from the colorations inherent in ported subwoofer
designs.
Robert Harley puts it best in his review of the Genesis subwoofers in
The Perfect Vision: “Transient impact was extraordinary; the dynamic
envelope of low-frequency sounds was tight, clean, and articulate…. In
addition, bass extension was outstanding; this woofer extended to
subterranean depths and maintained its composure.” He went on to
say, “It combines first-rate musicality and exceptional delicacy with a
bottom-end solidity and power that was fully up to the job of
reproducing today’s dynamic soundtracks.”
Please read through the Owners Manual and Set-up Guide to achieve
the maximum enjoyment from your purchase.
Please write the serial number and purchase details of your Genesis S2/12t
here for future reference.
Purchased at: _________________ Date: __________
2
~ÄëçäìíÉ=Ñ áÇÉäáíó™
A Quick Start Set-up Guide
Now that you have your new Genesis Surround ServoSub 2/12t, we
realize that you are eager to hook it up and start listening!
Nevertheless, please read this quick start guide NOW before you
begin setting it up.
Safety Tips
The S2/12t is a powered subwoofer with a built-in amplifier: it needs to
be connected to a power socket that is always on. Make sure that you
are providing the correct voltage, and keep the S2/12t away from water
and direct heat.
Connections
There are two common options for hooking-up
the S2/12t to your existing system. For
dedicated music systems and bass extension
of surround speakers, connect the high-level
speaker binding posts on the S2/12t to your
amplifier’s speaker outputs, or connect them
to the “speaker through” binding posts on the
associated speaker, using a short run of
loudspeaker cable.
For traditional subwoofer use in audio/video
systems in multi-channel home theater
applications, connect the line level LFE output
of your processor to the LFE input on the
S2/12t
Our unique LFE Blend™ technology allows
you to use the S2/12t in BOTH your music
system and your home theater system at the
same time by using the high-level speaker
inputs to augment the bass response of your
surround speakers and connecting your
processor’s LFE output to the the LFE Input.
You are able to blend the two signals together
for better bass management of your listening room.
The S2/12t’s LFE out can be used to daisy-chain multiple Genesis
subwoofers together for better control of the bass modes in your
listening room. This makes bass management easier, and reduces the
chance of experiencing a boomy, inarticulate bass response.
3
~ÄëçäìíÉ=Ñ áÇÉäáíó™
Placement of the Subwoofer
One of the most common reasons to buy a subwoofer is to augment
your existing loudspeakers when they do not provide enough bass for
your liking. In general, the S2/12t is used to augment surround or rear
channel speakers in a multi-channel system, and would be placed in a
room corner closest to the surround/rear channel that you are going to
augment. In this case, you should also connect the LFE input of the
S2/12t to the LFE/Subwoofer output of your processor (or daisychained from the nearest Genesis subwoofer with an LFE output).
Since the S2/12t has speaker-level inputs for left and right channels,
you can place a single sub against the back wall between the two rear
speakers of your multi-channel system. If you are using a 7.1-channel
system, the S2/12t’s dual inputs can also be connected so as to
augment both surround and rear channels.
If you are using only one S2/12t for just the LFE channel, place it in
one corner of the room. Try all available corners and pick the one that
sounds best. Note that corner placement of a subwoofer excites
EVERY bass mode in your room, the good, the bad, as well as the
ugly. In a very well designed room, this may be the ideal placement. In
a badly designed room, this could be a nightmare.
A useful excel spreadsheet can be found on the Stereophile Guide to
Home Theater’s website at www.guidetohometheater.com. “The
Sweet Spot” about 2/3 of the way down the page, has the spreadsheet
to check the acoustics of your room.
Adjusting the Controls
Locate the spec sheet for your existing main L/R loudspeakers, and
adjust the Low Pass frequency on the S2/12t so it matches the –3dB
point of your L/R speaker’s frequency response (If you can’t find that
the -3dB frequency, set the S2/12t to 63Hz – the 12 o’clock position on
the knob). For speakers of general sensitivity, the Bass Gain and LFE
Gain can also be set at the 12 o’clock position.
Note: Should your woofer amplifier unexpectedly turn off and you are
unable to turn it back on, you may have overheated or over-driven the
amplifier. It can take up to thirty minutes for the amplifier to turn back
on. Be patient. The two most common causes for this are poor
ventilation and too much amplifier gain (ie, the amp is being driven too
hard). If the amplifier is well ventilated and it still shuts down then you
may have the volume control turned up too high. Refer to the section
on increasing the low frequency response of your speakers without
turning up the volume control.
4
~ÄëçäìíÉ=Ñ áÇÉäáíó™
Setting-up the S2/12t
While it is relatively easy to add a subwoofer into your system and hear
more bass, it is not as easy to integrate a subwoofer well into your
system. The Genesis ServoSub 2/12t makes system integration far
easier than most other subs because the servo system makes the
S2/12t’s bass quick, clean and articulate. This means that no matter
which main speakers you use, the S2/12t will integrate well with them;
even fast electrostatic or magnetic planar speakers.
Positioning and connecting the S2/12t
The S2/12t is uniquely designed to augment surround and rear
channels of home theater and multi-channel music systems:
One Surround Subwoofer
If you are using one S2/12t in a 5.1- or 7.1-channel system, try placing
the S2/12t in either rear corner, and also the center of the back wall
between the rear channels. Pick the location that gives you the
smoothest bass response throughout the room. When positioned in a
corner, the S2/12t will excite ALL bass modes in the room with equal
energy. This will generally give you the smoothest bass response in
the room unless your room has just a few very strong modes.
Connect the high level thru from one of the surround (rear) speakers to
one of the High Level Inputs of the S2/12t, and the thru from the other
surround (rear) speaker to the other S2/12t High Level Input. Connect
the LFE output of the surround processor to the LFE Input of the
S2/12t.
5
~ÄëçäìíÉ=Ñ áÇÉäáíó™
Two Surround Subwoofers - 5.1 System
In a dual subwoofer 5.1-channel system, place one S2/12t in each
rear corner of the room, and connect the speaker-level inputs to the
nearest surround speaker thru connectors. Connect the LFE-input of
one S2/12t to the LFE/Subwoofer output of the processor, and its LFEoutput to the LFE-input of the other S2/12t. Several Genesis
loudspeakers and subwoofers can be daisy-chained in this manner.
Two Surround Subwoofers - 7.1 System
If you have a 7.1 system and two subwoofers, each S2/12t can be
used to augment BOTH the nearest surround as well as the rear
channel via the high-level inputs, as well as distribute LFE to both rear
corners of the room. Connect the high level thru from the surround
speaker to one set of high level inputs on the S2/12t and the high level
thru from the rear speaker to the other.
6
~ÄëçäìíÉ=Ñ áÇÉäáíó™
LFE Input
The Low Frequency Effects (LFE) input allows the S2/12t to be used
for augmentation of the surround speakers as well as for the LFE of
your home theater system. The LFE input blends the low frequency
effects signal from the home theatre processor into the normal input
signal on the subwoofer. We call this our LFE Blend™ technology.
The LFE input bypasses the internal crossover, and hence uses the
home theatre processor’s crossover. This means that the S2/12t can
be used to augment the surround speakers as well as deliver the LFE
channel without resorting to digital bass management on the
processor.
On the home theatre processor, set the front speakers to “LARGE” and
sub-woofer to “YES”. Then, connect the sub-woofer (LFE) line-level
output from the processor to either the single-ended RCA or balanced
XLR “LFE IN” connector on the S2/12t. Do not use both inputs at the
same time.
We recommend that single-ended interconnects be no longer than 10
feet (3m). Hence, we have provided balanced LFE inputs. If your
processor is further than 10 feet from the S2/12t, please use a highquality balanced cable.
If your processor has only single-ended outputs and is further than 10
feet from the S2/12t, we recommend that you consider using an active
(or passive) signal balancing device to convert the unbalanced output
signal from your processor to a truly balanced signal. A truly balanced
signal will give you the benefit of maximum noise rejection and
maximum signal fidelity over long cable runs.
The unbalanced interconnect which connects your preamp to the
balancing device should be shorter than 4.5 feet (1.5 meters). You can
then use a balanced interconnect to connect the output of the signal
balancing device to the input of the S2/12t.
An added benefit of the S2/12t is that the servo-amplifier incorporates an
active signal-balancing device. This means that if your processor has
only single-ended outputs, but you can place an S2/12t close enough to
use a single-ended interconnect, that balanced output of that subwoofer
can be used to daisy chain to the rest of the system.
7
~ÄëçäìíÉ=Ñ áÇÉäáíó™
LFE Gain
The S2/12t has a control for LFE GAIN that is separate from BASS
GAIN. This allows you to have the S2/12t augment your surround
speakers as well as deliver LFE around the room at the same time
without conflicts. The usual way to control the level of the LFE output is
to set the LFE gain to 6 – the twelve o’clock position – and then use
the home theatre processor’s level control to dial in the level. However,
different locations in the room may have different room gain in the bass
frequencies. The LFE gain control allows you to tune each subwoofer
for optimum balance.
LFE Output
Along with the LFE input, the S2/12t has the unique capability of
providing an LFE output. This buffered output can be used to daisychain the LFE signal from the S2/12t to the LFE inputs of other
Genesis subwoofers including other S2/12t’s, S4/8’s or G928’s. Thus,
it is possible to channel the LFE signal from your home theatre
processor to one S2/12t, and then from that to another, and another,
and another!
You can even use BOTH single-ended RCA and balanced XLR LFE
outputs to daisy-chain even more subwoofers when either the singleended input or the balanced input is used.
In the case of LFE, using more low frequency sources (not higher
level) is better than using less. The point is not to achieve a higher
level of bass response but rather, by using multiple subwoofers to
distribute the LFE signal around the room, dramatically reducing and
evening-out room modes and increasing the bass capability of the
system.
Distributing low frequency information is also helpful for reproduction of
Multi-channel Music because you get incredible articulation and detail
in the bass all around the room.
Power
Make sure the ServoSub 2/12t is plugged into a wall outlet that is
always on. The S2/12t has an auto-on feature and will automatically
power up from “stand-by” when it detects a signal, and will switch itself
off after about 10 minutes of being idle.
We recommend against the use of an extension cord for providing AC
power. If you are forced to use an extension cord, make certain that it
is as heavy duty (a minimum wire thickness of 12 gauge), an extension
cord as you can find. The S2/12t running at full tilt can draw up to
8
~ÄëçäìíÉ=Ñ áÇÉäáíó™
1200Watts from your power supply, so make sure that whatever you
plug your subwoofer into can handle it!
Speaker-level connections: High
Level Inputs
Using a good quality speaker cable,
connect the output of your power
amplifier to the binding posts on the
back of the S2/12t. You may also
connect the S2/12t to the binding posts
on the back of your loudspeaker
terminals if this is more convenient.
Make sure that you maintain proper
polarity. This means that the plus (+)
terminal of your amplifier must be
connected to the plus (+/red) terminal
on the back of the S2/12t, and the
negative (-) terminal to the negative (/white) terminal.
Using the high level inputs to feed the
S2/12t power amplifier will not degrade
the sound quality of either your
loudspeaker or the subwoofer.
Line-level connections
As an alternative, you can use the lowlevel inputs on the S2/12t. Using a high
quality interconnect cable, connect your preamplifier’s output to the low
level inputs on the subwoofer labeled PRE AMP IN.
We strongly recommend that you do not use single-ended
interconnects longer than 10 feet (3.2 meters) to connect the
preamplifier outputs to your subwoofer. On many preamplifiers, using
an interconnect that is too long will negatively affect the performance of
your preamplifier because of the high capacitance of the interconnect
cable across the output of your preamplifier. This is why we provide
balanced inputs on the S2/12t. Balanced interconnects can be as long
as you like. (See page 7.)
If your preamplifier has only one set of balanced outputs and one set of
unbalanced (RCA) type outputs, choose your first preference of
connection for the amplifier that is driving your loudspeaker. Use the
remaining set of outputs to feed the S2/12t’s amplifier.
9
~ÄëçäìíÉ=Ñ áÇÉäáíó™
Do not connect BOTH single-ended and balanced inputs to the S2/12t
at the same time. You could over-drive the built-in amplifier, and void
the warranty.
Phase Switch
There are many power amplifiers that invert the phase of the incoming
signal. If you have one of these, and you are also using the line-level
inputs from your preamp, you will have to invert the phase of the
S2/12t. Push the switch down to 180º.
Please note that if you have a phase inverting power amplifier and
have inverted the phase on the S2/12t, AND you are using both linelevel and speaker-level inputs, you must invert the phase of the
speaker-level inputs. Connect the +ve speaker lead to the –ve input
terminal on the S2/12t, and connect the –ve speaker lead to the +ve
input terminal.
10
~ÄëçäìíÉ=Ñ áÇÉäáíó™
Making your system sound right
The ServoSub 2/12t subwoofer is perfect for use in 2-channel or multichannel music and video applications. The setup for either is very
similar and the goals should be quite the same too. In our opinion, the
end goal of adding a high-end subwoofer should be to not “hear” the
subwoofer work, but rather to add the appropriate amount of low bass
that is currently missing in your system.
When listening to music, the full frequency range of the orchestra or
rock band should be reproduced with proper dynamic range and
realism, from the lowest notes of a pipe organ to the whack of the
timpani or the pluck of the lowest string on a Fender bass. When
listening to film soundtracks, the same goals should be sought after so
that the results are both realistic and exciting; as the roar of jet planes
rumble through your living room and prehistoric creatures shake the
earth!
Fine-tuning an audio or video system is an art that takes time and
patience. It can be one of the most rewarding learning experiences you
will encounter during your pursuit and enjoyment of high-fidelity music
or video reproduction
One of the best pieces of advice we can offer is that you take
advantage of the ear’s ability to identify similarities in sound. This ability
is useful in fine-tuning your system because, if every recording you
listen to (or every video you watch) has a similarity of sound (too much
or too little of a certain frequency for instance), then you can be fairly
certain that you have yet to perfect your setup. Keep at it and
remember to enjoy your music and video as you work on perfecting
your setup.
One idea that we would like to suggest is that you set the S2/12t’s
bass gain controls for music, and use your processor to turn it up or
down for home theater. That way, you have a subwoofer that will take
care of all your needs.
With proper setup and placement, you can achieve stunning realism,
and musically correct and natural bass – not just more bass.
11
~ÄëçäìíÉ=Ñ áÇÉäáíó™
The Main Controls
The S2/12t subwoofer has two controls that you will use to make
your system (and that includes the room), sound right. The first is the
gain control of the woofer amplifier. This adjusts the volume at which
the subwoofer plays.
The gain can be adjusted from 1 to 11.
The second control is the low pass filter. This adjusts the crossover
frequency for the built-in 12dB per octave variable crossover. The
crossover frequency can be adjusted from 40Hz to 138Hz, where
frequencies below the number set are sent to the subwoofer, and
frequencies above are rejected.
To begin, adjust the low pass filter to 63Hz and set the gain control to 6
(both at the 12 o’clock position). At this point, you can turn on the
woofer amplifier.
Tuning the system in
Set up your subwoofers one at a time in conjunction with the rear or
surround speaker that you are using them to augment. If you are using
a single subwoofer to augment two different loudspeakers, adjust the
subwoofer with one speaker at a time.
Set the low pass filter to the -3dB frequency of your main speakers,
and the gain control to 6, and start from there. If you don’t know the
3dB point of your speakers, start working from a low-pass filter
frequency of 63Hz. This will work for most small speakers.
We suggest that you start with a single vocal track, with instrumental
accompaniment, that you are very familiar with. The sound of the
human voice is more easily recognizable than many instruments and is
the least complex sound to deal with. Run a mono full-range signal to
the speaker that you have the S2/12t connected to.
Turn the gain control of the subwoofer amplifier up or down until the
voice sounds correct. Concentrate on the mid bass regions (as
opposed to the very low bass in your recording), to achieve a natural
blend. The voice and the music accompaniment should sound as if it
were cut from one cloth, not separate.
If the voice sounds “thin” or does not have enough “chest” to its sound,
turn the S2/12t’s bass gain control up until it does. You may also want
12
~ÄëçäìíÉ=Ñ áÇÉäáíó™
to experiment with increasing or decreasing the low pass filter control.
This control will raise or lower the frequency cutoff point of the woofer.
If you find that the sound is “thin” or lacking in mid bass, and that
turning the gain control up to “thicken” the sound creates too much low
bass, this is a good indication that you may want to turn the low pass
filter up to a higher frequency instead. This will extend the response of
the S2/12t into the upper bass regions without affecting the low bass
level.
Next, check the S2/12t using more than just a voice. Select some
music that you know to have good deep bass, a symphonic piece of
music if you can, or use a natural bass instrument for your guide. Try to
make it sound real. You may have to return to the vocal track from time
to time to make sure you have not gone too far in one direction.
If, at this point, the overall sound seems to be lacking in mid bass, turn
the low pass filter to a higher position or, alternately, position the main
speakers closer together in order to achieve better mid bass coupling
between the main speakers. If the overall sound is too “fat” turn the low
pass filter down or adjust the gain. At this point we suggest you use
only the low pass filter control until you get to the refinement stage.
Low bass
If you find that there isn’t enough deep bass in the overall sound of the
system, your first remedy is the gain control on the S2/12t amplifier.
This has several limitations. First, turned up too high, it may result in
some distortion on very low frequencies.
Secondly, you may make the mid bass produced by the top of the
woofer out of proportion with the mid bass produced by the bottom-end
of your main speakers. This would make your system sound “boomy”
in the mid bass regions.
A good rule of thumb is to first adjust the gain control of the subwoofer
for proper mid bass response rather than low bass. The theory is that if
the mid bass response is correct, then the low bass response should
be very close to correct.
A good balance between proper low bass extension and a deep and
spacious soundstage needs to be established to optimize your new
speaker’s performance.
13
~ÄëçäìíÉ=Ñ áÇÉäáíó™
Tuning for Low Frequency Effects (LFE)
The LFE input has a separate gain structure and bypasses the
crossover in the subwoofer. Hence, it should be set-up separately from
the main speaker augmentation function.
A simple way to set up the S2/12t for LFE is to use the test and level
signal available in most home theater processors and multi-channel
players, and test discs. Many DVD’s include a THX calibration option
that has a set of test tones for speaker level adjustment.
Using a high quality sound pressure meter, set the LFE gain so that
the S2/12t matches the volume of the main speakers.
If you are using multiple subwoofers, you will need to set each
subwoofer in turn. As each location of the subwoofer may have
different bass levels caused by room-related gain, adjust each
separately. To do this, you first set the LFE gain on all your subwoofers
to 1 (fully anti-clockwise).
Then, using a LFE test tone and a sound pressure meter set the LFE
gain on the first subwoofer to 3dB down (for 3 subwoofers, 5dB down if
using 5 subwoofers) from the reference volume of the main speakers.
Write down the setting, and then turn the LFE gain back to zero.
Go to the next subwoofer and repeat the process until you have the
LFE GAIN settings of all your subwoofers. When you have all the
settings, go to each subwoofer and turn up the LFE GAIN to the setting
you noted down. Re-check the bass volume with all subwoofers on.
If the bass response is too high or too low, use the subwoofer level
setting on the processor to match the LFE volume to the volume of the
rest of the speakers – or do it all again using a higher or lower setting
for each subwoofer.
14
~ÄëçäìíÉ=Ñ áÇÉäáíó™
The Technology
The Servo Advantage
Very few loudspeakers use servo drive, either because most designers
think that it is too difficult to design, too expensive, or because of the
extraordinary demands a servo system makes on the amplifier and the
transducer. However, the Chief Scientist of Genesis, Arnie Nudell, first
introduced the servo system in the legendary Infinity Servo Statik One
in 1968(!) – so we know how to design and build servo systems.
The concept of our servo bass system is an easy one to understand: It
employs an accelerometer as a sensor to constantly monitor the
movement of the woofer cone, and instantaneously compares it to the
input signal. This comparison circuit identifies any deviation from the
ideal and instantaneously applies a corrective signal to compensate for
the deviation; virtualy eliminating inherent woofer distortion.
As an example, when you have a high-impact, low-bass signal that
starts and stops suddenly (for example a kick drum), the inertia of the
woofer cone causes the cone to be slow to begin moving. Once the
cone is in motion, the momentum of the cone causes it to keep moving
- even after the output signal of the amplifier has stopped.
The sonic result is overhang, bloat, lack of tautness and definition, and
a blurring of dynamic impact. With the servo system, the circuit senses
that the woofer is not moving as fast as it should, and applies more
current to make it move faster. When the signal stops, it detects that
the woofer is still moving when it shouldn’t, and applies a countersignal to cause the the woofer to stop faster and more effectively than
normal circuitry would.
Thus, the servo-drive reduces distortion and improves transient
response by making the woofer seem mass-less. Typical non-servo
woofer systems have distortion levels that exceed 10% at even
moderate levels. The Genesis servo bass system reduces this
distortion to below one percent at almost any output level. Moreover, it
drives the woofer to constant acceleration, which makes its frequency
response nearly flat!
500W Class-D Switching Amplifier
The servo system places extraordinary demands on the amplifier
because it uses enormous amounts of current to make the woofer
follow the signal. This means that the amplifier used must deliver huge
amounts of clean power.
15
~ÄëçäìíÉ=Ñ áÇÉäáíó™
The best amplifier for this application is a Class-D switching amplifier.
One of the reasons a Class-D amplifier is optimum for this application
is that it has a dramatically increased efficiency, especially at lower
frequencies. A typical Class A/B amplifier is only 50% efficient. A
Class-D amplifier, on the other hand, can be 90% efficient. A Class-D
amp also puts out more power with less heat and less power
consumption; ideal for use as a subwoofer amplifier.
The S2/12t uses a proprietary, ultra-efficient, discrete MOSFET
switching amplifier with output capability of up to a full kilowatt. The
design provides extraordinary control with high-damping and great
thermal stability, so that you can play the most demanding sources
continuously at high volume.
The Transducers
The transducer used in a servo system must be strong enough to
withstand the high current approach of the servo, and yet delicate and
light enough to react extremely quickly. The S2/12t subwoofer features
two 12-inch woofers that are designed with ribbed aluminum cones,
that are lightweight and yet inherently stiff. Our aluminum cones exhibit
no resonance or cone flexure anywhere near the frequencies at which
the subwoofer operates. The lowest break-up mode (where there can
be any chance of distortion at all) is at 6,000Hz – far above the 25Hz to
120Hz frequency response of the S2/12t. Therefore, the driver is a
perfect piston within the frequencies used, and exhibits very low conebreakup distortion.
16
~ÄëçäìíÉ=Ñ áÇÉäáíó™
Specifications
Dimensions:
31” x 21” x 16” (w x h x d)
(533mm x 787mm x 406mm)
Frequency Response:
20Hz to 120Hz +/- 1dB
16Hz to 180Hz -3dB, +2dB
Weight:
83.5 lbs (38 kg)
Inputs:
High-level left and right with 5-way
binding posts;
Low-level left and right, single-ended
RCA and balanced XLR;
LFE low-level mono single-ended RCA
and balanced XLR
Outputs:
LFE low-level mono buffered singleended RCA and balanced XLR
Controls:
Variable low-pass filter
Variable bass gain control
Variable LFE gain control
Phase switch 0º, 180º
Finish:
Basic Black or Automotive Finishes
17